Columbia ISA
Audio – Video


DVD Sound

DVD Player Primer | DVD audio | What is Surround Sound | DVD Intro | DVD FAQ

DVD is a Digital Video Disc, but the audio considerations are important enough to warrant their own consideration. In fact audio considerations are often as numerous - and possibly more confusing - than video ones.

DVD Audio formats:

DVDs can store multiple audio tracks, usually in various languages or commentary tracks in different formats, supporting up to eight simultaneous audio tracks.

DVD Audio Tracks found on commercial discs:

• Dolby Digital (AC-3): The most popular format, standard on most DVDs is a compressed format supporting up to 5.1 channels of surround sound.
• DTS Digital Surround: A high-quality alternative 5.1 surround format.
• Linear PCM (LPCM): Uncompressed, high-fidelity audio, often used for stereo tracks.

To switch or select a DVD audio format source, access the DVD player's settings menu to set audio output to DTS or Dolby Digital Bitstream. Use the remote's "AUDIO" button during playback to cycle through language/format options.


5 Ways to get DVD Sound


Cable connections to DVD Player

1. RCA cables - Stereo analog 2 channels
2. RCA cables - Surround Sound analog 6 channels
3. RCA cable - Coaxial digital up to 6 channels
4. Optical cable - digital up to 6 channels
5. HDMI cable - digital up to 6 channels

Connection Options

1. TV - stereo speakers
2. Powered Speakers - stereo
3. Soundbar - Surround amplifier/speakers
4. Audio Video Receiver - Surround passive speakers
5. Stereo Amplifier - Passive stereo speakers

Wireless Sound

1. Bluetooth Transmitter - Stereo

Connect a Bluetooth wireless transmitter to the white and red RCA outputs on the DVD player and send audio to a Bluetooth speaker or headphones or use a Bluetooth Receiver connected to a vintage stereo or use a Bluetooth capable A/V Receiver for sound from larger speakers.

Stereo connection options
DVD Sound


You can use the TV speakers or connect powered speakers or a stereo amplifier with passive speakers.


Connect a stereo amplifier to DVD player for better sound


A soundbar can handle stereo or surround sound. Most modern soundbars have built-in surround sound decoders, such as Dolby Digital, DTS, and often Dolby Atmos or DTS:X. They decode these signals and use virtualization technology or upward-firing drivers to simulate an immersive soundstage without the need for multiple speakers around the room like A/V Receivers.


DVD - Dolby : DTS


DTS or Dolby Digital

When you look at DVD audio specs, you are likely to encounter two types :

  • DTS (Digital Theater Sound)
  • Dolby Digital (this might also be called AC-3, but it is the same as Dolby Digital).

What is the difference between Dolby Digital and DTS?

DTS is newer and is capable of producing slightly better (the difference in audio quality might be undetectable audibly by humans) sound, but both DTS and Dolby Digital are 5.1 channel systems. What does that mean? It means the sound is processed into 6 separate paths.

The 5 channels are center, front right, rear right, front left, rear left, and the .1 stands for the subwoofer (really low bass). This allows you to have a theater-like surround sound with the center channel mimicking the dialog and the other channels giving the sound from everywhere else.

Decoders and compatibility

Look to see if your DVD player is "compatible" or has "decoders." Some models are just "compatible" with these sound systems and better ones will have what are called "decoders" built right in. Decoders actually separate the sound into those discreet 5.1 channels and send them to the appropriate places. And those places 
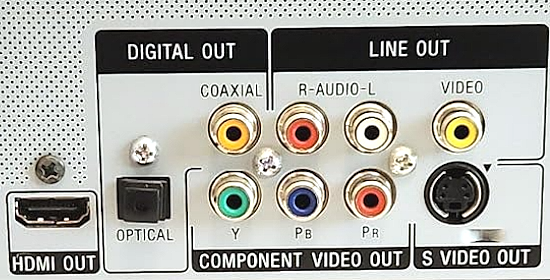
are 6 separate output jacks on the back of the DVD player. (Budget DVD players do not have these outputs)

So, if you want the benefit of those separate channels, your Audio/Video receiver must be equipped to handle them with 6 separate inputs. In other words, they need to match.

That's important because it means that if your DVD player is part of your home entertainment center, then the sound will only be as good as what your receiver is capable of. There is no reason to spend $1000 on a DVD player with onboard DTS decoders if your receiver only has stereo left and right inputs.

Other feature considerations

DVD players can also play music CDs. Some DVD players will also handle DVD Audio. These are essentially CDs made on DVD discs to take advantage of DVD's higher sampling rate (a "higher sampling rate" is capable of superior sound). 


Stereo

Stereo sound first came to the home in the early 1960s and revolutionized home audio  entertainment. Compared to mono, two channel stereo sound was seen as a tremendous improvement, and stayed that way until Dolby Surround came to  the video market.

Dolby Surround

Dolby  Surround first debuted in theaters in 1979 and was available in the home by 1982. These original home theater Dolby Surround decoders could only decode the  left, right and surround channels. It wasn't until the early '90s that Dolby  Pro Logic decoders appeared that could decode the center channel as well.  Dolby Pro Logic surround is an analog (not digital) format, with the rear surround channels in mono only.

Dolby Digital 5.1

Dolby Digital (originally known as AC-3)  was first heard in theaters in 1992. The Dolby Digital specification for surround  sound consists of five separate audio channels and a bass channel. Unlike Dolby Pro Logic, whose rear channels are mono and do not have the full  dynamic range as the front set, Dolby Digital provides up to five discrete audio  channels, all with full dynamic range. This means that with a 5.1 system you can hear the film as the director intended, with sounds all around you and thumping  bass.

Digital Theater Systems

DTS is also a digital 5.1 surround system, but the  audio is far less compressed than Dolby Digital. DTS is therefore the choice of  audio purists, although in a normal home theater set-up the difference may be difficult to detect. But as DTS is less compressed, few DTS DVDs have extras or  foreign audio tracks.

What Do I Need For Dolby Digital 5.1?

Your route into Dolby Digital will depend largely on whether you already have any home theater components, and how much money you have to spend. These factors will determine which of the two routes below are best for you.

Internal Dolby Digital Decoding On A DVD Player
If you already have an older home theater amplifier that doesn't have a Dolby Digital  decoder, then your best bet will be to buy a player with its own decoder. With this set-up, the decoded audio is sent out of the back of the DVD player via the phono outputs into the six inputs of your amplifier.

External Dolby Digital Decoding Using An Amplifier
The other option is to invest in an  amplifier which has its own built-in Dolby Digital decoder. This option will suit people who don't have a decoder in their DVD player, or people who want to use the highest quality components in their system. This option handles the  decoding by lifting the Dolby Digital track off the DVD and sending it out to the amplifier for decoding via either a digital coaxial or optical audio cable or HDMI cable for players and receivers with HDMI. Modern Audio Video Receivers have all the required audio decoders built-in. (Older AVRs may not offer the latest revisions of Dolby or DTS formats such as Dolby Atmos)


DVD player to A/V Receiver for sound

• White and red RCA analog stereo audio
• RCA coaxial digital audio up to 5.1
• Optical digital audio up to 5.1

Select the correct source input on the A/V Receiver


DVD player connection diagram
Connect to TV for stereo sound using white and red RCA cables or connect to AV Receiver for surround sound using either an optical audio cable or an RCA coaxial audio cable.


HDMI Connection:


HDMI can handle the best audio formats. Options include a direct connection from DVD player to TV using an HDMI cable. This will only give you stereo using the TV speakers. For better sound, connect to a soundbar or A/V Receiver with 6 speakers for surround sound.


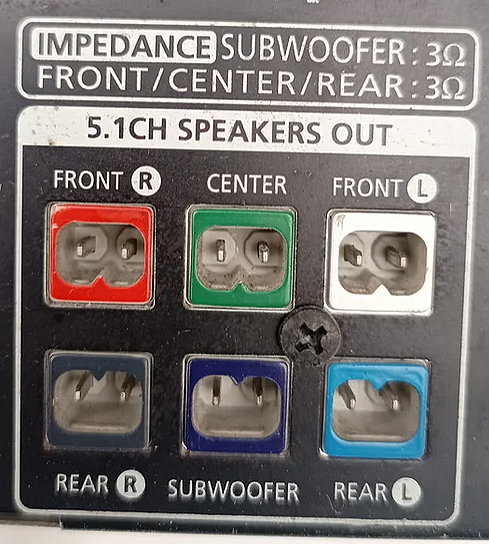
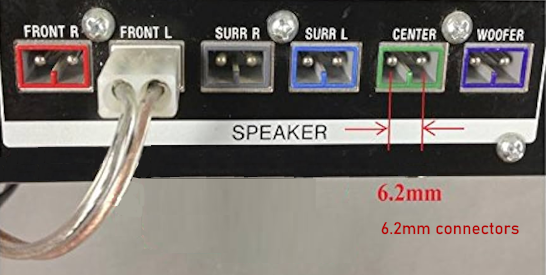
DVD Player Analog Audio -
Multi-channel RCA Surround Sound

Internal Decoder

DVD players with analog multi-channel (5.1) outputs are generally older high-end models from the early-to-mid 2000s. These players feature six RCA jacks (Front L/R, Rear L/R, Center, Subwoofer) for direct connection to analog receivers. These players use older amplifiers or receivers that usually lack HDMI, allowing the player to handle the decoding of Dolby Digital and DTS surround.

Note: The Yamaha RX-V765 7.2 receiver (2009) has both HDMI and Multi-channel analog inputs.


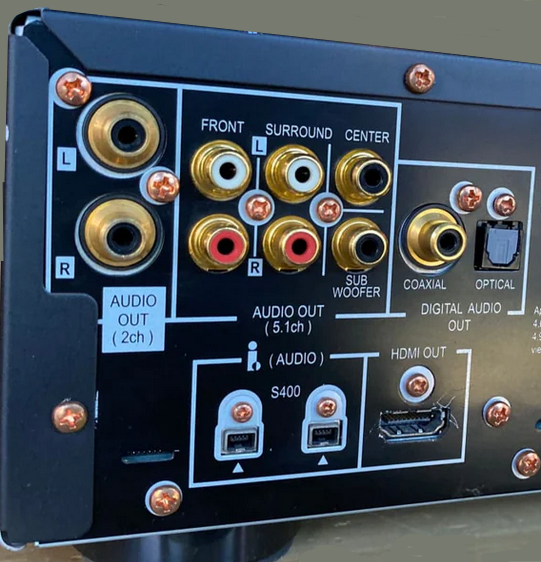
High-end DVD Player
Analog Outputs for 5.1 surround sound

6 channel for a 5.1 audio surround sound
Left Front, Right Front, Center channel, Subwoofer for bass sounds, Surround Left and Surround Right


Connection Diagram for RCA Analog 5.1 Surround Sound to AV Receiver


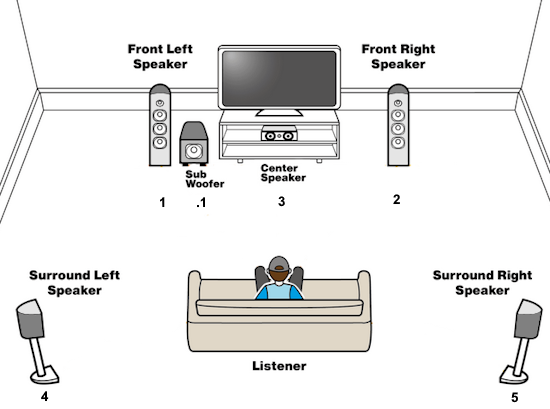
Surround Sound Setup for 5.1 Audio


Blu-ray player with on-board decoder capable of multi-channel analog output of 7.1 channels

Q: Why would you want to use the player to decode instead of the amplifier?
A: A high-end player may have a better DAC (Digital to Analog Converter) than the DAC in your amplifier.


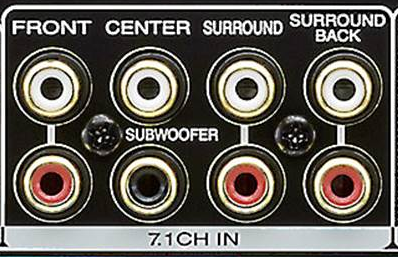
Amplifier or A/V Receiver with analog multi-channel RCA inputs (line-level) for up to 7.1 Surround Sound

For analog multichannel audio (such as 5.1 or 7.1), select the Multi Channel Input, Analog Input, or EXT. IN (External Input) setting on your amplifier or A/V receiver. This bypasses internal digital processing, allowing analog signals from a DVD/Blu-ray player to be processed directly.

Standard DVDs do not offer native 7.1 surround sound. They are typically limited to 5.1 channel surround audio via Dolby Digital or DTS. Blu-ray discs natively support 7.1 channel surround sound. They provide high-quality audio through lossless formats like Dolby TrueHD, DTS-HD Master Audio, and through object-based formats such as Dolby Atmos.


Surround Sound 

For Internal Decoding

For External Decoding

DVD Player

Must have an onboard Dolby Digital  decoder. These players are older and largely not made anymore for the consumer market. DVD players with native multichannel analog outputs (5.1 or 7.1 RCA) for direct receiver connection are primarily found in high-end Blu-ray models or older, used units. These allow older audio systems to receive surround sound.

Can be equipped with or without an internal decoder.

Amplifier

Must be able to accept 5.1 external inputs (6 RCA cables). Older Amplifiers or very high-end modern AVRs. Largely replaced by HDMI.

Must have an onboard Dolby Digital  decoder.


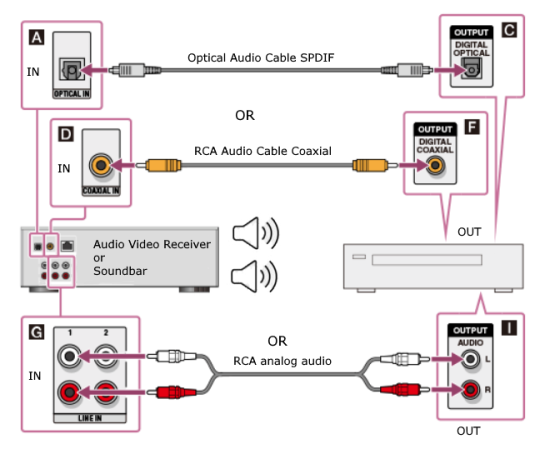
Connection
RCA phono cable
Digital Coaxial or Optical cable
Identifying Dolby Digital and DTS audio:

Dolby Digital
(also known as AC-3) made its debut in theaters in 1992 with Batman Returns. Since then, it has become the format of choice in both theaters and the home. The Dolby Digital format has varying sound formats, ranging from mono up to full 5.1 surround sound. It is the 5.1 sound aspect that's most important, as it allows you to reproduce the film's soundtrack in your own home, exactly as it was heard in the theater.

A 5.1 soundtrack will contain six distinct channels of audio for the positions of left, center, right, left surround, right surround and the Low Frequency Effects (LFE, bass or ".1") channel. Unlike the analog Dolby Surround and Pro Logic formats, Dolby Digital has two independent surround channels. This means that a 5.1 system will give a far greater sense of depth and localization than a Pro Logic system. The LFE channel is a separate channel that allows the inclusion of low frequency bass sounds that are felt more than heard in the theater. The LFE channel can be routed to either a separate subwoofer or to all five speakers individually. If even Dolby Digital isn't good enough for you, consider a DTS compatible sound system.

Also available, but much rarer, are DVDs with 5.0 Dolby Digital soundtracks. These discs offer the same 5 channel surround sound as 5.1 discs, but don't carry an LFE channel to provide the low frequency bass.

DTS, full name Digital Theater Systems, made its debut in theaters in 1993 with Steven Speilberg's Jurassic Park. Like Dolby Digital, DTS is an audio codec (meaning to code/decode) that can allow anywhere between one channel (mono) and six channels (5.1 surround) of digital sound. However, DTS uses less than one quarter the compression of Dolby Digital, meaning a DTS soundtrack is much closer in quality to the studio master. DTS audio offers more subtle nuances, giving individual sounds superb clarity; better dynamic range, meaning the loudest bangs have more depth and the quiet passages are free of noise; and finally, improved channel separation across the 5.1 spectrum, for greater localization of sound around the room. But because it's less compressed, the DTS soundtrack takes up more space on the DVD, meaning DTS discs often come with fewer extras or foreign language tracks.

Most DVD players available today will be able to handle DTS, either by using DTS Digital Out to pass the bitstream to an external amplifier for decoding, or by using its own internal DTS decoder.


Identifying Dolby Digital soundtracks on DVD

Because DVDs can carry a variety of soundtracks in different languages and audio formats, it is important to identify audio content clearly on disc packaging. The Dolby Digital logo should be used along with a simple description of the audio format. For example:


English: 5.1
Spanish: Dolby Surround
German: Stereo

Dolby Laboratories has developed icons which can also be used. to distinguish formats. For example:


English (5.1)
Spanish (Dolby Surround)
German (stereo)


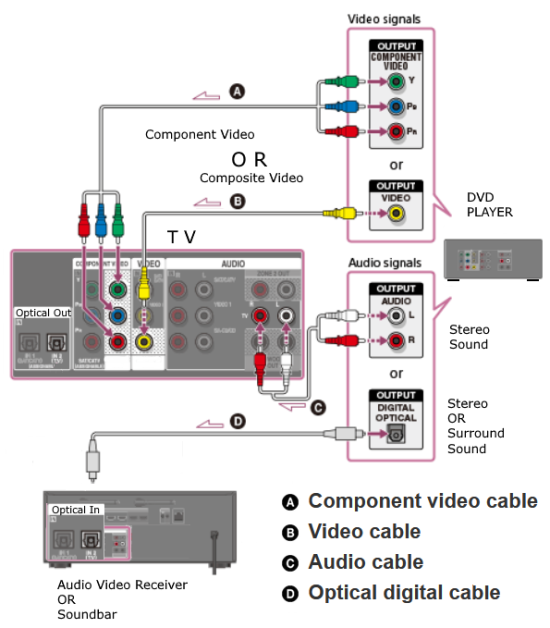
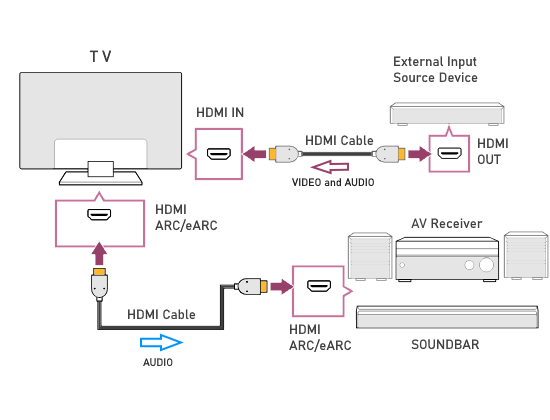
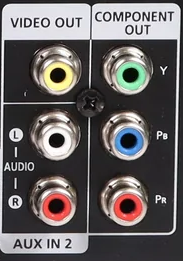
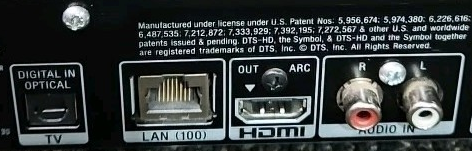
Audio Connections for DVD soundtracks


Audio connections can be either analog or digital. Analog connections will typically be in the form of stereo (right and left) RCA connectors, whereas digital connections will either use a single RCA coaxial connection, or a single optical (toslink) connection. Different sources will have different connection options, and some equipment does not give you the choice of an analog or digital connection. If you are unsure which connection options you have, please refer to your owner's manual or the audio connectors on the back of you equipment.

If you have the choice between an analog or digital connection (for this to be true, the source will always have to be digital), it is important to focus on the fundamental processing differences between analog and digital connections. The fundamental difference has to do with where the digital to analog conversion takes place, using a Digital Audio Converter or DAC.

All digital sources must be converted to analog in order to be produced as sound. Making a digital connection transfers the digital signal from the source to another piece of processing equipment (such as a receiver, a pre/pro amp, or an outboard DAC) to be converted to an analog signal. Making an analog connection uses the DAC's on the source component for the digital to analog conversion, which will transfer the signal as analog from the source. The main purpose of making a digital connection is to take advantage of higher-quality DAC's in another piece of equipment. Another motivation for making all digital connections whenever possible, is to use the same Digital Audio Converters for all the digital sources, thus creating some congruency in how the digital sources are translated to analog. For example, by using the same DAC for both CD audio and DVD audio, the audio from your CD player will sound virtually the same as the audio from your DVD player.

Analog Audio Interconnect:

Transfers a stereo (right and left) audio signal by using a two-channel cable. If the original source is digital, then the signal must be converted to analog on the source piece of equipment in order to utilize the analog audio connection. However, this stereo signal may be converted to some type of matrixed surround format, such as Dolby Pro Logic, via the processing equipment (receiver, pre/pro amp, etc.) that the signal is sent to.

Coaxial (Coax) Digital Audio Cable: Transfers a digital audio signal, via electricity traveling down a copper wire, over a shielded 75 Ohm coaxial cable. 75 Ohm RCA connectors are used on both ends. The jack for this connection looks like this:


Optical (Toslink) Digital Audio Cable: Transfers a digital audio signal, via a red light beam, over a fiber-optic cable. A fiber optic cable is comprised of many small strands of polished plastic specifically designed to transfer light. The jack for this connection looks like this:


The performance difference between Coax and Toslink connections is negligible. That is not to say that each connection cannot sound different, though. Any audible difference between the two connections stems from differences in the quality of the electronics, NOT the type of connection. For example, if a CD player uses superior quality components for its Coax digital audio connection and inferior components for its Toslink connection, then it is reasonable to assume that the Coax could have superior sound quality. The bottom line is, neither type of connection is inferior to the other for digital audio connections. Both connections are equally suited for multi-channel digital audio.

If you ever have to choose between these two types of connections, performance will basically be a moot point. So, how do you choose? Well, lets look at the physical characteristics of each cable/connection.

A Coaxial cable is more sturdy and durable than a digital optical (Toslink) cable. However, due to the metal shielding and conductor, a Coax cable may transfer grounding problems from one component to another if they already exist. Basically, if there are ground loop problems stemming from electrical abnormalities in the electronics, the cable may carry ground or "hum" noise from one component to the other. However, these problems are fairly rare, and the Coax cable will ONLY exhibit the problems if they already exist. It will NOT create any new ones.

An optical (Toslink) cable, on the other hand, is more fragile than a coaxial cable. If stepped on, a Toslink cable can be crushed and possibly destroyed. However, an optical connection is immune to possible ground or "hum" problems because it does not contain any metal.

There are also usability differences between the two cables. A Coax cable uses a standard male RCA plug, which is very easy to plug-in. On the other hand, a Toslink cable uses a quasi-pentagonal connector, which must be aligned properly to be inserted. It will only go in one way, which makes it a lot harder to work with. With most equipment racks requiring us to become a contortionist with near-perfect night-vision to make any sort of connection, the ease of use of the familiar RCA is a good thing!

Summary: With everything else being equal, a Coax digital audio connection would be your first choice simply because a Coax digital audio cable is more durable, easier to use, and less expensive (in most cases) than a similar quality Toslink cable.

Wireless Bluetooth

How to connect Bluetooth Speaker to TV
How to connect Bluetooth Headphones to TV

You can connect a DVD player to a smart TV which has Bluetooth capability and send the audio to a Bluetooth wireless speaker or headphones. Older TVs can use a Bluetooth transmitter.

Step by Step:
For Smart TVs

STEP 1 Initiate Pairing Mode on Your Bluetooth Speaker or Headphones

Locate the pairing button on your Bluetooth device.
This is often marked with a Bluetooth symbol or may be the power button itself, depending on the model.

Press and hold this button until you hear an audio prompt (like a beep) or see a light indicator (usually a blinking LED) that confirms the Bluetooth device is in pairing mode.

STEP 2 Navigate to Your TV’s Bluetooth Settings

Turn on your Smart TV and get the remote control. Press the "Home" or “Menu” or “Settings” button on your remote to access the TV’s main settings menu.

Scroll through the menu options until you find "Sound" or “Bluetooth,” “Sound Settings,” or a similar option.
This might be under a sub-menu like “Connections” or “Audio Settings.”

Select “Sound Output” or an equivalent option, then choose "External Speaker" or “Bluetooth Speaker List” or “Bluetooth Audio Devices” to view available Bluetooth connections.

STEP 3 Complete the Connection

From the list of available Bluetooth audio devices, select your Bluetooth device. It should be listed by its name or model number. If prompted, confirm the pairing on your TV. Some TVs might require you to enter a matching PIN. Once connected, you’ll typically see a confirmation message on your TV screen, and your speaker might also give an audio prompt indicating a successful connection. Some smart TVs will indicate a connection on the screen. The TV sound should now go to the wireless Bluetooth device.

Step by Step:
For Non-Smart TVs


Get a compatible low-latency (LL) Bluetooth transmitter. This device will enable Bluetooth connectivity for your non-Smart TV. Locate the audio output port on your TV. This could be a headphone jack, RCA port, or optical audio output, depending on your TV model. Connect the Bluetooth transmitter to the TV using the appropriate audio cable.

For a headphone jack, use a 3.5mm audio cable.
For RCA, use an RCA to 3.5mm cable.
For digital optical output, use an optical audio cable.

STEP 2 Power On and Pair the Bluetooth Transmitter

Power on the Bluetooth transmitter. Some models draw power from the TV via a USB port, while others may need a wall outlet. Put the transmitter into pairing mode.
This usually involves pressing and holding a button on the transmitter until an LED light blinks, indicating it’s ready to pair.

STEP 3 Initiate Pairing Mode on Your Bluetooth Speaker
Follow the same steps as for Smart TVs to put your Bluetooth speaker into pairing mode.

STEP 4 Complete the Connection
The Bluetooth transmitter should automatically search for and connect to your Bluetooth speaker in pairing mode. Once the connection is established, the transmitter’s LED light will typically stop blinking and remain steady. Test the connection by playing audio from your TV. Adjust the volume to ensure the sound is being transmitted through the Bluetooth speaker.

Each TV brand and operating software has its own unique menu options and settings for Bluetooth device pairing.

2025 LG TV (WebOS)
Long Press "Settings" button (gear icon) > SOUND > SOUND OUTPUT > USE WIRELESS SPEAKER > BLUETOOTH DEVICE > a search begins for nearby bluetooth devices. With your device in pairing mode, look for your device and "Connect".

No Sound from DVD

Q: I have a HTiB Home Theater Unit with DVD player and I am not getting any sound on the TV from the RCA white and red audio cables connected to the TV, only the video. What is the problem?

A: The HTiB (Home Theater in a box) usually has small surround sound speakers which connect to the main unit with the DVD player. The typical intended operation is to have the sound from the DVD going to the unit's connected small surround speakers. Video goes to the TV through the unit's component video (green, blue, red) or composite video (yellow) outputs.


Usually these HTiB units also have audio inputs, RCA stereo (white, red) and Optical. Some units have an HDMI output. So the white and red RCA ports on the HTiB are actually INPUTS, not Outputs. Therefore no audio is going to the TV. If you have a TV with HDMI, and a HTiB with HDMI out, you could connect an HDMI cable from the HTiB to the TV and get video and audio.


If you really want to get stereo analog audio out from the unit for other purposes such as connecting another amplifier or connecting to the TV RCA audio inputs, one solution would be to get a line-out converter (LOC) (converts speaker level input to RCA line level) which will take a high-level speaker out and give a low-level line out (RCA white and red).


These small devices have 4 wires on one end to connect the left and right speaker terminals and 2 RCA outputs, left and right on the other end. Then you could connect white and red RCA audio cables from the converter output to the TV or amp RCA audio inputs.


Home Theater in a box speaker terminals

2-pin snap on wires connect speakers to HTiB main unit


You can disconnect the normal speaker connections and substitute a spare speaker wire for the left front and right front which connects to the wires on the LOC converter. These can be bought online but be sure to get a matching size and shape with the correct pin alignment.


Line Out Converter (LOC) with wires connected from speaker terminals.


Columbia ISA Audio Video
Empowering consumers through information
columbiaisa@yahoo.com
SWS