|
|
 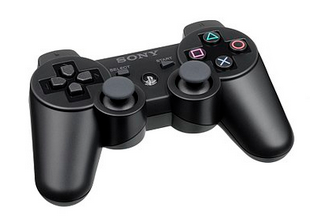 SONY PLAYSTATION 3 HOOKUP to TV Sony produced three different physical models of the Playstation 3. Depending on which model you have, there will be slightly different connections and capabilities. 1. The original PlayStation 3 (2006) has a glossy piano-black finish, and the power and eject buttons are touch-sensitive. 2. The PlayStation 3 Slim (2009) is quieter and more compact than its predecessor. 3. The PlayStation 3 Super Slim (2012) weighs at least 25% less than the PS3 Slim due in part to the slot-loading Blu-ray drive being replaced with a top-load disc reader similar to the original PlayStation's, but with a sliding cover. The Sony PS3 Super Slim model has a 2-pin power cord. 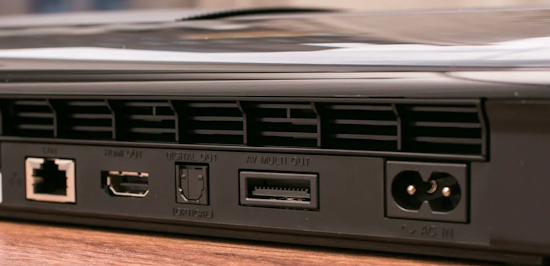  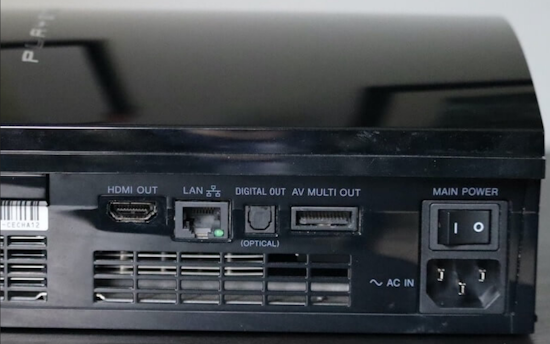  Power cord for original Sony Playstation 3 Plug in the power cord to the back of the PS3 and plug other end of the cord into a working wall outlet. Next, flip the Main Power switch on the original PS3 rear to the one position. Next press the power on the right front of the PS3. Check to see if the green light comes on. 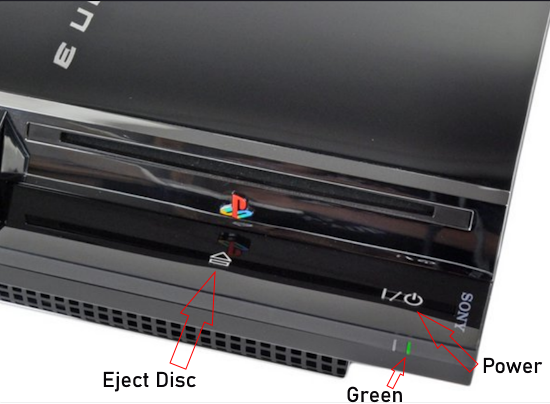 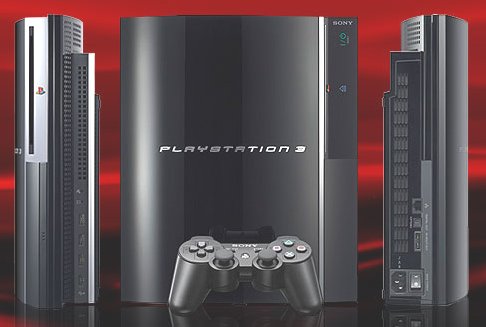 The PS3 controller can operate wirelessly using Bluetooth 2.0 short range low bandwidth wireless data transfer but the internal Lithium-ion rechargable battery pack (3.7V 1800mAh) has to be charged using the USB cable connection to the PS3. Connect the USB mini Type B end of the cable to the PS3 controller and the USB Type A end to the PS3 front USB port. 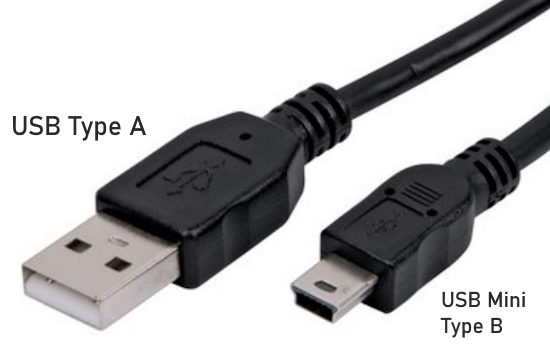 Supplied USB cable to charge the controller 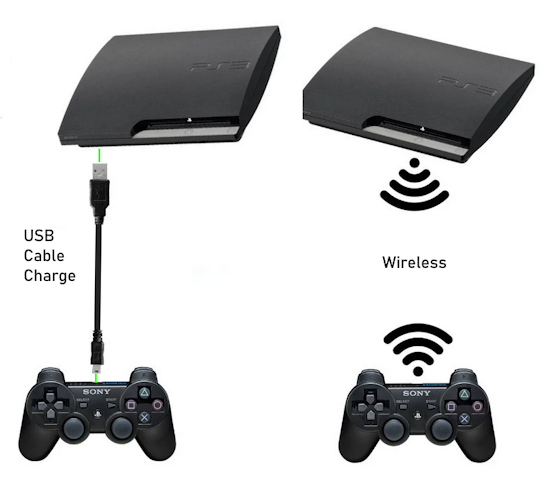 Press the Playstation button (center) on the controller. Wait for the flashing lights to stop on the controller. 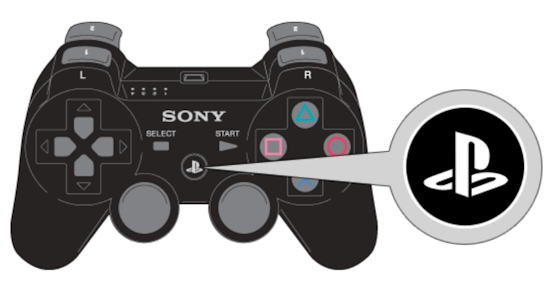 The PS3 controller has an LED light that indicates the charging status: Solid red light: The controller is charging. Blinking red light: The controller is low on battery. No light: The controller is fully charged or not connected. To check if the controller is charging, simply look for the solid red LED light. As long as this LED is illuminated, it means the controller is receiving power and charging. 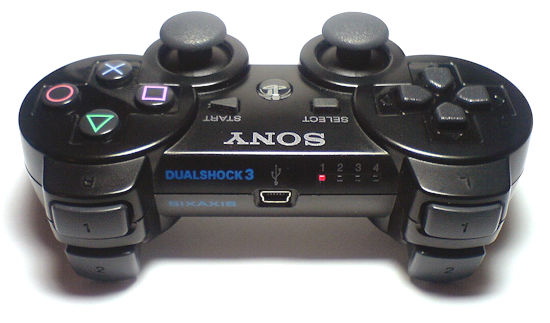 The battery can be replaced by taking off the bottom of the controller and removing the old battery, then installing a new battery.  Remove the screws on the bottom of the controller. Use a needle nose pliers to pull off the old battery connector. Take note of the black wire position. Connect new battery wires onto the circuit board. The PS3 Game Controller is designed to be held with both hands, with the thumbs operating two analog joysticks and a set of four buttons on each side. In addition, there are a pair of buttons for the index fingers and another pair of pull triggers for the middle fingers. Three buttons in the middle section are less frequently used during actual game play and serve to control overall operation of the game console. While several of the buttons appear to be simple on/off switches, in comparison to joysticks or triggers which are analog, almost all the buttons measure pressure. The X, Circle, Square, Triangle, R1, L1 and the D-Pad buttons all include how hard they are being pressed in the data sent to the console.  PS3 buttons and controls 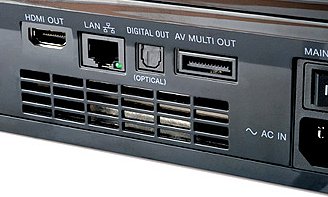 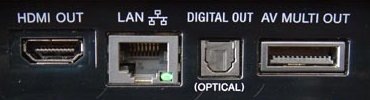 Sony Playstation 3 - Rear jacks From right to left there are four jacks including: • Audio and Video multi-pin output for TV. • Digital audio (Optical) output for surround sound. • Network connection. • HDMI output for video and audio to TV and/or HDMI Audio/Video Receiver/home theater. The PS3 super slim model reversed the positions of the LAN and the HDMI ports Sony PS3 Audio Video Cables You can connect PS3 to TV by any of the following methods: 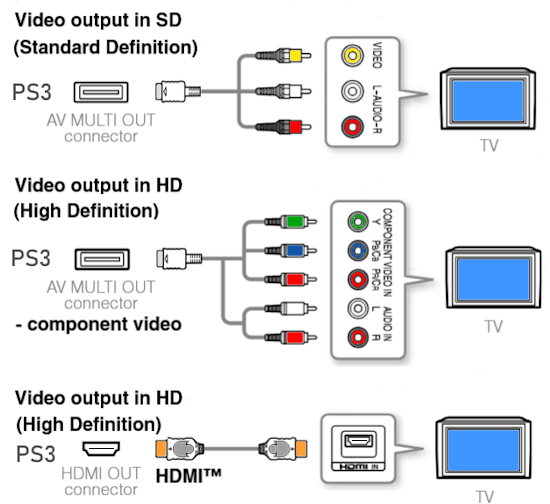 Composite Video Cable 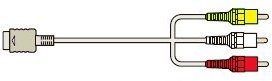 PS3 Cable - Composite video/audio - standard Video resolutions - 480i for TV connection. 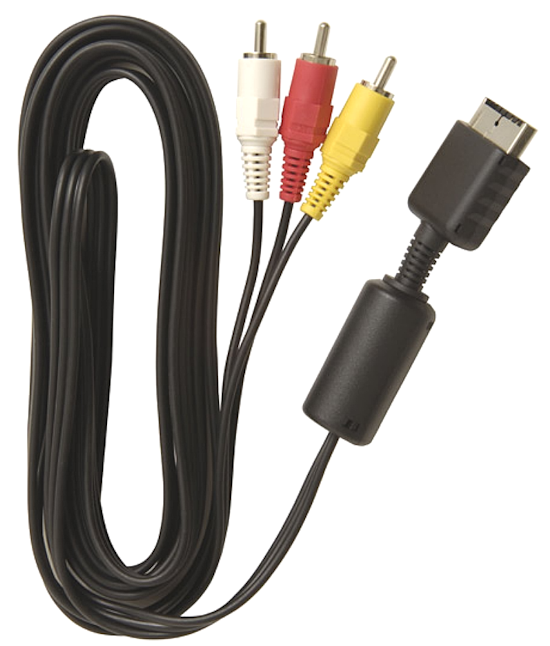 Composite connection to TV (High Definition content is not possible, only standard definition video) The yellow cable is for video and the white and red cables are for sound. Match the colors on the TV, yellow to yellow, white to white and red to red (if your TV only has white input, just leave red unconnected). 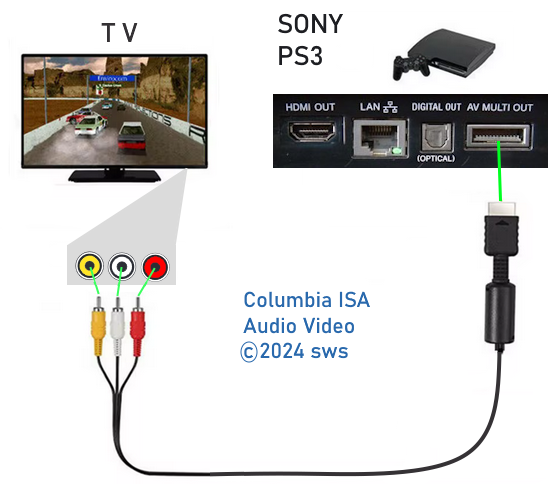 Diagram - Connect PS3 to TV with composite cable 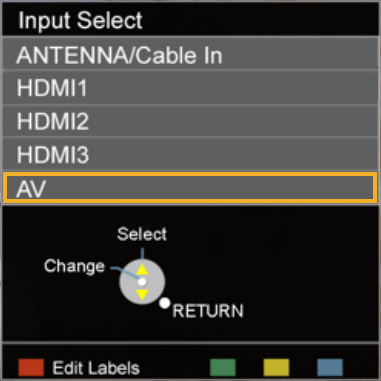 Using TV remote, select the correct source input Component Video cable Using the component video cable to connect to TV, High Definition video is possible. Instead of a single yellow video connection, component video has three video cables, green, blue and red along with the white and red audio for a total of five connections to the TV. Many older TVs have these input ports available to connect.  PS3 Cable - Component video/audio. Video resolutions - 1080p, 1080i, 720p, 480p, 480i For analog or digital TV sets. 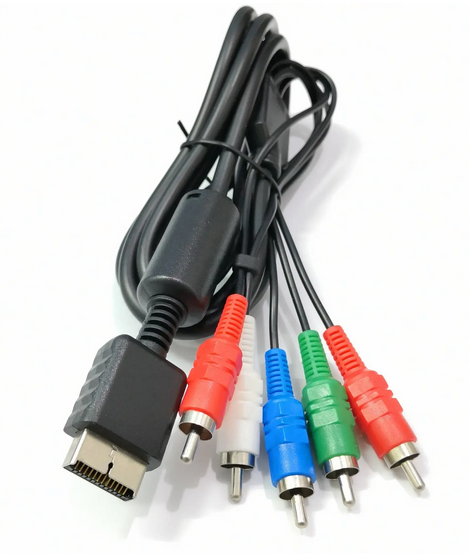 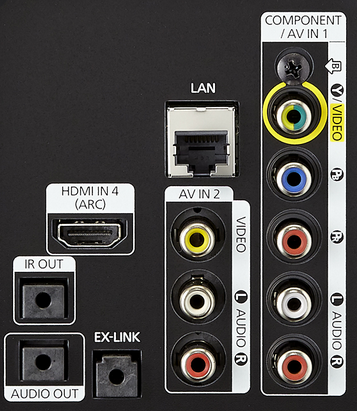 TV panel with inputs for composite and component video. Connect green cable to green input port on TV and do the same, matching colors, for the blue and red. Also connect the white and red audio cables to the white (L) and red (R) TV stereo audio input ports. Some TVs will allow the yellow video cable to be connected to the green input port if composite is not available.  Connection to TV - Component video/audio   Select on the TV, the Component input source using the TV remote control. It may be listed as AV2 or AV3 or the like depending on the TV model. HDMI Connection Changing Cables How do you change Audio Video / HDMI Input on SONY PS3? What if no picture shows on the TV screen? Answer: Power off your PS3. Now press and HOLD, for at least 5 secs. the 'Power On' button on the PS3 itself, not on the controller. Wait for two beeps from the PS3. It will beep and reset the connection type. HDMI will be used if available, if not then AV will be used.  Cable - HDMI. Video resolutions - 1080p, 1080i, 720p, 480p For digital TV set connection. Capable of carrying the highest video and the highest audio quality available. Must have compatible components such as TV, Audio/Video receiver and surround sound loudspeakers to enjoy the top performance levels. 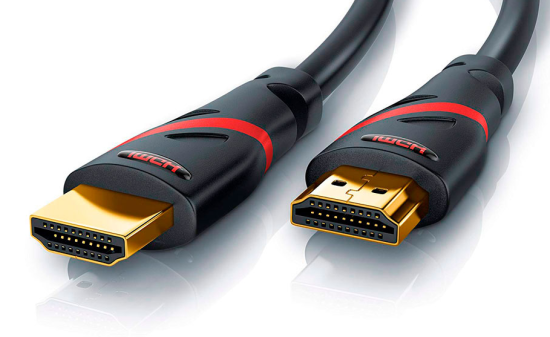 HDMI cable  HDMI connection - PS3 to TV  Using TV remote, select the correct source input PS3 TV hookup using composite video and audio 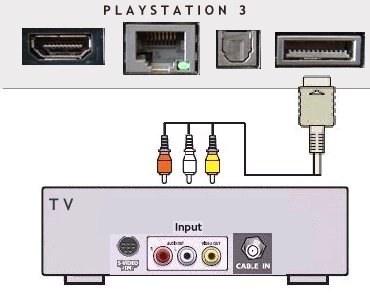 Standard Playstation 3 hookup to TV using supplied A/V cable 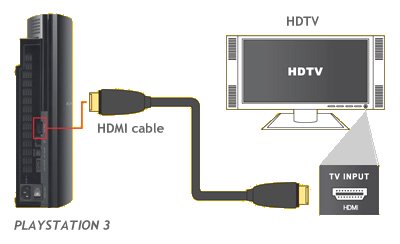 Playstation 3 hookup to HDTV using HDMI cable Optical audio cable for digital audio to surround sound processor. Capable of Dolby Digital 5.1 audio but not Dolby True HD. Use HDMI for Dolby True HD. How to hookup surround sound PS3 Initial Setup The first time you start up the PS3, follow these steps The selections below are only examples Select your Language  Select your Time Zone 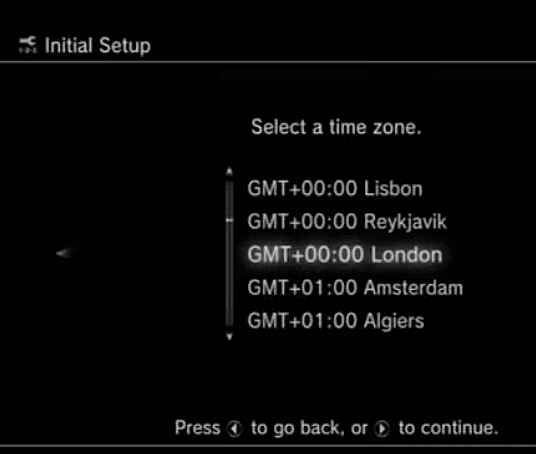 Set the correct Time and Date 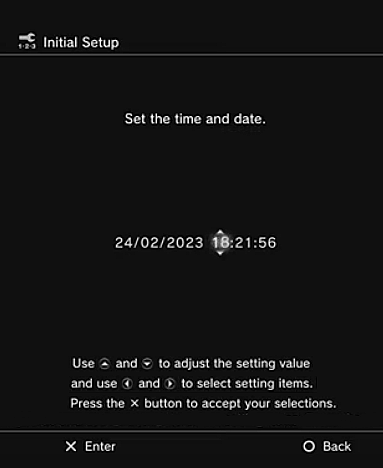 Create a user name  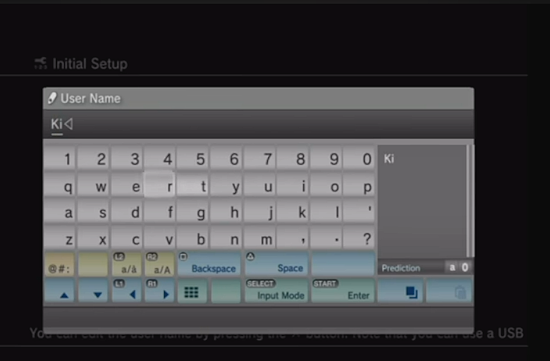 Setup wired or wireless network 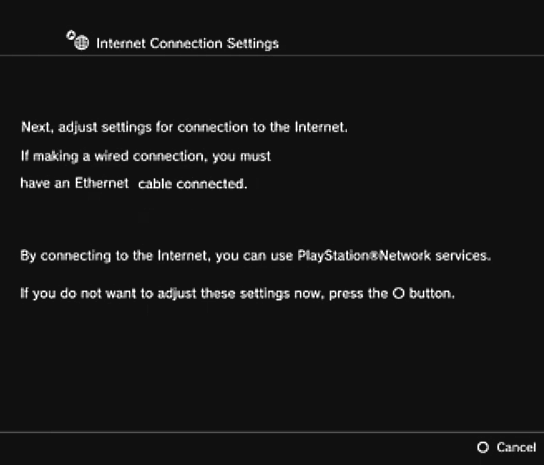 You can connect Playstation 3 to internet using a wired (Ethernet cable) or a wireless (router modem) connection. You can skip this step for now and setup the internet connection later by going to SETTINGS> Network Settings> Internet Connection Settings. Then, Select Easy, then Wired or Wireless. Scan for wireless, select access point, enter wi-fi password. Selecting "Automatic" should auto-fill the IP Adress, Sub-net Mask, Default router, Primary DNS or you can select "Manual" and fill in this data yourself if you know it. Setup your Video Output To access the home screen on a PlayStation 3, you press the "PS button", which is the large, circular button with the PlayStation logo in the center of the controller. This action will open the XMB (XrossMediaBar) menu, which functions as the PS3's home screen.  On your PS3, go to Settings, then choose Display Settings. Under the Display Settings sub-menu, select Video Output Settings.  Select HDMI if using HDMI cable connection to TV or select AV Multi if using RCA cables. Set the video resolution. Select all resolutions supported by the TV. Video will automatically be output at the highest resolution possible for the content you are playing from among the selected resolutions. The video resolution is selected in order of priority as follows: 1080p > 1080i > 720p > 480p. Set the TV type (aspect ratio) 16:9 or 4:3 depending on the TV in use. Older CRT TVs will be 4:3 while newer wide screen TVs will be 16:9. SAVE your settings. Select FINISH. For the best video resolution, if possible, use HDMI connection to TV as this can handle up to 1080p, including 720p video which many PS3 games have natively. For older CRT TVs, which can only handle lower video resolutions like 480i, use the 3 RCA cable connections (yellow, white, red). Using TV remote, select the correct source input for the PS3 • PS3 online manual How to troubleshoot HDMI picture and sound problems with the SONY PLAYSTATION 3 If You Do Not See A Picture / Hear Sound Resetting the Video Output Settings (VOS) 1. Make sure the HDMI cable is connected to the [HDMI OUT] port on the back of the PLAYSTATION 3 system. Connect the other end of the HDMI cable into the [HDMI Input] port of the TV or display monitor. 2. While the PLAYSTATION 3 system is in standby mode (red light on the front of the system), hold down the touch-sensitive On/Off button on the front of the system until the system goes into standby mode again . (So the light cycle would go from: red light to --> green light --> then back to red light) This will ensure that you have held down the On/Off button long enough to reset the Video Output Settings. 3. Turn ON the PLAYSTATION 3 and once the system finishes powering up, the Video Output Settings will automatically reset to the standard resolution (or detect the current display output settings of your TV/monitor). [If resetting does not auto-detect your HDTV, see next step below.] NOTE: As of system software update version 1.60, the PLAYSTATION 3 can automatically detect an HDMI connection to a TV. If the PLAYSTATION 3 is turned on with an HDMI cable connected, the screen for switching video output settings will be displayed automatically. (Does not function unless the TV that is connected by the HDMI cable is turned on.) As of version 1.80 of the system update for the PLAYSTATION 3, the PLAYSTATION 3 can upscale the video content of PlayStation format software, PlayStation2 format software, and DVDs to HD resolution. If Resetting the Video Output Setting Did NOT Detect Your HDTV Automatically (Certain TV's Only) With certain televisions, the PLAYSTATION 3 may not automatically detect the HDMI source (TV) which it is plugged into, even after resetting the Video Output Setting. If resetting the Video Output Setting did not work, you may need to follow these steps to manually locate the HDMI source: 1. Connect both the AV Cable and the HDMI cable from the PLAYSTATION 3 to the corresponding (AV and HDMI) ports on your TV. 2. Proceed with resetting the Video Output Setting on the PLAYSTATION 3 again. (Follow these steps, then continue to step 3 below.) 3. Turn the TV channel to the corresponding "Input" or "Video" channel for the AV Cable connection. 4. Manually change the Video Output Settings to HDMI. (Follow these steps, then continue to step 5 below.) 5. Now switch the "Input" or "Video" channel on the TV for the HDMI port the PLAYSTATION 3 is currently plugged into. 6. Accept the display settings for HDMI before the timer runs out (30 seconds). Highlight "Yes" and press the X button. 7. You can now disconnect AV Cable from the PLAYSTATION 3 and the TV, as it is no longer needed. Manually Change the Video Output Settings It may be necessary for you to manually change the Video Output Settings to "HDMI" in order to see a picture. To manually change the Video Output Settings on the PLAYSTATION 3: 1. Navigate to the [Settings] icon on the XMB Home menu. 2. Navigate to the [Display Settings] icon and press the X button. 3. Highlight [Video Output Settings] then press the X button. 4. Select HDMI as the connector type on your display. 5. You will then be informed that the console will test the settings for 30 seconds. Press the X button to "Change" the display of the system. [Note: If your TV has multiple "Input" or "Video" channels, (i.e., "Input 1", "Input 2", "Input 3", etc.), you may need to toggle through each "Input" channel on your TV to find the correct one that will display the HDMI picture during the 30 seconds, especially if you do not see a picture.] The system will remain in the selected connector type for 30 seconds. 6. If your display supports HDMI, you will see a screen that asks to accept the setting. Highlight YES and press the X button. 7. You will be asked what resolution you wish to be displayed, AUTOMATIC or MANUAL. - If you choose AUTOMATIC, the system will configure itself to the highest possible resolution. - If you choose MANUAL, the system will allow you to select the resolution to be used (1080p, 1080i, 720p, or 480p). Highlight the resolution you wish to be displayed and press the X button. 8. At this point the PLAYSTATION 3 will prompt whether you wish to "Set Audio Output Settings". (See next section.) Manually Change the Audio Output Settings If you do not hear any audio, you should confirm the correct Audio Output Setting is selected for your installation. The PLAYSTATION 3 allows you to configure the audio output settings separately. To choose the Audio Output Setting: 1. Go to the [Settings] icon in the XMB Home menu. 2. Navigate down to [Sounds Settings] and press the X button. 3. Navigate to [Audio Output Settings] and press the X button. 4. You will be prompted to choose from "Audio Input Connector / SCART / AV MULTI", "Digital Out (optical)", or "HDMI". Highlight the output port of your setup (i.e., HDMI) and press the X button. [Note: If you are using HDMI for video, but using AV cables for audio, you must select the "AV MULTI" option, and NOT the "HDMI port". This is also true if you are using an optical cable for audio (you would select the "Digital Out (optical)" option).] The audio output of the PLAYSTATION 3 will now output audio from the port you have selected. Check Your PLAYSTATION 3 System Software Version Make sure you have the latest system software update installed. If your PLAYSTATION 3 is connected to the Internet: 1. Go to [Settings] on the XMB Home menu. 2. Select the [System Update] option. Press X. 3. Select the [Update via Internet] option. Press X. 4. The system will look for the latest version of the system software. If you already have the most recent version installed, you will not need to perform anupdate at this time. If you have an older version of the system software, it will prompt you to download the file. If your PLAYSTATION 3 is not currently connected to the Internet, download the system software update via PC and install to your PLAYSTATION 3 via mass storage device (i.e., USB flash drive). Check Your HDMI Cable HDMI is available in several versions. The PLAYSTATION 3 is compatible with HDMI version 1.3 or higher, which will take full advantage of Blu-ray Disc high-definition video. There are also "Type A" and "Type B" connectors. The PLAYSTATION 3 uses the 19-pin Type A HDMI connector, which will allow resolutions up to 1080p. The HDMI cable is not included with the PLAYSTATION 3. If you are using an HDMI to DVI converter, you may wish to remove this adaptor. Check Your HD Setup and Equipment The resolution output (i.e., picture quality) of the PLAYSTATION 3 will depend on three factors: 1. The type of cable used and the inputs available on the TV or display monitor. 2. The maximum resolution the TV or display monitor can support. The PLAYSTATION 3 can output two types of resolution: HD and SD. Refer to the TV or display monitor's owner's manual to check which video modes are supported. 3. The maximum resolution programmed into the source material (movie or game). Refer to the software packaging for information on maximum resolution details or contact the publisher directly. Restore Default Settings If, after trying all of the suggestions/steps above, you still cannot get a successful HDMI installation, use the Restore Default Settings option. Once you restore the PLAYSTATION 3 to its default settings, you can follow the HDMI installation steps again. Additional Troubleshooting * If you can't get a picture using the HDMI cable after following these instructions, try connecting with the supplied AV Cable instead to see if you can get a successful installation. This will help determine where the problem may be with your particular HMDI setup and/or equipment. * If using an adaptor, such as an HDMI to DVI converter, try installing the PLAYSTATION 3 without the use of such converters. (For instance, try using the AV cables that came with the PLAYSTATION 3 instead). This may define an issue with the DVI cable or converter. There are many different types of HDMI to DVI converters and the converter may be causing an issue. * Make sure the HDMI cable is free of any cuts, frays or other visible damage. * Try using a different HDMI cable on the PLAYSTATION 3. * If possible, try installing the PS3 system to another TV or display (i.e., monitor). This will help determine whether the issue is with the TV or with the PLAYSTATION 3. * If possible, try using the HDMI cable you purchased with a different PS3 system. * Make sure you follow the recommended Proper Electical Connections for the PLAYSTATION 3 system. * If you need further assistance, please call the number below. Additional Assistance If you continue to experience problems or need more assistance, you can contact the Consumer Services Department. As a reminder, please make sure you have confirmed the following common troubleshooting steps before calling, as they may resolve your problem. * Restore Default Settings From the XMB menu, go to [Settings] > [System Settings] > [Restore Default Settings]. Once you select Restore Default Settings, you will see a list of settings that will be restored. Scroll through them and press the X button to restore the settings. After the operation is complete, you will see the initial setup screen that appeared the first time you turned on the PLAYSTATION 3. You will need to go through the initial setup process before you can use the PLAYSTATION 3. * Install the Latest Firmware Update To check what version of the System Software is currently installed on your PLAYSTATION 3, from the XMB menu go to [Settings] > [System Settings] > [System Information]. The system will display the System Software version number. You can check online to make sure you have the latest version installed. Do not perform Playstation updates using any data other than the official update data provided by Sony Interactive Entertainment over a network or on disc media. If an update is performed using data from another source, by another method, or with a PS3 system that has been altered or modified, the PS3 system may not operate properly and may not be able to install the official update data. Any of these actions may void the PS3 system warranty and affect your ability to obtain warranty services and repair services from Sony Interactive Entertainment. Recent Sony PS3 updates Year Version 2016 > PS3 system software version 4.80 2020 > PS3 system software version 4.86 2022 > PS3 system software version 4.89 2023 > PS3 system software version 4.90 If you have a recent update installed and you have no problems, then it may be a good idea to wait to install the latest update because there may be issues introduced with the new release. As time goes by these issues may be fixed. Be sure to have auto-update disabled. PS3 system software update 4.91 An update to the PS3™ system software was released on 02/27/24. To download the update, you need a minimum of 200MB of free space on either the PS3 Hard Disk Drive (System Update) or on removable storage media (PC Update). By updating, you could enjoy additional features, improved usability, and enhanced security. Note, to play Blu-ray discs, your PS3 system needs a renewed Blu-ray player encryption key. Update your PS3 system software to the latest version to renew the Blu-ray player encryption key. How to update PS3 system software You can update the system software of your PS3 system using the internet or using a PC or Mac. Update using the internet Download the update data directly to the system from the Internet. The latest update is automatically downloaded. Select Settings > System Update. Next, Select Update via Internet. Download the latest update data from the Internet. Follow the on-screen instructions to complete the operation. Go to Settings and then System Update 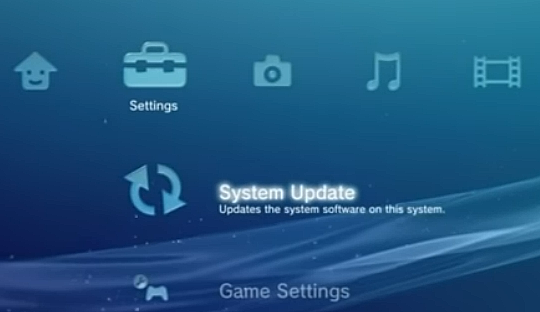 Update via Internet  Start the Update 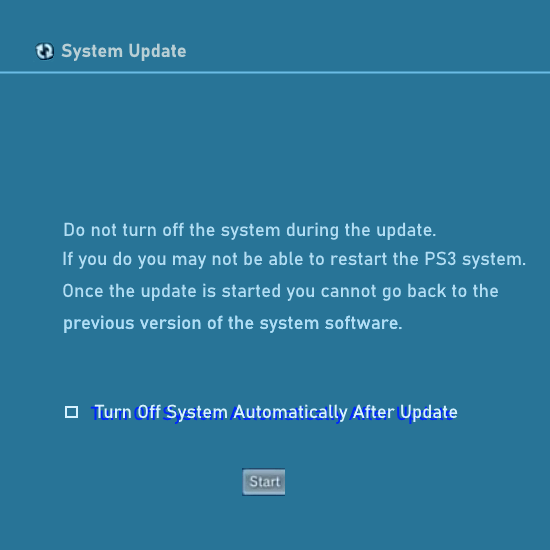 Progress of download  The system should restart automatically after the download has completed and you now have the new system software to use. How to update PS3 using USB drive Using a PC or Mac, create a folder named "PS3" on a USB drive formatted as FAT32. Inside that folder, create another folder named "UPDATE". With the computer on the internet Download the update file, and save it in the "UPDATE" folder you created on the USB drive. Save the file with the file name "PS3UPDAT.PUP". Now that the update file is on the USB drive, take the USB drive and Plug the USB device into your PS3 system and go to Settings > System Update > Update via Storage Media. • PS3 system software update * Check your Environment Make sure to allow adequate ventilation to flow from the PLAYSTATION 3's vents (i.e., avoid obstructing the vents with long/shaggy carpet, inadequate airflow from cramped entertainment cabinet setups, etc.). Make sure to also keep the PLAYSTATION 3 away from excessive dust, smoke, steam, extreme temperatures, humidity, or direct sunlight. Phone Number: Call 1-800-345-SONY (7669) Hours of Operation Monday through Saturday, 6:00 a.m. to 8:00 p.m. Sunday, 7:00 a.m. to 6:30 p.m., Pacific Time How do I install the SONY PLAYSTATION3 using Component A/V Cables? PLAYSTATION 3 Minimum Requirements * PLAYSTATION 3 computer entertainment system * SIXAXIS wireless controller (and USB cable) * AC power cord * Component AV Cable for PlayStation products (sold separately) * TV or display monitor with component video/audio inputs * Internet connection and/or PC connected to the Internet to update the PLAYSTATION 3 system software update Update the PLAYSTATION 3 system software Please update your console with the most recent version of the system software. Install the most recent version system software for the PLAYSTATION 3 now. Additional Resource Read the Knowledge Base Article on How to Update the PLAYSTATION 3 System Software if you need more information. You Will Also Need to Know * The TV "Input" or "Video" channel you need to use for the component ports on your TV. For instance, if your TV has multiple "Input" or "Video" channels, (i.e., "Input 1", "Input 2", "Input 3", etc.), you will need to toggle through each "Input" channel on your TV until you find the correct channel that displays the component video feed (picture). This is important to remember, especially if you do not see the picture after you connect the Component AV Cable and have configured the PLAYSTATION 3 settings. (Please refer to the Owner's Manual of your TV for more information on its "Input" channels.) Component Audio/Video Cable Installation 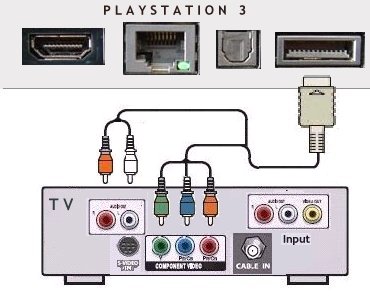 1. Before you begin: - Turn OFF the PS3 system using the [MAIN POWER] switch (in the back) - Unplug the AC power cord from the electrical outlet. - Turn OFF and unplug the TV 2. Connect the flat end of the Component AV Cable into the [AV MULTI OUT] port on the back of the PLAYSTATION 3 system. 3. Now connect the other ends into the Component Inputs on the back of your TV. The red, blue, and green plugs should go into the Component VIDEO INPUTS, while the separate white and red plugs go into the AUDIO INPUTS (white = left and red = right). 4. Plug the AC power cord for the PLAYSTATION 3 system into an electrical outlet. Turn on the PLAYSTATION 3 by pressing the [Main Power] switch on the rear of the console. A red light should appear on the front of the console indicating power is available. 5. Press the touch-sensitive [On/Off button] on the console front. This will cause the red light to turn green, indicating the PLAYSTATION 3 is now turned on. (The blue light will also appear on the front of the console if you have a disc inserted.) 6. Plug in the TV and turn the power on. Access the input channel on the TV (for example, "Input" or "Line" channel). The input channel will vary between different TV manufacturers. For Sony TVs, the channels are labeled as "Video" channels (i.e., "Video 1", "Video 2", etc.). Use the original remotecontrol for the TV and try to locate the "TV/Video" or "Input" button. This should take you directly to the TV's input channels. For further assistance, please contact the TV manufacturer directly for details. 7. Once the TV is tuned into the proper input channel, you should see a picture from the PS3 system on the screen (i.e., XMB menu). How to hookup Playstation 3 for Surround Sound 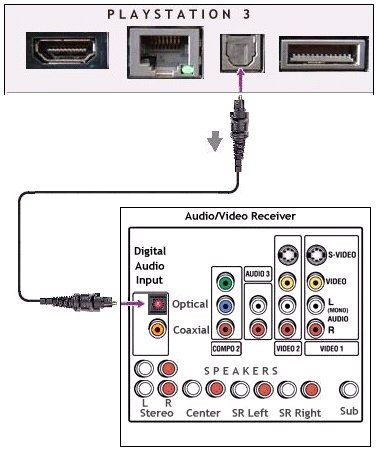 Use an Optical audio cable to connect the digital audio OUT port on the Playstation 3 to your Audio/Video Receiver with Dolby Digital 5.1 capability. Connect six loudspeakers to the A/V Receiver and position them around the listener, left, right, center, back left, back right and subwoofer.  PlayStation 3 supports Dolby Digital and DTS (Digital Theater Systems) surround sound. Digital Surround Audio Unless you have a home theater receiver with HDMI, you'll need to use the Playstation 3's optical output for digital surround sound. HDMI carries audio and video information, but for those who haven't yet bought a high end A/V receiver with HDMI capability, that HDMI cable will go directly into your HDTV. The optical cable is another purchase you will have to make as it is not included with the PS3. PS3 is capable of Dolby Digital, DTS and their respective extended versions (including lossless audio versions for Blu-ray). Playstation 3 is compatible with Sony's proprietary SACD format (the competitor to DVD-Audio) for high resolution audio. Using PS3's HDMI output to a Audio/Video receiver with an HDMI input will get you pristine, lossless, multi-channel sound. Just make sure you have at least HDMI 1.3 capability. HDMI has undergone several revisions and continues to do so. HDMI 1.0 or 2.0 will not pass the newer lossless audio codecs (as the optical output also will not) but HDMI 1.3 will. 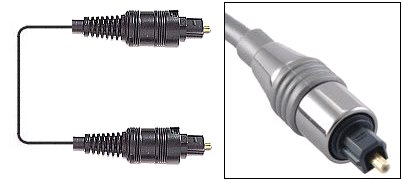 Cable - Digital Audio Optical Playstation 3 has on-screen menus for Sound Settings. You can select 2-channel stereo or surround sound. Also, select proper source on your A/V reciever. Adjust volume on A/V receiver. 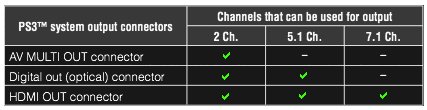 Audio using various connectors on the Playstation 3 The Audio/Video multi-out connector is only capable of stereo sound (left and right) 2-channel. The Optical cable connector is capable of 2-channel and 5.1 channel sound. HDMI is capable of 2-channel, 5.1 channel and 7.1 channel sound. 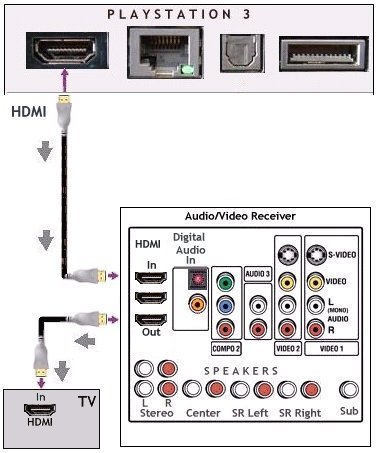 HDMI hookup diagram. Audio/Video Receiver has HDMI capability and TV has HDMI inputs. This hookup represents the top capabilities including 7.1 audio and 1080p video. Your TV would need 1080p resolution and your A/V receiver needs HDMI 1.3 with 8 surround speakers. 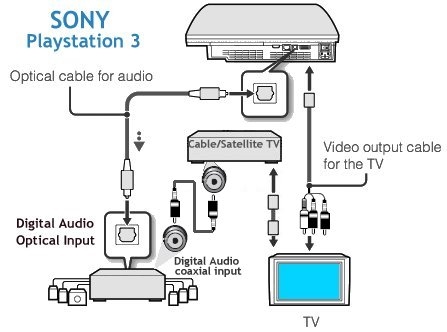 This hookup diagram shows the PS3 connected to a 5.1 capable home theater and a TV. 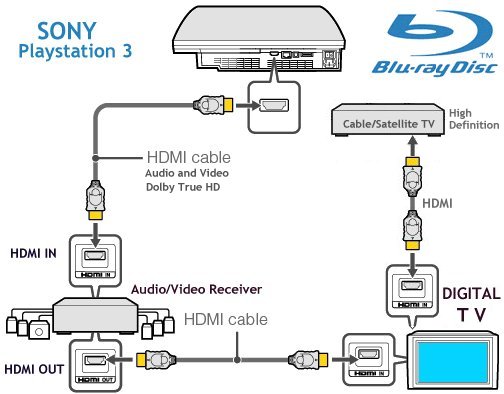 This hookup diagram shows a HDMI cable connection with 7.1 capable receiver and HDTV. A Soundbar can be used instead of an AV Receiver 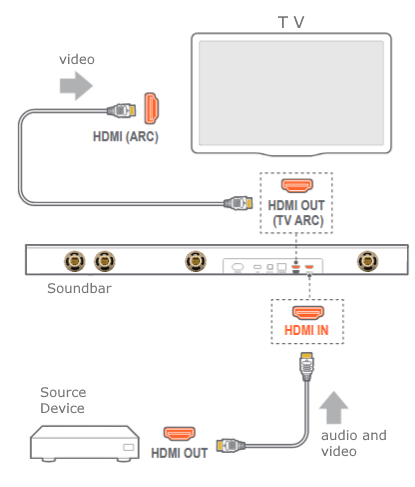 PS3 Audio Settings Depending on what audio is available on the source you have, you can adjust the audio settings to get the best sound experience. The PlayStation 3 (PS3) Slim model supports Dolby TrueHD available on Bluray disc, while the original PS3 Fat model does not. The PS3 Slim has an upgraded HDMI chip that allows it to bitstream lossless audio codecs to an external receiver. To output Dolby TrueHD from the PS3, you can: Configure the PS3 to output audio via HDMI Ensure that Dolby TrueHD is listed in the output format list Dolby TrueHD is a lossless audio codec that supports up to 7.1 audio channels and Dolby Atmos immersive audio. It can carry up to eight channels of 96 kHz/24-bit audio or up to six channels of 192 kHz/24-bit audio simultaneously. In order for the PS3 to output Dolby Digital Plus and Dolby TrueHD formats, first configure the PS3 to output audio via HDMI®, and ensure that both Dolby Digital Plus and Dolby TrueHD are listed in the output format list. Go to the XMB (Xross media bar) menu and go to: Settings > Sound Settings > Audio Output Settings Audio Output Settings In Settings -> Sound Settings… Ensure that “Audio Multi-Output” is turned off In Settings -> Sound Settings -> Audio Output Settings… 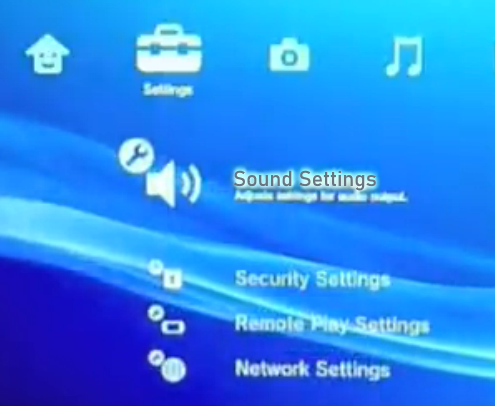  Select HDMI as the output 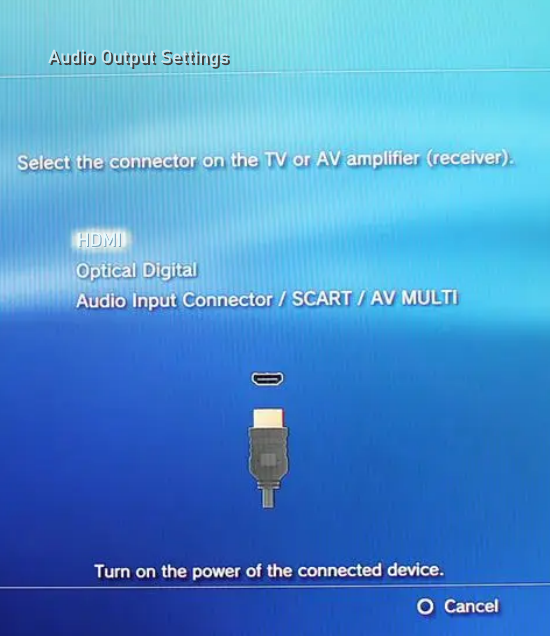 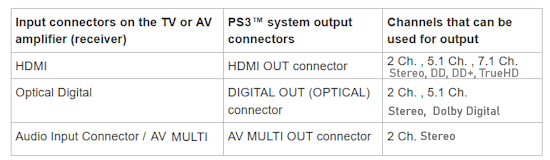 Set the “method for selecting output format” to “Automatic” You can also select "Manual" if you want to check or uncheck each audio format you want 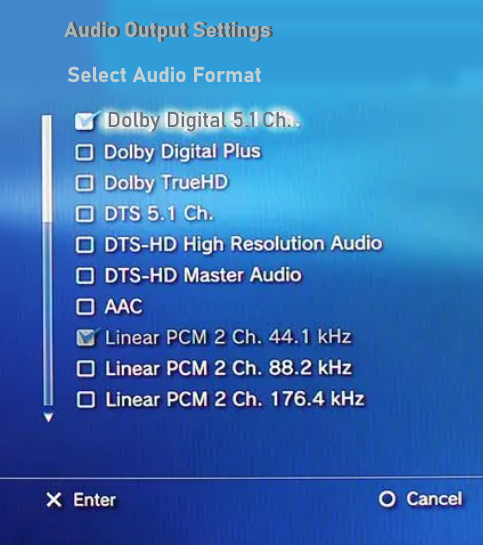 Confirm that Dolby Digital Plus and Dolby TrueHD are available in the output format list and then SAVE your settings. Press X button to save settings. 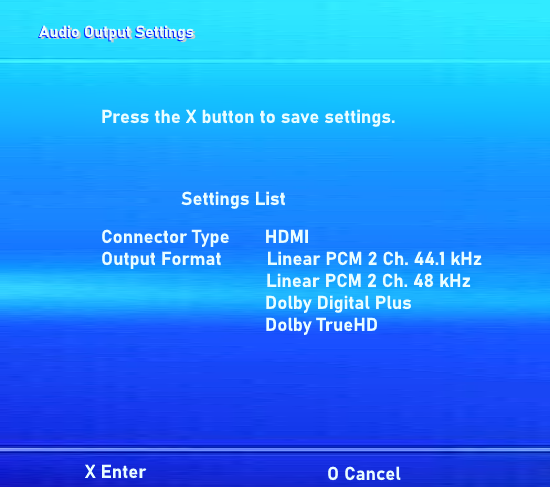 You can only get Dolby TrueHD and DTS-HD MA if you send your audio signal via HDMI (you cannot use optical cables with the fat or the slim PS3). On your 60 gb PS3, set your HDMI audio to PCM (the fat PS3 cannot bitstream, only the PS3 slim can). Make sure that your AV receiver is capable of receiving the signal through HDMI. The PS3 will decode the audio and send it in PCM format to your AV receiver. Your AV receiver will display LPCM or Multi-Channel. You can see which codec is playing by pressing select on your PS3 controller. It should say TrueHD or DTS-HD MA on screen. Make sure you select the HD track on the disc's setup menu (many discs auto-start with the lossy track). Also, you may have to get firmware updates for your PS3. Depending on when you last did this, early models of the PS3 did not have the ability to decode DTS-HD MA. This required a firmware update. The PS3 can decode DTS HD-MA and Dolby TrueHD internally and send out to the receiver as PCM. In order to fully realize HD audio (PCM, DTSHD-MA, & Dolby TrueHD) you should set your PS3 to Linear PCM through HDMI. 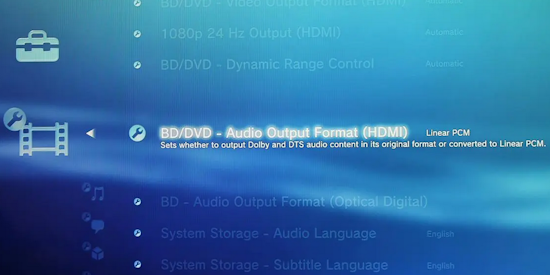 As the PS3 has internal decoding, it will be displayed as "PCM" or "Multichannel" on the AV Receiver. Settings > BD/DVD Settings > BD/DVD Audio Output Format (HDMI) > Linear PCM Settings > Sound Settings > Audio Output Settings > HDMI > Automatic To enjoy the online capability of Playstation 3, you need to connect it to the internet. Playstation 3: How to setup your Internet connection • How to connect Playstation3 to Internet • What's the best way to get connected to the internet? click here PS3 GAMES Where to buy PS3 games E-Bay.com Local thrift stores (Goodwill) Amazon.com Gamestop.com Download from PlayStation Store* * Note: PS4 and PS5 games will not work on a PS3. Also, PS3 digital games are becoming scarce and the online buying process is cumbersome for the PS3 and subject to shutdown at SONY's discretion. Maintaining the PS3 store is not a high priority for SONY anymore. Using physical discs is best for PS3. The best-selling PS3 games are Grand Theft Auto V being the top seller by a large margin, followed by racing simulator Gran Turismo 5. Other highly successful games include Naughty Dog's acclaimed action-adventure titles The Last of Us and the Uncharted series (especially Uncharted 3 and Uncharted 2), alongside the stealth action classic Metal Gear Solid 4: Guns of the Patriots. How to Play a Game on PS3 To start a game on a PS3, you press the X button for a game that has already started, or the "PS button" to open the main menu and select a game from the XMB (XrossMediaBar) game icon (scroll) to start it. If you just inserted a disc, the game may start automatically, or you may need to select it from the XMB menu. 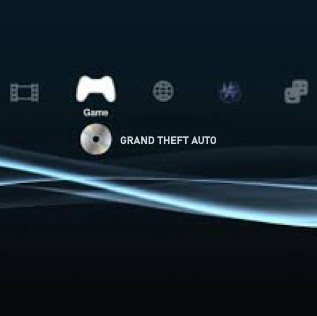 PlayStation Games Games can be on a disc or downloaded online. To download a game, sign in to your "PlayStation Network account" on your PS3, navigate to the "PlayStation Store", select a game, and choose "Add to Cart" to purchase it or add it to your download list. After purchase or selection, you can find the game in your Download List under Account Management or Transaction History to start the download. To create a PlayStation Network (PSN) account, go to the PlayStation website PlayStation.com or use your PlayStation console's account management section to start the sign-up process. On the playstation website, Go to Support> Account> Account Management and then you can create or close an account. You will need to provide personal details like your date of birth, email address, and a secure password, then create a unique Online ID. Finally, verify your email by clicking the link in the verification message PlayStation sends you. You can still buy games from the PS3 store, but you must add funds to your PlayStation Wallet via a website, console, or PSN card, as direct credit/debit card payments on the PS3 are no longer supported. Purchases are made directly on the PS3 console, not through the website or app, and you can download previously purchased games and add-ons. How to Purchase Games on the PS3 Store 1. Add Funds to Your PSN Wallet: You cannot use credit/debit cards on the PS3 store itself. Go to the PlayStation website on a mobile or desktop device. Log in to your PlayStation Network account. Add funds to your wallet using a credit/debit card or by redeeming a PSN gift card. 2. Purchase on the PS3 Console: Turn on your PS3 and navigate to the PlayStation Store. Browse or search for games and other content. Add the desired content to your cart and complete the purchase using the funds in your wallet. You can then download the purchased content to your system. Many games have been "delisted" (removed from the store). If you can't find a specific game, you will need to buy a physical copy instead. The PS3 store can be slow and difficult to navigate. The web-based or app PlayStation Store does not display PS3 titles, so you must use the PS3 console to access the store for these purchases. To access the PS3 store, you must use the PS3 console itself; it cannot be accessed via web or mobile apps. On your PS3, go to the PlayStation®Network menu and select PlayStation®Store. You'll need to sign in to your PlayStation Network account, update your system software, and then you can browse and purchase games, add-ons, and other digital content. Steps to Access the PS3 Store Turn on your PlayStation 3: console. Navigate to the PlayStation®Network menu: on the XMB (cross-media bar). Select PlayStation®Store: to open it. Sign in with your PlayStation Network account credentials if prompted. Browse the store to find the games, add-ons, or other content you wish to download or purchase. You must have a PlayStation Network account to use the PlayStation Store. System Software Updates: Ensure your PS3's system software is updated to the latest version to ensure proper access and functionality. Funds for purchases must be added to your PSN wallet using another device like a PS4, PS5, or a web browser/mobile device, as you cannot add funds directly on the PS3 store. Some content may only be usable on specific activated devices, such as the PS3 system. Columbia ISA Audio Video Empowering consumers through information columbiaisa@yahoo.com |