Home Theater
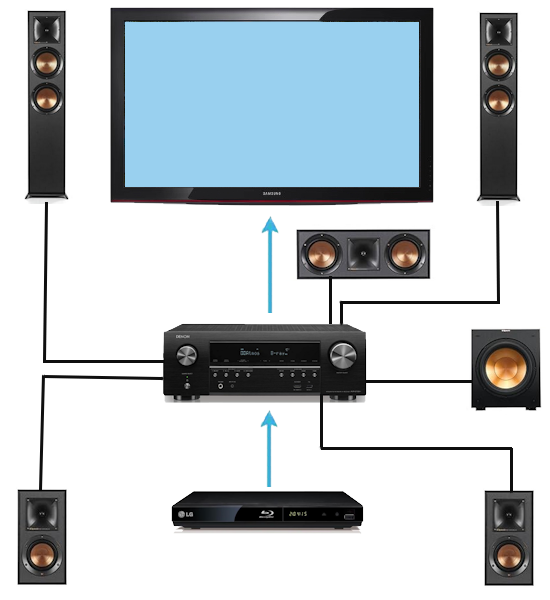
Basic Home Theater Setup
A Home Theater consists of your TV for visual display, a sound system Audio Video Receiver (AVR), loudspeakers and
source components such as a Blu-ray/DVD player, media streaming devices, turntable, and more.
The AVR handles the audio and sends to the speakers while passing video to the TV.
Except for the TV, you can buy a complete package called a
Home Theater in a box. These are usually less expensive but also lower quality than buying your components individually. However, you do not have to undertake the task of matching components. But for those who demand the highest level of quality in their video and audio performance,
you're better off buying individual top of the line gear such as Audio/Video Receiver, DVD player, loudspeakers and of course TV.
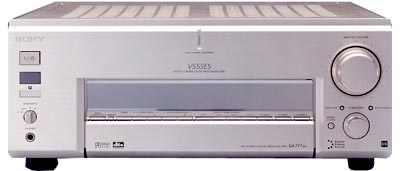
THE RECEIVER
The Audio/Video Receiver is the central hub of a
home theater system. It provides AM and FM tuners, amplifiers, surround
sound processing, and switching capabilities for all of the components which connect
to it. Most of the devices in a home-entertainment system can connect to
it, including audio components such as loudspeakers, CD player, cassette
deck, and turntable, as well as video sources such as a TV, DVD player,
VCR, and cable and satellite TV boxes.
Sony, Denon, Onkyo, Panasonic, Pioneer, and Yamaha are the top popular brands. Most
models now are digital, designed for the six-channel (5.1) surround-sound
formats encoded on most DVDs and some TV programs, such as high-definition
(HD) programming.
The newer AVRs offer Dolby ATMOS for a more realistic audio experience. Also the 4K video resolution offered by the UHD
Blu-ray player with Dolby TrueHD lossless audio along with Dolby ATMOS. Additional height speakers for an ATMOS setup can
enhance the movie experience.
Basic receivers accept the analog stereo
signals from a tape deck, CD player, or turntable. They provide two
channels that power a pair of stereo speakers. Power typically runs 50 to
100 watts per channel.
Dolby Pro Logic, Pro Logic II, and Pro Logic
IIx are the analog home-theater surround-sound standard. Receivers that
support it can take a Dolby-encoded two-channel stereo source from your
TV, DVD player, or hi-fi VCR and output them to four to six
speakers--three in front, and one to three in back. Power for Dolby Pro
Logic models is typically 60 to 150 watts per channel.
Dolby
Digital is currently the prevailing digital surround-sound standard, a
Dolby Digital 5.1 receiver has a built-in decoder for six-channel audio
capability--front left and right, front center, two rear, and a powered
subwoofer for low-frequency effects (LFE), or bass (that's where the .1
comes in).
Dolby Digital is the sound format for most DVDs, HDTV, digital
cable TV, and some satellite-TV broadcasts. Newer versions of Dolby
Digital, 6.1 and 7.1, add one or two rear channels for a total of
seven-channel and eight-channel sound, respectively.
A rival
to Dolby Digital 5.1, Digital Theater Systems or DTS also offers six
channels. It's a less common form of digital surround sound that is used
in some movie tracks. Both DTS and Dolby Digital are often found on the
same receivers. Power for DTS models is typically 75 to 150 watts per
channel.
THX-certified. The high-end receivers that meet
this quality standard include full support for Dolby Pro Logic, Dolby
Digital, and DTS. THX Select is the standard for components designed for
small and average-sized rooms; THX Ultra is for larger rooms. Power for
THX models is typically 100 to 170 watts per
channel.
FEATURES
Controls: Look for a front
panel with displays and controls clearly labeled and grouped by function.
Onscreen display lets you control the receiver via a TV screen, an
alternative to using the receiver's LED or LCD display. Switched AC
outlets (expect one or two) let you plug in other components and
turn the whole system on and off with one button.
Remote
controls are most useful when they have clear labels and buttons that
light up for use in dim rooms. It's best if the buttons are color-coded
and grouped by function. A learning remote can receive programming
data for other devices via their remotes infrared
signal.
Input/output jacks are more important on a receiver
than on perhaps any other component of your home theater. Clear labeling,
color-coding, and logical groupings of the many jacks on the rear panel
can help avoid problems during setup such as reversed speaker polarities
and mixed-up inputs and outputs. Input jacks situated on the front panel
make for easy connections to camcorders, MP3 players, digital cameras, and
MiniDisc players.
S-video and component-video
jacks allow you to route signals from DVD players and other
high-quality video sources through the receiver to the
TV.
Digital receivers also have analog audio 5.1 inputs.
These accept input from a DVD player with its own built-in Dolby
Digital decoder, an outboard decoder, or other components with
multichannel analog signals, such as a DVD-Audio or SACD player. This
enables the receiver to convey up to six channels of sound or music to
your speakers. Dolby Digital and DTS receivers have the most complete
array of audio and video inputs, often with several of a given type to
accommodate multiple components.
Tone controls adjust bass
and treble, allowing you to correct room acoustics and satisfy your
personal preferences. A graphic equalizer breaks the sound spectrum
into three or more sections, giving you slightly more control over the
full audio spectrum. Instead of tone controls, some receivers come with
tone styles such as Jazz, Classical, or Rock, each accentuating a
different frequency pattern.
DSP (digital signal processor)
modes use a computer chip to duplicate the sound characteristics of a
concert hall and other listening environments. A bass-boost switch
amplifies the deepest sounds, and midnight mode reduces loud sounds
and amplifies quiet ones in music or soundtracks.
Sometimes called
one touch, a settings memory lets you store settings for each
source to minimize differences in volume, tone, and other settings when
switching between sources. A similar feature, loudness memory, is
limited to volume settings alone.
Tape monitor lets you
either listen to one source as you record a second on a tape deck or
listen to the recording as its being made. Automatic radio tuning
includes such features as seek (automatic searching for the
next in-range station) and 20 to 40 presets to call up your
favorite stations.
Direct tuning of frequencies lets you
tune a radio station by entering its frequency on a keypad.
Even
low-end receivers generally have enough video and audio inputs for a CD or
DVD player, a VCR, and a cable box or satellite receiver. Mid and
high-priced models usually have more inputs, so you can connect additional
devices, such as a camcorder, a personal video recorder, or a game
system.
The number of inputs isnt the only issue; the type also
matters. Composite-video inputs, the most basic type, can be used with
everything from an older VCR to a new DVD player. S-video and
component-video inputs are used mostly by digital devices such as DVD
players and satellite receivers. If you have such digital devices or may
add them, get a receiver with a few S-video and/or component-video
inputs.
All these video inputs require a companion audio input. The
basic left/right audio inputs can be used with almost any device to
provide stereo sound. A turntable requires a phono input, which is
available on fewer models than in years past.
To get multichannel
sound from DVD players, digital-cable boxes, and satellite receivers, you
generally use a digital-audio input. With this input, encoded multichannel
sound is relayed on one cable to the receiver, which decodes it into
separate channels. The input on the receiver must be the same type--either
optical, the more common type, or coaxial--as the output on the other
device. You usually must buy cables, about $10 and up, for digital-audio,
S-video, and component-video connections.
All new digital receivers
support Dolby Digital and DTS, the surround-sound formats used on most DVD
movies. Both provide 5.1 channels. Most receivers also support Dolby Pro
Logic, Pro Logic II, and Pro Logic IIx. If you want the latest type of
surround sound, look for a receiver that supports Dolby Digital EX and
DTS-ES. These offer 6.1 or 7.1 channels.
Any receiver can reproduce
stereo from regular CDs. Most models have digital signal processing (DSP)
modes that process a CDs two channels to simulate a sound environment
such as a concert hall. DSP modes feed a stereo signal through all the
speakers to simulate surround.
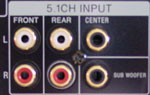
For multichannel music from
SACD or DVD-Audio discs, get a receiver with 5.1 analog inputs.
These inputs are different from the digital audio input. The analog 5.1
inputs require separate RCA type cables for each channel.
Make sure
a receiver has at least 50 watts per channel in a typical 12-by-20-foot
living room, or 85 watts for a 15-by-25-foot space. A huge room, or a
noisy setting all call for more power.
Make sure your receiver is
compatible with your speakers. Most receivers are rated for 6-ohm and
8-ohm speakers. If used with 4-ohm speakers, such a receiver could
overheat and shut down.
Most receivers have legible displays and
well-labeled function buttons. Some add an onscreen menu, which displays
settings on your TV screen. An auto-calibration feature adjusts sound
levels and balance to improve the surround effect. Models with a test-tone
function for setting speaker levels help you balance the sound
yourself.
When deciding where to place your receiver, allow 4
inches or so of space behind it for cables and at least 2 inches on top
for venting to prevent overheating. If setting up a home theater is more
than you want to tackle, consider calling in a professional installer.
Retailers often offer an installation service or can refer you to
one.
Home theater receivers have many duties to
perform as the central hub of your home theater system. Once
properly connected with the rest of your audio/video home theater
components and surround sound speakers, an A/V receiver switches between
your audio and video sources at the push of a button or turn of a
knob. Buttons and knobs are the pre-amplifier controls that allow
you to adjust settings to your specific tastes or situation. A
volume knob and tone controls are examples. A remote control allows
you to adjust your home theater's audio/video settings without leaving
your couch.
The basic elements to create a home theater
are:
(1) display for video
(2) source for audio/video
content
(3) audio electronics
(4) speakers
The Display
Most experts recommend at least a 55" to 65"
display, and the larger the screen, the more convincing the theatrical
experience. It is important to purchase a television with HDMI inputs. These inputs offer a more accurate
rendition of high-resolution digital sources. For more information about
current display technologies, see TV
displays.
The Source
The source is whatever material you are using
for video and audio content. In newer home theater set-ups, this is most
often a Blu-ray / DVD player, but can also include video game consoles, VCRs, Laser Discs, streaming media player and
cable/satellite TV signals.
Blu-ray / DVD players are currently the
most popular home theater format, and provide good image and audio
quality. DVDs hold considerably more information than VHS, so watching a
movie takes on new dimensions. Many DVDs contain full-length commentaries,
multiple languages, different camera angles, outtakes, deleted scenes, and
many other extras that are fun to watch and enhance the movie viewing
experience.
The best DVD players have progressive-scan this
technology delivers a sharper, cleaner picture. Progressive-scan DVD
players only work with digital TVs, but they are cheap enough now that it
may be worth buying one before you upgrade your display. There are also
DVD based high-resolution audio formats to consider: DVD-Audio
and Super Audio CD. These
are multi-channel music formats that can only be played back in a
compatible DVD player. Universal players are available which can play
DVD-Video, DVD-Audio, SACD, CD, DVD-R, DVD-RW, MP3 and JPEG
discs.
DVD-Audio and SACD multi-channel audio discs are
decoded by the DVD player and sent to the A/V receiver by way of multiple
analog RCA type line-level cables. Therefore make sure your receiver has
the proper inputs for all these analog cables.
Digital audio output on a single cable (coax or optical)
from the DVD player to the receiver will not be available from SACD or
DVD-Audio content, in the case of 5.1 surround sound, due to copyright
restrictions. A/V receivers do however have the decoders built-in for DTS
and Dolby Digital 5.1 surround sound. Therefore you can use the digital
audio output from the DVD player to the receiver for DVD-Video discs with
5.1 surround sound.
Safety First: Always connect/disconnect cable connections while the AV Receiver and any power amps are completely powered down or in standby mode
to prevent electrical damage to your speakers and amps.
Most sources will connect to the AV Receiver using an HDMI cable. Another HDMI cable connects the AV Receiver to the video
display. Your AV Receiver may have 3, 4 or more HDMI inputs to connect all your sources and 1, 2 or more HDMI outputs to
connect the video display.

Connect an HDMI cable from the source HDMI output to the AVR HDMI input. Do this for each source device. Switch the AVR input source to the
source device you want, using the AVR remote control or the AVR front panel control.
Connect an HDMI cable from the AVR HDMI OUT (ARC/eARC) to the TV video display HDMI (ARC/eARC). This allows video to be sent to the TV
and audio to be sent from the TV to the AVR.
For any analog audio sources such as CD player, connect two RCA audio cables (white, red) from source RCA audio OUT to the AVR analog audio
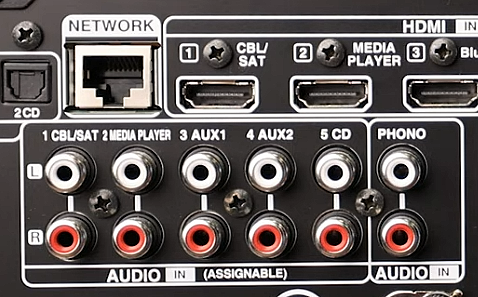
INPUT (white, red). A turntable connects to the PHONO audio input. Switch to the correct source on the AV Receiver.
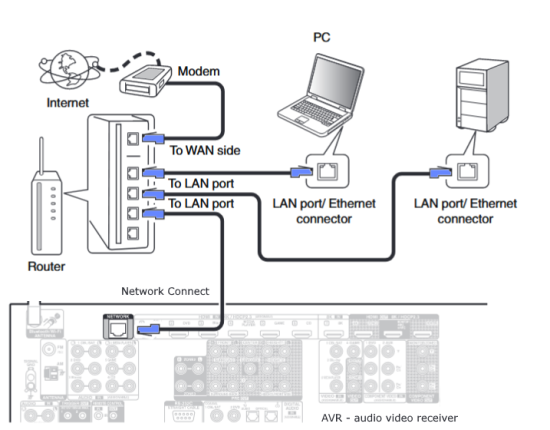
Internet - Wi-Fi
You can connect the modern AVR to internet sources either wired or wireless. A wired connection uses a CAT-5 or CAT-6 Ethernet cable to your router LAN
port from the AVR Network RJ-45 port. Wired connections are faster and more reliable than Wireless Wi-Fi which uses the AVR antennas and built-in
Wi-Fi radio for internet access.
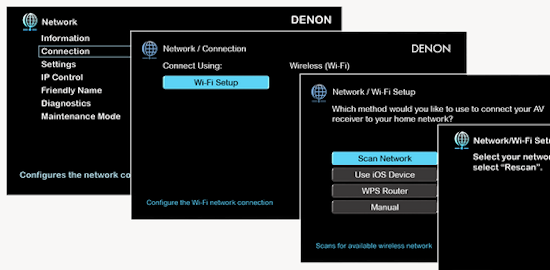
The Network has to be setup on the AVR. To Setup: Turn on your TV, set it to the correct HDMI input for your AVR,
and press the Setup button on your Denon AVR remote.
Navigate to Network > Connection > Wired. The AVR will automatically obtain an IP address and connect to your available network.
For a Wi-Fi connection, select Wi-Fi setup and scan for available networks. Select your network, enter your Wi-Fi password and connect.
Audio Electronics
Good sound enhances the home theater
experience, and the hub of any home theater sound system is the receiver.
A home theater receiver (commonly called an Audio/Video, or A/V receiver)
is usually the best place to start building a home theater system. An A/V
receiver has four important sections:
(1)
pre-amp,
(2) signal processing,
(3) amplifier
and
(4) tuner
The pre-amp (before
amplification) section of an A/V receiver allows you to switch between
input sources such as a DVD player or CD player or cable TV box. This is
where all your cable connections come into and go out of the A/V receiver.
When you are buying a receiver, it is important to make sure that you have
enough inputs and outputs for all your sources and that they are the
proper type. If your DVD player and your TV have component video
connections, make sure your receiver does as well.
It is also
important to consider your future needs, so make sure you are not using
all the available inputs. Separate pre-amps and amplifiers are also
available, instead of the combined receiver. While these provide a better
quality of audio reproduction, they are much more expensive, and are only
recommended if you want to seriously invest in your home theater
system.
The most important part of the receiver when creating
the theater ambiance is the signal processing section. DVDs come with
surround sound encoding in a variety of flavors, and decoding circuitry in
the receiver is what separates it into the individual channels to drive
each speaker. Dolby Digital and DTS are available on most current
receivers. Always look for at least one of these, preferably both.
The
amplifier section of the receiver is what drives the speakers. Unlike
stereo receivers, which have only left and right channels of
amplification, the A/V receiver must drive a full complement of speakers
to create a surround sound atmosphere. You need at least five different
channels of amplification, and some A/V receivers include up to six or
seven.
The amount of amplifier power you need depends on the
type of speakers you are using, the size of the room, and how loud you
like to listen to your movies and music. When buying a receiver, however,
a good rule of thumb is to buy as much amplifier power as you can afford.
Having the amplifier rated higher than your speakers is better then not
having enough power.
DVD-Audio and SACD are surround sound formats
that are decoded at the DVD player, not the receiver. Because of this,
these signals are sent to the receiver as six separate audio channels. If
you are interested in exploring these formats, make sure that your
receiver has a six-channel input, or you will not be able to hear them
properly. Many receivers are also marked THX Certified THX is not a
surround format, but an indication that the component meets a set of
superb standards in accurate sound reproduction.
The tuner
section is an AM/FM tuner so you can listen to AM radio stations for
news/sports/weather and FM stereo broadcasts for music and
news.
Speakers
Remember the good old days of stereo,
when two speakers were enough for premium sound? For today's home theater experience, you
need at least six, and some formats are in development that use up to 11
speakers!
Generally, however, six is the place to start, which includes
five full-range speakers and one subwoofer.
The five speakers
reproduce the right and left channels (just like your old stereo), a
center channel, and right and left surround sound. While you can use your
old stereo speakers, and add on additional ones, its usually better to
purchase a complete system of voice-matched speakers, or at least a set of
speakers made by the same manufacturer. Having matching speakers ensures
that the sound is similarly reproduced from every channel.
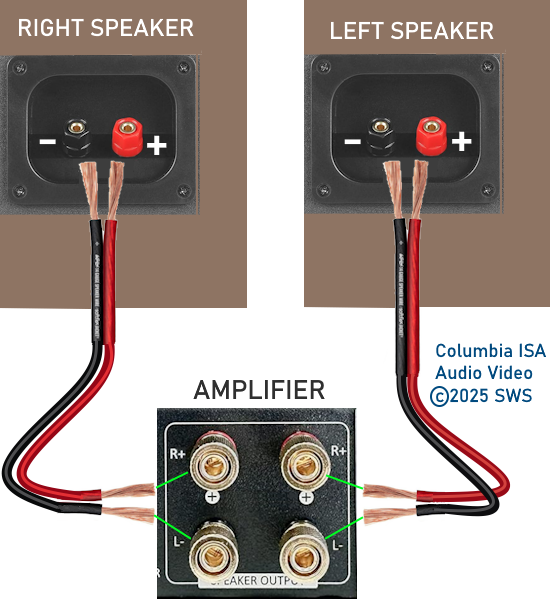
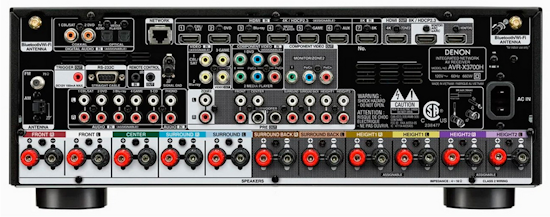
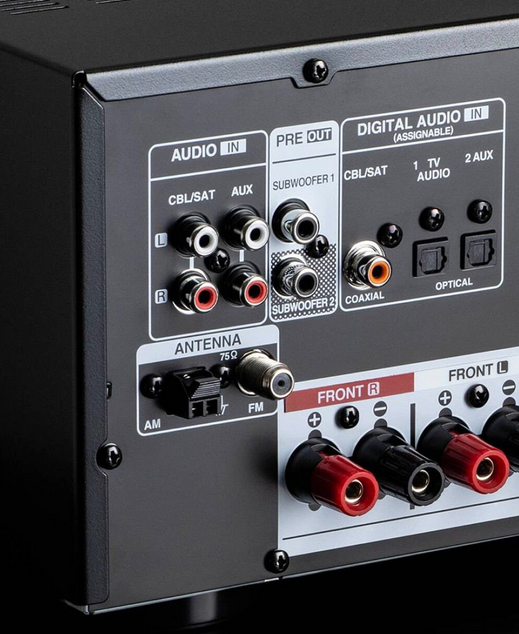
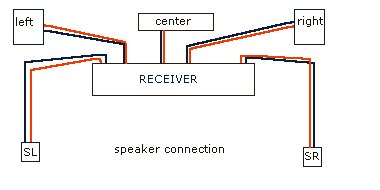
How to Connect Home Theater Speakers
Audio Video Receiver Speaker Terminals

Front left and front right speaker connections
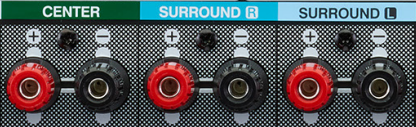
Center speaker and left and right surround speaker connections
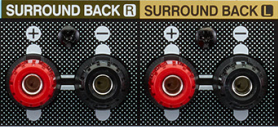
Surround back left and right for a 7.1 setup for example
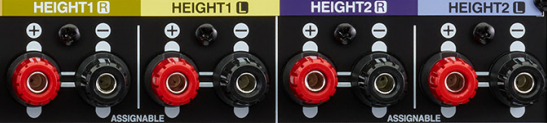
Height speaker connections for a Dolby ATMOS setup
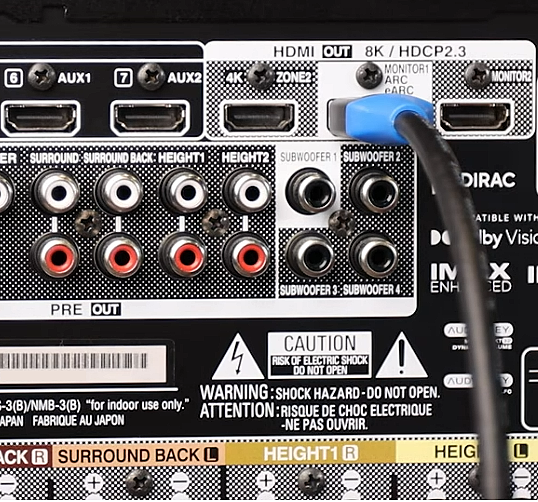
Audio Video Receiver PRE-OUTS

For each additional speaker you add to the Audio Video Receiver, the amplifier has to work more, so this is where another amplifier would be handy.
Using Pre-Outs to connect a second amp, levels out the load and also allows the use of possibly a better amplifier for some speakers.
The AV Receiver may only output 70 percent for 5 channels driven and even less for 7 channels driven. With Atmos, 9, 11 or more
speakers means even less power. Adding a second amp can boost power for the additional speakers. In fact, some AV Receivers with 9 or
11 speaker connections will require a second amp to drive the last two speakers.
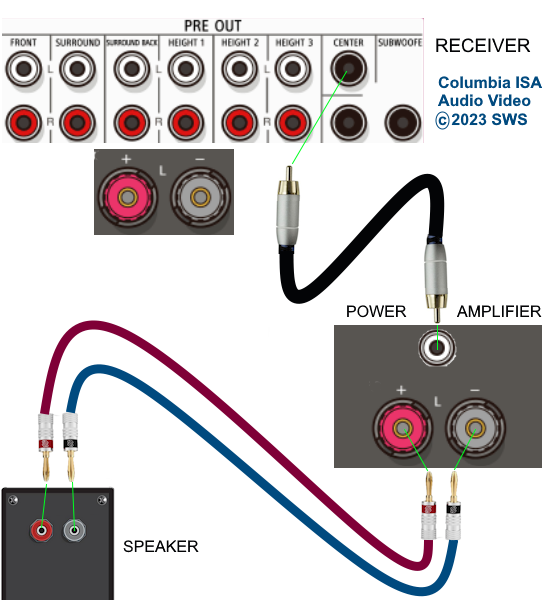
AVR to Power Amp hookup diagram
Instead of connecting the speaker to the AVR, connect the speaker to the power amp speaker terminals. Some power amps support only two
channels, a left and a right front stereo setup. This would work for a ZONE 2 connection to a secondary room. Other power amps support 6 or more
channels.
Subwoofer Speaker
For low frequencies, the subwoofer speaker connects using an RCA audio cable.
Subwoofer speakers are usually powered, so they only need a line-level signal input. Use a high-quality RCA audio cable.
Often labeled PRE-OUT, which bypasses the amplifier section of the AVR, most subwoofers are powered, meaning
they have their own amplifier built-in and require an A/C outlet. So you are just sending a line-level signal to the sub.
Some AVRs offer more than one subwoofer output so you can balance low frequencies around the room. The subwoofer audio signal is a mono
audio signal.
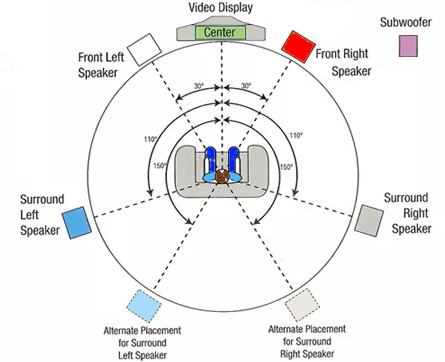
In surround sound, centered elements are not shared by the right and left
speakers (like stereo), but come from the center channel. The center
channel speaker ends up handling the reproduction of the majority of
dialog, music, and sound effects. It is best positioned immediately in
front of the TV, either above or below. Make sure that your center channel
speaker is video shielded, otherwise the magnets in the speaker may
interfere with the television image. Depending on how close you place your
right and left speakers to the display, you should probably make sure they
are shielded too.
Surround speakers come in two different styles,
point source and bipolar. A large part of which type to buy depends upon
how you are setting them up in your home. If you are placing the surround
sound speakers behind the listening position, a point source speaker is
the better choice. If your couch is against the wall, however, it is
difficult to position speakers behind you. In this orientation, bipolar
speakers are better. Bipolar speakers radiate sound forward and backward,
and produce a more diffuse sound field. These speakers are best mounted on
the walls, at about ear level height (when youre standing, directly to
the sides of the listening position.
The last speaker you need is a
subwoofer. Most subwoofers today are powered, meaning that the subwoofer
itself contains an amplifier to drive it. Most A/V receivers do not have a
separate amplifier for the subwoofer, but only a line level output.
Subwoofers are designed to handle only the very low frequency sounds, and
the LFE or low frequency effects track.
A good subwoofer is
important to provide the impact for your speaker setup. Speakers can be
had for as little as $300 for a full 5.1 setup, but a good set of speakers
will probably range from $800 to $1,000.
How to play music from Android Phone through Denon AVR
Power On: Turn on your Denon A/V Receiver and phone.
Press and hold the Bluetooth button on the Denon remote or select "Bluetooth" as the input source.
"BLUETOOTH" should display on the front panel of the AVR.
Pairing Mode: If not automatically pairing, press and hold the
Bluetooth button (or use the Options menu) until "Pairing" is displayed on the receiver's front panel.
Phone Settings: Open Settings > Connections > Bluetooth on your phone and be sure Bluetooth is enabled.
Select Receiver: Locate your Denon receiver's name in the available devices list on the phone and tap to pair.
Confirm Connection: Once connected, the receiver will display your phone's name, and audio will play through your speakers.
Other Extras
Speakers may need stands or wall
mounting hardware. Sound systems need shelves to support multiple heavy
components. All of these components and speakers are going to need cables
to connect them. The expense of cabling alone can run about 10-15 percent
of the cost of the entire system. Look for good cables, well-shielded, and
appropriate to their function. Speaker cables should be at least 14-gauge,
and try to use oxygen-free copper. It is not necessary to buy $500
interconnects and $30/foot speaker cable, but you should definitely
upgrade from the included cables that come with most components. Consider
a power management component also, particularly a surge
suppressor.
Set-up
Movie theaters have low traffic,
dim lighting and soundproofing to reduce ambient noise. Try to design an
area of your home to be apart from too many distractions, plan ahead where
you will be placing your speakers (do this before you buy them) and make
sure you have sufficient electrical outlets. Speaker placement is
extremely important, read the manuals that come with the speakers,
and ask questions when you are out shopping. When everything is right, the
system should draw you in, transform your environment, and envelop you
within the experience, so you can get lost in the movie. This is the
enjoyment of home theater.
How to Buy
Listen before
you buy. Find some source material you are familiar with, and bring it
with you to demonstrate on systems you are considering. Bring some
different styles of music or a movie to test the system under different
conditions. If you are going to build a system as you have available
funds, try to make each piece the best you can afford. If you are buying
your system all at once, set a realistic budget, and break it down into
reasonable assumptions for the cost of each component. After youve had
the opportunity to listen to a few systems and you find what you like,
dont just buy it, shop around and find the best price for what you have
decided upon.
Major Brands: Home Theater Buying Guide
Audio / Video Receivers
Yamaha Electronics Corp.
Tactile Transducers
A tactile transducer is a device
that utilizes a compact compression driver to translate audio signals into
tactile vibrations. Simply put, you can now feel the sound. Transducers
are mounted under your seating (or floor), and are powered by a separate
amplifier. The effect is incredible and may change your movie viewing
habits forever. Scenes that once just rumbled now shake you. It increases
the apparent volume and you feel much more immersed in the scene.
Transducers do not replace your subwoofer, but complement it, providing
you with a fuller listening experience. Transducers are available starting
from $250. Home Theater
Glossary
5.1 Channel Discrete Input
- DTS (Digital Theater Sound) 5.1 surround sound format delivers 5
discrete channels of 20-bit audio plus a subwoofer output for low
frequency audio, creating a theatre-quality sound experience. Some
audiophiles claim that because this format uses less compression than
Dolby Digital, the sound is of a purer quality. A discrete channel system
means the system sends sound to a particular speaker from separate
recorded spaces on the source, like a DTS-encoded DVD.
The other
option is matrixed channels, which use a mathematical formula to calculate
the sound for a channel from other channels. Because the DTS format takes
up more room on a disc, DTS DVDs usually have fewer special features, but
if you are searching for arguably the best audio experience, you may want
to consider a home theatre system capable of DTS playback.
6 Ohm Capable - An Ohm is a measure
of the resistance a speaker has when it receives an audio signal. The
lowest Ohm rating this receiver is capable of providing is listed here.
Less resistance may theoretically provide a purer sound through the
speakers, however, it is generally thought that an Ohm rating of 6 or 8 is
best for the receiver as it can be damaged when made to deliver too much
current. All speakers in your system should have the same Ohm rating, and
your receiver should be able to provide this rating.
6.1 Channel Discrete Input
- DTS (Digital Theater Sound) 6.1 surround sound format delivers
six distinct audio channels plus a subwoofer output for low frequency
audio. The additional channel occurs in the center rear of the surround
system. To take advantage of this feature on your receiver, the source
material, such as a DVD, must be DTS 6.1 encoded. (See also 5.1 Channel
Discrete Input)
7.1 Channel Discrete Input
- An advanced version of DTS surround sound that delivers seven
distinct audio channels plus a subwoofer for low frequency audio, giving
you a top of the line audio experience. The sixth and seventh channels are
two rear surround speakers. To take full advantage of this ability on your
receiver, you must be playing a DTS 7.1 encoded DVD. (See also 5.1 Channel
Discrete Input)
A/V Inputs/Outputs - The
number of connections this receiver has for receiving audio and video
signals. This is where you can connect devices like your CD, turntable, or
MP3 player (audio components), and DVD television and VCR (video
components). Make sure your new receiver has enough connections for all
the your components.
Banana Plug Speaker
Terminals - This type of speaker connector is quick and easy to
hook up, and the plug design ensures good contact, meaning less chance of
sound distortion or short circuits over bare wire.
Component Video Input/Output
- The next step beyond S-Video input/output, providing an
excellent picture with very high resolution, better color accuracy, and
less color bleeding. Component Video transmits the video signal in three
parts: the luminance (Y), the blue chrominance (Pb), and the red
chrominance (Pr). Ensure your TV and/or receiver has these input/output
connections to take advantage of this increased quality.
Component Video Switching -
Models with this feature allow you to connect multiple component video
inputs to a single component video channel and easily switch between
inputs by pressing a button on the front of the receiver or the receiver
remote control.
Composite Video Input/Output
- The most common and basic video format, composite video is found
in most home video equipment and provides good quality signals.
Digital Inputs - How many and what
type of digital cables can be attached to the receiver to receive signals.
A digital coaxial cable has the commonly-used "RCA" style connectors, but
the cable itself is designed to provide high quality digital transfer.
Digital optical is a high quality method of transferring data in your home
audio system. The connector component of the cable uses fiber-optic
technology to improve the signal transfer, ensuring there is the minimum
distortion between the source and the recorder. You can send signals out
from your DVD or CD player, or HDD to your receiver ensuring optimal
quality transfer.
Digital Outputs - How many and
what type of digital cables can be attached to the receiver to send out
signals. Digital coaxial cables have the commonly-used "RCA" style
connectors, but the cable itself is designed to provide high quality
digital transfer. digital optical is a high quality method of transferring
data in your home audio system. The connector component of the cable uses
fiber-optic technology to improve the signal transfer, ensuring there is
the minimum distortion between the source and the recorder.
Dolby Digital EX - Dolby Digital
EX and THX EX (Lucasfilm) formats are a collaboration between Dolby and
THX labs to produce a better quality surround sound by adding one or two
back speakers to the 5.1 surround system. These sound channels are
matrixed from the existing sound channels. Many new DVDs are designed for
Dolby Digital EX and THX EX, but these systems can also approximate the
extra channels from DVDs designed for 5.1 surround sound.
Dolby Digital Surround Sound
- A surround sound format that offers five discrete channels of
full-range sound and a subwoofer for low frequency effects. This is the
most popular and widely available format for surround sound, and will
provide you with a high quality output.
Dolby Pro Logic - A form of
surround sound that converts specially encoded 2-channel stereo signals
into four distinct channels - left, center, right and low frequency sound.
This is the basic and original form of surround sound.
Dolby Pro Logic II - An
advancement from Dolby Pro Logic, this format can take input from a stereo
or Pro Logic source and convert it to 5.1 channel output. You can enjoy
your old audio and VCR collection with improved quality if your system has
this feature.
DSP Modes - DSP (Digital Sound
Processing) Modes simulate the acoustic conditions of special environments
such as a stadium or a concert hall. By using this feature you can
customize the sound format for what you are playing; for example, 'concert
hall' when you are listening to a live classical music recording, or
'sports' when watching the game.
DTS - DTS (Digital Theater Sound) is a surround
sound format that delivers 5.1 channels of 20-bit audio, creating a
theater-quality sound experience. Some audiophiles claim that because this
format uses less compression than Dolby Digital, the sound is of a purer
quality. Because the DTS format takes up more room on a disc, DTS DVDs
usually have less special features, but if you are searching for the
arguably best audio experience, you may want to consider a home theater
system capable of DTS playback.
DTS ES - The DTS ES further enhances your
audio experience by adding a sixth channel of full bandwidth back surround
sound that can be played through one or two speakers. This is delivered in
a discrete format, rather than matrixed like Dolby THX, and thought by
some to produce a better quality playback. To take full advantage of this
format, the DVD you are playing must be recorded in the DTS ES - look for
it on DVD packaging, it is becoming more and more widely available.
Front AV Jacks - A/V jacks allow
you to connect other components to your receiver. The advantage to front
jacks is quick and easy connection of temporary elements, such as a video
game console, MP3 player or camcorder.
Graphic EQ - The Equalizer (EQ) lets
you adjust the bass, midrange, and treble in the music, resulting in a
customized sound. You can select from a variety of presets, customize to
compensate for a poor recording, or turn off the EQ to hear the music
exactly as it was recorded.
High Current - The current flow from
the receiver to the coils in the speakers creates sound. Sound effects in
movies and music can often create short bursts of high current transfer. A
high current receiver is specially designed to handle these short, high
power bursts and may yield a better quality sound over a non high current
model of the same wattage.
Multiroom Capability - Enjoy
your home theater system in multiple rooms with multi-room capability.
This function allows you to attach multiple speaker systems and play
through all speakers, or select which speaker system you want to use with
a switch.
On Screen Display - Sometimes
it's hard to see the display on your system from across the room, or the
abbreviations are difficult to figure out. Systems with on-screen display
show you all the options on your television screen, allowing to make
adjustments quickly and easily.
Phono Inputs - Short for phonograph,
a type of connection that allows you to connect a turntable (record
player) directly to the receiver.
Preamp Outputs - Delivers
unamplified, low voltage line level signals that allow you to connect the
system to a powered subwoofer or external amplifier.
Remote Control Type - The type
of remote control that comes with the receiver. Standard remotes control
the receiver only. Universal remotes control not only your receiver, but
other components - such as your TV and DVD player - as well. Multifunction
remotes allow you to operate components of various brands in your home
theater/audio system through the one device. A learning remote is able to
learn functions from other remotes of various brands, and can often be
programmed for custom functions you frequently use.
S-Video Input/Output -
S-Video breaks the video signal into two separate parts - chrominance
(color) and luminance (brightness). This makes for a more precise,
detailed picture as opposed to the standard RF or composite video output
found in some devices such as VCRs.
S-Video Switching - The
capability for the receiver to direct S-Video signal to the TV. Some older
models don't have video switching, meaning they must be connected directly
(eg, the VCR must connect directly to the TV, rather than the receiver
acting as a "hub"). Others are limited to composite video, a lower quality
signal. S- Video is the mid-range signal quality, see also Composite Video
Switching.
Watts Per Channel - this
is a measurement of the intensity of the sound signal being delivered to
each channel in a home theater/home audio setup. The greater the power
output, the greater the strength of the signal, and the greater the
capacity for loud and clear sound. This feature is useful for comparing
different models, however, the rating of the speakers themselves also
affects output.
THX Select - THX Select certified
products are the mid-priced technology offered by a variety of
manufacturers, providing an audio experience true to the original movie
soundtrack in your 5.1, 6.1, or 7.1 surround sound system.
THX Ultra II - The Ultra II format is
THX's ultimate technology standard for movies and music. THX strives to
provide the truest reproduction of movie soundtracks in the home theater
environment. THX Ultra II certified devices are also designed for all the
latest advances in music recording technology, allowing the best
multi-channel music playback. Ultra II takes full advantage of 7.1
surround systems, smart technology automatically detects the sound format
and optimizes playback over the surround system, whether movies or
music.
See also:
• PC stereo hookup
• VCR Recording
• HDTV Hookup Diagrams
• TV input select
• Timer Record Radio Shows on a VCR
• Camcorder hookup to TV, DVD
• Audio Video Connections
• Video Cables Connections
• Hookup Diagrams
• Home Theater in a box - user guide
Understanding Audio Video Receivers
A receiver is the control center of most home theater systems. It
enables you to switch easily between sources of music (CD player, cassette
tape deck, MiniDisc player, DAT deck, etc.) and allows you to control
volume, and bass and treble as well. It does all of this by combining,
into one piece of gear, three separate components: a preamplifier,
amplifier and tuner.
Most people choose to buy a receiver
rather than the three separate components because receivers are more
affordable and are simpler to set up and operate. This doesn't mean that
receivers are for everyone. Lots of folks choose to go the separates route
because they like the flexibility that comes with being able to mix and
match the strengths of various amps and preamps with their particular
speakers and source components.
The Pre-Amp
The preamplifier performs a couple of major functions: it routes the
signals from your source components (these signals are called line-level
signals) to your amp and it serves as a volume controller.
So when you choose to listen to a compact disc, for example, the CD
player sends a line-level signal to your preamp, which then controls the
system's playback volume according to your specifications before passing
the signal on to your amplifier.
Some receiver models have preamplifier outputs. These are connectors
that feed a line-level signal to a subwoofer, or a separate power amp.
Preamp outputs are a great feature for those looking to add bass to their
sounds with a sub or for those who'd like to add a separate, more powerful
amp to their system.
The Amp
The amplifier is the heart of the receiver; it pumps out the powerful
signals that drive the loudspeakers. The amplifier receives from the
preamp, signals which originated from your source components, which it
then boosts before sending them on their way to your speakers.
The power ratings for the amplifier section of the receiver are what
most consumers pay attention to when making a purchase.
A typical power rating for a typical receiver at a typical electronics
store looks like this:
100W RMS x 2 into 8 ohms (40Hz-20kHz)
at 0.5% THD.
First, "100W RMS x 2 into 8 ohms" means this receiver delivers 100W of
continuous power into both channels, with an 8-ohm speaker load. (Ohms are
a measure of resistance to the flow of electricity.) Next --
"(40Hz-20kHz)" -- indicates the range of sound available when the receiver
is putting out its maximum power. (Humans can typically hear from
20Hz-20kHz, so the receiver described by this power rating isn't giving
you some of the very low-end signals.) And, finally, "at 0.5% THD"
describes the total harmonic distortion (THD) this receiver adds to the
signal generated by your source component. The lower this number, the less
the receiver will distort your music.
Ways in which power ratings are manipulated: A simple way to manipulate
power ratings is to list them without the "RMS" (Root Mean Square -- a
mathematical calculation which describes the average power output)
designation. The "RMS" designation lets you know that the ratings are for
continuous power, not peak-power capability (you want continuous
power).
Also, sometimes manufacturers will leave off the part of the
specification that tells you that the rating refers to the power of the
receiver with both of its channels driven. If a rating doesn't say "x 2"
(or "x 5," for the five channels of an A/V receiver), then you can assume
that it's for one channel driven. A receiver appears most powerful when
driving only one channel.
The Tuner
This is the part of the receiver that does the receiving -- in this
case, it's AM or FM radio signals which are then fed into the preamp.
Other features
DSP modes: These digital signal processing (DSP) modes are touted as
enabling your receiver to make your music sound as if it was recorded in a
concert hall, cathedral, nightclub, etc. Some people enjoy the big, boomy
distortions that DSP modes offer, but remember, your music collection was
recorded in recording studios, and you'll probably enjoy the music most if
it sounds as much like it did to the musicians in the studios as
possible.
Input/output jacks:
These are the jacks on the back
of the receiver where you plug in your source components and speakers.
It's always a good idea to count up all of your source components and
check to see that the receiver you're considering for purchase has at
least that many inputs. Also, it can be convenient to have one or more
input jacks on the front of the receiver in case you ever want to quickly
hook-up your portable player, recorder, etc.
Tape monitor: This lets you listen to one source as you record a second
source on a tape deck, or you can listen to a recording as it's being
made.
Bass boost switch: This amplifies the bass.
Tuner presets: This function allows you to choose which radio
stations you'd like to have available with the push of a button.
Treble and bass controls: These allow you to increase or
decrease the levels of bass and treble in your music.
Balance controls: These allow you to shift emphasis from one
channel to the other or to maintain equal levels between the left and
right channels.
A/B speaker selection: Allows selection of a main set of speakers, a
second set of speakers (usually in another room), or both.
There are affordable A/V receivers that do superb jobs of playing back
music in stereo. Plus, A/V receivers are multichannel, allowing you to
play the five, six, seven (and more) channels available in the Dolby
Digital and DTS formats. This means that you'll need five, six, seven (or
more) speakers in order to hear the soundtracks of those DVDs as they were
intended to be heard. It also means that you're going to have to make
choices about which type of sound-processing format you want (Dolby
Digital 5.1 and DTS are two examples) and if you want to be able to listen
to DVD-Audio or SACD formats for recorded music.
A home theater receiver has a built-in multi-channel digital surround
sound processor whose job it is to decode your DVDs and HDTV signal and
send out clean, high-quality, non-distorted audio signal to as many as 7
or more speakers.
Lastly, a receiver includes an AM/FM radio tuner, usually with radio
station presets. Some are even XM satellite radio ready. Other
source components that will most likely be connected to the inputs on your
home theater receiver include your DVD player, your HDTV receiver, your
VCR, CD player, or even your audio cassette deck or phonograph.
(Word of warning: Many A/V receivers today DON'T have a phono input
on the back.) You may also want to look for a receiver with an
Ethernet connection to allow you to access your home computer network,
too.
The video signal will be sent out to your television so you
have a picture (and sometimes on-screen menu display) and your audio
surround sound signal will be sent to your speakers and your subwoofer so
you can hear sound that rivals that in your local movie theater. The
quality and proper placement of your home theater speakers will make or
break the overall sound performance of your home theater surround sound
system.
Many new home builders will also want to build a whole house
audio system right into their building plans and integrate it with their
home theater system. Your favorite music pumped through in-wall
speakers and ceiling speakers throughout your home (and even to outdoor
speakers outside) is something that will make your everyday living more
enjoyable.

Receivers still connect to audio gear such as a CD
player, but tape monitors and phono inputs are less common. You can still
find receivers with these audio hook-ups, but - if you want to play vinyl
records or cassette tapes - don't assume your new purchase will
accommodate you. A/V receivers can take signals from an astounding number
of audio and video sources. These can include broadcast television, cable
TV, DVD and VCR players, satellite dishes, CD players, cassette tape decks
and phonograph players. They also can accept external antennas to receive
transmissions from AM and FM radio stations as well as satellite radio. (
Note that A/V receivers do not have TV tuners in them. You'll need to have
a TV tuner in your TV or use a cable TV box or satellite TV tuner box. The
video outputs from these devices are then connected to the video inputs on
the A/V receiver for routing to your TV display or you can connect the
cable or satellite box video outputs directly to your TV
display.)
In addition to an AM/FM radio tuner, virtually all A/V
receivers include an amplifier. These amplifiers can power as many as
eight speakers. Depending on the make and model, receivers can deliver
anywhere from 50 to 110 (and up) watts per channel.
Total harmonic
distortion (THD) is one specification that lets you gauge overall quality.
This spec measures the distortion or noise that the receiver's amp adds to
the audio signal.
The most expensive models may boast a THD of 0.07
percent. This is definitely worth bragging about, but not exactly
relevant, since the human ear cannot hear anything under two
percent.
Receiver
Features
Direct
AM/FM Tuning
Tune in a station, directly, just by entering its
frequency into the control panel or remote.
DSP
Most
receivers use digital-signal processing (DSP) to let you adjust acoustic
quality. Depending on make and model, you can adjust tone controls to
evoke the acoustics of a concert hall, stadium, nightclub or other
venue.
Front-panel Inputs and Outputs
Including inputs
and outputs on the front panel makes it easy to hook up camcorders and
video game systems.
Onscreen Display
A display on your
television, guides you through operation of your receiver.
Sleep
Timer
Set the sleep timer to program the receiver to shut off after
a specified amount of time.
THX Select and THX
Ultra
This proprietary surround sound technology - created by
Lucasfilm to deliver enhanced audio in movie-theatres - is now available
on high-end home theater components. Look for the THX logo on receivers
and speakers.
THX Select delivers optimal performance in rooms of
less than 57 cubic meters. For larger rooms, choose THX
Ultra.
Universal Remote
When your A/V receiver comes
with a universal remote, you can use the remote to operate several other
components, even when they are from other manufacturers. You can program
the universal remote that comes with your Panasonic receiver, say, to
operate your Sony DVD player and your RCA
HDTV.
XM-Ready
Starting in April 2005, A/V Receivers,
as well as other home entertainment devices, can be equipped with the
capability to receive XM satellite radio programming. A manufacturer can
make their product "XM Ready" by including XM's "Connect-and-Play" chip
and data-port, a mini-serial bus connector. If a home entertainment
product is labeled as XM Ready, it means that product has everything you
need to play XM radio once you connect the XM Connect and Play antenna and
subscribe to the service from XM radio (currently $12.95 per month). No
other accessories are needed. For about $50, the consumer purchases and
plugs the XM Connect-and-Play home antenna into an XM-Ready receiver to
get 150-plus digital channels. The Connect-and-Play antenna is a fully
integrated XM receiver and antenna combination and is the only component
needed to provide the XM experience through any XM Ready home audio
system. Simply look for the XM Ready logo. With this technology consumers
simply plug an XM Connect-and-Play home antenna into an XM-Ready audio
product and activate the service to receive XM's 150-plus digital radio
channels. The Connect-and-Play antenna receives the XM signal, processes
it and delivers digital audio to the system to which it is connected. You
simply plug the single cable connection into an XM Ready audio system and
activate the service.
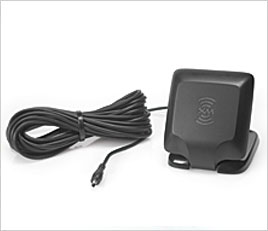
XM Antenna and receiver with 25 ft.
cable
Specifications: 1.15" H x 3.03" W x 3.60" D. Weight:
10 Oz.
Auto Listening Room Tuning
A
few manufacturers of A/V receivers provide the ability to fine-tune your
audio to the particular room you are listening in based upon feedback from
a microphone at the exact spot you are located in the room. YPAO
(Yamaha Parametric Room Acoustic Optimizer) which uses an optimizer
microphone at the listening position to pick up test tones from your
speakers, which the system then analyzes to let you know the best audio
parameters. The system will even automatically equalize the sound
according to the readings it takes.
Some Pioneer
receivers provide a "multi-channel acoustic calibration" system (MCACC)
for optimum accuracy in multi-channel sound reproduction. The
calibration system works by measuring the acoustic characteristics of the
listening area and neutralizing the ambient characteristics that can
color the original source material. First the MCACC uses the microphone
provided to check and test ambient noise levels, the microphone, and
speaker levels. Once the initial set-up calibration is complete, the
system automatically confirms size of the speakers that are hooked up to
the receiver and distance to the listener, then performs a surround
analysis. Finally, MCACC checks the channel delay and channel level,
before performing the acoustic calibration. During the acoustic
calibration process, the speakers will emit a series of noise and timing
pulses that are received by the microphone and sent to a digital equalizer
for final calibration of up to seven channels.
Advanced Room Tuning
Advanced MCACC features include:
- Professional Acoustic
Calibration Setup takes into consideration the reverberant qualities of
the listening area and uses this information to adjust the frequency
response more accurately for human ears. It distinguishes the difference
between the direct sound from each speaker and the reflected sound off
of the walls.
- Auto Pro This feature
enables the receiver to output test tones, and automatically adjusts the
frequency balance for each speaker in accordance with the reverberation
characteristics in the listening room.
- Manual Pro This allows
the receiver to measure the room acoustics with reverberation and
displays this information on the television connected to the receiver.
Once the reverberation characteristic in each frequency band is
measured, the user can select which timing frequency to use for manual
calibration.
- MCACC also has the ability to
send data to a PC through the RS232C port for a detailed and precise
display of the measured reverberation frequency response in the
listening room.
Considerations
Will you have the necessary space
for your new receiver Check the specs, then make sure there are about 4
to 5 extra inches in the back to accommodate wiring. Also, add at least 2
inches on top for venting and air flow to dissipate heat.
Installing Your A/V
Receiver
The Receiver's amplifier section may produce quite a bit of heat and
therefore needs adequate ventilation. Place the receiver on a shelf with
at least two inches (preferably more) above its vents. If it has a fan,
whether on the back or on the side, be sure not to block it. Otherwise, it
will overheat and might shut down or be damaged. Your receiver is the hub
of your home theater system. Accordingly, it must be in a central location
where it can be reached by interconnecting cables from other components
and by speaker cables. If possible, place it so that the back panelwhere
most of the jacks are locatedis easily accessible. At the top of your
equipment stack is a good spot.
Connectivity
First,
hook up the speaker cables, because that affects the physical layout of
your system. Then do the interconnects to other electronic components,
such as your DVD player. Save the AC cable for last, but don't plug it in
till you've hooked up all the speakers. Never hook up speakers with the
amplifier turned on. If you cross the speaker leads, you probably will
blow at least one channelpossibly more. Let's look at some more specific
connectivity issues.
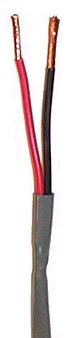
Speaker Cables
The receiver amplifies the audio from the source
and sends the signals to the loudspeakers for you to hear. You need a
connection path from the receiver to the speakers and this is accomplished
by using speaker wire or cable, a metal (usually multi-strand) wire used
to connect the speaker outputs on an amplifier to the binding posts on a
loudspeaker. The most basic speaker wire, also know as zip cord, is a
thin, light gauge wire.
Speaker wire is often made of copper, a good
quality conductor. The metal wire is encased in some form of plastic
coating that insulates the wire while still allowing the wire to be easily
bent and turned. Most high-quality speaker wire is fairly thick with a
gauge around 12.
Quality wires are usually terminated with a metal
connector. The most commonly used of these connectors are spade lugs,
banana connectors, and pin connectors. Bare wire without a connector may
also be used.
Speaker cables should be heavy gauges with
gold-plated spade lug or banana connectors for good signal transfer
between amplifiers and speakers. Lengths of speaker cable should be kept
to a minimum. Long runs of speaker wire should be heavy gauge to ensure
enough power is transferred and the amplifier is not presented with too
great an impedance or resistance. Speaker wire has its own impedance or
resistance to the flow of electric current with heavier gauge cables
having lower resistance ratings allowing the efficient flow of power from
the amplifier to the speakers.
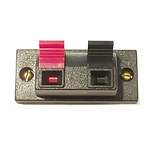
Your receiver will have at
least one or two sets of relatively large terminals that are designed to
accept speaker wire. Some models use only wire clips, which accept bare
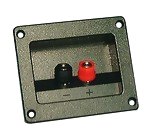
wire or pin connectors. Better models usually have binding posts for at
least the front left and right speakers. Binding posts normally accept
bare wire, pins, banana plugs, and spade lugs, though some omit support
for one or the other of the last two. Bare wire and spade lugs provide the
most secure connections, because they have the large contact areas
and can be clamped down tightly. Snugly fitted banana plugs are almost as
secure, and much more convenient when you need to disconnect and reconnect
for any reason.
Although there is a thriving market in premium
speaker cable, there is no real technical or sonic imperative for using
wire of premium construction or exorbitant price. Ordinary stranded copper
wire (lamp or zip cord) is perfectly satisfactory provided that it is not
too skinny.
The thicker the wire, which corresponds to a lower
gauge number (AWG), the less its resistance to the passage of electricity.
The thinnest wire you should possibly consider using is 18-gauge, but
since 16-gauge costs only slightly more, it is recommended. For long
runs of more than 15 or 20 feet, you might consider moving up to thicker
14- or even thicker 12-gauge cable. If you do, just make sure whatever you
buy is reasonably flexible; such thick cable can be too stiff to handle
easily if it isnt braided to maximize flexibility.
| WIRE
GAUGE DIAMETER TABLE |
| American Wire Gauge (AWG) |
Wire Diameter (in.) |
| 18 (smaller) |
0.040303
|
| 16 |
0.0508214 |
| 14 |
0.064084 |
| 12 |
0.08080810 |
| 10 |
0.10189 |
| 8 (larger) |
0.128496 |
| AWG gauge |
Diameter Inches |
Diameter mm |
Ohms per 1000 ft |
Maximum amps for power transmission |
| 1 |
0.2893 |
7.34822 |
0.1239 |
119 |
| 2 |
0.2576 |
6.54304 |
0.1563 |
94 |
| 3 |
0.2294 |
5.82676 |
0.197 |
75 |
| 4 |
0.2043 |
5.18922 |
0.2485 |
60 |
| 5 |
0.1819 |
4.62026 |
0.3133 |
47 |
| 6 |
0.162 |
4.1148 |
0.3951 |
37 |
| 7 |
0.1443 |
3.66522 |
0.4982 |
30 |
| 8 |
0.1285 |
3.2639 |
0.6282 |
24 |
| 9 |
0.1144 |
2.90576 |
0.7921 |
19 |
| 10 |
0.1019 |
2.58826 |
0.9989 |
15 |
| 11 |
0.0907 |
2.30378 |
1.26 |
12 |
| 12 |
0.0808 |
2.05232 |
1.588 |
9.3 |
| 13 |
0.072 |
1.8288 |
2.003 |
7.4 |
| 14 |
0.0641 |
1.62814 |
2.525 |
5.9 |
| 15 |
0.0571 |
1.45034 |
3.184 |
4.7 |
| 16 |
0.0508 |
1.29032 |
4.016 |
3.7 |
| 17 |
0.0453 |
1.15062 |
5.064 |
2.9 |
| 18 |
0.0403 |
1.02362 |
6.385 |
2.3 |
| 19 |
0.0359 |
0.91186 |
8.051 |
1.8 |
| 20 |
0.032 |
0.8128 |
10.15 |
1.5 |
| 21 |
0.0285 |
0.7239 |
12.8 |
1.2 |
| 22 |
0.0254 |
0.64516 |
16.14 |
0.92 |
| 23 |
0.0226 |
0.57404 |
20.36 |
0.729 |
| 24 |
0.0201 |
0.51054 |
25.67 |
0.577 |
Speaker wire: What gauge do you
need
The thickness of a wire's copper bundle is identified by
its "American Wire Gauge" (AWG) number. The lower the gauge, the thicker
the wire, and the better its capacity to pass the amplified audio signal.
Most speaker wire today ranges in thickness from 12 to 16
gauge.
When choosing speaker wire, keep in mind the distance
between your receiver (or amp) and your speakers long wire runs can
cause significant power losses, and thus require thicker cable. In
situations where you can't avoid long wire runs to your speakers,
thicker wire reduces the overall resistance, lightening the load on your
receiver or amplifier.
If you're buying a modestly priced system, or if your speakers are
located relatively close to your receiver, standard 16-gauge wire may be
all you need.
You can use the following chart as a general
guideline:
| Distance from
amplifier to speaker |
Gauge |
| Less than 60 feet |
16 |
| 60 to 180 feet |
14 |
| More than 180 feet |
12 | |
How much speaker wire do I need
Determining how much speaker wire to buy is a
simple process. One method is to run a string from your receiver location
to each of the locations of your speakers. Pull a string along any
doorframes, corners, etc. in the wire path. Now measure the string length
from receiver to speaker. Repeat the process for each speaker. Add a
couple of feet to each just to be on the safe side.
How do I connect my
speakers
Speaker wire consists of two leads, typically
encased and bundled in plastic insulation, one for the positive signal,
and one for the negative. Your speaker wire will probably be marked in
some fashion like (+) and (-) or if not, you can look for colors or wire
types to help you distinguish the two leads. Low cost speaker wire has a
copper color wire and a silver color wire (actually just tinned copper) to
help you connect it correctly.
The two wires connect to the
two terminals on the back of the speaker and then to the positive and
negative posts on the back of the receiver. Do this for each speaker in
your system, connecting the proper speaker (center, left front, right
front etc.) to the correct place on the back of the receiver. Remember to
connect positive (speaker) to positive (receiver) and negative (speaker)
to negative (receiver). Positive terminals are typically red and negative
terminals are typically black.
A/V Receiver's speaker connections
on back panel
click image for larger view
Speaker
Terminals
Speaker wire connectors help safeguard against
short circuits. When loose strands from a bare wire's positive and
negative leads accidentally touch, your receiver can shut down, or even
suffer serious damage. Also, speaker wire connectors maintain more of a
corrosion-free contact with the terminals and speakers, unlike bare copper
wire, which may corrode.
Make sure your speakers have compatible
terminals for the intended speaker wire connectors. See speaker wire connectors.
Unsightly
speaker wires annoy you
Hiding your speaker wire inside your
walls, under floors, or in the ceiling is an option. You could try doing
this yourself but calling in a professional installer is always a second
choice.
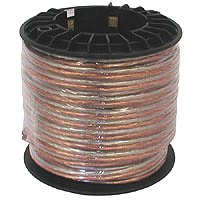
Speaker
Cables
The Speaker Cable is used to connect a powered
output of an amplifier to the
speaker.
|
PREMIUM ELECTRICAL CONDUCTORS RANKED
1 Silver
2 Copper
3 Gold
4
Aluminum
5 Platinum
6 Lead |
#1 BEING THE BEST CONDUCTOR
| |
|
Bare copper stranded, twisted pair conductors each
individually jacketed with an overall round jacket added for
durability. Available in 18 gauge, 16 gauge, 14 gauge and 12
gauge.
|
| WHY HAVE COLORS
* Color coding Subwoofers, Lows, Mids and Highs
* Color code different lengths for easy identification. ie: (25'
= Blue) (30' = Red), etc. |
ZIP SPEAKER CABLE
Uses two parallel connectors, one tinned, the other bare copper
for ease of identification. Uses rugged PVC jacketing material and
standard nickel plated 1/4" connectors, Zip Speaker Cable is the
best value in the industry. Available in 18 gauge, 16 gauge and 14
gauge.
|
- Speaker cable.
- Unshielded.
- Conductors: 2
- Gauge Size (AWG): 16
- Conductor/Strands: 19/.0117
- Jacket: PVC
- Temperature Range: -20C to +75C
| Conductors
(1) Bare Copper
(1) Tinned Annealed Copper
Stranding
16/30 Awg (18 Gauge)
26/30 Awg (16 Gauge)
41/30 Awg (14 Gauge)
Jacket - PVC
Voltage - 300 Volts Maximum DC/AC
RMS | |
If you are making bare-wire connections or adding your own
terminations (banana plugs, spade lugs, etc.), go to the hardware store
and invest in a wire cutter/stripper. It will resemble a pair of pliers
with notches for cables of varying thickness.
Be sure that
your receiver is compatible with the speakers you attach to it. Primarily,
this means ensuring that their impedance is not lower than the receiver is
designed to handle. Just about any decent receiverincluding those that
indicate you must use speakers of 8-ohm or higher impedancewill work fine
with speakers with impedance ratings of 6 ohms or greater. In the event
your speakers are rated at 4 ohms, however, you should check with the
receivers manufacturer if there is any question. (Unfortunately, the
warning labels on the receivers themselves are often excessively
conservative, to meet UL requirements.) Otherwise, you may find that your
system will not play as loud as you would like or that the receiver
overheats sometimes and shuts itself down; in extreme cases, it may even
be damaged.
Video Interconnects
Youll find that
three different types of video connections are in common use today:
component video, S-video, and composite. Component-video connections offer
high picture quality. Only quality A/V receivers support this type of
connection, along with some DVD players, DTV receivers, and TV sets. Use
them if you have a digital television set or a high-end analog set with
component inputs as well as source components with component-video
outputs.
Component-video connections are made with a trio of RCA
phono jacks, color-coded red, green, and blue. You can buy pre-bundled
component-video cables, but three ordinary 75-ohm video cables (often
color-coded yellow) will work. Don't use audio cables, however, since they
do not have the correct impedance.
S-video is a small step
down from component in quality and a fairly large one up in convenience.
Connections are made with a single multipin plug and socket. Look at the
plug carefully to find the notch and plastic pins that orient correctly in
the socket. Then push gently and firmlybut only when you're sure it's
going in straight.
Almost all A/V receivers now support
S-video switching for at least one or two inputs. The only VCRs that
consistently have S-video connections are S-VHS models, but you can expect
almost all other common video sources, including DVD players and satellite
TV receivers, to have S-video outputs.
Composite (not to be
confused with component) is the lowest-common-denominator video
connection. It is the easiest to make, requiring only a single 75-ohm
coaxial cable terminated with RCA plugs, usually yellow colored. See
cable
connections.
Audio
Interconnects
Generally speaking, every selectable input on
your receiver will have an associated stereo pair of analog audio inputs,
which will be ordinary RCA jacks. Be sure to connect these for any analog
source components, such as VCRs, cassette decks, and so forth. You may or
may not want to connect them for digital sources, such as CD and DVD
players and satellite TV receivers. If you have enough digital inputs, you
will probably find it more convenient to use them instead.
In
the case of components that deliver Dolby Digital signals, such as DVD
players, you will have to use a digital connection to get discrete
multichannel surround sound. If you want to make analog recordings from a
digital source, such as from a CD player to a cassette deck, you will
normally need to make the analog connections even if you intend to use a
digital link for normal listening. This may also be necessary for
recording to digital recorders through the receiver, if the receiver does
not supply a digital recording output for this purpose.
One
important thing to note is that turntables (used to play vinyl phonograph
records) must be connected to a special set of analog inputs labeled
"phono." If you connect it to one of the other (line-level) inputs, the
sound from the turntable will be bass-shy and very low in level. All of
the other analog inputs are the same in terms of their electrical
characteristics, and you should use those for connecting analog sources
other than turntables.
Connect your CD player to the input
labeled "CD," and so forth. Recording devices, such as cassette decks,
should be connected to inputs labeled for recorders or "Tape." These will
usually have an associated set of outputs to feed signals from other
sources to the recorder. Most receivers also have one or two inputs
labeled "Aux" or "Auxiliary" to handle miscellaneous analog
sources.
Gold-plated connectors offer superior corrosion
resistance if both jack and plug are so finished. To the extent possible,
try to match gold plugs to gold sockets and nickel plugs to nickel
sockets, as this will yield the most reliable long-term
connections.
Digital audio connections come in two
different types: coaxial and Toslink optical. It doesnt matter which type
you use, so long as its the same at the source and receiver ends. That
is, coaxial outputs mate only with coaxial inputs and optical only with
optical. Coaxial digital connections should be made with 75-ohm cable,
which normally will be labeled for video or digital audio use; do not use
ordinary analog audio cables. Optical connections are made with
fiber-optic cables. The digital inputs on most receivers will
automatically detect what kind of signal is coming into them and respond
appropriately. Some, however, may have only one or two digital inputs that
can accept Dolby Digital signals. In that case, make sure to attach Dolby
Digital sources, such as DVD players, to digital inputs labeled for Dolby
Digital (often with the double-D Dolby logo).
If your
receiver does not have enough digital inputs for all your digital audio
sources, you may plug the digital output from your CD player directly into
the digital input of your CD-R recorder, the CD-R's analog output into
your receiver, and monitor or play recordings that way.
A/V
receivers normally have a line-level output generally labeled "subwoofer
output" designed to feed the input of a powered subwoofer. If you have a
powered subwoofer in your system, connect it to this output. You may need
to buy a long interconnect cable for this purpose. Even if the sub has two
line inputs, one connection will usually do. Finally, a good rule of
thumb: Connect outputs to inputs and inputs to outputs. Never connect an
output to another output!
Many A/V receivers have six-channel
analog inputs designed to accept the output from an external 5.1-channel
surround decoder or from multichannel music sources, such as DVD-Audio or
Super Audio CD (SACD). Simply match the output jacks on the decoder or
player to the multichannel input jacks on the receivers and run ordinary
audio interconnects between them.
Some receivers have preamp
outputs that enable you to feed a system in another room or to upgrade by
using more powerful external amplifiers in place of the amps built into
the receiver. If these are connected to the internal amplifiers by
jumpers, you will have to remove the jumpers before proceeding. Again,
simply match outputs to inputs in this case, preamp outputs to amplifier
inputs.
Special Connections
To get Dolby Digital out
of a laserdisc player, you will need either an AC-3 RF input on your
receiver (a rare feature) or an external AC-3 RF demodulator to go between
the laserdisc player's AC-3 output and one of your receivers standard
digital inputs. Plug the LD player's AC-3 RF output into the matching
input on the receiver or external RF demodulator. Note that on laserdisc
players the AC-3 output is separate from the standard digital outputs. If
you have a turntable, its delicate low-voltage signal should go only into
the receiver's phono input, which typically will accept moving-magnet
phono cartridges (a few receivers switch between this and the moving-coil
type of cartridge). The turntable's ground wire should go into the
receiver's ground terminal to prevent hum.
Hook up the AM and
FM antenna supplied with your receiver (the AM antenna may be built in)
into the appropriately labeled terminals. The receiver's FM input may be
either 75-ohm (which typically accepts an "F-type" RF connector) or 300
ohms (accepting bare wire or spade connectors). An adapter, if needed,
will likely be supplied with the receiver. Consult the
manual.
Operation
Testing your
home theater:
When you first power on the receiver,
select the FM tuner to see if you can get any sound from the speakers.
This is a good place to start because the speaker connection is less prone
to errors. Even FM static will verify your speakers are working. The next
step is to turn on each signal source (DVD, VCR, CD, etc.) and make sure
its picture or sound output goes through the receiver to the TV and the
speakers. Also make sure recording devices (VCR, cassette, etc.) are able
to get signals from the receiver.
Many A/V receivers
incorporate what is known as bass management. That is, they allow you to
apportion where the bass in the various channels go according to the
capabilities of the speakers. This is possible because we tend to localize
sound sources based on middle and high frequencies more than low
frequencies.
Next you should go into the setup menu and
adjust the bass management. Normally this will consist of indicating
whether or not there is a subwoofer in the system (subwoofer on or off)
and what the bass capabilities of the front left/right, center, and
surround speakers are. (Assuming the system has center and surround
speakers. If not, these should be set to "Off" or "None" in the
menu.)
If a speaker has limited low-frequency output
capability, you should designate it as "Small." Almost all center and
surround speakers fall into this category.
Speakers with good bass
capability may be designated as "Large," but if you have a good subwoofer
in the system, you may find that you get best results with all the main
speakers set to Small. If there is no subwoofer in the system, you should
make sure that at least the front left and right speakers can handle a
decent amount of bass and be set to "Large". If you plan to use your
receiver's surround capability, you'll need to adjust the channel balance
among the speakers. Using the remote, activate the receiver's internal
test signal. Adjust the center and surround channels so that they are the
same level as the front left and right speakers. A sound-level meter (such
as the Radio Shack model, catalog number 33-2-50) can be a helpful and
inexpensive way to guarantee the accuracy of your settings, which are
critical to good surround performance. Set the meter to C-weighting, slow
response and hold it so the microphone is at seated ear height at the
listening position, pointed toward the ceiling. Then change the level
settings on the receiver until the outputs from the speakers in the system
are as close to the same as you can get them. Some receivers (including
all THX models) include a test signal for calibrating the level of the
subwoofer.
Finally, you will need to adjust the delays to the
surround speakers and possibly to the center speaker. Your receivers
manual will have explicit instructions on how to do this.
The above
is a very general guide to receiver installation and setup. Every model
has its own feature complement and idiosyncrasies. So make sure you
consult your receiver's manual before and during this
process.
Columbia ISA Audio Video
Empowering consumers through
information.
columbiaisa@yahoo.com
|