
 |
• VCR Basics - Recording VCR Guide DVD/VCR Combo Set VCR Clock Copy digital images to VCR Video Cassette Recorder - VCR User Guide Magnetic tape medium for magnetic storage of information, made of a thin, magnetizable coating on a long narrow strip of plastic film, was developed in Germany in 1928 for recording sound by Fritz Pfleumer. Later, Charles Ginsburg, Ray Dolby, and Fred Fost, developed the first broadcast-quality video tape recorder (VTR) in the mid-1950s. Used in broadcast TV stations, the VTR was too expensive for home consumer use. In 1965, SONY introduced the first VTR for home use. In 1969, SONY introduced the video cassette to replace the cumbersome reel to reel format used in VTRs. By November 1975, the SONY Betamax VCR was selling successfully and consumers were using these machines to record analog TV broadcasts. The "time shifting" recording allowed for the first time, to view a TV show at a time the consumer wanted to watch it instead of only being able to view at the time of broadcast. The VCR was designed to record and playback TV broadcasts using magnetic video tape in a cassette format. Pre-recorded movies could also be played. Sony VCRs first used the Beta format while others used the VHS cassette. VHS eventually dominated home VCRs and even Sony made VHS VCRs. 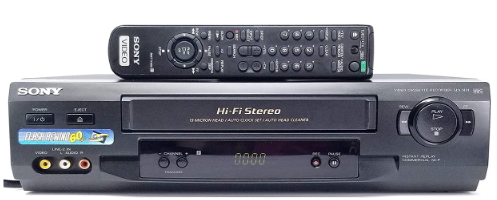 Hi-Fi Stereo VCR with on-screen display, jog shuttle control, VCRplus+, auto clock-set, built-in cable ready tuner and 8-event programming. The front of the VCR has controls for Power on/off, Play, Stop, fast-forward, Rewind, Eject and Record. The large flip door opening is where the cassette is inserted for play/record or ejected when finished. The remote control will have additional control buttons. 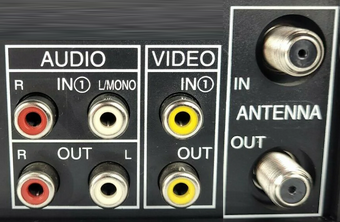 The rear of the VCR has two RF connections (coaxial cable), one input and one output. Also there will be RCA video (yellow) and audio (white/red) connections, inputs and outputs. VCR Tape Path When the VHS cassette is inserted into the VCR, the tape is pulled around the heads for playback or recording. As the tape moves past the heads the information (video and audio) is recorded or played back. The video heads are spinning and slightly tilted so that a helical scan can maximize the tape usage. Audio is recorded in the traditional linear fashion. 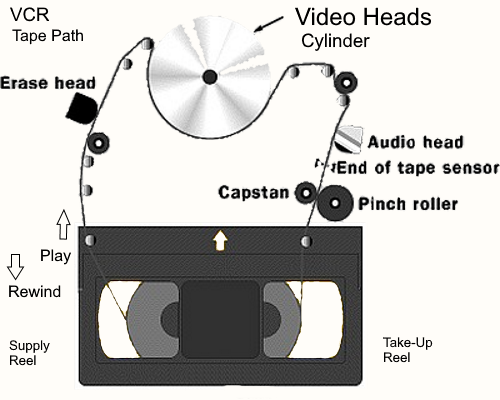 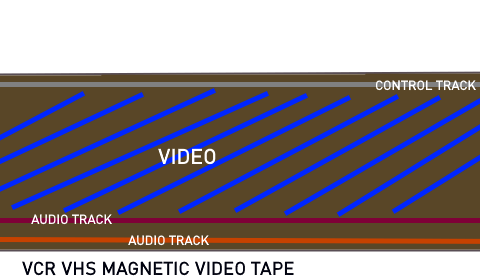 Playing a VHS Tape 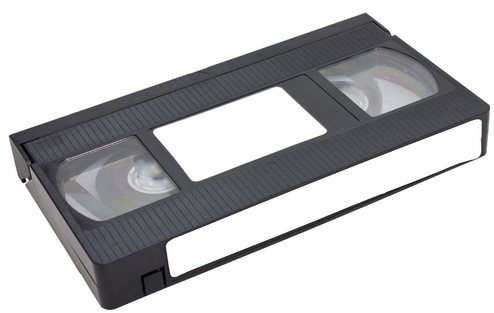 To play a VHS tape, the VCR has to be connected to a TV. How you connect depends on the type of TV. 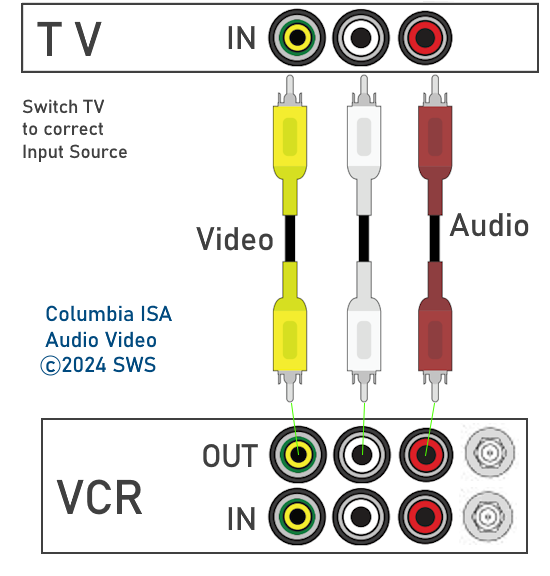 If your TV has RCA yellow, white/red inputs, then connect the RCA cables from the VCR OUT ports to the TV inputs matching the colors. Select the source input on the TV using the TV remote which matches the VCR cable connections such as "AV" for example. Connect the cables then power on the TV and VCR. Insert VHS tape into the front slot firmly until it goes all the way in and the flip door closes. Press PLAY on the VCR. • How to connect VCR to TV  How to insert tape into VCR First-time VCR setup Many brands of VCR need an initial setup, sometimes even after being unplugged from AC power. The channel setup process (what channels are available), setting the clock and the input signal selection (AIR/CABLE) are examples. Make sure this is completed before attempting to record. A VCR has an NTSC analog TV tuner built-in, meaning the VCR can tune in the old analog TV channels 2 thru 13 and 14 thru 99 and sometimes even more, over 125. However, this tuner cannot receive the newer digital TV broadcasts. You must use a DTV converter which can tune the ATSC digital TV channels, convert them to analog and send to the VCR for recording. 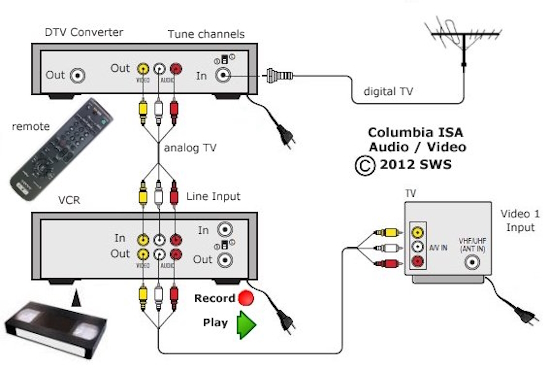 Most digital cable TV and DBS satellite TV providers scramble their channels and you therefore need a converter/receiver box to decode the signals before you can record them. The converter boxes typically provide a composite or RF output so you can hookup your VCR or DVD recorder. The following guidelines consist of general VCR operation information. Because there are so many different brands of VCRs available, not all of these guidelines may work for your particular component. For additional information regarding your VCRs operation, please consult your VCR owner's manual. If you want to record TV programming from a cable or satellite converter/receiver box, please see the following instructions for installing a VCR. 1. Connect cable TV or satellite TV signal cables (coming from wall outlet) to the cable/satellite TV receiver input labeled "Satellite In" or "Antenna In." 2. Connect a RF coaxial cable to the "Out To TV" output post on the back of the cable/satellite TV receiver and connect the other end of this cable to the "Antenna/Cable In" input post in the back of the VCR. 3. Connect a RF coax cable to the "Out To TV" post on the back of the VCR and connect the other end of this cable to the "ANTENNA IN " post on the back of the TV.
Connections for recording local over-the-air TV broadcasts 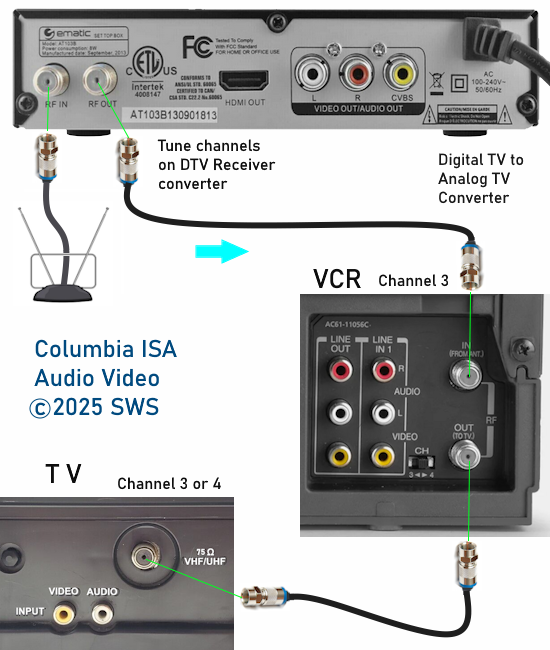 An alternative would be to connect the VCR's yellow, white, red RCA OUT cables to the TV's yellow, white, red IN ports. Be sure to select on the TV, the correct source input. For a TV with only HDMI inputs, you can use a RCA to HDMI adapter. These are available online and are inexpensive. 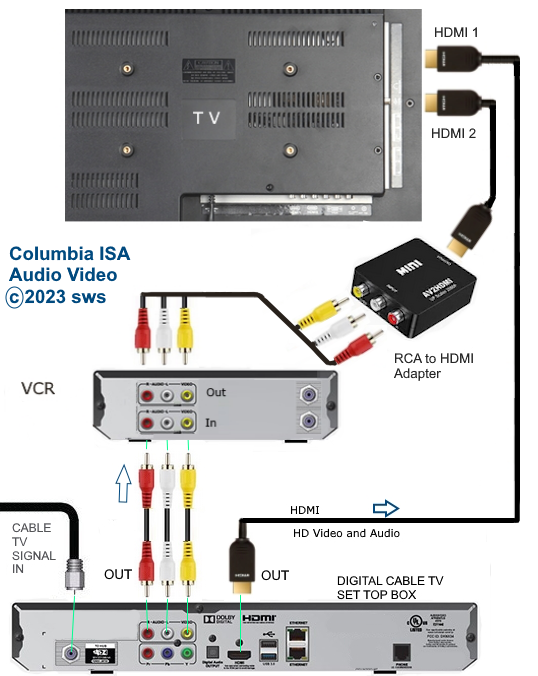 About VHS videotapes 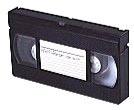 Videocassettes come in various lengths which translate to recording capacities of about 2 hours to 8 hours for VHS. Make sure the tape you choose to use has enough recording time for the TV show you want to record. Also be sure to check if the tape you are using has been previously used to record something you want to keep. If this is the case, fast forward to a point on the tape to prevent recording over your prior TV show. If it looks like you will not have enough tape to record the next TV program, your best option is to use a new blank videocassette. 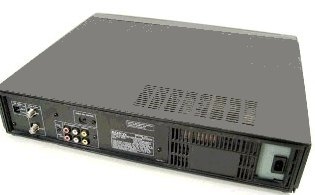 The back of the VCR has connections for coaxial cables and RCA audio/video cables (IN and OUT). Recording a TV program How do I program my VCR? • VCR Basics - Recording To record on a VCR, you need a source such as broadcast TV signals from local TV stations or satellite TV, cable TV or other sources. The VCR has an analog NTSC TV tuner, now outdated for TV broadcast reception due to the switch to digital TV broadcasts. The newer digital ATSC broadcast TV signals require a DTV converter box in order to send analog signals to the VCR so you can record over-the-air TV programs. 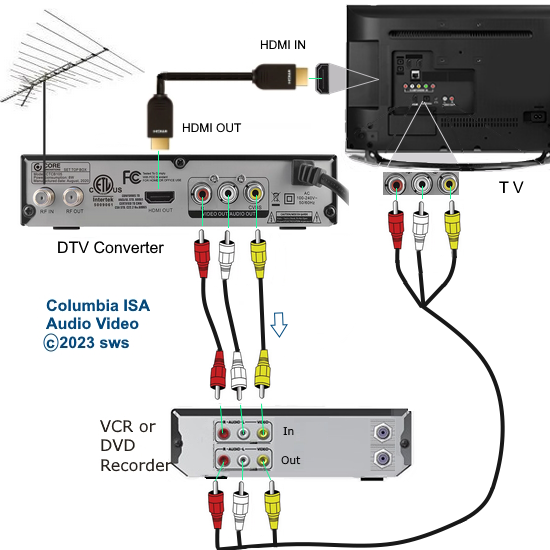 Select on the VCR and the TV, the correct source input. The VCR must have an input signal. This can be ANT for over-the-air antenna or CABLE using a coax cable TV signal or a satellite TV signal from a converter box or a converted to analog signal from a streaming device (HDMI to RCA) or a video game console or any device that outputs RCA composite signals or can be converted to composite audio/video signals. 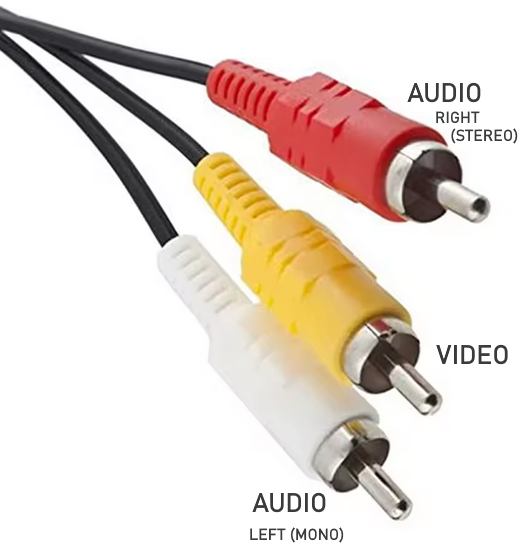 Composite audio video RCA cables The DTV converter box needs to have a saved list of your local broadcast TV channels. Perform a "Channel Scan/Search" to find and save your local TV channels on the DTV converter box. This may take a few mins.  The VCR must be connected properly. Coax cables or red, white, and yellow composite video/stereo audio RCA connector cables can be used. The 3-cable RCA hookup allows better video than the RF coax connection and also allows stereo audio. A TV with only a RF coax cable input will not yield stereo sound from the VCR, only mono sound. Using an S-video cable hookup instead of the yellow composite video will yield better video. The TV and the VCR must both have this port/jack to be able to benefit from an S-video connection. Recording "LIVE": 1. Power on the VCR and the TV. 2. Load a blank videocassette into the VCR. 3. Tune the TV to channel 3 or 4 if using a RF coax cable from the VCR to the TV. If using the audio/video RCA (yellow, white/red) phono cables, then select "VIDEO" or "AV" on the TV and on the VCR, "L1" or "L2" using the VCR remote control (Input Select). Some VCRs have channel UP/DOWN buttons on the front panel. Pressing the UP or PLUS button or the DOWN or MINUS button for channel selection on the VCR should increase or decrease the channel number until you reach the end of channels where the next selection is the L1 or LINE 1 input. Pressing again gives you the L2 input and next push starts at the VCR tuner's channels again. 4. Set the VCR to the channel you want to record. If the converter box is outputting on channel 3, then select channel 3. This would be the case if you are connected using coaxial cable RG-6 on the round silver threaded port. Note: In the case of an input signal from a converter box such as satellite TV or Cable TV, the VCR needs to be set on channel 3 or 4 if using an RF coax cable, or LINE input if using a audio/video cable. The converter box needs to be set on the channel you want to record. The cable connecting the converter box to the VCR input will provide the signal source. Make sure the VCR is set to "VCR" in the "TV/VCR" function. 5. Select the record speed on the VCR. SP is standard or best quality and EP is extended or long for the lower quality but longer recording times. 6. When you want to begin recording, press REC on the VCR or VCR's remote control. Recording will begin unless the cassette is protected with the safety tab. To cut out commercials, press PAUSE and then PAUSE again to resume recording. 7. When finished, press STOP, REWIND then EJECT. Unattended or "overnight" recording: TV shows can be recorded automatically at a pre-determined time/date. The VCR's clock must be set to the correct time and date. Programming a VCR to record TV shows while you are away (time-shifting). Watch your TV program at your own convenience, later the next day or next week. Never miss an episode again and archive episodes for the future. Different brands of VCR use various specific sequences of steps to setup an unattended recording, but the process used by all brands ultimately leads to accomplishing the following: Basically you need to setup the VCR so that it starts recording at a specific time on a specific day for a specific input signal. Usually pressing the MENU button on the VCR remote enters into the main menu where you can accomplish the process of setting these parameters. 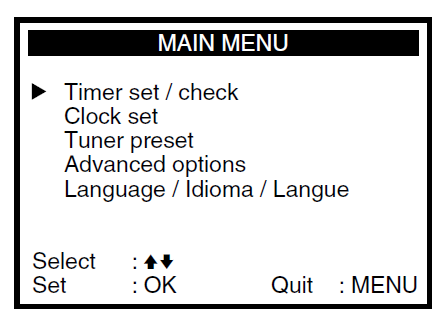 Use the arrow buttons on the VCR remote UP/DOWN/LEFT/RIGHT to navigate to your selection and the OK or ENTER button to select. Use the INPUT SELECT button on the VCR remote to switch between LINE inputs (L1 or L2) or the channels input. L1 is usually the rear RCA input connection and L2 is the front RCA inputs if available. 1. Set time of day in hours and minutes and day. 2. Set channel to record from. 3. Set start time and stop time. 4. Set to record only once or every day or weekly. 5. Set recording speed (SP, EP) Most VCR remotes have a button such as MENU or GUIDE which enters the on-screen setup options function. You do all the setup functions in this way using the arrow keys to move up, down, forward, backward. Setting the clock and date is done in this way.  On-screen menu. Depending on your brand of VCR, your on-screen menu may appear differently. 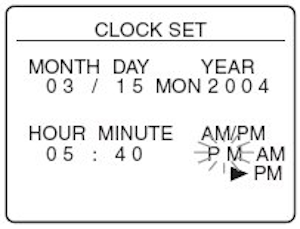 TIMER PROGRAMMING is also done thru the MENU. The "arrow" keys may be PLAY or STOP or ENTER or SELECT depending on your brand of VCR. Consult owner's manual for which keys to press or use trial and error approach. Usually you can program multiple events enabling you to accomplish more than one unattended recording. Sometimes the settings will be auto-filled by your VCR which makes it easy. You just have to move forward to the next field. For example, the start time may be auto-filled to the current time. After setting the start and end times, channel etc. , press MENU again to exit the setup. If you make a mistake or want to change a setting, press MENU - go into TIMER PROGRAMMING, skip down to the field to change and press key to make your change, then exit by pressing MENU again. You can check your settings anytime by going into MENU - TIMER PROGRAMMING again and looking at your settings to make sure they are correct. 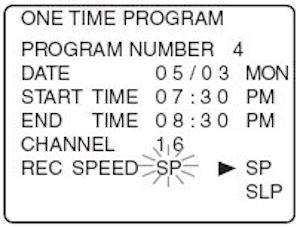 Using your VCR remote control, fill in the date, start and end times, channel to record and speed. 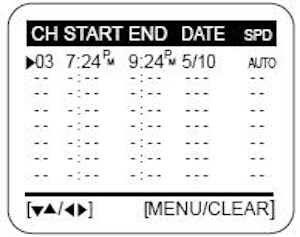 Your brand of VCR may have a menu that looks like this. Make sure you have a videocassette loaded and ready to go, then turn VCR power OFF to activate the timer. You should now see a "TIMER" indicator on the VCR. This shows you the VCR is set to record unattended. When the day/time you have setup occurs, the VCR will automatically record the TV show on the channel you setup and stop recording according to your set "end time". You can easily change your settings, if desired, anytime up to the event start day/time by powering ON the VCR and ejecting the tape if desired and then make your changes or even cancel the entire event program. The only other thing you may need to do is stop an unattended recording IN PROGRESS. Most VCR brands today will have some sequence you can execute to do this if required. For example, Press the power ON button and immediately press the STOP button. This will stop the recording process on some brands of VCR. How to record from the DTV converter box to the VCR unattended/overnight The DTV converter box usually has an option in the TIME on-screen menu to POWER-ON at a preset time. Enable this option and set a time to power ON about 5 mins. before the time you want to record the TV show. Use the 24 hour clock times (5 PM=17:00). Be sure the Region (Central, Eastern, Mountain, Pacific) is set correctly for your location. Be sure Daylight Savings Time is set correctly. The alternative would be to leave the converter box powered ON and set to the channel you want to record.  Press MENU on the DTV converter box remote, skip over to TIME, skip down to Power ON, Enable and use number buttons on DTV remote to enter the time to power ON the converter box. 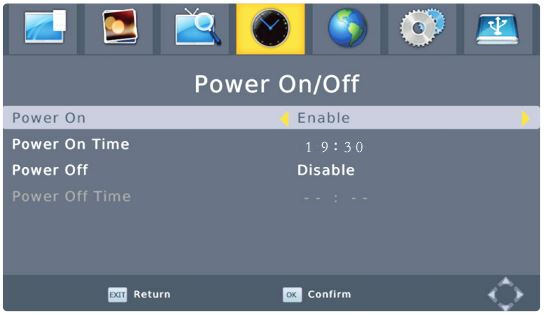 Press the "OK" button to confirm and the "EXIT" button to return. The DTV converter box will power ON at the set time and if the VCR is setup to power ON at the same time, the VCR will record the channel the DTV box is tuned to. You can also set the POWER Off time on the DTV box. Setup the "Timer Record" on the VCR, date, start time, end time, the channel would be L1 (LINE 1) if using the RCA cables connections (yellow, white, red) from the converter box to the VCR. If using the coaxial (RG-6) cable from the DTV coax output to the VCR RF coax INput, then set the VCR to record channel 3 (or 4). Some models of VCR may designate the RCA INputs under a different name than L1. The converter box will power on at the preset time and be set to the last channel you viewed. The VCR will power on at the preset time/date and begin recording whatever the DTV box is sending.  VCR set to record L1 input at 8PM on Sept 30.  Diagram - DTV converter to VCR to TV cable connections DTV box recording to USB thumb drive 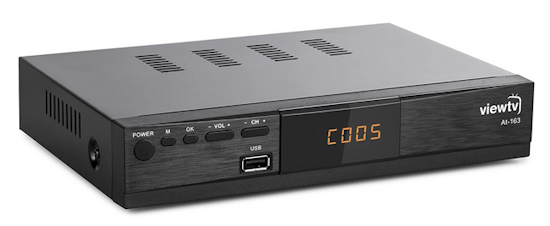 DTV Converter box - digital to analog (front USB port) 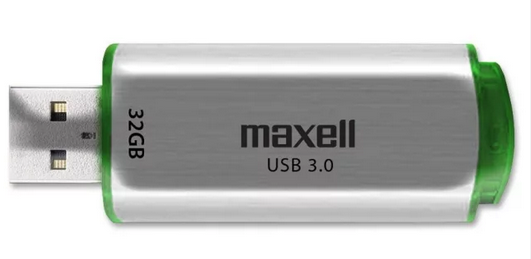 USB Thumb (Flash) Drive - 32GB Maxell Most DTV boxes can record to their own built-in USB drive port. There may be some limitations. The portable USB thumb drive must be formatted first. Insert your new or blank USB thumb drive into the USB slot on the front of the DTV box. From the main menu on the DTV box, skip over to the USB section (USB icon) and scroll down to "PVR Configure". Press "OK".  Next, go down to "Format". Press "OK". Next, wait for the USB drive to be formatted. Then Exit. To record the current channel, press "Record" button on the DTV remote. To view the recording, go to Menu, then USB, and select "Multimedia" and then "PVR". For previous recordings on the USB drive, it may take some time for all the data to be read/loaded so be patient. You should see your recordings listed. Look in the HBPVR directory. 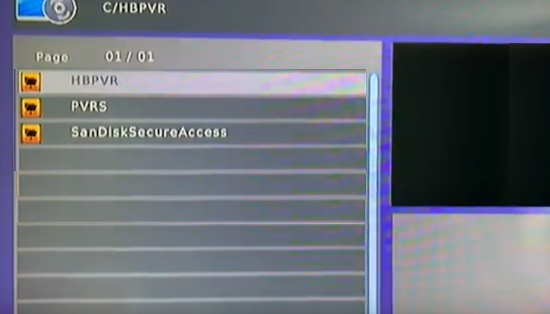 Select to view on the TV. Press "PLAY" for fullscreen or "OK" for preview. Press "HOLD" for fullscreen/preview toggle. Press the "STOP" button on the DTV remote to end viewing. To erase a recording, press the "EPG" button and "OK" to confirm. Press the "RECALL" button to go up a folder. Press the "EXIT" button to return. DTV VIEWTV AT-163 Remote Control  Navigation arrow buttons Up/Down/Left/Right and center select/OK button. Channel Up/Down and Volume Up/Down  VCR back panel cable hookup 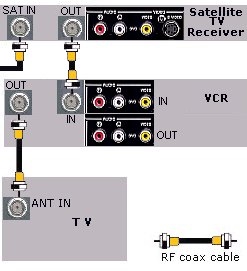 Hookup using coax cables. The VCR gets the signal from the satellite box. Tune VCR to channel 3 or 4. Tune TV to channel 3 or 4. 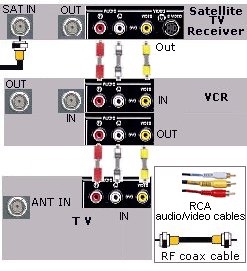 Hookup using coax and RCA cable connectors. Select VIDEO or LINE input on TV with TV remote. Select LINE input on VCR with VCR remote. With this setup you get stereo sound. TV VCR HOOKUP DIAGRAMS VCR cable hookup VCR Plus+ The VCR Plus+ feature is now outdated and not used anymore. Some VCR models have a built-in feature called "VCR Plus" which was designed to help you setup your TV show recording without entering each piece of required information yourself. Instead you entered a code, which you get from your local newspaper TV listings or TV GUIDE, for the show you want to record. The code for a particular TV show is all you need to enter and the VCR handled the rest, recording the TV show at the start time, on the channel it is shown on and stopping at the end of the show. Some people find this method easier than programming the VCR the old standard way. One possible glitch with this method is you have to "map" your channels locally. This only needs to be done once but if it is not done you may end up with a recording of the wrong channel. Refinements of VCR PLUS include VCR Plus Silver and VCR Plus Gold. VCR Plus+ had become a standard feature. VCR Plus+ lets users program the VCR by entering the PlusCode numerical codes that are found in many newspapers, television listings, as well as in every edition of TV Guide. Some VCR models feature VCR Plus+ Silver. Others offer VCR Plus+ Gold. VCR Plus+ Silver automatically set up the VCR by mapping all receivable channels according to your entered zip code (AllSet Automatic Channel Mapping.) VCR Plus+ Gold added control of cable TV and satellite TV boxes. More details on VCR Plus+ VCR FAQ How do you set-up the YEAR for unattended recording when VCR only has limited YEAR available? How do you set-up the Guide channel setting for VCR Plus+? How do I make a copy from a camcorder to a VCR or from one VCR to another VCR? I cannot bring up my VCR's On-Screen menu. The MBR remote for my VCR has no code listed for my brand of TV. Is there another code? Will a TV or VCR designed for use in the U.S. work overseas? What is quasi S-VHS playback SQPB? What is a TBC (Time Base Corrector)?
My VCR will not turn on and the Timer indicator is flashing. How do you set-up the Guide channel setting for VCR Plus+? Individual cable companies use different channel numbers for various cable stations. For example, one system may assign HBO to channel 14, on another it may be channel 24. The manufacturers of VCR Plus+ assign one specific number to each cable channel; for HBO they use channel 33. The stations must be reassigned to those numbers consistent with those of your respective cable company. When setting Guide channel, the VCR Plus station number should appear under Guide channel and your channel should appear under listing VCR or Cable Channel. Guide channels will be found in your local TV-Guide. How do I make a copy from a camcorder to a VCR or from one VCR to another VCR? Connect the audio and video outputs of the playing camcorder, or VCR, to the audio and video input of the recording VCR. Set the recording VCR to AUX or Line Input setting. I cannot bring up my VCRs On-Screen menu. To bring up the menu on a VCR, set TV to video channel, either channel 3 or 4. Turn on the VCR, and press the "TV/Video" button on VCR remote. At this point the video indicator on the VCRs display should be lit; press Menu?. The Multi-BRand remote for my VCR has no code listed for my brand of TV. Is there another code? The only codes that are incorporated into the remote are listed in the instruction manual. If the code is not listed then the remote is not compatible. However, sometimes if you try all the codes, there may be a possibility one of the codes will operate your TV. I have attempted to copy a movie that I rented or own but the copy came out very dark or with no color. This is normal. The motion picture industry does not want unauthorized copying of their material whether owned or rented. They have encoded the tape with a signal known as Macro-vision or copy guard. When a copy is attempted the VCR picks up this signal and produces a poor quality copy. I cannot get Surround Sound. Surround sound requires a stereo source. A VCR cannot transmit stereo via channel 3 or 4 to a Television. It can only transmit stereo through the left and right audio inputs of the VCR. These may be connected directly to a surround sound receiver or to a television with audio/video inputs and outputs. When connecting to the Television audio and video inputs, make sure to connect the TV?s audio input to the audio out on the Receiver. Also with this connection remember to put TV in video mode, not on channel 3 or 4. Will a TV or VCR designed for use in the U.S. work overseas? TVs and VCRs designed for use in the U.S. traditionally use a broadcast system called NTSC. The NTSC system is primarily used in North America and Japan. Most other countries use either a system called PAL or SECAM. These three systems are incompatible with one another. An NTSC TV or VCR will not receive or playback information from a PAL or SECAM broadcast or tape. The same is true of the other systems. There are some TVs and VCRs, which are capable of handling all three systems, and both would be needed to play tapes of different systems. What is quasi S-VHS playback SQPB? SQPB is a feature that is available on some VCRs. This will allow you to playback a S-VHS tape on your regular VHS VCR. The resolution of the tape will play back in regular VHS mode. What is S-VHS ET? S-VHS ET (Expansion Technology) allows the broader-bandwidth S-VHS signal to be recorded on VHS tapes (High grade recommended). So you can easily enjoy high resolution images even when you record on VHS tapes. Once the tape is recorded in ET mode, that recording will not playback on a VHS VCR. You will have the ability to select the ET mode to off, if you do not want to record a certain tape with this technology. What is a TBC (Time Base Corrector)? The Time Base Corrector digitally removes jitter from fluctuating video signals to deliver a stable picture even with old tapes and rental cassettes. Contributes to improved dubbing quality and superior big screen images. What are 19 micron heads? These high-precision heads are only 19 microns wide to minimize cross talk during EP playback, contributing to sharper image contours and highly stable colors. My VCR only has 2 recording speeds: SP and EP. How do these compare to the 3 speeds (SP, LP and SLP) of other VCRs? The EP speed has the same ability of SLP of other VCRs. LP is generally not available anymore. My VCR will not turn on and the Timer indicator is flashing. If the Timer indicator is flashing you would need to press the Timer button on the remote control to dis-engage the timer and unlock the VCR. The same instructions apply if there is a cassette symbol flashing with the timer indicator. VCR means Video Cassette Recorder. A VCR plays videos and records shows from TV. The modern VCR standard media is the Video Home System or VHS, more commonly known as a videotape or videocassette. There are many features of a VCR. VCRs may connect to your television, cable TV box, satellite TV system and/or audio system. VHS and SVHSVHS stands for Video Home System, which is very simply, a videotape. A VHS tape is a small plastic rectangular device that has a roll of magnetic tape inside, just like an audiocassette tape. The standard resolution of VHS is 240 lines. A Super Video Home System or SVHS has a resolution of 400 lines, outputting better image quality. An SVHS VCR is recommended for use with high-quality satellite systems. Some VCRs are for VHS only, and therefore an SVHS tape played in one, will play at VHS quality. An SVHS video, on the other hand, can play both VHS and SVHS tapes. VCR HeadsA VCR head may be the most important piece inside your VCR. The VCR head is the part that comes into contact with the magnetic tape inside a VHS cassette. How many heads your VCR has affects the quality of recording, playing and pausing videotapes. The main difference is in transitions. With a four-head VCR, a pause is a clear still frame, as opposed to a fuzzy paused frame with a two-head VCR. Definitely get a four-head VCR if it will become part of your home theater system. As part of regular maintenance for your VCR, it's important that the head is cleaned. Since a video head comes into contact with so many videotapes, it tends to collect dust. Hi-FiHigh Fidelity or Hi-Fi refers to the quality of sound. The human ear can hear up to 20,000Hz of an audio frequency, and Hi-Fi provides 20-20,000 Hz. Good quality audiocassette tapes never reach Hi-Fi quality, and neither do non-Hi-Fi VCRs. If you plan to hook your VCR to a stereo system or want it to be part of your home theater system, definitely shop for a VCR that's Hi-Fi. Many movies are recorded with Dolby-encoded soundtracks. To enjoy the sound of these movies like they were meant to be heard, a Hi-Fi VCR is a must. Using high-grade videotapes are preferable with Hi-Fi VCRs to optimize viewing quality. VCR Plus+VCRs that have VCR Plus simplify recordings, and allow you to record from a particular television or cable channel just by entering a specific code. VCR Plus Silver allows you to create auto-channel mapping, matching your television channels with your VCR channels, and VCR Plus Gold has all these features and more for satellite TV connections. SpeedsSP, LP and SLP are all modes of recording speeds. A standard T-120 VHS tape records two hours of video on the SP mode, four hours with the LP mode, and up to six hours with SLP. Not all VCRs record in all speeds. If you plan to record long shows, make sure your VCR comes with speed adjustments. The slower the recording speed, the poorer the quality of video, but the more time you have to record on a single VHS. Inputs and OutputsAV or audio/video inputs and outputs are what you use to connect equipment like a stereo, television, satellite system, cable box, video editor and other devices to your VCR. Every VCR has at least one audio and video input and output. AV inputs and outputs are usually located on the back panel of any VCR, and some models have an AV jack on the front panel for easier access. If you just want a TV-VCR connection, then one output should be enough. Two or more input and output jacks are recommended if you plan to add your VCR to a home theater or stereo system. Multi-SystemMulti-system VCRs have the ability to play a videocassette from any country. In America, a standard in all videos is NTSC. Other formats are PAL, M-PAL, and PAL-SECAM. A Multi-system VCR will play some if not all of these formats. With another standard single-system NTSC VCR, you have the ability to transfer videotapes from one system to another, so they may work in other countries. If you often view tapes from other countries, or have business in transferring videotapes from one system to another, then you need a multi-system VCR. Remote ControlsMost VCRs do come with remote controls so that you may control your VCR while not standing beside it. Some VCRs come with an MBR or Multi-Brand Remote which functions like a universal remote, allowing you to function not only your VCR, but your television and even your cable box. If your VCR will be part of your home theater system, it's a good idea to find a VCR that has an MBR. Some VCR remote controls have functions like slow motion and fast-play that normally are not found on a VCR. TrackingThere are thousands of VCRs that have been used for recording movies, and hundreds of different brand names. Although basic functions are the same for all brands of VCRs, there are some differences in playing and recording. It is because of these differences that most VCRs have a tracking feature. Whether it's automatic or manual, you should always buy a VCR with adjustable tracking. Most newer model VCRs have an ATR or Automatic Tracking feature, while others have a manual knob or button for adjustment. It allows you to get rid of annoying lines and static that you may find on your screen while playing a pre-recorded video. Dual-Deck DevicesA dual-deck VCR is essentially two VCRs built in one machine. Made especially for dubbing purposes, most dual-deck VCRs function like any other VCR with a remote control and channel changing. Each deck has its own head, and is stacked either one on top of another or side-by-side. One-touch button features allow for easy and speedy dubbing. Auto-Head CleaningMany VCRs have a simple foam ring positioned next to the video drum which is used to "clean" the heads. However, as the VCR is used more and more, this method is simply not enough to get the video heads clean. A manual cleaning is required to restore the original video quality. This requires taking the cover off the VCR and using some alcohol on a cloth to get the dirt off the heads. If done carefully, this process can be accomplished by the consumer. For a detailed explanation see VCR CLEANING. 4-Head VCRs incorporate four record heads that allow you to see a jitter-free still frame, or advance the picture one frame at a time during playback. Noise levles from tapes are reduced as well. Hi-Fi Stereo VCRs provide theater-like stereo sound reproduction from both recorded tapes and broadcast TV. This feature enhances viewing since most newer rentals and TV shows are produced in stereo. A Hi-Fi stereo VCR an essential component in a home theater system. Super-VHS is a video format that records and produces over 400 lines of horizontal resolution. This format is ideal for recording the best picture and audio from standard "off-air" broadcasts, and is especially crisp when recording from a DSS system. Super VHS ET lest you record s-0VHS using standard high-grade VHS tapes. SQPB means you standard VHS deck can play back S-VHS tapes without the picture distortion that would normally happen when you try to play S-VHS tapes on a regular VHS VCR. VCRPlus+ with Cable Box Control lets you record basic and optional premium channels through the cable box your cable system provides. All you do is enter the codes found in most TV listings. VCRPlus+ programs the proper channel on your cable box and VCR, then turns them on at the proper time to record. VCR Plus GOLD automatically maps your channels for the cable system in your area. It makes setting up VCR Plus a breeze. Flying Erase Head allows you to produce "glitch free" starts and stops during recording. The advantage is clean images when going from scene to scene. A VCR with this feature is particularly useful when editing from a camcorder. Jog Shuttle is a circular dial control that allow you to have touch control over special effects playback. By turning the dial you can view the image a frame at a time. some units allow reverse viewing as well. This a great feature for a sports fan. Program Information Storage lets you know what programs are on the tapes you've recorded. Features such as Smart File and Program Index Search show you on-screen what program are on the tape included when the program was recorded, what channel, the length of the program and the title of the program. Now you won't miss any programs on your tapes because you forgot what was on them and recorded over them by mistake. Auto Clock Reset automatically sets the correct time on your VCR when you plug it in. It will also adjust itself for daylight saving time in the spring and fall. This assumes you live in an area where the time signals are broadcast (most PBS stations) or sent over cable. Commercial Advance/Movie Advance . Commercial advance automatically marks the commercial breaks on the program you've taped. when you play back the tape, the VCR will automatically scan past the commercial break and go back into play when your program resumes. Movie Advance automatically skips the previews at the beginning of movie rental tapes. Now you can start enjoying the movie you've rented right away.
|