| |
Home :
Cable Connections :
Audio Video Connections :
Copy VHS to DVD
Copying videotape - VHS to VHS
How do I copy a videotape? You may have
old Beta tapes or VHS tapes you want to put on a newer format media. You
may have 8mm/Hi8 or MiniDV camcorder tapes you want to put on DVD. All of
this can be done.
Copying from one VCR to another is easy. But
there are many ways to copy video and audio.
VHS to VHS VCR
(copy tape to tape)
Beta VCR to VHS VCR (copy tape to
tape)
VHS to DVD (copy tape to DVD)
Camcorder to VCR (copy tape to tape)
Camcorder to
DVD (copy tape to DVD)
Camcorder to computer to DVD
(copy tape to hard disk to DVD)
There are computer programs
which you can use to cut out/edit/modify your video before copying to DVD.
This way you can eliminate any video you do not want to share with family
or friends before creating the final version on DVD.
Copy a videotape to another
videotape:

You don't necessarily need two VCRs to make a
tape copy. You can use one VCR and a camcorder, or one VCR and a
videocassette player as the source. The two machines don't have to use the
same format. That means you can play an 8mm or MiniDV tape on your
camcorder and make a copy on your VHS VCR.
Basically what you have
to do is connect the source device (what's being copied from) to the
destination device (the newly created media or copy of the source) for
audio and video and then play the source and record on the
destination.
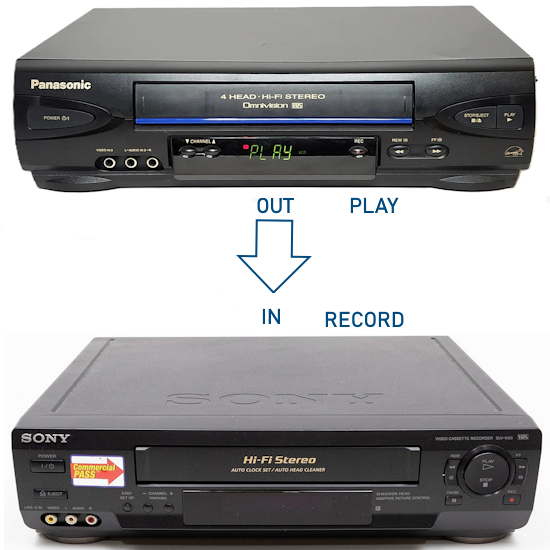
If you are using two VCRs, the hookup is
simple. Just connect the OUTPUT of the source (playing) VCR to the INPUT
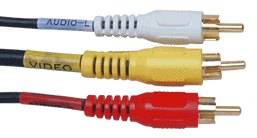
of the destination (recording) VCR. If both VCRs have RCA style
connectors, hookup a yellow RCA style video cable and two (red and white)
RCA type audio cables. For monophonic sound you only need one (white)
audio cable. These connectors are called "RCA" jacks or "phono"
jacks.
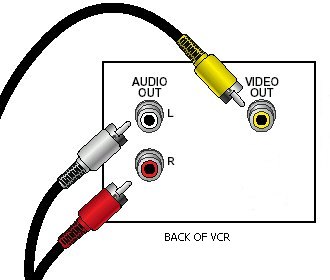
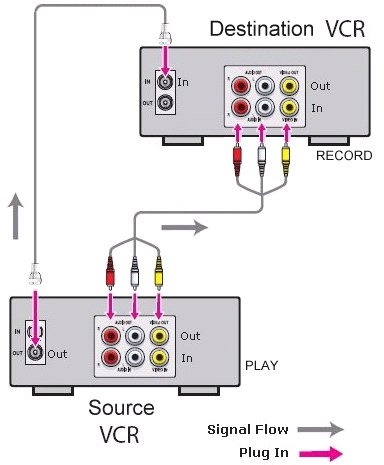
This image shows the back of the source VCR with video OUT
cable going to the video IN on the destination VCR and audio OUT cables
going to the audio IN jacks on the destination VCR. (yellow to yellow, red
to red and white to white)
Plug an RCA-type cable into the "video
out" jack of the playing VCR.
Plug the other end of this cable into the
"video in" jack of the recording VCR.
If you have stereo VCRs, you have "left" and "right" jacks for the
input and the output. (Note, however, that often these jacks are simply
color-coded instead of labeled; red always means right, and the other
color- whatever it is-always means left.) Plug an RCA-type cable into the
"audio out" jack of the playing VCR. The other end of that cable must be
plugged into the "audio in" jack of the recording VCR. Plug in left and
right cables if you have stereo VCRs.
(If only one of your
VCRs has stereo sound use a Y-connector to combine the left and right
cables of the stereo VCR into a single cable.) You can buy Y-connectors or
any of the other cables mentioned here at any Radio Shack store or
Wal-Mart or online.
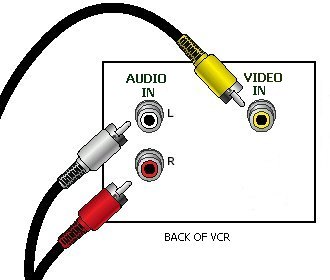
This diagram shows the back of the destination VCR (with the
blank tape).
Alternate connection:
If you have an old
VCR without any RCA jacks, or if you prefer to hookup the two machines
with TV coaxial antenna cable, you will use 75 ohm coax cable to connect
the two VCRs. This connection has both video and audio together on one
connection. This cable is the same as a "cable TV" cable (RG6 or RG59) and
you would hookup the RF (VHF) OUT jack from the source VCR to the VHF IN
jack on the destination VCR.
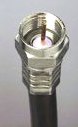
Sometimes the jack is labeled ANT for
antenna. Push the wire into the center hole in the jack and screw the
connector on tight. By connecting the machines in this way, remember that
the source VCR is sending out it's signal to TV VHF channel 3 or 4. What
this means is that in order to get this signal, you must set the
destination VCR to channel 3 or 4.
If the source VCR is switched to set
it's output to channel 3, then the destination VCR will need to be set to
channel 3 to pick up the signal. You can easily verify a good signal path
by hooking up a coax cable from the destination VCR antenna OUT jack to a
TV antenna IN jack and playing the source tape. If you see your source
content on the TV, this means the signal is going out from the source VCR,
in to the destination VCR and out to the TV. You should be able to now
copy your tape to a blank tape on the destination VCR.
Now you have the two machines connected together. Power on both VCRs.
Now you're ready to record. Make sure you adjust the tracking control
of the playing VCR, and be sure to set the proper audio level if you have
a VHS Hi-Fi deck as the recording VCR. Use good quality tape in the
recording machine, and clean the heads if you haven't done it
lately.
Setting the proper LINE INPUT:
Some
VCRs have more than one set of IN audio/video jacks. This is so you can
connect, for example, a camcorder up in the front of the VCR and a game
console, cable TV tuner or other device in the back of the VCR.
If you are
using the 3 RCA audio/video cables (yellow, red, white) to connect the two
VCRs you will need to set the proper LINE INPUT on the recording VCR by
selecting either using the VCR remote control or the VCR setup menu,
LINE1/AUX/LINE2 or however your VCR designates the LINE INPUT selections
so that you match the connection you have made using the A/V cables.
Some
VCRs designate 01,02,99 or L1, L2 etc. for the different LINE INPUT
options. Some VCRs select the Line Input by pressing numbers 0-0-1 or
0-0-2 on the VCR remote control. Read your owners manual to learn how to
set the "line input" if you do not already know. Cycle thru each selection
until you can verify you've got the right one. Play the source tape and
try recording a little bit on the destination VCR. Rewind the recorded
tape and play it to see if you've got the right input setting. If it did
not record your source, try the next LINE INPUT selection until you find
the right one. There should only be two or three.
Rewind the "play"
or source tape, then put a blank tape in the recording VCR (destination)
and make sure it is at the beginning of tape. Press record on the
recording VCR and press play on the source VCR. You can watch what
is being recorded on the destination VCR on a TV connected to the ANT/VHF
OUT jack on the destination VCR just as you would when recording a TV
show.
Copy a camcorder videotape to
another videotape or DVD:
To copy a videotape from a
camcorder (VHS-C, 8mm, MiniDV) to a VHS tape or a DVD, you would follow a
similar process. Using the camcorder as the source VCR, hookup the
(typically) supplied Audio/Video cable(s) from the camcorder to the
destination VCR or DVD recorder. Play the camcorder tape and record on the
VCR or DVD recorder.
Many camcorders have a 4-pin S-Video jack and
many VCRs and DVD recorders have S-video jacks. Using a S-video cable to
connect source to destination will give you a slightly better video
connection than the composite video RCA (yellow)
connection.
MiniDV camcorders may also have a Firewire/iLink/IEEE1394
jack. Many DVD recorders also have this jack, so by using a iLink/IEEE-1394 cable to
hook up the camcorder to the DVD recorder, you get an all-digital
audio/video copy.
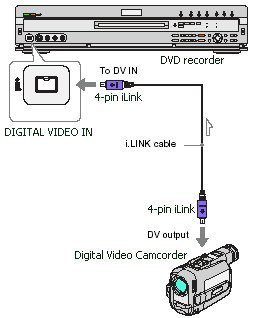
Copy MiniDV to DVD using IEEE-1394
cable
NOTES:
Remember that VCRs and DVD recorders may need to be
"setup" once you have unplugged the power cord and plugged it back in
again. If you move VCRs around and unplug them, check to make sure the
initial setup is done before proceeding. It may be a good idea to make a
trial run of 2 min. or so of copying rather than coming back in 6 hours to
find it did not work.
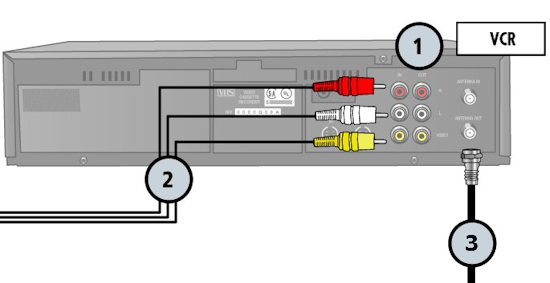
This diagram shows the destination
(recording) VCR connections. The Audio/Video RCA connector cables (2) are coming
from the source (playing) VCR going into the IN jacks (1) on the recording VCR.
The coax cable (3) goes from the Antenna/VHF OUT jack on the recording VCR to
the Television Antenna/VHF IN jack. (Remember your TV has to be set to channel 3
or 4 to see the output of the VCR)
Columbia ISA Audio Video
Empowering consumers through
information.
columbiaisa@yahoo.com
|