VCR Basics - Part 2
•
Go back to Part
1
of VCR basics
• Retro Gaming - how to hookup Atari 2600 to Modern TV
• VCR Head Cleaning
• How to connect a VCR to a flat screen TV
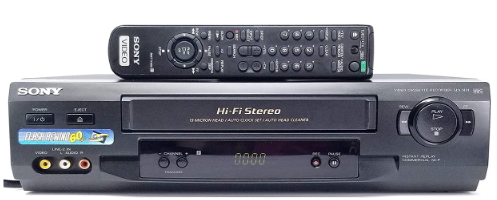
VCR front: Display Panel, Controls, Cassette
Door, remote control
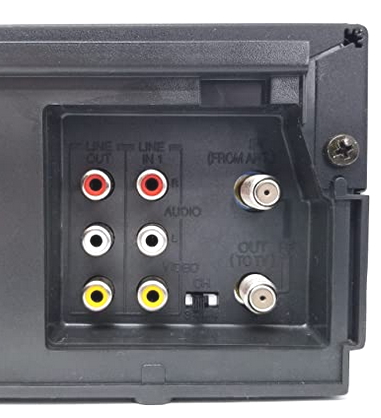
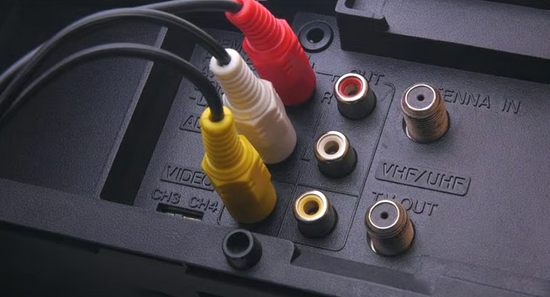
VCR Rear panel cable connections
From right to left
• Coaxial RF input (top)
• Coaxial RF output (bottom) for connection to TV
• Switch for output to TV channel 3 or 4
• RCA inputs (video - yellow and audio - white, red) for RECORDING
• RCA outputs (video - yellow and audio - white, red) for connection to TV RCA AV inputs for PLAY
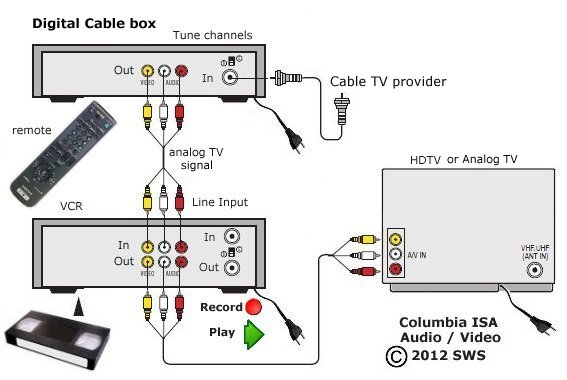
Cable Connections - VCR to TV
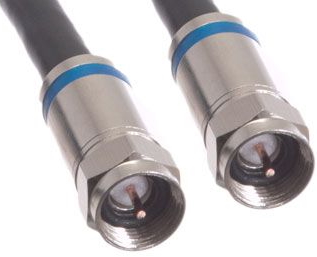
Coaxial RG-6 Cable
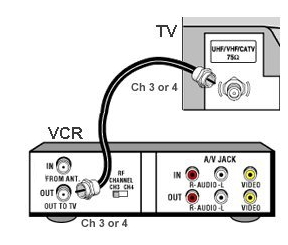
Basic VCR connection to TV with RF coaxial cable hookup.
This is all you need to play video tapes on an analog CRT TV.
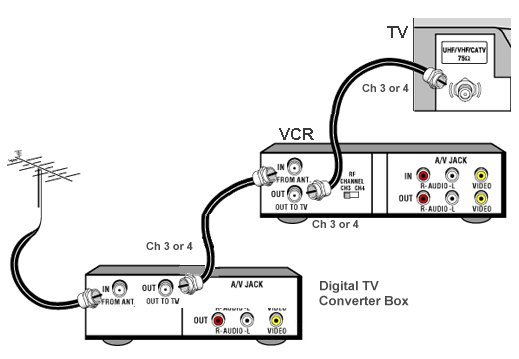
VCR Hookup to TV for recording broadcast TV
After 2009, the NTSC analog TV tuners in VCRs can no longer tune in broadcast TV stations which went all digital (ATSC).
A digital to analog TV converter box is required.
For a coaxial cable connection, the TV must be set to channel 3 or 4.
Use RF Coaxial cable RG-59 or RG-6. Video and Audio are carried combined on
coaxial cable but only mono audio. Tune channels on DTV converter box.
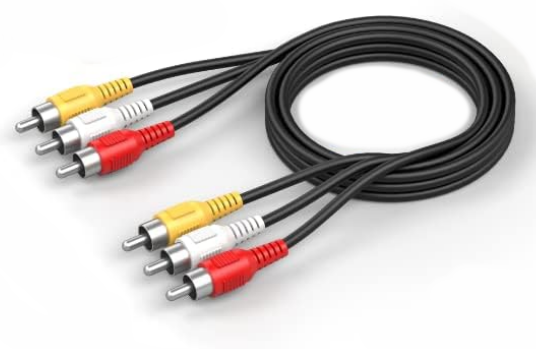
RCA cable connections for 2-channel stereo sound
Yellow - Composite Video
White - Left Audio
Red - Right Audio
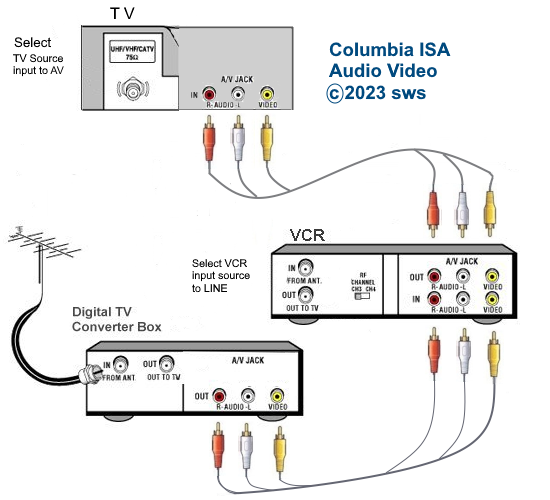

VCR Hookup to Stereo TV
TV must be set to AV Input for stereo sound from VCR.
VCR with mono audio: Some VCRs only have the yellow video and the white (or black) audio ports. In this case leave the red RCA cable
disconnected.
A TV with a 3.5mm yellow Audio Video input uses an adapter cable to connect the VCR
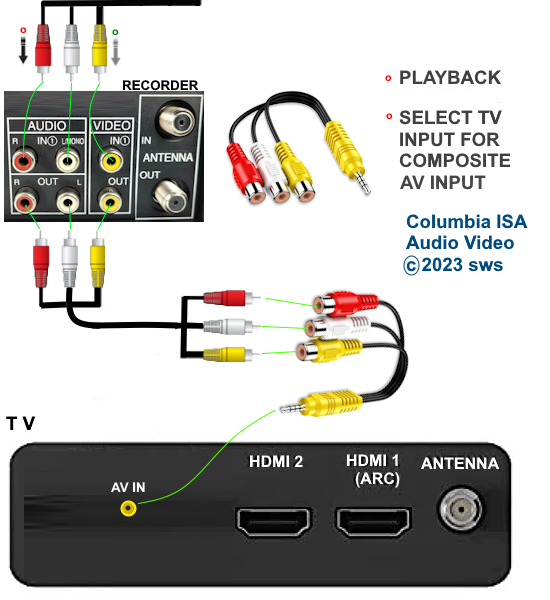
An older TV with only a RF coax input needs an RF Modulator to connect
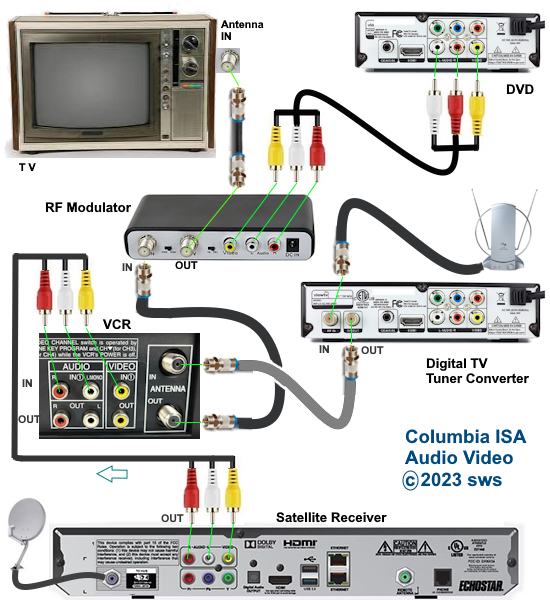
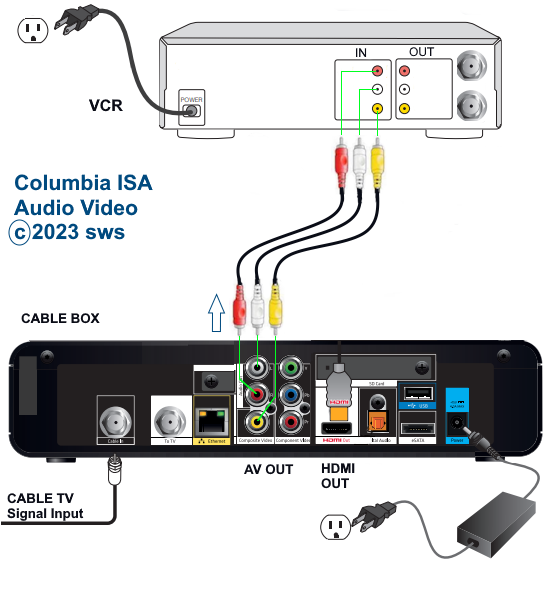
Connection diagram - DVD, VCR, DTV tuner, satellite
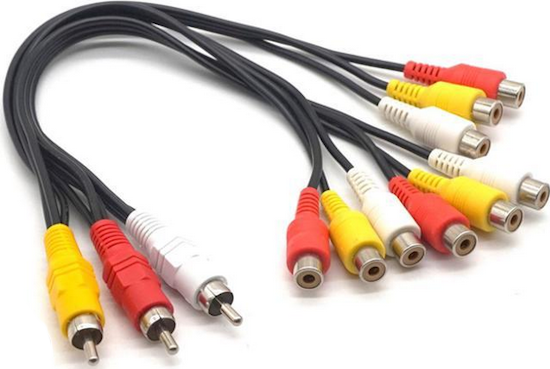
RCA 3 way cable - 3 inputs and one output for a TV with only one RCA input.
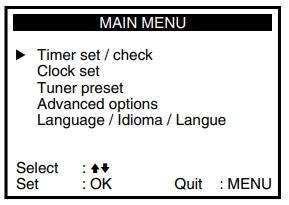
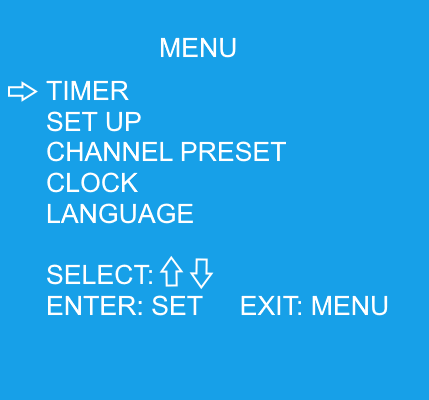
VCR Setup
If you have powered on the VCR and the TV, connected your cables and
tuned the TV to channel 3 or 4 if using RF coax cable, you can now press the
MENU or PROG button on the VCR remote. Some VCRs have a EASY-SETUP
button.
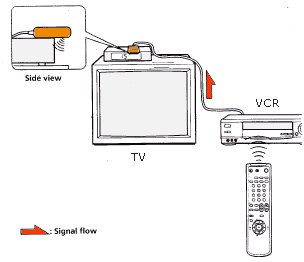
Why can't I get the VCR menu on the TV screen?
There are a few steps to perform to get the VCR menu on the TV.
First, many VCRs require you to connect the VCR to the TV using coaxial cable. This connection is the round silver threaded port on the rear of the
VCR labeled OUT connected to the TV Antenna round silver input port.
Use RG-6 coaxial cable. The VCR will send the menu to the TV only
over a specific channel, usually 3 or 4 but some VCRs use a different channel. Consult the VCR user manual.
Second, the VCR must be set to VIDEO instead of TV. Some VCRs use different designations such as ANT or antenna instead of TV but
there should be a button on the VCR or the remote to switch between the VCR tape transport and the TV antenna input.
Third, the TV must be set to the correct channel and must be set to the correct input.
Example: SONY VCR connected to TV using RG-6 coax cable from VCR OUT to TV antenna input. VCR is switched to VIDEO, not TV.
TV is set to channel 3 and set to TV instead of VIDEO. Note: If the VCR was also connected to the TV using RCA yellow and white cables
then you could set the TV to either VIDEO or TV and the menu could be seen on either setting.
For a TV with multiple inputs, select the input the VCR is connected to, for example VIDEO2 or composite. Scroll through the TV inputs
using the TV remote.
Most VCRs want you to select your LANGUAGE before anything
else. After that, many VCRs also want you to set the proper time of day
(CLOCK) before you setup channels or any advanced options.
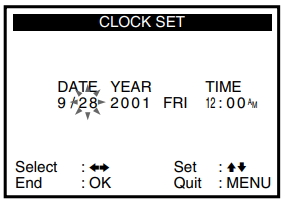
Setting the CLOCK
• How to set VCR clock
If you want to do timed recordings, the VCR clock has to be set so the recording happens at the correct time/date.
Set the month and year, day of week, hour, min and AM or PM and press OK.
Select from the on-screen menu (seen on the TV screen) SET CLOCK or
equivalent selection. Enter hour and minute (AM or PM) by using the
buttons on the remote. Consult owner's manual if arrow buttons on
remote do not work as on-screen navigation is always a function of how
the manufacturer of the VCR has "programmed" the functionality of the
VCR. Some VCRs use a plus/minus scheme while others use a up arrow/down
arrow selection combined with the OK button or an equivalent button on
the remote control.
Some VCRs made after 1998 have a very user friendly setup process,
walking you thru each menu step by step. The Auto Clock Set feature in
some VCRs took advantage of a signal sent from PBS stations and cable
companies which contained the current time of day information. By
setting the VCR to "AUTO" clock set, the clock in the VCR could be
automatically set to the correct time as soon as it received the time
signal although some VCRs had to be turned off in order to set the
clock. Often this service was sending out the wrong time or broadcasters in your area were not sending the signal at all so setting the clock manually was often required.
Setting CHANNELS
With the conversion from analog to digital in both broadcast and cable TV, the VCR channel scan is mostly reduced to channel 3 or 4 and the RCA LINE inputs for recording.
DTV converter boxes and cable TV digital receiver boxes can connect to a VCR using the LINE RCA cables (yellow, white, red) to the VCR RCA inputs to record whatever
channel the digital tuners are tuned to. Set the VCR to LINE input. If connected using coaxial cable, use channel 3 or 4.
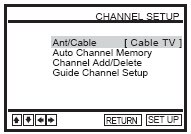
In the analog TV days:
You tell the VCR if you are connected to Cable TV or Antenna. Select
one or the other. Over-the-Air broadcast TV uses VHF/UHF channels while
Cable TV uses more channels. Some VCRs have built-in tuners which will
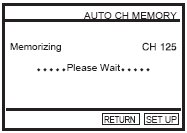
go all the way up to channel 125 for analog Cable TV. You can setup
only the channels available to you so that you will not get static when
channel surfing on inactive channels.
If you get channels 4, 5,
9, 12,
29, 60 for example, you do not want to stop at channels 6, 7, 8, 10,
11, 13 etc. and see snow, you just want to skip inactive channels. This
process is automatic in modern VCRs but takes a few minutes to perform
as each channel is scanned for a signal and those with a signal are
stored. After this process is completed, you can press CHANNEL+ or
CHANNEL- on the remote and only go to active channels for your area.
VCR Operation
To play or record video, insert a video cassette into the rectangular
slot in the front of the VCR. Push gently until the cassette is pulled
into the machine. The plastic door will close and the VCR will mount
the cassette and ready the magnetic tape for playing/recording. A VCR
moves the tape in the videocassette over a spinning drum inside the
VCR. This drum contains the "heads" which are used to record and
playback video.
A VCR has buttons on the front panel and the remote control to RECORD,
PLAY, PAUSE, STOP, REWIND and FAST FORWARD the tape. Also an EJECT
button to remove the cassette from the VCR.
VCR buttons
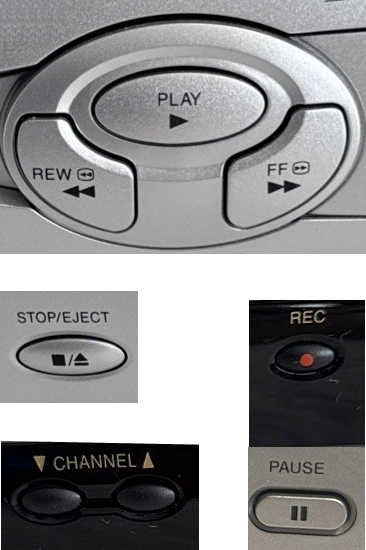
PLAY (Arrow pointing to the right) moves the tape forward at normal speed,
so any video/audio previously recorded is played back.
FF Fast Forward (Two arrows pointing to the right) moves the tape forward at a faster speed, skipping ahead.
REWIND (Two arrows pointing to the left) moves the tape backwards to the beginning or to a previous location at a fast speed.
STOP (Square) Stops the tape from moving and usually takes the tape off of the video heads.
PAUSE (Two vertical bars) Stops the tape but retains the tape on the video heads so a single video frame can be viewed or if
recording, content can be omitted such as advertising.
EJECT (Arrow pointing up) moves the tape cassette out of the VCR.
RECORD (Red circle) moves the tape forward at a normal speed, recording video and audio from an input source. Any
content previously recorded will be recorded over (lost).
There may be additional buttons for selecting input sources, changing channels, setup etc.
A VCR detects playback speed (SP, LP, or EP) primarily
by reading the linear control track pulses recorded along the bottom edge of the tape.
The control head reads these pulses, allowing the VCR to synchronize the tape speed and align the video heads with the recorded helical tracks.
VCRs have many moving parts inside which are plastic and metal. Always
be patient when operating a VCR because many operations take a moment
or two to get started. Many VCRs have "intelligent" rewind and fast
forward for example, altering the tape speed slower or faster as
required for optimum operation.
If you just want to watch TV, turn the VCR off and the antenna
connection going into the VCR will be "passed thru" to the TV antenna
input. This means you have to connect a coaxial cable to the TV VHF
input jack in order to "pass thru" the signal. If you use RCA type
cables for stereo TVs, you may have to keep the VCR turned on in order
to send the stereo signal to the TV. If you do not care about stereo
sound then a single coax RG-59 cable will suffice. The VCR/TV
switch/button on your remote control allows you to switch back and
forth between the VCR source signal and the TV. The VCR source signal
is either the videocassette or the VCR television antenna/cable signal.
Remember the VCR has a television tuner (analog NTSC) and your TV also has it's own
tuner (analog NTSC or digital ATSC).
Selecting the correct input
For recording a tape on the VCR, you need to select which input signal source you are using.
If you are using the RCA LINE input (yellow, white, red) then you need to select the LINE input.
Some VCRs even have a LINE2 input for a camcorder usually on the front of the VCR.
Usually there is a button on the VCR remote called INPUT or INPUT SELECT to switch inputs.
Some VCRs have a button on the front panel for input selection. Every VCR uses a slightly different method
for selecting the input source.
Tape Speed
While you record video and audio, the tape is moving past the "heads"
at a specific rate of speed. Most VCRs use "SP" (standard speed) and
"SLP" or "EP" (extended speed) for recording. Setting the VCR to "SP"
will give the best video results and allows about 2 hours of content on
a T-120 video cassette tape. However if you want to maximize your tape
usage, a setting of "SLP" will yield more content on the tape, about 6
hours. You sacrifice some quality for the extra content.
Record Protect Tab
The VHS video cassette is a plastic housing with two plastic reels
inside. The feed reel contains the source magnetic tape and the take-up
reel contains the tape after it has been recorded/played. On the back
of the cassette is a small square tab of plastic which controls the
ability of the VCR to record on the VHS video cassette. If the tab is
in place, then the VCR can record on the tape. If the tab is missing,
then the VCR cannot record on the tape. Pre-recorded movies will have
the tab removed in order to protect the tape from being written over.
Removing the tab creates a small hole about the size of your fingernail
and this hole prevents the VCR from recording on the tape. Some people
later decide to record on the tape and place a small piece of
cellophane tape over the hole to again allow recording.
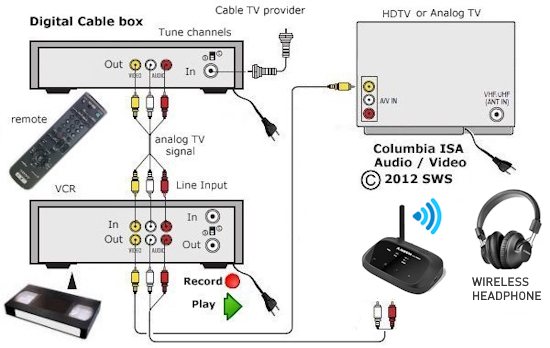
Cable box/satellite
receiver control
When you get your TV programming from cable TV or satellite TV and you
want to record a TV show while you are away (unattended or timer
recording), you have to be able to select the channel you want to
record on the receiver and not the tuner in the VCR. This is because
the tuner in the VCR is not able to convert satellite signals or tune
scrambled cable TV channels. If you own a VCR which has the capability
to send signals to the cable/satellite box, you may be able to change
channels on the cable/satellite box when the timer recording needs to
take place. This way you can select the proper channel to tune in, and
with the proper connections, record the TV show on the VCR.
The optional device works like a remote control and plugs into the VCR
back panel. The other end of the cable has a small emitter which
transmits the codes to the remote sensor on the cable/satellite box.
Sony calls their version "cable mouse". Others call it "cable eye" or
IR (infra-red) Blaster.
The optional Cable Mouse
controller (approx.
$17.95) allows unattended channel-changing of DIRECTV receivers or most
cable TV boxes for timer recordings. CAUTION: Incompatibilities exist
with some cable boxes and not all decoders/receivers will work with
these devices. Also, as cable TV and satellite receivers evolve, you
may find these setups do not work. The newer digital cable and DBS
boxes have hard disk video recorders built-in, so this problem can be
solved.
Cable box on TV with VCR "cable mouse" setup
to change channels.
Frame advance / slow
motion
VCRs with this feature allow you to view super slow or even frame by
frame for examination of video. 4 head VCRs give you an amazingly sharp
image allowing you to freeze the action.
Flash rewind
60 sec. rewind for T-120 tape.
Tracking
Newer VCRs do not have a
knob for tracking control adjustment as this is done automatically.
Older VCRs have a manual adjustment control for tracking problems.
Adjust left or right for correcting tracking errors.
On-screen status display
A DISPLAY button on the remote, controls what you see on the TV screen
as indicators of status such as channel, tape speed, counter etc.
Record one channel, watch
another
Since the VCR has a tuner and your TV has it's own tuner, you can, with
the right hookup, view a TV program on one channel while recording a TV
show on another channel. With cable TV as your signal source, you would
use a signal splitter to route channels to both the VCR and TV.
Timer Recording: How to program a VCR to Record
The VCR has a very
powerful capability to not only record a TV program, but do that
automatically for you while you are away from home. This is called a
timer or timed recording.
You setup the information beforehand and the
VCR does the rest. The VCR turns itself on at the preset start time,
records the channel you selected and stops recording at the time you
specify.
Every VCR brand will be slightly different but the logic is basically the same.
The buttons on the remote will vary from one VCR brand to another.
For example one VCR remote may use a button ENTER while a different brand uses EXECUTE button.
The on-screen menus will be slightly different and the navigation may be different but the steps are the same to program a VCR.
You want to go to the menu item for a timed recording which may be TIMER or TIMER SET or TIMED RECORDING.
On the next screen you enter all the information the VCR needs to do a timed recording.
Use the VCR remote to skip UP, DOWN, LEFT, RIGHT and
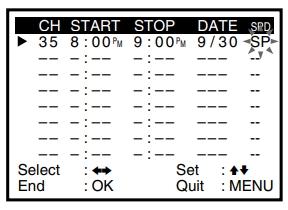
watch where the cursor is moving. You must enter the channel to record, the time to start and the time to end the recording, the date to start
and the tape speed you want to record at.
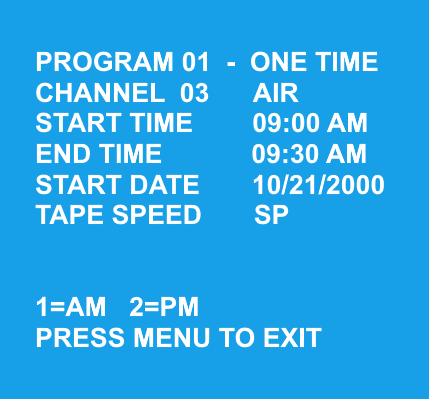
Navigate up and down to select and either use the number buttons on the VCR remote or just navigate up or down to get the correct information.
When you see the correct time or date then move to the next item to setup.
When finished, either press SAVE or MENU to exit. If done correctly, the information is saved in the VCR and your TV show will be recorded
at the preset time and date and channel. Some VCRs have to be powered off in order to enter the timer record function which should be indicated
on the front panel.
Most VCRs with more than one EVENT recording will give you the ability to view all the setup recording events and you can cancel
an event if you decide you do not want to record that TV show at that time. Some VCRs have the ability to setup eight recording events
for future TV show recording. Also some VCRs can be setup to record a TV show WEEKLY so that you do not have to program over and over.
You just have to be sure you have enough blank tape available and the tape is positioned correctly for the recordings.
How to setup a VCR timer recording:
Use your VCR remote control to enter the VCR on-screen MENU and select
the timer section from your
list of options.
Some VCRs can setup up to 8 events to allow recording of different shows at different times or days.
Enter the channel, start time, stop time, date and tape speed for the
TV program you want to record. For the channel enter 3 or 4 or for LINE inputs, press the INPUT SELECT button until L1 shows for the channel.
Use the right arrow and up/down arrow keys to change the numbers. Some VCRs have a CANCEL TIMER key to cancel a recording. Read user manual.
If you want to record the same TV show every day or once a week etc.
there are menu selections which will set this up.
Daily/Weekly Date
Programming
Weekly
[SUN'S~SAT'S]: You can record TV programs on the same channel at the
same time every week.
Daily
[MO ~ FR] : You can record TV programs on the same channel at the same
time every day Monday through Friday.
To set multiple days, use
the 'down arrow button' in the date field until desired choice
is selected.
How to program a RCA VCR to record (Timer Recording)
Insert good batteries into VCR Remote Control
Power ON VCR
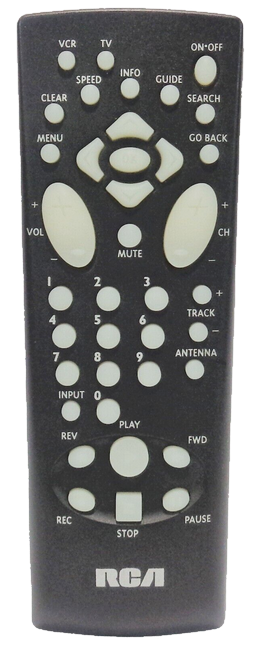
RCA VCR Remote Control
The VCR CLOCK must be set correctly.
Note: The timer indicator appears in the display when you turn off the VCR and a timer recording has been set. The timer
indicator flashes if there is no tape in the VCR when a timer recording has been set and the unit is turned off.
Using the INPUT Button
Use the INPUT button to toggle through the available Video Input sources (Video1 and
Video2) and regular RF broadcast signals (antenna). The Video Input ports allow you to view
from a device connected to the VCR such as a TV Tuner/Receiver box.
Video1 represents the rear Audio/Video jacks (yellow/white) and Video2 represents the front Audio/Video jacks on the VCR.
For a cable TV box, DTV Tuner box or satellite TV receiver, turn it on and tune it to the channel you want to record before the recording is
to begin.
Insert a cassette tape into the VCR with enough tape to record the program.
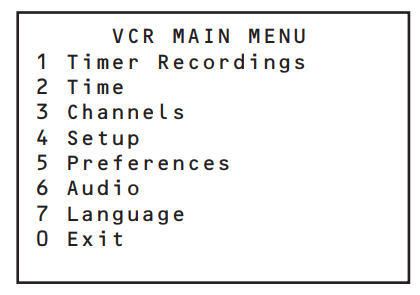
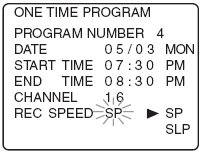
RCA VCR MAIN MENU
Use the VCR Remote Control :
Press the MENU button to display the VCR MAIN MENU.
Press the 1 button to choose Timer Recordings.
Press the 1 button to choose Create a New Program.
Select how often you want the program to record.
1 ONE TIME or 2 DAILY or 3 M-F or 4 WEEKLY
Enter the data for the program with the number buttons.
The data includes the channel number, and start and end times
(including AM or PM). The start date is automatically entered based
on the VCR clock. Both the recording date and speed can be
changed.
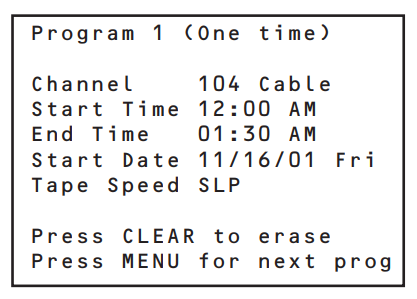
Press the MENU button to save
Program 1 has been saved
Remember to insert a recordable tape and
turn the VCR off before the program start time.
Remember to leave your cable TV box or TV Tuner box on and tuned
to the desired channel.
Note: If your VCR is connected to a cable TV box or DTV converter box or other source device using a coaxial cable, the VCR most
likely is receiving signals on channel 3 or 4 so that should be the channel you set to record from.
Also, if your VCR is connected
to a source signal device such as a cable TV box etc. and you have the VCR connected using RCA audio and video cables
(yellow/white/red or yellow/white) to the rear VCR inputs, you should set the channel to record to L1 or LINE1 or VIDEO1 as it shows on
the channel option on-screen menu. You may have to go all the way through until the end of channels before L1 shows up as an
option for the channel to record.
RCA audio video cables connected to VCR inputs (Line 1)
Recording to VCR from Cable box (set VCR to record from Line 1)
Stopping a Timer Recording
To stop or cancel a timer recording in progress
Press and hold the STOP button for several seconds until STOP
appears in the on-screen display.
Use the CLEAR button on the remote to erase programs setup.
Question: My VCR has run out of years.
The menu only goes up to 2003. How do I program for recordings now in 2022?
Answer: You can setup the VCR for a date (year/month) that is equivalent. The VCR won't know the difference.
For example July 2012 is the same as December 2002. It starts on the same day of the week and has the same number of days.
It is annoying to do this each month but it does work and if you want to continue to use your VCR for unattended recordings this is one solution.
Check the website below for repeating dates.
There are some entire years that repeat also so in these cases you only need to set the VCR once per year. For example 1994 and 2022 have the same calendar.
• Time and Date.com
• Repeating calendars
Question: How can I record a show while I'm sleeping from my cable TV box to my VCR?
Answer: Set your VCR for timer recording. Setup the start time and end time, day and date. Insert blank tape.
Next go into your cable TV box's MENU and go to SETTINGS. Most cable boxes have a power on setting which allows a predetermined time to power on.
By combining this with a power on channel setting which most cable boxes have, you can have the cable box power on at that time of day and tune to the channel you want to record.
There are favorite channels also but usually there is a power on channel, the channel tuned when the box powers on.
Set this to your channel to record and both VCR and cable box should come on and you will record your show.
Connect video and audio cables from cable box outputs to VCR inputs and make sure VCR is set to record from the LINE input.
Auto Tape Speed Select
If you are not sure the
tape is long enough for timer program recording in the SP tape speed,
set the recording tape speed to AUTO. Recording starts in the SP tape
speed. If the tape length is not long enough, the tape speed
automatically changes from SP to SLP.
Press MENU again on the remote control to exit and save your changes.
Make sure you insert a blank VHS cassette with enough tape to record
your selection.
Turn the VCR off and it will enter the timer mode. Usually there is an
indicator light on the front panel which shows the VCR is in timer
mode. This indicator can be a clock symbol or the word "Timer" lighted
up on the display.
When the date/time occurs, the VCR powers
on, starts recording on the
cassette tape and stops when the end time occurs. If you selected "one
time recording", the entry you setup in the timer section is erased. If
you setup a cyclical recording schedule such as every day, your entry
will still be setup in the timer section.
Note:
When recording from a cable TV box or digital satellite receiver,
additional considerations are required.
Most modern VCRs are "cable ready" meaning they have tuners in them
which can tune unscrambled channels from analog cable TV. Also,
depending on your hookup configuration, you could set your VCR to
channel 3 and record cable TV channels tuned on your cable box and sent
to your VCR, since they will be converted by your cable box. This means
you could even record scrambled channels that you subscribe to, or
digital channels from a digital cable box converter as long as the
digital cable box converts them to VHF channel 3 (or 4) output for your
standard VCR. Having this type of a setup means that when you select
which channel you want to record in the VCR timer section, you need to
specify channel 3 (or 4) and make sure your cable box is powered on and
set to the correct channel (CNN, TBS, TMC, HBO) at the time of the
recording.
When
using a cable decoder box or Digital Satellite System, make sure the
decoder box is on and set to the correct channel for timer recording
and enter channel 3 or 4 (which ever you set your TV to), as the
channel to record. Your VCR should be connected to your converter box
so that the converter box output goes to the VCR input. The converter
box can output to channel 3 or 4 such that your VCR antenna input jack
can pick up channel 3 or 4. If you use RCA type cables to connect cable
box to VCR, set VCR to L1 (Line 1) input.
VCR PLUS+
Many VCR's offer "VCR
Plus+," which makes timer programming easy once you've initially
pointed the VCR to your area's channels (channel mapping). VCR Plus+
lets you use those numbers after the TV show descriptions in the TV
listings: you just activate the programming feature, punch in the code,
and you're ready. VCR PLUS+ Silver and VCR PLUS+ Gold take this one
step further by doing the channel mapping automatically when you enter
your area's zip-code.
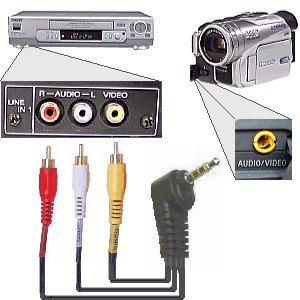
Camcorder connection
Copying home video from
your camcorder to
a VHS tape is easy. Just hookup
your camcorder to a VCR input
jack (yellow video and white audio) then play your camcorder video and
record at the same time on the VHS VCR to a cassette.
VCR to VCR recording
See VCR
copy tape
Connection to Stereo or Headphones
You can hookup your VCR audio
to an AV Receiver or stereo amplifier instead of your TV and get richer sound from
loudspeakers. You have to use RCA type cables (red and white) from the
VCR audio OUT to the AUX IN on the stereo receiver or amplifier. The
same for recording from a stereo, only use the VCR audio IN. You could
even do a timer
recording of a radio show by
setting the VCR up to
record at a specific time.

Wireless Headphones
Connect the VCR audio out to a Bluetooth transmitter and listen on Bluetooth wireless headphones.
Secondary Audio Program -
SAP
If your VCR has a MTS (An MTS VCR is a VHS player with a built-in Multichannel Television Sound (MTS) decoder.
This feature allows the VCR to record and play back broadcast television in Hi-Fi stereo sound and decode Second Audio Program)
stereo tuner, and many do, then you can select SAP instead of stereo
sound in order to hear any available audio channel for your current TV
program. The audio can be a different language, so you will hear the
dialog for the TV program in another language. It depends however on
what is available for that program. Some TV shows may have a Spanish
audio dialog available or may have nothing at all. You can easily
switch back to stereo mode by going into your on-screen MENU options
and selecting STEREO sound instead of SAP.
VCR formats other than
VHS.
VHS is not the only format
available. For a price, you can get 8mm, MiniDV and S-VHS
machines. There are even a few Beta VCRs still around from the
1970s and 1980s.
Recording a TV show at
slow speed (SLP or EP) on S-VHS gives a better picture than recording
on fast speed (SP) on regular VHS.
8mm is popular for
camcorders, and there are a few 8mm home VCR's, but it's not big as a
home format. It's small and portable, which is nice for camcorders.
VHS and 8mm tapes won't
fit in each other's machines. So, if you want to play a tape from the
other format, you'll have to copy it over to the other type and live
with the inevitable loss of quality. With MiniDV today the most popular
camcorder format, there are MiniDV machines however the price is high.
You have to have a TV capable of displaying the higher resolution or
you might as well just convert your MiniDV over to VHS.
TAPE SPEED = IMAGE QUALITY
A faster recording speed
gives a better picture. This is because less information has to be
recorded onto a particular section of tape. So if picture quality means
a lot to you, record on SP for regular VHS. If it really
means a lot to you, buy S-VHS or go to DVD.
A word about LP (Long Play). Besides
being an obsolete form of recorded medium that was pushed out of the
spotlight by compact discs, LP is a middle VCR speed that fits between
SP and SLP (or EP). Not too many VCR's offer this speed for recording
any more, but most if not all of them will automatically play it back.
Still, when all is said
and done, most people are perfectly happy with regular VHS, which is by
far the most popular and affordable format. Just realize that you can
do better if it's important to you.
When VCR's first came out
their audio quality was about equivalent to AM radio. VHS eventually
added stereo sound that gave you two audio channels that were
marginally better than AM radio and then, finally, stereo hi-fi audio
entered the fray. And the rest is history.
Hi-fi audio is the
ultimate VHS sound playback system. It isn't quite CD quality but,
except for some occasional fluttering you may notice coming from your
speakers, you may never notice the difference. Hi-fi works just fine at
all tape speeds and will also pick up the Dolby Surround encoding on
most of Hollywood's releases. It won't decode the Dolby Surround, but
it'll pass it along to your decoder. And if you're going to run the
VCR's sound through an audio system, and you can afford it, you should
definitely opt for "hi-fi" audio. It isn't as good as digital CD sound,
but it's close enough for most occasions.
This is especially important
if you like watching movies. Even TV programs benefit from hi-fi sound
these days; many of them are recorded in Dolby Surround and if your VCR
has an MTS stereo tuner (and most do), and if you have a Dolby Surround
decoder built into wherever you're plugging the VCR (usually an
audio/video receiver or a TV) you'll be able to take advantage of the
surround sound.
Hi-fi audio is so good
you can use your VCR as an audio tape recorder, though it's not nearly
as convenient as cassette, DAT (Digital Audio Tape), or Minidisc. And
you can't stick the tape into your car stereo, no matter how hard you
push it. But for recording TV and watching movies, it's great.
Even many low end VCR's
today come with MTS stereo tuners. This is a must if you want to take
advantage of stereo TV (or bilingual TV) broadcasts. Most major shows
are now broadcast in stereo (or even encoded with Dolby Surround -
which an MTS tuner will also pass along to your decoder), and while the
sound quality isn't as good as a tape or disc, it still beats mono.
MTS tuners also have the
"SAP" feature (a rather insulting-sounding acronym that merely means
"second audio program") that isn't used very much but that allows the
broadcaster to send bilingual programming, or programming with an
alternate audio track (like a commentary).
Most VCR's are also
"cable ready," which means they can pull in a multitude of channels.
Numbers vary depending on the make and model, but what's important to
consider is how many channels you receive in your area (or how many you
anticipate will be offered over the life of the VCR - channels that
you'll actually use).
Don't forget, you'll
spend more time with the remote control than with the front panel
buttons on your VCR. Many manufacturers are taking this into account
and virtually eliminating them from the VCR itself. This isn't a big
deal unless you chronically misplace the remote and are suddenly faced
with a programming emergency…
Some remotes are
"unified" or "universal," which means they operate more than just the
VCR. They can also be used to control a TV, LD player, cable box, etc.
And they sometimes operate other brands of equipment, too, usually by
having you enter a code from a list supplied by the manufacturer. It's
an easy process and you'll like the results. Don't expect these remotes
to replace the other ones, though; they generally only operate the main
functions of the other components, which is still a bonus.
Before buying, make sure
you're comfortable with the remote, with where the buttons are and how
the whole thing feels. Make sure you can figure it out! And make sure
you think it'll be easy to use in dim lighting.
If you want to copy from
another VCR or a camcorder, it's nice to have a set of audio and video
input jacks on the front of your VCR.
Here are some features
you might run into on your quest for the perfect VCR:
AUTO
PROGRAM: This is a set up
feature you'll probably only use when you first unpack the VCR. It
searches all the channels it can receive, automatically programming the
ones it gets and ignoring the ones it doesn't. This sets up the
"channel up and down" buttons. Every channel is still available from
the number keys, even if there's nothing on them. After
auto-programming, you should go back and erase the channels it
memorized but that you don't want to scan, like scrambled pay TV
channels you don't want, the airport listings, or the all commercial
channel. Again, these channels will always be there if you have a
number pad on the remote: you just won't hit them when you channel surf
up or down.
AUTO
CLOCK SETTING: A quick way of
eliminating that flashing "12:00". Some channels broadcast a signal
that can set your clock. Make sure the channel you use is in the same
time zone as you are!
AUTO
HEAD CLEANING: Every time you
insert a tape, this feature gives the heads a quick scrub.
AUTO
TRACKING: Sometimes called
"digital tracking," this feature is nice when you're playing tapes and
you don't know where they've been. It automatically adjusts the VCR's
heads for the best playback. It doesn't always work perfectly, but it's
pretty good.
AUTO
START: This is a feature that,
when you slip a tape into the VCR, it turns itself on and, if the
tape's "write protect tab" (the little plastic tab you remove to
prevent the tape from being recorded on again) is broken, starts
playing.
AUTO
REWIND: When the tape reaches
its end, the VCR switches into rewind mode and zips it back to the
beginning.
AUTO
SHUTOFF: Auto Shutoff is just
what the name says: it shuts off by itself.
AUTO
EJECT: The VCR spits out the
tape when it shuts off. This can be handy when you've left a
"write protected" tape in the deck because the next time you walk by
the VCR, you have a chance to be warned to put a recording tape back in
for your next time shifting session.
DIGITAL
EFFECTS: These are nothing like
those seen in Jurassic Park and other movies. These digital effects, in
fact, are merely toys you may never use. The most popular is Picture in
Picture, which can let you see two programs simultaneously. You need
two picture sources to take advantage of the feature, though, like two
tuners, a videocassette and a tuner, etc. Others include trinkets like
mosaic or pixelization, which are fun to see once but basically a waste
of time and money unless you're planning to use them in your own video
productions.
FLYING
ERASE HEAD: This is a nice
feature if you're going to do a lot of editing with your VCR. It's an
erase head mounted on the spinning drum with the video (and hi-fi
audio) heads. It makes for clean, sparkle-free edits. If you don't plan
on doing a lot of editing, pass this feature by: it adds to the price.
INDEX
SEARCH: This is really nice.
The VCR puts a mark on the tape each time it begins recording, and
later you can have the machine find these marks either by number or by
scanning forward or backwards. It makes finding the beginning of your
recording programs easy. It certainly beats scanning back and forth
randomly!
JOG-SHUTTLE:
A little wheel or knob on
your VCR and/or remote that lets you scan at various speeds, from frame
by frame to high speed.
VIDEO
NOISE REDUCTION: A circuit that
shovels snow from your picture. Does a better job than not having it,
but another way to reduce video noise is to buy a laserdisc player.
What to look for in a VCR:
- A
feature than lets you skip over commercials during playback.
Higher-end models breeze through ads automatically, while this is a
manual function on less expensive VCRs. Movie Advance automatically
skips ahead to the beginning of the feature on pre-recorded tapes.
- VCR
Plus+ is a programming tool that uses the numerical codes published in
most TV guides. You simply enter
this code, and the VCR knows that you want to tape your specific TV
program, on Tuesday at 9 PM. VCR+ Silver and VCR+ Gold are easier to
set up; just punch in your zip code, and the VCR automatically maps
your cable network's channels.
- A
jog/shuttle wheel allows you to advance frame by frame during playback.
This is a great tool for video editing, and sports fans love being able
to use their own slow motion. Some VCRs have a jog/shuttle wheel on the
VCR unit, while more expensive models have one on the remote as well.
- Flying
erase heads are great for editing, as they give you crisp edit points.
If you're not going to do any editing, skip this feature, as it adds to
the cost of the unit.
- A
universal remote can operate other components, such as a TV, DVD player
or even another VCR.
- If
you record a lot of TV shows, you'll value an index feature.
When you pop in a tape, you'll get a listing of contents; select an
item and the VCR will take you to the right spot.
- Front
input jacks will make your life
easier if you download frequently from a camcorder; you won't have to
fumble around the back of the unit to get hooked up.
- Most
S-VHS VCRs have a feature called ET, or expansion technology.
This lets you record S-VHS quality on standard VHS tapes instead of
more expensive S-VHS tapes.
- Almost
all VCRs now have four heads, automatically set the clock to the
correct time and use onscreen programming.
Also, most VCRs have automatic tracking, although some have a manual
override.
- Many
newer VCR models can deal with the ever-growing number of cable TV
channels and are compatible with digital cable television.
But if you plan to run your expanded cable TV through the VCR, it's
worth checking this out before you buy. There are problems programming
VCRs through cable boxes, and since there are so many flavors of cable
TV, you should be prepared for some issues; often you may need to
purchase a "cable eye" or "cable mouse" to control your cable box.
VHS or S-VHS?
Regular television
broadcasts deliver about 330 lines of horizontal resolution; VHS VCRs
are capable of about 240 lines. This means that standard VHS VCRs will
not give you quite as crisp a picture as a broadcast will. Super VHS,
on the other hand, can put out 400 lines of resolution, so taped TV
should look like the real thing. Satellite TV looks especially good on
S-VHS, with all 400 lines of DirecTV resolution coming through crisp
and clear.
S-VHS VCRs are the better
choice for picture quality, but experts say they have some drawbacks.
First of all, S-VHS VCRs are more expensive. Second, S-VHS recordings
aren't compatible with most VHS VCRs. This means if you tape a show in
S-VHS format and pass it on to a friend, your friend's standard VHS VCR
may not be able to play it. Of course, you can turn off the S-VHS
feature and record in regular VHS mode, but then you're not using what
you paid for.
VIDEOCASSETTE CARE INSTRUCTIONS
The most common causes of damage to video cassettes are improper
storage and improper loading into a videocassette recorder
(VCR).
1. Always store a VHS videocassette upright, like a book, away from
anything magnetic or that might emit a magnetic field. This includes
television sets, speakers, computer monitors, telephones, microwave
ovens, and airport security gates. NEVER lay a videocassette flat on a
television set , speaker, or computer monitor.
2. Protect videos from extreme temperatures. Do not leave videos for
extended periods in automobiles. Videos can be damaged if played before
reaching room temperature-- they may stretch if hot or easily break if
cold. Allow cold videos to lie unpacked for at least two hours, to
reach room temperature before playing.
3. Be sure that your VHS format VCR is in clean condition. Depending on
usage, clean the magnetic heads periodically.
4. Load the video into the VCR gently, and in the direction of the
arrow embossed on the cassette case. Usually, the VCR will do the work
once the cassette is inserted.
5. Find the VCR's tracking dial so that the video's playback can be
adjusted, if required. The tracking adjustment is usually on the bottom
of the front panel of the VCR, as a small wheel or knob labeled
"Tracking." If you experience any "snow" or distortion on your TV
screen, or if the audio sounds garbled: simply adjust the tracking both
ways, unit the picture and sound become clear. Of course, this
procedure will only affect and correct a tracking problem.
6. To avoid tape damage, use an "image pause" feature only when
necessary. Never pause more than 10 to 20 seconds, maximum.
Connect VCR to computer
Play, record to PC or laptop using a video capture device and some software
such as OBS Studio download and install on computer.
The video capture device which is basically a RCA to USB adapter, runs about $40 or so and the OBS software is free.
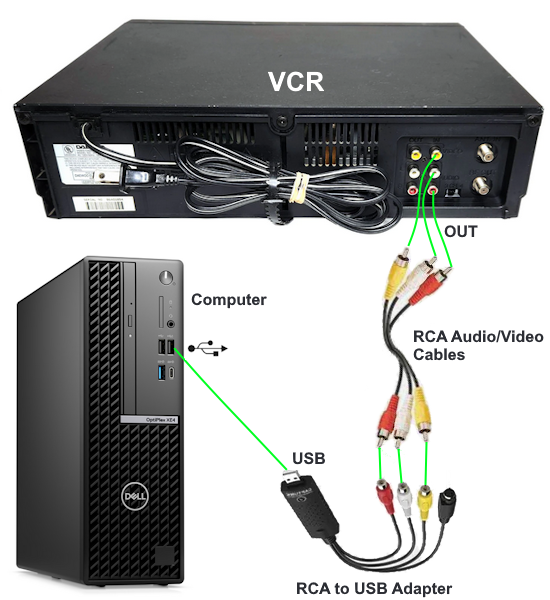
VCR to PC Connection Diagram
• Connect VCR outputs using RCA cables to RCA/USB adapter.
• Connect USB end to USB port on computer.
• Install capture software on computer
• Run capture software on computer
• Choose file type such as MP4
• Play VHS tape on VCR
• Click RECORD button in capture software
When finished, playback computer file or edit footage. When ready, burn a DVD or upload to internet.
How to use the OBS software to view and record
Setup for using the OBS software once installed
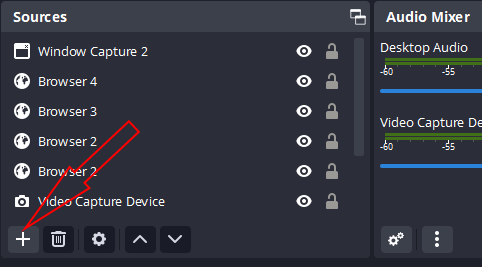
Select the plus sign to choose a source

Select "Video Capture Device"
Create/select Source and then click "OK"
Select your video capture card device
(Power on the VCR)
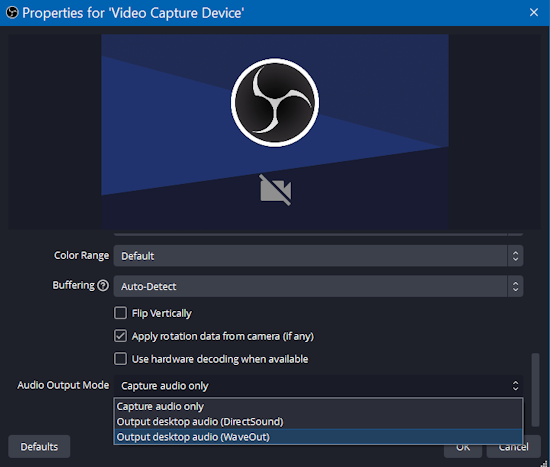
OBS software Select "Properties" for Properties for video capture device
Scroll down to audio output mode to adjust sound
Select "Output Desktop Audio (Waveout)"
Select and click "OK"
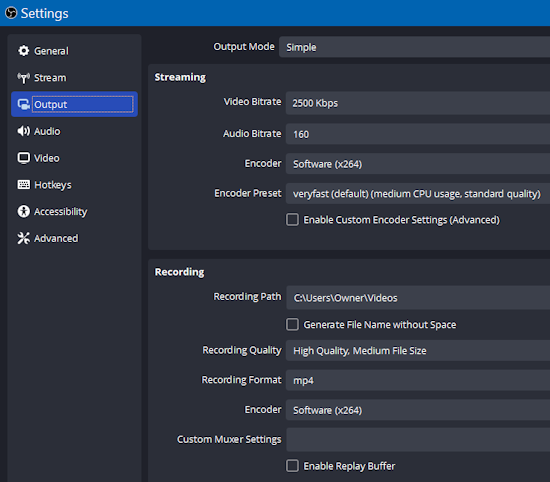
OBS software Go to "FILE" (upper left) next select "Settings". Scroll down to "Output" and you
can select your recording format and recording path.
Next click "Apply".
(Insert a VHS tape into VCR and press "PLAY")
Check computer display for video from VHS tape
OBS software Open full screen mode
Right click on the video window and
select "full screen projector".
Next select your display device shown.
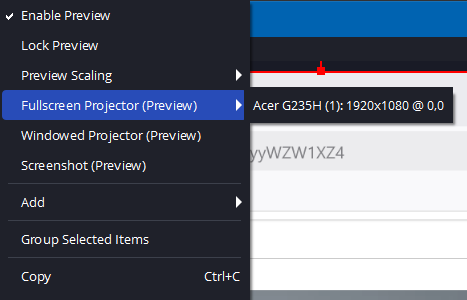
press "ESC" key to exit full screen.
You can record anything on your computer browser screen as well.
To start recording, select "Start Recording" under Controls.
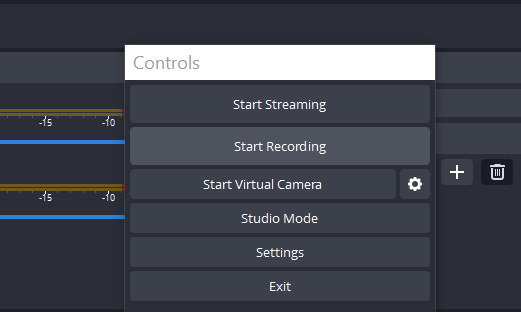
To stop recording, select "Stop Recording".
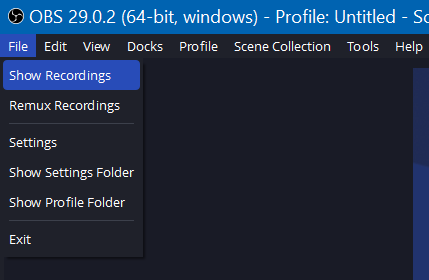
OBS software Go to "File" (upper left) and
select "Show Recordings".
A window should show all the files recorded. Select a file to view.
Select "EXIT" to leave the OBS software program.
• Video
vcr copy tape
• VHS
to DVD
• VCR
recording basics
Columbia
ISA Audio Video
Empowering consumers through information.
SWS
columbiaisa@yahoo.com
|