VCR Cleaning : How to clean a VCR
Go to Part 1 of
VCR Basics
VCR Basics Part 2
• How to hookup VCR to Flat Screen TV
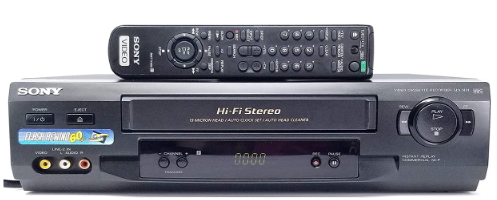
VCR front: Display Panel, Controls, Cassette Door
VCR HEAD cleaning: VCR cleaning
HOW TO CLEAN VCR HEADS
If you use your VCR constantly, then you will need to do some
maintenance eventually. The video tape is moving over the drum and guide
rollers inside the VCR, the eject mechanism has moving parts and dust gets
in air vents and on small components which need to shed heat.
Additionally, if you use rented tapes or old tapes, you can get a build-up
of particles from the tapes themselves which tend to show up on your TV
screen as snow, since the video heads get clogged.
You have
three choices:
1) Do nothing and hope your VCR performs
flawlessly for as long as you own it.
2) Take your VCR in to an
electronics repair shop and pay them to clean it.
3) Clean the VCR yourself.
The first choice is a bet against the odds. You may get
lucky and never have a problem but the more you use the VCR the less your
chances are of flawless performance.
The second choice is good if you do
not have technical ability. You just need money.
The third choice is good
if you have some technical skill and do not mind doing the job yourself.
You could also save some cash.
If you are careful, use common sense
and follow the cleaning process step by step, you could end up with a
clean machine, and the best video picture possible from your VCR.
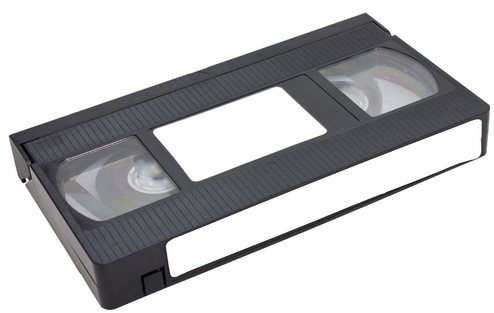
Using Cleaning Cassettes
VHS cleaning cassettes come in the dry or the wet versions. You may have good luck using these but
cleaning
cassettes can only be effective on the video heads and upper drum assembly.
They can work sometimes, but tend to just smear the grime around instead
of removing it. The rest of the VCR assembly has to be cleaned by
hand. If you take your VCR in for a professional cleaning they will not use a cleaning cassette.
What parts in my VCR should I
clean?
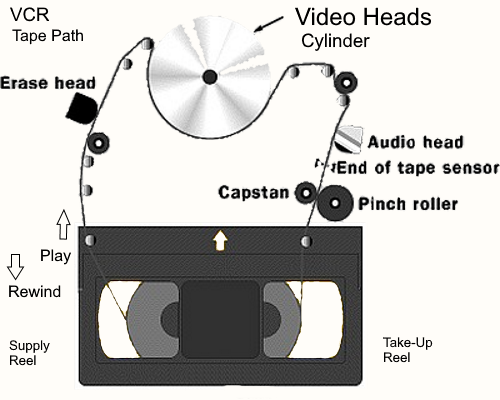
- The capstan shaft: This is the motorized shaft that pulls the video
tape through the tape path.
- Pinch roller: This is the wheel that presses against the capstan
shaft, so the capstan shaft can pull the video tape through the tape
path.
- A/C head: A mechanical part that contains the record and playback
audio head, the audio erase head, and the FM head.
- Tension rollers: These rollers attenuate vibration or flutter from
the video tape as it is moving across the record/playback head.
- Erase head: As the name implies, this head erases all recorded
information off the video tape before it reaches the recording head.
- Roller guides: These guides pull the video tape onto the tape path
and align the video tape to the video drum (the part that holds the
video heads).
- Video heads: The most important, expensive, and dirt-sensitive
piece, the video heads (video drum) pick up the image part of the signal
off the video tape, or record the video image onto the tape.
The chrome cylindrical drum is where you will find the video heads,
spaced equally apart from each other around the drum. Two video heads will
give you good results if you're always recording in SP mode. If you like
getting more than 2 or 2.5 hours or so on a tape, or if you like your
scanning speed to be as fast as possible, you probably record in SLP.
So
you'll want a four head deck, which has a pair of heads for each speed.
You may never notice the difference if you're just watching tapes, but if
you use freeze frame etc., the extra two heads will give you better
results on the slow speed. Currently most decks have 4 heads. The video
heads are mounted on that silver, spinning drum inside the vcr.
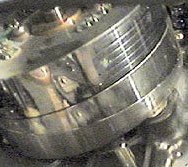
VCR Video Drum with Video heads
Close-up of a Video Head

The video heads are just inside the dark groove running
around the drum. They are very small but you can feel them when turning
the top portion of the drum by hand while cleaning.
CAUTION: You do not have to be a risk taker, but
remember, you could be asking for trouble by cleaning your VCR yourself.
That is not to say it can't be done. Many consumers can do the job
themselves, however if you have no knowledge or experience with electronic
devices, you are better off not attempting to clean your VCR yourself.
Leave it to the professionals.
Step by step
process to clean your VCR: (Do this process at your own
risk)
1) Make sure you eject any tape in the VCR and then turn the VCR OFF and unplug it from the AC power
outlet. You do not want to get an electrical shock from the internal
parts. It is a good idea not to touch any parts inside the VCR with your
fingers. First because you want to avoid electrical shock from capacitors
which may store a charge and second because you do not want to leave oil
from your skin on parts inside your VCR.
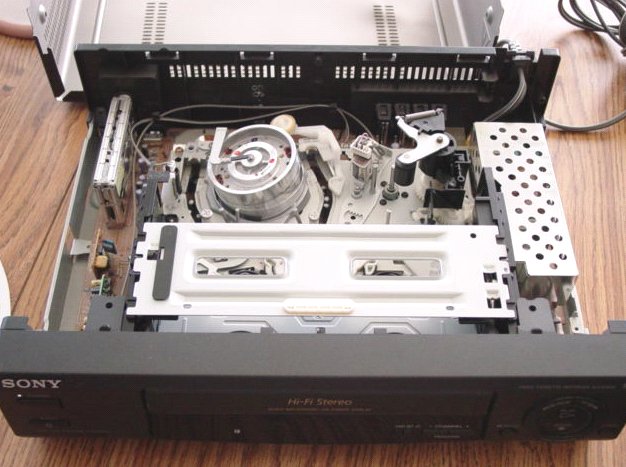
2) Remove the small screws
(usually four) with a screwdriver and take off the top housing of the VCR.
The main thing to be cleaned inside the VCR are the video heads which are
located on a spinning (when operating) chrome drum.
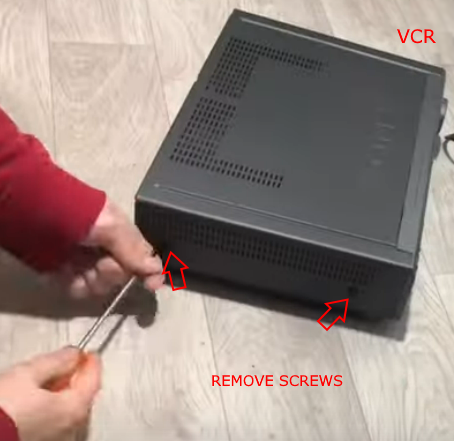
Remove the screws holding the top cover on the VCR.

There may be screws to remove on the back side of the VCR.

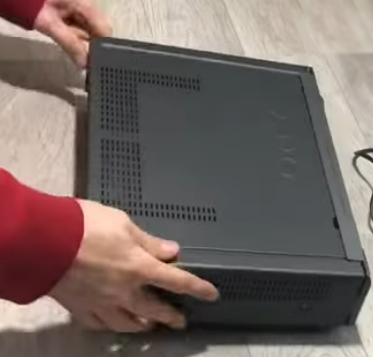
When all the screws are removed, lift up, pull and remove the top cover.
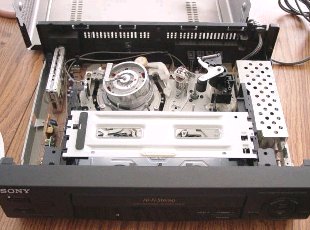
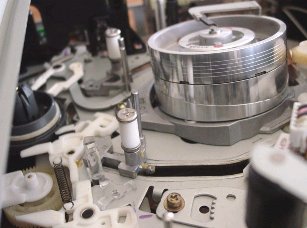
Enlarge image
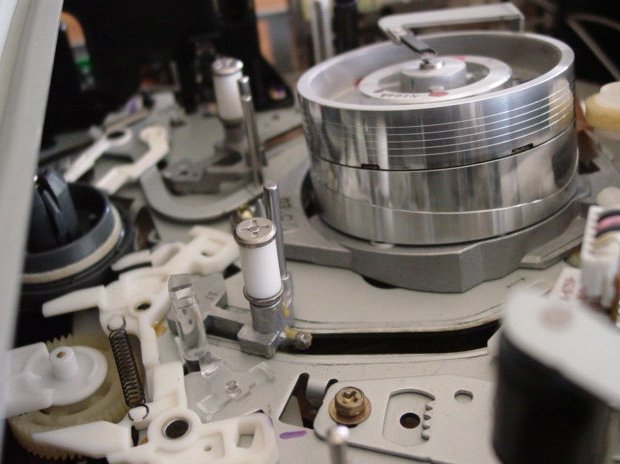
VCR after removing cover. The Video drum is the round silver cylinder (back left).
The video drum
is the large tilted assembly the tape wraps around and is divided into two
halves. The small fragile video heads are visible in the groove between
the two chrome halves of the drum when you rotate the upper part by hand.
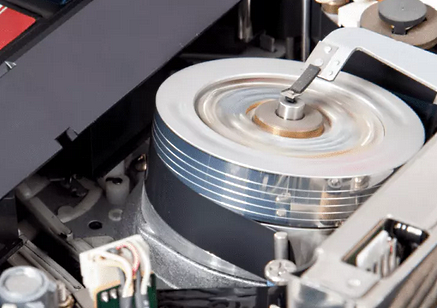
VCR in operation showing the video tape wrapped around the video drum. As the magnetic tape moves across the video heads,
oxide from the tape can be deposited on the video heads. The heads must be cleaned eventually so a clean image is presented on
the TV.
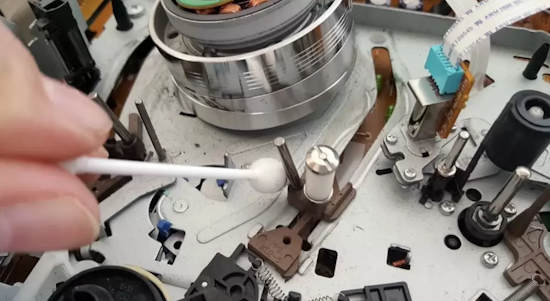
Use extreme caution. Never use cotton swabs to clean them. Cotton tends to
grab, get caught or leave fibers in the heads. It can also break them.
Using chamois sticks and head cleaning fluid is by far the safest method
although you could also use clean, high quality typing paper lightly soaked in
isopropyl alcohol on older VCRs. Only soak half of the strip of typing paper in the alcohol because your fingers will
need to hold the paper against the drum and you do not want to over soak the paper. An electronics shop usually has the
materials you need or you may have them around the house or you can buy them online.
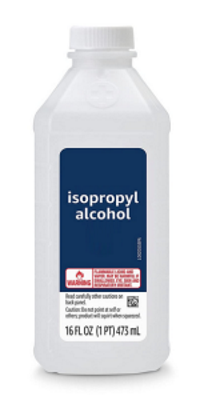
Isopropyl Alcohol
Enlarge image
3) You
want to press lightly, but enough to get the dirt off the heads. Rotate
the drum by hand while pressing against the groove where the heads are and
try to get the dirt off the video heads with several turns. Examine the
residue, if any, to see if less and less is coming off until you get a
clean swipe. You may not see any residue but you are still getting
microscopic particles off the heads with the solvent.
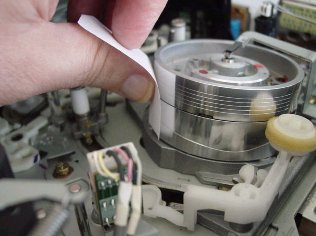
Enlarge image
Using a piece of clean typing paper soaked in 90% to 99.9% isopropyl alcohol by lightly pressing against video drum while turning the top portion with your other hand. You can just feel the video heads on your finger as they pass by while turning. The alcohol will assist in wiping the dirt off the video heads. Do this several times even if you see no residue on the paper. If you do see dirt, then repeat using a clean part of the paper each time until you see nothing else coming off on the paper.
Do not use a cloth on the video head. Cloths have fibers which can catch on the head and might rip it out as you spin it. Use a small strip of new copy paper and wet it with some of the alcohol. Hold it against the video drum and move the drum counter clockwise. Do not put too much pressure against the head with your finger as you can damage it. Put enough pressure just to make sure it makes contact with the video heads. Spin several times, check the paper and if you see dark residue, get a clean sheet and repeat the process. Do this until the copy paper is completely clean.
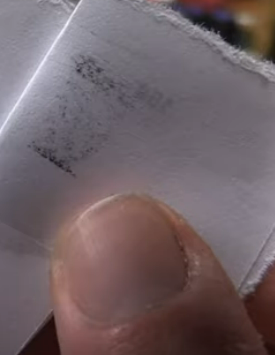
If you see residue on the paper like the above, you know that the video heads are being cleaned. Repeat the process until you see no more
residue coming off on the paper. Be careful not to move the paper up or down while turning the drum. This could damage the small video heads.
If done properly you'll be amazed at how good your picture will look when you play a tape (assuming all else is working as it should). If not, you should repeat the cleaning process. The video heads are so small the unseen microscopic dirt particles can still be present. Repeating the cleaning several times may remove the particles.
4) You can
use Q-tips cotton swabs with a little alcohol to clean almost everything
else in the VCR along the tape path. Do not use alcohol on the rubber pinch rollers. Alcohol will tend to dry out the rubber.
Take the dust off circuit board components such as
capacitors with a dry Q-tip.
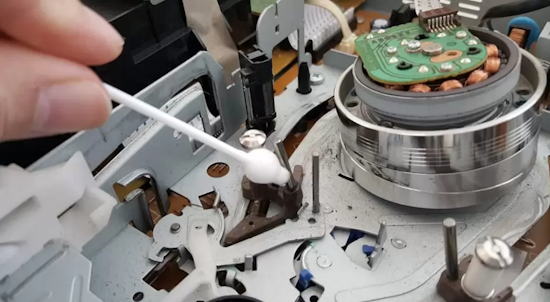
Swipe the dust off everywhere it has
accumulated but do not remove the lubricant on gears and glide paths. The
moving parts need this lubricant to operate smoothly. You can use alcohol
on audio heads, erase heads, chrome parts and metal framework but do not
use solvents on any rubber parts as it tends to harden them and make them
brittle. Try not to touch any parts which could be put out of alignment.
When in doubt, don't move it.
If after cleaning you still have a
video problem, most likely your video head(s) are damaged, although you
could try to clean them again.
The capstan shaft always seems
to collect most of the debris. Most of the buildup is an oxide material
that comes from the tapes. You want to be sure when cleaning it, that you
use minimal cleaning fluid on the swab to help keep it from going down
into the capstan bearing. Most of the time this shaft cleans right up, but
sometimes buildups can be stubborn. Don't be tempted to scrape the oxide
off with something hard like a knife. If the buildup won't come off after
persistent scrubbing, try soaking the capstan shaft with any lubricating
oil and set it aside for a few hours - preferably overnight. The oil will
penetrate and loosen the oxide material making it much easier to remove.
Don't forget to clean the oil off when finished.
You might be
tempted to use a vacuum cleaner or an air compressor to remove dust and
grime but this is not recommended. The VCR components are too delicate to
stick these large tools inside the deck and you do not want to blow dust
into the lubricants on the assembly.
5) Next we clean
everything else in the tape path. The only thing we need to be careful
about is getting any fluid on belts or rubber. Head cleaning fluid is
still a good choice. Starting with the supply reel table, clean off any
dust. Give special attention to where the idler and brakes make contact
with it as well as the brakes themselves. Then, in the same direction the
tape flows, clean the guide post, tension arm, full erase head, impedance
roller (if any), guide rollers and angle pins, audio heads, guide post,
capstan shaft, half load arms or review post (if any) and finally the
take-up reel table and brakes.
6) Clean the pulleys if possible.
Dirt buildup in the pulleys reduces the belt tension. If belts are worn,
buy a belt kit for your model VCR. They are very inexpensive. Clean door
tray and front panel with some 409 type cleaner.
7) Replace top
cover and align screw holes. Replace screws and tighten firmly but not
over tight. Clean exterior of VCR with 409 cleaner.
8) Plug
VCR back into Ac outlet, then power ON. Test video on TV by playing a
tape.
• VHS to DVD
• VCR recording basic
Columbia ISA Audio Video
Empowering consumers through
information.
columbiaisa@yahoo.com
|
|