Video
Cassette Recorder:
VCR Basics and User Guide
How To Set Clock on VCR
How to Timer Record on VCR
How to Connect VCR
The invention of the VCR, or video cassette recorder, in the 1970s gave
us the first consumer device which allowed people to record TV shows
for viewing at a later time. This capability released us from the
bondage of the TV networks scheduling, thanks to the VCRs
"time-shifting" capabilities, we could record a program when the
networks deemed it would run, but watch at a time convenient for us.
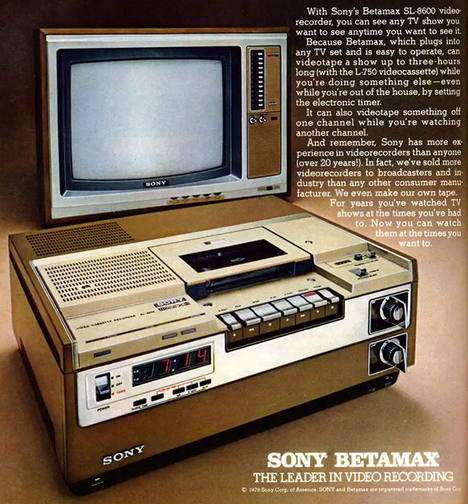
SONY Betamax VCR 1976
VCR cassette tape formats
The SONY Beta tape cassette is not as wide as the VHS tape cassette

The Sony Betamax (Beta) VCR format ruled in the beginning (1975-1976),
until the VHS format eventually succeeded in taking over the market.
Beta VCRs, Sony's proprietary format, existed for years and many models
were produced, but VHS (Video Home System) won out in the long run and
became the standard consumer format for video cassettes, both
pre-recorded Hollywood movies and blank tapes for recording at home,
and the VCR itself. Even Sony eventually made VHS VCRs.
The SONY L-750 Beta video tape cassette recorded at standard speed (BI) could record up to 90 mins. However Sony
Betamax machines could double that time to 3 hours if recorded at BII speed and up to 4 hours 30 mins. at BIII speed.
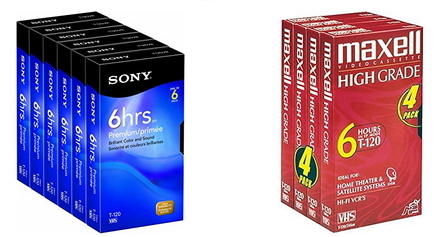
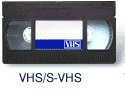
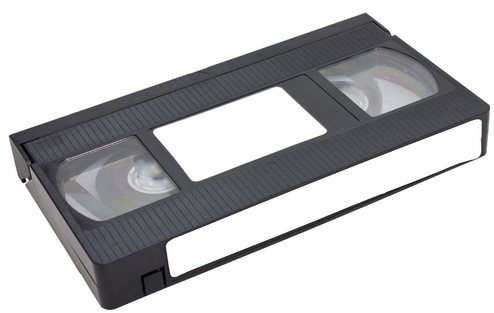
VHS Video Tape Cassettes
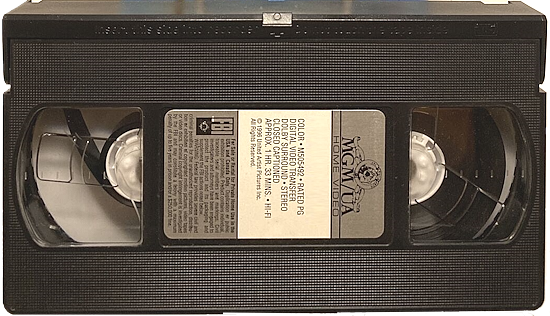
VHS video tape cassette TOP VIEW

VHS video tape cassette BOTTOM VIEW
VHS T-160 tapes recorded at EP/SLP speed could record up to 8 hours or 5 hours 20 mins. in LP mode or 2 hours 40 mins.
in SP mode. SP= standard play, LP= long play, EP = extended play.
Slower recording speed results in lower video quality but
longer recording times. Faster recording speeds results in better video quality but less recording times.
Over the years, VCR's
have grown in features, and shrunk in price. Where the basic VCR, which
was also the top-of-the-line VCR, once cost about $1,500, a basic VCR
now is affordable by all, with some as low as $40 and used models going
for far less, some for only $5 at a thrift store.
Top of the line VCRs
with more features go for about $100 or so, but what you get now rivals
or exceeds what you'd only have seen in video studios back in TV's
infancy.
Although many people progressed to the DVD recorder,
personal video recorders and hard disk recorders, the VCR still occupies a place in the home of
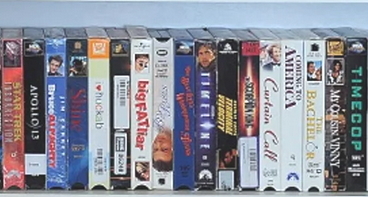
millions of TV viewers and Hollywood movie enthusiasts. The second hand
market for old movies on VHS tape is a bargain, typically only costing
a dollar or two per VHS movie.
The cassette is approx. 7x4x1 inches and takes up much more space than DVDs.
Many people discovered
that time-shifting wasn't their number one priority: renting
videocassette movies was. Still others want a VCR so they can
copy from
their camcorders. Even audio recording on the VHS tape gives stereo
sound for hours of listening.
VCR Introduction
The modern VCR reached
it's zenith by the year 2000. That is a very good lifespan, about 25
years. Still, by the year 2006 and beyond, many VCRs are still in use in the home,
but many models now contain a DVD player and a VCR together, called a
Combo unit, with DVD on one side and VCR on the other.
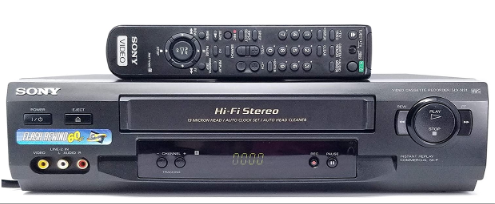
The standard VCR is an
electronic
device which weighs about 8 lbs. and is about 15 in. wide, 11 in. deep,
4 in. high and contains an analog television tuner (Channel Coverage:
VHF:
2-13; UHF: 14-69; CATV: 1-125 Total Channels: 181), circuit board,
video heads/drum and tape transport along with gears, a small electric
motor, front panel controls and multi-function display.
VCR Control
Playing a tape, recording to a tape and controlling the tape movement forward, backward plus ejecting a tape can be done using
the VCR remote control or often by buttons on the VCR front panel.

VCR front panel left side: Buttons for Power On/Off and Ejecting the tape cassette currently in the VCR
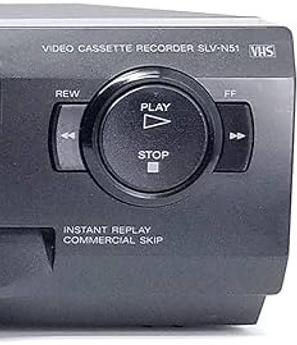
VCR front panel right side: Buttons for PLAY (forward), Stop, Fast Forward and Rewind (backward)
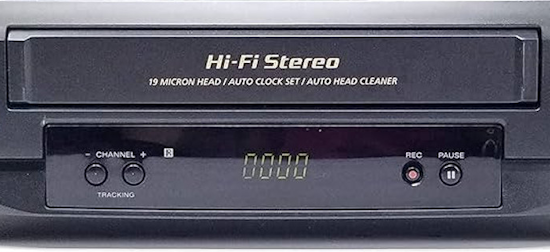
The VCR front panel center section usually has the door used to insert the cassette tape into the VCR transport and
may have the channel select options. Also there may be a button to start Recording and a Pause button to stop the tape
for a moment to view a portion of the video or stop the tape for a moment from recording.
Some VCRs will have a front panel display so you can get status information.
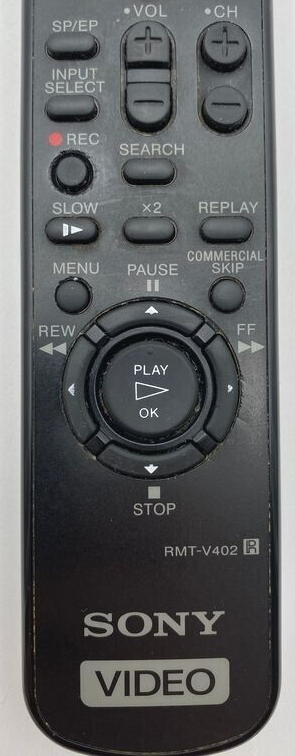
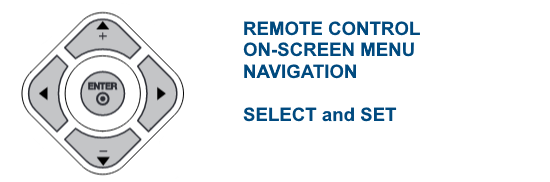
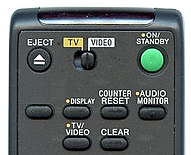
VCR REMOTE CONTROL
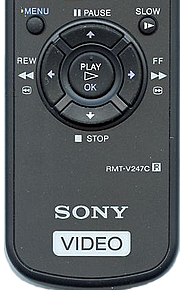
Most VCRs come with a remote control. The remote has buttons to control POWER ON/OFF, Eject a tape, Channel Selection,
Volume Control, Record and Pause, Input select, Tape Speed select, Rewind, Fast forward, PLAY, STOP and more.
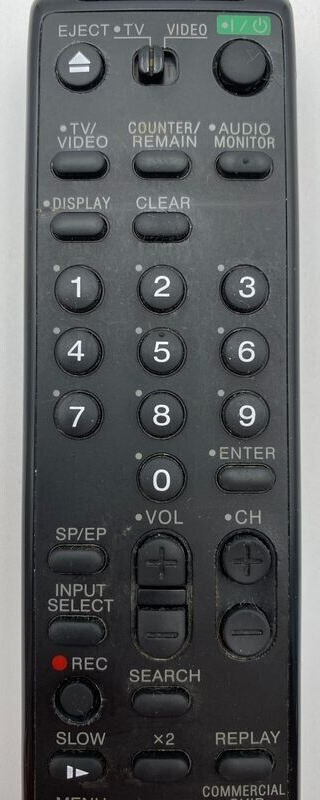
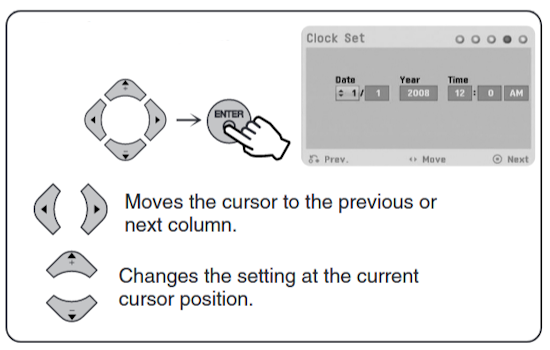
The navigation buttons for on-screen menu options and the OK button are needed for setting the clock, programming the timer and other options.
The four arrow buttons up/down/left/right allow movement within menus and the center "OK" button selects your choices.
How to insert a video cassette tape into a VCR

Push the VCR door open with your finger and see if there is already a cassette in the VCR. If there is then power ON the VCR and push the
eject button. You should be able to remove any cassette but if not, the tape may be jammed and you will need to remove the VCR's top cover,
release the tape from the transport and carefully pull out from the VCR.
If you see the VCR transport is empty, then push the cassette into
the VCR firmly (top side up) until you feel the VCR "grab" the cassette and pull it into the VCR. The door flap should flip closed. At this point
you can rewind or play or prepare to record. The VCR tape transport takes a moment to operate and switch from stop to play modes
for example, so be patient.
Top VCRs
Top manufacturers included Sony, Panasonic, JVC, Toshiba, RCA, Sharp,
Samsung and many others. Most modern full-feature VCRs have stereo
sound and 4 heads with a variety of nice to have features such as
freeze frame, auto clock set, auto channel setup, VCR Plus+, slow
motion, search and 60 sec. skip for commercials.
The reason people own a
VCR is to:
1) Record and view TV programs live or time delayed (digital to analog
converter tuner required since 2009)
2) View pre-recorded movies on VHS tapes
3) Copy camcorder recordings to VHS tape
4) Record music or any audio source
VCR SETUP
VCR
SETUP - Hookup Diagrams
What you should have in
your VCR setup:
VCR, TV, Hookup Cables, Remote
control, videocassettes and TV signal
source.
VCR |
Remote Control |

TV |
VHS Video-cassettes |
Connecting Cable |
TV signal source can be
antenna, cable TV or satellite TV |
Basic VCR cable hookup for Analog TV (NTSC) reception
This setup only works
today if you have any low-power analog
TV broadcasts nearby. Otherwise you need a digital to analog TV converter
box to tune TV stations.
Both the VCR and the TV need to be plugged into AC outlets for power.
The VCR is powered on using the power button on the VCR or by using the
power button on the VCR remote control.
Playing old VHS tapes on old CRT TV sets

If you only want to play old VHS tapes and have an old analog CRT TV, then all you need is a coaxial cable connection from the VCR OUT
(silver threaded coax port) to the TV's coax INPUT (antenna silver threaded port). Select on the TV, channel 3 or 4.
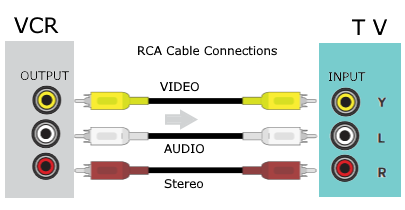
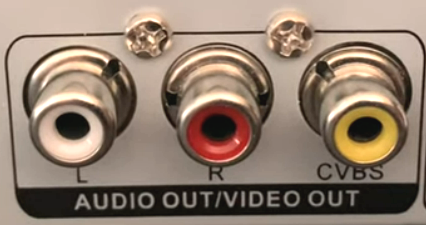
The other option is to connect using the 3 RCA cables (yellow, white, red) or just yellow and white if TV is only mono audio.

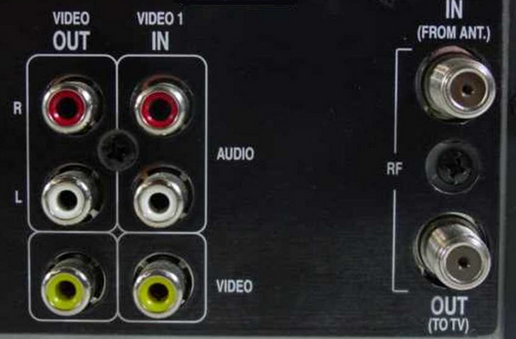
Analog CRT TV

Analog CRT TV REAR

Analog CRT TV Input Ports: antenna RF coaxial (VHF/UHF) and the RCA video and mono audio input ports.
The VCR needs to be connected to the TV using audio/video cables.
Exactly which cable you use and how you connect your components depends
on your specific situation. Not everyone has the same components. You
may receive your TV programming by Cable TV while someone else gets
their TV programming over the air using a rooftop or indoor TV
antenna.
A VCR can be connected to a TV using a single coaxial cable which
carries audio and video combined, or several A/V cables which split the
audio and video so they are carried to the TV separately.
If you use a
single coax cable, as seen in the drawing above, connect the VCR OUT
jack in the back of the VCR to the TV VHF/UHF IN jack on the back of
the TV. Be sure to set the TV on channel 3 or 4 when using the VCR as
your signal source. Select which channel to use (3 or 4) on the VCR by
setting a switch manually, usually in the back of the VCR, or by
electronically selecting channel 3 or 4 on your VCR. As there are many
different brands of VCR and even many more models, the procedure
varies. Consult your owner's manual.
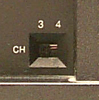
VCR selector switch on back panel of VCR.
Switches to TV channel 3 or 4.
Also, connect your TV signal source, such as Cable TV or Antenna to the
back of the VCR using a single coax cable connected to the VCR's ANT IN
jack. This jack is typically just above the ANT OUT jack going to the
TV. Both are silver in color with threads on the jack. The cable is
screwed on or sometimes just pushed on.
Most VCR's come with
"onscreen programming," which is a series of menus that (at least
theoretically) walks you through the various settings and functions of
the VCR.
VCR rear panel
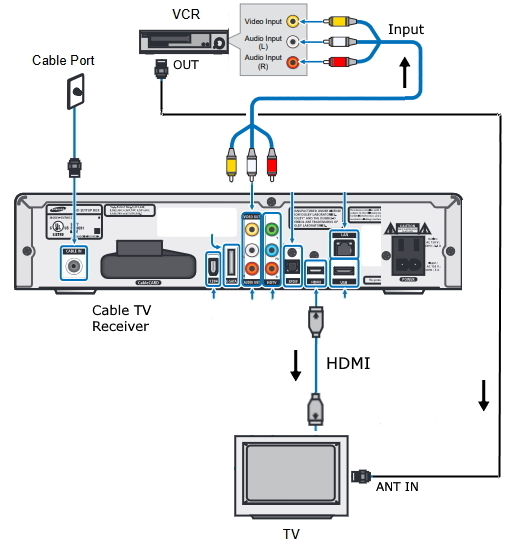
Connect VCR to Smart TV flat screen TV
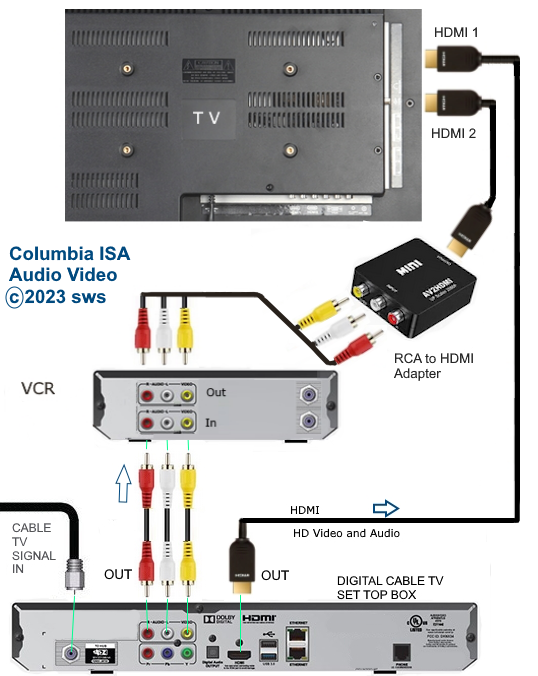
Connection diagram: Cable box to VCR to TV
Using a RCA to HDMI adapter box, you can play VHS recordings from VCR to modern TV. Select the correct HDMI input on the TV.
• RCA to HDMI,AV to HDMI Converter
DIGITAL TV BROADCASTS
Since 2009, most local TV
stations in the U.S. have converted to digital TV broadcasts. This has
caused the analog TV tuners in VCRs to become virtually useless as far
as tuning in TV stations. One solution is to use a converter box to
tune the digital channels, convert them to analog TV signals and then
pass on to the VCR for recording and on to
the TV.
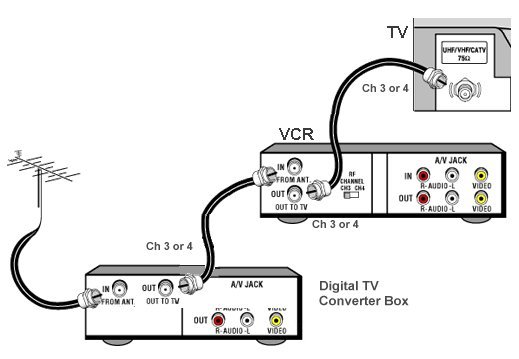
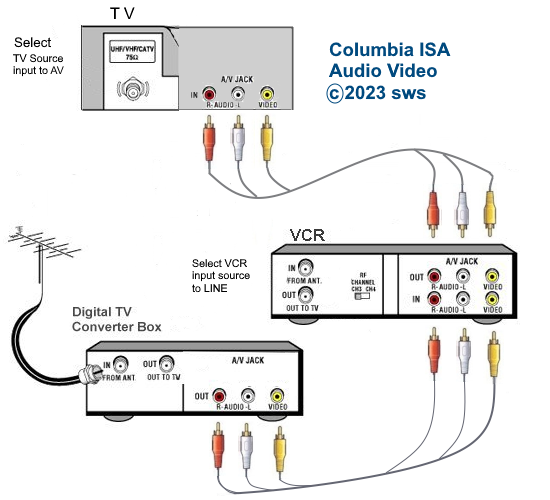
VCR hookup for digital broadcast TV (ATSC) using converter box
With digital TV broadcasts, the converter box will output on channel 3
(or 4) to the VCR's tuner. Set the VCR when recording to channel 3 (or
4) and the TV likewise.
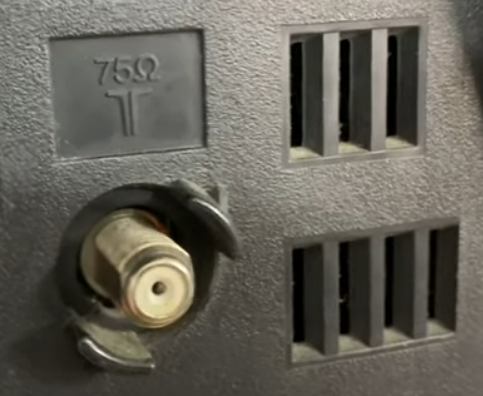
Analog CRT TV Coax RF input
In the old days, a TV antenna connected directly to this port for tuning channels 2-13 VHF and 14-83 UHF.
This port is now used to connect the coax cable from a DTV converter box output or a VCR RF coax output.
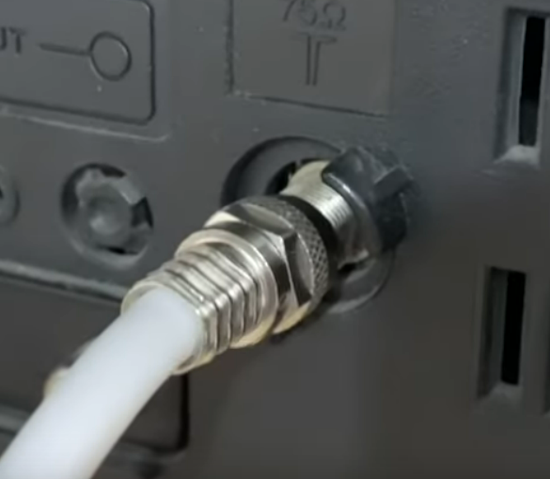
TV coax cable connected. Be sure to insert copper wire into small hole and align and turn cable until screwed on tight.
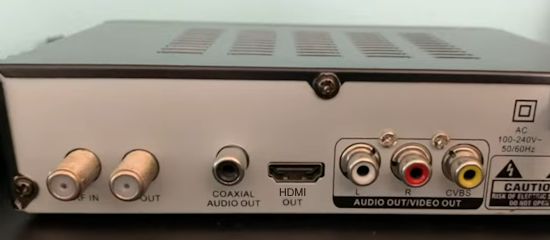
Digital to Analog TV converter box rear panel
From left to right the ports are RF antenna coax input, RF coax output, output for digital audio, HDMI output for flat screen high-definition
TV, RCA audio output (white and red) and RCA video output (yellow).
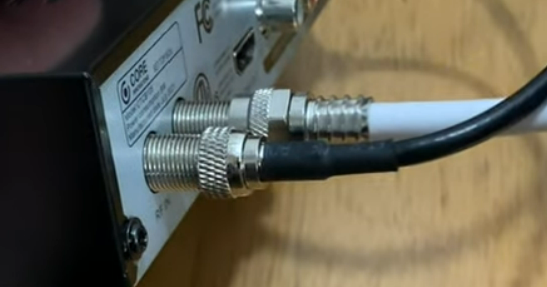
Coax cables connected to DTV box. Black is antenna feed in and white is output to TV RF coax antenna input port or VCR RF coax input port.
• VCR to TV Connections
How to Record over-the-air digital TV shows on VCR
Since the VCR tuner is analog (NTSC) and local TV stations broadcast in digital (ATSC), the VCR tuner cannot directly receive TV programs to record. However, using a digital to analog TV converter box,
and sending the channel tuned on the DTV box out to the VCR on channel 3 (or line out using 3 RCA cables), you can still record broadcast TV shows (in standard definition).
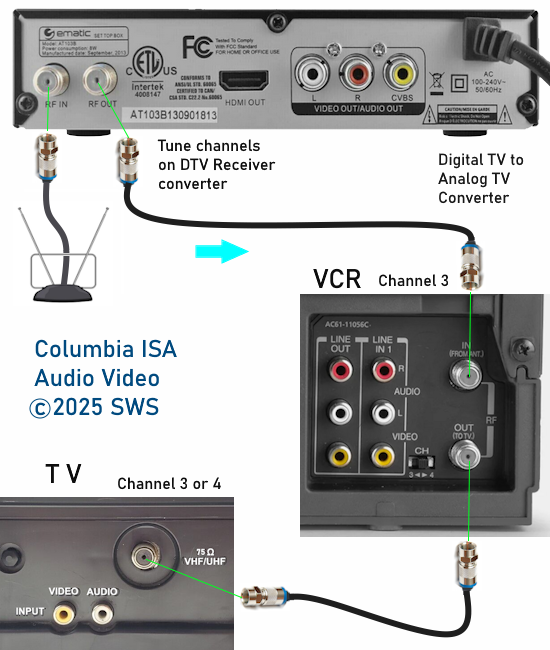
Connection diagram to record and view broadcast TV
If you try to tune TV channels (scan) on the VCR, the only channel you can pick up is channel 3 when the DTV box is connected and powered on. So set the channel to record on the VCR as channel 3.
This way any channel tuned on the DTV box will come over to the VCR as channel 3.
Attended and unattended recording on VCR
For a VCR timer (timed) recording, set channel 3, start time, stop time, tape speed etc. and
then the VCR will power on at the preselected time and record channel 3 which will be any channel tuned in on the DTV
converter box at that time.
Some DTV converter boxes have the ability to be set
to power on at a preset time. Setting this up would allow the DTV box to remain off until the set record time.
Otherwise the DTV box would have to remain powered on and tuned to the proper channel for possibly long periods of time unless attended by someone.
If the 3 RCA cables are used as the connection from DTV box to VCR, set the channel on the VCR as L1 or LINE input instead of channel 3.
DTV Converter box preset Power On
Using the DTV converter remote control, press the "MENU" button. Skip over to the "TIME" section using the right arrow button. Skip down to
"Power On/Off" using the down arrow button. Press the "OK" button to select.

Press the right arrow button to ENABLE Power On and then press the down arrow button to select Power On Time. Next press the number
buttons to enter the time (hour and min) and then press the down arrow button to go to the Power Off section. Press the right arrow button
to enable. Press the down arrow button to go to the Power Off Time section. Next press the number buttons to enter the power off time (hour and min)

Press OK to confirm and then press the EXIT button to return to previous menu. The DTV converter box should now power on at the preset time
and if set to the channel you want to record, will send audio and video to the VCR for recording. The VCR will also have to be preset to do a
timed recording at a specific date/time. Be sure to select the channel you want to record on the DTV converter before you power off the receiver.
This way when the receiver powers on, the correct channel will be recorded.
Checking the DTV converter clock - correct date and time
Press the EPG button on the remote. This will show the electronic program guide. The EPG will display the DTV converter's current date and time along with TV programs. Make sure you have the correct settings. The digital TV broadcasts will usually send signals with the date and time so
that the converter gets this information when powered on. Some converters allow you to set the clock manually. Be sure you have set
the correct TIME ZONE (Eastern, Central, Pacific etc.) and if it applies, the setting for DST (Daylight Savings Time).
VCR Programming
VCRs need to be setup for the first time and after a power outage
possibly, with basic information like your preferred language
(English), time zone (Central/Pacific), date (year/month/day), time of
day (hour/min), cable or antenna signal source, receivable channels (scan) and so
forth. After this initial setup, you can program the VCR to record TV
shows.
Usually you would use the VCR's remote control to do the initial setup,
pressing the up/down/left/right arrow buttons within the on-screen menu
system. Press OK/SELECT or the like to select the menu item you want.
There should be a "MENU" button on the remote to enter the setup screens. In the case of some Panasonic VCRs, this button is called
"ACTION" on the remote. Each brand of VCR is slightly different. Search online to find your VCR's user manual. Often these can be downloaded
so you have the instructions.
You must set the clock so the VCR can power on at the proper time of
day to record.
How to set the clock on a VCR.
Follow the steps below to set the clock:
Use the VCR remote control
Turn on the VCR.
Turn on the TV.
Tune the TV to the channel (usually 3 or 4 if using coax cable) or video input (TV/VIDEO) to view the VCR screen. Some VCRs only
show the on-screen menu if you have the coax cable connection and tune to channel 3 or 4. If using a universal remote, the buttons
will be labeled slightly differently. Here, you will need to experiment to find which button functions as the original remote button and
sometimes universal remotes do not have all the functions of the original remote.
For high-definition TV, select the input source the VCR is connected to
On some VCRs you need to press ANT or LINE or INPUT button to show the VCR on-screen menu options.
On the VCR Remote control, press the MENU button.
You should see the VCR main menu on the TV
Press the up arrow or down arrow to select Clock set.
Press the OK button.
Press the up arrow or down arrow to select MANUAL.
Press the OK button.
Press the arrow buttons UP, DOWN, RIGHT or LEFT to select the current hour, min, date, year
When finished
Press the up arrow or down arrow to select OK.
Press the MENU button or EXIT.
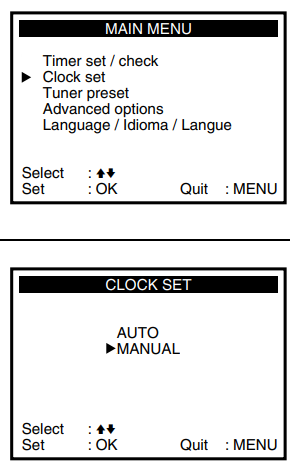
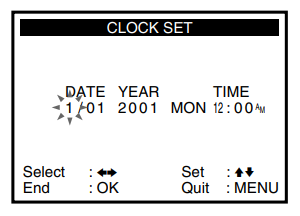
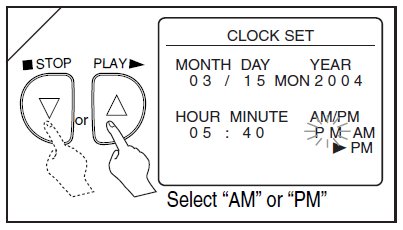
VCR CLOCK SET
Be sure to set AM or PM for the correct time of day
Do a channel scan, tuner preset or the like to pick up
all the channels you can record.
Select ANT for antenna if you're using a roof-top or indoor antenna to
get TV programs. Select CABLE if you're using a cable TV set-top-box to
get TV programs.
Which channel to record from is a very important step. You can record
from LINE input (Input Select) if you have a cable or satellite TV
set-top-box connected to the VCR's audio/video inputs
(yellow/white/red) or you can record from channel 3 or 4 if connected
with a coaxial cable.
What
to do if the VCR has no remote control.
You can buy a universal
remote and set it to your VCR brand. This may work.
You can order a
replacement remote online. Often they are available.
You can search
local thrift shops like Goodwill. Possibly look online for local ads.
You may find one.
Some VCRs have the main menu buttons on the front
panel and some VCRs can utilize the channel up/down and other buttons
on the front panel to control the on-screen menu functions.
Always make
sure to get the original remote when buying a VCR used. This way you
get all the functions.
A universal remote may only give you the main
functions and lack the more esoteric functions.
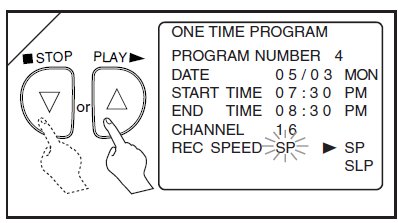
Setting
the VCR to record:
There are several ways
to setup a VCR to record depending on what capabilities and features
the VCR has built in, however this will only cover the manual method.
1. Place a blank tape into the VCR (rewound or in proper location on
tape) which has enough space to contain your TV show. See below for
recording times.
2. Make sure the VCR clock is set to the correct time.
3. Go into on-screen menus and select TIMER SET or the like for your
VCR.
4. Use up/down/left/right buttons on VCR remote to set DATE and TIME
for your TV show to start. Then do the same for the ENDING/STOP time.
Next select the channel to record or select LINE1. Selecting the LINE
input to record from is accomplished various ways depending on your VCR
model. For example on a SONY SLV-778HF model VCR, you press the INPUT
SELECT button on the remote and you should see LINE1 in place of the
channel.
Next select the speed (EP/SL). EP or extended play is slower
but gives you more time. SL is faster (uses tape up faster) but gives
you better video resolution.
To check the timer setup of the programs you have entered or to cancel an entry or modify an entry
Press MENU and select TIMER SET/CHECK
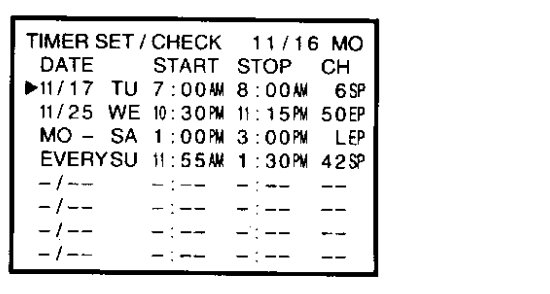
You should see the date, day, start time, stop time, channel and tape speed for each entry. The VCR channel will be 3 or 4 or LINE for
a digital to analog TV converter box while the correct over-the-air TV channel will need to selected on the DTV converter box.
5. When finished programming, press OK/SELECT and power off the VCR.
At the set time, the VCR should power on, record your show and power
off.
More recent VCRs will have better aids and prompts to help you setup a
timed recording. Some VCRs even have a button on the front panel to
setup date/time for recording (dial timer).
VCRs usually have what is called events so you can program multiple
shows at multiple times. An 8 event VCR can store 8 different
start/stop times for 8 different channels
or multiple times on several
channels.
Digital to Analog TV Converter Box Timer Recording
Since the VCR must take signal input from the DTV box and the DTV box must select the TV channel (DTV box has the ATSC tuner),
you must coordinate the VCR timer record with the DTV tuner.
For unattended recordings, the DTV box will need to be setup ahead of time like the VCR. Most of the DTV boxes have a PVR recorder
function using a USB drive to store the video. The DTV box should have a timer record function like the VCR so you can have the DTV box
auto select the correct channel at the desired time/date. In fact, if this function on the DTV box works to perfection, you could substitute
this PVR for your VCR if you are content with viewing from the USB drive instead of tape.
How to setup
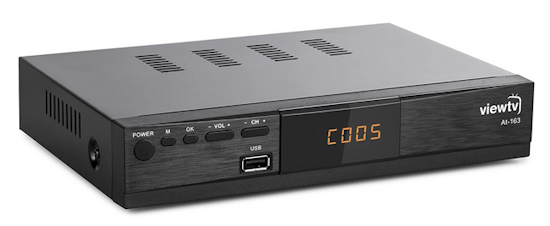
VIEWTV AT-163 DTV box
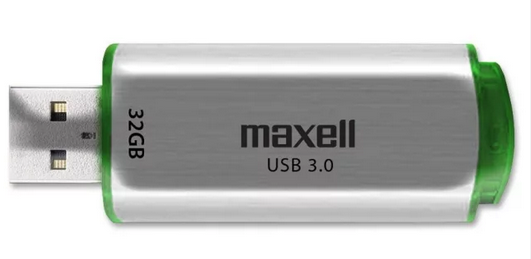
Maxell 32GB USB Drive
Of course all of the preliminary connections and channel scans have already been accomplished before recording.
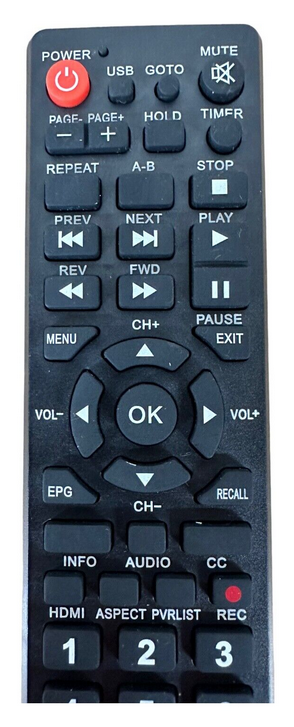
Remote Control for DTV converter box
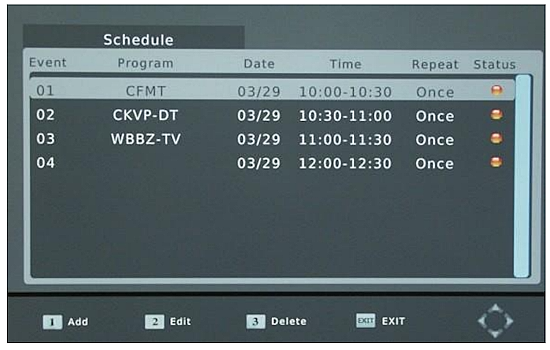
Press TIMER button on remote.
Next press the 1 button to add a recording event. To select the channel to record, press the
right arrow button until the channel appears on screen in the channel no. area.
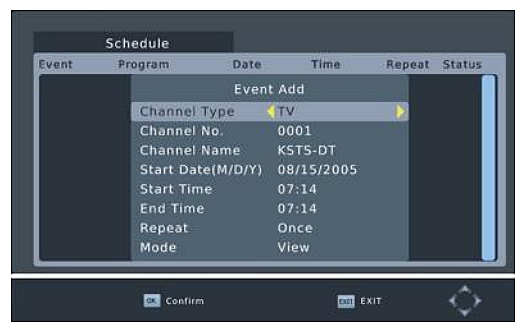
The channel name appears under the channel number.
Next press the down arrow button. Use the number buttons to enter the start date MM/DD/YY.
Next press the down arrow button.
Enter the start time HH/MM using the number buttons on the remote.
Press the down arrow button. Use the number buttons to enter the end time HH/MM.
Press the down arrow button. Press the right arrow button to enter ONCE or DAILY or WEEKLY.
Press the down arrow button. Press the right arrow button to enter RECORD or VIEW.
Press the OK button to confirm and save or Press EXIT button to exit.
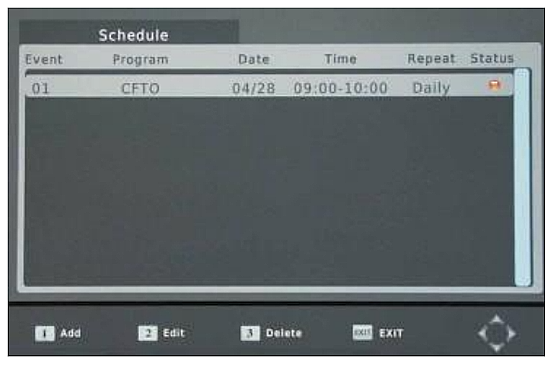
Press TIMER button to see the events scheduled.
To delete an event, select, press 3 and the OK button.
To edit an event, select, press 2, change info and press OK.
At the preset date and time, the DTV tuner will power ON and record the preset channel on the USB drive.
By coordinating the VCR timer record with the same date and time, the VCR will power ON and record the signal from the DTV box.
If setup correctly, the VCR will record your TV program, stop and power off. You just have to rewind the tape and watch at your pleasure.
Try a test run to see if it all works properly before your TV event occurs.
To playback a recording from the USB drive, press USB on the remote and the OK button. The USB drive will be read and
the recordings will be listed on the TV screen. Scroll down to select the PVR recording. Press the HOLD button for full screen viewing.
Clock set - press menu, clock set, move to each setting, increase or
decrease until correct number appears.

Most VCRs (and digital converter boxes) need to execute a channel scan
to
pickup all available channels.
Program the VCR by setting date, start and end times, channel or line,
and tape speed.
Navigation through the on-screen menus is different for each VCR brand.
Practice using the remote and see what happens. You're not going to
hurt anything.
Q: Where are the connection ports on a VCR?
A: Look on the back of the VCR to find the antenna input coaxial port and the RF coaxial output connection.
Also you have the RCA cable connections for input and output. Yellow video, white audio and for stereo VCRs, red audio.
Some VCRs also have front RCA inputs for a camcorder.
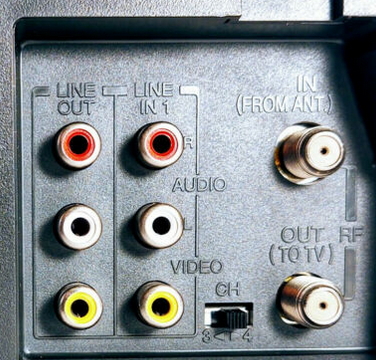
VCR Rear Panel
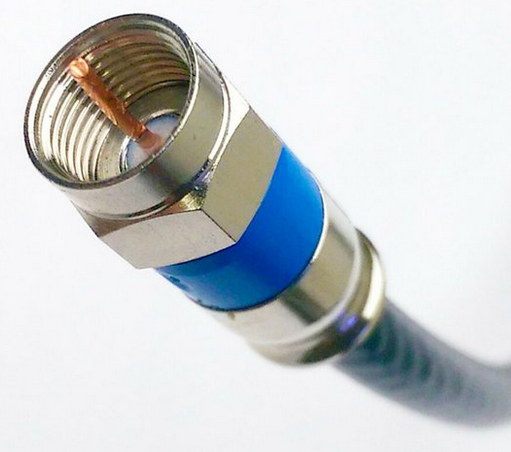
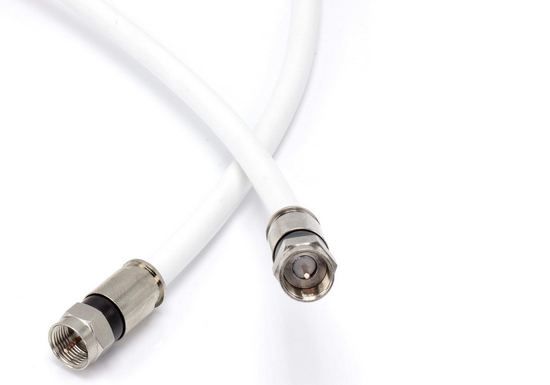
RG-6 Coaxial Cable to connect VCR
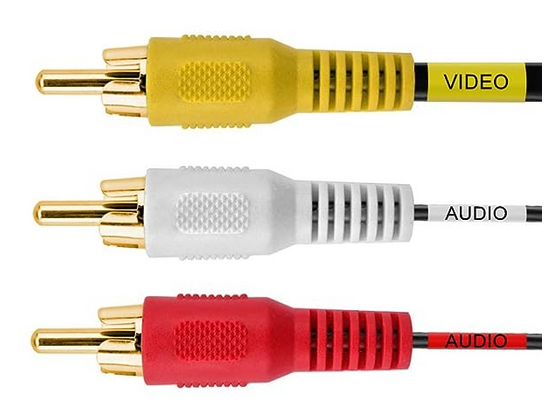
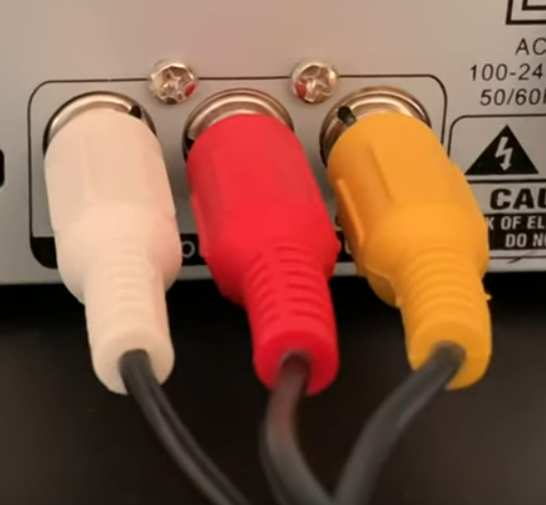
RCA cables to connect VCR
Mono audio VCRs will not have the red connection, only the white connection. The red audio cable is not connected for these VCRs.
VCR RCA cable connection gives you stereo sound and better video
Connection diagram DTV box to VCR to TV using RCA cables
RCA audio video ports
RCA cables connected
RECORDING TIMES
T-120
Blank Videotape :
Standard Play (SP) speed - 120 minutes (2 hours)
Extended Play (EP) speed - 360 minutes (6 hours)
T-160
Blank Videotape :
Standard Play (SP) speed - 160 minutes (2 hours, 40 minutes)
Extended Play (EP) speed - 480 minutes (8 hours)
Question:
Will my older VCR still be able to record with my new digital TV? Just
have rabbit ears.
Answer: Yes, but you need a digital to analog converter box, about $40,
to allow todays TV broadcasts to record on VCR.
Your antenna connects to the converter box and the converter box can
connect to the VCR using coaxial cable or the
RCA (yellow video and white audio) cables. This allows recording on the
VCR. Tune channel on the converter box.
For playback, connect VCR output (coaxial or RCA) to the TV (coaxial or
RCA) and select on the TV, the source for the VCR.
Question: Can
I record on VCR if I only have digital cable TV?
Answer: Yes, most digital cable TV set-top-boxes will have the yellow
video and white audio outputs. Connect these using RCA cables to the
VCR's RCA inputs and select the LINE input to record from on the VCR.
This will record any show you can receive on the cable box to the VCR,
only in standard definition video resolution, not high-definition.
• How to clean VCR heads
VCR Operation
The VCR is a electronic and mechanical device to record and playback video and audio to a television or other electronic device.
The magnetic tape is pulled from the tape cassette over an erase head and then over the video heads inside the metal video drum
and on to the take up spool on the other side of the cassette. The video drum spins the heads as the tape passes over them. The tape
travels at a variable set speed, faster for better quality but less recording time and slower for less quality but more recording time.
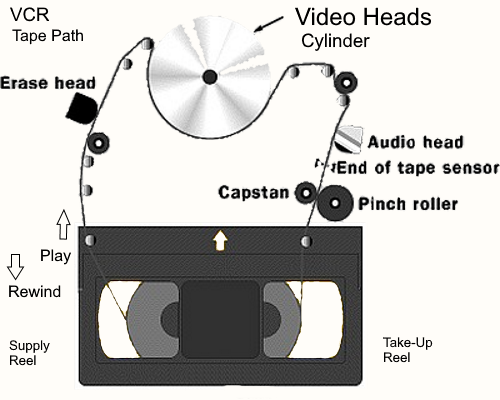
VCR tape path inside VCR
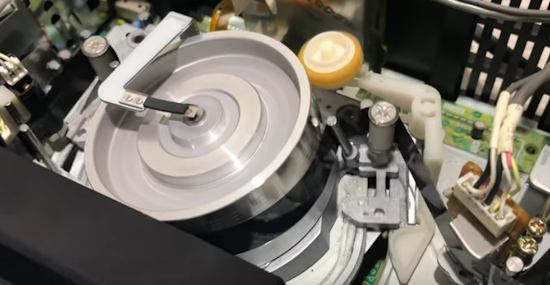
VCR pulls the tape from the cassette and over the video drum
Continue
>>
Next Page
More information on VCRs
|