|
|
|
HOW TO HOOKUP SURROUND SOUND • TV Streaming Surround Sound ROKU, FireTV, Netflix, Hulu • See over 100 A/V Hookup Diagrams • Surround Sound over HDMI • How to hookup a DVD player • How to connect PC to stereo system • Powered Speakers hookup Surround Sound For true surround sound you need a Source which provides multi-channel surround sound such as 1. Blu-ray disc 2. Streaming TV content from internet 3. DVD 4. Broadcast TV 5. Satellite TV or Cable TV You also need a capable Audio Video Receiver or soundbar with surround sound decoder and amplifier.  Audio Video Receiver 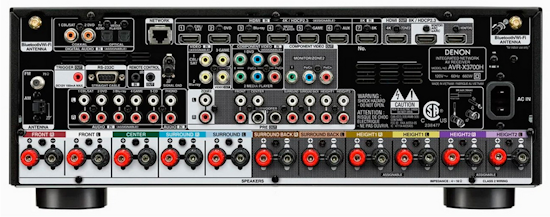 Audio Video Receiver - Rear 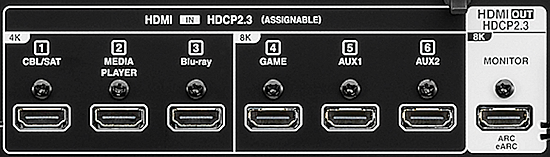 AVR Rear - HDMI inputs and output You need multiple loudspeakers, 6 at a minimum. 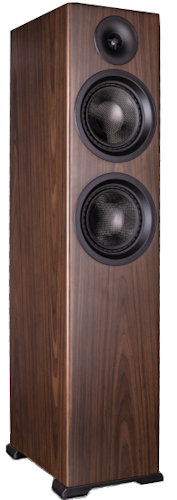 You need speaker wire to connect speakers to AV Receiver.  For hiding the wires, you can get flat speaker wire. This way you can hide the wires along raceways. mouldings or in walls or ceilings. You could place them under carpet but not in walkways. Soundbars eliminate the wires since the speakers are built-in to the soundbar but you will not get the full surround experience. A soundbar may also be a good choice for renters since a renter may not be able to cut holes in walls or ceilings for Dolby Atmos or be able to blast full audio from a home theater setup without getting complaints. A soundbar is a good choice for the non-technical since you just plug it in, connect the audio cable, select the input and enjoy. But which sounds better, a soundbar or a full AVR setup? There is no question about it, the AVR full surround setup sounds better than a soundbar. Soundbars have smaller speaker drivers and less power behind them than the full AVR setup. Soundbars are usually thin and not too tall so they have to have 3 or 4 inch speakers so the soundbar does not cover up the bottom of the TV screen. The AVR setup uses larger, more powerful speakers capable of pushing more air out to the listeners ears. Why can't I use my TV for surround sound? TVs usually only have two speakers for stereo (2-channel) sound. Surround sound requires 6 or more channel sound. TV speakers are small and cannot provide the best sound experience like full sized loudspeakers. The speakers need to be positioned around the listener for a surround sound experience. Surround Sound Speaker Placement 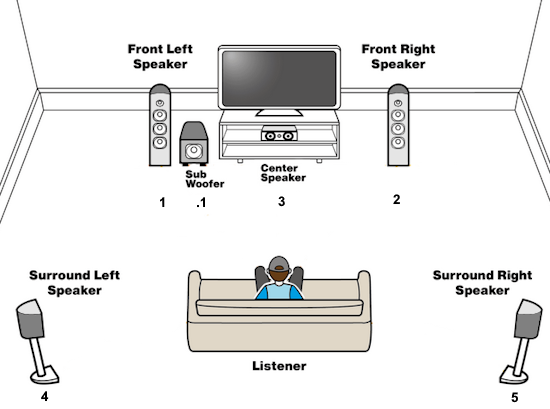 Surround Sound 5.1 setup - Speaker Arrangement The five represents five full range speakers, left front (1), right front (2), center (3), left surround (4) and right surround (5). The .1 represents the sub-woofer or bass low frequencies speaker. A 7.1 setup adds two more surround speakers. Dolby Atmos adds height speakers and also adds a third speaker designation so that you have a 5.1.2 or 7.1.4 setup or more.  6 channel (5.1) surround sound speaker connections Each audio channel is decoded, amplified and routed to the correct speaker. For example, the center speaker will receive over half of the voice or dialog content from the source while the booms of car crashes may get sent to the subwoofer speaker. Concerts or music get sent to the front left and front right speakers. Dolby Atmos adds moving sound. For example, a helicopter can start at the front and move to the rear overhead speakers for realistic sound. The source can be broadcast TV, satellite TV, internet sources or DVD, Blu-ray disc and so on but remember not all channels or content providers will offer surround sound. You may only be receiving 2 channel stereo. The decoder and amp can be a soundbar (not true surround sound) or a modern Audio/Video Receiver. SoundBars The soundbar is a long speaker setup designed to blend with your TV decor and give you better sound than your TVs built-in speakers but not as good as a true surround sound system. The soundbar has small speakers, left and right, which can provide the illusion of surround sound and often come with a subwoofer for enhanced bass. Soundbars vary in capability and price and can provide a minimal hookup of analog audio and digital audio or more robust hookups including HDMI with multiple inputs for TV, video games, DVD/Bluray and cable or satellite boxes. The subwoofer can be wireless so no wires are needed from the soundbar. Soundbars are easy to setup and are a good choice for small rooms. However, an Audio Video Receiver with full sized speakers is the best choice for home theater and the best sound experience. 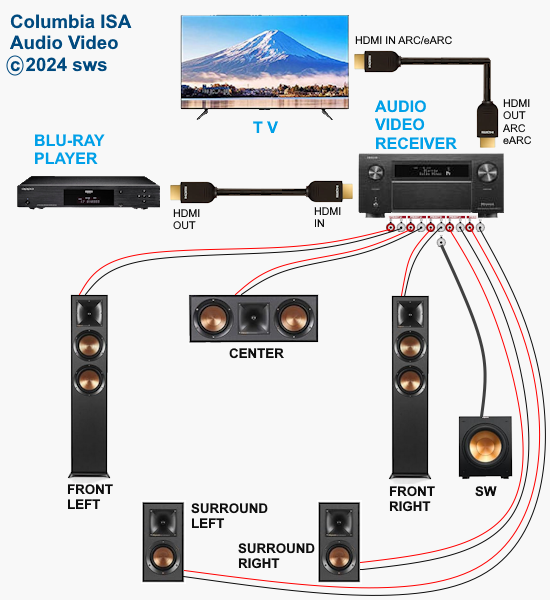 Surround Sound Connection Diagram How to Setup Surround Sound for Fire TV Stick 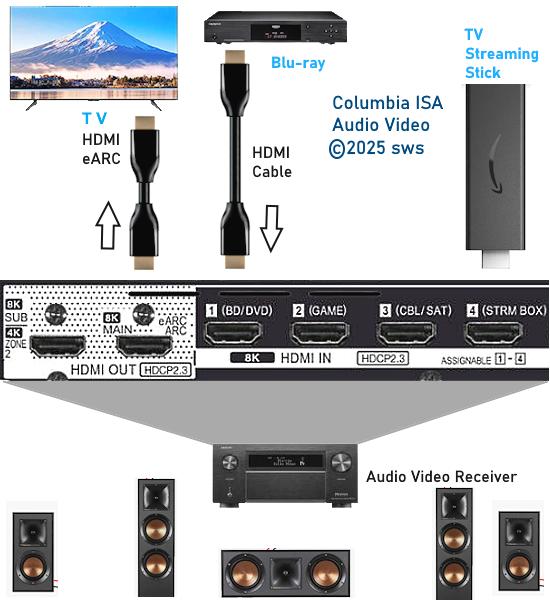 Internet streaming content provders offer surround sound on some of their programming using their apps. Dolby Atmos is available usually through Dolby Digital Plus, a compressed audio format used by the content providers. Select the Fire TV stick as the source input on the Receiver Set the TV to the HDMI eARC input. This is the connection to the Receiver's HDMI eARC output. Long press the "HOME" button on the Fire TV stick remote.   Skip over to "Settings" and select. 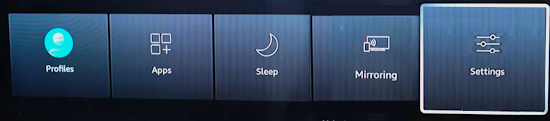 Navigate over to "Display & Audio" and select. 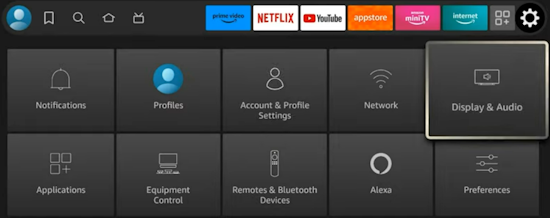 Go down to "Audio" 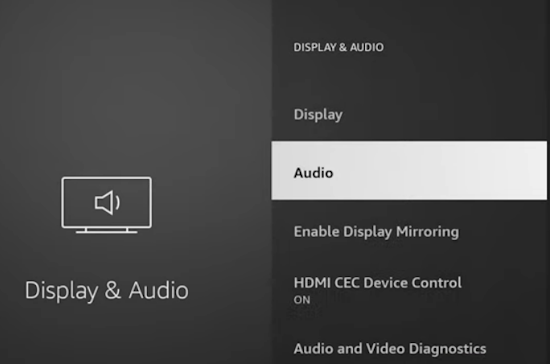 Select "Surround Sound"  Select "Pass-through Dolby Digital Plus"  You should see on the AV Receiver's front panel display, the surround sound format being decoded and processed. 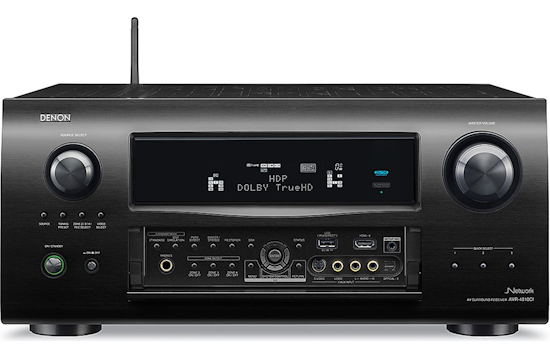 Surround Sound Formats Surround Sound can be in many formats from Dolby Digital 5.1 to Dolby Digital Plus to Dolby TrueHD with Dolby ATMOS and more. 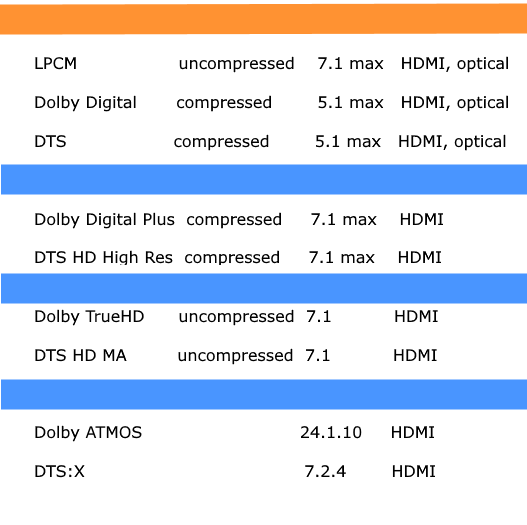 Note: Dolby Atmos is not a surround sound format. It is metadata or information about sound which rides on a surround sound format such as Dolby Digital Plus or Dolby TrueHD. Your decoder/amp must be able to process the audio surround source format, which most modern devices offer. Use HDMI cable or Optical cable or digital coaxial cable to hook up your surround sound source component (Cable box, Blu-ray player etc.) to your surround sound processor component (Audio/Video Receiver, Soundbar) which has speakers attached or inside. Connect the OUT jack on the source to the IN jack on the decoder/processor. When using HDMI to get video and audio to the decoder/processor component, you generally connect another HDMI cable from the HDMI OUT on the processor component to the HDMI IN on the TV. For the best digital surround audio such as Dolby TrueHD on a Blu-ray Disc, HDMI must be used as optical or coaxial does not have enough capacity. 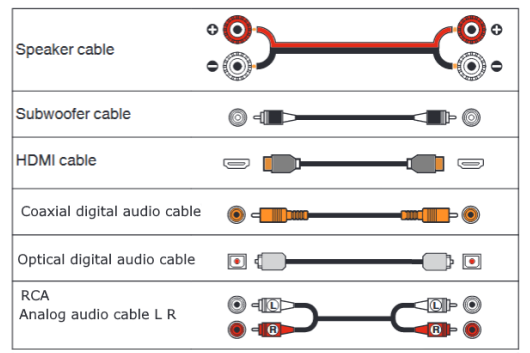 Cables used with audio connections  HDMI port - 2nd from left Orange Coaxial Audio port Optical Audio port - far right 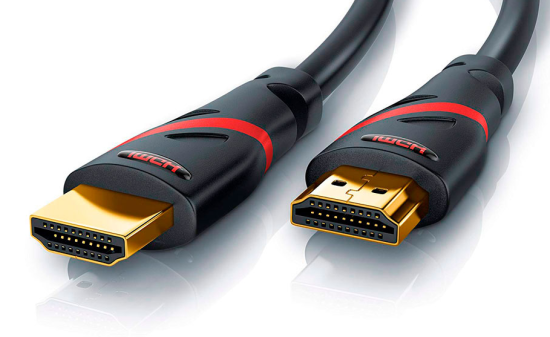 HDMI Cable HDMI connections can send video and audio. HDMI can handle the highest audio formats and 4K and 8K video.  Optical Audio Cable Optical audio cables use light instead of electricity to transmit digital audio. Optical can send Dolby Digital 5.1 but not the higher end formats. These fiber optic cables can be longer than the copper cables and are less affected by electrical interference. The connection ports are called TOSLINK for Toshiba Link. Be sure to remove any plastic protective caps on the end of the cable before inserting. 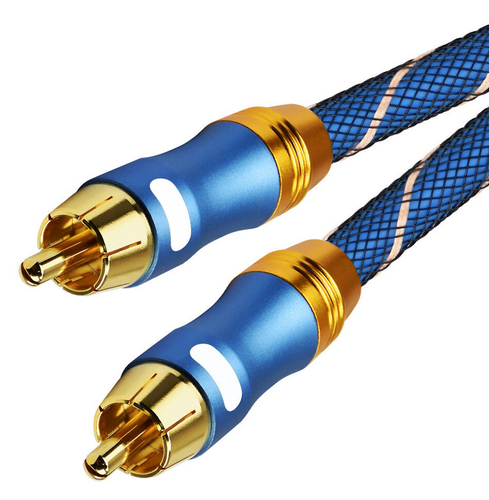 Coaxial Audio Cable These audio cables are high quality shielded RCA cables and can handle the same audio formats as optical. There are adapters to convert coaxial to optical and optical to coaxial if a device has only one type of port and does not match the other device port. How to Hook Up Surround Sound 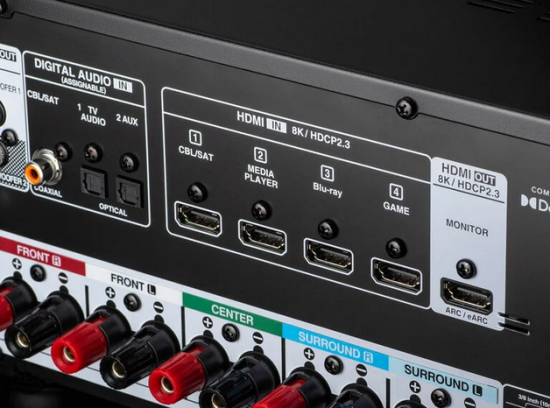 Audio Video Receiver rear On the left are the orange digital coaxial audio input and two optical digital audio inputs. The four HDMI inputs and the HDMI OUT (ARC/eARC) on the right. Surround Sound from TV Most televisions today use HDMI or OPTICAL connections to send audio out to a processor/decoder (soundbar or AVR). If your program has surround, connect TV to soundbar or AVR with speakers to get surround sound. Use an optical audio cable or HDMI cable.  Be sure to set the TV audio output to the correct sound setting in the audio on-screen menus and be sure to select the correct input source on the soundbar or Audio Video Receiver. 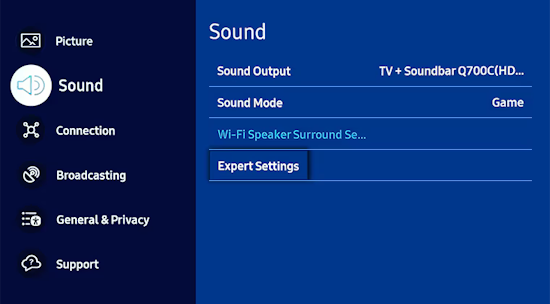 Samsung TV Sound Settings menu options 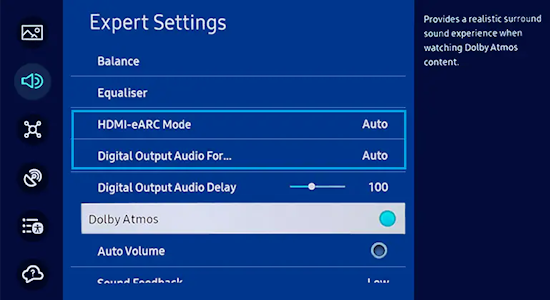 For Surround Sound, select the correct digital audio output setting Stereo sound has 2 channels, left and right. Stereo receivers have 2 speaker connections, left and right. Surround sound has 6 channels or more. Surround sound typically has to be decoded before going to your amplifier and loudspeakers. Surround sound is available on most DVD movies, Blu-ray and many TV programs. For surround sound you need a source such as a DVD movie with surround sound audio available like Dolby Digital 5.1 or you could use a source such as a TV program (satellite, digital cable or ATSC broadcast TV sending Dolby Digital 5.1) and you need a component with a decoder such as an Audio/Video Receiver (AVR) with Dolby Digital 5.1 or greater capability. You also need loudspeakers, including left front, right front, center, left surround, right surround and a subwoofer for a total of six speakers minimum. The AVR must have digital inputs: fiber optic (Optical) and/or digital coaxial (Coax) or HDMI. Without these, you're stuck with stereo surround. That means you'll get sound from all your speakers, but it will be simulated surround sound. Rather than playing the 5.1 soundtrack on the DVD, your receiver will take the stereo track and decide what to play in the rear speakers. Your subwoofer will be under-utilized. If your receiver has digital audio connections, your DVD player has to have them, too (virtually all do). You'll also want to have a subwoofer pre-out on your receiver. This is usually colored purple but not always. Check your receiver's manual to determine whether or not you have a subwoofer pre-out and to figure out where it is on your receiver. If you don't have a sub pre-out, there's an alternate way of hooking up your subwoofer, but its not optimal. Your bass will be drastically reduced. For an optimal surround sound setup, you'll need the following: - (1) Optical or digital coaxial audio cable or HDMI cable. - (1) Subwoofer cable (or a regular RCA audio cable, but an actual subwoofer cable is preferred) - (1) Y-Adapter (this plugs into the red and white RCA jacks on your subwoofer and combines them into just one jack. With many subs this is not required) - Enough speaker wire of 14 gauge quality to connect your 5 speakers and your subwoofer (200 ft for most rooms) The Y-adapter is optional but recommended. Some subwoofers expect two inputs from your receiver, but for your use, you'll only be outputting one cable (from the subwoofer pre-out) to the subwoofer. The Y-adapter is the optimal method of hooking up your sub, but if you don't have one, just plug the cable from the receiver into either red or white RCA inputs on your subwoofer. If you don't have digital audio inputs on your receiver and/or DVD player, you'll need a pair of RCA audio cables (red and white). And if you don't have a subwoofer pre-out, you'll need a little extra speaker wire.  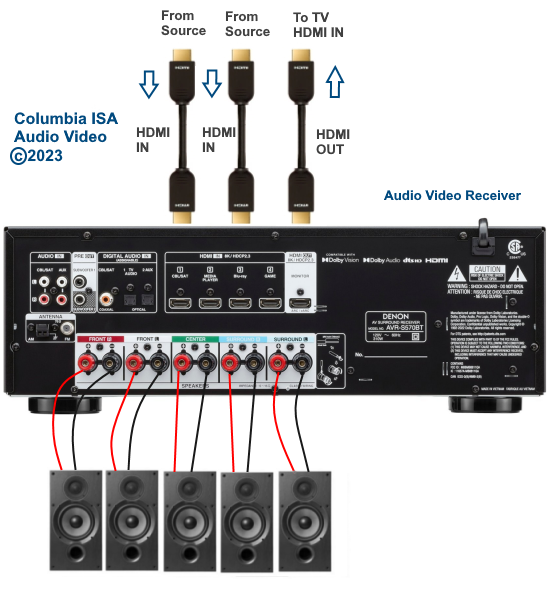 HDMI ARC and eARC HDMI has been available since 2004 and HDMI ARC since 2009 while eARC was not generally available on a TV until 2019. Some audio video receivers and two Sony TV models offered eARC in 2018. HDMI Audio Return Channel (ARC) and enhanced Audio Return Channel (eARC) . ARC is a 2 way HDMI channel. This allows audio to be sent one direction and video the other. The enhanced ARC or eARC is the newer more capable version. eARC is needed for the latest audio formats. Most TV makers ship their TVs with the ARC function turned OFF. You may need to go into your on-screen menus to turn on your ARC function to get your surround sound working. How do I know if my TV and soundbar, AVR have ARC/eARC? Look at the HDMI ports on the TV or soundbar to see if HDMI 2.1 or ARC eARC is labeled next to the port. You may see HDMI ARC or you may see HDMI ARC/eARC or HDMI 2.1 but since manufacturers can label a port HDMI 2.1 it does not mean they included the chips inside your device for all the HDMI 2.1 features. For the eARC capabilities, your TV, soundbar or audio video receiver should be a 2019 or later model. If you see HDMI ARC but no eARC label, and your device was made before 2019 then chances are your device is not eARC capable but may be ARC capable. Do I need a new HDMI cable for eARC? The Ultra High Speed HDMI cable is recommended for the best results using eARC. Older HDMI cables may not be capable of delivering the latest sound formats. Speaker Placement Its important to understand that you can't just place your speakers (or subwoofer) just anywhere in your room. You need to consider distance, angle, level (vertical height), and if there is anything blocking the sound. Considering distance, you should make sure that your front speakers and center channel speaker are located close to the TV. Its OK to space your front left and right channels out towards the walls, but don't put them further out than where you'd be sitting. For instance, if your seating goes all the way against the wall, you could have the speaker against the wall. But if your seating ends say 10ft from the wall, don't put your speaker past that point. Rear speakers should be spaced out equally to the fronts (or close to it). They will also need to be as directly behind your seating as possible. Don't put them 10ft behind where you sit if you can get them closer. They don't do a lot of work in most movies, and most of the work they do is typically quiet compared to the front speakers. The subwoofer can be anywhere between where you sit and the TV. Optimally, place it closer to the TV and more to the center of the room. You also don't want to put the subwoofer behind dense objects, doors, walls, or in closets. When possible, let the subwoofer rest on the floor itself. Putting it in a cabinet or anything else that raises it off the floor will diminish its effects. When positioning your speakers, make sure the front, the center, and the rear speakers are aimed straight out towards where you sit. The subwoofer doesn't matter as much as long as it is not directly blocked by anything. You obviously don't want your speakers facing the floor, the wall, or the ceiling. The height of your speakers should match your ear level when sitting. You don't have to get it dead on, but try to keep all your speakers as close to ear level as possible. That means if you're mounting your speakers, don't put them at ceiling height. The subwoofer is always best on the floor, and rear speakers need to be as close to ear level as possible. An exception is the center channel. Its not always possible to get it just where you want it since it is in the center - right where your TV is. You can place a center channel speaker above or below your television, but keep it away from the ceiling and the floor. 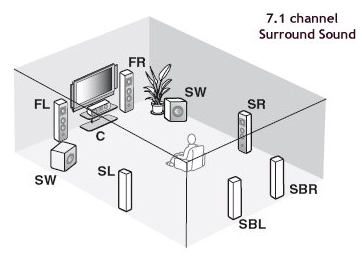 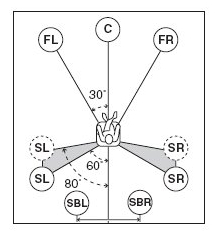 Running the Speaker Wire Start connecting the speakers one by one and running the wire back to the receiver. You're going to want to make sure you connect the right speaker to the right jack on your receiver. First recognize that you will be connecting positive (+) and negative (-) wires on your speakers and on your receiver. Most speaker wire is either colored differently or has writing on one of the cables to designate + vs -. Figure out which one is which (in the case of identical colors and text on one cable, just pick one for positive and one for negative). As long as you match it up on both ends (the speaker and the receiver), you're going to be fine. Just don't use one of the wires as positive on your speaker and then the other wire as positive on your receiver. Crossing the wires is a no-no and can result in damage (or possibly fire). Keep it simple and use the same scheme for every speaker. Determining which speaker is which is quite simple. Stand in the center of your room and look at your TV. The speaker to your front left is just that - front left. Then you have center and front right. Behind you and parallel to your front left is your rear left. Opposite that is rear right. Now you know which is which on your receiver. How to Run Speaker Wire Speaker Wire Gauge The gauge of a wire means how thick the electrical wire actually is. Speaker wire is simple electrical wire insulated by a protective sheathing. The thicker the wire, the more electrical current can pass through. The higher the gauge, the thinner the cable. This means 18 gauge is much thinner than 12 gauge. 14 AWG is fine for most installs. A 10 gauge cable is far too thick for most receiver and speaker input jacks. Gauge also depends on how long the wire is. If you need to run a 100 ft speaker wire, you'll need 12 gauge. For anything less, 14 gauge is optimal. Most rooms won't require a single run of speaker wire longer than 50 feet, so you don't have to worry about distance unless your room is very large. Some receivers, and even some speakers, can't handle thick speaker wire. This is especially true for HTIB (home theater in a box) systems or extremely inexpensive equipment. Try to connect 14 gauge cable, but if it doesn't fit, you'll have to use 16 or even 18 gauge. Speaker Wire Length As mentioned, very long runs of speaker wire require lower gauge cable. But you also need to keep your speaker wire matched. Its simple: If you run 15 ft of speaker wire for your front left speaker, than your front right speaker needs to be 15 ft as well. Your rear speakers should match each other, but they don't have to match the front speakers. You want to do this to avoid sound delays or varying volumes. Different lengths of cable can provide different levels of wattage. Hiding speaker wires 1. Under your carpet - for an area rug, make sure to have a big enough rug to cover from the front cabinet edge all the way to the rear area where the rear surround speakers sit. For installed carpet, you can pull the carpet from the nail boards, cut a groove in the liner pad for the wires and re-install the carpet over the wires. You can get flat speaker wire for this case so that there is no bump in the carpet. Hidden Super Flat Audio Cable. Can be used on the wall, floor or ceiling, used for hidden speaker wires. 2. Baseboards and crown mouldings - wire can be run along raceways or use clips and paint the same color as the existing decor. 3. Inside walls or ceilings - running wire this way may require some work with drywall so if you are not a do it yourself type, you can call the professionals. 4. Clips - attaching the wires to the wall with clips. Some are available with nails or screws and can be painted to match decor. 5. Cable sleeves or raceways - vinyl or plastic covers along baseboards or floors to seamlessly hide them from view. Color match to existing decor. 6. Wireless speakers - you will still need to run the speaker's power cable to an A/C outlet. Wireless can have issues with sound quality. Positive and Negative Leads You've probably noticed that speaker wire splits off at either end into two separate eletrical wires. These are called leads. One of them is positive and the other negative. They can be used interchangebly, however, as neither is definitely positve or negative. What matters is which one you choose to use for positve and which for negative. Most speaker wire is colored differently or labeled on one side or the other. This helps you match the leads up. For instance, if one of the lead's sheathing (the coating around the electrical wire) is red, use that for negative on your speaker and your receiver. This way, you're not crossing the leads by using the wrong one for negative on the speaker or receiver. Crossing leads can result in damage to your speakers and your receiver. It can also lead to fire under some circumstances. Plugging Speakers In Now that you understand the basics to wiring your speakers, you can go ahead and connect them. Most receivers have speaker jacks in the form of binding posts. Bind posts work by tightening a plastic cap down on your speaker wire. You would loosen the cap by turning it counter-clockwise until you can slip a lead into it. Then you would turn it clockwise to tighten it down on the lead. However your receiver or speaker jacks are designed, make sure you get a good amount of the lead into the jack. You might have to strip your wires yourself (or extra on pre-stripped wires). Stripping means cutting away the protective sheathing on the end of the wires to reveal more of the leads. A good rule of thumb is to leave a quarter inch of electrical wire exposed. You want to get as much of it as possible into the speaker wire jacks to ensure a good connection. If your speakers aren't working or are giving off static/low volume, check to make sure you have good contact with the leads in the wire jacks. You might have to strip the wires a bit more to get enough electrical wire into the jack. Some speakers and receivers have easy connect posts such as banana connectors. This makes it easy to disconnect and connect. • How to hook up Speakers - Banana plugs 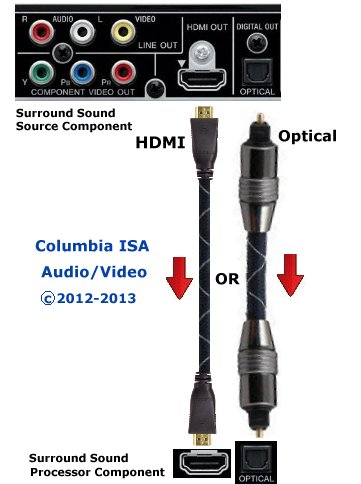 Connect the Subwoofer Subwoofers come in a variety of designs with many different capabilities and features. Most subwoofers today are powered, that is they have an amplifier inside the speaker enclosure. Also, most subs have controls for volume and phase along with connections for RCA cables and speaker wire. If you have a Y-adapter, go ahead and plug that into your sub's red and white RCA inputs (line level). Then plug a subwoofer cable or an RCA cable (if you have a red and white pair, just select either the red or white and let the other cable dangle) into the Y-adapter. The other end goes into your audio/video receiver's subwoofer pre-out RCA jack. Now plug the power in for your sub and you're finished with connecting the subwoofer. If you don't have RCA inputs (line level) on your subwoofer, you might not even have a power cable for it either. That means your subwoofer is un-powered. Therefore it will not and cannot sound as impressive as a powered subwoofer. Either way, if you don't have RCA jacks (or your receiver doesn't have a subwoofer pre-out), you've got to connect the subwoofer a bit differently. You'll notice some speaker wire jacks (speaker level) on your subwoofer. There should be four pairs of them (two inputs, two outputs). What you have to do is run your front left and front right speaker cable into the left and right speaker outputs on the subwoofer. Yes - that means instead of running the front speakers to the receiver, they go to your subwoofer's outputs. Next, use more speaker wire to connect the speaker inputs on the subwoofer to the left and right speaker jacks on your receiver. Make sure you're going left to left, right to right (check the labels) and not crossing positives and negatives (remember your wiring scheme). Once you've done that, you're all set with your subwoofer except you may have to adjust the phase and volume on the subwoofer to match your other speakers. Whatever sounds best to you is how to set your levels.  Powered Subwoofer Panel Connect source device to audio/video receiver Now connect audio cable from your DVD player to your receiver. If you have digital coaxial or fiber optic jacks on both the receiver and DVD player, choose one of them and connect the output on your DVD player to the input on your receiver. If your receiver has multiple inputs, choose one labeled DVD. If you don't have digital connections, run a pair of red and white RCA audio cables from the outputs on your DVD player to red and white audio inputs on your receiver. This is only 2-channel stereo, not surround sound. For the video (picture) connect a yellow composite video cable or component (green, blue, red) RCA video cables from the source device to your TV. The last thing you need to do is select the input you want on the receiver. For the DVD player, select DVD. When using a digital audio connection, refer to your receiver's manual. You need to select which digital input you're using (usually labeled Digital 1, Digital 2, etc.). Its simple but every receiver is different. Some might even automatically select the DVD player if it is the only digital audio input connected to the receiver when you turn on the DVD player. When using analog (composite, red and white) audio connections, just select the input you used. They might be labeled Video 1, Audio 1, TV, DVD, CD, or some similar label. The back of your receiver should be labeled as to what input you connected. How do I connect Fire Stick or ROKU to my surround sound system Connect your Fire TV stick or ROKU to your Audio/Video Receiver (or soundbar) HDMI input port. If you want 4K, you need the 4K stick or 4K ROKU and you plug into a HDCP 2.2 HDMI port on the AVR. You can plug into any HDMI input on the AVR but you may not get 4K. Next, plug in an HDMI cable to the AVR OUT ARC to TV HDMI port and then the other end of the HDMI cable into the TV ARC HDMI port. eARC is needed for the high end audio and this is available on current TV and AVR models. You could plug your stick directly into the TV HDMI input, however not all TV will output surround sound properly to the AVR. You may not get surround sound, only stereo. AUDIO SETTINGS The AVR or soundbar may need to be set to the proper audio output in the menu options. AUDIO - Best Available or AUTO is often the audio setting which will yield surround sound but each device is different so try each setting to find out which one gives the best sound. On the TV select the HDMI ARC as your input source and you should see the content from the stick on the TV screen. • How to hookup an Audio/Video Receiver • Surround Sound over HDMI • Xbox 360 Kinect motion sensor • Surround Sound Audio hookups for Xbox 360 • How to hook up a Plasma or LCD HDTV • How to hook up a Cable TV box • Cable TV - Cable Box Setup • How to Install a HD Cable Box • Cable TV - Cable Box Setup Scientific Atlanta 4250HDC • Surround Sound over HDMI • Surround Sound - How to Hookup • HDTV Antennas and Reviews • See over 100 hookup diagrams • Bluray Players, internet-enabled, Netflix movie streaming • Cable Types, audio/video for TV, explanation • Hookup diagrams, TV, VCR, DVD, Digital cable box • DVD Players reviews and Guide • VHS to DVD copy VCR tape to DVD disc • United Kingdom TV, SKY, HDTV, Surround sound • What's the best way to get connected to the internet? click here • Surround Sound • Audio and Video Cables • Blu-ray Surround Sound • Blu-ray Basics, players, Netflix • Blu-ray and HDTV • Video cable connections • Cable TV video cables • DVD cables • Camcorder Formats • Hookup diagram hdmi bluray • 100 hookup diagrams • DVD connect • DVD FAQ • DVD Glossary • DVD player - How to connect • DVD Introduction • DVD players • DVD buying guide • DVD Primer • RF Modulator hookup for DVD • DVD player trouble-shooting • HDMI Switch Box • How to add great sound to your HDTV • How to add great sound • Internet-ready HDTV • LED HDTV • Diagram RF Modulator • Surround Sound Glossary • How to hookup surround sound • Surround sound over HDMI • Hookup TV DVD VCR • VCR basics Columbia ISA - Audio/Video Empowering consumers through information columbiaisa@yahoo.com |