|
|
| See
over 100
hookup diagrams |
| How to Hookup Surround Sound Speakers Surround Sound involves multiple speakers driven by a capable audio/video receiver where the speakers are connected to the receiver. The speakers are connected to the receiver using speaker wire. There are two wires per speaker, one positive and one negative. 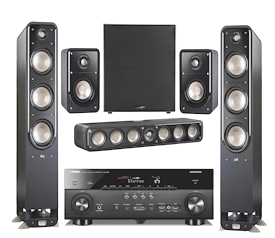 Audio Video Receiver (AVR) a 5.1 surround sound setup. Five full range speakers and one speaker for low frequencies. The speakers in a 5.1 setup are left front, right front, center speaker, surround left, surround right and a subwoofer speaker for bass. Receivers are available with 7.1, 9.2, 11.2.4 setups for additional speakers for placement in overhead locations for Dolby ATMOS and extra subwoofers. These AVRs tend to be expensive plus the cost of the additional speakers and wiring. 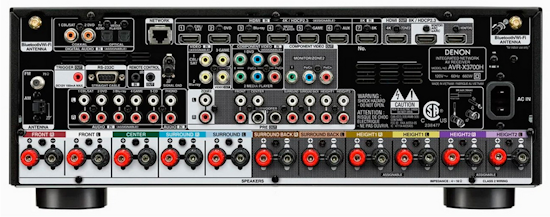 13 speaker AVR for Dolby ATMOS capability. 11 full range speakers, 2 subwoofers. Audio Video Receiver Speaker Terminals 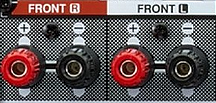 Right (R) and Left (L) FRONT Speaker connections on AVR STEREO 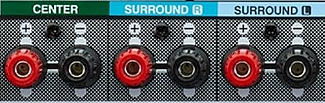 Center (C) speaker and Right (R) and Left (L) Surround Speaker connections on AVR DOLBY DIGITAL 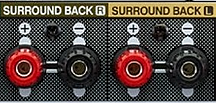 Right (R) and Left (L) Surround Back Speaker connections on AVR DOLBY DIGITAL PLUS, DOLBY TrueHD 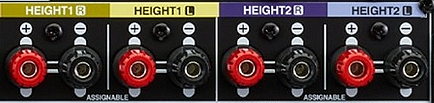 HEIGHT Speaker connections on AVR (ATMOS) DOLBY DIGITAL PLUS with DOLBY ATMOS, DOLBY TrueHD with DOLBY ATMOS 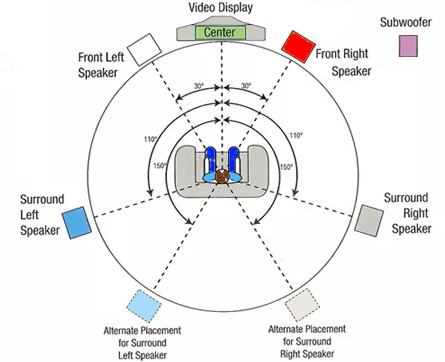 Surround Sound Speaker Placement Speaker Terminals 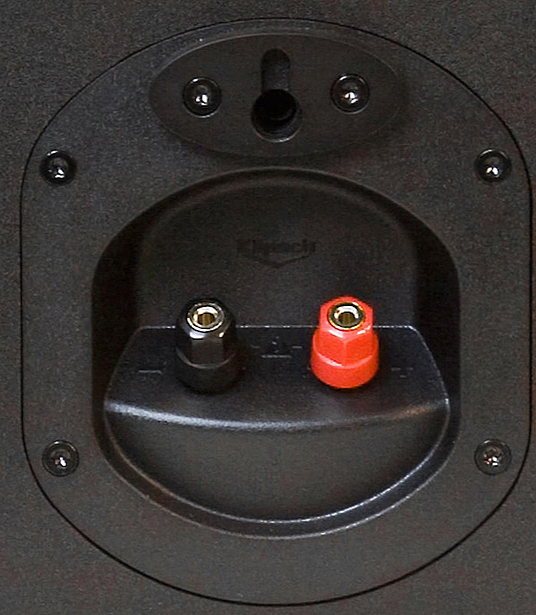 REAR of Speaker Surround sound speakers are typically passive speakers (not powered) because the AVR's amplifier supplies the power. The exception may be a powered subwoofer where the subwoofer has a built-in amp. In this case, a line level RCA audio cable is used to connect. Speaker terminals vary but usually have a way to connect speaker wire directly. Positive to (red) positive and negative to (black) negative. Some have a second way to connect, for example a banana plug connection. Hiding the wires 1. Under rugs - use flat speaker wire 2. Raceways along walls, behind baseboards 3. In-wall or ceiling 4. Wireless speakers 5. Consider a Soundbar How do I check if a speaker wire is positive or negative? The most common ways to tell: o A printed line or series of dashes/lines is on the positive o One side is a different color (red and black or blue and brown) o One wire has a copper color and one has a silver finish o The positive wire may have small positive (“+”) symbols and/or size info printed on it o An imprint or molded stripe is made in the positive side’s insulation 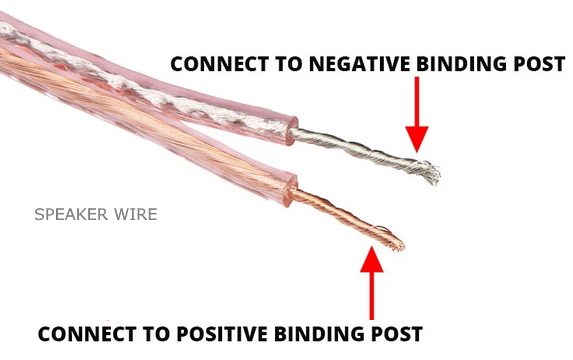 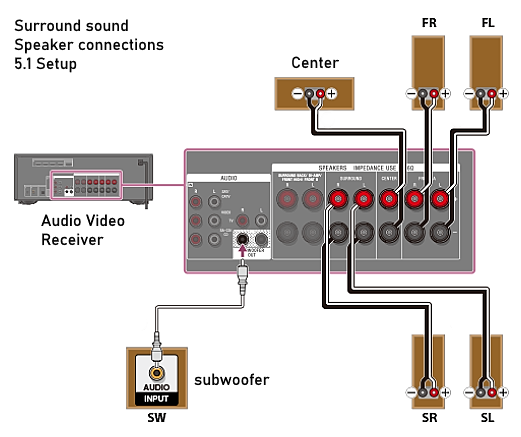 Surround sound speaker connections - 5.1 Setup Connecting speaker wire to an amplifier or receiver: Loosen the binding post twist tops enough to expose the wire hole. Strip the speaker wire to about 3/8″ to 1/2″ length bare wire. Use a wire stripper tool. Twist the wire tightly by hand to keep the wire strands together. Insert the wires into each speaker terminal one at a time up to (but not including) the insulation. While holding to keep it from moving, twist the tops down firmly to hold it in place. The positive terminal is usually labeled with a plus sign “+”, a red-colored band, and/or red plastic. Likewise, the negative terminal uses black and the minus “-” sign. 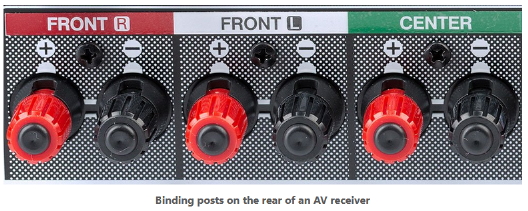 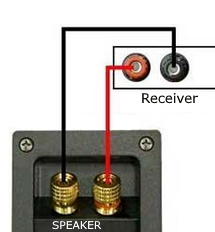 Connection from Receiver to Speaker 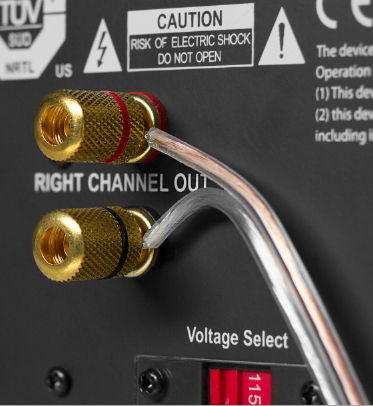 Speaker wire connection  There are available a wide variety of speaker wire terminations including spade connectors and banana connectors so depending on the type of speaker terminal you have, choose a connector which will give you a good connection. 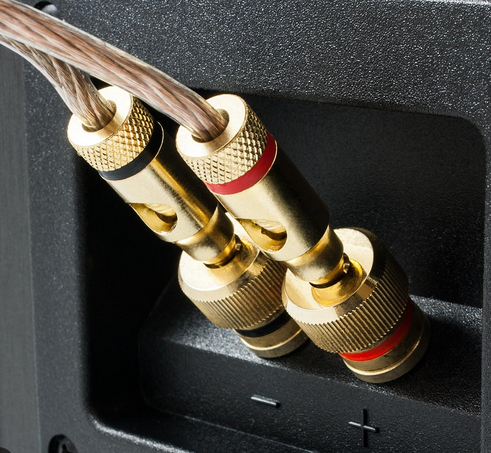 Instead of bare wire, you can use banana plugs: Banana plugs come in 2 main types: those with a side-mounted set screw and those with a top “tension screw” and either a top-located hole and/or side hole. 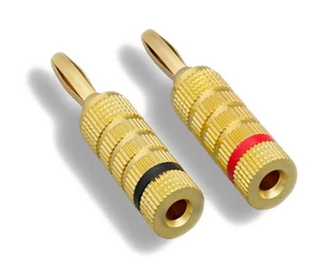 Steps for connecting to a receiver with banana plugs: Loosen the set screw or tension screw as provided but don’t remove it fully. If you’re inserting wire through the center hole you can remove it . Strip the speaker wire using a wire stripper tool or similar for the best results. Leave roughly 1/2″ of bare wire. [Side hole type] Fold the wire under the insulation. [Center hole type] Twist the wire tightly and thread the wire through the screw’s center hole. [Side hole type] Insert the wire into the opening carefully, making sure it fits under the screw. [Center hole type] Shape the wire into a half-circle, with the wire tilting horizontally away from the insulation. Tighten the tension screw carefully. [Center hole type] Push the wire into the bottom of the plug. [Center hole type] Tighten the tension screw down onto the wire. Holding the wire and the plug, pull gently to be sure the connection is good and the wire won’t slip out. Push the banana plugs into the jacks firmly. 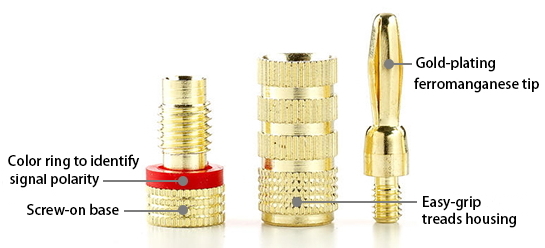 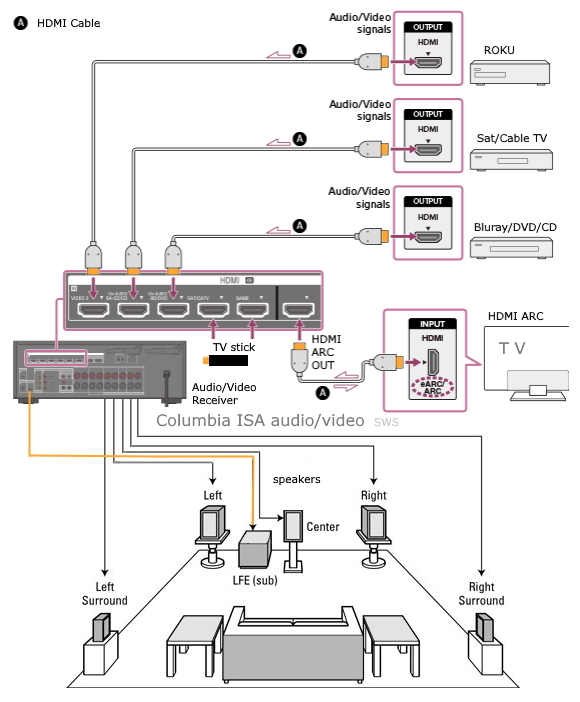 5.1 surround sound system wiring above. The 7.1 system adds two speakers. Even more complex systems add ceiling speakers and more subwoofers. While the majority of speaker wiring conductors are formed from stranded copper wire or some similarly low-resistance alternative, no conductor is ideal; all metals have some resistance per unit length and cross-sectional area. The resistance of a given conductor is directly related to how much energy loss a transmitted signal will experience when traveling through it. In brief, longer, thinner cables generally cause more attenuation. If a particular 5.1 home theater setup or design isn’t going to work because the speakers are too far away, it’s always possible to choose a thicker wire that can support transmission at a longer distance without fouling up the signal. Remember that the AWG (American Wire Gauge) and SWG (Standard Wire Gauge) gauge numbers found on most speaker wires get smaller as wires get thicker. 12-18 gauge wire is recommended for home theater speaker setups. Resistance isn’t the only factor of concern when matching wiring to a home theater setup. Most modern speaker wire is manufactured in pairs; each length of cable contains two conductors that connect the positive and negative input terminals on a speaker to a corresponding pair on an amplifier. These cables are separated by insulation that prevents signal crossover from one path to its partner. Unfortunately, this arrangement also forms a capacitor that adds to the wire’s frequency-based impedance, or reactance. Also contributing to reactance is the fact that audio signals include alternating currents that are naturally attenuated by a wire’s inductance, another form of frequency-based impedance. Some audiophiles also recommend that cables should never be longer than 15 m (50 ft.) in a standard home theater setup. While this limit depends on the dynamics of the space in question, longer wires often tend to act as radio antennas that can pick up random interference. Electromagnetic interference is exacerbated even further when long stretches of wire are coiled up. Resist the temptation to simply make loops to get excess wire out of the way; instead, measure the distances between home theater components as accurately as possible, and cut or purchase wire to match precisely. Home Theater Wiring There are other important factors to consider when creating a home theater setup. For one, speaker wire isn’t designed for high-stress situations; if it becomes snagged on something like a passerby or a pet and stretched forcefully, it might not immediately break, but such interactions can cause tiny tears in the internal wire strands that ultimately reduce sound quality. Similarly, crushing forces on speaker wires may break conduction paths and impact the sound of a particular 5.1 home theater setup. To be safe, always route speaker wires along safe paths, like walls and ceilings. One of the most common ways of connecting speakers to a receiver or amplifier is through the use of binding posts. Whether you’re using bare wire or banana plugs, these simple connection points will work with any 10-gauge speaker cable, allowing you to easily dictate the length of wire needed for your particular setup. Proper polarity Connecting loudspeakers to a receiver, integrated, or power amplifier is easy, but there are a few things to keep in mind for best sound. Loudspeakers have a polarity to them, just like a battery does. You’ve seen the + and the – terminals on a battery before, and you know that getting these mixed up often means battery operated equipment won’t function. Loudspeakers and amplifiers are no different. Unlike batteries, they will continue to work, just not at their best. It’s important to make sure the polarity of your loudspeaker is correct between both left and right speakers, and between the speaker and amplifier (receiver or integrated). Polarity of a loudspeaker is typically denoted by a color on its connector: red for +, black for -. Why does polarity matter? Polarity is important for two reasons, and both concern how the woofer and tweeter move. Sound is generated by the loudspeaker drivers (woofer and tweeter) moving back and forth, pressurizing the air in synch with the music. This moving air pressure is picked up by your eardrum and converted to sound in your brain. When a musical signal comes from the power amplifier, the recording studio intended it to either move forward or backwards on what is known as the leading edge (the point at which sound starts and stops). Forward motion happens first when the + (red) terminal of the amplifier and speaker are tied together properly. This honors the intent of the studio and the musician. Secondly, it is of critical importance left and right speakers move together. If they move out of step with each other, (one moves forward at the same time the other moves backwards) the sound will lack bass because the two speakers cancel each other’s sound pressure. Make sure the left and right speakers are connected exactly the same with respect to polarity (red to red, black to black). Red to red, black to black Speaker wire is made of two separate cables that need to be connected to the positive and negative connectors on the amplifier and speaker. Installing Screw Locking Banana Plugs This type of connector features either one or two screw locking fasteners on an internal chamber which secures the speaker cable in place. Some examples of this type of connector are our IntraLock Banana Plugs, Dual SpaceLock Banana Plugs or SuperLock Banana Plugs. Tools Required: Wire stripper, precision screwdriver (standard flat head). Strip the appropriate amount of wire from each conductor (approximately 12mm is recommended). Remove the outer section of the banana plug with a twisting motion to reveal the inner chamber. Loosen the screw locking fasteners on each plug (be careful not to remove the screw completely). Insert the speaker cable into the banana plug with minimum force until you feel the wire touch the end of the chamber. 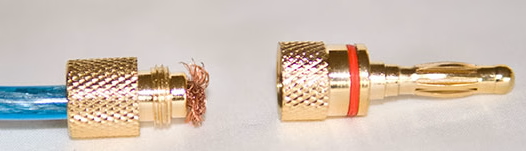 Tighten the screw locking fasteners. Replace the outer section to conceal the inner chamber. Insert the banana plugs into the binding posts. 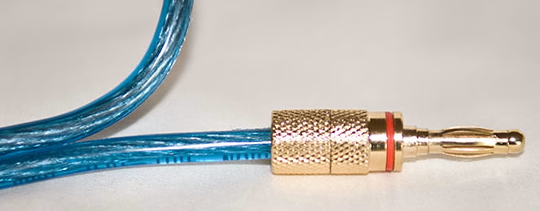 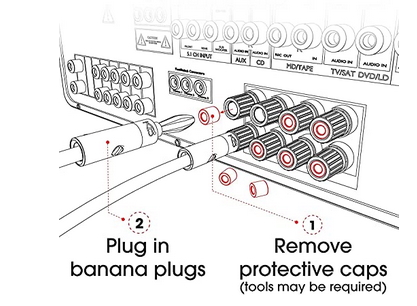 If installed, remove the plastic caps protecting the terminal and then insert the banana plug with speaker wire attached. 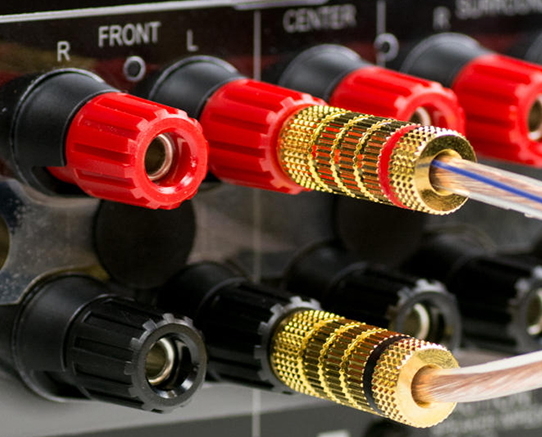 Why Banana Plugs There are many benefits of using banana plugs with your speaker wire. Not only do they help your installation to look cleaner, banana plugs also give you a permanent and high quality connection. Often bare speaker wire connections are unreliable. Wires tend to get pulled out or frizzy as time passes, which can affect your sound quality. With banana plugs you ensure this won't ever happen. Another benefit comes when you are doing behind the wall installations and using wall plates (as opposed to just leaving a big hole in the wall). These wall plates will generally just have a jack for a banana plug. Banana plugs also will help the back of your speakers and receiver look nicer and reduce the messy look of all the wires. The best banana plug for your cable isn’t necessarily the biggest or the most expensive. The most important thing to ensure is that your cable’s thickness is suited to the plug. Generally, the better the fit for the cable, the more surface area it will have to contact the banana plug and hence the best connection. A good fit will also ensure that the end is neat and will hang nicely from the back of your speakers. Get your cable and check the diameter of the conductor. The best fit is if it’s slightly smaller than the diameter of the plug. See more... • Hookup Diagram HDMI AVR ARC • TV Streaming surround sound • Surround sound how to hookup speakers • Stereo hookup • VCR to digital cable TV box connection • Combo VCR/DVD Player/Recorder Guide • Input Select on TV and other devices • Cable hookup digital cable and TV • Audio Video Connections and cables • HDMI Versions • HDTV hookup options • HDTV basic setup • See over 100 hookup diagrams Columbia ISA Audio Video Empowering consumers through information. columbiaisa@yahoo.com SWS |