
 |
| Home • Car Stereo Systems GOOGLE SEARCH Stereo Hookup How to connect speakers, amplifier, receiver, tape, turntable on your home stereo system 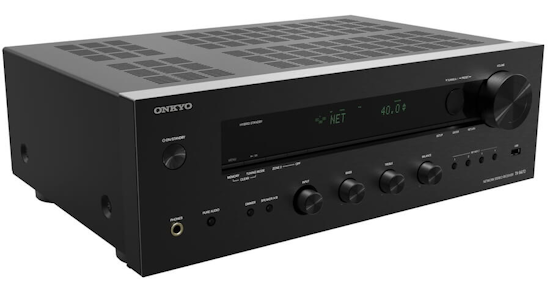 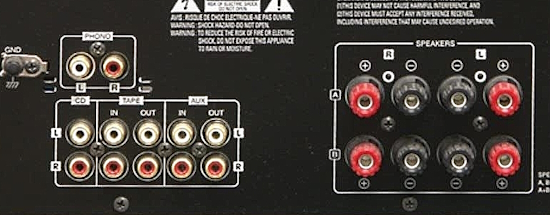 Stereo Receiver (Rear) Analog Stereo Audio Inputs on the left and Speaker Outputs on the right. Notice there are two sets of speaker terminals, an "A" set (top row) and a "B" set (bottom row). The "A" pair is normally the main pair of speakers connected. The "B" pair is for another room or a possible subwoofer speaker connection.  For binding post speaker terminals, loosen the red (positive) or black (negative) binding posts by turning them counter-clockwise. Insert the speaker wire into the slots under the binding posts and then turn the binding posts clockwise to tighten. These can also accept a banana plug for easy disconnect and connect. 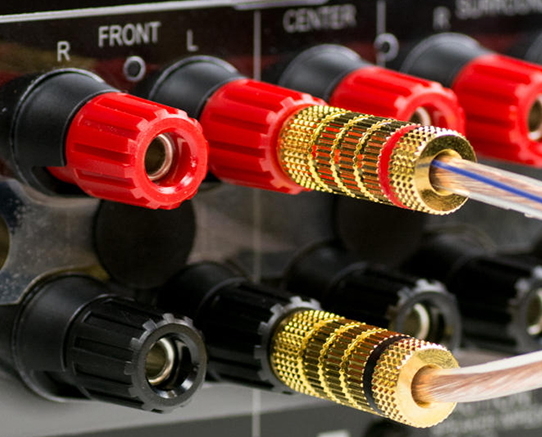 Budget stereo amplifiers may have spring clip speaker terminals. You may see only one row, two red and two black terminals. To hook up spring clip speaker terminals, strip about 1/2 inch of insulation from your speaker wire, twist the copper strands tight, then press on the spring clip tab to open the slot, insert the twisted wire, and release the tab to secure it. Always match positive (red) to positive and negative (black) to negative on both the speaker and amplifier, and ensure no stray strands touch other terminals. 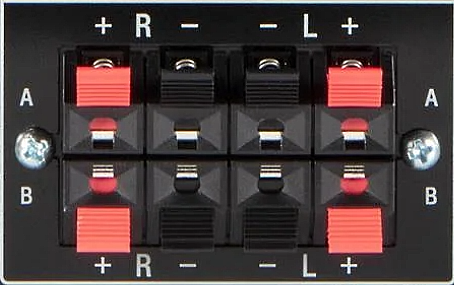 Speaker connections - spring clips 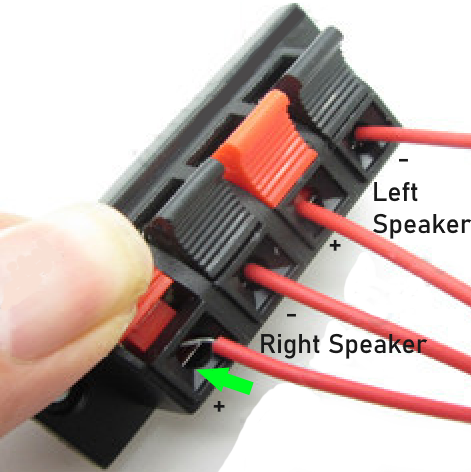 How to connect Speakers 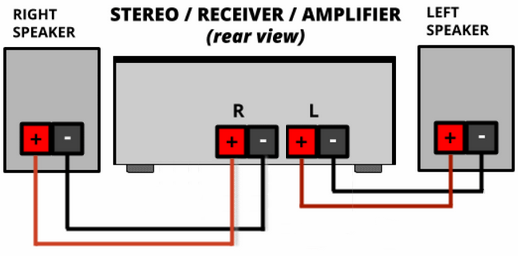 Stereo means 2 channels, a left channel and a right channel. A stereo receiver or amplifier allows 2 channel input devices such as a turntable for playing vinyl records or a Compact Disc player or a magnetic tape player/recorder to be connected and then amplified for output to a left and a right loudspeaker.  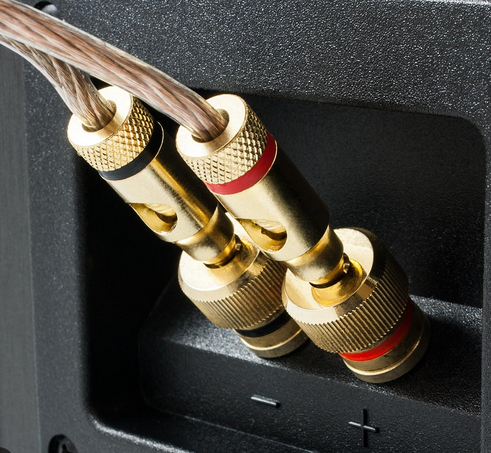 Speaker Connections (rear) Passive Speaker Connect two speaker wires from the amp/receiver left speaker terminals (black and red) to the same color terminals on the left passive speaker. Connect two speaker wires from the amp/receiver right speaker terminals to the same color terminals on the right passive speaker. Passive and Powered Speakers Powered speakers have a built-in amplifier inside one of the speakers. These type of speakers only require a line level (low level) input signal. This can be RCA analog stereo signals or digital stereo signals such as from an optical audio connection. 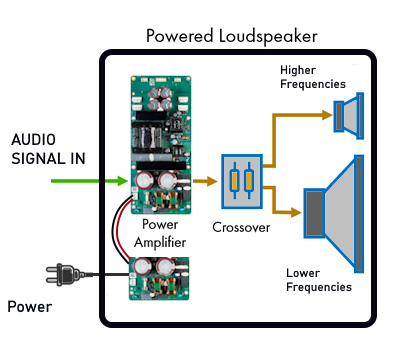 Passive speakers only have the speaker(s) inside and require an external amplifier. They accept a high-level (or speaker-level/amplified) signal. 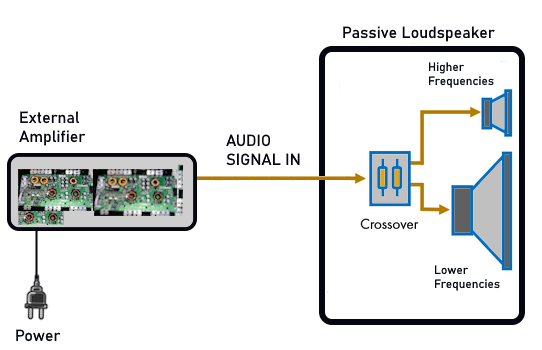 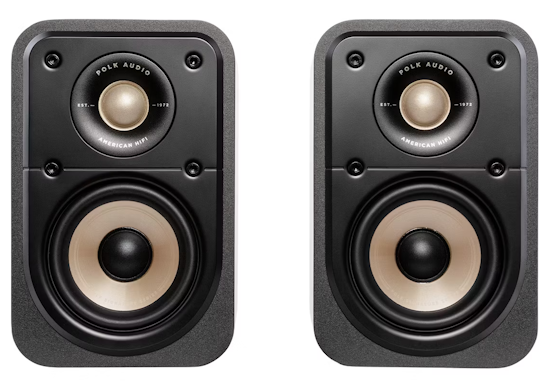 Bluetooth wireless audio is available on even the most inexpensive stereo receivers. This means you can play music from your smart phone on the stereo system in addition to other stereo input devices.  Connect input devices using RCA cables (white and red) for analog audio. 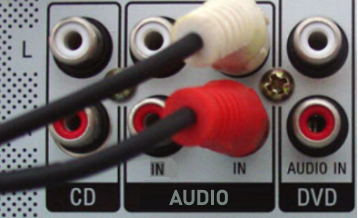  Select the source input you want to play using the front panel of the receiver or the remote control. Adjust the volume. 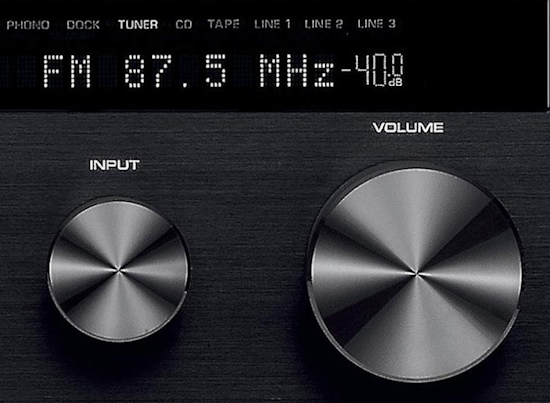 Connect stereo to TV An inexpensive mini-stereo amp can drive small speakers to enrich TV sound. Use a DAC (digital to analog converter) to connect the TV optical audio output to the amp's RCA inputs. 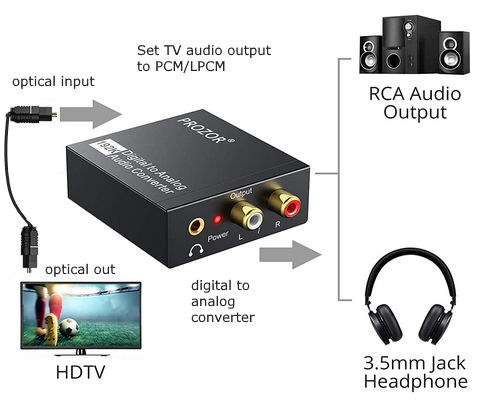 This is one way to connect headphones to a TV without a headphones port. Be sure to get a DAC with volume control. Select in the TV settings, the sound output to go from Optical instead of TV speakers. Connect stereo to Phone A phone with a headphones output (3.5mm) can plug into the stereo using a 3.5mm (male) to RCA adapter cable. A phone without a headphones output will usually have a USB-C port and you can use a USB-C to 3.5mm (female) adapter cable along with the 3.5mm (male) to RCA adapter cable to connect to the stereo CD input or AUX input. Select the correct source input on the stereo. 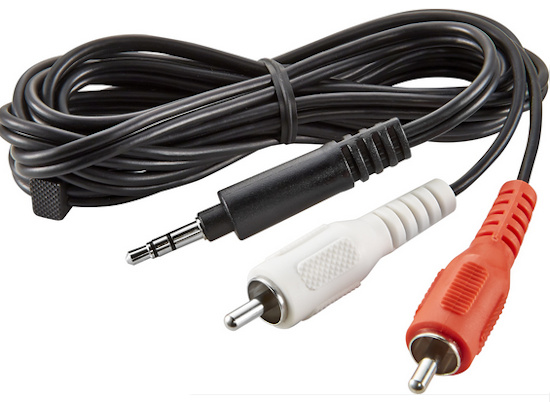 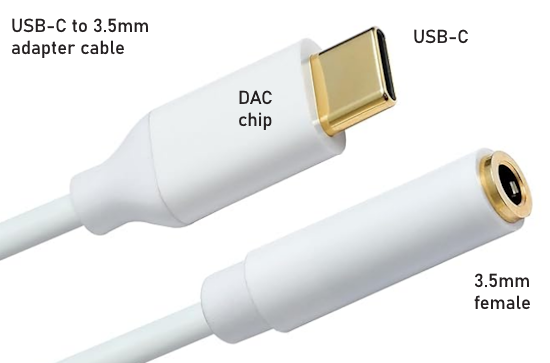 You could also use Bluetooth wireless audio. Make sure Bluetooth is enabled on both the phone and stereo. For older stereo systems, you can use an external Bluetooth receiver plugged into the stereo. Connect a laptop 3.5mm headphone out using an adapter cable to the amp for external speakers. Connect a DVD player's RCA audio outputs to the amp for richer sound from movies. Also you can get a RCA audio switch so you can connect multiple audio inputs and select the device you want without disconnecting and reconnecting the cables to the amp. 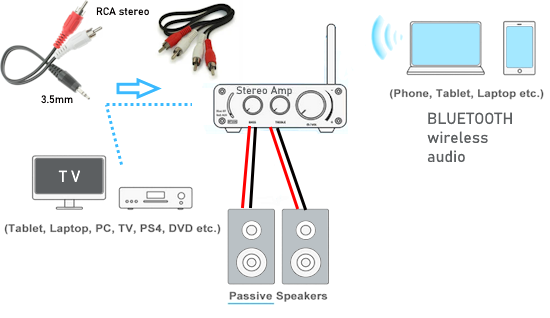 Q: Are speaker wires and RCA cables the same thing? A: No, speaker wires are for high level signals (amplified) while RCA cables are for low-level signals. Phono (Turntable) input How to Connect a Turntable - Analog Audio 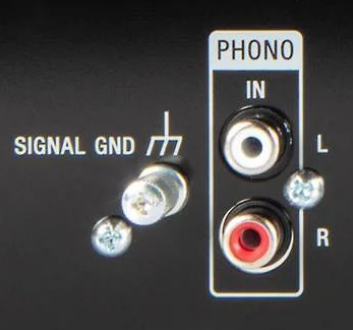 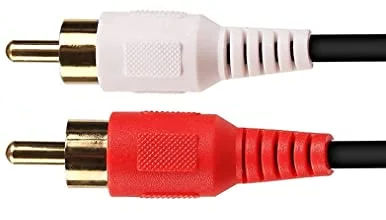 RCA analog audio cables - Stereo Connect the white cable from the turntable to the white IN port on the amp or receiver. Next connect the red cable to the red IN port on the amp or receiver. Next connect the ground wire from the turntable to the ground (GND) terminal on the amp or receiver. Select the PHONO input on the amp or receiver. Adjust the volume. Stereo sound in the home became very popular in the 1970s. Many companies in Japan and the U.S. made excellent stereo components which can still be found today. In those days companies produced amplifiers, tape decks and turntables of very good quality. In the decades to follow, build quality suffered in the effort of some companies to increase profits at the expense of quality. The typical home system consisted of a receiver, turntable and two loudspeakers. Some people also had a reel to reel tape recorder. A receiver is a combination amplifier and AM/FM tuner and is the heart of the system. 1970s 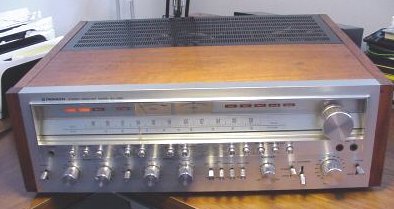 Stereo Receiver by Pioneer from the 1970s. 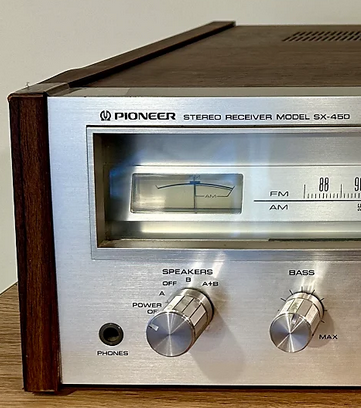 Headphone Out, speaker control 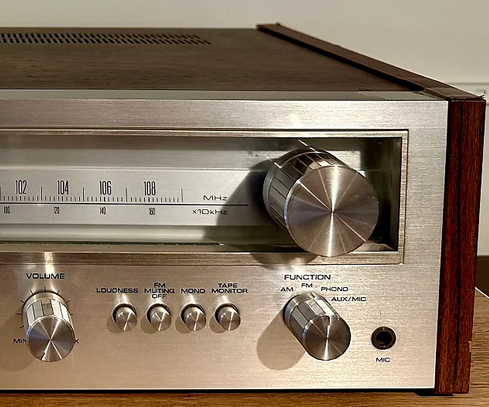 AM/FM Tuning, Volume control, Input Select 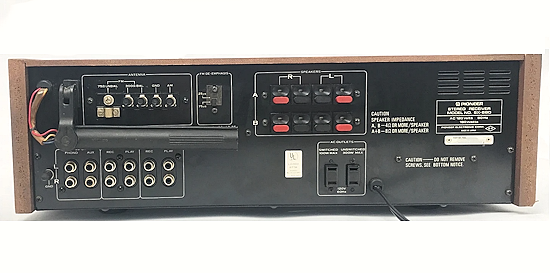 Pioneer stereo receiver rear 1979 Connect Stereo Speakers   Pioneer Stereo Receiver 1979 speaker connections. There is an A pair of stereo speakers and a B pair. The B pair would only be used for a secondary room or adding a subwoofer speaker. Push the spring loaded button in while inserting the speaker wire.  AUDIO CONNECTIONS - Inputs and Outputs 1970s receivers had inputs for turntable (vinyl records), magnetic tape recorders (reel to reel) and AUX for an additional stereo device. 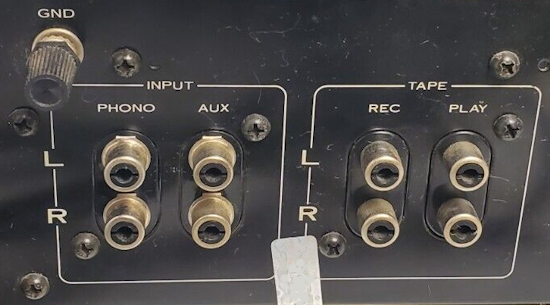 Turntable Phono input: Use the dedicated "Phono" input on the receiver, which has a built-in preamplifier to handle the low-level signal from the turntable. Connect the two RCA audio cables from the turntable to the two PHONO inputs on the receiver matching right to right (R) and left to left (L). Red is right. Next connect the turntable's ground wire to the receiver's ground terminal (GND) next to the PHONO inputs. Select the PHONO input source on the receiver. Tape Recording and Playback:  Stereo cable connections from receiver to tape deck for recording and playback The VCR was introduced in the mid 70s but was usually connected directly to the TV for video and sound. The VHS cassette tapes were capable of stereo sound so the audio from the VCR could be connected to a stereo receiver for better audio using loudspeakers. The white and red audio cables from the audio OUT on the VCR to the receiver's white and red audio INputs. Bluetooth wireless audio The old vintage stereo receiver can receive Bluetooth audio from a Bluetooth capable TV or laptop or mobile phone for example, using a Bluetooth receiver connected to the vintage stereo's audio input. Using the amplifier and larger speakers of the stereo system, you get richer sound than from the source device's internal speakers. Just pair the source device (TV, laptop, phone) to the Bluetooth receiver, turn up the volume and enjoy. 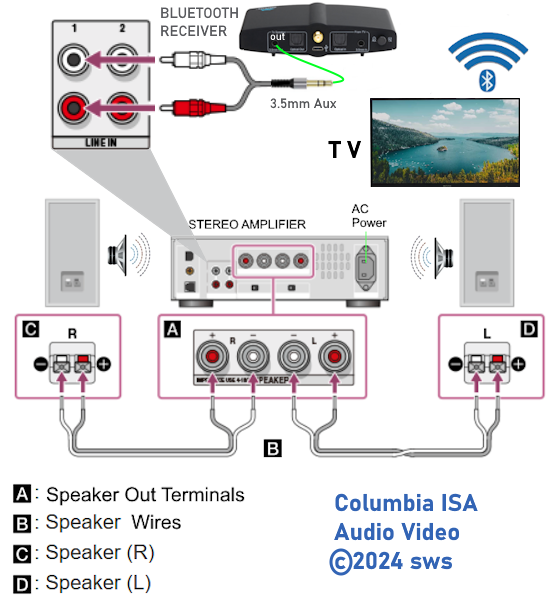 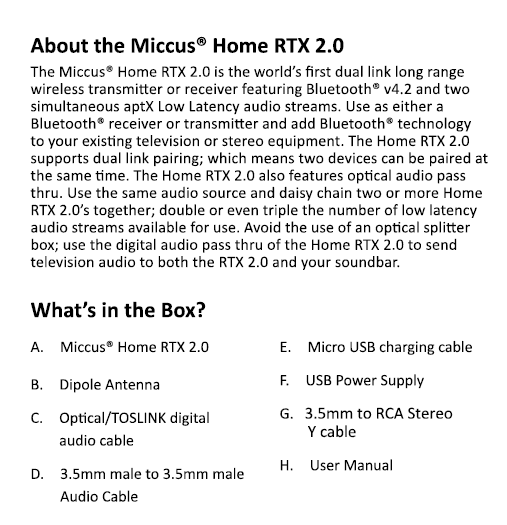 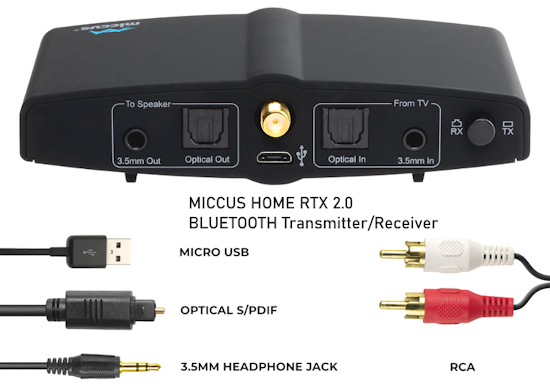 You can also transmit audio from the vintage stereo receiver through a Bluetooth transmitter to a wireless Bluetooth speaker in another room. Connect the audio cables from the vintage stereo's audio output (you can use the TAPE OUT) to the Bluetooth transmitter input such as AUX, then pair with the Bluetooth speaker and enjoy. 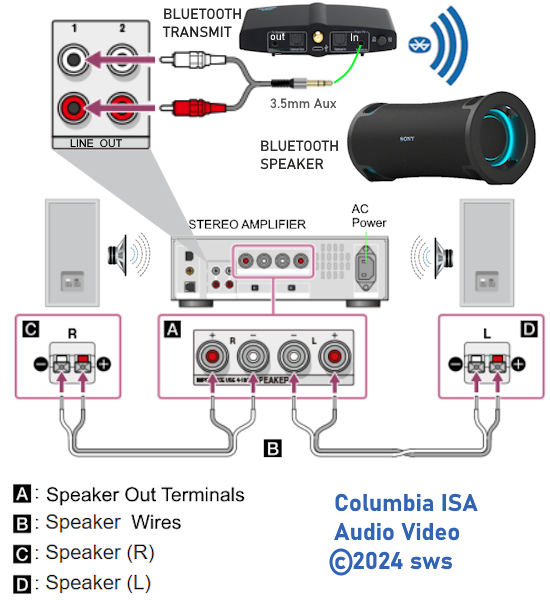 1980s The 1980s saw the introduction of Compact Disc (CD) which was also stereo and compatible with home systems. The CD was introduced in the early 1980s, peaked by 2000 and by 2020 was mostly gone as far as sales. CD players were play only and so had only the white and red RCA Out ports on the rear panel to send audio to a stereo receiver. Stereo receivers in the 1980s had a CD input, white and red RCA cable connections or if available, an AUX input, again white and red RCA audio cable connections. 1990s The 1990s saw the Mini-Disc (MD) introduced which was recordable and had stereo sound like a CD but was eventually, in later models, capable of compressing music so that you could fit two CDs on one MD. MiniDisc decks could use the AUX inputs on a receiver. The DVD became popular with surround sound and high resolution video better than VHS so receivers had to be capable of decoding the digital sound tracks using optical and later HDMI connections. Audio/Video Receivers or AVR were becoming more complex, offering expanded video, audio and more speakers. 2000s Everything was going digital and receivers started to incorporate expanded high-definition video as well as audio. Todays Audio/Video Receivers are more complex, and include HDMI audio and video jacks as well as the older analog audio jacks. Today, many receivers have multiple loudspeaker capability called surround sound where not just two but five or more speakers are used to immerse the listener in the sound field. Speaker wire 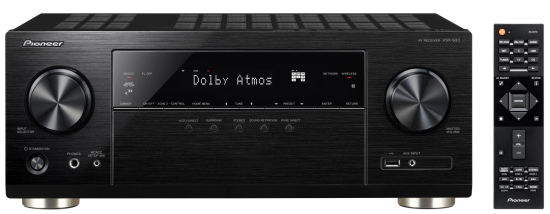 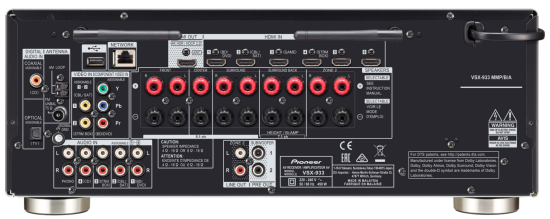  HDMI and Internet connections 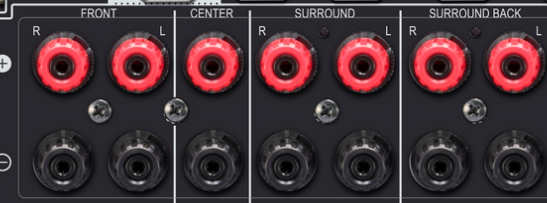 Surround sound Speaker connections STEREO Stereo consists of two channels, left and right. Connections between components typically use a RCA stereo cable. In the 1970s, the color black was used on almost all input and output jacks on the rear panel of stereo gear. Later, in the 1980s the left channel was changed to white and the right channel was red. This made it easier to identify the left and right channels. When connecting stereo gear, you will want to connect left (L) output to left (L) input and right (R) output to right (R) input. What you need:
 Cable to connect stereo components RCA stereo cables are available at electronics stores or online at Amazon, Monoprice and others. 
Loudspeaker wire Loudspeaker wire consists of two wires, positive and negative. Loudspeakers have two posts on the back to connect the wires, one positive and one negative. The negative is typically black and the positive, red just like a car battery. The wires however are often not color coded which makes them hard to determine which wire is positive or negative. Some manufacturers code the positive with a white strip all along the wire insulation. One way to keep your speaker wire from being reversed is to flag the positive with a piece of tape or label as shown. 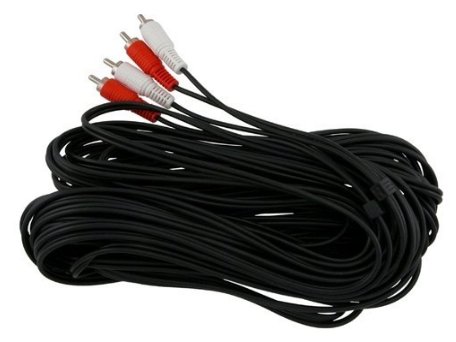 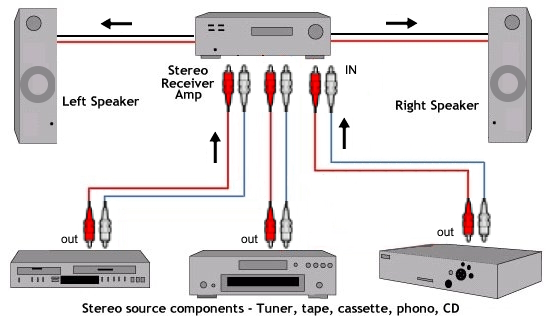 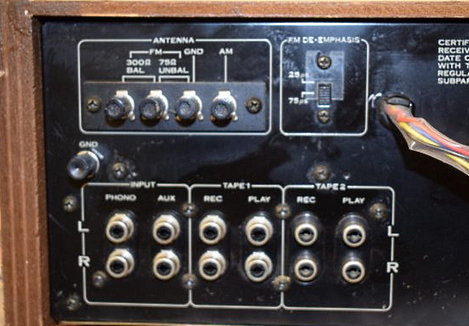 From left to right: Phono connection left and right, with ground wire hookup for turntable (vinyl records) Left and right AUX input Tape (reel to reel or cassette) record and play, play is input and record is output. Tape for second component. 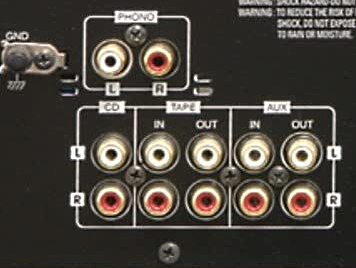 Stereo rear connections 1980s The Compact Disc (CD) player was big in the 1980s 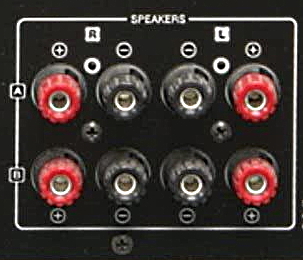 Most receivers had two sets of stereo speakers Connecting your stereo components
Stereo speaker connections from stereo Amplifier/Receiver to left and right speakers 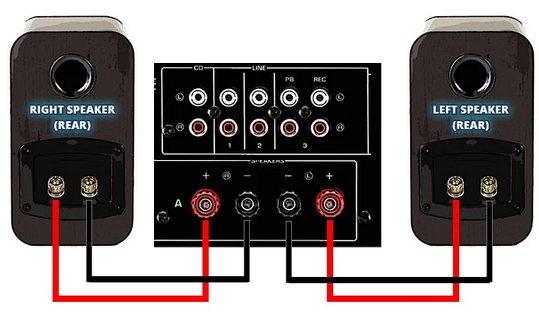 Some amps and receivers have two pairs of speaker connections, A pair and B pair for a second room. 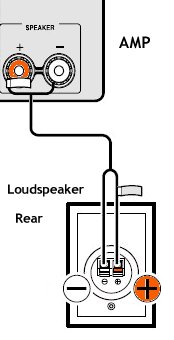 Speaker connection. 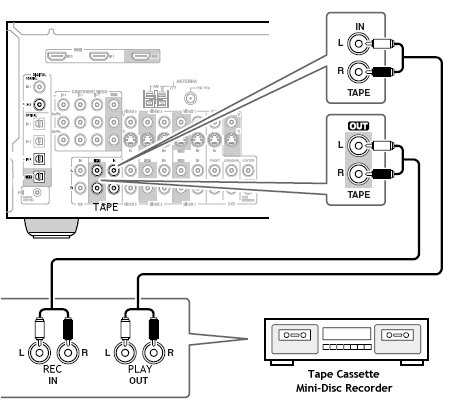 Tape recorder connection. An important note on tape recorder hookup: Some manufacturers label their gear with PLAY and REC (record) while others label using IN and OUT. Be careful when connecting tape decks so that record and play are hooked up properly on the tape deck and the amplifier. PLAY or OUT on the tape deck connects to TAPE IN on the amp and TAPE OUT on the amp connects to REC or IN on the tape deck. 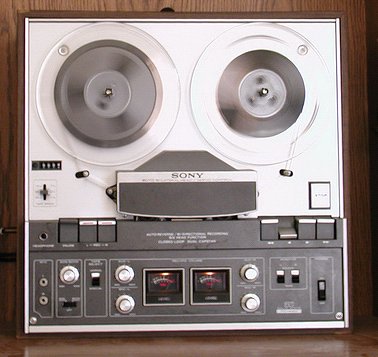 Tape Recorder - reel to reel or open reel as opposed to cassette decks. Connecting a turntable (PHONO) for playing vinyl records Vinyl records became popular in the 1950s and 1960s as the way to enjoy the latest music releases in stereo. Records were either the 7 inch 45rpm or the larger 12 inch 33rpm and had typically two sides and about 2 to 12 songs total. Vinyl records are still popular today with audiophiles who contend analog audio is richer and warmer than the compressed digital music of more modern times. 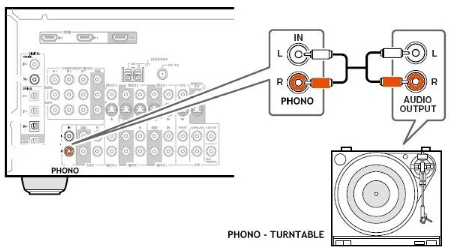 The PHONO connection is different than the other stereo components in that the signal level is much less from the turntable. For this reason you cannot connect just any component to the PHONO jack. The PHONO jack input on the amp has a pre-amplifier which boosts the signal level from the turntable. If your amp or receiver does not have a PHONO input, then you can buy a phono pre-amplifier unit which will allow you to connect it's output to the amp's AUX input jack or other standard input jacks. 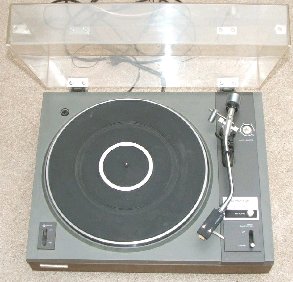 Turntable by Pioneer. Turntable hookup Your receiver may have a PHONO audio input or it may not have any PHONO input at all. Your turntable will hookup to the receiver in one of several different ways depending on your components. 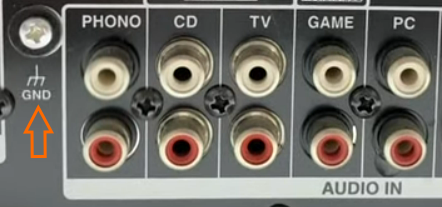 Receiver with PHONO input and associated ground wire connection 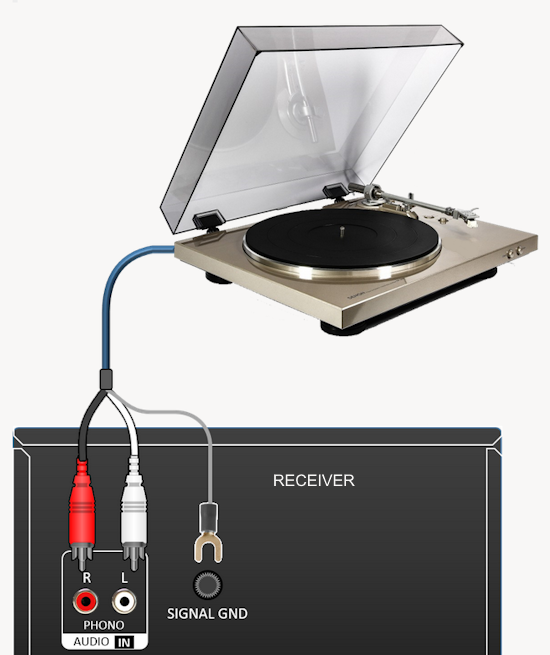 Turntable hookup to receiver with a PHONO input. No phono pre-amp required. The ground wire connection prevents the buzzing noise often present with a turntable hookup. 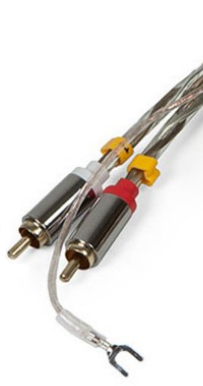 Turntable RCA stereo audio connection with ground wire. 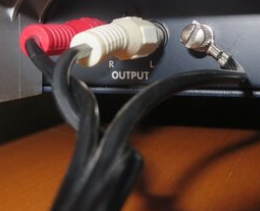 Turntable rear panel 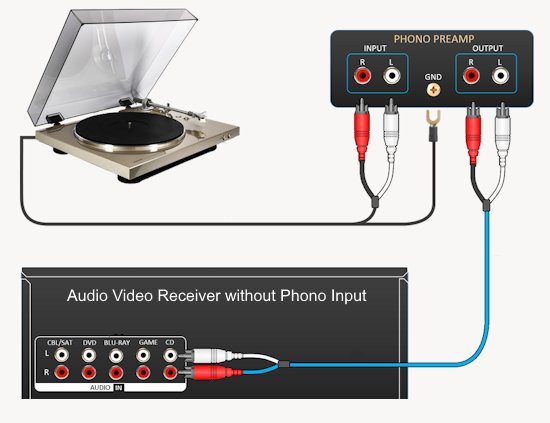 Receiver without any PHONO input will need a phono preamp. Then you can connect to available RCA audio inputs such as CD, game, cable, satellite. Some turntables have a built-in pre-amp so that you can connect to any RCA audio input on the receiver. Phono Pre-Amp PRE-OUTS on RECEIVER Hooking up a second amplifier Pre-out stands for preamplification output. It is a way to take a signal out from your receiver amp before it passes through the power section and on to the speakers. Preamplifier is a parallel output made available before the signal is amplified to be reproduced by the loudspeakers. Pre-out is a volume-controlled, source-selected analog audio output. It facilitates the signal to pass through and subsequently be amplified by another power amp. A pre-out allows you to connect an external power amplifier instead of using the amp that’s built into a receiver. It allows a signal to pass through the receiver without amplification, and to instead be amplified by another power amplifier. Why would I want to use Pre-Outs? If you have powered speakers or a powered sub-woofer, there is no reason to amplify the signal twice. Use the amplifier in the powered speaker. If your receiver's amp cannot handle a more powerful speaker setup, you can use a second, more powerful amplifier. Splitting the load between two amplifiers reduces the stress on a single amp. Types of Pre-outs There are several types of pre-outs commonly found in audio equipment: Main Pre-Outs: Are designed to connect to external power amplifiers that drive the main front speakers. Center Pre-Out: Some receivers or amplifiers have a dedicated pre-out for the center channel. Surround Pre-Outs: For surround sound systems, there may be pre-outs for the surround channels, such as left surround and right surround pre-outs. Zone 2 or Zone B Pre-Outs: These pre-outs allow you to connect external amplifiers and speakers in a separate room or zone. Subwoofer Pre-Out:This pre-out provides a low-frequency line-level signal that is sent to the subwoofer, allowing you to enhance the bass performance in your audio system. The availability and configuration of pre-outs can vary depending on the specific audio equipment. 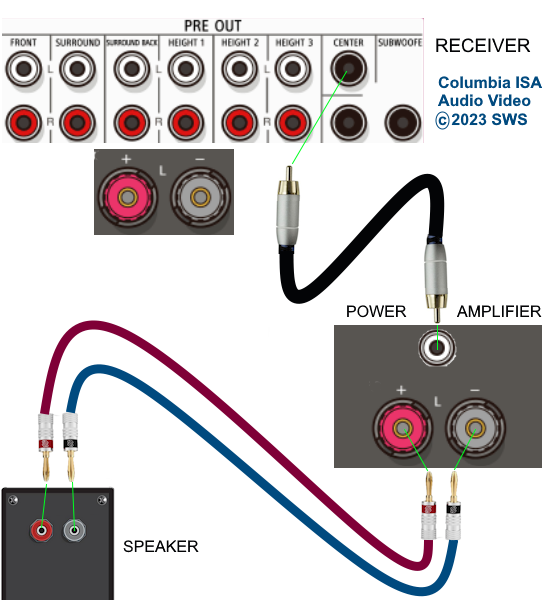 Instead of driving the speaker with the receiver, swap the speaker cables from the receiver to the power amp. Connect a RCA cable from the pre-out for a channel such as the CENTER channel to the power amp RCA input. Power amplifiers can have one to seven or more inputs. You can drive some speakers from the receiver and some from the power amp. What if my Receiver has no pre-outs? You can get an adapter which connects to the receiver's speaker terminals and reduces the signals from speaker level (high) down to a lower level for line input using RCA cables. 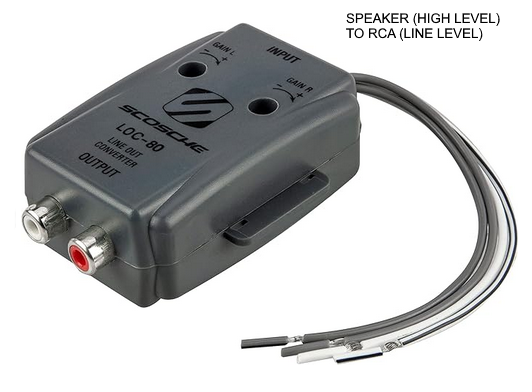 • YOUTUBE video on speaker to rca adapter when no pre-outs on receiver How to play mobile phone music to stereo receiver speakers: Your stereo most likely does not have Bluetooth wireless capability. To listen to music from iPhone or Android phone wirelessly, you need a Bluetooth adapter. Connect the adapter to the stereo input (AUX) and pair the adapter to the phone. Now play music on the phone and hear thru stereo speakers. Select the AUX input on the stereo receiver. 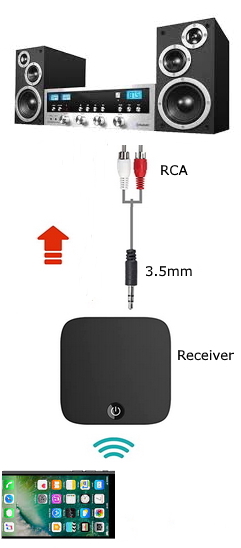 See also: • Audio convert HDTV sound • Turntable to PC - Convert vinyl LPs to digital music files on PC • PC to stereo hookup • How to Wall Mount TV • Make Old TV into Smart TV • How to Setup Samsung TV ARC eARC • Smart TV Introduction • How to reset Samsung TV • How to Setup Wi-Fi on Samsung TV • How to Pair Bluetooth wireless headphones on Samsung TV • Wireless Headphones for TV Play your iPhone on your stereo system: Wired: Use a 3.5mm to RCA cable – Plug the 3.5mm end into the headphone jack of your iPhone and plug the other end of the cable into an open red-and-white input on your stereo (AUX, CD, TAPE). Select that input on the stereo system, adjust volume. Use USB – some stereo systems have a USB input that you can connect your iPhone to with the charging cables. Wireless: Use AirPlay – some stereos support AirPlay and if yours does, you can connect your iPhone wirelessly to your stereo. Use Bluetooth – if your stereo has Bluetooth, you can connect your iPhone wirelessly to your stereo. If you don’t have a Bluetooth-enabled stereo, you can add a Bluetooth adapter. Connect adapter to stereo receiver using the CD input or other available RCA input and then pair with phone. Top Brands for Car Audio Systems Pioneer Pioneer has been in the business of making receivers, speakers, and other audio components for both the home and vehicles since it was founded in Tokyo, Japan in 1938. It is one of the premier electronics companies in the world, offering some of the best-sound-quality car stereos. JBL Since 1948, this Los Angeles, Calif.-based company has been making speaker systems for both personal and professional use in a wide array of applications. It produces tweeters, mid-range, and subwoofers designed for either home or car use. Alpine Electronics Alpine produces car audio and navigation systems and produces most of the factory stereos found in BMW and Honda vehicles. The company is responsible for some of the best-looking car stereos. JVC (Japan Victor Company) JVC is a subsidiary company of the JVC Kenwood Corporation. Kenwood and JVC merged in 2008, but JVC has been designing and developing electronics since 1927. Its headquarters are in Long Beach, Calif. What to look for in a car stereo Receiver Also called a head unit, this is the brains of an audio system that sits in the dash and has an interface that you can interact with. Newer receivers are referred to as infotainment systems because they provide useful information such as navigation details and vehicle status updates in addition to entertainment. Speakers Car speakers are separated into categories based on the frequency of soundwaves that they produce. In order from highest to lowest frequency are tweeters, mid-range, and subwoofers. Tweeters are directional and usually placed in the dash, mid-range speakers are ambient and installed in the doors, and woofers produce deep bass and are placed behind the back seat in the trunk. Equalizer An equalizer is the most important piece of equipment in your audio system for optimizing sound quality. Depending on your setup, you can have either an external equalizer or one that is built into the receiver. It works by using different filters to accentuate or mask different tones as well as minimize distortion. Amplifier This component increases the amount of wattage that is sent to the speakers. This increases the output of the speakers, which means louder music. Smartphone Integration: Receiver manufacturers are increasingly offering products that come with full smartphone integration. This means you can make phone calls, play music, open apps, and scroll through your contacts from the display on your receiver. The development of Apple CarPlay took nearly a decade (it’s been around since 2014). If you have iOS 7.1 or higher installed on your iPhone, you have Apple CarPlay. To activate Apple CarPlay, you must plug your iPhone into the main USB port of the car. In some vehicles, you can wirelessly connect your iPhone to the car. If your car is equipped with Apple CarPlay, the system will launch on your infotainment screen. You do not need to download Apple CarPlay to have it on your phone. It comes pre-installed and launches automatically when your car is equipped with Apple CarPlay. Vehicles from 2014 on can come equipped with Apple CarPlay. Toyota added it in 2018. Like Apple CarPlay, Android Auto is Google’s version of the in-car assistant. Android Auto is designed to make using things like Google Maps, Waze, and Google’s Voice Assistant technology, easier and safer when you are driving. Like Apple CarPlay, you can do things like navigate, play music, listen to audiobooks, respond to and send voice-to-text messages and emails and make calls. Android Auto launched in 2015. This includes Google Maps (which also owns the popular navigation app, Waze), and Google Assistant which allows you to use voice commands to ask your Android phone to do things like changing a Pandora station or read the last text message you sent. If you have an operating system of 5.0 or higher on your Android phone, then you can get Android Auto. You have to download Android Auto on your phone. It does not come pre-installed. You can use Android Auto on your infotainment system if your car comes with Android Auto capability or you can use the system on the phone itself. Unlike Apple CarPlay, you can use the system on the phone alone. Android Auto can be connected wirelessly to some vehicles equipped with Android Auto technology, but some Android phones will not work wirelessly. Android Auto can be found on some cars that are from 2014 or later. Compatibility issues: Always check your phone model and make sure it works with the car stereo unit you intend to purchase as some are incompatible. • Android.com auto compatibility Android Auto on your car display (wireless) A compatible Android phone with an active data plan, 5 GHz Wi-Fi support, and the latest version of the Android Auto app. Wireless projection is compatible with these Android versions: Any phone with Android 11.0 A Google or Samsung phone with Android 10.0 A Samsung Galaxy S8, Galaxy S8+, or Note 8, with Android 9.0 A compatible car or stereo. Find out if your car or stereo is compatible with Android Auto To find out if your phone has 5 GHz Wi-Fi support, contact your manufacturer. To find out if your specific car model is compatible with wireless Android Auto, contact your car manufacturer. Bluetooth technology lets you sync up Apple and Android devices, giving you hands-free calling as well as access to your device’s apps. USB and AUX inputs let you charge your device or hook up another device for an additional source of music. DIN size refers to the size of the stereo's chassis, and car stereos come in two standard sizes: Single-DIN refers to stereos that are two inches tall (and seven inches wide) Double-DIN refers to stereos that are four inches tall (and seven inches wide) 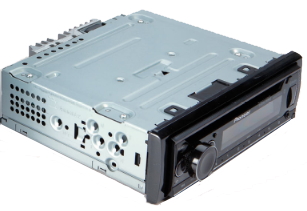 SINGLE DIN 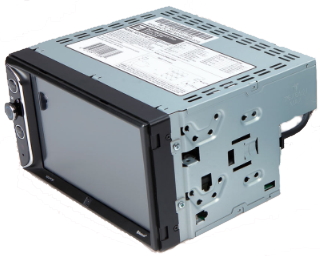 DOUBLE DIN Double-DIN usually has touchscreen. Touchscreen stereos have lots of advantages: Easier operation and a big, colorful display Better phone integration, especially those stereos compatible with Apple CarPlay® or Android Auto™ Rear-view camera capability Onscreen GPS navigation, either built in or via your phone Touchscreen stereos are also more difficult to install because you have to connect a few extra wires. BEST CAR STEREOS Pioneer AVH-W4500NEX 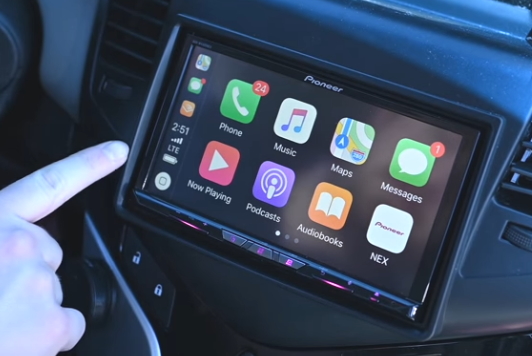 Wireless Apple CarPlay® or Android Auto General Features: • DVD/CD receiver with 6.94" touchscreen and AM/FM tuner • fits double-DIN (4" tall) dash openings • built-in Bluetooth for hands-free calling and audio streaming • built-in HD Radio tuner • 5 display colors, 112 key color options • detachable face • remote control • plays lossless FLAC audio files (up to 192kHz/24-bit) from flash media Smartphone Features: • works with wireless and wired Apple CarPlay and Android Auto • WebLink for in-dash control of select apps, including YouTube and Yelp (Apple iOS 10.0+, Android OS 5.0+) • Siri Eyes Free control with compatible iOS devices • Wi-Fi Certified Miracast™ for wireless screen-mirroring of select Android devices • Pandora control through iPhone and Android Audio/video Features: • plays CDs, DVDs, and USB drives (see Details for full capabilities) • 13-band graphic EQ with Easy EQ preset equalizer • Auto EQ with Time Alignment (optional CD-MC20 mic required) • low- and high-pass filters with adjustable crossover points • Advanced Sound Retriever enhances compressed digital files • dual-zone A/V output Expandability: • works with SiriusXM SXV300 tuner — supports Tune Mix, Traffic & Weather Now, and Sports Flash features • inputs: HDMI input; dual rear USB inputs; 2 rear A/V inputs; one camera input (A/V input can be used for a 2nd camera) • outputs: 6-channel preamp outputs (4-volt front, rear, subwoofer); composite video output INSTALLATION: Some people with the skills required to swap a car audio system can do the install themselves. It takes some time and effort and you had better know basic electrical and wiring information and power/battery setup. However most people will want to have the install done by the professionals. Some retailers will even do the install free. Make sure you do not get in over your head if you are not experienced because you could cause problems with your car wiring or power circuits. • Car Stereo Installation Pioneer AVH-X490BS Double Din Bluetooth In-Dash DVD/CD/Am/FM Car Stereo Receiver with 7-Inch WVGA Display/Sirius Xm-Ready • Modems Routers Setup Home Internet • Cable TV Box • What is BLUETOOTH • PC stereo hookup • How to scan broadcast channels on Samsung TV • How to setup Wi-Fi on Samsung TV • How to setup ARC eARC on Samsung TV • How to play computer through Stereo • How to turn old TV into Smart TV for streaming • How to hear computer sound on TV • Surround Sound Speakers • Streaming TV Surround Sound • How to select Input Sources on TV • Streaming TV and devices • Surround Sound • What you don't know about your 4K TV Share on Twitter Tweet • See over 100 Hookup Diagrams • Timer Record Radio Shows on a VCR • Camcorder hookup to TV, DVD • Audio Video Connections • Video Cables Connections • Hookup Diagrams Columbia ISA Audio Video Empowering consumers through information columbiaisa@yahoo.com |