|
|
|
How to Hook up Surround Sound • How to hook up a Plasma or LCD HDTV • Cable TV - Cable Box Setup • Surround Sound over HDMI • Surround Sound - How to Hookup SURROUND SOUND All sound you can hear begins as analog and ends as analog. Analog meaning analogous or a very good likeness. Digital audio cannot be heard as voice or music as it has to be converted back to analog, however for purposes of recording, storing, transporting and manipulating audio, it is advantageous to use the audio in a digital form. Analog audio is electrical pulses of many different amplitudes where digital audio is only two distinct amplitudes. Audio stored on physical media will wear down over time as each playback will wear on the media and the physical playback device will wear out over time. Digital audio is more like a instruction set to eventually recreate the original sound. Digital audio is a long string of numbers which represent the original sound. The DAC or digital to analog converter will generate a voltage based upon the numbers it gets. The voltages are amplified to drive a loudspeaker which creates pressure waves in air which reach your ear so your brain can interpret the sound. The long string of numbers can be stored in flash memory storage chips (NAND chip), a solid-state electronic circuit composed of incredibly small transistors. Another advantage of digital form of storage is the data can be encrypted to safeguard the information until it is used. CD, DVD, Bluray, internet content providers all store audio in a digital format. There are many different standardized formats used by these media. When you want to hear the sound, the digital audio has to be converted to analog, amplified and sent to the correct loudspeakers (or headphones). An audio digital to analog converter or DAC is used in your gear to accomplish this task. The quality of the DAC is important and accounts for part of the high cost of top level gear. Your gear must be able to recognize and handle the digital audio formats being input so decoding can be accomplished. Mono Sound has been recorded since the early 1900s. Back then there was only one loudspeaker because all sounds were on a single all-encompassing channel. Radios only had one speaker. Television broadcasts were only mono audio. Record players only had one speaker. Sounds generally came at you from only one location. Audio could be recorded on 10 inch or 12 inch shellac records. The two sides of the disc could store up to 5 mins. of audio played back at 78 revolutions per min. by a stylus. Most record players were mechanical and had to be wound up so a spring release could turn the record for playback. Grooves of audio are created on a record and on playback, move the needle which moves a magnet which makes electrical signals which are then amplified. The stylus is built out of two components: The pin with the needle shaped (diamond or sapphire) tip and the plastic shell (cartridge) that holds the pin & tip in place. The tip is the element that you place into the groove of your record. The long play or LP record was introduced in 1948 and was made of polyvinyl chloride PVC or vinyl, a more durable plastic material than shellac, and could store up to 25 min. per side played back at 33 revolutions per min. Stereo In the 1950s, a two channel sound setup called stereo became available. A left and a right loudspeaker gave a more realistic sound experience. Recordings had two tracks. Sounds could come at you from two locations but still up front. Some audio purists insist that the analog stereo audio recorded on vinyl records is the best recorded sound you will hear for music. In the 1970s, the VCR or video cassette recorder introduced magnetic tape recording in the home. The VCR recorded video and audio on VHS tapes (or Beta tapes) and could store 4 to 8 hours of playing time. In the 1980s, the stereo magnetic tape cassette and later, the compact disc or CD surpassed vinyl in sales. Smaller and easier to handle, these media increased the capacity to store audio to 60 mins. and more. CD can store up to 74 mins. of uncompressed stereo digital audio while audio cassette tape can store up to 150 mins. (75 min. per side). The beginning of surround sound In the 1990s, a movie theater experience in the home became possible with the six channel or surround sound setup. Sound could come at you from multiple locations, front, back, sides or surrounding you with sound, thus enhancing the experience. In 1997, DVD was introduced for the home surround sound experience. A DVD could fit a 2 hour movie on a single side disc but in addition to the video, the audio for the movie was also stored on the disc in a digital surround sound format, Dolby Digital 5.1. By 2003, DVD surpassed VHS in sales. With the introduction of height speakers and moving audio, the sound experience is the closest yet to reality. As technology moves forward even more advanced sound systems will emerge to give a truely realistic audio experience. Speaker Formats 1.0 - Mono - one speaker 2.0 - Stereo - two speakers 5.1 - Surround - six speakers 7.1 - Surround - eight speakers 7.1.2 - Surround - ten speakers 9.2.4 - Surround - fifteen speakers The first number is the number of full range speakers, the second number is the low frequency effects (bass speakers) and the third number is the number of height speakers. Speaker Positions Placing the speakers around the room for maximum effect is part of the surround sound experience unless you use a soundbar which contains most of the speakers inside. Basically the six channel setup consists of a left speaker, right speaker, center speaker, rear left speaker, rear right speaker and a low frequency speaker. The more advanced surround sound formats use additional height speakers above the listener. 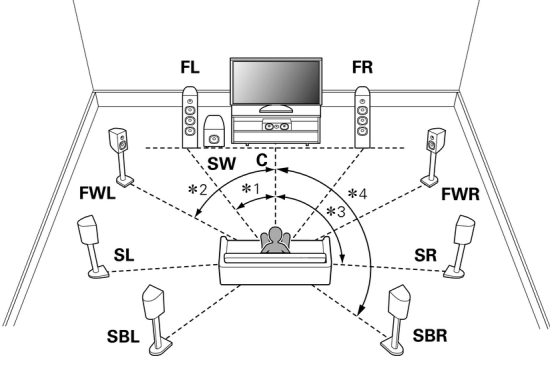 FL - front left FR - front right C - center SW - subwoofer FWL - front wide left FWR - front wide right SL - side left SR - side right SBL - surround back left SBR - surround back right Surround sound sources Surround sound can be delivered by broadcast TV, satellite TV, cable TV, DVD, Blu-ray, UHD Blu-ray, streaming internet and more. DVD was one of the first 6 channel sources available for the home. DVD has to store video and audio so the space available for six channels of audio is limited. So the audio has to be reduced/compressed/encoded in order to fit on the disc. There are many ways to compress/encode the sound but upon playback, the sound has to be decompressed/decoded, converted to analog, amplified and sent to the appropriate loudspeaker. This is the job of the surround sound decoder/processor, namely a soundbar or Audio Video Receiver. Surround sound format standards Sound can be digitized and encoded to save resources. There are many format standards to do this but basically the two formats which are available on DVD and other sources are Dolby and DTS. Within Dolby and DTS there are several compressed and uncompressed formats. The six channel Dolby standard is Dolby Digital 5.1 and in addition there are Dolby Digital Plus and Dolby TrueHD. These last two have 7.1 capability and more. 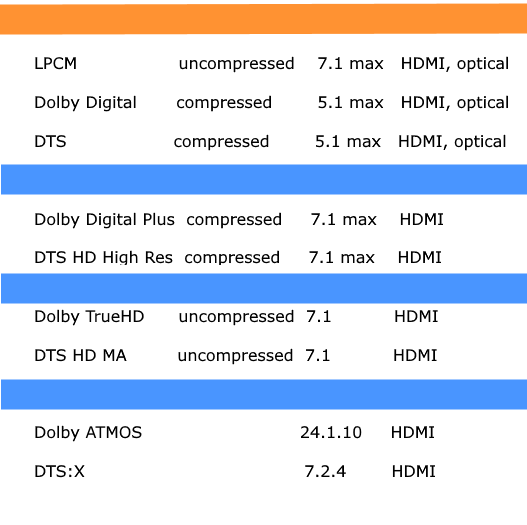  While an audio format may be capable of using a certain maximum number of channels, often in everyday practice a medium will use fewer channels. Q: Can I get 7.1 surround from my local TV broadcasts? A: While ATSC 1.0 digital TV broadcasts are primarily standardized on the Dolby Digital 5.1 format, Dolby Digital Plus and those included in ATSC 3.0 can deliver 7.1 and even more immersive surround sound experiences. However, the availability of such broadcasts depends on the specific content and the broadcasting standard adopted in your local TV station. Q: Can I get Dolby Atmos from internet streaming services? A: Some streaming services do offer Atmos using the Dolby Digital Plus format. Always check if specific content offers Atmos and if your provider has this capability. The most important characteristics of different surround sound audio formats LPCM LPCM is lossless audio format. It supports a maximum of 8 channels (7.1), but LPCM surround sound format on a DVD or Blu-ray disc more often supports only 6 channels (you will need 5.1 system to get the maximum out of this format). You can use any type of HDMI connection (starting from 1.0) to pass LPCM audio. Using a digital coaxial or digital optical, LPCM audio will be downmixed to 2 channels (stereo). LPCM is the basic lossless surround sound audio format (not compressed). Every receiver or Blue-ray player supports this format. LPCM supports 8 channels maximum and it will work fine with 7.1 system but it performs best when used with 5.1 systems. LPCM can be transmitted via any HDMI cable. Dolby Digital (Dolby AC-3 or DD 5.1) DD 5.1 is the DVD and Blu-ray standard. Unlike LPCM, this is a lossy format (audio gets compressed and some data is lost). DD 5.1 supports up to 6 channels. Dolby Digital was invented in 1992 and it is also one of the mandatory formats supported by all kinds of AV receivers, DVD and Blu-ray players. However, it is not lossless, which means it is compressed, which also leads to partial information loss. This format supports 6 channels max, and it works best with 5.1 systems. Dolby Digital can be transmitted via HDMI connection as well as optical or digital coaxial. DTS (DTS 5.1) DTS 5.1 is the direct rival of DD 5.1. This one is almost the same as DD 5.1 – it’s lossy and it supports up to 6 channels. It offers slightly better audio bitrate, but in reality, the difference between DTS 5.1 and DD 5.1 is not that noticeable. DTS is Dolby’s competitor and rival. It appeared in 1993 and it is also mandatory lossy format, just like Dolby Digital. It also supports 6 channels max so it is recommendable to use it with 5.1 speaker systems. As far as sound quality, these two are essentially the same. DTS supports the same types of connection as Dolby Digital. Dolby Digital Plus (DD+ or E-AC3) Dolby Digital + is the first optional encoding format. It offers much better audio quality than DD 5.1 (significantly higher bitrate) but it is still a lossy format. DD+ supports up to 8 channels (you will need 7.1 system to get the maximum out of DD+). Considering the size of DD+ file you will need at least HDMI 1.3 connection to pass DD+ audio (you will need HDMI 1.3 input port on your receiver). This format first appeared in 2004. It is one of the lossy formats, it supports maximum 8-channel systems and in order to get the expected sound quality, you will have to use at least HDMI 1.3 type cable. Not all receivers and players support it but it definitely offers better audio quality than the original Dolby Digital format (higher bitrate). DTS HD High-Res Audio Just like DTS 5.1 was a direct rival of DD 5.1. DTS HD High-Res Audio is the competitor of DD+. It’s also a lossy format and it supports up to 8 channels (7.1 system). DTS HD High-Res and DD+ have pretty much the same bitrate and need the same type of connection (minimum HDMI 1.3). Digital optical and coaxial connections are not supported. Dolby True HD Dolby True HD is Dolby’s lossless digital format. It offers the best audio quality with much greater audio bitrate than DD+ and DTS HD High-Res audio. It can support up to 14 channels, but most of Blu-ray Dolby True HD soundtracks will have up to 8 channels (made for 7.1 systems). You need HDMI 1.3 connection on your home theater receiver along with Dolby True HD decoder. DTS HD Master Audio A direct rival of Dolby’s True HD. It is also lossless, it has slightly greater bitrate than True HD, but there is no real difference in audio quality. Maximum number of supported channels is 8 (7.1). Required connection is at least HDMI 1.3. Not all home receivers support both Dolby True HD and DTS HD Master Audio. Check the supported formats or you may end up with a receiver that doesn’t support the format that you want. (that doesn’t mean you won’t get any audio, you can get a mandatory audio track, but you won’t get the best possible audio quality) Object-based audio formats. These audio formats extend the previous surround sound formats by incorporating greater control over where the sound can be directed and therefore how sound is perceived by the listener. These audio formats allow studios and film makers to include additional audio objects and improve listening experience by adding another dimension (height) to the sound. You will need at least two or four additional height speakers in order to hear all those additional sound objects. Dolby Atmos Atmos is not sound but information about sound. A container sound format like Dolby Digital Plus or Dolby TrueHD is used but rather than specifying discrete channels, a Dolby Atmos soundtrack uses up to 128 audio objects. Dolby Atmos movie soundtracks will have a 10-channel 7.1.2 bed that will play on any standard 5.1 or 7.1 system. Then, it can place a further 118 audio objects anywhere around the 3D sound field, overhead, to the side, front to back, back to front. This allows specific sound effects to move independently around the room while the channel-based audio bed carries on underneath. Playback isn’t tied to a speaker layout, and an Atmos soundtrack will adapt to the speakers available. Dolby Atmos can use up to 128 objects and usually supports up to 34 channels, but Blu-ray discs will have a maximum of 12 channels supported (7.1.4). Required connection is minimum HDMI 1.4 and you need this connection on your audio video receiver in order to make use of Dolby Atmos. The Dolby Atmos format started a true audio revolution in 2012. Receivers that support Dolby Atmos decoding require minimum 7 channels to reproduce the audio, which means that it is not enough to have 5.1 speaker system to achieve the expected sound quality. You will need at least two additional speakers and it should be two height speakers. What is Dolby ATMOS Dolby Atmos® creates moving audio by introducing two concepts: audio objects and overhead speakers. Together, these completely change how soundtracks are created and heard. Traditional surround soundtracks confine all sounds to a set of channels that can deliver sound to you from only a few perceived angles. Sounds exist only as part of a channel mix. In Dolby Atmos, by contrast, sound can be freed from channels. It enables artists to treat specific sounds as individual entities, called audio objects. These can be precisely placed and moved by the soundtrack creator anywhere in the three-dimensional space. The Dolby Atmos processor determines which of an array of front, back, side, and overhead speakers it will use to recreate lifelike movement. As a result, with Dolby Atmos, sounds flow all around you to completely immerse you in the action. The implementation of Dolby ATMOS can take many levels so it can be much more complex than a particular version you may be hearing. Soundbars will not give you as good a Dolby ATMOS experience as a 7.1 or better audio video receiver with appropriately positioned loudspeakers all around the room. Many devices will claim to offer Dolby ATMOS but you will only get ATMOS within the capabilities of the device. DTS:X DTS:X is a direct rival of Dolby’s Atmos. This format exploits DTS HD Master Audio and adds object-based sounds to HD Master Audio track. It’s very similar to Dolby Atmos. The maximum number of channels is 13 (you can easily make a 7.1.4 or 7.2.4 system). You need HDMI 1.4 connection (digital optical or coaxial inputs can’t be used). You don’t have to have height speakers (if you have 5.1 or 7.1 system) since DTS:X uses standard 5.1 or 7.1 soundtrack and adds object-based sounds to these tracks. Any 5.1 or 7.1 system will be able to play DTS:X audio (your receiver has to support DTS:X audio format). DTS:X appeared later (in 2015) and it’s the greatest rival of Dolby Atmos. It supports up to 13 channels and it requires minimum HDMI 1.4 cable in order to reproduce DTS:X audio. However, it doesn’t require the use of height speakers and it works normally with regular 5.1 or 7.1 home theater systems. Height Speakers 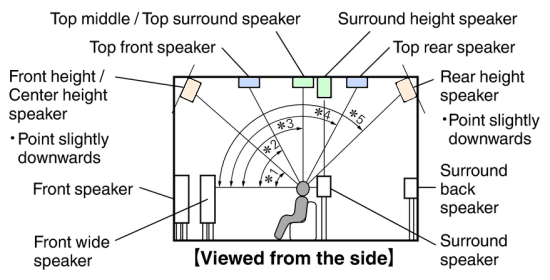 There can be up to 14 or more height speakers in addition to the ground level speakers. 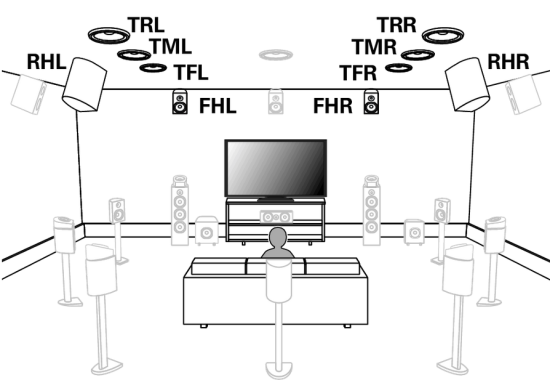 FHL - front height left FHR - front height right TFL - top front left TFR - top front right TML - top middle left TMR - top middle right TRL - top rear left TRR - top rear right RHL - rear height left RHR - rear height right CH - center height TS - top surround SHL - surround height left SHR - surround height right Surround sound capable equipment A 1970s vintage stereo receiver is not capable of decoding a six channel surround sound source. In order to process a multi-channel source, you need an appropriate processor such as a capable soundbar or Audio Video Receiver (AVR). Cables also need to be capable of sending multi-channel information. As complexity is increased, more capable equipment is required. Surround sound chain Think of a surround sound setup as links in a chain. Each piece of equipment is a link in the chain. Therefore each link must be capable of processing the desired audio result. If any link is not capable of handling the desired audio result, then you will not be hearing what you want to hear. Examples: 1. You want to hear Dolby TrueHD in wonderful 7.1 surround sound and you have a UHD Blu-ray with that audio available on the disc. You connect your UHD Blu-ray player to your High-Definition TV and your TV to a soundbar or AVR with speakers. However, your TV is not capable of audio passthrough for Dolby TrueHD. Your TV will downmix the audio before sending to the AVR and you hear something real good but not as good as Dolby TrueHD. 2. So your TV has Bluetooth capability and so does your soundbar and you like that wireless setup but Bluetooth cannot process more than 2 channel audio so again, you hear good audio but you do not hear surround sound audio. 3. You want to watch a movie from an online streaming source that offers Dolby ATMOS but the app you have does not handle ATMOS. You are not hearing Dolby ATMOS. So you see that any link in the chain that is not up to the capabilities you desire is going to result in less than desireable results. Every link must support the format you want. Only then will you get the desired audio result. HDMI ARC and eARC HDMI ARC is a two way communication over a single HDMI cable, video sent to the TV and audio sent from the TV. HDMI ports on TV and soundbar or AVR which are labeled HDMI ARC/eARC connect using HDMI cable. “ARC” is an abbreviation of Audio Return Channel. “ARC” allows the TV audio to be sent to the AV receiver or sound bar, by connecting the HDMI input jack that supports ARC of your TV to the HDMI OUT jack that supports ARC of your soundbar or AV Receiver with only one HDMI cable, without a digital optical cable. “eARC” is an abbreviation for enhanced Audio Return Channel. “eARC”, enhanced the function of ARC, supports uncompressed 5.1-channel and 7.1-channel audio formats, and object-based surround (such as Dolby Atmos and DTS:X) via compatible TV with the Ultra High Speed HDMI cable. If your source devices are connected to TV, make sure the TV has audio passthrough capability for each audio format you want because TVs usually do not decode surround sound into individual channels. Unless the TV passes the audio to a surround processor, you may get a downmixed version. The alternative is to connect source devices to a capable soundbar or AVR but again, make sure the soundbar or AVR can passthrough the video quality you want to the TV. HDMI • HDMI Versions Most HDMI cables will perform well for ARC but for eARC, which allows such features as Dolby ATMOS, you will get the best performance with Ultra High Speed HDMI cables. Ultra high speed HDMI cables let you take advantage of all the features of HDMI 2.1, including up to 8K video, eARC, and faster refresh rates. How To Hook Up Surround Sound 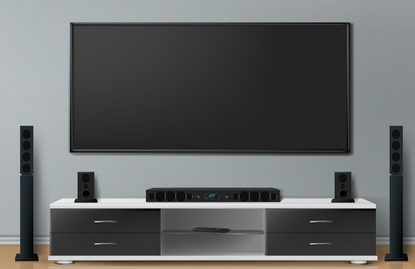 Many people do not understand what true surround sound involves. True surround sound must come from a multi-channel audio source such as a commercial DVD-Video or a digital TV broadcast in multi-channel sound like Dolby Digital 5.1 surround. The audio channels are individual discrete sound streams which must be decoded before being heard by the listener. How are they decoded? By a sound processor capable of handling the various audio formats used today for surround sound. A sound processor is a component such as an Audio/Video Receiver with DTS and/or Dolby decoding capability. Only after processing can the sound be sent to 6, 7 or more loudspeakers positioned around the listener. No, your TV cannot handle real surround sound, only simulated surround. What do you need for surround sound? You need a surround sound source, at least Dolby Digital 5.1, such as broadcast TV, cable TV, satellite TV or a movie disc like Blu-ray Disc or standard DVD-Video and you need hardware such as a surround sound receiver, speakers (five speakers and a subwoofer), a TV, a digital audio cable, speaker wire and other components like a DVD player, digital cable box or satellite TV box with digital audio output jacks.  From creator to your ears, the multi-channel audio is stored on a disc or broadcast over TV, cable or satellite TV, decoded by your receiver, amplified and sent out to loudspeakers. In order to setup true 5.1 surround sound, you'll need a surround sound receiver with digital audio inputs: fiber optic or digial coaxial. Without an Audio/Video Receiver with at least Dolby Digital 5.1 and digital audio inputs, you'll have to use stereo surround. That means you'll get sound from all your speakers, but it will not be surround sound. Rather than playing the 5.1 soundtrack from your DVD, your receiver will take the stereo track and decide what to play in the rear speakers. Your subwoofer will be underused, and you'll hear much of the same out of your front speakers as your rear speakers. If your receiver has digital audio connections, your DVD player, digital cable box, TV etc. has to have them, too. You'll also want to have a subwoofer pre-out on your receiver. This is usually colored purple and included with a whole set of inputs labeled "Pre-Outs". Check your receiver's manual to determine whether or not you have a subwoofer pre-out and to figure out where it is on your receiver. If you don't have a sub pre-out, there's an alternate way of hooking up your subwoofer, but its not optimal. Your bass will be drastically reduced and you won't "feel" it as much. Surround Sound Cables For a surround sound setup, you'll need the following: - (2) HDMI High-Speed 19 pin cables - (1) Fiber optic OR digital coaxial cable - (1) Subwoofer cable (or a regular RCA cable, but an actual subwoofer cable is preferred) - (1) Y-Adapter (this plugs into the red and white RCA jacks on your subwoofer and combines them into just one jack) - Enough speaker wire of 14 or 16 gauge quality to connect your 5 speakers and your subwoofer (200 ft is good for most rooms) The Y-adapter is optional but recommended. Your subwoofer expects two inputs from your receiver, but for your use, you'll only be outputting one cable (from the subwoofer pre-out) to the subwoofer. The Y-adapter is the optimal method of hooking up your subwoofer, but if you don't have one, just plug the cable from the receiver into either red or white RCA inputs on your subwoofer speaker. If you don't have digital audio inputs on your Audio/Video receiver and/or DVD player, you'll need a pair of RCA cables (red and white). And if you don't have a subwoofer preout, you'll need a little extra speaker wire. 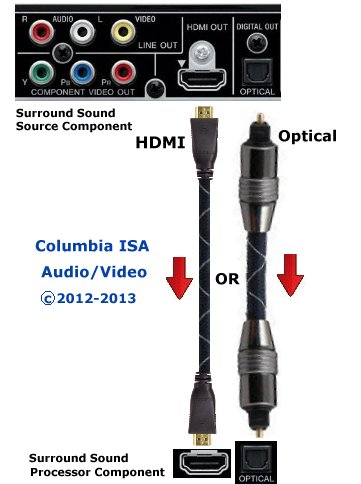 SURROUND SOUND HOOK UP Connect a digital audio cable from the source device (DVD player/cable or satellite TV box) digital audio out, to the A/V receiver's digital audio input. You can use a digital coaxial or optical cable. Either one will work fine. The coaxial cable is typically more robust than the optical cable for wear and tear but the real benefit of optical fiber cable for audio is that it is not susceptible to line noise or other electromagnetic interference. Optical audio cable specifications: • Audio Signal - Digital audio bitstream. • Originally limited to 48 kHz at 20 bits. Extended to support all modern formats, except Dolby Digital Plus, TrueHD and DTS HD audio streams. • Bandwidth - Originally 3.1 Mbit/s; Now 125 Mbit/s. • Protocol - Serial • Cable - Fiber optic (10 meters max) • Pins - 1 • Connector - JIS F05 (JIS C5974-1993 F05) Cables for digital audio connections Digital audio cables for bitstream audio connections can be optical or RCA coaxial (or HDMI 1.3). The optical cable can be recognized by the connector at each end. It is round like the RCA coaxial cable however, there is a hole for the light to come out and the connector has edges so it fits into the jack properly. Optical uses light to transmit the data and coaxial uses electricity over copper wire. The RCA coaxial cable connector is just a single round pin with a collar. There are two types of digital audio transmission (three if you include HDMI cables which carry both digital video and audio) - coaxial and fiber optic (optical) and they use two types of cables - coaxial and fiber optic (also known as Toslink). A coaxial cable is a shielded cable with a RCA type connector on each end. An optical cable contains a fiber optic strand encased in a protective clading and rubberized case with molded connectors on each end. It's a toss-up as to which is better. Neither actually offers an advantage as far as sound quality - however convenience and reliability factors give coaxial some advantage. Fiber optical cables can be damaged if not handled carefully. Likewise the emitter or receiver is more likely to fail on a fiber equipped unit. Coaxial cables on the other hand are sturdier than fiber and less likely to be damaged by prying hands and there is no optical emitter/receiver to fail on coaxial systems. In addition to being more reliable in the long run - coaxial cables are much more economical than fiber. Fiber can run from $20 at retailers to more than $50 for a premium brand. HDMI cables are relatively new to the home theater scene and are incredibly convenient. The HDMI cable carries both video and audio in digital loss-less format to HDMI equipped display devices or A/V receivers. Be aware that a lot of HDMI "pass-through" A/V receivers do not actually sample the audio from the HDMI cable. These "pass-through" receivers require an additional fiber or coaxial cable from the source to the A/V receiver for audio. HDMI 1.3 is designed to enable higher bandwidth transmission for High Definition audio sources from Blu-Ray discs such as Dolby TrueHD.  OPTICAL DIGITAL AUDIO CABLE 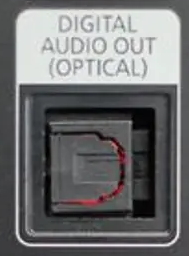 The Surround Sound Experience Its important to understand that you can't just put your speakers (or subwoofer) in any old place in your room. You need to consider distance, angle, level (vertical height), and if there is anything blocking the sound. Considering distance, you should make sure that your front speakers and center channel are are located close to the TV. Its OK to space your front left and right channels out towards the walls, but don't put them further out than where you'd be sitting. Rear speakers should be spaced out equally to the fronts. They will also need to be as directly behind your seating as possible. They don't do a lot of work in most movies, and most of the work they do is typically quiet compared to the front speakers. The subwoofer can be anywhere between where you sit and the TV. Optimally, place it closer to the TV and more to the center of the room. Don't block the side of the subwoofer where the air comes out. You also don't want to put the subwoofer behind dense objects, doors, walls, or in closets. When possible, let the subwoofer rest on the floor itself. Putting it in a cabinet or anything else that raises it off the floor will diminish its effects. When positioning your speakers, make sure the front, the center, and the rear speakers are aimed straight out towards where you sit. The subwoofer doesn't matter as much as long as it is not directly blocked by anything. You obviously don't want your speakers facing the floor, the wall, or the ceiling. The height of your speakers should match your ear level when sitting. That means if you're mounting your speakers, don't put them at ceiling height. The subwoofer is always best on the floor, and rear speakers need to be as close to ear level as possible. An exception is the center channel. Its not always possible to get it just where you want it since it is, afterall, in the center - right where your TV is. You can safely place a center channel above or below your television, but keep it away from the ceiling and the floor. Running the Speaker Wire You should have already figured out how much square footage of speaker wire you needed and made sure you had that (and a little extra). Now you can lay that cable out. Start connecting the speakers one by one and running the wire back to the receiver. Do whatever concealing of the wires you have planned at this point. You can always change it up in the future. You're going to want to make sure you connect the right speaker to the right jack on your receiver. First recognize that you will be connecting positive (+) and negative (-) wires on your speakers and on your receiver. Most speaker wire is either colored differently or has writing on one of the cables to designate + vs -. As long as you match it up on both ends (the speaker and the receiver), you're going to be fine. Just don't use one of the wires as positive on your speaker and then the other wire as positive on your receiver (or other similar situation). Crossing the wires is a no-no and can result in damage (or possibly fire). Keep it simple and use the same scheme for every speaker. Determining which speaker is which is quite simple. Stand in the center of your room and look at your TV. The speaker to your front left is just that - front left. Then you have center and front right. Behind you and parallel to your front left is your rear left. Opposite that is rear right. Now you know which is which on your receiver. Connect the Subwoofer If you have a Y-adapter, go ahead and plug that into your sub's red and white RCA inputs. Then plug a subwoofer cable or an RCA cable (if you have a red and white pair, just select either the red or white and let the other cable dangle) into the Y-adapter. The other end goes into your receiver's subwoofer pre-out. Now plug the power in for your sub and you're finished with connecting the subwoofer. If you don't have RCA inputs on your subwoofer, you might not even have a power cable for it either. That means you sub is unpowered. It will not and can not sound as impressive as a powered subwoofer. Consider upgrading your subwoofer if this is the case. Either way, if you don't have RCA jacks (or your receiver doesn't have a subwoofer pre-out), you've got to connect the sub a bit differently. You'll notice some speaker wire jacks on your subwoofer. There should be four pairs of them (two inputs, two outputs). What you have to do is run your front left and front right speaker cable into the left and right speaker ouputs on the subwoofer. Yes - that means instead of running the front speakers to the receiver, they go to your subwoofer's outputs. Next, use more speaker wire (this is where the extra comes in handy) to connect the speaker inputs on the subwoofer to the left and right speaker jacks on your receiver. Make sure you're going left to left, right to right (check the labels) and not crossing positives and negatives (remember your wiring scheme). Once you've done that, you're all set with your subwoofer. DVD Player, cable TV box, HDTV Now you just need to run audio cable from your DVD player, cable TV box etc. to your receiver. If you have digital coaxial or fiber optic inputs on both the receiver and DVD player, choose one of them and connect the output on your DVD player, cable TV box etc. to the input on your receiver. Be careful because there is most likely one or more digital coax or fiber optic outputs on your receiver as well. You want to use the digital audio INPUT. If you don't have digital connections, run a pair of red and white RCA cables from the outputs on your DVD player to an input on your receiver. Connect your DVD player, cable TV box, satellite TV box etc. video output to your TV (using composite, component, s-video, HDMI, or DVI). The last thing you need to do is select the input you are using on your receiver. If you're using a digital connection, refer to your receiver's manual. You need to select which digital input you're using (usually labeled Digital 1, Digital 2, etc.). Its simple but every receiver is different. Yours might even automatically select the DVD player if it is the only digital input connected to the receiver when you turn on the DVD player. If you're using analog (composite, red and white) connections, just select the input you used. They might be labeled Video 1, Audio 1, TV, DVD, CD, or some similar label. The back of your receiver should tell you what input you're using. If you followed the directions here, you're going to enjoy your fully connected surround sound system. Hopefully you've got a digital connection between your DVD player and receiver so that you're getting real surround sound. 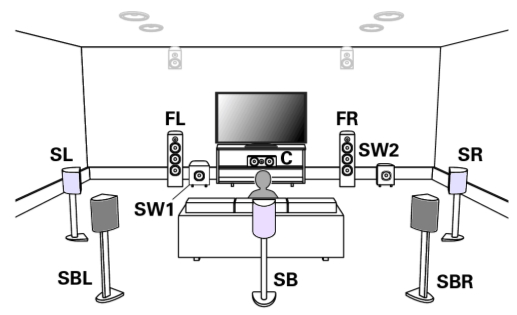 Surround Sound Setup • Stereo setup would have a front left (FL) speaker and a front right (FR) speaker for 2-channel sound or 2.0 • Dolby Digital would have a front left (FL) speaker, a front right (FR), a center speaker (C), a surround back left (SBL), a surround back right (SBR) and a subwoofer (SW) speaker or 5.1 Additional speakers can be added for 7.1 systems and even more can be added however there is limited content available with these additional channels. Audio Video Receivers A "receiver" serves as a command center for either a basic audio system (a stereo receiver) or as an elaborate audio-video routing, switching, surround decoding and amplification center for a multi-source audio-video system (a 7.1 channel surround AV receiver). In both cases, the receiver will contain an AM-FM radio tuner and either two internal amplifiers (stereo) or, most commonly, seven amplifiers, for 7.1-channel surround sound. Now that Dolby Digital 5.1 surround sound has become the standard for HDTV broadcasts and the vast majority of DVD and Blu-ray movie soundtracks, it makes sense to get an Audio/Video surround sound receiver, even if you just use it in stereo. The increased realism of surround sound is very seductive, not just for movie watching but for all genres of music listening. It is, after all, the way we hear in real life, with sounds coming at us from every direction, and it makes acoustical sense to reproduce it that way. Moreover, a basic A/V receiver costs little more than a stereo receiver and gets you a lot more versatility and listening options. Although some new A/V receivers have connections for internet radio surfing and many are XM/Sirius satellite radio ready, a canny shopper must still consider basic output power for a given room and listening taste before going on to the more exotic features. Power Output It's a receiver's first duty to amplify the weak incoming audio signals to a level where they'll drive loudspeakers to clean, reasonably high volume levels in most typical living rooms or home theaters without audible distortion. The first thing to look for is the receiver's rated per-channel output power into an 8-ohm load. (Most domestic speakers are either 8 ohms or 6 ohms impedance, which are essentially identical for purposes of power output). The biggest problem with the per-channel rating is that it is frequently only one channel driven, so that every added channel will reduce the per-channel output power e.g., "100 watts per channel" is actually 50 watts per channel with 2 channels driven and 14 watts per channel with 7 channels driven. This recent habit of taking the 100 watts per channel and multiplying it by 7 ("100 watts x 7") to get the so-called "total power" is complete nonsense. The only method to determine how much power an A/V receiver truly generates is to separately measure the total watts produced by each channel, or to drive 5 channels simultaneously and measure the output of each. How Much Power? To cover all but very large rooms and extremely high-volume playback, most people will be quite happy with A/V receivers rated at between 70 and 130 watts per channel, with two channels driven. Although many A/V receivers will deliver far less than that when all channels are driven simultaneously, it's not a severe drawback. Even with the most raucous movie soundtracks, it would be extremely rare to ever find an A/V receiver having to produce simultaneous output of 70 watts or 100 watts into each of its 5 or 7 channels. Typically, the surround channels demand far less power output (a few watts) than do the main left, center, and right channels, which carry the bulk of the acoustical output demands. Inputs and Outputs Your A/V receiver performs a source selection function, allowing you to choose which components (DVD, Blu-ray, cable- or satellite TV, CDs, videotape, iPod and MP3) to listen to and watch, so keep in mind how many audio/video sources you may want to connect now and in the future. That may include an aging VCR for all those older videotapes or perhaps even a turntable (that input is called Phono, and only some A/V receivers have it) for a vinyl record collection. Back-Panel All receivers should have inputs for the full range of video connectors -- composite, S-video, component video, and HDMI. With the popularity and standardization of HDMI, the DVI inputs have largely disappeared. If you have an older DVD upconverting player with only a DVI output, you can get a DVI/HDMI adaptor. With increasing price, the number and variety of inputs and outputs, especially HDMI, increases. The over-$1,000 models typically feature three or more HDMI inputs, and plenty of analog and digital inputs and outputs, both optical and coaxial.  Audio/Video receiver rear panel Speaker color designations 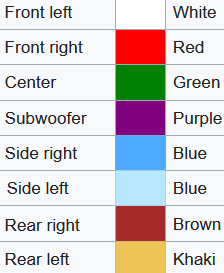 Speaker color designations for height speakers  The Audio/Video receiver rear panel also has your loudspeaker connections Entry-level A/V receivers may offer only simple HDMI switching of connected components but you'll want to make sure that whichever AV receiver you choose, the HDMI "version" is compatible with your HDTV's input and with any upcoming purchase of HDMI-equipped components such as a Blu-ray player or gaming system. The latest HDMI version is 1.3, but earlier versions will carry many of the high-resolution audio formats. If you anticipate getting a separate power amplifier with much greater power output in the future, then make sure the AV receiver has "pre-outs" (preamplifier output jacks) for all channels. Multi-channel Surround Sound Decoding In most installations, your A/V receiver will do much of the work of "decoding" the various new and older surround sound formats. There are now ten surround formats, Dolby Digital 5.1 being the standard of HDTV broadcasts and standard DVDs. The ten formats are: Dolby Digital (5.1), Dolby Digital EX, Dolby Digital Plus, Dolby TrueHD, DTS, DTS-ES, DTS-HD, DTS-HD Master Audio, Dolby Pro Logic II, Dolby Pro Logic II x. Dolby-DTS The "important" surround formats on inexpensive A/V receivers are Dolby Digital and Dolby Pro LogicII x, now almost universal on even entry-level models. You'll also find various DTS codecs comparable to the Dolby Digital variations, which some enthusiasts like better for DTS's somewhat exaggerated deep bass effects. If you want to have the latest high-resolution multi-channel audio formats -- Dolby TrueHD, DTS-HD (Master Audio) and Dolby Digital Plus -- common to Blu-ray high-definition discs, you'll be looking at A/V receivers in the upper price range. However, as Blu-ray and its associated hi-res soundtracks become more common, prices will fall. In early 2008, Onkyo announced an A/V receiver, the TX-SR606, in the $500 price range that will decode Dolby TrueHD and DTS-HD (Master Audio) as well as having four HDMI 1.3a-compatible inputs. A lower-priced A/V receiver (or an older model) lacking these capabilities doesn't mean you can't hear the newest soundtrack formats from a Blu-ray player. As long as any A/V receiver has a multi-channel (usually eight) analog input set, then a Blu-ray player will do the decoding of Dolby TrueHD, DTS Master Audio or Dolby Digital Plus, and route the signals to the Blu-ray player's analog 6 or 8-channel outputs. It just means a complex connection, with either six or eight analog RCA cables between the Blu-ray player and your A/V receiver's multi-channel input set. On-screen Display Make sure the A/V receiver has a legible on-screen display so you can navigate the receiver's settings during setup and calibration. Most AV receivers will have on-screen options for component-video outputs, but typically only more expensive models offer an on-screen display with the HDMI outputs. Auto-Setup and Calibration Even inexpensive A/V receivers now have some type of auto-setup mode, with many including a supplied microphone and auto-calibration/equalization circuit (Audyssey is very common) that claims to adjust the frequency response of the system's speakers to match the room's characteristics. While the auto-setup modes are initially useful for first-timers, they are still prone to error, sometimes setting speakers that are small to "Large" and making errors in speaker level settings of 4 dB or more. You should still do a manual check using a sound-level meter and a pink-noise signal. Video Processing Your new HDTV set will automatically do its own video processing, "scaling," de-interlacing and trans-coding (convert) incoming video signals in order that they conform to your set's specific fixed-pixel array (the latter is common to all plasma, LCD, and DLP displays). Many A/V receivers also contain video processors that will perform similar functions. The question remains as to which unit -- your AV receiver or DVD player or the HDTV -- does a better job. It's generally agreed that there should only be one conversion take place for maximum picture quality; adding more than one may degrade the video image and add various visible processing artifacts. In any case, be sure to set your HD cable-TV converter box (or satellite receiver) to output video at the native resolution of your HDTV display (720p or 1080i). If you have a 1080p display, try setting the cable box to either 720p or 1080i and see which produces the better picture. The three operative terms that define upconversion are: 1. Transcoding, which is converting one signal format like S-video to another, say component video. 2. Deinterlacing, which converts an interlaced video signal (480i or 1080i) to progressive-scan, e.g. 480i to 480p or 1080i to 1080p. 3. Scaling, which alters the video signal from one resolution to another, like going from 480p to 720p. • Blu-ray Surround Sound • Surround Sound over HDMI • Surround Sound - How to Hookup Columbia ISA Audio Video Empowering consumers through information columbiaisa@yahoo.com SWS |