
 |
|
Home TV CABLE BOX SETUP How to setup home cable TV set top box Search Columbia ISA SEARCH *** Columbia ISA Audio/Video Your service provider should have a kit which contains all the parts you need to get started. This kit should contain at least one HDMI cable, one RG-6 coaxial cable, a remote control, the power adapter, a user manual and the cable receiver box.  Basic Cable TV box connections There are many different types of receiver/decoder boxes offered by your service provider. Be sure you get one that will work with your home TV and your home wiring setup. 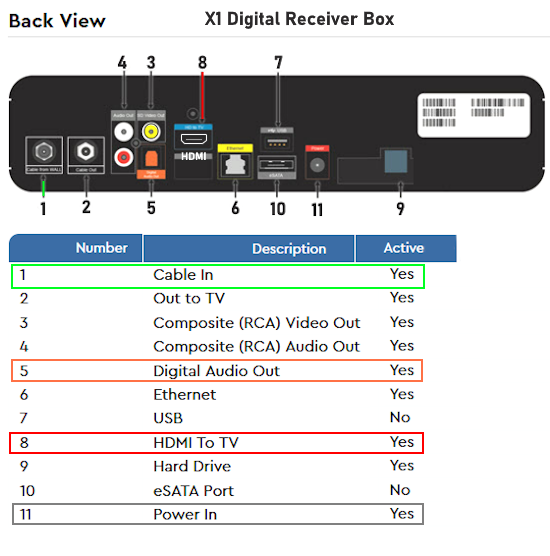 You need a signal input connection, a signal output connection for the TV and you need to connect power to the receiver box. Additional connections may include those for an older TV or surround sound or a wired internet connection. 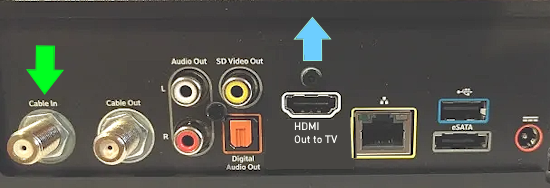  For a TV with HDMI, connect the RG-6 coaxial cable from the service provider to the "Cable In" port on the Cable box. Next, connect an HDMI cable to the HDMI port on the Cable box and the other end of this HDMI cable to the TV HDMI input port. Be sure to select on the TV, the HDMI input source where the cable box HDMI cable is connected. For example, HDMI 1 or HDMI 2. 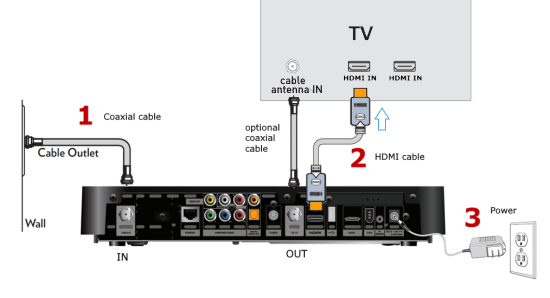 The 3 steps to basic setup are: 1. Connect a coaxial cable (RG-6) from your provider's wall outlet connection to the cable receiver box input port. This is a round silver threaded port. Be sure it is the INPUT, not the OUTPUT. This port is usually towards the outer edge of the box, usually on the left as you face the rear of the receiver box. Insert the copper wire into the port and screw on the connector until you have a tight secure connection. 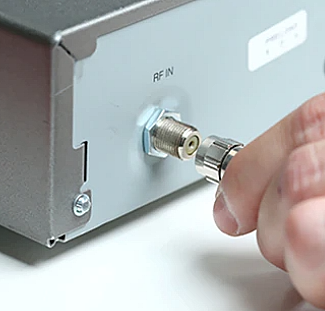 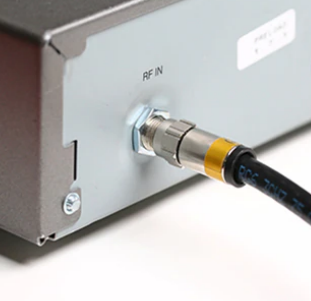 2. Connect your cable or cables from the cable TV receiver box OUTPUT to the TV. This can be an HDMI cable for newer TVs or RCA cables for older TVs.  HDMI cable connection to cable TV box 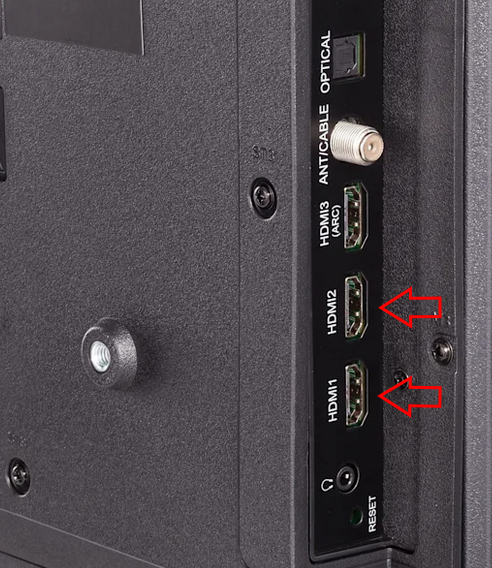 TV HDMI input ports 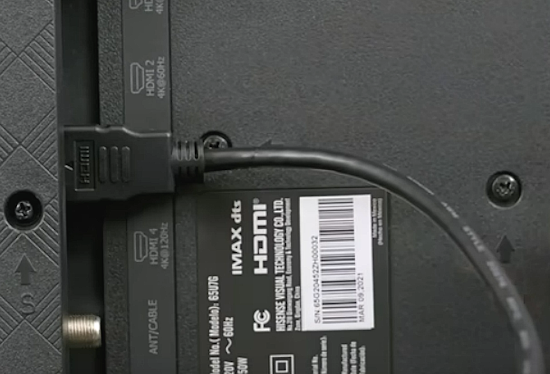 HDMI cable connected to TV HDMI input port 3. Connect the Power Adapter cable to the cable box power input and then insert the power adapter into an available wall outlet or power strip. 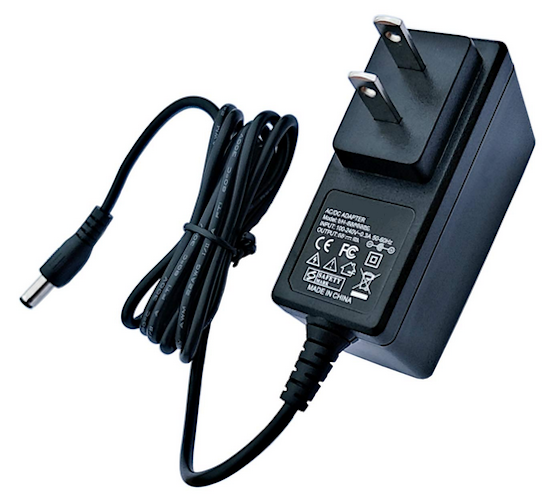 Cable TV box Power Adapter 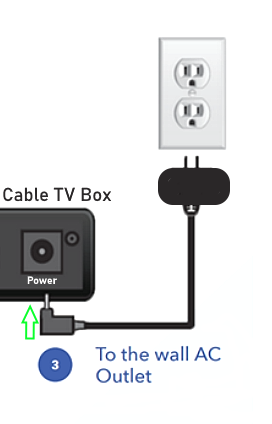  This completes the basic connections. Be sure to insert good batteries into the Cable TV box remote control in the correct orientation. Now you can move on to the next steps. Remember to select on the TV, the correct source input using the TV remote control. For example if you connected an HDMI cable to the TV HDMI 1 port, then select the HDMI 1 source input in order to view the output from the cable TV box. 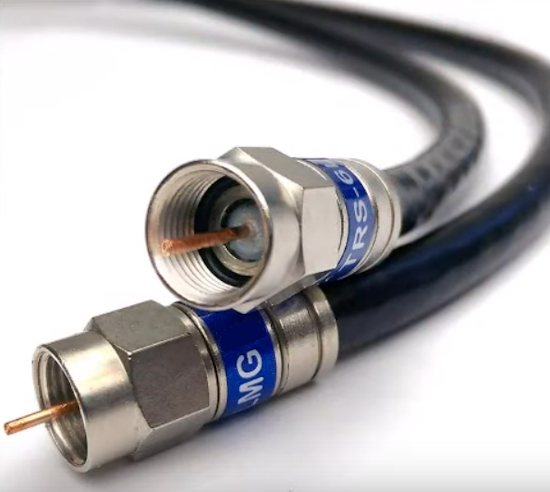 RG-6 Coaxial Cable 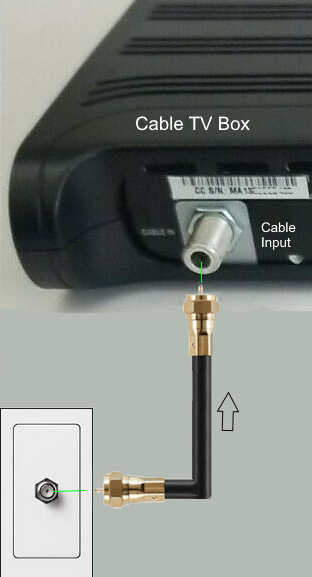 INPUT To get the signals into the cable TV box, connect an RG-6 coaxial cable from your cable TV provider's working active wall coaxial source (threaded silver connector jack) to the cable TV box's coaxial (threaded silver) input port. Insert the center cable pin into the port hole and screw on the cable housing until it cannot get any tighter. This allows signals from your cable TV provider to get into the cable TV box. Be sure the cable TV box is powered ON after all connections are made. The other connection you need is from the cable TV box OUTPUT to your TV input. For output to the TV, you have several options and you only need one of these output options. OPTION 1 - Coaxial Cable Output 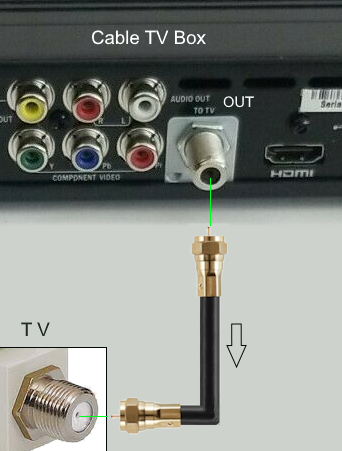 OUTPUT from cable box to TV Input If your TV only has an antenna input, no HDMI, connect an RG-6 coaxial cable from the cable TV box coaxial output (threaded silver) to the TV antenna coaxial input. You will tune channels on the cable box with the cable TV box remote control and view them on the TV which is often required to be set to channel 3 or 4. If your TV has more than a single input, such as a set of RCA input jacks, you may need to select the antenna input on the TV using the TV remote control. OPTION 2 - HDMI Cable Output 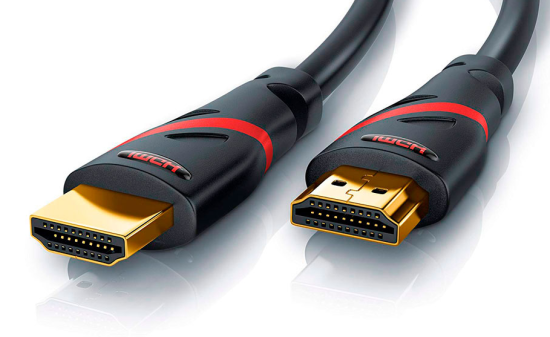 HDMI Cable - 19 pins If your TV has HDMI inputs and almost all newer TVs do have them, you can connect an HDMI cable from the cable TV box HDMI output to the TV HDMI input. 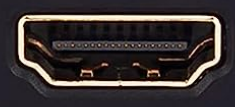 HDMI port 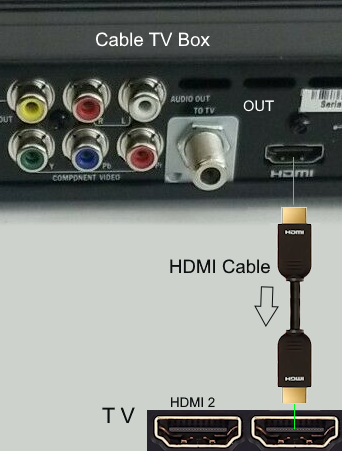 OUTPUT from cable box to TV HDMI Input Using the HDMI cable connection can give you better video resolution. Remember which HDMI input port you connected to and select on the TV, the correct HDMI source input using the TV remote control. Some TVs have several HDMI inputs. OPTION 3 or OPTION 4 - Composite or Component Cable Output Composite uses 3 cable connections, one video (yellow) cable and two audio (white and red) cables. Component uses 5 cable connections, three video (green, blue, red) cables and two audio (white and red) cables. If your TV has RCA composite or component inputs, you can connect using these cables. Component video gives you slightly better video resolution than composite video but not as good as HDMI. 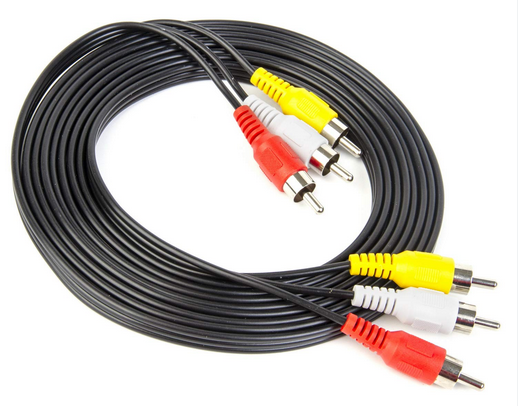 RCA Composite audio/video cables 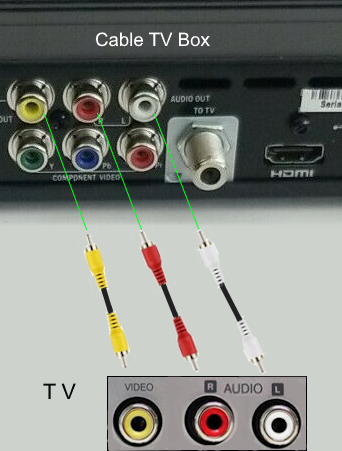 Using the TV remote control, select the correct AV source input. Select channels on the cable TV box. COMPONENT VIDEO CONNECTION - Cable box to TV 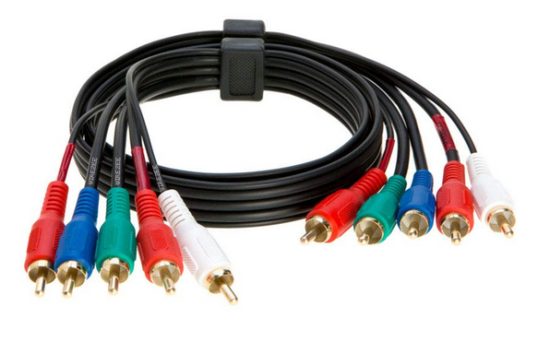 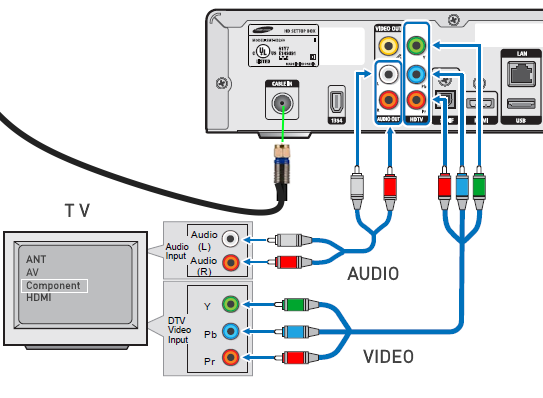 Be sure to switch the TV source input to the component input using the TV remote control. How do I get started with digital cable TV? Getting started with digital cable TV: Years ago cable TV was analog and no converter/decoder boxes were needed. The signals were sent "in the clear" from local cable TV providers. Now the signals are encoded and sent so that you need a decoder/receiver box which the local cable TV provider must approve, activate and authorize. The boxes come in several different varieties depending on which TV you have, analog or digital. 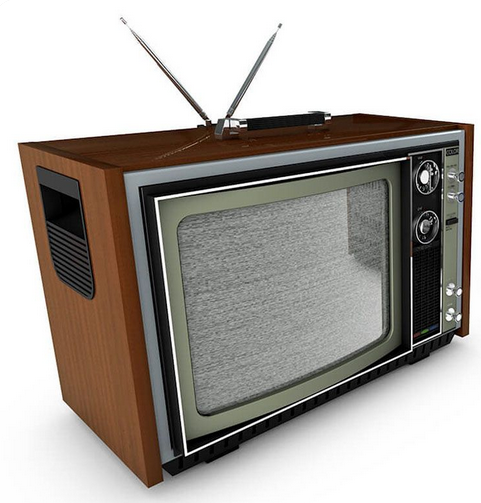 Many people assumed that analog TV sets were obsolete when the 2009 conversion took place from analog to digital TV. This is not the case. All you need is a converter box for over-the-air broadcast TV or a decoder/receiver box for cable TV or satellite TV. You can even use analog TVs for internet streaming content and turn that older TV into a smart TV. For older analog TVs, all you need is a DTA for minimum service. The digital terminal adapter is not a full service receiver but will allow viewing of digital cable TV channels on an analog TV (or a digital TV). The larger full service receivers are for flat screen TVs with high video resolutions, HDMI connections and offer additional services. 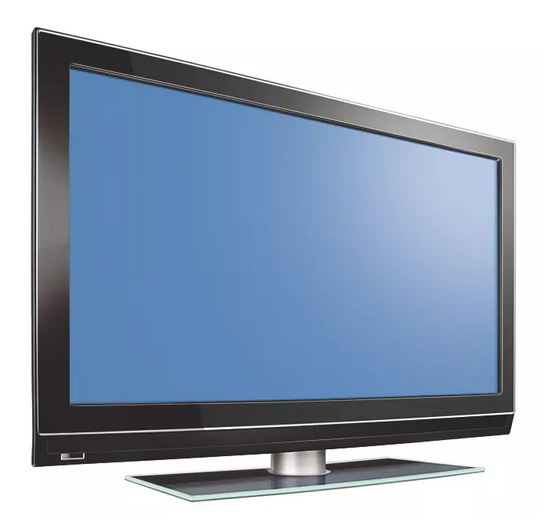 High Definition flat screen digital TV Contact your local provider for cable TV service, sign up and obtain a cable TV receiver box and remote control which matches your needs. Major providers include: AT&T - available in 21 states COX - available in 19 states Spectrum - available in 42 states Comcast Xfinity - available in 40 states The availability in any given state may be limited to only one or several high population areas. There are many different models and makes of cable TV receiver boxes. • User Manuals for cable boxes Cable TV Set Top Box brands: o Motorola o PACE o Scientific Atlanta/CISCO o Samsung o ARRIS 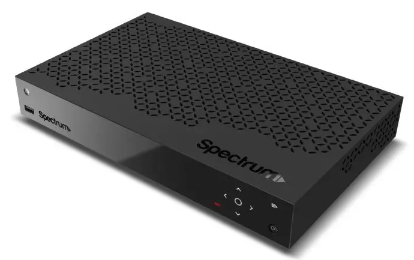 The trend is to remove most buttons from the front of the box and provide most functions on-screen. Often you do not own the cable box. You just rent it from your provider. As upgrades take place, you can swap out your current box for the new box. Your provider may even use two or more different manufacturers for their cable boxes. Within each maker you could have SD or HD models or HD models with a DVR or dual-tuner models. Also, boxes can have different jacks such as component video or HDMI. Make sure you get a box that meets your needs. Digital cable is not always High Definition, but to get HD you need a HDMI, or component video cable connection as these are the only cable hookups that allow High Definition video signals to pass to your HDTV and allow the on-screen graphics you need to use the channel guide, DVR and other functions. What is High Definition TV? High Definition TV or HDTV means a digital television signal of 720p, 1080i, 1080p, 4K, 8K or higher video resolution displayed on a digital TV capable of processing at least 720p or 1080p video resolution. The HDTV must have HDMI, or Component video input connections and usually has Composite video inputs for lower resolution sources such as VCR, DVD player or Game Consoles. What is DVR? DVR stands for Digital Video Recorder. A standard VCR records and plays analog video. DVR records and plays digital video. Unlike an analog cassette tape, the DVR hard drive allows recording and playback to occur simultaneously. DVR offers the ability to control your viewing experience by pausing (time shifting) live TV and providing trick playback modes (pause, fast forward, slow forward, fast rewind, slow rewind). • Record Programming Record hours of TV programming. The total hours of recorded content will vary based on the storage capacity of your box and type of content (digital, analog, or HD) being recorded. You can archive shows you want to keep to a VCR if you run out of disk space and you can erase old shows you no longer want. • Control Live TV Pause, rewind, and fast-forward live TV. HDTV display technologies HDTVs are widescreen with a 16x9 aspect ratio instead of the squarish 4x3 aspect ratio of older analog TVs. Makers include Sony, Samsung, LG, Panasonic, Pioneer, Sharp, VIZIO, Hisense, TCL and more. SETUP The cable TV signal coming from your service provider carries all your video and audio and enters your home on coaxial cable. This cable, if not already present, will need to be installed by a technician from the cable company. If already in the home, you may be able to setup the cable box yourself without a visit. Self Install If you want to do a self install and a visit is not required from your provider, you may be able to order a self install kit which contains the following: 1) The cable TV decoder/receiver box 2) A coaxial cable 3) A HDMI cable 4) A Power adapter 5) A Remote Control 6) Instruction Guide 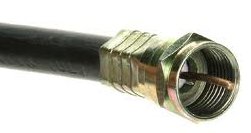 Coaxial Cable (RG-6) Problems can arise when doing a self-install so be sure you know your environment before going this route. If you moved into a new place or others have access to the cable signal incoming path, you may experience no signal, low signal strength or other issues. Having a tech out to do the install could save you money in the long run. INSTALLATION You may want only cable TV or you may want internet service and cable TV (and possibly digital home phone). If you also want internet service, the coaxial cable will be split, using a 5-2400MHz coaxial splitter, so that the TV and a internet modem can be connected by their own cables. The splitter allows both internet and TV channels to be received and processed by the proper hardware. If you only want cable TV or you only want internet, then no splitter is required to split the two services. The incoming coax cable from your provider plugs into the single jack on the splitter and then two coax cables attach to the two other connections on the splitter, one going to the internet modem and the other to the cable TV box. 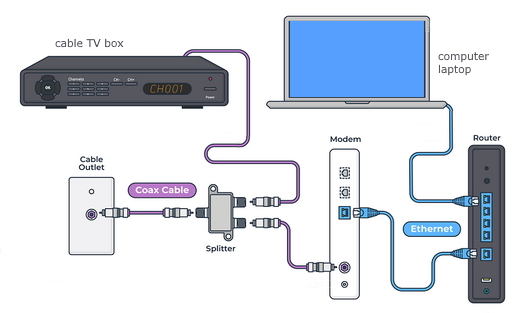 The proper coaxial cable then is attached to the cable TV box on the F connector. This is the same type connector jack for antenna on the TV. This allows the cable box to send and receive signals to and from the service provider.  Diagram for home cable TV setup with wireless router 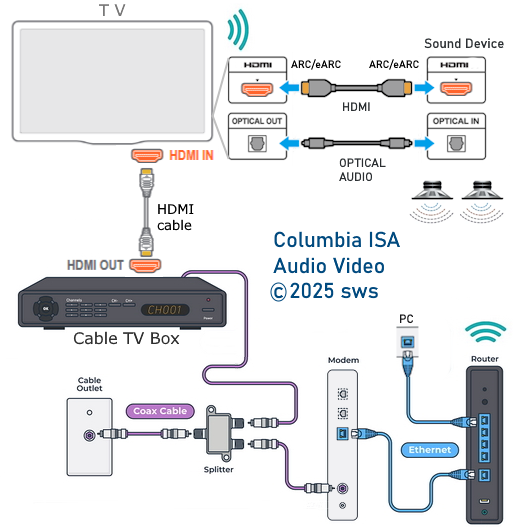 Diagram for Surround Sound Connection Not all Cable TV channels will offer surround sound. Many will have 2-channel stereo. The sound device can be an Audio Video Receiver or Soundbar or powered speakers for stereo. Check Audio SETTINGS to be sure you get the correct format. Also be sure to select the correct INPUT on the sound device. 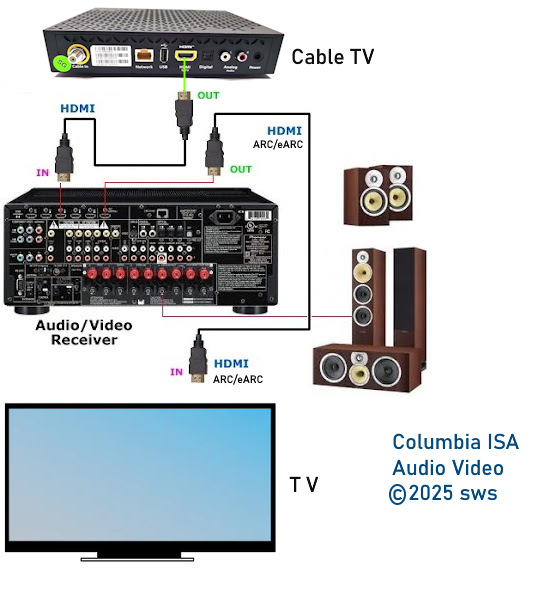 Diagram - Alternate Surround Sound Connection 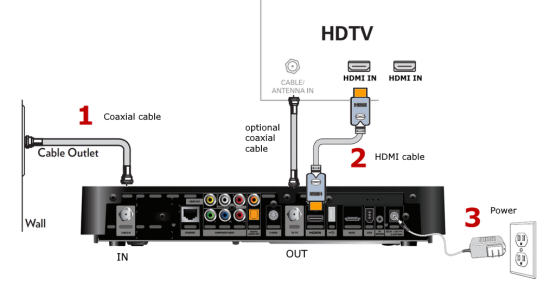 Diagram for cable TV setup without internet Cable TV receiver box connections 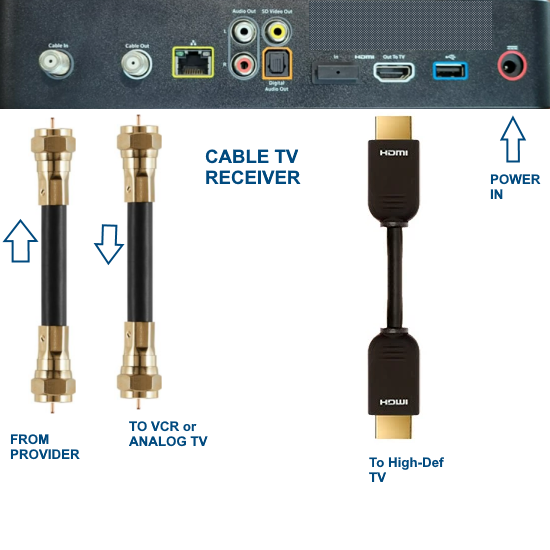 Insert coaxial cable RG-6 into cable box and turn until tight. Insert HDMI cable into cable box HDMI OUT, connect other end to High Definition TV HDMI input port. Plug in power. Connection to TV 1. Connect coaxial cable from provider wall out to coaxial input port on cable box. Turn so that cable is secured in the port. 2. Connect HDMI cable from cable box HDMI OUT to TV HDMI IN. Select this input on TV using TV remote. 3. Plug cable box into power outlet. If TV is not High-Def, use coaxial cable from cable box out to TV antenna input. Select this input on TV using TV remote. For High-Definition TV, connect a HDMI cable from the HDMI OUT on rear of the cable box to the HDMI input on the TV. HDMI will do both video and audio. For standard TV, connect three RCA cables, yellow, white and red from cable box RCA outputs to the three matching RCA inputs on the TV. Power on cable box and TV. Select on the TV, the input for the cable box. Install batteries into remote control for cable box. Setup specifics will vary depending on the make and model of cable box but generally follow the same process. Some cable TV providers will allow you to activate the receiver box online using your account number, phone number or email however this process may not be enough to activate the receiver. You may need to call your provider and possibly wait a while before the receiver is active. You may also need the serial number of the receiver box. Some of the newer boxes may offer an on-screen activation. If you cannot get the receiver to work, check all cable connections and call your provider for help. A service visit may be required. Picture Quality Your actual picture quality will be limited to the format that the broadcaster chooses. Some broadcasters, rather than broadcasting in high definition will send out their standard television signals in digital format, and this is known as "Standard Definition Television" (SDTV), which is limited to 480 interlaced lines of resolution or about half that of High Definition. Other broadcasters may choose the middle format known as "Enhanced Definition Television" (EDTV), which delivers 480 progressive lines of resolution. Our older analog TV broadcasts by comparison are about 330 lines of video resolution. A VHS tape from our VCR is about 250 lines. The High Definition video signals have 720p, 1080p and 4K resolution and need more bandwidth so cable providers may limit these higher quality broadcasts to premium channels. Currently the highest quality of 4K is limited to only a few, if any channels. HDTV Connections You may be familiar with standard connections to your TV, such as from your VCR, DVD player or game console. These include, from worst to best, coaxial cable connection, composite video (RCA Type), S-Video, Component Video and HDMI cable connections. HDTV rear panel inputs and outputs With HDTV sources, you will need to become familiar with some new digital cable connections that you may not have seen before. The different digital connections may not be supported by your television or HDTV decoder. You should check the manual or the rear of your HDTV set or tuner to determine what connections are supported. Many of the digital connections allow copy protection capability to prevent recording. • Audio Video Connections • HDTV Basic Setup Component Video 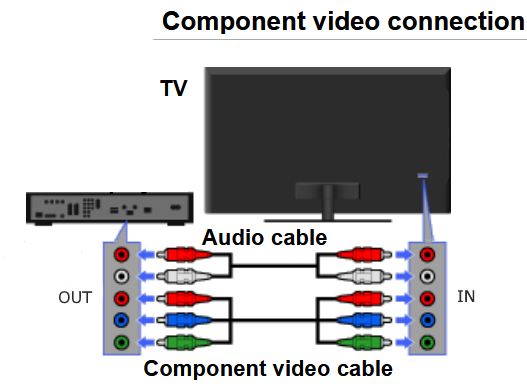 The component video connection separates the video signal into 3 distinct streams (red, green and blue), in which the video signal is carried via three individual cables using RCA type jack connections. There are two types of component video, Y,Cr,Cb (normal interlaced DVD players) and Y,Pr,Pb (Progressive scan DVD players, HDTV decoders and DTV inputs on televisions). Separating the video stream prevents color bleed through and delivers a dramatic increase in picture quality compared to composite video where the red, green and blue segments are compressed together into a single channel. Requires separate audio connections. HDMI High Definition Multimedia Interface (HDMI) began appearing on new HDTV sets in late 2003. HDMI, is capable of passing both video and also multi channel audio (8 channels). Also, the video portion is compatible with DVI devices if they are HDCP enabled. HDMI is evolving and has undergone several revisions. HDMI 1.0, 1.1, 1.2 and 1.3 can be found on various hardware. The latest version, 2.1, is needed for the very best high end audio found on some Blu-ray movies. HDMI has all the capability required currently for the highest quality video and audio plus future expansion. 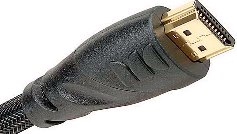 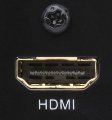 HDMI cable Wireless HDMI connection Plug HDMI transmitter into cable box and HDMI receiver into TV - plug and play, up to 98 feet wireless HDMI Component Connections How you connect your components to your HDTV is an important consideration. Setup your set top box to match your native HDTV video mode, 720 lines progressive, 1080 progressive or higher video resolution. Some set top boxes have a switch located in the back of the unit and others have a on-screen menu setting which performs this function. Use the remote control to navigate the on screen menus. The arrow keys (left, right, up, down) and the Enter or Select key should be all you need to move around and select the option you want. Check that the aspect ratio is set to 16:9 preferred, or "full screen mode" on your television, set top box and DVD player. Most recent mid range to high end televisions also now have the capability to "zoom in" or "stretch" a 4:3 ratio broadcast to fill most of a wide screen picture, although there will be a noticable picture distortion or loss of some top and bottom details with 4:3 broadcasts. Some HD cable TV decoders have the capability to record High Definition broadcasts using a built-in hard disk. It is important to remember however that the high bandwidth nature of high definition broadcasts will significantly reduce your recording capacity as they consume many times the amount of storage space compared to standard broadcasts. 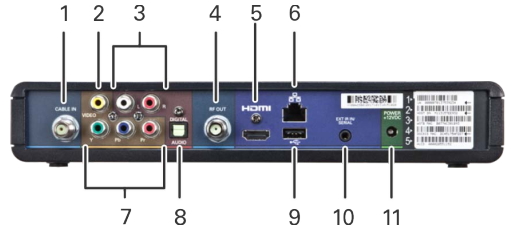 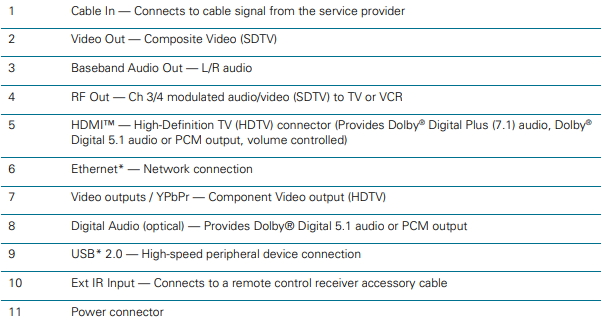 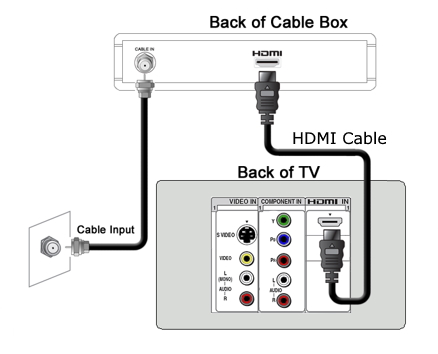 HDTV hookup to digital cable box using HDMI. Select proper INPUT on TV using TV remote control. • Cable TV set-top-box hookup • Cable TV hookup diagrams, cables Note: If you connect your HDTV using HDMI but your TV is not HDCP compliant, you may have to use component video connections instead. 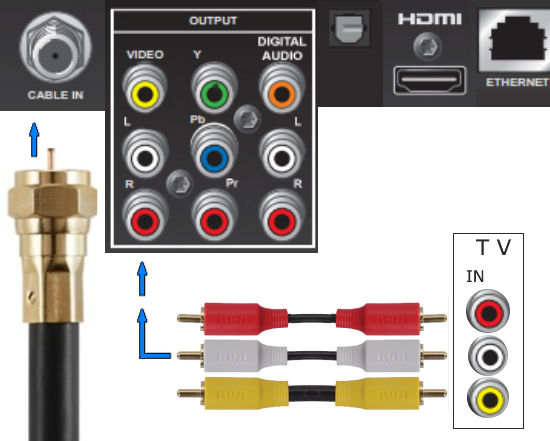 If your TV is an older model without HDMI, be sure to get a cable TV receiver box with yellow video output. All you need to connect is the coax cable input to cable box and the 3 RCA cables from cable box to the TV 3 RCA inputs (yellow, white and red). Be sure to select the proper TV input using the TV remote control. Use the SOURCE or INPUT button or navigate to SOURCE on-screen. Be sure to plug cable box and TV into wall outlet for power. Install good batteries into remote control. Use remote to power on cable box and TV. Select channels on the cable box. Authorization and startup Activate cable box by calling your provider or go to their website online to activate. Plug the cable box into power outlet. You may need to contact your service provider in order to authorize your cable box. Also you may want to program your remote control SPECTRUM • Spectrum Remotes • Spectrum Activation Spectrum Activate the Receiver: Call (877) 314-4138 to activate. • Spectrum Setup and Activation Video COMCAST Xfinity startup, setup and support Activate on the Comcast website. The quickest way to activate your box is to visit the Comcast Activation site: Visit xfinity.com/activate. Enter your account number and phone number. Wait while your cable box is activated. This may take 20 minutes or more to complete. Comcast will not activate used cable TV boxes. All cable boxes are the property of Comcast, and all used cable boxes available for sale are unauthorized. You should only receive cable TV boxes directly from Comcast. If the online activation service isn't working, you can activate over the phone: Obtain your account number and cable box serial number. If you have digital adapters, have the serial numbers for those ready as well. Call 1-855-OK-BEGIN (1-855-652-3446). Enter the requested numbers when prompted, including the telephone number associated with the account. Wait for your cable box to activate. • Xfinity Support • Xfinity Forums, Questions? get support from experts Initial Startup Be sure cable box is powered on. After activation, the cable box may download updated operating code for 5 or 10 mins. showing a WELCOME screen on the TV and then present some initial screens for you to select options such as which language you prefer. 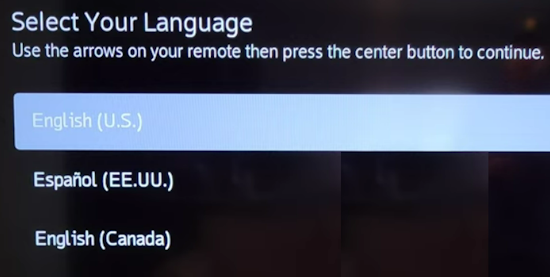 Navigate up and down using the remote control buttons and then press the center select button to proceed. 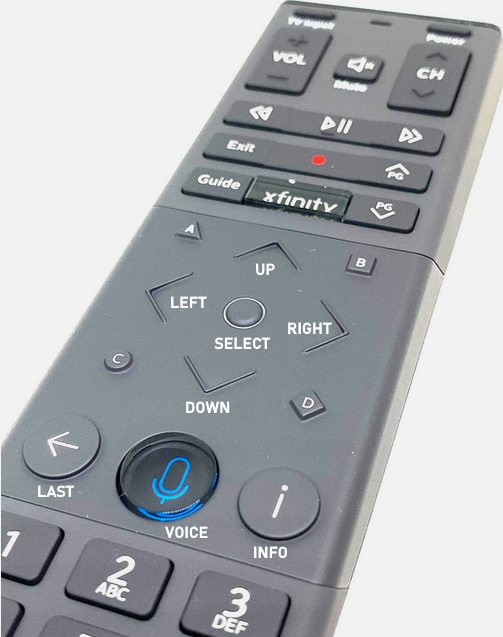 Be sure to select on the TV, the input port you connected the receiver box to such as HDMI 2 for example using the TV remote source input button or select the correct source input on your menu based smart TV. The initial setup will walk you through a series of screens to establish some basic settings. You can always go into "SETTINGS" and adjust any video, audio, power or preference settings you prefer. One of the questions you may want to answer is if you want to use the cable box remote control to also control TV power and volume. You can ignore this and use your TV remote instead. 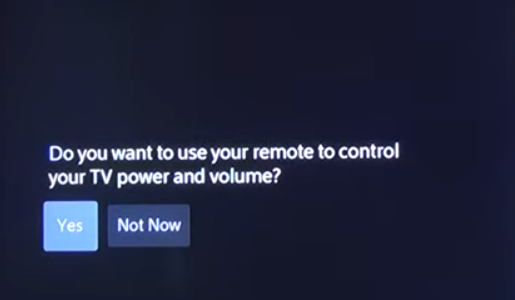 If you select "Yes", then an attempt is made to determine a match for your TV brand. 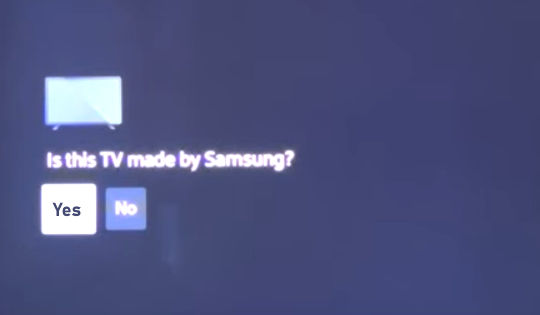  Do you want the remote to control an Audio Receiver? If Yes, select your audio receiver brand from the list on screen and if No, Finished. You should now be viewing regular content on the TV and the setup is completed. • How to setup Xfinity box - Video How to use remote control - PAIRING remote control You need to pair your Xfinity remote with the Xfinity Set-Top-Box. Make sure the remote batteries are installed and your TV and Xfinity TV Box are powered on. Also, set the TV input to correspond with your Xfinity TV Box. Press and hold the Xfinity button and wait for the remote light to change from red to green. Then type in the three-digit code on the TV screen. Press OK to complete the pairing. Once your remote is paired, follow the TV on-screen instructions to set up control for your TV. How to fix unresponsive Xfinity Remote Control Some remotes are not factory reset and can cause issues: Press any button on the remote control. If the LED does not flash at all, or flashes red five times, this is an indication that the installed batteries are very low and need to be replaced. If you’re still experiencing issues such as no response, you may need to try a factory reset. Factory Reset the Xfinity Voice Remote With a Setup Button (XR11) Press the Setup button until the LED at the top of the remote changes from red to green. Press 9-8-1. The LED will blink green twice to indicate that the remote was reset. The factory reset unpairs your remote and TV Box, so you'll need to re-pair them. (The TV Box needs to be activated prior to re-pairing.) See instructions above for pairing your Xfinity remote and TV Box. Factory Reset the Xfinity Voice Remote Without a Setup Button (XR15) Press and hold the A (triangle) and D (diamond) buttons at the same time for three seconds until the status light changes from red to green. Press 9-8-1. The LED will blink blue three times to indicate that the remote was reset. The factory reset unpairs your remote and TV Box, so you'll need to re-pair them. (The TV Box needs to be activated prior to re-pairing.) See instructions above for pairing your Xfinity remote and TV Box. Additional options include the following and are presented on the TV screen: Do you want to control your TV with the Xfinity remote control You can select YES or you can just SKIP and setup later. Xfinity XR16 Remote Control 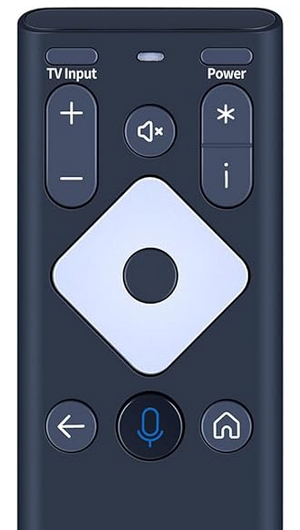 Need to pair your remote? Point the remote at your TV Receiver Box and press the voice button to get started. Refer to the instructions below if you don't see anything on-screen. Pair the XR16 Remote to Control an Xfinity Flex TV Box: Make sure the remote batteries are installed and your TV and Xfinity Flex TV Box are powered on. Also, set the TV source input to correspond with your Xfinity Flex TV Box connection. Point the remote at your TV Receiver Box and press the Voice button once. 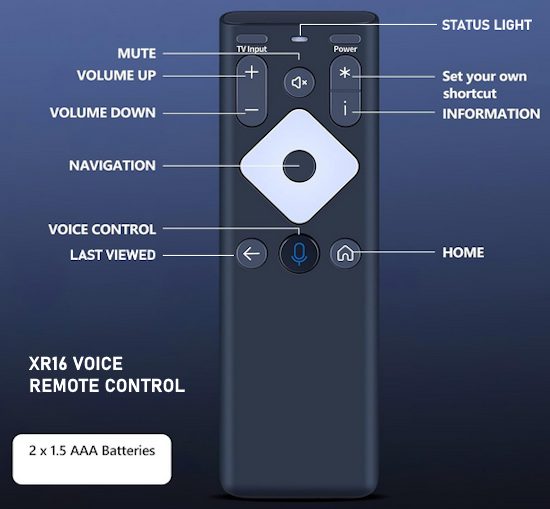 (wait 5 secs.) should get message on-screen "Start using voice control" and Select "Yes". Message: Activate voice control and Select "OK". Message: Your remote is paired for voice control. Select "OK". Message: Do you want to use your remote to control your TV power and volume? Select "Yes" or "Not Now" Scan for TV make - Ready to pair Follow the instructions on screen to pair your remote for voice control. Once your remote is paired, follow the on-screen instructions to set up power, volume and input control for your TV. Pair the XR16 Remote to Control a TV or audio device: This will allow you to control your television's power, volume and input from the XR16 remote. Press and hold the Voice button and give the command “program remote“. You can also get there by navigating to the Settings page, then selecting “Remote Settings“ and then “Voice remote pairing.“ Follow the instructions on screen to select your TV and audio devices for power, volume, and input control. Aim the remote at the TV, and press the Power button. If the TV turns off, turn the TV back on and verify that the Volume and Mute buttons work. If you are still having issues, perform a factory reset on the XR16 remote: Simultaneously press and hold the i (Information) button and the Home button [house icon] until the status light on the remote blinks (turns green). This takes about 5 seconds. Press the Power button, then Last (<- arrow), then Volume Down (-) on your remote in sequence to complete the factory reset. (Blinks blue) Once this is complete you can retry pairing your XR16 remote. Xfinity XR15 Remote Control Pair the XR15 Remote to Control an Xfinity X1 TV Box: Make sure the remote batteries (AA) are installed and your TV and Xfinity X1 TV Box are powered on. Also, set the TV input to correspond with your Xfinity X1 TV Box connection. Press and hold the Xfinity and Info(i) buttons together for five seconds. Wait for the remote light to change from red to green. Follow the instructions by entering the three-digit, on-screen pairing code. Once your remote is paired, follow the on-screen instructions to set up power, volume and input control for your TV. Pair the XR15 Remote to Control a TV: This will allow you to control your television's power, volume and input from the XR15 remote. While the TV is on, press and hold the Xfinity and Mute buttons together for five seconds until the remote light at the top changes from red to green. Enter the first five-digit code listed for the TV manufacturer. Most likely code: 12051 for Samsung TV Others to try: 10766, 10814, 10060, 10178, 11959, 10702, 10650, 13118, 11755 Most likely code: 12731 for LG TV Others to try: 11178, 10178, 11756, 11637, 10017, 11530, 10442, 11314 Most likely code: 10810 for SONY TV Others to try: 11685, 11791, 11786, 12337, 11712, 11913 Most likely code: 12434 for TCL TV Others to try: 11756, 13559 Valid code = remote light blinks green twice Invalid code = remote light blinks red, then green Aim the remote at the TV, and press the Power button. If the TV turns off, turn the TV back on and verify that the Volume and Mute buttons work. If the TV does not turn off, repeat the process with the next TV manufacturer device code. If you are still having issues, perform a factory reset: Simultaneously press and hold the A button [triangle] and the D button [diamond] until the status light on the remote changes from red to green. This takes about 5 seconds. Press 9-8-1 on your remote to complete the factory reset. Once this is complete you can retry pairing your XR15 remote. Settings - change your Xfinity Cable Box settings options Access the Settings Menu 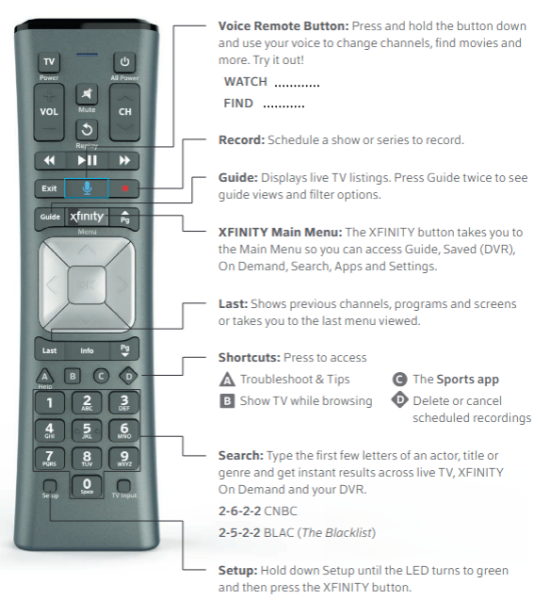 Press the xfinity button or the HOME (house icon) button on your remote control. 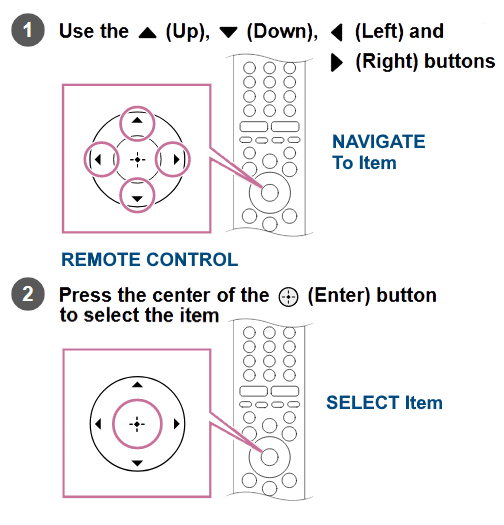 Use the right arrow or left arrow button to select the gear icon.  Select the small gear icon on-screen Press OK (or center of directional pad) to go to the Settings menu. To make setting changes, use the up or down arrows to highlight an option and select OK (or center of directional pad). Device Settings lets you: Control the brightness of the lights on TV Box. Turn Closed Captioning on/off. Turn Voice Control on/off. Set audio/video resolution settings. View your best available video resolution. Manage the screen saver, power saver. and more.... 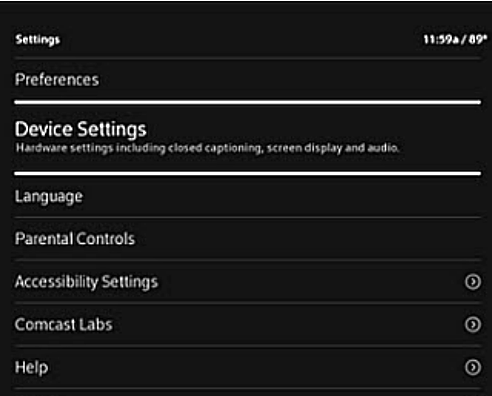 On-screen menu options for setting cable TV box 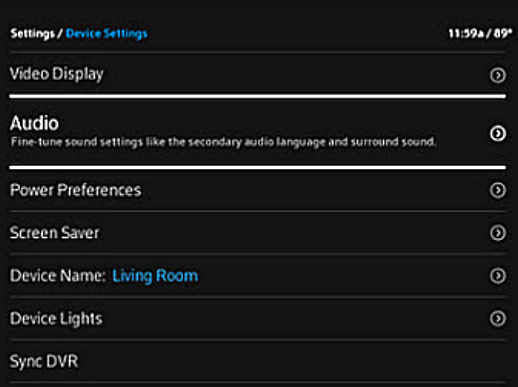 On-screen menu options for audio and video settings 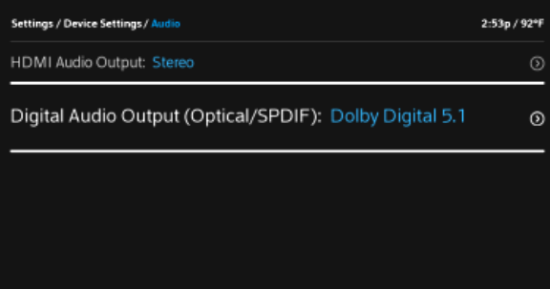 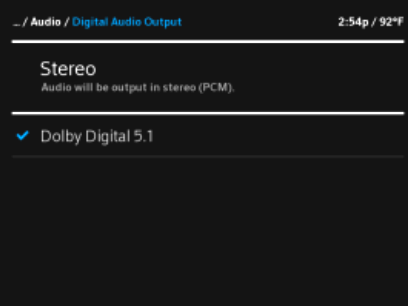 Surround sound on Xfinity X1 Dolby ATMOS Once you have connected your Dolby ATMOS compatible sound system to your X1 TV Box with an HDMI cable, visit Settings > Device Settings > Audio > HDMI Audio Output and select Expert Mode. Expert Mode: The best available Dolby sound will be passed through to your audio system. 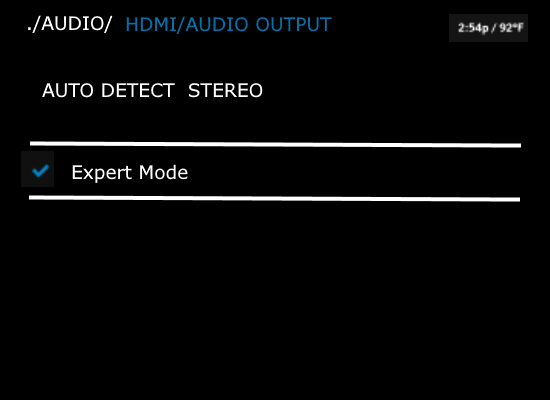 Video Settings Your TV may be the newest display technology or an older TV so you need to set the video up so that the cable box outputs a compatible video resolution to match your TV video capability. The 4:3 480 settings would be for an older TV while the 16:9 720, 1080 and 2160 settings would be for High-Def flat screen TV with a native video resolution of 720p, 1080 or 4K. 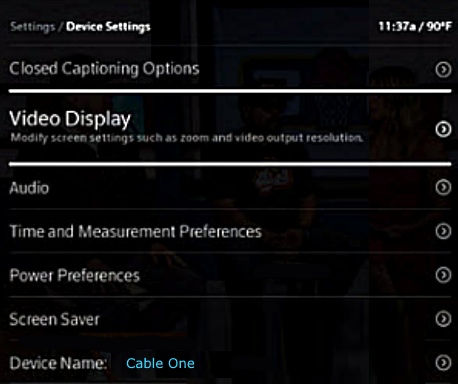 Select Video Settings 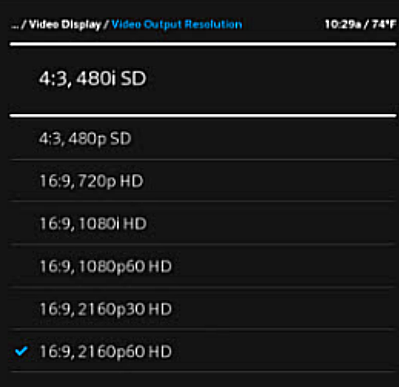 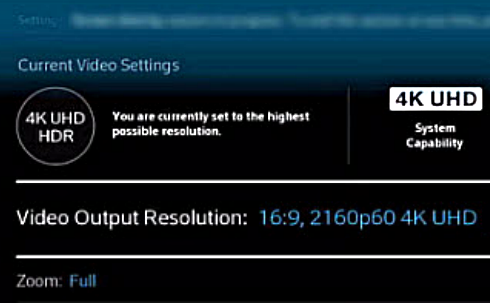 Cable Box set to output 4K video Settings> Device Settings> Power Preferences> and shut off HDMI Device Control. Time Warner Cable/Charter/Spectrum Cable TV Receivers 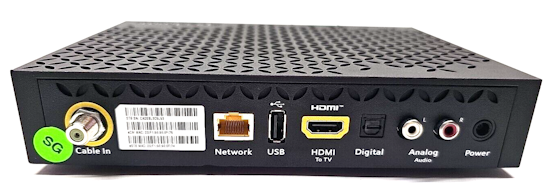 Once connected and powered ON, the cable TV box will begin to download firmware updates. This process may take 10 mins. or more so be patient. Once this process is completed, the cable box may power OFF so power it back ON. Activate your Service The activation process may change over time. You can always call your service provider for details or assistance. With mobile phones being so prevalent, the service providers have trended towards using their apps to process just about everything including activation. The My Spectrum App is available for iOS and Android phones. Once you download the app, you can CHAT with customer service for help. Security has become increasingly important so you need to establish a user account and password to login to your service provider before you can do anything. Go to Spectrum.net to create a user name and password for your account. • Spectrum.net Open the Spectrum app. You’ll see a notification on your home screen to Set Up Equipment. Select "Get Started". Your Equipment List will show any devices on your account that are ready to install. Select "Set Up Receiver". Follow the prompts until your screen reads "Establishing a Connection" with a progress bar. Be sure not to close the app or leave this screen. If the connection is successful, the app will start activating your receiver automatically. Be sure not to close the app or leave this screen. If your receiver turned off during or after activation, turn it back on and follow the prompts on your TV screen. Once complete, you’ll see a confirmation notification that your devices and services are ready to use. If your connection or activation failed during setup, you’ll be prompted with options to try again, or contact info to troubleshoot with an agent.  Once you get activated you can proceed to customizing your cable TV receiver box. 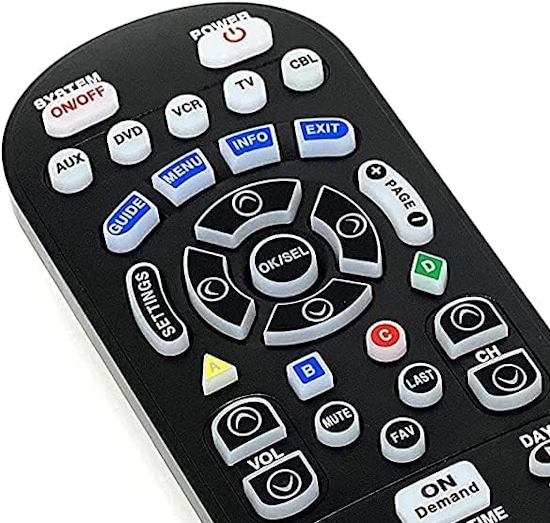 Setup Cable TV box - Settings On the remote control for the Cable TV box, press MENU or SETTINGS button.  The GUIDE option brings up the Channel guide showing you the available channels and programs. 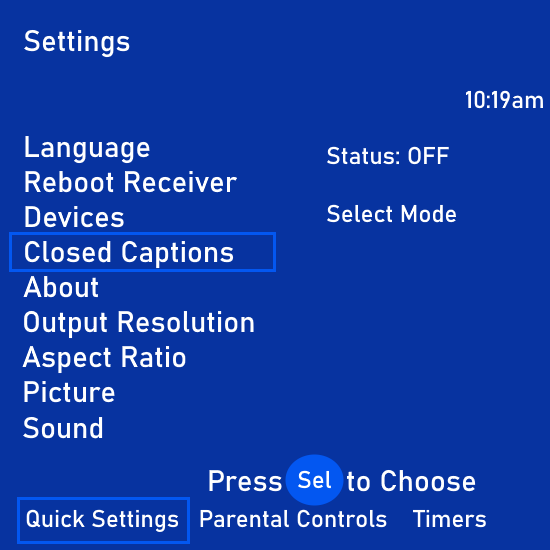 Use the four arrow buttons (next to the OK/SEL button) to move UP/DOWN/LEFT/RIGHT. You can choose menu items on the vertical left or move to select menu items on the horizontal bottom. For each choice press OK/SEL button. You can select video or audio details or setup favorite channels, timers, parental control, power on channel and more.  Video Resolutions Depending on what kind of TV you have, set the video resolution so that the picture is compatible. For an older analog TV, set the video resolution to SD 480 and an aspect ratio of 4:3 but if you have a newer TV, choose HD 1080p with an aspect ratio of 16:9. Settings Quick Reference • Closed Captioning • Messages • Favorites • Parental Controls • Purchase Controls • On Demand • Audio & Video • Display • Caller ID • My Account • Preferences • System Info Each selection has sub categories so you can fine tune the setup of the cable TV box. For example: Audio & Video> Audio Output Change your Audio Output setting to Dolby Digital, HDMI or PCM. Video Settings To access Video Settings: Press the Menu button on your remote. Select Settings & Support. Choose Preferences. Select Audio & Video. Go to Video and press OK/Select on your remote. From here, you can access: Video Format: Select the screen resolution that’s best for your TV. Aspect Ratio: Choose from Letterbox or Zoom. Highlight Save and press OK/Select on your remote. To access the audio output settings on a Spectrum cable TV box: Press the Menu button on your remote Select Settings & Support Select Preferences Select Audio, Video & Display Select Audio Select Audio Output Choose your desired audio output, such as Dolby Digital, HDMI, or PCM. Programming the Remote Control to your TV: (Be sure you have two good AA alkaline batteries installed into the remote control and in the correct position before starting the programming.) If you want to use the same remote for the Spectrum cable TV box and your TV to power ON/OFF, change channels and adjust volume, follow the steps below. • Spectrum Remotes - Identifying & Programming For the Spectrum Universal CLIKR-5: 1. Power on Cable TV box. 2. Power on TV using the original TV remote control for the TV. 3. Press and hold at the same time, the "TV" button and the "A" button on the cable box remote. Hold them down for 3 seconds. The "TV" button should light up giving you 30 seconds to complete programming. The "A" button works for the following TVs: Samsung, LG, Sony, Vizio, RCA, Panasonic, Toshiba, Sharp The "B" button is for the following TVs: JVC, Insignia, TCL, Hitachi, Westinghouse, Emerson 4. Point the Cable TV Remote control at the TV. Next Press a number button 0 to 9 depending on which brand TV you have. 1=Samsung, 2=Sony, 3=LG, 4=Vizio, 5=Sharp, 6=Panasonic and Insignia, 7=Sanyo and Emerson, 8=Toshiba, 9=TCL The TV should power OFF. Press the "TV" button on the cable box remote control. Press the Power ON button top left (SYSTEM ON/OFF) to Power on both the TV and the Cable Box. You can also program other devices such as DVD players or soundbars by using the AUX button. What if my TV brand is not one of the major TV brands, how do I program the remote for the TV? 1. Power ON the TV by using the original TV remote or by pressing the TV Power ON button 2. Press and hold at the same time, the cable remote buttons "TV" and "OK" for 3 seconds. 3. The "TV" button lights up. The remote is now ready to be programmed. 4. Press down and hold the "channel down" button on the cable remote. 5. Keep holding down while the cable remote sends numbers to the TV (keep aiming remote at the TV) 6. The TV should power OFF at some point. It may take several mins. 7. Power ON the TV using the cable remote. If it does power ON, then you have the correct code and you are done. Next, press the "TV" button to save and the "TV" button will turn off (no light). If the TV does not power ON then you do not have the correct code yet. 8. If you do not have the correct code yet, Power ON the TV manually again. 9. "TV" button is still lighted. Press the "Channel down" button down and hold down. The TV should eventually Power OFF. Press the POWER button on the cable remote to see if the TV powers ON. If it does, you have the correct code. Press the "TV" button to save. Control TV Volume using Cable TV Box remote control Press and hold at the same time, the "CBL" and the "OK" buttons CBL button should light up Press the "Volume UP" button Press the "TV" button Now you should be able to control volume on the TV using the Cable box remote. How to program the newer Spectrum Remote Control 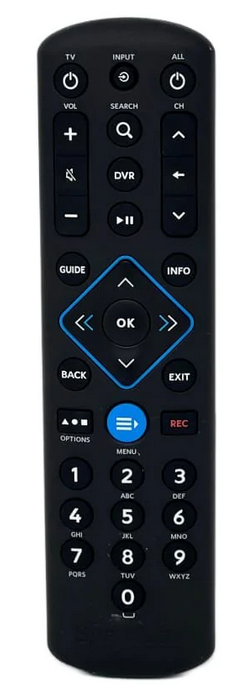 Spectrum remote control programming (Spectrum Guide Remote) Programming remote to work with your TV Remove battery cover from rear of Spectrum remote control Place two good AA batteries into the battery compartment making sure to position them correctly with the plus sign to the positive end. 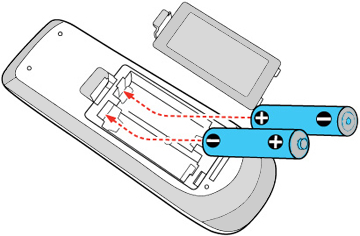 1. Power ON your TV 2. Press and hold down the "OK" button and the MENU button at the same time on the Spectrum remote control. 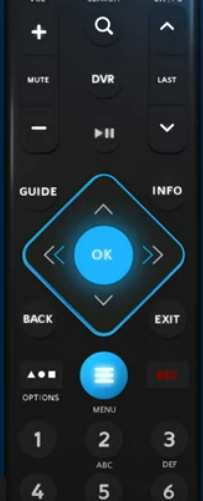 3. Hold down until the INPUT key blinks twice (top/center of remote) 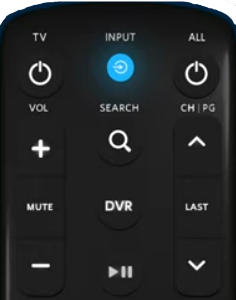 Not one flash but two flashes quickly one then another. (It will flash once and then flash twice) 4. Press the TV power button (top/left) on the Spectrum remote control 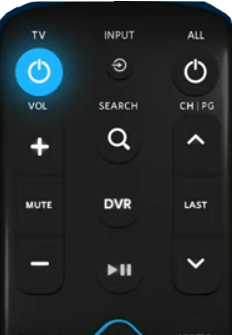 INPUT button should now light up solid. Aim the remote at the TV and press and hold down the "UP Arrow" button (just above the OK button) until the TV powers OFF. 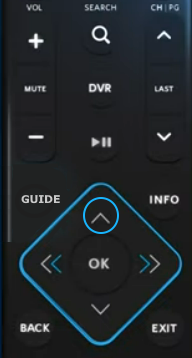 You may need to hold down for several mins. When the TV powers OFF, you have completed programming. How to reset the Spectrum remote if it no longer controls the cable TV box Press and hold the "MENU" button and the number 3 button at the same time until the INPUT button flashes twice. Next aim remote at cable TV box and try pressing channel up or down or volume up or down and so forth to test if the remote is working to control the cable TV receiver box. If it is working you have successfully completed the task. If it is not working, try the following: Press and hold the "MENU" button and the number 2 button at the same time until the INPUT button flashes twice. Aim the remote at the cable TV box and press channel up or down or volume up or down and so forth to test if the remote is working to control the cable TV receiver box. If it is working you have successfully completed the task. Scientific Atlanta Digital Cable boxes Note: Scientific Atlanta has been bought by Cisco When first setting up your new cable box, never hesitate to call your cable TV provider if problems arise. Your digital cable box is not passive, that is to say the box is receiving information from your provider other than TV programming. Your cable box needs to be initialized, loaded, authorized, programmed as well as converting TV signals. Therefore any problems you experience should be checked out with your support staff at the cable TV company. Doing so may save you time and effort. If you are not getting the answers you need, try the internet. Search Google, and also read your owner's manual for the cable box. CABLE COMPANIES / PROVIDERS Comcast - product names are Xfinity • Xfinity SPECTRUM • Spectrum • Spectrum Cable receiver boxes COX • COX Scientific Atlanta 4250HD Digital Cable box 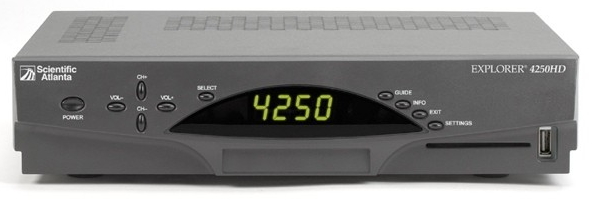
Scientific Atlanta 4250HD Set Top Box initial setup The latest software, programming information and service information needs to be downloaded into the box from your cable TV provider. Plug in the box but do not power it on. Wait several minutes until you see the time of day or four dashes on the front display. Now power on the box. Press and hold the SETTINGS button until the Message light blinks. Now press the VOL -- key. HDSr should display on the front panel to indicate picture format mode. Your brand of cable box may offer the capability to change settings while you are watching a TV program. You may also be able to do the following: 1) set a FIXED picture format so that all incoming programs are set to a specific format for your TV. 2) set a PASS-THRU picture format so that whatever format the program is in, it is sent on to the TV unchanged. 3) set a UPCONVERT picture format so that any program is upconverted to 720p / 1080i. Keep in mind that your HDTV will convert or scale incoming video to the TV's native screen resolution. So, if your HDTV has a native resolution of 720p, a 1080i signal is scaled internally to 720p. For any particular HDTV, you need to experiment with the settings and see which combination looks best on your screen. Do not assume that any jacks or ports on the cable box are operational as many cable TV providers disable them. Also remember that the box is operating under control of software which can be re-programmed or changed at any time and downloaded to your box by your cable TV provider. For these reasons, always call your cable TV provider when needed for any issues or problems which arise. Scientific Atlanta 8300HD Digital Cable box Your setup process will differ depending on what type of converter box you have and what cable connections you use. Setup for High Definition TVs and Digital Video Recorders will be more involved than standard definition TV and a non-DVR cable boxes. You need to use your remote control for the cable converter/DVR setup so become familiar with the buttons. On-screen menu - select using the remote If you want to make changes after using the setup wizard you can do so by accessing the on-screen menus. Press the remote control SETTINGS button once for QUICK settings or twice for GENERAL settings. Then use the UP, DOWN and RIGHT Arrow keys to make your selections. • Cable TV - Cable Box Setup - Scientific Atlanta 4250HDC MOTOROLA DIGITAL CABLE BOX MOTOROLA HD Cable Box Setup: To access your HD settings: 1) Ensure that your cable box is plugged into a power outlet and is turned off. 2) Press the MENU key on the front panel. If your TV is on, the on-screen display menu appears listing the settings you can configure. Use your cable box remote control or the cursor keys on the front panel to navigate the on-screen display: Press the UP Arrow and DOWN Arrow keys to highlight the setting you wish to change. Press the RIGHT Arrow key to select an option for that setting. To exit the setting and move to another setting, use the UP Arrow and DOWN Arrow keys. To exit the menu and save your settings, press the POWER or MENU key. Notes: • If you are not using an HDTV, selecting a video resolution other than 480i causes the on-screen display to go blank. If this happens you can use the front panel of the cable box to change the setting back to 480i. • Some TVs cannot display 480i or 480p on their component video inputs. • There is usually a selection called RESTORE DEFAULT SETTINGS. This will do a RESET to factory setup. Columbia ISA Audio Video Contact: columbiaisa@yahoo.com • How to hook up a Plasma or LCD HDTV • How to hook up a Cable TV box • Cable TV - Cable Box Setup Scientific Atlanta 4250HDC • Surround Sound over HDMI • Surround Sound - How to Hookup • HDTV Antennas • See over 100 hookup diagrams • Bluray Players, internet-enabled, Netflix movie streaming • Cable Types, audio/video for TV, explanation • Hookup diagrams, TV, VCR, DVD, Digital cable box o Laptop to TV Connection See also: o 2015 4K TV ultra high definition o HDMI to Old TV converter • Plasma TVs - top ten things before buying HDTV • PC stereo hookup • VCR Recording • see over 100 Hookup Diagrams • TV input select • Timer Record Radio Shows on a VCR • Camcorder hookup to TV, DVD • Audio Video Connections • See over 100 Hookup Diagrams • How to hookup surround sound • Surround sound over HDMI • Hookup TV DVD VCR • VCR basics |