Laptop to TV Hookup
How to connect your Laptop to your TV
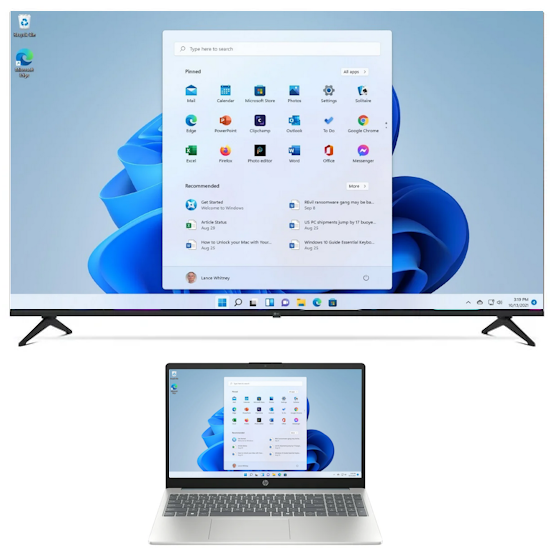
Laptop
to TV connection
Laptop to TV - Microsoft Windows or Apple
You can connect laptop computer to a TV using a wired or a wireless option.
Wired connections require a cable from the laptop to the TV. Wired connections are simple and do not require a home network as do
wireless connections. Wired connections may not be as elegant as wireless but they work without complicated upgrades of software
or apps or other hardware and are much more standard between manufacturers.
Most modern TV and laptops have HDMI ports for a wired
connection but with wireless, you may find many incompatibilities and difficulties which may result in not being able to connect.
You can use all kinds of adapters for a wired connection if your computer's ports do not match the TV's ports.
Wired connection : Laptops
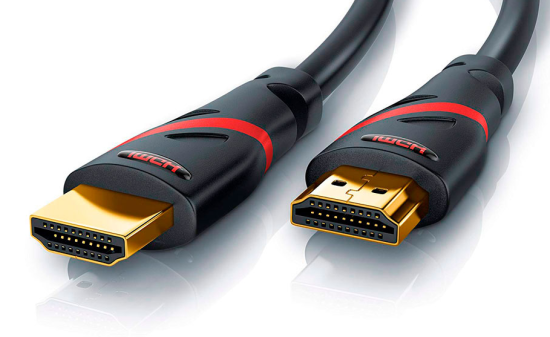
HDMI Cable - Video and Audio
Newer model laptops
Use the HDMI or the USB-C ports on
the side of the laptop to connect HDMI
or USB-C cables to the TV.
Older model laptops
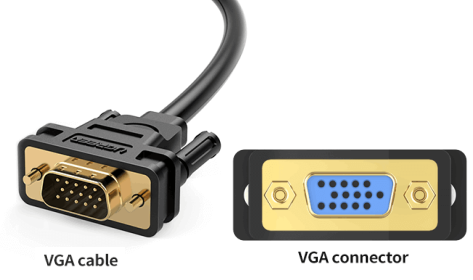
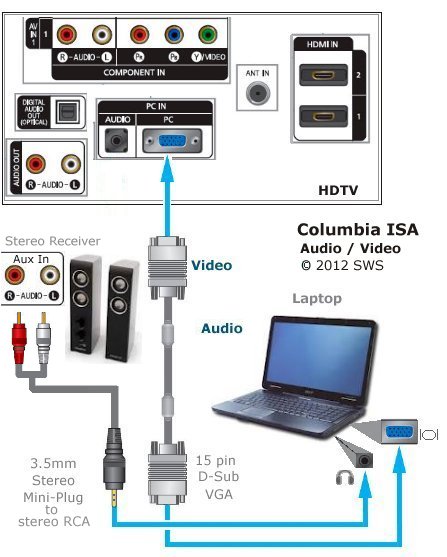
If you have an older laptop without HDMI, use VGA to connect to older TV with VGA input. Since VGA is video only, you will need an
audio cable connection also. This is usually a 3.5mm to 3.5mm audio cable connection.
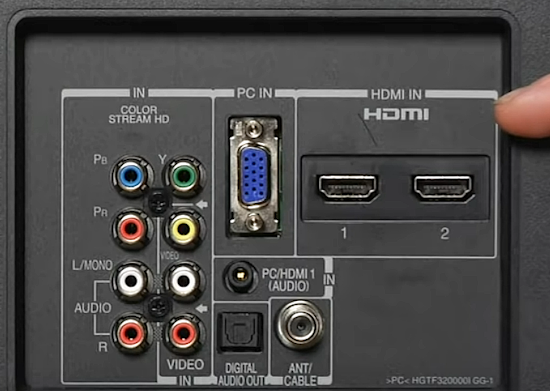
Older model TV with VGA input for computer (PC IN).
Notice the PC (AUDIO) IN
For even older TVs, you can use a VGA to composite converter.
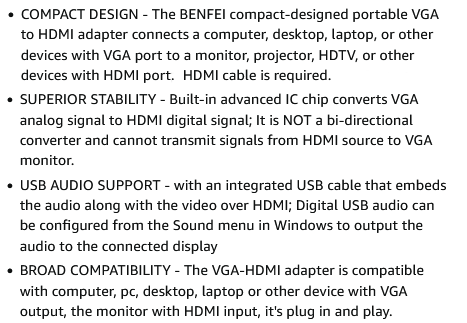
VGA to HDMI for older computers and newer TVs

LAPTOP PORTS
Look for your laptop ports on the sides or back of the laptop
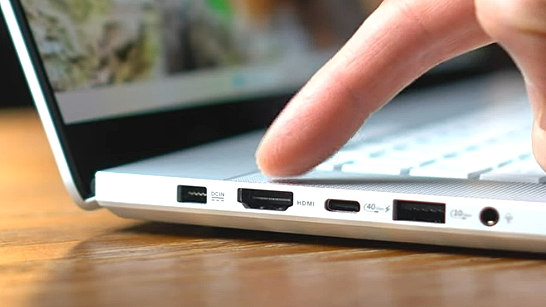
Laptop HDMI and USB Type C ports
Use one of the HDMI inputs on
the TV to connect HDMI cable from laptop and select that HDMI input on the TV using the TV remote. Audio and Video are carried
by HDMI and USB-C (1080p or 4K).
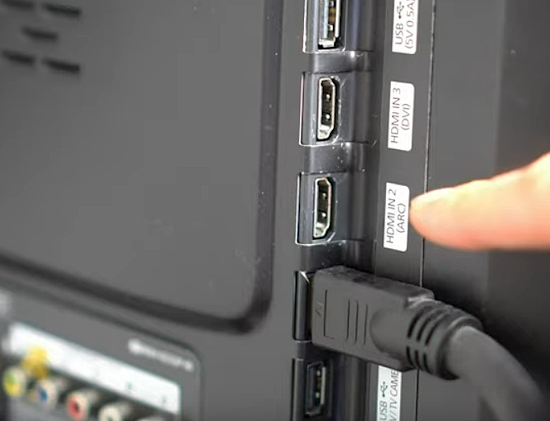
TV HDMI input ports
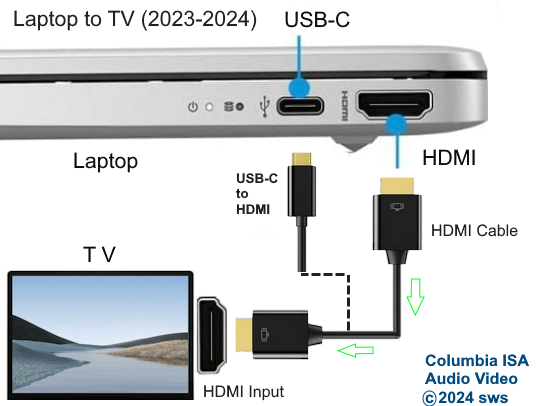
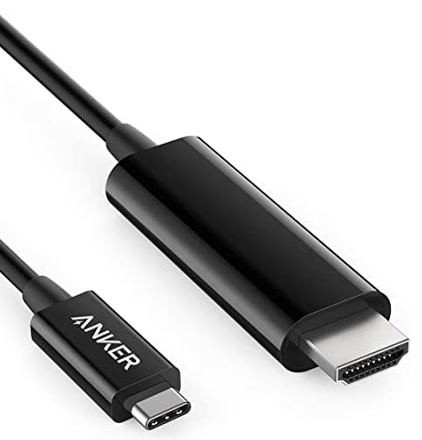
Use a USB-C to HDMI adapter cable if connecting USB-C to TV.
Select the correct input source on the TV with the TV remote.
Completion
Once you have the cable connected from the laptop to the TV, power on the TV and the laptop.
On the TV, select the source input where the
laptop is connected such as HDMI 1 or HDMI 2. Newer TVs and laptops will just work with no added intervention required.
You should see the
laptop's screen on the TV. Now you can use the TV speakers and play music files on the laptop for richer sound.
View video on the big screen
and send audio from the TV optical output to a stereo receiver using an optical audio cable connection.
• Cable USB-C to HDMI
Do I need a driver for a USB-C to HDMI connection?
No, driver software is not needed.
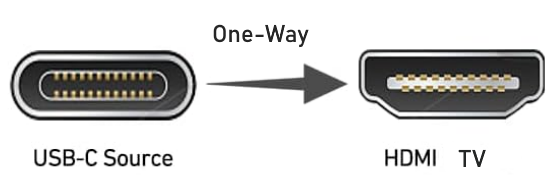
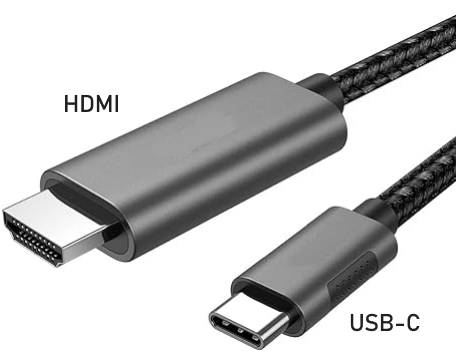
USB-C to HDMI Cable
Wired - HDMI (Laptop HDMI to TV HDMI)
How to connect your laptop to your TV via HDMI
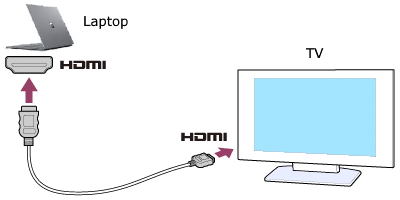
Connect HDMI cable from laptop HDMI output port to TV HDMI input port
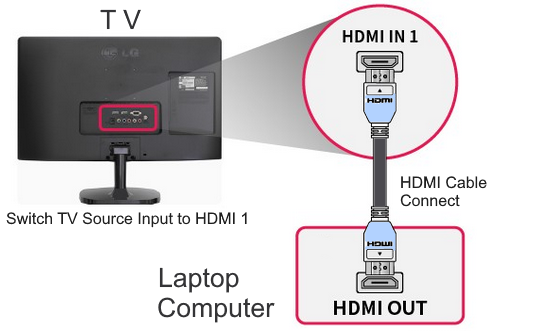
The computer-to-TV connection consists of an HDMI cable from the computer HDMI output to the HDMI input on your TV.
(If you have an older TV and an older laptop, you can connect using VGA video cable and 3.5mm audio cable).
Be sure to select the proper input source on the TV.
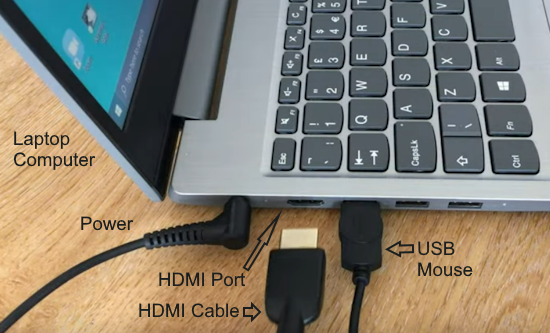
Step by Step - Laptop to TV - Microsoft Windows
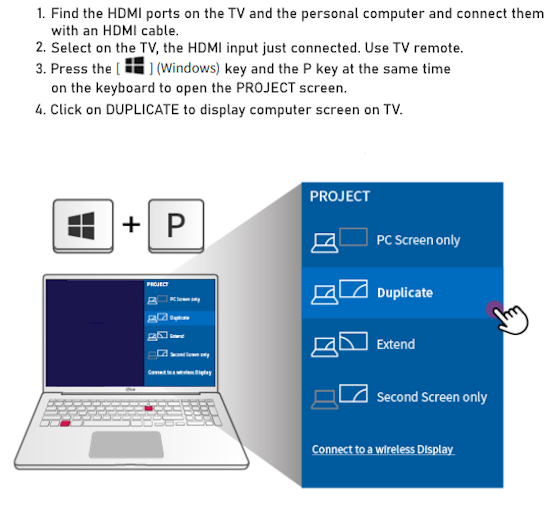
How to select Display on Windows 10 and 11:
Press the Windows key and the "P" key on your keyboard at the same time.
A pop-up window should appear offering 4 options for display, (1) computer only, (2) duplicate, (3) extend and (4) second screen only.
Select
the option you want. Duplicate option will display on both computer and the TV.
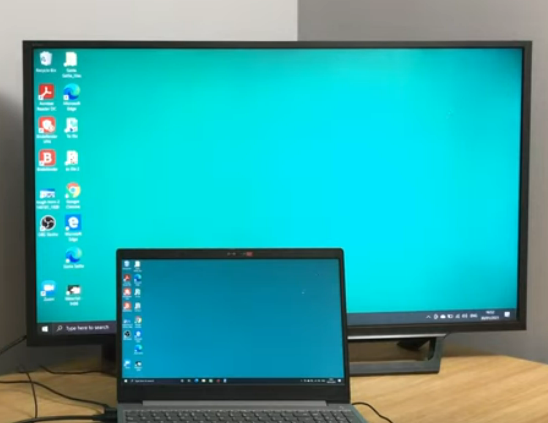
Optional:
If you're on a Windows PC, right-click the desktop and choose Display Settings.
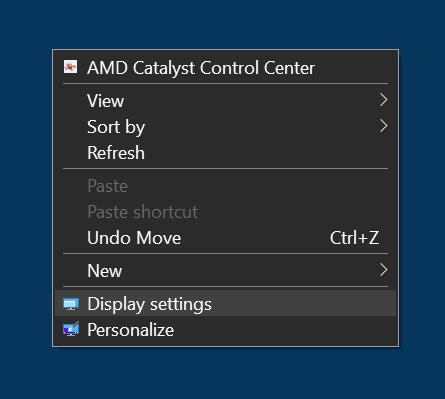
Scroll down to the "Multiple Displays" —you can choose to show the same thing on both screens,
extend your laptop's display to the TV, or show your desktop only on one of the two screens.
Click on DETECT if the automatic connection
does not occur. ADVANCED DISPLAY SETTINGS is another option to set resolution.
Click the square that corresponds to your TV, then scroll down and make sure Display
Resolution is set to the right numbers (1920x1080 for 1080p TVs, 3840 x 2160 for 4K TVs)
If you're on a Mac, go to System Preferences > Displays and click on the Arrangement tab.
Here you can check the Mirror Displays box to show the same thing on both screens, or uncheck this option to
extend the desktop across both monitors. If you choose to show the image on both screens, go to the
Display tab, open the "Optimize For" dropdown, and select your TV from the list.
Full-sized HDMI: If your laptop has a full-sized HDMI output, you can use a standard HDMI cable to connect to your TV.
Plug one end of the HDMI cable into the laptop HDMI port and the other end of the cable into HDMI input on the TV.
Mini- or micro-HDMI: If your laptop has one of these smaller versions of HDMI you just need an adapter
cable to connect directly to your TV.
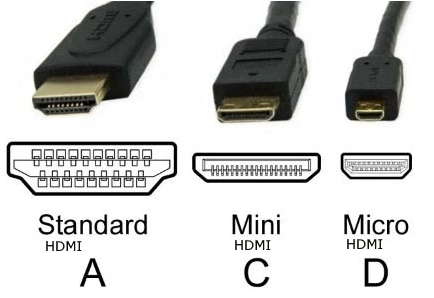
Thunderbolt, DisplayPort or Mini DisplayPort: All of these usually work with HDMI as well. Thunderbolt is found on many laptops.
The first two versions of the connector were the same as Mini DisplayPort, so
Mini DisplayPort-to-HDMI cables or adapters should work. Newer versions use the same connectors as USB-C.
Full-sized DisplayPort is common to Windows PCs. Again, you need an adapter or cable with this type of connection on one
end and full-sized HDMI on the other.
USB-C port: Many laptops have only this kind of port. Usually you will just need an adapter (USB-C to HDMI) and it should work.
MacBooks from the last few years should work, as will Microsoft Surface laptops and many others.
USB-C uses the same physical connection as Apple's Thunderbolt 3.
A USB-C-to-HDMI cable
How to Configure Display
Apple MAC – Change External Display Mode
To turn on (or off) Desktop Mirror click the small icon of a monitor on the upper right side of the menu bar
and select Turn On Mirroring
Microsoft Windows – Change External Display Mode
Windows uses the term Duplicate instead of Mirroring. Change the external display settings.
Windows 10
Right click on an empty area of the desktop
Choose Display Settings
Scroll Down to the Multiple displays area and select
Duplicate these displays or Extend these displays
For Windows 7
Right click on an empty area of the desktop
Choose Screen Resolution
Click the Multiple displays drop-down list, and then select Duplicate these displays or Extend these displays.
Connect your Apple MacBook to a TV
Ports: Look on your TV and your computer to discover what ports are available to connect a cable. Most modern TVs will have
HDMI input ports.
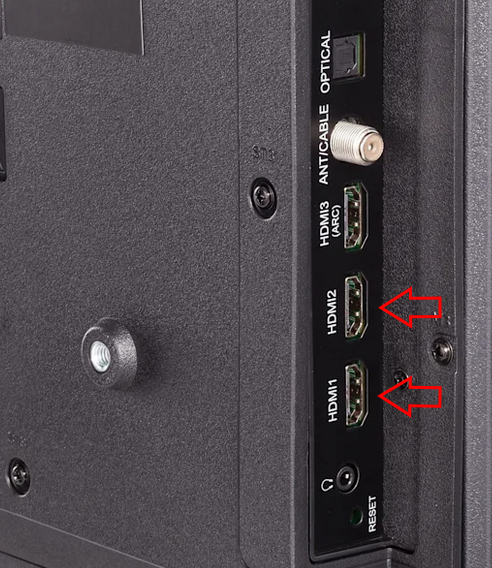
TV HDMI input ports
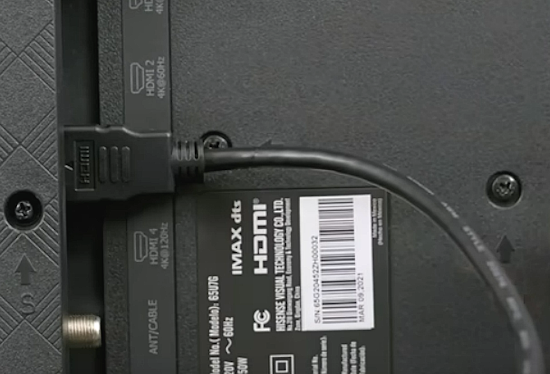
Connect one end of an HDMI cable to the TV HDMI input port
Macs that are equipped with any of the following ports can connect to HDMI devices:
If your Mac has an HDMI port, you can connect directly to the TV HDMI input port with an HDMI cable.
Connect the other end of the HDMI cable to the HDMI port on the Mac.
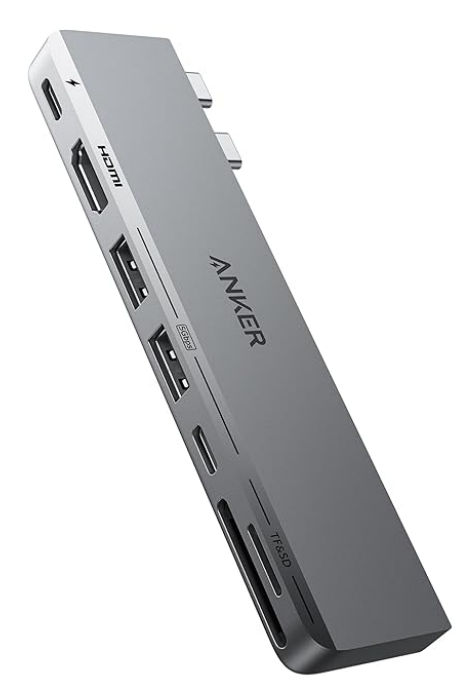
If your Mac has USB-C ports, you can use an adapter, like the Apple USB-C Digital AV Multiport Adapter, to connect to HDMI.
If your Mac has a Thunderbolt 2 or Mini DisplayPort connection, you’ll need a Mini DisplayPort-to-HDMI adapter and an HDMI cable.
If you have a TV with HDMI but want to connect a device with USB-C, you can use a USB-C to HDMI adapter.
If your Mac has a Thunderbolt 4 port, you can use an adapter hub which has HDMI output.
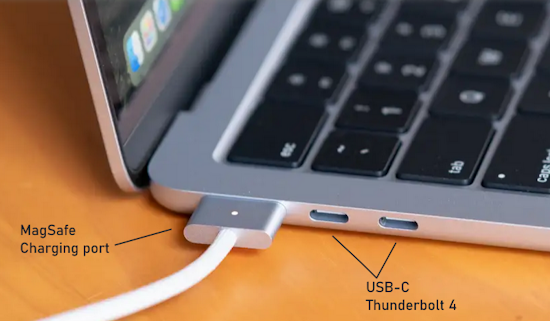
Apple Macbook ports (2025)
Newer Apple MacBooks can support 4K resolution, both on their built-in displays (in some models) and through external displays.
Many MacBooks, particularly those with M-series chips, can handle 4K resolution for both video playback
and external monitor connections.

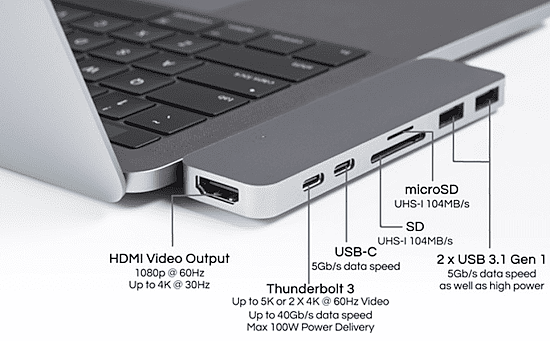
USB-C Adapter Hub for MacBook
• USB C Hub for MacBook, 7-in-2 with 4K HDMI,
Compatible with Thunderbolt 4, 1 Type C and 2 USB A Data Ports for MacBook.
By running the cable from your Mac to the TV's HDMI port and choosing the correct output,
your computer should instantly recognize the TV and automatically extend your desktop.
With this setup, you can use the TV like an external display. Be sure to select the correct HDMI input on
the TV using the TV remote control.
Adjusting the Display
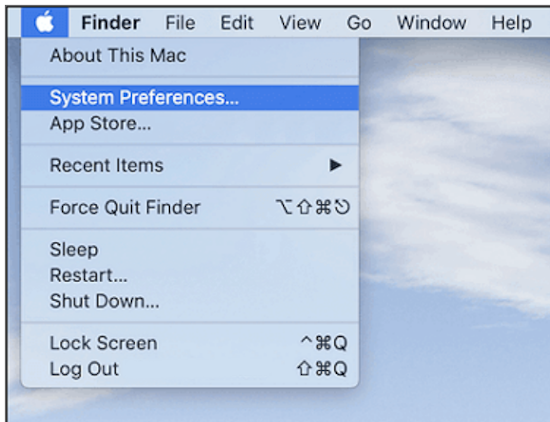
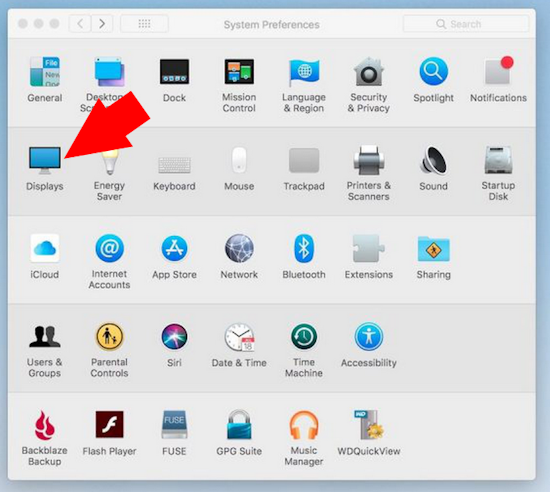
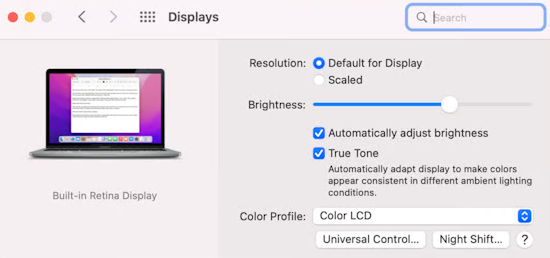
On the Mac, Go to System Preferences > Displays.
Select "Default for Display" to set the resolution automatically or select Scaled to manually set a resolution.
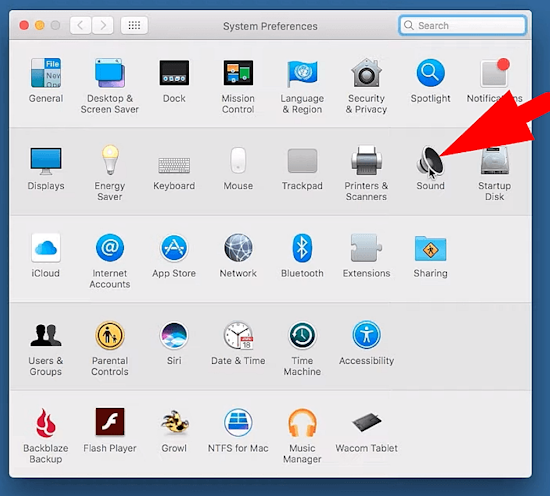
Sound Output
Using HDMI, the audio should automatically switch from your Mac to the TV once connected. If this isn’t the case, you can do it manually.
On the Mac, Go to System Preferences > Sound.
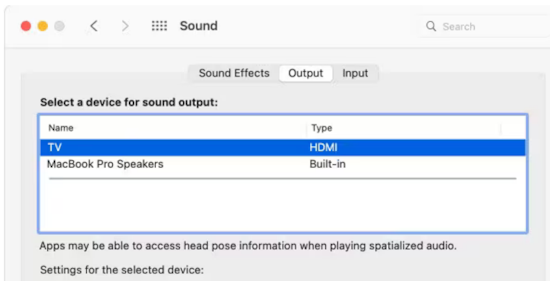
Click the Output tab and select the HDMI option under "Type".
How to connect Laptop to Stereo or Surround Sound Receiver and Flat Screen TV
1. For Stereo sound only. Connect 3.5mm / RCA audio cable from laptop headphone output to receiver's analog audio RCA stereo inputs.
Select correct source input on receiver.
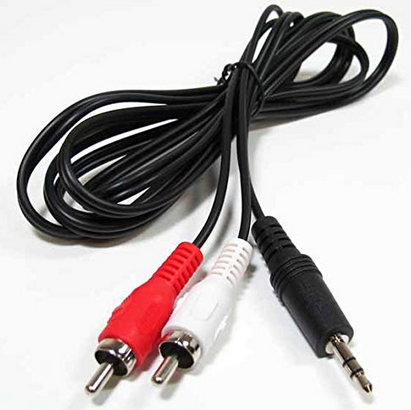
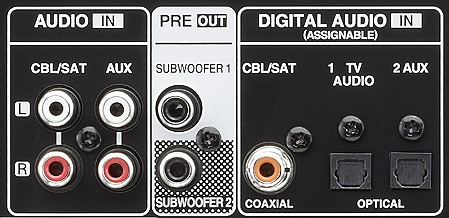
Receiver Audio IN - White Left (L) and Red Right (R) analog stereo.

Laptop headphones output to soundbar analog audio inputs

Laptop headphones out to stereo amplifier analog audio inputs
2. For Surround Sound. Connect HDMI cable from laptop's HDMI port to AV Receiver's HDMI input port.
Select correct HDMI source input on Receiver.
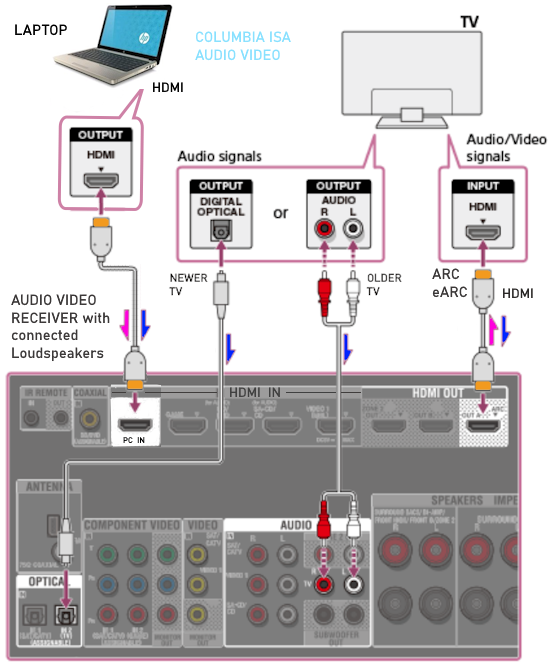
Connection Diagram:
Laptop connect Surround Sound AV Receiver
To play surround sound from a laptop to a receiver, use an HDMI cable for a direct connection
that transmits both video and high-quality audio, ensuring your receiver has the corresponding HDMI input.
Once connected, configure your sound settings in Windows to select the correct output device and set the speaker
configuration to "5.1" to enable surround sound, then make sure your receiver's input source is set to the correct HDMI input.
Configure Sound Settings in Windows
Open Sound Settings:
Right-click the speaker icon in the taskbar, select "Open Sound Settings", and next go to the "Sound Control Panel".
Select the Correct Device:
In the SOUND window, select the "Playback" tab, find and select (click on) your HDMI output device, then click "Configure".
If your device does not show up, Right-click on an empty area and select show disabled devices and disconnected devices. Then enable it.
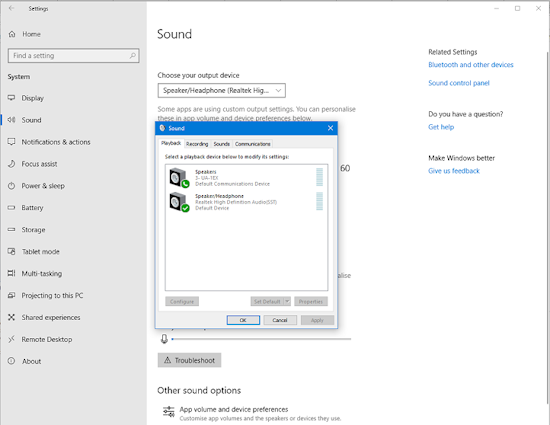

Set Speaker Setup Configuration:
Choose 5.1 Surround and click "NEXT", selecting your full-range speaker setup.
Run the sound test (click on TEST) to confirm all speakers are producing sound.
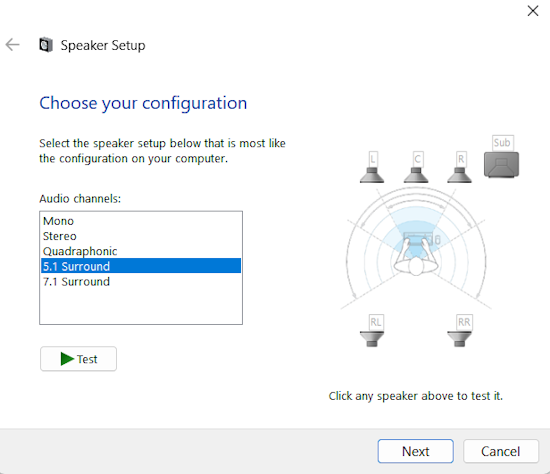
Click on "Finish" to apply the new sound settings.
Requirements for Surround Sound from Netflix on Microsoft Windows Laptop/PC
Sign up for Netflix account, you usually need the Premium plan for Atmos and surround.
To get Netflix surround sound on a PC, you need a Windows 10 or 11 computer, compatible web browser, a compatible 5.1 or
Dolby Atmos sound system setup connected via HDMI cable or Optical audio cable,
the Dolby Access app, and the correct Windows sound settings configured for 5.1 or 7.1 surround sound.
Finally, find and play a Netflix original title with a 5.1 or Dolby Atmos badge to ensure the audio is available for that specific content. (Streaming only).
1. Hardware & Software Requirements
Operating System: Windows 10 or Windows 11.
Browser: Use Netflix in the compatible web browser for the best results.
Netflix supported web browsers and system requirements
You can create a Netflix account and watch Netflix using one of the below web browsers on your computer.
Supported web browsers
Chrome: 117 version or later with up to 1080p video
Edge: 118 version (Oct 2023) or later with up to 4K video
Firefox: 111 version (2023) or later with up to 1080p video
Opera: 92 version or later with up to 1080p video
Safari: 14 version or later with up to 1080p video.
Audio System: A compatible 5.1 or Dolby Atmos surround sound system.
Connection: An HDMI connection to your sound system.
Dolby Access App: Install the Dolby Access app from the Microsoft Store to enable spatial sound.
2. Configuration Steps
Install Dolby Access: Download and install the Dolby Access app from the Microsoft Store.
Connect Audio System: Connect your PC to your surround sound system using HDMI or an Optical cable.
Set Windows Audio:
Right-click the speaker icon in your taskbar and select "Sound Settings" or go to "Sound Control Panel".
In the "Speaker Settings" tab, select 5.1 Surround or 7.1 Surround for your connected device.
In the "Dolby Access" app, set your spatial sound setting to "Dolby Atmos for Home Theater" or a similar option.
Launch Netflix in Edge: Open the Netflix app or go to Netflix in the Microsoft Edge browser.
Select Content: Find a Netflix original title that displays a Dolby Digital Plus, Dolby Atmos, or 5.1 badge.
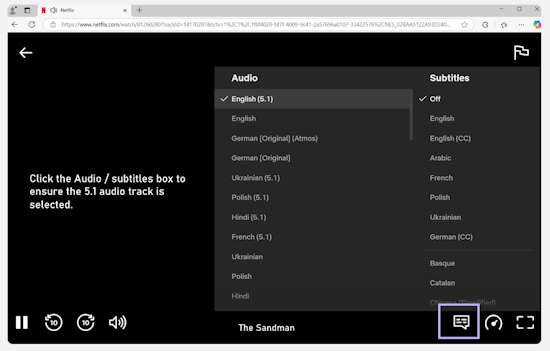
Check Audio Options: While playing the title, select the "Audio & Subtitles" menu.
If you see "5.1" or "Dolby Atmos" listed, select it to activate surround sound.
3. Troubleshooting Tips
Check Netflix Account: Ensure your Netflix subscription plan supports Dolby Atmos or 5.1 surround sound.
Check Title Availability: Not all content supports surround sound; look for the proper badges.
Check HDMI Cable: Ensure your HDMI cable is modern and supports the necessary audio bandwidth for 5.1 audio.
Reset Audio Settings: Sometimes, resetting your audio settings in Windows can resolve issues.
When you might NOT need the Dolby Access app:
If you don't care about immersive spatial audio:
Your PC has other built-in spatial sound options, like Windows Sonic, which is free and pre-installed.
If you're using a compatible sound system that can decode Atmos:
In some setups, the PC sends a bitstream signal, and the external device handles the Atmos decoding, in
which case the app may not be needed for that purpose.
If you have a compatible Atmos headset that includes activation:
Some partner headsets come with Dolby Atmos for Headphones already activated, negating the need for the app in some cases.
In short, if you want to pay for and experience the enhanced spatial sound of Dolby Atmos on your headphones
or home theater setup, you need the Dolby Access app; otherwise, you can stick to the free, built-in Windows audio options.
Wireless computer to TV
Wireless depends on what computer you have, as well as the built-in capabilities of your TV or
the streaming device connected to your TV.
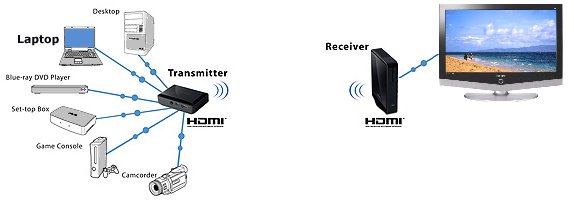
Wireless HDMI connection
Wireless HDMI works by transmitting audio and video signals from a source device to a
display wirelessly, eliminating the need for physical HDMI cables. This is achieved using a transmitter
connected to the source device and a receiver connected to the display,
both of which are powered and communicate via radio frequencies.
The transmitter encodes the HDMI signal into a wireless format, which is then received and
decoded by the receiver for display.
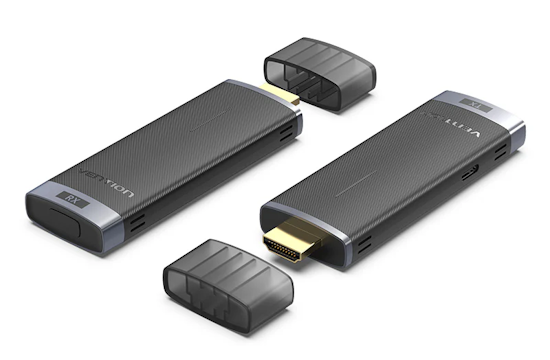
The wireless HDMI transmitter plugs into the source device's HDMI output and the receiver plugs into the display's HDMI
input port. The transmitter and the receiver both require power. There is a USB Type C port for power and a USB Type C to
USB Type A cable which can be plugged into a wall adapter.
Distance is usually around 100 to 300 ft. maximum and video resolution is 1080p or 4K. Some have built-in
antennas while others have larger external antennas.
• Wireless HDMI transmitter and receiver
Wi-Fi
Most laptops today have built-in Wi-Fi capability. Desktop PCs can add Wi-Fi with a USB adapter.
• USB Wi-Fi adapter for PC
Most modern TVs have Wi-Fi built-in but if your TV is an older model, you can often add wireless capability with an adapter.
You can also get an HDMI wireless transmitter adapter setup so that you do not need a home network. These units use
various wireless technologies to transmit audio and video to the TV.
Compatibility
Products
tend to work as a brand partner group so if you have Google Chrome browser,
Google Chromecast and an Android TV, wireless should work with those products.
If you have a Samsung
TV with AirPlay 2 and a current Apple computer, Airplay wireless should work for you using those products.
Problems occur when using incompatible products.
Wireless Technologies
Airplay, Miracast and Chromecast are the wireless standards for projecting wirelessly from computer or phone to TV.
Airplay is the Apple product while Miracast
is the Windows product. Google uses Chromecast. Many manufacturers incorporate these wireless
technologies into their products but
not all have the same wireless built-in.
For example a Samsung TV may have Airplay but not Miracast or it may have both. You can get a specific adapter
for your TV and plug it into an HDMI port. Many modern TVs have some wireless casting built-in along with Wi-Fi capability.
• Adapter for wireless to TV
Wireless HDMI Display Dongle Adapter - Stream from Laptop, PC, or Smartphone to HDTV/Projector -
No Setup or Apps Required - Compatible with iOS, Android, Windows, MacOS
Supports Airplay mirroring for Apple iOS/MAC and Miracast for Android/Windows, providing versatile connectivity.
Apple AirPlay
How to use Airplay to connect your Apple laptop to your smart TV:
If you have a smart TV with AirPlay 2 (most TVs manufactured in 2019 or later), you can use AirPlay to connect
your laptop to your TV wirelessly.
Ensure that your laptop is connected to the same Wi-Fi network as your smart TV with AirPlay 2.
Go to the Control Center (the icon with the two switches in the top right corner) on your Mac.
Tap Screen Mirroring.
Select the device with which you want to share your display.
Click Screen Mirroring, then select Stop Mirroring to end your streaming session.
If you have an Apple computer: The easiest way is to use AirPlay. But you'll need a device that supports it, such as:
Apple TV
Apple TV 4K
A TV that's Air Play 2 compatible, such as a compatible TV from Samsung, Sony, LG or Vizio.
AirPlay Mirroring lets you show whatever is on your Mac or iOS device's screen on an HDTV using the Apple TV.
This method is another OS-level feature that's not available as part of Windows,
but you can try adding it with 3rd party software.
How do I turn on AirPlay?
To turn on AirPlay on a Mac, select the AirPlay icon in the menu bar and choose your compatible TV.
Within apps like Apple Music, Apple Podcasts, or Apple TV, look for the AirPlay icon.
To turn on AirPlay on iPhone, open Control Center and long-press Music or tap Screen Mirroring/AirPlay Mirroring.
On a Samsung Galaxy device, the screen mirroring feature is called "Smart View".
You can easily mirror your screen with Smart View by just tapping the Smart View icon and doing a few simple steps.
Miracast
Miracast was introduced in 2012.
There are several requirements for Miracast to work. Your computer must be capable of supporting Miracast. Older models may
not have the requirements. Your TV must also support Miracast. Miracast allows sending up to
1080p HD video (H.264 codec) and 5.1 surround sound.
How do I know if my computer supports wireless Miracast?
How to Check if Windows 10 Computer Supports Miracast
Miracast is a wireless technology your PC, laptop, or tablet can use to project your screen to wireless TVs
and streaming media players that also support Miracast. You can use this to share what you’re doing on your
PC on a larger screen.
Both your Windows 10 computer (PC, laptop, or tablet) and device (TV, projector, or streaming media player) must
support Miracast to be able to project your computer's screen to the device.
The device (TV, projector, or streaming media player) must support Miracast, and have Miracast turned on.
To see if your device supports Miracast, you will need to check its manual to see if it's a supported feature.
Miracast requirements:
Graphics driver must support Windows Display Driver Model WDDM 1.3 or higher with Miracast support.
Wi-Fi driver must support Network Driver Interface Specification (NDIS) 6.30 and Wi-Fi Direct.
Windows 8.1, Windows 10 or Windows 11.
For Windows 10
In the search bar (lower left) type RUN and press ENTER
Type DXDIAG

(The Apple version of DxDiag is called “system information.”)
A window will pop up titled "DIRECTX Diagnostic Tool".
You should see information about your computer.
Click on "Save All Information" at the bottom and save to a text file.
Open Notepad with the text file.
Look/Find in this text file "Miracast".
There should be a few entries such as:
Miracast: Not Available
Miracast: Not Supported by Graphics driver
If you see entries indicating Not Supported, then Miracast is not going to be available for you.
Your computer may be too old with an outdated driver and there may not be an updated software driver available.
There could be some workarounds but not always.
Windows DXDIAG Report
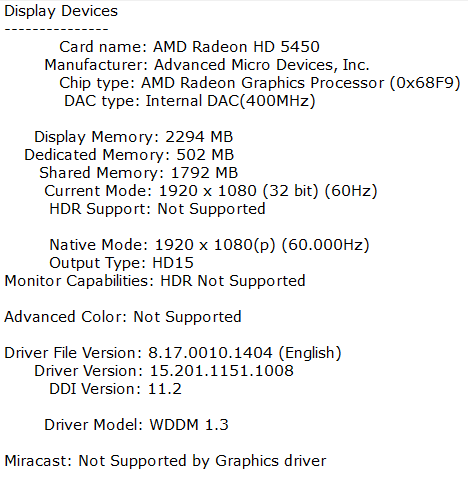
Portions of the dxdiag report showing Miracast is not supported by the graphics driver.
If your computer supports Miracast, you may see in the dxdiag report, the following:
"Miracast: Available, with HDCP" meaning your device's wireless adapter (typically the Wi-Fi) is capable of Miracast.
Graphics Driver Support: Your graphics driver is also compatible with Miracast.
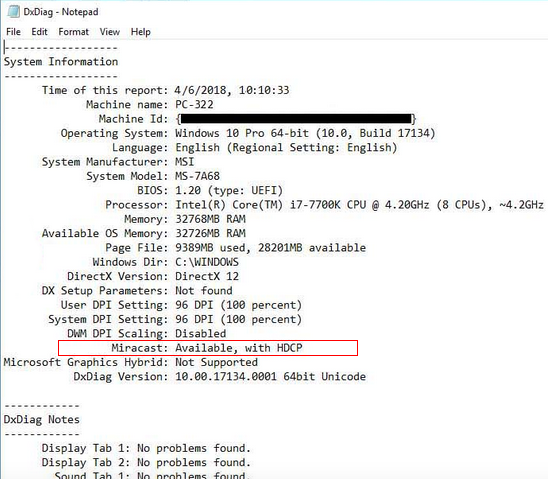
"Miracast Available" often includes "with HDCP," indicating that your device supports High-bandwidth Digital
Content Protection for secure content streaming.
Windows netsh command
Another method to verify Miracast support is the netsh command:
Verifying your computer supports or does not support Miracast using the following command
"netsh wlan show drivers".
Step by step procedure:
In the Windows search bar (lower left) type RUN and press ENTER key.
Type netsh and press ENTER key.
At the netsh prompt , type wlan show drivers and press ENTER key.
If your computer has no Wi-Fi or if Wi-Fi is not turned on, you will get a message:
There is no wireless interface on the system.
Type EXIT and then troubleshoot your Wi-Fi issues.
If using a USB Wi-Fi adapter, be sure the USB port is working or try another USB port, then be sure Wi-Fi is turned ON.
Go to SETTINGS> Network & Internet> look for Wi-Fi and slide to On

If Wi-Fi is working, you will get a screen with information about your Wi-Fi interface.
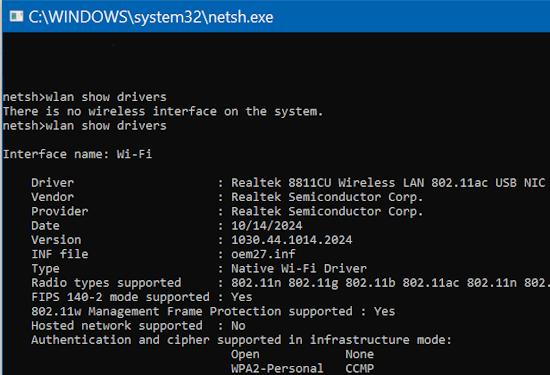
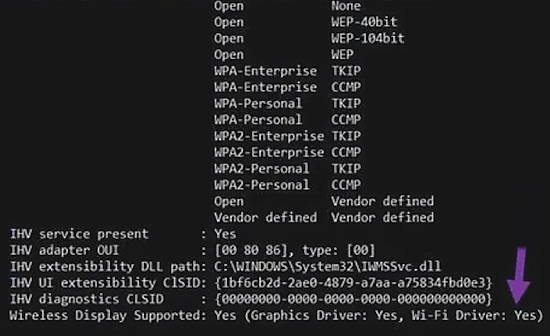
Scroll down and locate the "Wireless Display Supported" section.
If both show Yes, (Graphics Driver: Yes, Wi-Fi Driver: Yes),
then your computer is Miracast supported.
However, if you see that either the graphics driver or the Wi-Fi driver indicates "No" then your computer currently does
not support Miracast.
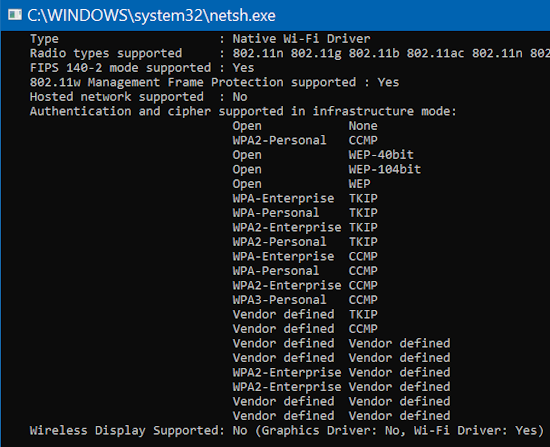
Possibly you can install a newer graphics card or driver if this is the issue.
How to Use Miracast
Step 1: Make sure both your source device (computer or phone) and display device (TV) support Miracast.
Step 2: Turn on the Wi-Fi on both devices and connect them to the same Wi-Fi network.
Step 3: On your source device, go to Settings > Display > Cast Screen or Wireless Display.
Step 4: Select your display device from the list of available devices.
Step 5: Follow the on-screen instructions to complete the connection.
Newer TVs that support Miracast use brand names such as Samsung's AllShare Cast, Smart View or LG's SmartShare.
How to turn on Miracast on Samsung TV
How do I Miracast my laptop to my Samsung TV?
On your PC, select Start, then begin typing Bluetooth and other device settings and select it when it appears.
Select Add device or Add Bluetooth or other device. Then, select Wireless display or dock.
Select your TV once its name is displayed.
Now your PC's screen will be mirrored to the TV.
On the TV go to SETTINGS, then GENERAL, then NETWORK. Be sure TVs Wi-Fi is connected to your network.
How to turn on Miracast on Windows 10
On the source device (computer), be sure Wi-Fi is turned ON. Computer must have Wi-Fi and be ON.
Next, click on the square at the
far bottom right of your computer screen.
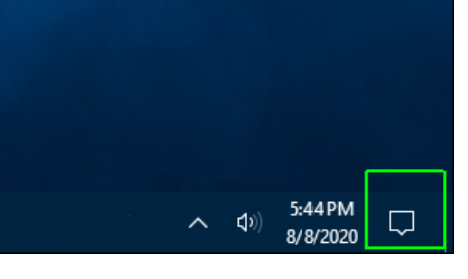
Next click on CONNECT.
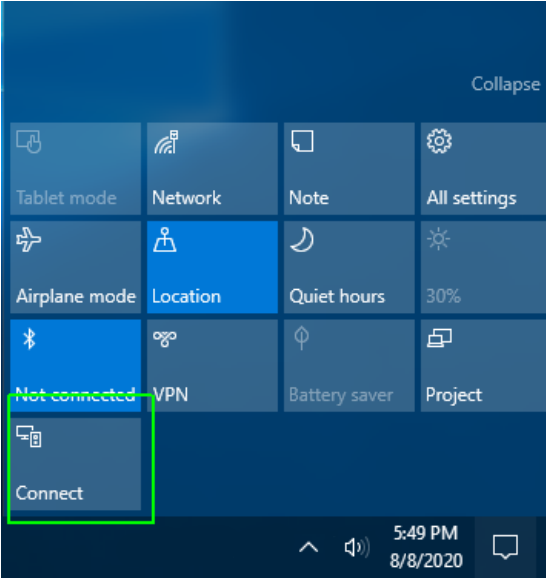
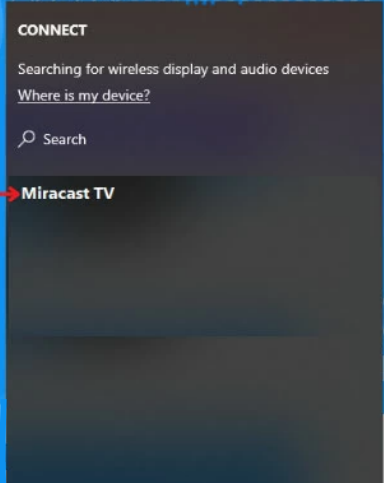
An alternative is to press the Windows key and the "K" key at the same time to bring up the
"CONNECT" window. A search will begin to find display devices such as your TV.
If your TV can support Miracast and it is on your Wi-Fi network, it should show up on the list of devices and you can choose
your TV. A wireless connection from computer to TV screen is now completed.
If the Connect button in the action center doesn't find your device, try the following:
Make sure the display you want to project to supports Miracast
and that it's turned on. If it doesn't, you'll need a Miracast adapter (sometimes called a dongle) that plugs into an HDMI port on the TV.
Make sure your device drivers are up to date and the latest firmware is installed for your wireless display or adapter.
Restart your computer and the wireless display or adapter.
To remove the device on Windows, select Start > Settings > Devices > Bluetooth & other devices.
Under Wireless displays & docks, select the wireless display or adapter, then select Remove device > Yes.
Now try reconnecting.
How to turn on Miracast on Windows 11
On right side of the taskbar, select the Network icon then Cast then pick your display or adapter.
If you have a Windows PC you may be able to use Miracast. Your Windows laptop should have it built-in.
On the TV side, devices that support Miracast include:
Roku streamers
A handful of TVs, mostly LG models with some Sony and Sharp.
Wireless display adapters that plug into your TV
There are multiple ways to mirror (Duplicate) your Windows 10 desktop to your Smart TV.
1. Press the Windows key and the P key on your keyboard at the same time.
2. If Miracast or another screen share option is available, a few choices to Project to will be displayed.
3. Right click on Windows icon (bottom left) and Select SYSTEM, then DISPLAY.
Look under MULTIPLE DISPLAYS for Connect to wireless display.
The text will not appear if you do not have any compatible displays.
You can check in the menus of the television itself to see if Miracast or casting is listed as an option.
There are a few ways you can check on your Smart TV to see if Miracast is supported.
Apps
Check if your Smart TV considers Miracast an app you can run.
Press the Menu button on your remote and select Apps for your Smart TV.
Look for "Miracast", "Screen Casting", or "Wi-Fi Casting" apps.
Input
Some TVs consider Miracast another input, rather than an App.
Select Input or Source.
Look for "Miracast", "Wi-Fi Casting", or "Screen Casting".
Miracast is a standard way for a computer, smartphone, tablet, or other device with WiFi to talk directly to a smart display.
Check with the WiFi Alliance for certified devices.
www.wi-fi.org
Project your Windows 10 or Windows 11 computer to a TV
Requirements
Make sure your computer and TV have the requirements for wireless projection. Most PCs that run
Windows 10 or Windows 11 will support this feature, but to check if your PC is compatible, press the
Windows key and "P" key at the same time on the keyboard. A Project action bar will open. To be compatible, this
action bar must contain the link "Connect to a wireless display." If it is not there, your device is not compatible.
Most Samsung Smart TVs will support screen mirroring and casting. Make sure that both the TV and
PC are operating on the same Wi-Fi network. Setup the TV for wireless and the computer must have Wi-Fi.
Mirror your screen
On your Windows computer, click Start, then type in "Bluetooth and other device settings" and click on it when it appears.
Click Add device or Add Bluetooth or other device. Then, click Wireless display.
Add a Bluetooth device on a Windows 11 PC
Click your TV once its name is displayed. If prompted, select Allow on your TV.
Now your PC screen should be mirrored to the TV.
Disconnect the devices
Once you are finished mirroring your screen, disconnect.
On your PC, click Start, then begin typing "Bluetooth and other device settings" and click on it when it appears.
If you're using Windows 10, simply click the connected device. If you're using Windows 11,
click More options (the three vertical dots) next to the device you want to disconnect.
Click Remove device, and then click Yes.
How to connect your Samsung Smart TV to a Wi-Fi network
You need to know your network name and the password to connect.
Press the Menu button on your Samsung TV remote and Open "Settings".
Go To General and Select "Network".
Next, Select "Open Network Settings".
Next, Select "Wireless" from the Network types.
Next, Select your Wi-Fi network that was setup by you or a technician in your home.
Enter the password for your Wi-fi network and Select "Done".
Your TV will test the network connection and display any issues. Select "Close" to finish.
Your TV should now be connected to your Wi-Fi network.
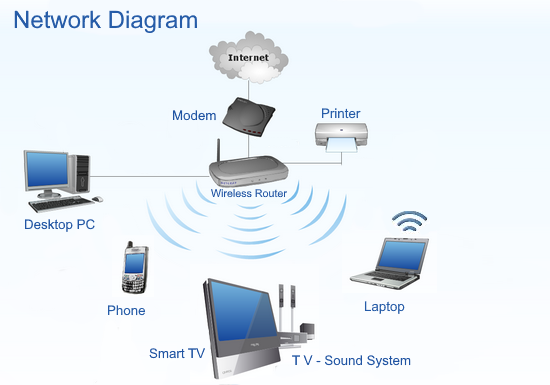
Network Diagram
Google
If you have a Chromebook: Computers that run Google's Chrome OS can send content to a TV wirelessly. To use it you need:
Chromecast (built-in Wi-Fi, check for max video resolution)
Chromecast Ultra
Smart TVs with "Chromecast built-in," mainly Vizio but also some other brands.
Nvidia Shield
Sony TVs that run Android TV
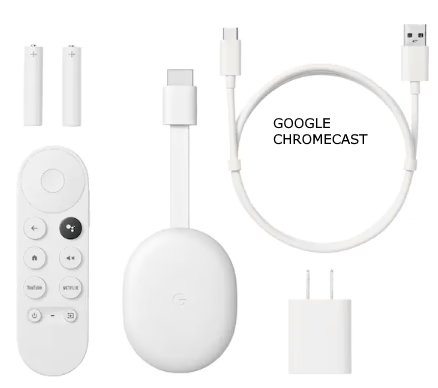
Casting from a Chrome browser: If you don't have a TV device with AirPlay or Miracast compatibility you can still mirror your screen
from the Chrome browser on any laptop. It works with any of the devices from the Chromebook list above.
Only content from the Chrome browser will be visible.
Google Chromecast lets you mirror your Chrome browser page on a TV.
Settings
Your TV and your laptop's screen are probably different resolutions. Adjust the laptop's output to match your TV's resolution.
If you are trying to send audio, that might need to be switched on as well, either by clicking the speaker
button in the lower right on Windows, or in System Preferences on Mac.
On the TV side, make sure you disable your TV's overscan. It might be disabled automatically, but if the
edges of your desktop are cutoff, look into your TV's menus for something like "size" or "zoom."
If you're not getting an image on screen at all, try unplugging the HDMI and plugging it back in, and if that
does not work, plug it all in, but turn the TV off, wait a few, then on.
Apple
Macbook laptop to TV hookup
Many people today want to display their laptop on their TV so
internet videos can be viewed. More and more video is available on the
internet and the laptop screen is nice but the larger TV screen is
better. Plus you have options for better audio by connecting the laptop
sound to better speakers.

You need to do 3 primary things in order to view your laptop display on
your home TV screen.
1) Connect a video cable from the laptop video output to the TV video
input.
2) Connect an audio cable from the laptop audio output to the TV audio
input or home stereo sound
system.
3) Setup the laptop computer to be able to use your TV display.
o
How to connect an
APPLE MacBook to an HDTV using HDMI
Note:
If
using HDMI connection, both video and audio can be
carried over a single HDMI cable.
Also be sure to select on the TV (using the TV remote or button) the
proper source, that is the laptop connection. The SOURCE button or
INPUT Select is used to switch to the
proper input to view the laptop
screen.
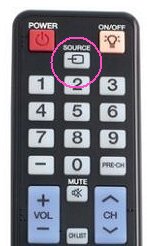
If using an HDMI connection, select one of the HDMI inputs. If using
VGA, select the PC source when navigating through the inputs on your TV.
OPTIONS
for hookup:
Today, the HDMI or the VGA connections are best. Almost all laptop
computers are designed to be able to use external
displays. A laptop computer can have a video output jack such as an
S-Video or an RCA composite video or a VGA port or a DVI port or an
HDMI
output and more. The video output port on your computer could be a
VGA output or it could have several options. It depends on what
graphics capabilities your hardware has and this determines how you
connect to a TV.
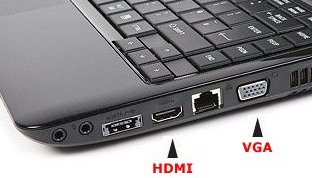
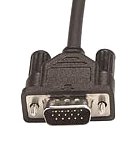
If your laptop has HDMI, use that connection. If your laptop has VGA
but no HDMI, you will have to use the VGA connection. In both cases you
need a male to male cable to connect
laptop
to TV.
Many modern HDTV display panels such as plasma and LCD
have a VGA input port built-in specifically for computer hookup. So you
can see that there are many possibilities and options depending on what
type of jacks your laptop has and what type of jacks your TV has.
Depending on which video output jack(s) your computer has, you can make
a direct cable connection or use one of several types of adapters.
• PC or laptop to TV adapter for CRT hookup
WIRELESS LAPTOP TO TV CONNECTION - See wireless section towards bottom
You can also make a wireless connection from laptop to TV using a set
of wireless boxes, transmitter and receiver, such as the ones here
from SewellDirect or here
from D-Link and this one has component video, composite video and VGA.
Your laptop's video and audio output jacks are along the back, sides or
front of the bottom section of the computer. Your laptop may have one
or more of the following ports for
video and audio:
STEP 1: Video hookup
| VIDEO CABLES |
|
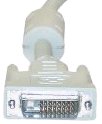 |
 |
| VGA |
DVI |
HDMI |
| VIDEO
CONNECTION PORTS |
 |
 |
 |
| VGA |
DVI |
HDMI |
STEP
2: Audio hookup
| AUDIO |
 |
 |
|
| Earphone |
Audio
3.5mm |
| AUDIO |
 |
 |
|
| Earphone
(Laptop) |
Audio
input
3.5mm (HDTV) |
You can buy cables already made
specifically for connecting laptops to
a TV.
The cable below
has a S-video and a 3.5mm audio on
one end and on the
other end the video to the TV and the stereo audio to the TV.
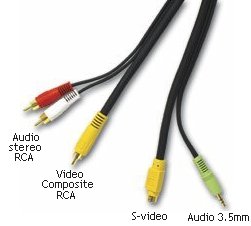

Cable to connect laptop computer audio output to TV or stereo
receiver's audio input.
Stereo 1/8" mini jack-to-RCA plugs Y adapter cable.
Available for less than $10 at local and online retailers. Radio Shack
part no. 42- 2551 Y-adapter audio cable.
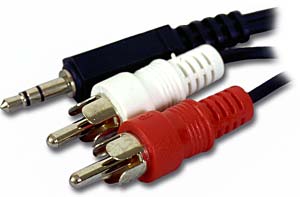
Audio Cable has 3.5mm stereo plug for
computer connection and at the
other end is the two RCA plugs for left and right stereo channels.
Most laptops utilize a 3.5mm (1/8-in) jack as the line output connector
and most TV and hi-fi equipment uses RCA type sockets for connecting
audio components.
What
you need:
- Laptop
computer with VGA, DVI, HDMI or S-video output jack and audio output
jack.
- TV or HDTV
with available video and audio input jacks such as VGA or HDMI or
S-video.
- Cable(s)
for video and audio.
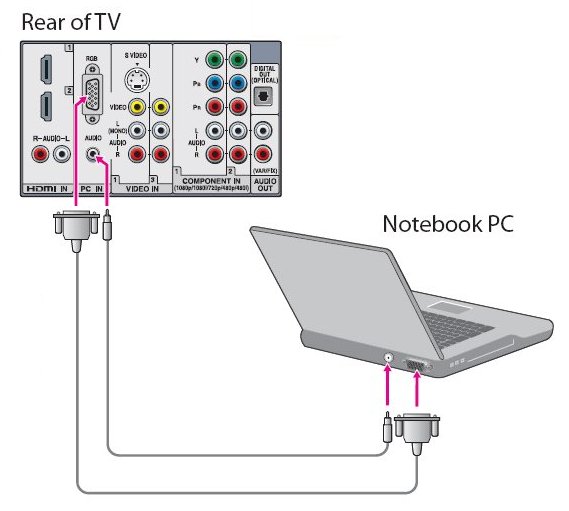
Connecting
laptop to HDTV with VGA and
audio cables
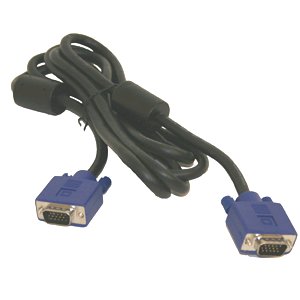
VGA male to male cable to connect
laptop to HDTV.
The VGA cable is for video only, so audio
connections will need to be
made for sound, if desired.
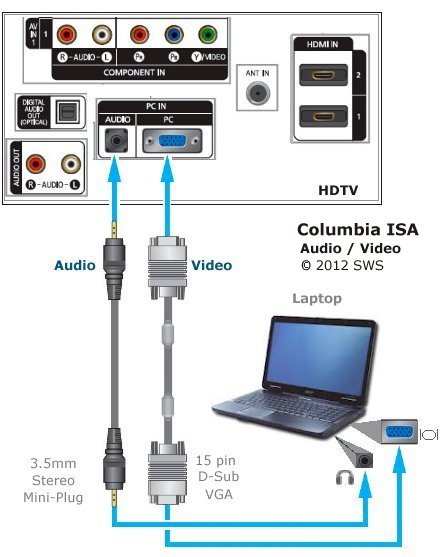
Most HDTVs today have a VGA female input port for connecting personal
computers. The color is typically blue and it has 15 small openings
arranged in three rows of 5 each. Most modern laptops also have this
female 15 pin video output port. What you need to connect TV to laptop
is a male to male VGA cable. Each end has 15 pins which insert into
both female ports on the TV and computer. These VGA cables cost about
$15 or so.

• How
to hook up a Plasma
or LCD HDTV
• How
to hook up a Cable TV box
• Cable
TV - Cable Box Setup
• How
to Install a HD Cable Box
• Surround
Sound over HDMI
• Surround
Sound - How to Hookup
• HDTV
Antennas and Reviews
• HDTVs
for under $500
• See
over 100 hookup diagrams
• Bluray
Players, internet-enabled, Netflix movie streaming
• Cable
Types, audio/video for TV, explanation
• Hookup
diagrams, TV, VCR, DVD, Digital cable box
• DVD
Players reviews and Guide
• VHS
to DVD copy VCR tape to DVD disc
• ROKU
digital video player Setup Guide
• HDTV
BUYING GUIDE in 9 EASY STEPS
• SAMSUNG
LED HDTV Review
• What
do I need to see 3D TV?
• How
To Setup Wireless Internet at home
• United
Kingdom TV SKY, Cable, HDTV
• How
to connect iPhone to HDTV
• How
to record sound in Vista and Windows 7 - missing stereo mix
• Sony
PS3 connections hookup
• XBOX
360 Kinect motion sensing device
• All
about Surge Protectors - Save
your electronic devices from power
spikes
• How
to spot fake silver coins or bars
• What
is
Bluetooth Technology?
• Hands
Free cell phone options for car
• Adult
Care - Help for the elderly in your home
o 2015
TV 4K,
OLED, NEW TV Samsung, LG
o How to record
radio shows LIVE from internet
or broadcast and listen later
Question:
My
HDTV does not have a VGA input, only HDMI. How can I connect my laptop,
without HDMI,
to TV?
Answer:
Your
laptop should have a VGA output. VGA is analog video but the TV's HDMI
input is digital video. Therefore no cable connection directly from the
laptop to the TV will work, even if the cable has VGA at one end and
HDMI at the other end. What you need is a VGA to HDMI converter which
accepts the analog VGA video and earphone out audio from the laptop as
input and then outputs HDMI video and audio to the TV. Connect to the
converter using a VGA cable for video and a 3.5mm audio cable for
sound. Connect a HDMI cable from the converter to the TV's HDMI input.
Press Fn-f7 or Fn-f4 etc. key on laptop.
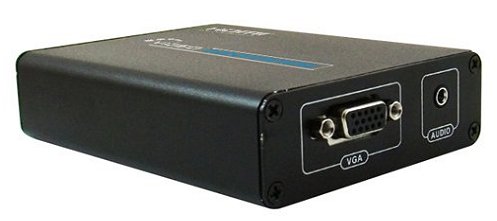
Converter VGA side with VGA input connection and 3.5mm audio connection
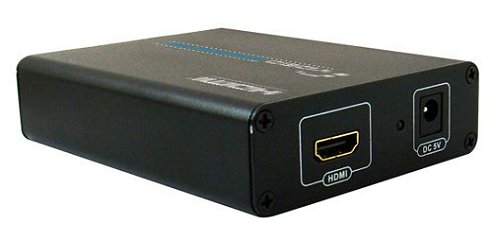
Converter HDMI side with HDMI output
connection and power connection
Atlona
AT-HDVIEW VGA to HDMI
- Display
VGA signals out of Laptop or Desktop to
an HDTV or a Monitor
- Audio
Compatible, the converter will take audio
from the computer and embedded it to the HDMI output along with video
signal
- High
Quality scaler allows any PC resolution to
be scaled to a native resolution of the display up to 1080p
- Converter
will automatically sense the native
resolution of the display and adjust to the output to that resolution
- Supports
resolutions of up to 1920 x 1200
- USB Powered
- VGA, Audio
and USB pig-tail cables are attached
to the converter
Belkin
F3H982-25 Pro Series High-Integrity VGA/SVGA Monitor Replacement Cable
(25 ft.)
Constructed of 3 coaxial and 5 twisted pair cable to minimize cross
talk, noise and other interference.
3 coax conductors for the RGB signal which maximizes color and imaging
Designed to support high resolution imaging and high speed
Fully compatible with the PC
Belkin Lifetime Warranty
Aluminum undermold shield helps meet FCC requirements on EMI/RFI
interference
Double shielding to ensure compliance with FCC requirements
Gold plated copper contacts provides
maximum conductivity
with no data
loss
Sound connection to stereo amp/receiver or other
audio system
for richer audio for movies, videos and
more.
Soundbars
offer a space saving solution for
apartments yet obtain better sound than TV speakers.
Mini Display Port for Mac Book, MacBook PRO to HDTV using HDMI adapter
http://www.youtube.com/watch?feature=endscreen&NR=1&v=kLgPwdb4BTM
How to connect Apple MACBOOK to HDTV with HDMI
There are at least two adapters with HDMI to choose from. The first one
is short and has the Mini Display Port plug on one end and a HDMI
female port on the other end. You use your own HDMI cable of chosen
length. The second is a longer cable with HDMI male on one end and mini
display plug on the other end. See the YouTube video above for step by
step setup.
How
to add great sound to HDTV
How
to buy a prepaid phone
How
to buy a wireless router
How
to hookup audio/video receiver
How
to hookup plasma HDTV
How
to install cable/dsl modem
How
to install HD cable box
How
to install pci card in PC
How
to setup surround sound DirecTV
How
to setup wireless internet at home
Connecting
your laptop computer to
your TV:
After you make the cable connections from laptop to TV, setup the
laptop to be able to use the TV screen.
STEP
3: Setup Laptop
To get an
image on the TV, you must configure the laptop computer to
display an external signal. Typically, this is done by toggling the
"Fn" key + "Fx" where x=1 or 2 or 3 or 4 or 5 or 6 or 7 or 8. The
actual function key varies with each laptop computer. Your laptop could
be Function key and F8 key. Refer to your computer's User Manual for
specific instructions for displaying an external signal. All notebooks
should support an external monitor, usually with a high-density D-Shell
15 pin VGA connector.
Newer laptops don't keep the external connector live by default, and
some don't allow for simultaneous display on both the LCD and an
external monitor. You can toggle between the notebook screen and the
external display with an Fn key combination. The Fn key is located at
the lower left of the laptop keyboard, normally between the CTRL and
the ALT
key.
Toshiba uses Fn/F5 to toggle between the laptop LCD and an
external display. IBM or Lenovo uses FN/F7, Acer varies with the model,
using Fn-F5, Fn-F3, Fn-F8, Sony Fn/F7, Dell Fn/F8, HP or Compaq, Fn/F4.
There are variations with the age of the laptop and not all
manufacturers have standardized on a key combo across the whole range,
but you can usually figure it out from the little graphics on the
function keys that line the top of the keyboard.
The "Fn" + "Fx" toggles between three settings, laptop display, TV only
and TV and laptop together. (Sometimes, laptops do not have enough
power to show both the TV and laptop displays, so only a scrambled
signal is viewable on the TV.)
Some laptops today have key combinations such as CTRL/ALT/F12 for
example which will bring up your graphics options. Press all three keys
together.
Right Click on the laptop desktop (main screen) and go to Graphic
Properties or Graphics Options.
Matching
screen resolution
When you connect a TV or HDTV to your laptop, your laptop display
resolution may need to be changed to match more closely the TV's screen
display properties. Depending on your laptop's graphic output
capabilities, you can try to match the TV's screen so that you see the
proper proportions for text and images. Technologies are always
changing, so consider the screen resolutions below as a guide only.
| 1. VGA
Video Graphics Array 4:3 640 X 480 |
| 2.
SVGA Super Video Graphics Array 4:3 800 X 600 |
| 3. XGA
eXtended Graphics Array 4:3 1024 X 768 |
| 4.
WXGA Widescreen eXtended Graphics Array 5:3 1280 X 768 |
| 5.
WXGA Widescreen eXtended Graphics Array 8:5 1280 X 800 |
| 6.
WXGA Widescreen eXtended Graphics Array 16:9 1366 X 768 |
| 7.
UXGA Ultra eXtended Graphics Array 4:3 1600 X 1200 |
| 8.
HD-1080 Full High Definition 16:9 1920 X 1080 |
Your computer graphics card may only have the first three possibilities
for screen resolutions or if you have a newer computer or newer
graphics card, you may have greater capability to match the TV's native
resolution. HDTV's can have 1920 by 1080 native resolution so only the
newest computer hardware can match this video resolution.
WARNING - Be very careful
when
adjusting screen resolutions and refresh rates as damage could result
to your TV. Always read your owner's manual and follow the guidelines
and parameters recommended. If in doubt, contact the TV's manufacturer
before proceeding to ensure
you are operating within the TV's valid
parameters.
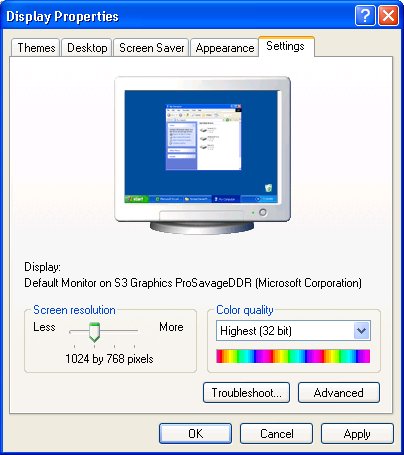
For Windows PC's, go into CONTROL PANEL, then DISPLAY and click on the
SETTINGS tab. Use the slider bar to set the screen resolution you want.
Next click APPLY.
For Windows Vista operating system, click START, go
to Control Panel, click PERSONALIZATION, then Display Settings Adjust
Screen Resolution.
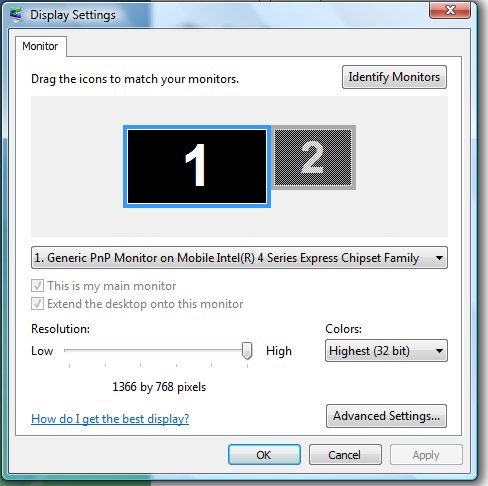
Your screen resolution is the number of pixels in the width and height
of your screen (width x height). A higher resolution results in a
sharper image, but things will appear much smaller. When changing
resolutions, you should consider the size of your monitor. Images may
appear to flicker because your monitor can't keep up with the
resolution and still provide a sharp image. 1024x768 is one standard
screen resolution. 800x600 was a standard screen resolution. 640x480 is
another, out of date, screen resolution.
In addition to your screen resolution, you should also consider the
number of colors to display. Adjust the slider to increase or decrease
resolution, and then click "Apply." Windows will pop up an info and
warning screen. Click "OK." The screen will go blank and then come back
in the new resolution. Windows will ask if you want to keep the
settings. Click "Yes" or "No". If you end up not liking the new
resolution, you can change it back to the old setting. When done, click
"OK" to close the display properties window.
Refresh Rate
If your screen looks very bright, you may need to adjust your monitor's
refresh rate (this is the speed at which the monitor "refreshes," or
redraws, the image). Standard television refresh rate is 60 Hz. To
change the refresh rate, click the "Advanced" button in the "Settings"
tab in the "Display" control panel. Read your TV owner's manual to
determine your TV's possible refresh rates and DO NOT EXCEED the
values.
Troubleshooting
tips:
If you have Windows Operating System,
click START -- CONTROL PANEL -- DISPLAY -- Then in Display Properties
click SETTINGS Then ADVANCED.
In the MONITOR tab and the DISPLAY DEVICES tab, you can adjust
properties if needed. In the DISPLAY DEVICES tab you should see both
the TV and the laptop displays with check boxes you can fill in.
Additionally you may require device drivers if you don't already have
them installed in the laptop. Also in your laptop BIOS, make sure you
have TELEVISION OUTPUT enabled and that you have NTSC selected for
analog TV sets.
HDTV with
HDMI connection:
Some graphics cards (video cards) have an HDMI port so you can use an
HDMI cable to connect the laptop to the HDTV. The key here is to
install the proper drivers for the card (if not already installed on
the computer) so that you can use the newer software attributes to fine
tune the HDTV connection.
One example of a modern laptop with HDMI output is:
Dell
Studio XPS 16
multimedia laptop
* Full 1080p HD support and premium ATI graphics.
* 15.6" LED or optional 16" RGBLED seamless display.
Graphics
ATI Mobility RADEON HD 4670-1GB
LCD Display
Edge-to-edge Glossy 15.6 inch HD WLED display (1600x900p)
Edge-to-edge Glossy 15.6 inch Full HD WLED display (1920x1080p)
Edge-to-edge Glossy 16.0 inch Full HD RGB-LED LCD display (1920x1080p)
No sound
with
HDMI
A common problem with HDMI connections is the first time you try using
it, you only get video and no sound. You must set your computer up so
that the HDMI output is the default audio out.
HDMI (High-Definition Multimedia Interface) connector for connecting a
TV.
If you use HDMI to connect your display, you must activate HDMI sound
by adjusting your Windows settings.
If HDMI is not activated, you cannot hear any sound.
Depending on your operating system software and your particular
graphics card driver, you need to configure HDMI output accordingly.
The following assumes Windows Vista operating system.
Use the following steps to activate HDMI sound on your computer.
1. Right-click the Volume icon in the lower-righthand corner or go into
Control Panel, then Sound.
2. Click Playback Devices.
The Sound window opens.
3. On the Playback tab, click the following audio output device that is
listed:
* Digital Output Device (HDMI)
-1
* Realtek HDMI Output
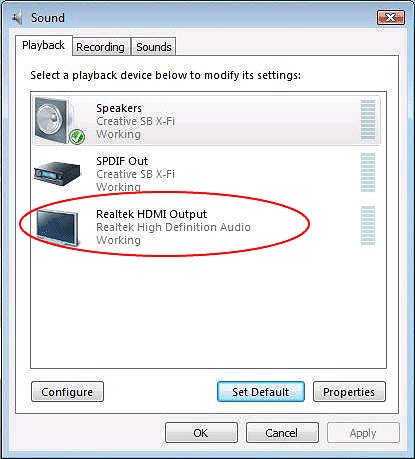
* NVIDIA HDMI Output
-3
* ATI HDMI Output
-4
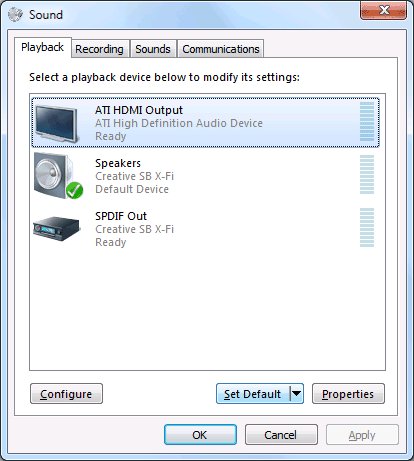
4. Click Set Default.
5. Click Apply.
* If you used Digital Output Device (HDMI) , click OK to close the
window. This completes the steps to activate HDMI sound.
* If you used Realtek HDMI Output , continue with Step 6.
6. Double-click Realtek HDMI Output .
The Realtek Digital Output Properties window opens.
7. Click the Supported Formats tab.
8. Place a check in the 48.0 KHz check box, and make sure that there
are no checks in the Dolby Digital check box and all other check boxes.
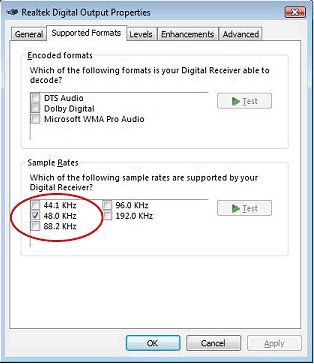
Supported Formats settings in the Realtek Digital Output Properties
window
NOTE: For most TVs to play back audio, the sample rate must be 48.0 KHz.
9. Click OK to close the
window.
How
to view NETFLIX on HDTV instantly via internet connection
Instead of going to the store to buy a DVD or waiting for a DVD to
arrive in the mail from Netflix, why not view the movie instantly over
the internet on your HDTV. You need a broadband internet connection,
router (wired or wireless) and subscription with Netflix, plus an HDTV,
computer and cables. Many people already have high-speed internet
service with their TV provider and have an HDTV and laptop. Some even
already have NETFLIX service and are getting DVDs in the mail.

Netflix’s “watch instantly” streaming
internet video service allows you to view a movie now without waiting
for a DVD to arrive in the mail. It’s easy to watch a Netflix
movie on a computer screen, but now you can watch from the comfort of
the couch on the giant plasma or LCD HDTV. You just need to hookup the
computer/laptop to the TV.
Your broadband download connection should be at least 10 Mbps for good
video. Check your speed here. http://www.speedtest.net
and click on Begin Test.
Also, there are TV shows and movies available from sites like
www.cbs.com, www.clicker.com, hulu.com, amazon video, itunes,
tvland.com, history.com, crackle.com, and others.
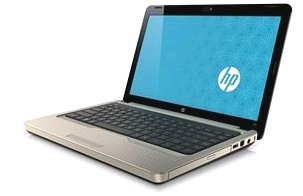
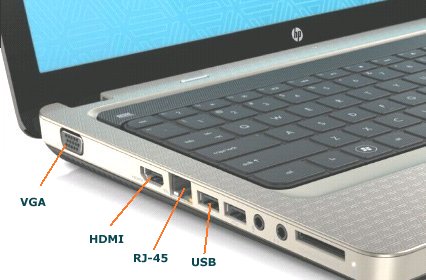
The image below shows the ports on a modern laptop including HDMI.
SELECT proper
TV input source:
You must select the source on the TV where the cable from the computer
is connected. Usually the TV remote is used to select the source so
that you get the output from the computer.
Tell the
computer to use the external display:
Refer to your computer’s user guide for the specific
keystroke for selecting an external display. On the HP Pavillion laptop
for example, press Fn + F4 keys together to toggle between the laptop
display, laptop and external display (TV), and external display (TV)
only. On a Dell, the key combination is Fn + F7.
Configure the
sound output on the computer:
With HDMI, you need to setup the computer so that the audio will output
over HDMI. With a Windows computer, go into CONTROL PANEL and then into
Sound and select the digital sound out so that the default is sound out
via the HDMI port. Windows Vista O.S. allows you to TEST the audio so
that you can hear the sound thru the TV speakers. Go into PROPERTIES,
then ADVANCED and click on TEST. You can also adjust the sound volume.
Other adjustments may also be needed in order to fine tune the sound
such as the rate (48kHz) and setting DVD QUALITY SOUND instead of CD.
Other adjustments may be required such as cancelling the screen saver
and/or power saving modes/sleep mode so that the computer does not
enter sleep mode or any kind of power save mode due to inactivity while
you watch the movie.
Speed of
internet service:
You need a speed of 6 Mbps or more to get acceptable viewing.
Connecting home theater system speakers:
Run a digital audio cable from the HDTV into your home theater system
so that you get richer sound from the loudspeakers instead of the TV
speakers. Adjust the volume.
HDMI cables:
HDMI cables should cost about $10 or so. The more expensive HDMI cables
are nice but the cost is too much. Try buying HDMI cables at www.monoprice.com
before going the $100 HDMI cable
route.
Wireless
Laptop
to TV
Connect
laptop to TV wirelessly
There are several solutions for a wireless connection from laptop to
TV. Be sure to learn all the pros and cons of a particular solution
before buying.
Google
Chromecast
Chromecast
was announced on July 24, 2013, and made available for purchase on the
same day in the United States for US$35.00. The small device plugs into
your HDTV's HDMI input and can stream audio and video from the internet
or a local network. Using Google's internet browser, Chrome, you can
display your laptop screen on your TV using Wi-Fi. Works with Android phones and
tablets, iPhone, iPad, Mac, Windows, and Chromebooks.
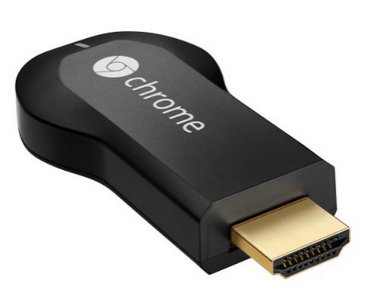
Chromecast dongle - wireless
laptop to TV
HP
Wireless TV Connect
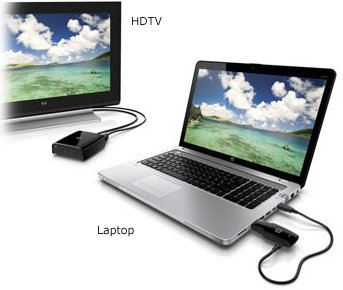
HP Wireless HDMI (Dec. 2011)
HP Wireless
TV Connect does not require any
software to be installed. Simply connect the receiver to your computer
and the transmitter to your TV and a power source, and it just works.
HP's updated Wireless TV Connect for 2011 now uses a HDMI dongle
transmitter and a receiver unit to stream HD content across a room
without lag. The unit requires no software and uses WHDI technology.
This new model also supports 3D media streaming. The two boxes,
transmitter and receiver, are made of glossy black plastic. The
transmitter has an HDMI and USB port, while the receiver has HDMI, USB
and a power port. Installation is extremely simple, only requiring an
HDMI port on your laptop and TV.
http://www.youtube.com/watch?v=SwQ8STLRSDM
WHDI certified -
Wireless Home Digital Interface
(WHDI) is a consumer electronic
standard for a wireless HDTV connectivity throughout the home.
WHDI wireless connection replaces the traditional HDMI cable solution.
Video and
Audio - (1080p)
Share photos, YouTube, no line of sight, up to 30 feet.
Laptop must have HDMI port, USB powered transmitter.
ASUS
WiCast (Wireless HDMI)
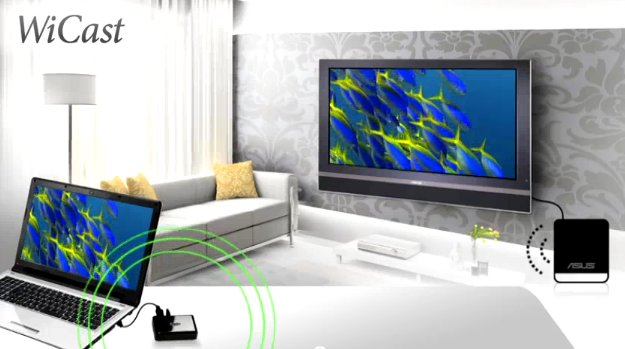
WiCast EW2000 wirelessly streams content in Full HD quality from a
user's PC to a display. WiCast allows users to view and share
high
definition quality multimedia and web content.
Latency
Free
WiCast
supports latency free (less than 1ms) transmission, providing users
with fluid and stutter-free playback of HD content. Low latency
prevents lip-sync issues and permits smooth delivery of HD content.
Operates in the 5 GHz frequency range.
USB
Powered
WiCast is
USB
powered, so there is no need for an extra adapter. Users simply
plug the device into the HDMI port and the two USB ports of a laptop
for power. This feature allows users to avoid the hassle of messy wires
and the need to look for and be tied to power sockets.
Omni-Directional
Broadcast
WiCast
supports a range of up to 33 feet and WHDI transmission is not limited
by directionality or line of sight. These features provide users in the
education or business sector with more flexibility and convenience when
connecting notebooks wirelessly with the projector to display
presentations.
Small
Package
At just
over 4” long (both the transmitter and the receiver), WiCast
is small enough to virtually disappear behind a notebook or on top of a
projector, eliminating cluttering and promoting space efficiency.
Lightweight, at a mere 0.242 lbs.(transmitter) and 0.352
lbs.(receiver), WiCast is easy to carry anywhere.
WiCast
utilizes Wireless Home Digital Interface
(WHDI) technology to wirelessly transmit high definition video and
audio signals from a user's notebook to a display TV or an LCD
monitor. WiCast supports latency free (less than 1ms)
transmission, providing users with fluid and stutter-free playback of
HD content. Low latency prevents "lip-sync" issues and enables smooth
delivery of HD content. WiCast is USB powered, so there is no need for
an extra adapter. Users simply plug the device into the HDMI port for a
signal and two USB ports for power.
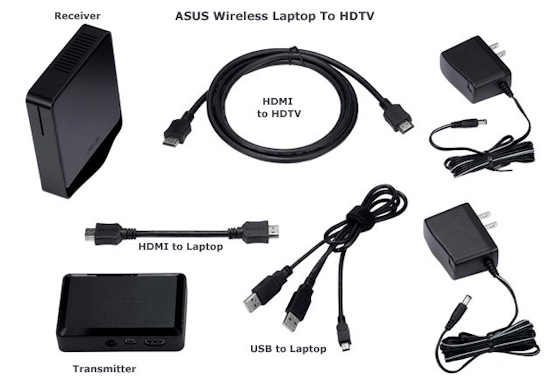
ASUS WiCAST
is very small and lightweight. Everything you need is included.
Transmitter, Receiver, cables and power adapters.
INTEL
WiDi
Intel has a solution, WiDi for wireless display, that requires the
laptop to have Windows 7
(64-bit) and the latest processor (smart 2nd generation Intel Core
processor) and Wireless Display technology. You also need to buy a box
like the Netgear PUSH2TV. The current release will not let you play DVD
or Blu-ray to the TV. Intel
is currently working on a new version of the technology (most probably
WiDi 3.0), which will feature support for connecting a maximum
of two monitors simultaneously.
WiDi enabled Laptops:
• HP Pavilion dv6-3150us
• Dell Inspiron 15R i15RN5110-7223DBK
• Lenovo Z570 10249LU
• HP Pavilion dv6t QE
• Lenovo Z570 10243WU
• Lenovo Z370 102527U
Question:
I want to connect my laptop to my HDTV with
HDMI but my HDTV
speakers are not the best sound, how
can I connect so that the sound
goes to my home theater sound system?
Answer: Buy a switcher which allows HDMI input and HDMI output to HDTV
but also has audio outputs for a stereo or audio/video receiver so a
richer sound system can be used. See the switcher from monoprice.com
below.
Question:
My laptop only has VGA out and my HDTV does not have VGA
input. Can I still connect laptop to HDTV?
Answer: Yes, if you get an adapter box. The SW-9393 from
sewelldirect.com or Amazon.com can take the VGA in and send out HDMI.
The HDMI is limited to 720p on this box but more expensive adapters
(SW-20505)
offer 1080p. The Sewell SW-4280 box accepts VGA in and outputs
component
video for older TVs or TVs without HDMI. The Sewell SW-23000 box will
accept VGA in and output composite video for
CRT tube
TVs. The Sewell VGA to RCA box for $20 accepts VGA in and outputs the
yellow RCA video for TV or VCR. Just connect laptop earphone out to
audio input on TV or VCR/DVD recorder
and enjoy!
For TVs with only a RF coax input jack, use an RF modulator connected
to the adapter's yellow video output and select channel 3 on the TV.
See also:
• PC
to Stereo hookup - how to play computer thru sound system
• Audio
cassette to computer hookup - how to record audio cassettes to PC
• PC
stereo hookup
• See
over 100 Hookup Diagrams
• TV
input select
• Timer
Record Radio Shows on a VCR
• Camcorder
hookup to TV, DVD
• Audio
Video Connections
• Hookup
Diagrams
|


