|
|
|
How to add great sound to your TV 4 Ways to Improve TV Sound 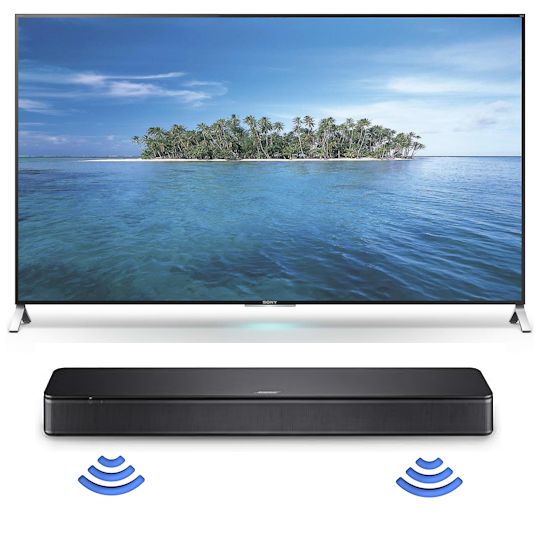
• Surround Sound over HDMI • How to hookup surround sound • How to add great sound to TV - Sound Bar The flat, wide screen TV has replaced the older tube TV. The newer flat screen TV is more about improved picture than it is improved sound. In fact the sound is hindered by the lack of space for TV speakers in the thinner TV screens. To solve this problem, you can add external speakers which give you richer, more powerful sound. How to add external speakers to TV External, more powerful speakers can be a soundbar, an audio video receiver (AVR) with attached speakers, powered stereo speakers, wireless Bluetooth speaker, a vintage stereo setup or just a pair of headphones for private listening. Headphones are great for enhancing the sound and not disturbing others. As TVs have become thinner and thinner, there is hardly any room for good speakers built into the TV. To improve the sound, you need to add some gear to your setup. The options include the following: 1. Add a Soundbar 2. Add Powered Speakers 3. Add an Audio Video Receiver and Speakers 4. Add Headphones (Wired or Wireless) SOUNDBAR 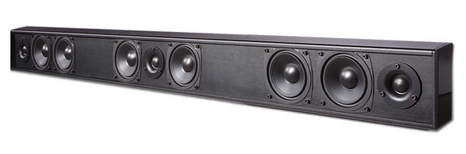 Adding a soundbar will greatly improve TV sound, particularly if you get a soundbar with a subwoofer for deep bass. 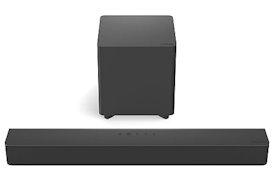 Adding great sound to your TV can be accomplished in several ways. The Sound Bar solution is one way. Optical Audio Connection The soundbar can be connected to the TV in several ways. The optical audio cable is one way. Look for a small port on the TV and the soundbar which looks like the image below: 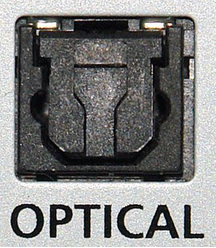 Notice there is a flat side opposite a curved side. The optical audio cable only goes in one way so orient the cable connector properly and insert one end into the TV's optical port and the other end into the soundbar's optical port.  Connect TV optical audio OUT port to the Soundbar optical audio Input port with a fiber optic audio cable sometimes called Toslink or SPDIF and select the correct source input on the soundbar. You will also need to select the correct sound output on the TV as the default is usually the TV speakers. 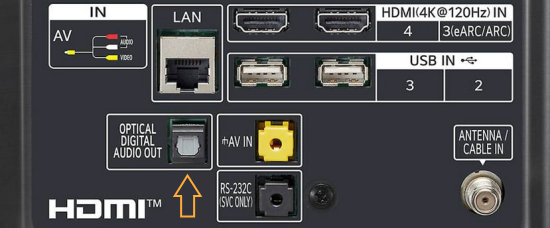 Newer TV rear panel showing optical audio output  Optical audio cable connected to TV optical audio output port  Optical audio cable  Soundbar rear ports Soundbar Ports Left to right: Power, Optical INPUT, button, 3.5mm AUX INPUT, HDMI ARC (out to TV), HDMI INPUT, USB, Network LAN RJ-45, button Get a soundbar with all the inputs you may want to connect. 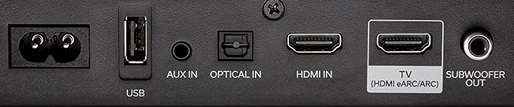 Soundbar Optical Digital Audio In port  Soundbar Optical Audio cable connected 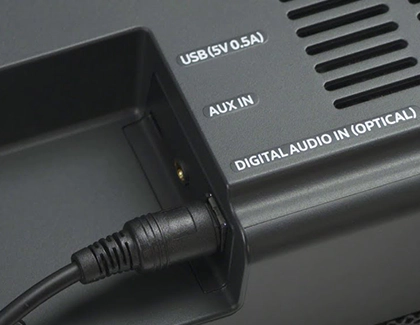 Selecting the Optical Output for sound on the TV On the TV, use the TV remote to navigate into the on-screen menu SETTINGS and change the sound output from TV Speakers to Optical Audio Out. 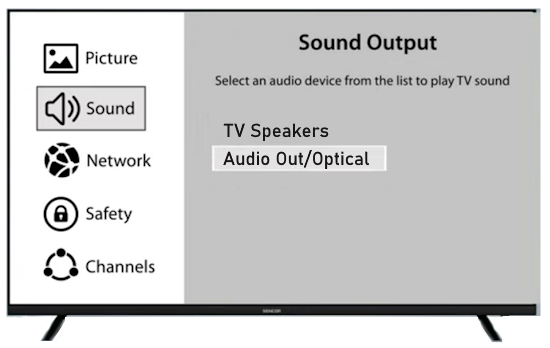 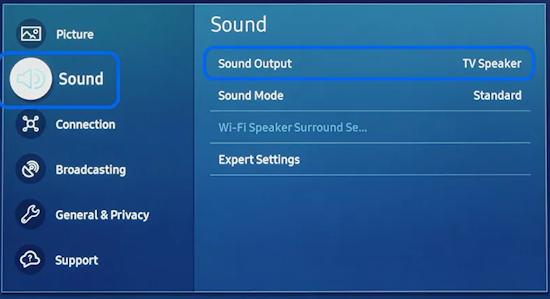 The sound output usually defaults to the TV speakers.  Switch to the Optical output so the sound goes to the soundbar speakers.  On the Soundbar, select the correct source input (optical) and adjust the volume.  A good soundbar will have a status display and have a remote control. Selecting the Audio Format For devices receiving audio from the TV, like soundbars or Audio Video Receivers, the "Digital Output Audio Format" is important if you want to get the best sound from your devices. To adjust this setting on a Samsung TV, navigate on the TV to "Settings", select "Sound", then "Expert Settings", and choose "Digital Output Audio Format". 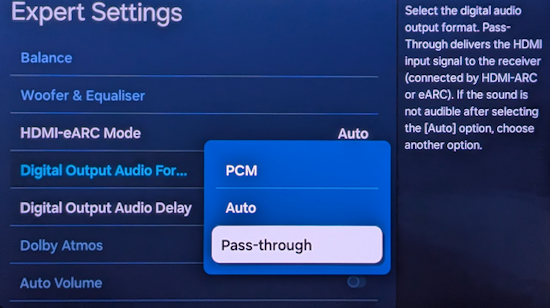 When audio pass-through is enabled, the TV simply passes the raw, digital audio stream (bitstream) to your AV receiver or soundbar. It is useful for devices that support advanced audio formats like Dolby Atmos, as your AV receiver will decode them and yield the best possible sound experience. 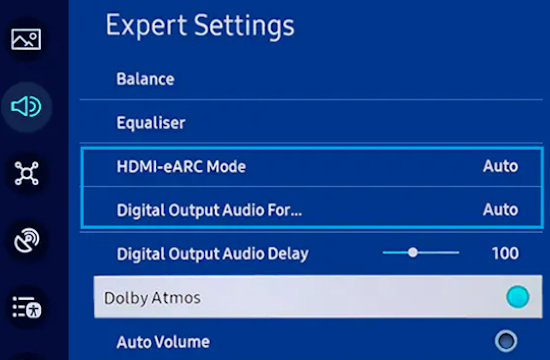 Your source (online streaming, local broadcast TV, DVD etc.) will offer various audio formats for processing. Common audio formats include PCM, Dolby Digital, Dolby Digital Plus, Dolby TrueHD, with Dolby Atmos metadata possibly available. There are many other audio formats. In addition to the TV settings, you may need to select audio settings in the streaming app to get the best sound. Your sound device must be able to handle the selected audio format. Select • PCM (Pulse Code Modulation): An uncompressed digital audio format usually offered as 2-channel stereo. • Dolby Digital: A compressed (lossy) format usually offered as 5.1 (6 channel) surround sound. • Dolby Digital Plus: A compressed (lossy) format which can support up to 7.1 (8 channels) of surround sound. This audio format is typically used by streaming services and it can contain Dolby Atmos metadata. • Auto: Many TVs offer an auto setting, which automatically selects the appropriate audio format based on the content being played. This can be convenient but may not always be the best option. Some audio formats are only supported with an HDMI cable connection and HDMI eARC capability. If you choose a format that your sound system doesn't support, you may not hear any sound. For example, if your soundbar only supports stereo, selecting a 5.1 Dolby Digital format may result in no sound or the sound system will downmix the audio and only output the left and right channels. Soundbars can cost more than your TV, particularly if you get subwoofers and satellite speakers. The choices are almost endless. All the major manufacturers offer soundbars including Samsung, Sony, Yamaha, Bose, JBL, and every brand from ROKU to Bowers & Wilkins. Soundbars can also wirelessly connect to your phone, giving you a powerful speaker for listening to the music on your mobile phone. HDMI - Video and Audio Connection 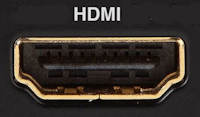 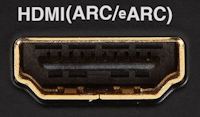 The HDMI connection on a TV, soundbar or AV Receiver is a 19 pin high capacity digital data path. The HDMI chipsets have evolved over time for faster transmission and higher data capacity. The HDMI audio return channel (ARC) is a feature which allows the TV to send audio from the TV over the same HDMI cable which receives data. There is a receiver and a transmitter in the HDMI chipset. You can view this as a one way street with a bike lane going in the opposite direction for audio. HDMI Audio Return Channel (ARC) was introduced with the HDMI 1.4 standard in 2009. It allows audio to be sent back from a TV to an A/V receiver or soundbar through the HDMI cable connection, simplifying audio connections and enabling single-remote control of devices. HDMI 2.1 introduced eARC (Enhanced Audio Return Channel) in 2017, offering higher bandwidth and support for advanced audio formats like Dolby Atmos and DTS:X. Generally, TVs made since 2019 can offer HDMI eARC. So there is two-way communication on a single HDMI cable allowing the TV to send audio to AV Receiver or soundbar. Usually only one HDMI port on the TV or soundbar or AV Receiver can perform this two-way communication and is labeled ARC or ARC/eARC. Remember, your TV must support the audio format you want to send out over the HDMI cable. 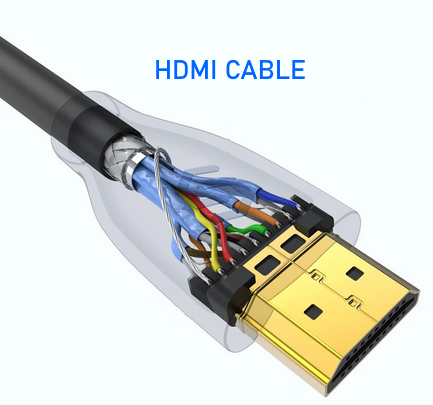 Of the 19 wires in a standard HDMI cable, only a few are used for audio return. Most are used for video signals and some for ground.   HDMI ARC uses pins 14 and 17 plus pin 13 for CEC (Consumer Electronics Control). HDMI CEC (Pin 13): This pin is used for Consumer Electronics Control, which allows devices to communicate with each other, such as turning on and off devices with a single remote. HEAC+, ARC, and HEC (Pin 14): This pin is used for several features, including the Audio Return Channel (ARC), which allows audio signals to be sent back from the TV to the soundbar or receiver, and the HDMI Ethernet Channel (HEC) for internet connectivity through the HDMI cable. Ground (Pin 17): This pin provides a ground connection for the other signals, including those related to ARC and CEC. HDMI eARC: HDMI eARC (Enhanced Audio Return Channel) uses pins 14 and 19, and the ground on pin 17, to transmit audio data. By using both 14 and 19 as opposed to ARC using only 14, eARC is able to increase bandwidth from ARC's 1 Mbps to eARC's 37 Mbps. This allows HDMI eARC to support the higher resolution audio formats. HDMI Enhanced Audio Return Channel (eARC) does not require Consumer Electronics Control (CEC) to function. Unlike HDMI ARC, which relies on CEC for device detection and communication, eARC has its own built-in detection system. This means you can use eARC without needing to activate CEC settings on your devices. However if any device in your setup does not have eARC, you may still need to enable HDMI CEC. These connections are responsible for the audio return functionality, allowing you to send sound from your TV back to your soundbar or receiver over the same HDMI connection that is delivering the video signal. My TV cannot passthrough the audio I want to my soundbar and the TV does not have eARC. What is the solution? If your soundbar has enough HDMI inputs, connect your source devices to the soundbar or AV Receiver and only send video out to the TV. This way the audio is handled by the soundbar or AV Receiver and there is no need for the TV's audio return channel. The drawback here would be if the soundbar could not send the correct high quality video out to the TV. Also, there could be some video lag. There are adapters and HDMI switches available if you need more inputs but be sure they have the audio/video standards you need. Soundbars with multiple HDMI inputs are usually high end and are priced accordingly. AV Receivers usually have plenty of HDMI inputs. For streaming services, get a streaming device instead of using the TVs apps. Apps will change over time and the TV's app store may not offer the ones you want or your TV may not support the new apps. It is much cheaper to buy a new streaming device than to buy a new TV. Do I need a specific HDMI cable for eARC? Ultra High Speed HDMI (HDMI 2.1) Cables are recommended: These cables are ideal for eARC and ensure support for all HDMI 2.1 features. They are backwards compatible, meaning they will work with older devices. Standard HDMI cables may present issues with the higher bandwidth audio formats.  HDMI ARC and HDMI eARC Audio Capabilities 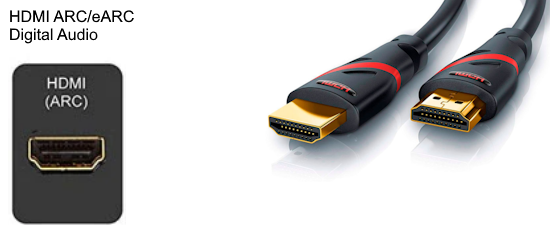 Optical cables are great for sending Dolby Digital 5.1 surround sound from device to device. However, add a newer surround sound format, like Dolby Atmos or DTS:X, and the optical connection has capacity problems. HDMI ARC, with its larger data capacity, can transmit these formats (compressed), so if you’re using your TV to stream a Dolby Atmos title, you should be able to send that signal to your compatible AV receiver or soundbar. Remember, even though HDMI ARC can transmit higher-bandwidth formats like Dolby Digital Plus with Dolby Atmos, your TV still has to support these formats. For instance, some TVs will play Dolby Atmos using their built-in speakers, but they can’t pass along that same Dolby Atmos content via their HDMI ARC connection (known as pass-through). Always pay close attention to a product’s specifications to know what it can or can’t perform. HDMI eARC improves on HDMI ARC by allowing even greater capacity for uncompressed audio such as Dolby TrueHD often found on Blu-ray movies. There are also some potential non-audio benefits to eARC. ARC requires HDMI-CEC to be enabled ie. the two work in tandem. eARC has its own built-in mechanism for device detection, which doesn’t require HDMI CEC. So while it’s still recommended to keep CEC enabled, if it’s causing you problems, it might be possible to use eARC without CEC. 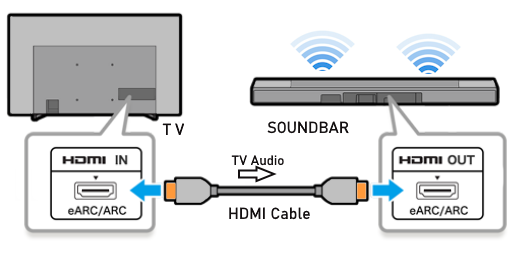 What if my TV only has HDMI ARC and not eARC? Even though newer HDMI devices are designed to be backward compatible with older HDMI devices, this is not always true of eARC. Most of the time, if you connect say, an eARC TV to an ARC soundbar, you’ll still get audio from the TV but you’ll be restricted to ARC’s lower-quality audio capabilities, but it should work. However the eARC specification does not require that eARC devices be backward compatible, so there may be some instances where it doesn’t work. If I see HDMI 2.1, can I assume eARC support? eARC is one of the features of HDMI 2.1 however manufacturers have the flexibility to choose which features of HDMI 2.1 they want to support. They can opt to include all the features, only a select few, or any combination thereof. As a result, they are still allowed to claim that their products offer HDMI 2.1, which can be quite misleading as HDMI eARC is considered an optional feature. The HDMI connection has the highest capacity for audio transmissions and can handle all the latest audio formats. Dolby Digital 5.1 (DVD), Dolby Digital Plus (Streaming), Dolby TrueHD (Blu-ray) can all be handled by HDMI.  Soundbar HDMI eARC/ARC connection  Using HDMI Soundbar With a Fire TV or ROKU HDMI TV Streaming Stick 1. Plug your TV Streaming Stick into an HDMI port on your TV (non-ARC HDMI input) 2. Connect an HDMI cable to your soundbar HDMI ARC port and the other end to the ARC/eARC HDMI port on your TV. 3. Set the input on the soundbar to HDMI. Select the HDMI input on the TV for the Stick. 4. Go to Settings on your TV Stick. 5. Select Equipment Control. 6. Select Manage Equipment and then select your TV Stick Audio. If audio doesn't automatically play on the soundbar, check the Speakers or Audio Output setting on your TV to make sure the soundbar or audio system is selected. Make sure to configure your TV's HDMI ARC and HDMI CEC settings correctly. If the TV has HDMI eARC, set to "AUTO". 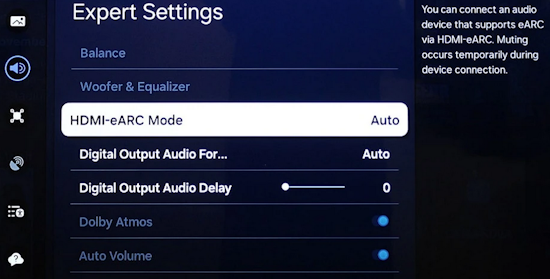 For a TV with only HDMI ARC, enable it. Samsung calls CEC "Anynet+" 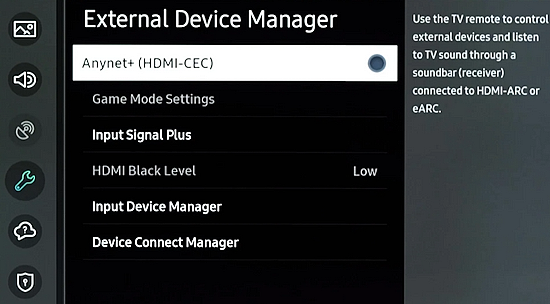 HDMI ARC - Enabling CEC Each TV maker has a different name for HDMI CEC. Samsung calls CEC, Anynet+ Go into the TV menus and turn HDMI CEC "ON" 1. Press the "Home" button on your Samsung TV remote 2. Select Settings 3. Select All Settings 4. Select Connection 5. Select External Device Manager 6. Select Anynet+ (HDMI-CEC) 7. Set Anynet+ (HDMI-CEC) to "On" 8. Connect an HDMI-ARC-CEC-compliant device to your TV  Select on the TV, the HDMI connected Soundbar for sound out POWERED SPEAKERS By adding 2 amplified speakers you can vastly improve TV sound. The speakers can be placed anywhere you think improves the sound. 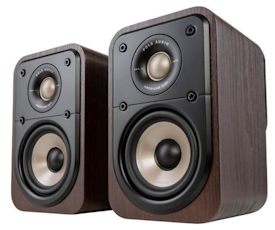  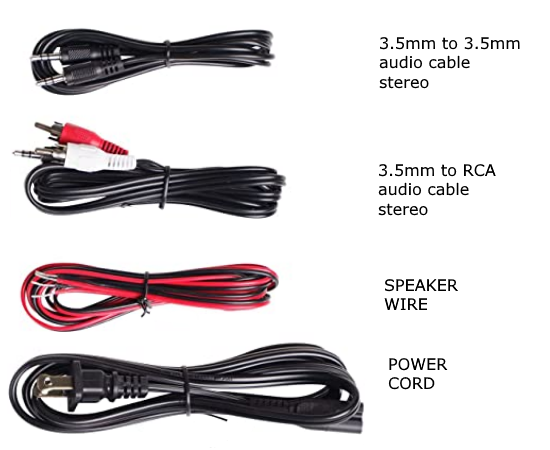 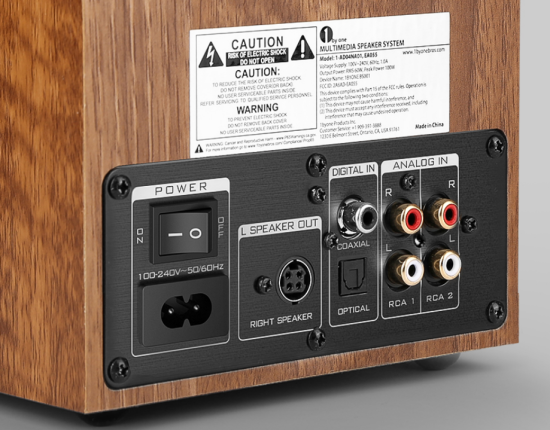 Powered speakers have an amplifier built into them, so you just connect from the TV or use Bluetooth wireless and plug them into an outlet. Powered speakers can have optical input ports for direct connection to TV. 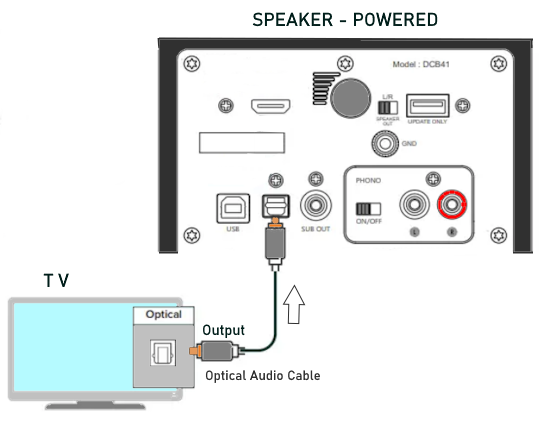 Select the input on the speaker by using the remote or by pressing the volume control knob. 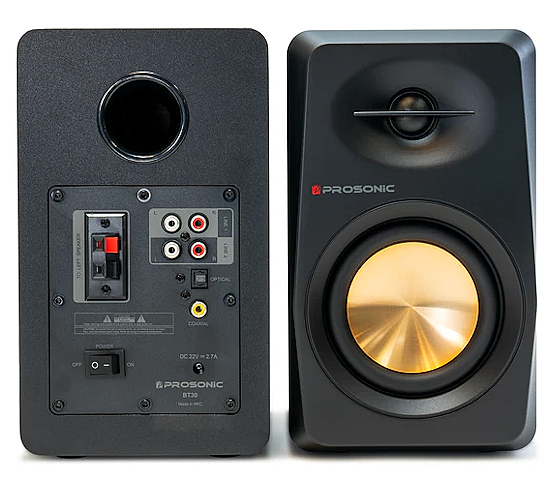 AUDIO VIDEO RECEIVER and SPEAKERS Another way to add great sound to TV is to go with a full function Audio Video Receiver and multiple speakers surround sound solution. The best way to improve TV sound is a full home theater experience with surround sound.  TV to Audio Video Receiver using optical audio cable 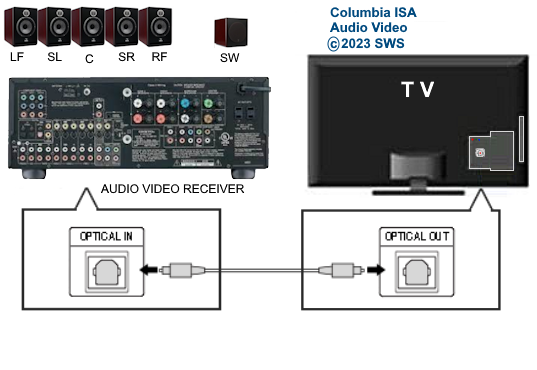 If your TV has an optical audio output, connect using an optical audio cable from the TV to an audio video receiver with an optical audio input. Switch to the correct input on the receiver. Adjust audio output settings on the TV. Optical can handle 2 channel stereo or 5.1 channel surround sound such as Dolby Digital 5.1 found on some TV broadcasts. The optical audio connection does not have the capability to handle Dolby TrueHD or Dolby Digital Plus. You need an HDMI hookup for those audio formats. HDMI connection  HDMI cable 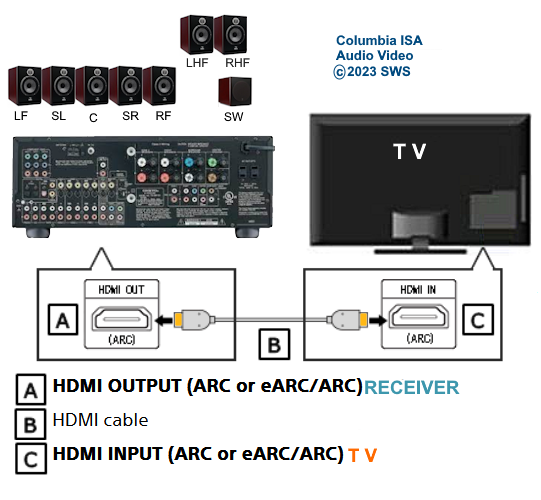 Your AVR must have HDMI ARC or HDMI eARC/ARC otherwise use optical.  Using HDMI to connect TV to a capable audio video receiver, you can enrich your listening experience for streaming video and process Dolby Digital Plus with Dolby Atmos. 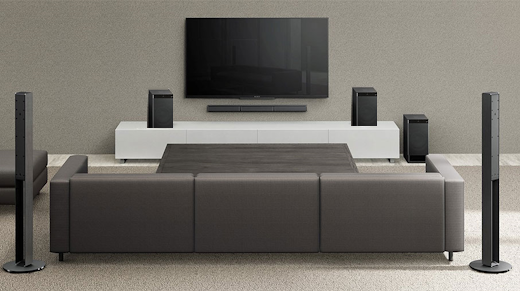 HEADPHONES Adding headphones not only gives you better sound but you can turn up the volume without disturbing others.  Analog Stereo Audio - Headphones 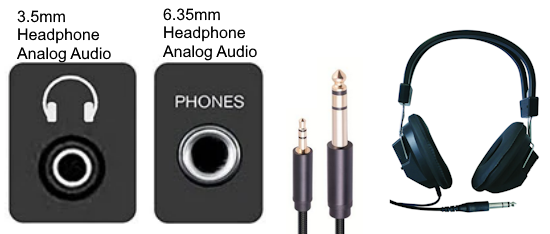 For private listening, headphones can add great TV sound while not disturbing others. • Ten ways to connect headphones for TV sound Stereo Amplifier and Speakers Another simple way to improve TV sound is to use a stereo amplifier and speakers. There are many ways to get TV sound from the TV or from source devices which send audio out. There are wired and wireless, analog and digital, stereo and surround sound available depending on what gear you have in your audio video system. Some of the more common ways to send audio include the following: Analog Stereo Audio 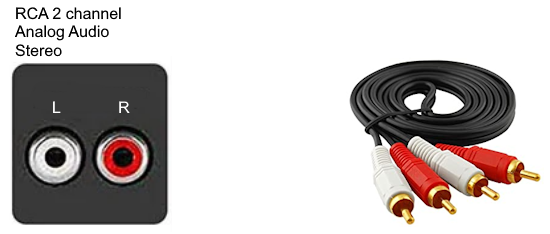 White (left channel) and red (right channel) analog audio - RCA audio cables for stereo sound. Digital Audio - Optical and RCA Coaxial 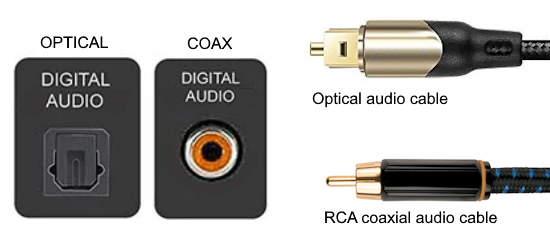 The optical or the coaxial connections can send 2 channel stereo or can send 6 channel surround sound such as Dolby Digital 5.1 TV connections for richer sound - AVR Audio Video Receiver - RCA Stereo 2-cable hookup from TV and also another option, the Optical audio cable from TV to AV Receiver 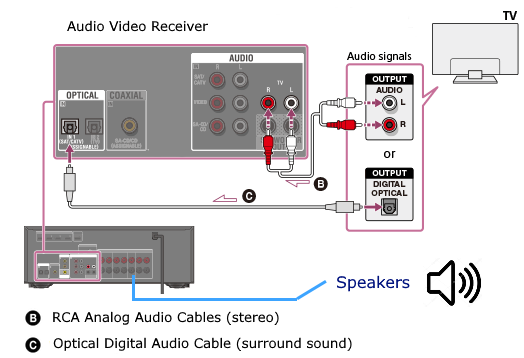 Every TV is different. Some older models may not have any audio output while some may have a white and red RCA stereo audio output. Newer TV models will have an optical audio output and some will have HDMI ARC/eARC which is the newest audio connection. 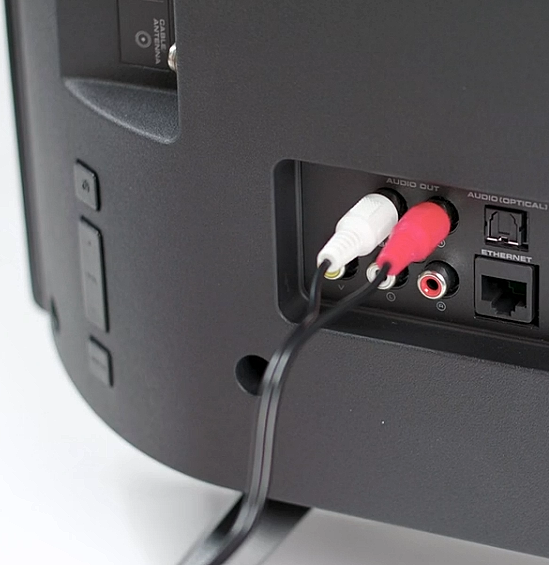 TV rear panel - analog audio out (RCA white and red) for 2 channel stereo. 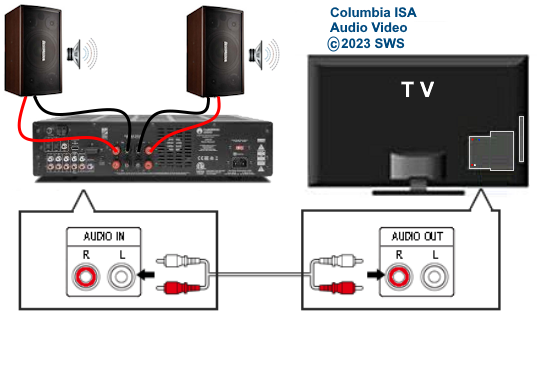 If your TV has RCA analog audio outputs, connect using the RCA white and red audio cables to the audio inputs on a stereo receiver. Select the correct input on the receiver. You may need to adjust audio/speaker settings on the TV. 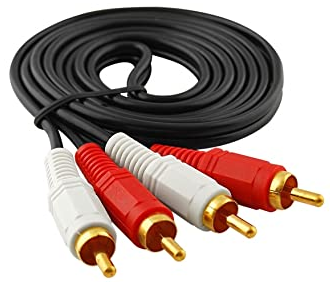 My TV only has the optical audio output. How do I hookup a stereo amp? Convert Optical to RCA analog stereo Insert one end of optical cable into TV optical output port and the other end into the optical input port on converter. Next connect white and red RCA audio cables from converter to audio inputs on stereo. Select the correct input on the stereo. 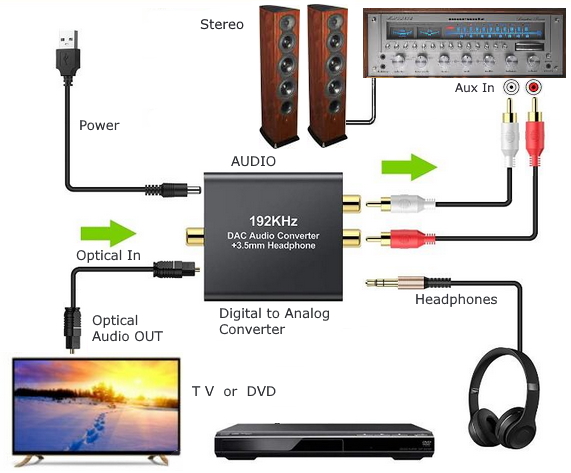 Use a DAC to convert TV optical audio output to a analog stereo input to amplifier or receiver for better sound from TV. Digital to Analog Audio Converter DAC Digital SPDIF Optical to Analog L/R RCA Converter Toslink Optical to 3.5mm Jack Adapter Older TV without any audio output 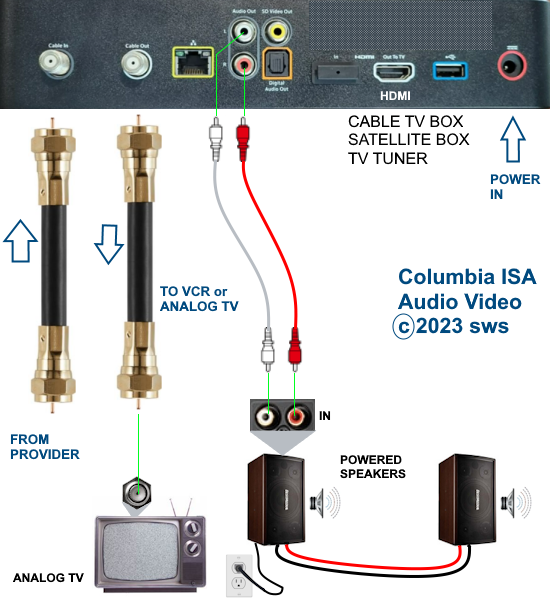 Enhance TV sound with powered speakers using RCA audio out from source device such as cable TV box, TV Tuner box. You can turn the volume all the way down on the TV and turn up the volume on the speakers. 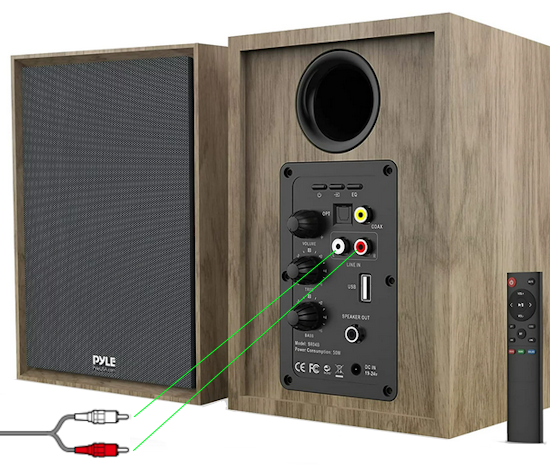 What's in the Box An active bookshelf speaker A passive bookshelf speaker US power adapter: 100-240V, DC 20V 2.5A, MAX 4.8A Remote control Battery Operated, requires 2 X AA' Batteries (Not included) Optical cable 3.5mm to RCA cable Speaker wire: 2 meters Speaker Dimensions (L X D X H): 5.9" x 6.7" x 9.4" -inches (Each) • Powered Speakers from Amazon 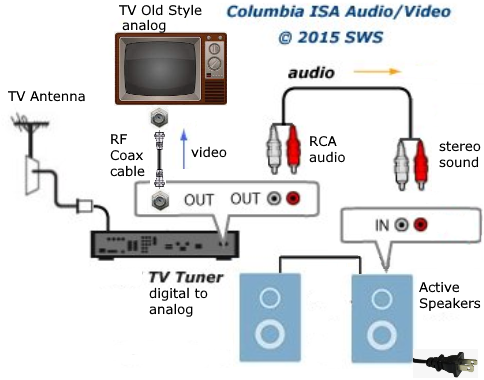 For older TV with a DTV converter box, connect RCA audio outputs (white, red) to RCA audio inputs on powered speakers or stereo.  TV Optical digital audio OUT to DAC Converter. The DAC converts digital audio to analog stereo for RCA cables to Powered Speakers. Good quality DACs will have volume control. • DAC with Volume Control from Amazon • DAC with Volume Control from Amazon  DAC with Optical IN and RCA stereo OUT TV Sound Adjustments Your TV may have audio options built-in to enhance sound without buying any additional hardware. Functions will vary from model to model. For specific information, check your TV user manual. TV sound on-screen menu options: Your TV may have sound options you can select such as: Standard: Balanced sound where no tones are emphasized, such as the voices or bass. Optimized: Specific effects are more powerful and sounds are more spacious. Amplify: Amplify mid and high tones of the sound. This is useful when voices are difficult to understand. 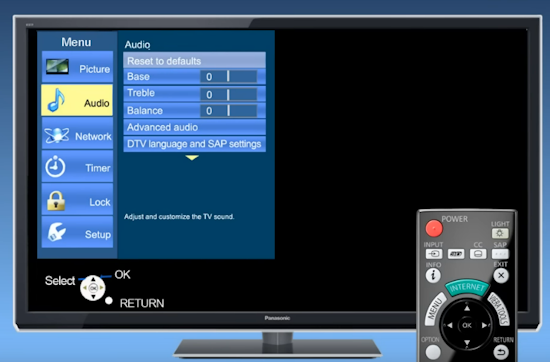 Whether you want more bass or need to adjust the balance, Sound Settings lets you adjust advanced TV sound settings. Press the Home button on your TV remote, and then navigate to Settings. Select Sound or Audio. Now you can customize the sound on your TV to make it right for you. These are some settings you may be able to adjust once you're in the Audio Settings menu: Balance: Emphasizes sound from the right or left speaker. Equalizer: Adjusts the level of low and high bands. HDMI Input Audio Format: Allows you to select your preferred audio format of the HDMI audio input. Digital Output Audio Format: Allows you to select the digital output format. The Dolby Digital + option is only available via HDMI (ARC) for external speakers that support the format. Dolby Atmos Input: Set to On if the connected speakers support Dolby Atmos. Auto Volume: Automatically adjusts volume based on your usage. Sound Feedback: Plays audio cues as you navigate through the settings and select options. Reset Sound: Resets current sound settings to defaults. Want to connect wireless speakers, Bluetooth speakers, or a soundbar to the TV? You'll just need to set the sound output. Press the Home button on your remote, and then navigate to and select Settings. Select Sound, select Sound Output, and then select the desired sound output. If the TV sound is still is not up to your desired results, you can add additional gear to really boost the sound you hear. • How to add Speakers to TV • How to connect Stereo I want to add a powered subwoofer speaker to my TV for boom boom bass. Is it possible to add a subwoofer to my TV? Yes, all you need is a DAC if your TV outputs Optical or if your TV outputs RCA analog stereo, you don't need anything except the white and red audio cables to connect. The DAC (digital to analog converter) takes the optical audio cable from the TV and outputs analog stereo. You may need to select PCM on the TV sound menu. Make sure to connect the white and red RCA cables to the LINE LEVEL INPUT (Low Level) on the subwoofer. Also the DAC will need power. Remember the subwoofer speaker will only output the low frequencies. What do I need for surround sound?  To reproduce surround sound at home, you need the following: 1) A source such as a DVD player, digital cable TV, satellite TV or digital broadcast TV, capable of either (a) passing a digital bit stream of encoded surround-sound signals to a separate decoder via an optical or digital coaxial audio output, or (b) decoding the bitstream and passing the multiple resulting analog audio signals to an amplifier. Most DVD players, digital cable TV boxes and HDTVs pass the digital bitstream for surround formats. 2) A sound system capable of multichannel reproduction. A basic 5.1-channel system (the minimum needed for the most common surround applications) consists of speakers for front left, front right, front center, surround left and surround right channels, each with a dedicated channel of amplification usually supplied by a home theater receiver, also called an Audio/Video Receiver or AVR, plus a separate subwoofer which usually has its own built-in amplifier. You must have a decoder compatible with one or more multichannel audio formats. For movie surround formats (Dolby Digital, DTS and their extended-surround variants), the decoder is typically built into the home theater receiver that supplies amplification and processing for each of the system's audio channels, but may also be built into a DVD player or added to the system via a dedicated processing device. For multichannel music (SACD and DVD-Audio), decoding must be done within the source component and the resulting audio signals passed on to the system's amplifiers via multiple analog audio outputs, usually 6 RCA audio cables. If multichannel music is a priority for you, make sure you buy either a dedicated SACD player or a DVD player with built-in SACD or DVD-Audio processing capability. For discrete multichannel audio, you'll also need surround-encoded media. All DVD discs, for example, are encoded with Dolby Digital soundtracks, but not all Dolby Digital soundtracks are multichannel. Unless a movie soundtrack was originally created with multichannel audio in mind, or remixed to accommodate multichannel playback, it will not necessarily have a surround soundtrack. Increasingly sophisticated hybrid matrix-surround technologies such as Dolby Pro Logic II, DTS Neo:6 and Dolby Pro Logic IIx can simulate the discrete multichannel experience, even with audio CDs, stereo VHS tapes and other 2-channel media. What to look for when buying a home theater receiver When buying a home theater receiver, look for high power (100 watts per channel or more is recommended), equally distributed to all channels of the system (e.g., 100 watts x 5 for a 5.1-channel system). Make sure the receiver you select includes decoders for the formats you want to use. Most modern receivers include basic Dolby Digital 5.1-channel decoding, and many include DTS 5.1 decoding as well. Extended-surround formats are backwards-compatible with 5.1-channel playback, and you can always start with a basic 5.1-channel system and upgrade with extra speakers later. Brands to look for include Pioneer, Yamaha, Sony, Denon and Onkyo. There are also all-in-one systems called "Home Theater in-a-box" or HTIB. Included are AM/FM, DVD/Blu-ray and 6 speakers. • Learn more about HTIB here. Home Theater Receiver › Features to look for: AM/FM reception Satellite radio reception Video conversion - analog video upscaled and sent over HDMI Video conversion allows composite video and component video input signals to be converted to HDMI, then all video sources are routed to the TV using one HDMI cable Lip Synch - ability to match (delay) sound with picture Audio Delay: You can delay the sound output up to 240ms to synchronize it with the video image. Multiple HDMI Inputs and HDMI Output (HDMI 1.3) Dolby Digital decoding, DTS decoding Analog 6 to 8 RCA audio Inputs for already decoded audio such as from SACD or DVD-Audio Phono Input for turntable Assignable input and output jacks Optical digital audio inputs Digital Coaxial audio inputs Media Docks such as for iPod Speaker level adjustments for each speaker Sleep Timer Headphone jack Multi-function Remote control Auto-Setup Subwoofer OUT 5-way speaker binding posts Inputs for DVD, CD, TV, DVR, Game, converter box Acoustic Optimizer - automatically adjusts the output of the speakers based on placement, performance, and the room's acoustic characteristics 192kHz/24-bit digital-to-analog converters for all channels On-screen Display Dual Zone Capability Bluetooth wireless capability for streaming audio Next-Generation SURROUND SOUND capability: * Dolby TrueHD: a lossless coding technology that supports up to 8 channels of multi-channel surround sound for the next generation optical discs; the reproduced sound is true to the original source bit-for-bit * Dolby Digital Plus: developed as an extension to Dolby Digital, the coding technology supports 7.1 discrete channels * DTS-HD Master Audio: an advanced lossless technology that delivers sound that is bit-for-bit identical to the studio master, offering a high-definition home theater experience * DTS-HD High Resolution Audio: high resolution audio, virtually indistinguishable from the original audio track Dynamic Range Control: The amount of dynamic range compression applied to bitstream signals; Min/Auto is suitable for low volume listening, Standard is typical for home use, and Max doesn't compress the dynamic range at all. HDMI Through: When the Receiver is in standby mode (power off), the HDMI Through feature allows HDMI source signals to pass through the receiver to the TV. The HDMI input must be selected before the unit is turned off. LOUDSPEAKERS Your speaker complement should ideally be "voice-matched," meaning that all the speakers in the system exhibit similar performance with regard to frequency response, sensitivity and overall tonal character. The easiest way to ensure voice-matching is to buy all your speakers at once and confine your choices to a single manufacturer. If you're fond of your current stereo speakers and wish to augment your existing system to accommodate surround sound, you're probably best off adding speakers by the same manufacturer to ensure the greatest tonal compatibility. CABLES You will need connecting cables for the video and audio to get from source components to the receiver and to a TV. These include HDMI cables, composite and component video, digital audio and also speaker wires. Visit this Cable Guide for an overview of common audio and video cable interconnects. Home Theater Receivers You can buy a good Audio/Video Receiver with Dolby Digital 5.1 decoding capability and HDMI for around $200 - $300. Examples include the following: Pioneer - 550W 5.1-Ch. Home Theater Receiver Model: VSX-519V-K with HDMI Price:$209.99 Yamaha - 525W 5.1-Ch. A/V Home Theater Receiver Model: RX-V465 Price:$329.99 How do I connect the components? CONNECTIONS You can connect your Cable or satellite TV receiver box, DVD player, Blu-ray player, TV and other sources using the optical, digital coaxial or HDMI outputs on the rear of the devices. Typically for Dolby Digital 5.1 you will use the optical output on a TV and this will pass the bitstream to the Audio/Video receiver using an optical audio cable to the optical audio input jack of the AVR. The AVR decodes the bitstream, amplifies the sound and sends to the speakers. TV DIGITAL AUDIO OUT (OPTICAL) Connects to a Digital Audio component such as a Home theater receiver. When a Digital Audio System is connected to the DIGITAL AUDIO OUT (OPTICAL) jack: Decrease the volume of the TV and adjust the volume level with the system’s volume control. 5.1 channel audio is possible when the HDTV is connected to an external device supporting 5.1 channels. When the Home Theater receiver is set to On, you can hear sound output from the TV’s Optical jack. When the TV is displaying a DTV(air) signal, the HDTV will send out 5.1 channel sound to the Home theater receiver. When the source is a digital component such as a DVD / Blu-ray player / Cable Box / Satellite receiver (Set-Top Box) and is connected to the TV via HDMI, only 2 channel sound will be heard from the Home Theater receiver. If you want to hear 5.1 channel audio, connect the digital audio out jack on DVD / Blu-ray player / Cable Box / Satellite receiver (Set-Top Box) directly to your Home Theater Receiver, not the HDTV. • See over 100 Hookup Diagrams • RF Modulators and DVD Connections. More options for video and audio connections. • Surround Sound • Camcorder Formats • HDMI Switch box • VCR Basics • HDTV • How to connect DVD player in 10 easy steps • HDTV Basic Setup How do I hookup my DVD player using component video? How do I setup my DVD player for surround sound? How do I hookup my DVD player with DVI or HDMI connections? COLUMBIA ISA Empowering consumers through information. Contact: columbiaisa@yahoo.com |