|
|
|
HDTV BASIC SETUP How to setup a SMART TV Step by Step |
 • How to Navigate On-Screen TV Menus and Options Using the TV Remote to navigate 1. When you get the TV home, open the box and carefully remove the packing material. Remove the TV, stand, remote control and power cord from the box. If the TV is a bigger screen than one person can handle, be sure to get another person to help. 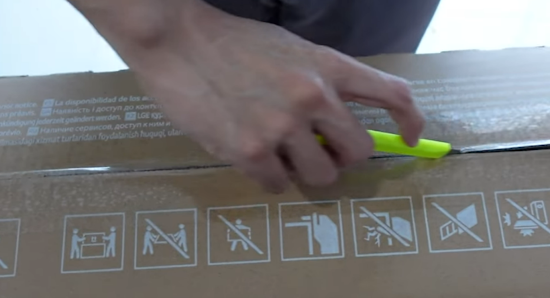 Sometimes laying the box on its side can assist in removing the TV. Carefully lay the TV down in such a way so that the stand can be attached. Some larger screens have pull tabs towards the bottom so that the box can be lifted off, making the TV itself more available for easier removal. 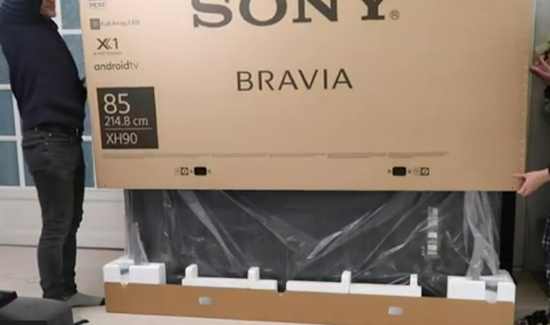 2. Next you will attach the TV stand or if wall mounting, follow the set of instructions available online or in the TV manual. You may need two people if the TV is large. 3. Next, find the TV remote and TV power cord. Install good batteries into the TV remote. 4. Plug the TV into nearby wall outlet.  5. Press the POWER button on the TV remote. 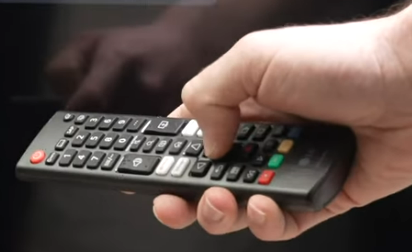 When the TV is first powered on, some setup steps that are usually performed are: 1. Select your language. (English) 2. Choose your viewing country. (USA) 3. Select the type of use. (Home) 4. Connect cable TV receiver and/or antenna to your TV. 5. Channels of the signal source (cable or antenna) connected in step 4 are scanned and detected. 6. Set the current date and time. 7. If your TV is connected to a wired LAN or wireless LAN (WiFi), perform the network settings and connect to internet. Select the network you want for wireless to connect and enter the network password. Wait a few seconds and it should connect. If not, check password, relocate router or use a wired ethernet connection. 8. Performing a software update is usually the first step after connecting to the internet. If your TV is connected to a network, it is recommended to set to automatically download future available firmware. |
For Wi-Fi setup you need to know the name of your network (SSID) and your network password. Every TV is different in exactly the steps to perform to setup or later change your setup but generally the steps are as follows: 1. Press the HOME or MENU button on the TV remote 2. Navigate to SETTINGS (some TVs use arrow keys on remote and OK or ENTER to select) 3. Under settings you usually have a number of options including PICTURE, SOUND, SYSTEM, GENERAL, SUPPORT 4. Navigate to the item you want and select. You may have to go into additional sub-menus to get to the area you want to change. 5. Each area usually has options to select, for example NETWORK, you can select WIRED or WIRELESS and then setup the details. It is important to note that you do not need to complete every initial setup selection upon first powering up the TV. Many of the required options can be setup at a later time. Often you can simply SKIP the task and set it up later by going into the TV menus and selecting an option. For example you may do a channel scan at a later time. Often you do not have to feel rushed to decide right away which option to select as it may be done later. A factory reset can take you back to the beginning and you can start all over. Some TV makers will run you through screens that will ask about terms and agreements. Be careful to only agree to the items you want. Uncheck any items you do not want before agreeing. User Accounts: Some TV makers want you to create a user account with them. This is not required except to perform certain actions such as downloading apps from their app store or using voice commands. Once you connect to internet, much of what you do on the TV is being tracked. The information is then sometimes sold to third-party advertisers. Connect devices: For any external devices such as Bluray/DVD player, streaming media player or TV antenna, connect cables to HDMI inputs or for the antenna, the threaded silver port using an RG-6 coax cable. Use the HOME button, the SETTINGS button along with the navigation buttons, left arrow, right arrow, and the RETURN button to select input sources such as DVD player, watch live TV, view apps, select sound outputs. The volume button and the channel UP/DOWN button are handy for viewing shows. There is often a GUIDE button to view channel information. • Samsung Smart TV How To Setup • LG Smart TV How To Setup • VIZIO Smart TV How To Setup • Samsung Smart TV - Install Apps Installing an app on your LG TV. Connect to the internet, press the HOME button on the TV remote. Navigate to the App icon, open the built-in app store using your remote, search for the app you want, and install it. 1. Connect to the Internet Ensure your LG TV is connected to Wi-Fi or a wired internet connection via your TV’s Settings > Network or General Setup. 2. Open the LG Content Store Press the Home button on your LG Remote to bring up the main menu. Navigate to the Apps icon. (Depending on your TV's webOS version, this may be on the bottom menu bar by scrolling all the way to the left, or on the main home screen tile). Click on Apps to open the LG Content Store. 3. Find and Install the App Browse: You can scroll through categories like Entertainment, Games, or Life & Education. Search: If you are looking for a specific app (e.g., Netflix, Hulu), click the magnifying glass (Search) icon at the top right of the screen and type the name using the on-screen keyboard. Download: Select the app you want and click on "Install". Sign In: You may be prompted to sign in to your LG account or create one. You can use your phone to scan a QR code on the screen for a fast login. 4. Launch Your App Once the download is complete, the app will be added to your app list and appear as a widget on your home screen for easy access. Select it to begin running the app. • Netflix not working - How to Fix Q: Must I have Internet Service for my Smart TV? A: No, you do not need internet to enjoy basic TV viewing from over-the-air local TV stations or your Bluray or DVD player or viewing images from a USB drive. You can connect the TV sound output to a soundbar or A/V Receiver for surround sound. Internet is required for voice commands, on demand streaming service from providers, downloading apps, downloading software updates, viewing internet TV channels. HDTV Wiring Diagram You have finally taken the Smart TV plunge. Now, how do you setup your TV? First some basics. High Definition is always digital but digital TV is not always High Definition. In fact High Definition is only a very few of the 18 digital TV formats. TV stations and cable TV providers can send out digital TV signals that are not High Definition. There are some High Definition only channels and there are a lot of High Definition shows but by no means is all digital TV "High Definition". What is HDTV? High Definition TV or HDTV means a digital television signal of 720p, 1080i, 1080p, 4K (UHD), 8K or higher resolution displayed on a digital TV capable of processing at least 720p resolution. The HDTV must have HDMI or Component video input connections and usually has S-Video and Composite video inputs for lower resolution sources such as VCR, DVD player or Game Consoles. HDTV display technologies TV display technologies today are OLED, LED, LCD flat panel, or even CRT with even newer display technology available soon such as Micro-LED and Organic LED screens. HDTVs are widescreen with a 16x9 aspect ratio instead of the squarish 4x3 aspect ratio of older analog TVs. OLED display panels are typically 50 inch screen sizes and larger while LCD run from 32 inches (some smaller) up to typically 46 inches. Makers include LG, Sony, Samsung, Panasonic, Hisense, Vizio, Sharp and more. Better Audio as well as Sharper Video Part of the digital TV standard involves enhanced audio as well as the sharper video picture. Dolby Digital 5.1 Surround Sound can be included with a TV show broadcast. Depending on where your tuner/decoder is located, this 6-channel audio can be fed to loudspeakers to give you a richer sound experience. Hookup your DVD player as well to a compatible Audio/Video Receiver and surround yourself with multi-channel realism. The big screen TV, surround sound audio setup and DVD player all combine to create a home theater. SETUP What you should know about HDTV Picture Quality Your actual picture quality will be limited to the format that the broadcaster chooses. Some broadcasters, rather than broadcasting in high definition, will send out their standard television signals in digital format, and this is known as "Standard Definition Television" (SDTV), which is limited to 480 interlaced lines of resolution or about half that of High Definition. Other broadcasters may choose the middle format known as "Enhanced Definition Television" (EDTV), which delivers 480 progressive lines of resolution. Our older analog TV broadcasts by comparison are about 330 lines of resolution. A VHS tape from our VCR is about 250 lines. HDTV Connections You may be familiar with standard connections to your TV, such as from your VCR, DVD player or game console. These include, from worst to best, coaxial cable connection, composite video (RCA Type), S-Video and Component Video cable connections. 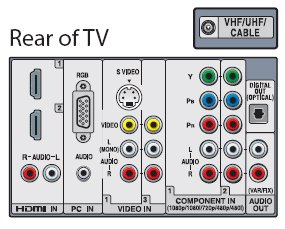
HDTV rear panel inputs and outputs With HDTV sources, you will need to become familiar with some new digital cable connections that you may not have seen before. The different digital connections may not be supported by your television or HDTV decoder. You should check the manual or the rear of your HDTV set or tuner to determine what connections are supported. Many of the digital connections allow copy protection capability to prevent recording. Over-the-Air Broadcast TV Local TV is available in the city and your HDTV has a digital tuner to receive the broadcasts. All you need is an antenna to pick up the signals. Most TV stations are on the UHF band. An indoor antenna is all you need if your TV stations are strong enough and you are close to them (within 20 miles). An outdoor antenna may be required for weak stations or if you are far from them. Connect the antenna to the coax input on the TV. Do a channel scan to setup the available TV channels. 
• How to Auto Program (scan) TV channels VGA VGA connections, also known as D-Sub-15, have been around for many years in the computer world and also separate the video stream into its red, green and blue elements. The 15 pin VGA connector is used to link a personal computer with its monitor. Many HDTVs today support VGA for PC connections. 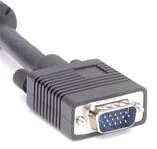 VGA cable Component Video The component video connection is the most common way to connect HDTV set top boxes and HDTV cable or satellite decoders to high definition televisions. Component video separates the video signal into 3 distinct streams (red, green and blue), in which the video signal is carried via three individual cables using RCA type jack connections. There are two types of component video, Y,Cr,Cb (normal interlaced DVD players) and Y,Pr,Pb (Progressive scan DVD players, HDTV decoders and DTV inputs on televisions). Separating the video stream prevents color bleed through and delivers a dramatic increase in picture quality compared to composite video where the red, green and blue segments are compressed together into a single channel. Requires separate audio connections. 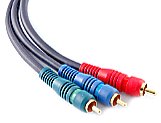 Component Video cables HDMI High Definition Multimedia Interface (HDMI) is the new connector on the block and is the successor to DVI. It began appearing on new HDTV sets in late 2003. HDMI, unlike DVI, which can only pass video, is capable of passing both video and also multi channel audio (8 channels). Also, the video portion is compatible with DVI devices if they are HDCP enabled. The digital connection is also smaller than DVI. Eventually HDMI connections will replace DVI on HDTV sets. HDMI is evolving and has undergone several revisions. HDMI 1.0, 1.1, 1.2 and 1.3 can be found on various hardware. The latest version, 2.1, is needed for the very best high end audio found on some Blu-ray and HD-DVD movies. HDMI has all the capability required currently for the highest quality video and audio plus future expansion. 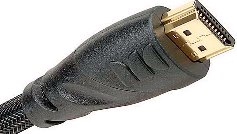  HDMI cable Connections 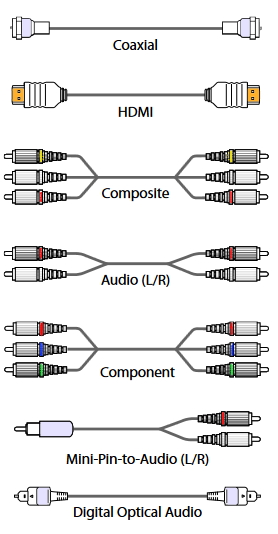 DVD Player hookup to TV with HDMI. 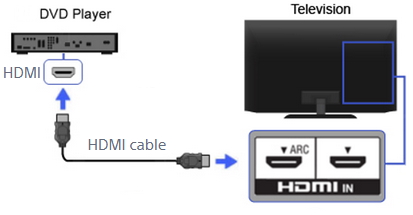 Remember to select the HDMI input for the DVD using the TV remote. How you connect your AV components to your HDTV is an important consideration. If you have HDMI available, use that. If you only have component video, use that plus an audio hookup. Composite video or S-Video will not work for HD video. Some people opt to connect their multimedia devices to their TV through their audio/video receiver so as to allow the receiver to switch between video sources. For high definition applications however, you will need to consult your receivers documentation to see if it supports high bandwidth video connections. Your manual should refer to this as "wide-bandwidth", "HDTV compatible" or "wideband". If your receiver is more than a few years old, it is likely that it does not support wideband video and you will not want to connect it in this manner or you will be restricting the video resolution which reaches your television. Also ensure any additional cables, splitters and other devices are capable of handling the full HDTV bandwidth. A bandwidth of at least 110 MHZ is required to carry HDTV signals through it without degradation. Audio Considerations You should also consider your systems audio capability. Since many HDTV and other DTV formats broadcast audio in Dolby Digital 5.1 (AC-3) or other 5.1 digital surround formats (DTS), you may wish to invest in an external receiver which is capable of decoding this audio format. At the very least, you will want a receiver or television capable of decoding Dolby Pro-logic, otherwise you will be missing out on the outstanding sound fidelity that HDTV can deliver. Most quality mid range to high end audio/video receivers support both Dolby Digital 5.1 as well as DTS and Dolby Pro-logic. Having all 3 standards is important so you can receive full audio benefit with other media devices such as DVD's, which sometimes use DTS instead of Dolby Digital. Most HDTV displays will have built-in stereo speakers but some do not. You could use your stereo receiver and stereo loudspeakers for a richer sound experience. If you want surround sound like Dolby Digital 5.1 which uses six loudspeakers, you will need a Audio/Video Receiver capable of decoding Dolby Digital 5.1 and/or DTS 5.1 plus the six speakers. You will connect a digital audio cable, either optical or coaxial, from the HDTV or decoder box to the A/V Receiver where the sound will be decoded, amplified and routed to the appropriate loudspeaker. Stereo Audio Hookup to Stereo Receiver 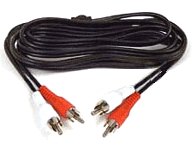 The left (white) and right (red) audio channels for 2-channel stereo sound connects to the AUX input jacks on your stereo receiver. Surround Sound Audio  Add four more loudspeakers for surround sound. Connect from cable box/satellite box digital audio OUT to A/V Receiver digital audio IN. 
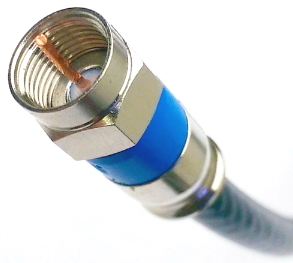
 Optical digital audio cable and jack. Cable carries digital audio bitstream to A/V Receiver. Optical cables use light instead of electricity to send audio signals digitally. By varying the brightness of the light, the 1's and 0's are sent as a bitstream to be decoded by the receiver, amplified and sent out over copper wires to the loudspeakers. These cables cost around $15 and can be found at Radio Shack or Best Buy or online. Google Search for optical audio cable. HDTV Setup Basic HDTV Setup Includes: • Unpacking of TV from box. • Assembly of attachable base and TV stand assembly if purchased. • Placement of TV on stand or entertainment unit. (Wall mounting of flat-panel HDTV is not part of a basic install) • Programming of universal remote if purchased. • Integration of new TV into pre-existing audio/video home theater system, surface routed. • Connection of system to AC outlet, surface routing. • Clean up of debris after setup. • Review the basic functions of the TV from owner's manual. HDTV Hookup Cables (HDMI, component video, composite video/audio). Components include: TV, VCR, DVD, DVR, Video Game Unit, Audio Receiver, Amplifier, CD Player, CD Recorder, Audio Tape Deck, Mini-Disc Player, Home Theater System (six speakers). For professional installation: If you do not want to setup your HDTV yourself, you can call a BEST BUY retail store in your area to setup an appointment for technicians to come out to your home and install the HDTV for you. The cost ranges from around $99.99 to around $399.99 depending on how much work you want done. You can also contact INSTALLS inc, LLC Customer Service Center at 1-800-344-4856 to setup an appointment. A basic installation typically takes 2 hours or less. Getting to know your HDTV: Your first step is to determine, from your TV manual, if your set's native resolution is 720 lines progressive or 1080 lines interlaced or 1080 lines progressive. Most HDTV sets come with a number of audio/video inputs allowing you to connect your decoder in addition to your DVD player, satellite and other media devices. The television's video/input button allows you to toggle between different sources. For most people, the component video connection combined with the digital audio coaxial or optical TOSLink cable works very well. You can also use one of the alternate methods such as HDMI if they are supported by both your television and set top box. If you also have an audio receiver, you will want to connect this to your HD set top box as well. If your box supports more than one set of audio outputs, you likely will want one set going directly to your television, and another set going to your audio receiver. In this fashion, you will be able to listen to audio through both your television speakers and also through your audio receiver. This is handy if you don't want to have to turn on your audio receiver everytime you want to watch television. Setup your set top box to match your native HDTV video mode, 720 lines progressive, 1080 line interlaced or 1080 progressive. Some set top boxes have a switch located in the back of the unit and others have a on-screen menu setting which performs this function. Now you must setup your high definition television for the first time. You should consult your operating manual as most sets have an on-screen menu which can assist you with this task. This allows you to configure the connections that you are using as well as tuning the television for off air reception, audio connections and more. It should also be calibrated as well for correct color, contrast, brightness and other critical settings. There are some calibration DVD's available from retailers. HDTV makers each use their own on-screen menu formats so they will all look different and usually will not have the exact same functions, but all will provide the basic owner setup functions such as the following: • Initial Setup (including Language selection) • Clock/Timers (Sleep) • Picture adjustments (brightness) • Sound adjustments (volume) • Video Options (aspect ratio) • Audio Options (speakers, external) • Channel Setup (Air, Cable, Auto) • Parental Lock • HDMI Settings • General Use the TV remote control to navigate the on screen menus. The arrow keys (left, right, up, down) and the Enter or Select key should be all you need to move around and select the option you want. Check that the aspect ratio is set to 16:9 preferred, or "full screen mode" on your television, set top box and DVD player. If a broadcast is not available in 16:9 it will automatically revert to 4:3. Most recent mid range to high end televisions also now have the capability to "zoom in" or "stretch" a 4:3 ratio broadcast to fill most of a wide screen picture, although there will be a noticable picture distortion or loss of some top and bottom details with 4:3 broadcasts. If you are using an over-the-air HDTV tuner/decoder, you will now want to setup the decoder for your antenna. Most decoders have an on-screen digital signal meter where you can adjust your antenna for optimum signal strength. Remember, unlike an analog signal which can deliver a "snowy picture" in fringe area, with digital you either will receive a signal or you won't, however homes in rural areas will require a larger outdoor antenna to receive an adequate signal. Off air HDTV signals utilize the UHF band, which is much more limited in range than VHF, so you will need an antenna with a good UHF range. For those who receive free over-the-air HDTV signals, you will need a good antenna. If you live in a large city and the local TV stations broadcast towers are close to your house, you may be able to use an indoor UHF antenna. Otherwise you will need an outdoor UHF antenna typically mounted on your roof. Winegard and Channel Master are two of the better known antenna makers although Radio Shack may provide you with a suitable antenna. Expect to pay between $35 and $95 for a good UHF antenna. Check AntennaWeb.org for antenna and TV station information for your area. You can hookup both your antenna for over-the-air HDTV and your pay TV provider (satellite and/or cable) so that you may be able to get your local channels over the air if your cable TV or satellite TV goes out. Use an AB switch to connect the coax cables. Some HDTVs have two RF connections, so those can use direct connections without the need for a switch. Be sure to select CABLE ON/OFF in your TV MENU when switching to antenna and execute AUTO CHANNEL SET so that you can change channels with the UP/DOWN button on the remote. A manual switch costs about $3.00 while a remote controlled AB switch can go for $40.00. Radio Shack has a remote controlled AB switch Model: 15-1968 Catalog #: 15-1968. 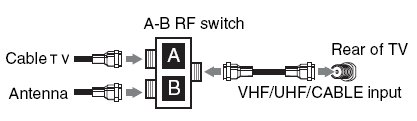
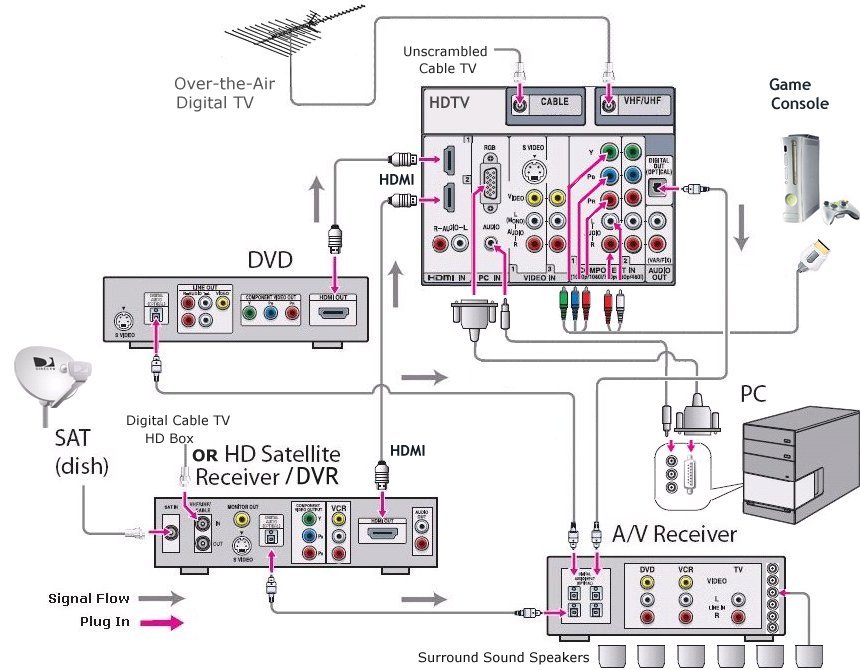
Where to put the HDTV Proper placement of your television is also important as well, especially if you have purchased a rear projection screen television where viewing angle is critical. You will generally want to match the screen size to the size of the room. A general rule of thumb for determining a comfortable viewing distance is 2x the diagonal screen size, so for a 40" television, a good viewing distance is about 6 1/2 feet from the television. The exception to this is for front projection televisions, which should be about 1 1/2x the screen size. You will also want to determine how room lighting will affect your viewing. Projection screen televisions are far more easily "washed out" by sunlight than direct-view televisions, so you will want to make sure you can close the curtains or blinds to reduce this in bright sunlight conditions. As well, lamps and lights should not reflect on the screen during night viewing, situate lamps away from the viewing screen to maximize viewing enjoyment. HDTV Recording Considerations Recording high definition broadcasts is also an important consideration, since they cannot be recorded via conventional means such as a standard VCR and still get HD resolution. Some HD cable TV decoders have the capability to record High Definition broadcasts using a built-in hard disk. Some satellite TV decoders also have the capability to do this. In addition, DVR manufacturers such as Tivo have HDTV compatible models to record HD video. There are also stand-alone DVRs with built-in GigaByte hard drive. It is important to remember however that the high bandwidth nature of high definition broadcasts will significantly reduce your recording capacity as they consume many times the amount of storage space compared to standard broadcasts. Another method of recording HDTV broadcasts is over a FireWire/IEEE 1394/iLink connection if your Set top box supports it. Some unsupported HDTV satellite decoders can be upgraded with FireWire capability. In order to record over the FireWire connection, you will also need a digital VCR (D-VHS), which can also playback broadcasts over the connection. Digital VCR's are also capable of playing and recording analog sources such as regular VHS tapes. If you lack HDTV capable DVR or D-VHS/FireWire connection, you can also record a down-converted version of the HDTV broadcast over the analog S-Video/composite audio/video connections. This would allow you to make use of your analog VCR or Tivo or other DVR device. The broadcast will be in either Enhanced Definition Television format (EDTV), or the Standard Definition format (SDTV), which is limited to 480 lines of resolution, delivering near DVD quality. High Definition TV from Satellite / Cable TV 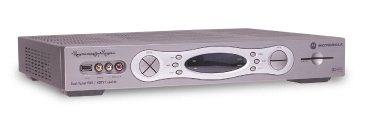 HD programming is available from local Cable TV and DBS Satellite TV providers for major metro areas. You will get a decoder/tuner set-top-box from your provider because their signals are typically scrambled and the box will decode them for your TV. The input signal is fed in to the set-top-box by a coaxial (RG-6) RF type cable from your satellite dish antenna or from a wall outlet hooked up to your cable TV provider. For HD TV shows when available, you will need to connect the box to the HDTV with HDMI or component video cables. The set-top-box will need to be setup for HD resolution such as 720p, 1080i, 1080p so consult your owner's manual for instructions on how to do this. Motorola for example, supplies many cable TV set-top-boxes for local Cable TV and one example of accessing the main menu for setup is to plug the box in to the wall power but have the box turned OFF. Then press the MENU button on the front panel of the box. With your HDTV turned ON, you should see a menu on-screen. If not, try connecting a yellow video cable from the box to the HDTV and try again. Depending on which cable connections you hooked up, the box may default to a matching setting possibly giving you a blank screen so try different combinations. Most boxes show you the video resolution number on the front panel. Some boxes have a setup wizard which will walk you thru the setup process. Sometimes you can call your provider for help in setting up the set-top-box. Currently there are many High-Def TV shows but there are also many TV shows that are not in High Definition and you will see the difference on your HDTV. Non-HD shows will not look as sharp as HD shows. • Cable TV set-top-box setup • Cable TV set-top-box hookup • Cable TV hookup diagrams, cables See also: • Plasma TVs - top ten things before buying HDTV • PC stereo hookup • VCR Recording • Hookup Diagrams • TV input select • Timer Record Radio Shows on a VCR • Camcorder hookup to TV, DVD • Audio Video Connections • Video Cables Connections • See over 100 Hookup Diagrams • HDTV Cables and connections HDTV Wiring Diagram DIAGRAM HDTV setup Columbia ISA Audio Video Empowering consumers through information columbiaisa@yahoo.com |