|
How to wall mount
a
flat-panel TV
TV Installation Guide
• HDTV
BUYING GUIDE
• More Wall
Mounts information for TV
Installing
a OLED or LCD TV Wall Mount
Flat
panel LCD, LED and OLED TV Instructions
Guide to a wall mounted
or hanging flat panel TV
You just bought that new TV with the flat panel design and big
screen. Now you want to hang the TV on a wall. Well, yes you can do
that, but you need to think about this project before you start
drilling holes in your wall.
First you should select your mount. With
some TV models, the manufacturer will offer a specific mount for your
set. Plan on spending at least $150 to $300 for the mount, remember
it’s holding up your very expensive TV. Go to www.omnimount.com
for a mount selection guide for specific TV models by brand.
You want your HDTV flat panel screen to be VESA mount compliant. This
means the back of your display panel will have standard spaced mounting
holes available for a matching mount and brackets. Two vertical
brackets will attach with screws to the back of the TV. The brackets
will attach to a metal wall plate which will be bolted thru your wall
to your wall studs. The studs will provide the support for the TV. You
can also mount to concrete blocks or brick walls.
Now select the right position. This will be decided by the room shape
or the room size, location of wall studs, lighting, glare, viewing
angles and person preference of viewing position.
After you have selected the final location, try a test run with two
people holding the TV set in a possible mount position. It looks great
there, but only one problem, the dangling cables. You can cut a hole
behind the TV screen and snake the wires through the wall, and out
another hole by your A/V equipment such as DVD player. Many building
codes forbid running power cables inside a wall, so you may want to
consider getting an electrician to install an AC outlet behind the TV
set.
Remember to plug in all your cables before you mount the HDTV, because
once it is up there on the wall you don’t want to have to
take it down just to plug in some more cables. Buy and connect as many
cables as you can before you mount the set, even if you don’t
plan to use them at the time, this will make adding new devices much
easier in the future. Consider HDMI cables as this connection will
"future proof" your setup for awhile.
Give yourself plenty of time when installing. If you are not sure about
anything, get a professional to do it for you.
• More Wall
Mounts information for TV
Mount Types for Flat Panel TV
|
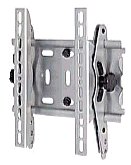
| Flat/Non-Tilting
Wall Mount for 32 to 50 inch Flat Panel TV. The TV remains in
a fixed position on the wall. |
| Tilting
Wall Mount for 32 to 50 inch Flat Panel TV. The TV can be tilted up or
down. |
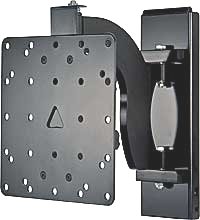
Full
Motion Arm Wall Mount for 32 to 50 inch Flat Panel TV. The TV can be
moved out from the wall, tilted up or down and turned left or right for
multiple viewing angles.
|
| Motorized
Adjustable Remote Controlled Mount for 37 to 63 inch flat panel TV. The
TV can be moved out from the wall, turned left or right, tilted up or
down all by robotics
remote controlled from your
viewing position. |
| Ceiling
Mount for 32 to 50 inch Flat
Panel TV. The TV is mounted to the ceiling instead of a wall. These tend to have electric motors to tilt the screen so with everyday use
the motors can wear out. |
| Floor
Stand for 32 to 50 inch Flat Panel TV. |
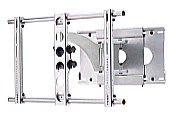
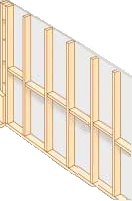
Flat panel TV wall mounts consist of
two main parts, a back plate that
mounts to the wall, and a front plate with the VESA mounting hole
pattern that is screwed onto the back of your television. The mounting
process is almost always the same. You screw the back plate onto the
wall, and attach the front plate to your TV rear, and then lower the
TV/front plate assembly into place on the wall mount assembly. Make
sure you follow the installation guides that come with both your mount
and TV. Articulated-arm TV mounts provide better positioning of the
panel while maintaining all the benefits associated with tilting and
swiveling mounts. These type of wall mounts however, are somewhat more
expensive than fixed or tilting wall mounts. Mounts come in attractive
polished silver finish, or black and feature tilt, swivel, pan, and
extended motion adjustments.
Sanus
VisionMount™ MF110-B1
For 15"- 40" TVs
• supports up to 100 lbs.
• tilt range: +5° to -15°
• swivel range: 90° left to 90° right
• swivel arm extends out to 9-1/2"
• VESA-compatible mounting hole pattern
• About
Wall Mount Brackets
• Tools
you need
• Getting
Started
• Stud
Finder
• Installing
the mount
• Placing
the TV on the wall
• About
Wall Studs
The concept of a "Home
Theater" has been around for years but with the introduction of High
Definition television in 1998 and the decreasing prices of large flat
panel TVs, more people are able to finally enter the exciting world of
home theater. The design of a home theater is very personal and the
choices of hardware are also based on your personal taste. For most
people able to afford it, the choices can involve very expensive
systems including the TV, sound systems and furnishings. Part of this
whole design is the idea of wall mounting your flat-panel TV.
Basically, the process requires that you drill four holes, attach the
mounting bracket to the wall with screws, connect your cables and lower
the TV into place on the wall.
The large screen sizes such as the 40 inch to 60 inch TVs can be
mounted on your wall as well as on a stand. Some people prefer a wall
mount for their TV and even for their loudspeakers. These large
flat-panel TVs typically weigh over 100 lbs., so you won't be moving
them around too much. But wall mounting your flat panel TV requires
some fore-thought and planning before cutting into your
wall. If you want the flexibility to move the television
around frequently, wall mounting isn't a good idea. For everyone else,
hanging the TV on the wall will save significant space and can add a
very attractive, professional look to any home theater system. Hanging
the display yourself can also help save money on professional
installation (basic professional installation can cost $500 or more)
and let you plan and implement a system to your exact specifications.
Another option is a ceiling mount. The ceiling joists in the framework
of the home are used to provide the support for the TV which can be
flat mounted to the ceiling or attach to a mount hung from a column
which allows the type of movement you can get with a wall mounting.
You have to decide exactly where to mount the TV. Once you cut holes
and run cables thru the walls you are fairly committed. You most likely
have to purchase a wall mounting bracket which accommodates your model
of TV. These brackets can cost over a hundred dollars. You have to
determine how the TV will plug in to AC power. You have to determine
how and where to run the connecting video and audio cables. You have to
have the correct tools and be willing to do the installation (or have
it done for you by professionals).
Before you undertake wall
mounting a LCD or oled flat-panel HDTV, you need to ask yourself "is
this a job for a professional installer?"
If you do not want to
undertake a job such as this or you feel you cannot successfully
accomplish this work, then it’s worth hiring a professional
to do it for you. If you select a known installer with a good
reputation you'll know the job is done right. However if you have done
some home improvement tasks before and want to do the job yourself,
then by all means go ahead.
WARNINGS
Hanging a flat-panel TV isn't an operation to take lightly. Not only
are you installing large, heavy, metal brackets, you're also going to
put your very expensive new television on the line expecting that you
did it right. The installer must verify that the mounting surface,
ceiling or wall, will safely support the combined weight of all
attached equipment and hardware, including the mount and the
TV. Safety is primary at all times. Do not be in a hurry. A
job done right will take longer but will reward in the long run. Always
opt on the side of caution. Working with power tools, electricity,
wiring, and heavy objects can be hazardous. Ceiling mounts can be more
dangerous than wall mounts due to the potential for falling.
Safety tips
- Be sure to use A/V
cables that meet local building and fire code. Most codes require
UL-rated wire labeled CL2 or CL3 for in-wall installations.
- Make sure the area
behind your wall is clear before cutting.
- Turn off the power in
areas you'll be drilling or cutting to avoid electric shock.
Your TV's power cable isn't made to be safely installed in your wall
— that means that if you want to keep that cable hidden,
you'll need to hire an electrician to install a recessed AC outlet on
the wall behind your TV.
PREPARATION
The
first step in preparation is shopping. You can find wall-mounting kits
in a variety of places, including electronics stores (both brick and
online) and direct from manufacturers. You can also choose between
mounts for specific models and generic kits that claim to work for
nearly any display. Buy the mounting hardware your TV's manufacturer
specifically recommends for your model. You're spending a couple
hundred dollars on the hardware and putting thousands more on the line.
This isn't the time to skimp. Additionally, buy the mounting hardware
from the same place you bought the TV or directly from the
manufacturer. Prices vary depending on your television's size and the
manufacturer, but expect to spend at least $200 for a complete
wall-mounting kit. You also need some tools to do the install.
First make sure that your
chosen LCD or OLED TV is even capable of being wall-mounted.
It’s rare but there are some early models that were table-top
only. The easiest way to check this is to see if the box or owners
manual mentions ‘VESA Compatible’ or just the words
VESA mount. VESA stands for “Video Electronics Standards
Association” and is just another way of saying this display
is designed to work with VESA standard wall mounts.
Wall mounts come in a
wide range of sizes and styles.
Plan the wire route
If you want to hide wires
running from your TV to your Audio/Video component rack, check out the
wire routing options below.
- Short run (TV and
component rack are located along the same wall)
- inside the wall
- behind a
baseboard, door jamb, or crown molding
- under your carpet
- inside cabinetry,
bookshelves, drawers, or closets
- Longer run (TV and
component rack are located in different parts of the room)
- the four options
above, plus:
- through a
crawlspace, or unfinished basement or attic
Try to run your cables in places that won't require drywall repair
afterwards.
After planning where you're going to route your wire, calculate how
much wire you'll need. Always have a bit more than you think you'll
need. You need enough wire to run from your receiver to the wall, then
horizontally inside the wall, vertically inside the wall and then out
to the TV. Allow for some slack. Now add 3 extra feet just in case.
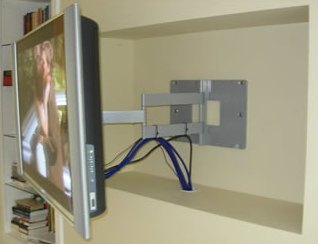
Wall-mounting your flat-panel TV can give you a modern look, but what
about your TV's audio/video and power cables? You need a neat,
décor-friendly covering that hides the portion of your cable
run between the TV and your A/V cabinet. You can run your cables along
the wall and keep them hidden by using plastic cable wiring solutions
such as smooth PVC housings which can be painted or even covered with
wallpaper to conceal them.
You can buy these in sections to match your needs and they include the
screws and/or attaching materials for wall use. About 1 inch deep and
up to 5 inches wide, they are good for short runs between the TV and
your audio/video rack. You want two separate channels for audio/video
cables and power cables to prevent interference.
» covers 12", or up to 30" of cables between TV and A/V
cabinet.
» non-textured finish accepts paint and wallpaper
» accommodates up to 10 cables in 2 cable channels
» ultra-light MDF construction
» installation hardware included
Some wall mounts offer external cord clips that keep the cables in
order. Others allow the cables to be threaded through a piece of the
mount. Many professional installers will run the cables behind the
wall. In any case, for aesthetic and safety reasons, it's always
important to keep the wires out of the way.
Tools
Needed for Assembly
Most flat panel displays
can be wall-mounted with tools you already own, (tape measure,
screwdrivers, a socket set, cordless drill etc). One item you might not
own, that can come in handy for pinpointing the exact location for the
mount, is a stud finder (about $20 at Home Depot or Lowe’s).
Recommended tools:
Tape Measure, Socket set,
Level, Sheetrock Saw, Electrical Tape, Stud-Finder, Philips Screw
Driver, and the LCD/oled TV and wall mount, as well as the proper
cabling.
• stud finder ("edge to edge" stud finder is
recommended)
• Philips screwdriver
• drill
• 1/4" bit for concrete and cinder block wall
• 1/2" bit for metal stud wall
• 5/32" bit for metal or wood stud wall
• level
There are several key factors to
consider when deciding where to hang your TV:
Availability of power.
Mount the display as close to a reliable power source as
possible.
Location of components.
Choose a location reasonably close to your home theater components
(including cable or satellite television wiring). The less cabling you
have to hide, the better.
Windows
and ambient lighting.
If you can't choose a room without windows or ambient light, position
the TV to minimize glare. Mount it out of direct sunlight and angled
away from any windows. Also, choose heavy window coverings that block
outside light.
Viewing
angles.
One of the greatest benefits of oled and LCD televisions is their
incredible (often 170-degrees or more) viewing angles. Even so,
position seating directly in front of the display, at a distance about
two to three times the TV's diagonal measurement. For example, if you
have a 50-inch television, the optimal viewing distance would be about
8 feet to 12 feet.
Speaker
positioning.
Leave room for speakers. Plan for speakers on either side of the TV,
plus a center channel speaker either directly above or below the
display. Arrange the seating area so you can place the left and right
surround speakers directly to the viewers' left and right, and leave
room behind for rear surround (6.1 and 7.1-channel systems).
Preparation is the key. Plan ahead so
you end up with the installation you want.
You need to consider
other things before wall-mounting a flat-panel TV.
HDTV Wall Mounting
Brackets
Metal brackets are used
to wall mount your TV. The bracket will have, in the most simple form,
a horizontal part called a wall plate which attaches to your wall and
vertical parts which attach to the back of your TV and the horizontal
wall plate. The weight of the TV is distributed across your wall studs.
Most TVs don't come with their own mounting hardware, so you'll have to
purchase it separately. Here are some tips to help you pick out the
right one for your TV.
- Check your TV owner's
manual for mounting guidelines. Some models require use of a specific
bracket, but most models are compatible with a number of brackets that
follow VESA
(Video Electronics Standards Association) standards. You'll see the
word "VESA" followed by a number, which tells you how far apart the
holes on the bracket or TV are in millimeters. For example, VESA 75
means that there are 4 holes in a square, and each side of the square
is 75mm long. VESA 100/200 means that the holes are in a rectangle,
with two sides measuring 100mm and two sides measuring 200mm. You
should be able to find that information in the owner's manual, or you
can measure the holes yourself to determine which VESA standard fits
your TV. Many mounting brackets are compatible with more than one VESA
standard, so finding one to fit your TV won't be difficult.
- Always check the
screen sizes that the bracket says it can hold, and stay within the
appropriate range. You should also check the maximum weight a bracket
can hold and make sure that it can support your TV.
- Think about what you
want your bracket to be able to do. Do you want to be able to swivel
the TV left and right, or get a better view from different seats? Do
you want to be able to adjust your TV up and down? There are
different brackets available which will allow you to make adjustments
to your TVs screen position.
The standard flat wall
mount is the easiest to do yourself. This is the TV wall mount that
takes up the least space. Tilted
and articulated arm wall mounts
add a bit more depth to the overall mount, but these mounts leave your
connecting options open, as they will enable you to add more cables to
support new gear later without having to remove the display panel from
the supporting brackets. Once you decide on the type of TV wall mount
to employ, purchase your mount only from a reputable source and ensure
that it fits your TV; in particular, check that its load bearing
capacity will accommodate your television.
Important:
Ensure that the TV wall mount you choose comes with a VESA compliant
mounting hole pattern. This is the standard measurement for flat-panel
TV mounts. Universal mounts designed to fit various sizes,
normally come with multiple hole patters to fit the different screen
sizes.
The VESA mounting
standard includes the VESA 50, 75, and 100, while larger models may use
the VESA 200. The number behind the VESA standard indicates the
mounting hole pattern in millimeters.
For example, the VESA 100 will have four holes placed at the corners of
a 100mm by 100mm square. The exception is the VESA 200, which comes
either in VESA 200x100mm, or VESA 200x200mm hole pattern.
OLED television sets
are slim, BUT they are heavy, with some very large screens weighing
over 200 lbs. Larger OLED television sets are substantially heavier than an
equivalent screen size LCD TV. A 42" may easily weigh over 90 pounds
while a 50" oled television set may easily exceed 100 pounds. This
means that not all walls are suitable to take a larger OLED TV wall mount.
If in doubt, either call for professional assistance or use a pedestal
stand.
In particular, if you are
installing your TV wall mount on a drywall, be sure to screw your mount
into the wooden studs behind the wall, not just into the wallboard,
otherwise your display panel could come crashing down and be damaged.
Alternatively, if your
drywall makes use of metal frames, use the appropriate spring loaded
fixtures - ordinary self-taping screws are not safe enough to hold your
TV. In either case, always ensure that the fixtures you use penetrate
the wall stud supports.
Where
can I buy the brackets to mount my TV on the wall?
There are several companies selling mounting brackets for TVs such as
SANUS, and others, as well as stores such as Best Buy.
www.sanus.com
www.Mountzilla.com
call 1.866.740.9830
What types of brackets are available?
Brackets are available
which will allow you to tilt your TV up or down.
Brackets are available which will allow you to swivel your screen left
and right as well as move the TV out from the wall.
Allows you to make tilt adjustments with the touch of a finger. Lock
the viewing position by simply tightening a knob — no tools
required. Places your flat-panel TV a mere 2-1/2" from the wall.
Heavy-gauge steel construction.
Features:
• Universal mount fits virtually any 32" to 60" oled or LCD
flat panel screen
• Adjustable 15° of forward tilt, 15° backward
tilt
• One-touch tilt for effortless adjustment
• Optional tilt lock in 5° increments
• Horizontal screen adjustment up to 12"
• Universal brackets easily hook onto wall plate for fast
installation
• Easy-glide bracket design ensures screen is securely
attached to wall plate
• Mounts to two wood studs, concrete, cinder block or metal
studs
• Comes with complete fastener pack with all necessary screen
attachment hardware
Position your flat-panel LCD TV for optimal viewing with this
wall-mount bracket. It uses an articulating arm that can hold the TV
close to the wall or extend it away up to 9-1/2".
TV Screen Tilt
Step by step - Brief
Summary
- Purchase a TV wall
mount from a reputable dealer, and ensure that it fits your TV.
- Locate the wall studs
in the wall on which you want to hang the TV. It
is critical that the screws
holding the TV to the wall are screwed into the solid wood of a stud,
not just into the wallboard.
Your wallboard alone will not support the weight of a large flat panel
TV. The best way to find a stud is with a stud finder, which is
available at a hardware store for $20.
- When you find a stud,
mark it in pencil on the wall. Measure the vertical distance between
the screw holes on the mount. After deciding how high to mount the TV,
mark in pencil where you will place each screw.
- Double check that it
will be level by measuring the distance from the floor up to each screw
hole you have marked. It is crucial that you mount it level. It will be
hard to fix after the fact.
- Use big screws and
drill a pilot hole first.
- Attach the mount with
the screws. Double check to ensure that it is level.
- Cut a hole behind the
TV to run the wires into the wall, as wall mounted TVs look best if the
wiring is completely hidden. Make another hole where you want them to
come out. Once your holes are made, fish the cables through the wall.
- Hang the TV on the
mount. Usually, this involves attaching rubber/plastic mounts to the
back of the TV.
- Double check the
stability of the TV, and ensure that it is firmly in place.
- Connect your wiring.
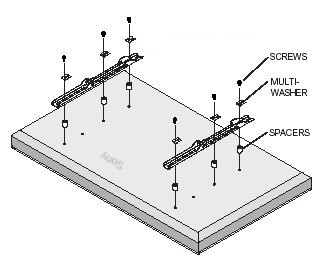
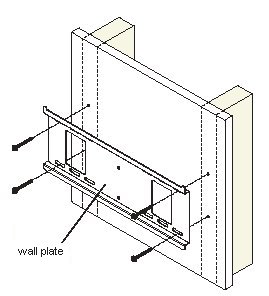
Wall plate can be mounted to two studs that are 16" apart.
Use a stud finder to locate the edges of the studs. Use of an
edge-to-edge stud finder is highly recommended. Based on their edges,
draw a vertical line down each stud’s center. Place wall
plate on wall as a template.
The top mounting slots should be located above the desired screen
center. Level plate, and mark the center of the four mounting holes.
Make sure that the mounting holes are on the stud centerlines. Drill
four 5/32" (4 mm) dia. holes 2- 1/2" (65 mm) deep. Make sure that the
wall plate is level, secure it using four #14 x 2.5" wood
screws.
Note: If mounting equipment weighing greater than 200 lbs, triple stud
mounting is strongly recommended.
• Installer must verify that the supporting surface will
safely support the combined load of the equipment and all attached
hardware and components.
• Tighten wood screws so that wall plate is firmly attached,
but do not overtighten. Overtightening can damage the screws, greatly
reducing their holding power.
• Make sure that mounting screws are anchored into the center
of the stud. The use of an "edge to edge" stud finder is highly
recommended.
• Hardware provided is for attachment of TV mount through
standard thickness drywall or plaster into wood studs.
- Don't mount too high.
It's tempting to mount at picture height, but most people would find it
more relaxing to watch if the screen center was around 40-45 inches off
the floor.
- "Future Proof" your
installation by including a HDMI cable through the wall, even if you
are not using one today.
Getting
Started
You’ll need to
determine the horizontal placement of the mount on your wall. Once you
have a rough idea where you want to place the TV display (left to
right) you’ll need to check for obstructions below the mount
down to where your power cable and video feeds will exit the wall, and
ultimately make their way to your source equipment. This is where the
stud finder comes in.
Also, locate the
wall-studs as they relate in position to your bracket. At the very
minimum you’ll want to ensure you are penetrating into at
least one wall-stud (with two anchor bolts, top & bottom) if
you are mounting a LCD. If you’re mounting a oled,
you’ll want to hit two studs with two anchors bolts on each
side, i.e. a total of four anchors. For HDTVs over 200 lbs., it is
recommended to secure using three wall studs.
Note: While it is
acceptable to bear the weight of a small to medium sized LCD on one
stud, that doesn’t mean you can leave the opposite side loose
or free. You’ll still need to anchor the opposite side, most
wall-mount kits come with the necessary hardware for this.
A note about the
aforementioned power cable: There are several methods of getting power
to your wall mounted display but not all of them are condoned by the
National Electric Code. The preferred method is to employ standard
'romex' electrical cable terminated inside a receptacle.
Consult an electrician if in doubt.
Once you find the studs,
mark their location in pencil on the wall. Measure the vertical
distance between the screw holes on the mount. Now it is time to decide
on how high to mount your TV. Both the 'flat' and the 'swivel
articulated-arm' TV wall mounts are normally fixed such as to set the
centerline of the display panel at eye-level when seated; on the other
hand, the tilted wall mount is usually set at a higher level.
After deciding on the
height, mark in pencil where you will place each screw. Double check
that it will be level by using a spirit level or by measuring the
distance from the floor up to each screw hole you have marked. It is
crucial that you mount it perfectly level - it will be hard to fix a
poorly done job later, so re-check your measurements.
Also, use heavy-gauge
screws that are capable of taking the full load of the display when
screwing your TV wall mount to the supporting wall. The best way to fix
thick-gauge screws is to first drill a pilot hole; this is a hole
slightly smaller in diameter than the diameter of the screws you are
using. Attach the mount with the screws - double check every time to
ensure that it is level.
Tip:
Double check the stability of your TV wall mount. Once you fix the TV
mount in place, pull on it as hard as you can to make sure it is
absolutely firm in place; do this before proceeding to hang on your
television set.
Once your mount is in
place, hang the television set on the mount. You would need someone to
help you hold the panel till you manage to hang the unit in place.
Irrespective of the model
and brand, the mounting process for a flat-panel television set is
practically always the same. You first screw the back plate of your TV
wall mount onto the wall and attach the front plate to your flat-panel
TV. Then all you have to do is to lower the TV with the mounted front
plate assembly (with the help of an extra pair of hands) in place into
the rest of the wall mount. Models vary considerably, so make sure you
follow the installation guides that come with both your TV wall mount
and your TV set.
TV Installation TIPS!
-
Recessed
Installation: If you plan to
recess your television set to keep the screen flush with the wall, it
is important to allow at least three inches of open space above the top
of the unit - plus the
necessary extra space on either side of the TV to attach the side
speakers - if applicable in your case.
In addition, ensure that the recess is deep enough to allow air to
circulate behind the unit to avoid any overheating. Remember that
ventilation is especially important with oled television sets since
these tend to get hotter than their LCD TV counterparts as a result of
the higher power requirements. A 42-inch oled TV may easily
consume 400W as against the 300W required for an equivalent
screen size LCD HDTV.
While aesthetically, recessed installations are an interesting option,
keep in mind that you are stuck with the size of the recess. In other
words, you cannot upgrade to a larger TV set at a later date should you
desire so and put it in the same recess.
-
Finding Studs: In new houses, studs are generally
placed 16 inches apart. In addition, power outlets are usually placed
adjacent to a stud, so look for a stud there.
If you cannot locate the
studs, get an inexpensive $20 stud finder - available from a hardware
store.
For slightly more, you
can get an all-in-one metal and wood stud finder and electric cable
locator. A great all-in-one product is the Zircon
60371 OneStep Stud Finder. It
sells for under $30 and includes auto depth sensing, auto
re-calibration, and even an integrated erasable marker to make it easy
to mark the spot for anchoring without removing the tool from the wall.
It will find the center of the stud so you can anchor the mount
securely.
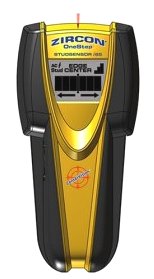
Zircon 60371 i65One-Step stud finder
Safety
-
The biggest concern
when installing a flat-panel TV wall mount is buried electric wiring in
the wall. Be careful not to drill or screw into any wiring. The best
way to work safely is to get an inexpensive electric cable locator -
usually available from hardware stores. The Zircon 60371 i65 One-Step
stud finder referred to above is also capable of finding buried
electric cables.
-
It is true that
oled television sets are slim, but as stated earlier on, they are
very heavy. If you are not sure of your "Do-It-Yourself" skills, or in
doubt about the load bearing capacity of your wall, call for
professional assistance.
Installing
the Mount:
Before you begin mounting
the bracket to the wall, you’ll want to attach the mounting
rails to the back of your display. Do this first to get a better idea
of exactly where the display will sit in relation to the bracket on the
wall. In other words, if the rails that affix to the rear of the
display shift the overall height of the display up by two inches,
you’ll need to factor this into where you mount the wall
bracket.
Once this is done
you’re almost ready to install the mount to the wall. Get a
pencil and make some light marks on the wall, where the anchor bolts
will go through the mount and also trace out a pattern where your
wall-box (for cabling) will be cut.
Then put the mount aside
for a minute. You’ll want to tap or pre-start a pilot hole
for your anchor bolts as they can be difficult to start on their own.
You can use a cordless drill with small diameter bit for this or by
driving in a sheetrock screw and then removing it.
Cut-out and install your
wall-boxes for the cabling, both at the display location and wherever
you want the audio/video cables to interface with your A/V system. This
is where the recommended sheetrock saw comes in.
If you’re
exiting the cables directly below the display (at electrical box
height), the actual pulling of the cables will be much easier than if
you’re trying to reach another location in the room, by going
into the crawlspace or basement and back up into the room.
If the wall you are installing the display on is insulated you might
find it difficult to get the cables from the wall-box behind the mount
down to the box near your equipment. Use a fish-tape for these types of
wire pulls, or substitute two straightened coat hangers taped together.
With your wall-boxes in
place and cabling run, you’re ready to attach the mount to
the wall. Hold the mount up to the wall and with your level ensure that
its level and in your desired position.
With a socket-wrench,
secure your first anchor; this may take a bit a pressure to get the
bolt started depending on how well you tapped your pilot hole. Move
onto the second bolt, third, fourth and give them all a good last twist
to ensure they’re snug and you’re ready to hang the
display.
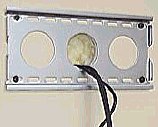
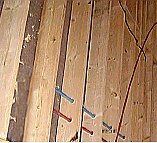
Wall plate secured to two wall studs with four fasteners.
Audio/Video wiring coming thru insulation in wall connects to TV.
Exit the cables in the
large open area in the center of the mount.
Attaching the wall-mount
bracket
Wall mounts are generally
composed of two pieces — one that attaches to the TV, and
another that mounts on the wall. The portion on the TV then attaches to
the piece on the wall.
Most flat-panel TVs have
four plastic caps over the holes used for wall-mounting.
Attaching mount to the TV
- Most flat-panel TVs
don't have their mounting holes exposed. The holes will be covered by a
plastic cap. Use a screwdriver to pry them off.
- Lean the TV up against
a couch or table, using soft material like a blanket to protect the
glass.
Attach the connectors or
rails to the television. Details will vary by manufacturer, but look
for rails or mounting holes on the back of the TV display. Bolt the
mounting hardware firmly to the television, making sure all parts are
level and facing the right direction. Make sure you'll be able to
access any knobs or controls when the unit is on the wall. Lock down
any sliders on adjustable wall-mounting kits so you don't have to
contend with moving parts when you're trying to hang the unit.
Attaching mount to the
wall
- To safely and securely
mount your TV to the wall, you'll need to drill the bracket into wooden
studs. After you've chosen your ideal TV mount location, use a
high-quality stud finder to locate nearby studs. Mark each stud with a
pencil or masking tape.
- Once you've chosen
which studs you're going to use, verify where each stud is located
using an awl or thin nail. Hammer the nail into the wall partially
until you hit the stud, then pull it out, move it about 1/4" to the
side, and repeat until you only hit drywall. Do the same in the other
direction.
- Find the middle of the
stud by measuring the distance between the two drywall-only holes. Mark
it — you'll want to mount the bracket on that middle line.
- Verify that the
mounting holes in the bracket line up with the center of the studs.
- Follow the steps below
to figure out how high to mount your bracket on the wall. Also check
the owner's manual for additional tips.
- Looking at the back of
the TV, measure the distance from the bottom of the panel to the bottom
of the bracket that you've attached to the TV.
- Use a pencil or
masking tape to mark the wall where you want the bottom of the TV to
be.
- Using your previous
measurement, mark the wall where the bottom of the bracket should be.
-
To figure out how
high to mount the bracket: Measure the distance from the bottom of the
panel to the bottom of the bracket. Make a mark on the wall where you
want the bottom of the TV to be. Mark the wall where the bottom of the
bracket should be.
- If you're going to run
the A/V cables inside the wall, cut a hole for the wire to exit the
wall before you mount the bracket. Some brackets will have pre-existing
holes for this purpose. Trace the one that's closest to the A/V
connectors on your TV. Next, drill a pilot hole. This is a small hole,
drilled in the center of the space. Use caution when drilling pilot
holes, so you don't plunge your bit into a pipe or electrical conduit.
Next, insert a sturdy wire (such as a bent coat hanger) into the pilot
hole, and explore the space behind the wall where you'd like to cut.
You should also explore nearby crawlspaces or review your electrical
and plumbing plans (available from your builder) to make sure you know
what's behind the drywall before you cut. Don't cut unless you know
that the area behind the wall is clear.
When cutting drywall, use a hand-held drywall saw (not an electric one)
and cut slowly. Cut the drywall in one piece, on an inward slant, so
that it's easier to patch later if necessary.
Use a sturdy wire
(such as a bent coat hanger) to explore your pilot holes. Be sure that
the space behind the wall is clear before cutting.
- Always use a level to
verify that the bracket is level before securing it to the wall studs.
Have your partner keep it stable while you screw it into the wall to
make sure it stays level.
- Verify that the
bracket is level before mounting the TV. It's much easier to make
changes now than after the TV's on the wall.
- Note:
Metal studs — If your
house has metal studs, you may not want to wall-mount your TV. Most
metal studs are too weak to support the weight of a flat-panel TV.
Hanging
the TV on the wall
Get a family member or
friend to help you with this part. It’s definitely easier to
hang a display with two people, one on each side, especially if
it’s a 42” oled, don’t try to hang
something that heavy by yourself.
Take a look at where the
inputs for power and video are located on the back of the display
before you lift it. It’s much easier to put the cables into
their respective slots if you already know where they go.
Once the display is
mounted and the cables are all in place, check to make sure the safety
tabs are in position. The weight of the display itself will likely keep
it secure on the mount but these tabs or “locks”
that close over the rails of the mount, add the extra piece of mind you
want when it comes to expensive LCD’s or oleds.
- Do not attempt to do
this part on your own. Ask your helper to assist you in lifting the TV
and lining up the bracket.
When you attach the
bracket on the back of the TV to the bracket on the wall, have your
helper assist you in lifting the TV, lining up the bracket, and keeping
it steady. If you have an adjustable bracket, use a level to position
the screen. After installing all the individual parts, hang the TV by
connecting the television's hardware to its connectors on the wall
plate. Often, this process will involve sliding or hooking slots on the
display hardware to rails on the plate. Finalize the attachment with
safety knobs or other bolts to hold the pieces in place. Unlock any
flexible controls and adjust the display's positioning on the wall as
needed.
Cable connections.
Finally, hookup. Most flat-panel TVs include accessible inputs and
outputs, making it easy to connect various home theater components.
Plug in the unit first, and then connect video and audio sources
(including cable or satellite TV receivers and DVD and/or VHS players).
Finally, group all the wiring with cable ties and hide them using
plastic housings matching the wall's color. See Audio/Video
connections cable types.
Wall studs
What are wall
studs?
Wall studs are part of the framework of a house. In most homes you will
find that behind plaster, dry wall or other wall types there are wooden
frames made up of supports called studs or wall studs. These were
traditionally of uniform measurement such as 2 inches by 4 inches (2 by
4) or 6 inches by 2 inches. You generally cannot see any evidence of a
wall stud from the outside.
Wall studs are vertical membranes that form the skeleton of a house.
Wall studs work together with the construction of the whole house to
provide and insure stability. Any other hardware, furnishings or
ornaments rely on quality wall stud construction and placement so that
they may stand and/or be affixed securely. Those strips of wood, the
wooden wall studs, stand between your roof, windows, doors, floors and
you. They are a foundation for your siding, plastering, mason work and
any other inside or outside wall coverings.
If you could look inside your walls, this is what you would see. The
vertical support studs are what will bear the weight of the TV. Mount
the wall plate using the center of the stud. A stud finder is
invaluable to do this. Mounts are designed to distribute the weight
evenly across two wall-studs.
What is a wall stud
finder?
A wall stud finder is an accurate and indispensable tool used in place
of manually finding studs by hand. When anything is hung from a wall by
nail or screw, the nail must be hammered into a stud for solidity and
so as not to tear holes in the plaster, wallpaper, paneling or other
wall covering.
Whenever home remodeling is done the studs must be discovered as well.
You will need to nail any new paneling to them, or any new
plasterboard. You will need to know where they are even to add
insulation within and between walls. You can get one at a hardware
store or possibly an electronics store. They come with instructions and
sometimes even with batteries.
What types are
there?
Electronic - can be held and used in one hand. It emits an alarm and
uses an LCD light array to acknowledge finding studs and edges of
studs. It measures the mass and the volume of the wall and then finds
the stud within it.
Other types of wall stud finders find metal staples or screws that hold
the covered drywall to the studs themselves. These are magnetic wall
stud finders, which are dependent on there being metal to find, and
that the metal is in the studs and not somewhere else.
When, how and why are they used? When you are mounting paintings,
shelving or other items to walls, you need to use a stud
finder. Move the stud finder across the wall until you hear
the first beep and the lights light up. At this point you have found
the edge of the stud and may want to mark it with the pencil. Slowly
keep moving the stud finder across the wall and when it beeps again you
have found the center of the same stud. Now mark the center by placing
the pencil at the top middle of the stud finder and marking there. This
center mark is where you will want to screw the fastener in. Stud
finders are used to make sure all your remodeling jobs are done in
conjunction with the solid framework of your house, known as the wall
stud.
• More Wall
Mounts information for TV
• Robotic
remote controlled flat panel TV mounts
• See
over 100 hook up diagrams
Columbia
ISA Audio Video
Empowering consumers through information.
columbiaisa@yahoo.com
LINKS
TV
- HDTV - VIDEO - CABLES
o HDMI
Versions
o USB
Cable
o DVD
VCR TV hookup diagrams
o Video
switch box
o Laptop
to TV hookup
o Cable
DVI HDTV connections
o HDTV
SHARP LCD
37 inch
o SONY
oled 50 inch and LCD 32, 40, 42 inch TV Feature Comparison
o HDTV
Cable Connections and Hookup Diagrams
o Cable
connections video
o Basic
TV connections
Wiring
Diagrams Index
o HDTV
FAQ - frequently asked questions
o The
end of
analog TV - will your old TV go blank when digital TV arrives?
o Cablecard
o Cable
Hookup diagrams Index
o Hookup
Xbox 360 to TV/HDTV & 5.1 surround receiver
o Hookup
DVD, VCR, TV
o Hookup
TIVO recorder - channel changing setups
o HDTV
setup
o TV
PIP picture in picture hookup
o Wall
Mount your HDTV
o Flat
Panel TV wall and ceiling mounts
DVD
- VCR - RECORDER - PLAYER
o Blu-Ray
and HD-DVD Players
o HD-DVD
and Blu-ray Guide
o Toshiba
HD-DVD HD-A1 Player
o Blu-ray
Players - Sony
o Blu-ray
Players - Samsung
o Blu-ray
Players - Panasonic
o Blu-ray
Players - Pioneer
o Blu-ray
Players - LG
o Portable
DVD Players Buyers Guide
o Copy
videotape
- VHS
o VCR
Operation
o VCR
and satellite TV
o VCR
Operation Guide
o DVD
Recorder Operation
o Copy
VHS tape to DVD
o Using VCR Plus+
o VCR
Recording
o Create a
personal tribute on DVD
use your digital camera and music source to record a video tribute on
DVD
o DVD
FAQ
o DVD
Sound
o DVD
Player Audio
o DVD
Players
o DVD
Player- how to connect
o How
to connect DVD player to TV in 10 easy steps
o DVD
VCR hookup to TV - A/B switches
o DVD
Player- what to look for
o RF
modulator connection diagrams
o DVD
Video standard
o DVD
Video glossary
o DVD
Player Buying Guide
o DVD
Recorder Basics
o DVD
formats compatibility
o DVD
Recorder Copy Protection
o DVD
VCR connection
o Macrovision
o DVD
connection - RF modulator
o DVD
Recorder Buying Guide
o DVD
Recorder hard disk drive
o DVD
Recorder Panasonic
o DVD
recorders-
Sony
o DVD
Recorder - Sony hard disk drive
o DualDisc
HOME
THEATER
Home
theater connections
Home
theater connections guide
Home
theater subwoofer guide
Home
theater RECEIVER Guide
Home
theater in a box guide
Speaker
wire and cable
o Minidisc
user guide
TV
SATELLITE
Satellite
TV Basics
Satellite
TV - buying guide
Satellite
TV - basic information
Satellite
TV - installation
Satellite
TV - DirecTV
Satellite
TV - Dish Network
Satellite
TV - Gear: receivers, dish antenna
Satellite
TV receiver Dishnetwork 811
Satellite
TV - Reception
Satellite
TV - Glossary
Diagram
DBS satellite connection dual LNB, multiswitch, diplexer, receiver, TV
Diagram
hookup satellite dual 2 LNB to receiver and TV
Satellite
TV Glossary
Programming
for Dishnetwork and DirecTV
Satellite
TV comparison - DirecTV vs. Dish Network
Satellite
TV dish alignment
Satellite
TV receivers
TV
satisfaction
Dish
Network Receivers
DVR
- digital video recorder
Converter
set-top-box for free digital TV on old TV set
DIGITAL
AUDIO
Apple
iPod photo
columbiaisa.50webs.com
Audio
Video Connections
Cable
Connections
Video
Connections
HDTV
Cable Connections
Video
Connections
Home
Theater Connections
Satellite
dish alignment
Satellite
TV and HDTV tuners/receivers
HDTV
setup
Dish
Network Receivers
DVR
-
digital video recorder
• PC
to stereo hookup
• PC
to stereo connection
• Windows
Sound Recorder
• PC
to HDTV Connection
• Audio
Video Connection Types
• Hookup
Diagram Blu-ray HDTV
• Hookup
Diagram Blu-ray HDTV AV receiver
• Blu-ray
disc and Surround Sound
|