|
|
| TV
Wall Mounts and Installation • In-wall Speakers Installation |
|
Search Columbia ISA 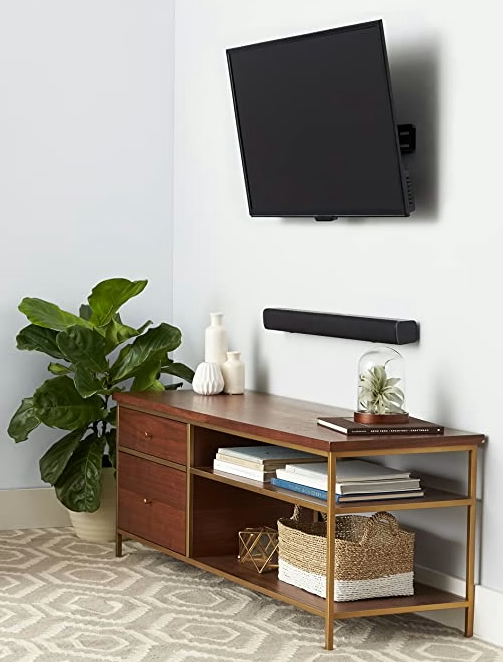 |
Mounting your TV on a wall is an option some people choose. It does require some work and a lot of planning. If you are up to the challenge you can most likely do this yourself, however if you do not have a desire to work out all the details and prefer to let a professional handle the job, this is also an option but be prepared to pay for the convenience. Reasons to wall mount your TV 1. Security - It is much harder to steal a TV attached to a wall. 2. Decor - The clean look of a mounted TV. 3. Viewing angle - Mounted at the ideal height. Steps to wall mount your TV 1. Find a compatible mount for your TV 2. Attach the brackets to rear of TV 3. Attach mounting plate to wall 4. Place TV on mounting plate on wall 5. Install power and signal cables Sounds simple but there are many details to get right in order to do this job properly. You need to decide what type of mount you want, how the TV will plug into a power outlet, where any cables will be run into the TV, how high the TV will sit on the wall, which tools will be required to get the job done and so forth. 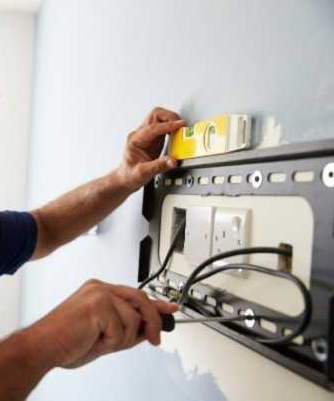 Plan out exactly what you're going to do before actually doing anything. Power cord location, TV source device cables installation all have to be planned out and make sure you get the mount perfectly level on the wall. Find your TV's owner's manual and look for the letters VESA. This is the standard which tells you how far apart the holes are on the rear of the TV. VESA 75 means that there are 4 holes and each side is 75mm long. VESA 100/200 means that the holes are in a rectangle, with two sides measuring 100mm and two sides measuring 200mm. You can measure the holes yourself to determine which VESA standard fits your TV. Many mounting brackets are compatible with more than one VESA standard. 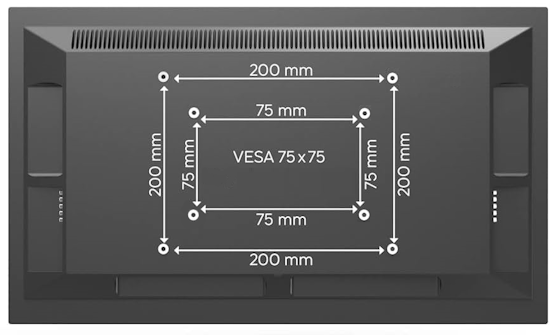 TV REAR - VESA Mounting patterns - Look for the screw holes. You can also buy adapter brackets for custom fits. How to find a wall mount for my TV WALL MOUNTS for TV • TV Wall Mount for 32-65 Inch TV, Full Motion TV Bracket with Articulating Dual Arms Share on Twitter Tweet For LED LCD or OLED Flat screen HDTV. A TV wall mount is a steel bracket used to attach a flat panel TV or computer display to a wall. In order to attach the bracket to the display, pre-existing screw holes must be present on the rear of the monitor or television. To allow manufacturers of wall mounts to make brackets that will fit a variety of displays, the screw holes must be set in pre-determined, standardized positions on displays and on brackets. The Video Electronics Standards Association (VESA) is responsible for issuing these standards, and a VESA wall mount is a bracket that complies with these standards. www.vesa.org 3 Basic Types of TV wall mounts Some TV wall mounts will hold the TV flush to the wall (TV does not move), while a tilt mount will allow the TV to be tilted downward, for example, for a truer viewing angle. 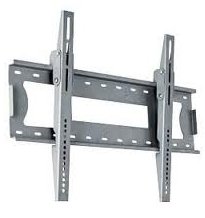 Fixed or static TV wall mount 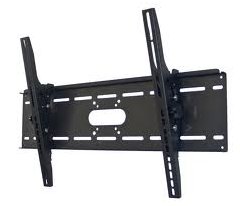 Tilting TV wall mount 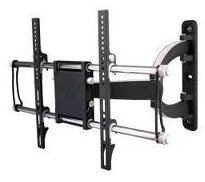 Articulating Arm TV wall mount The above type of TV wall mount allows maximum flexibility for TV movement. Also this mount would allow a TV to be wall mounted in a corner by pulling the TV out and angled to 45 deg. An articulating arm will bring the TV out from the wall (TV will move up/down and right/left), as often seen in hospitals or waiting rooms. A VESA wall mount might also come with a special tool that is required to unlock the TV from the wall mount before removal to discourage theft. 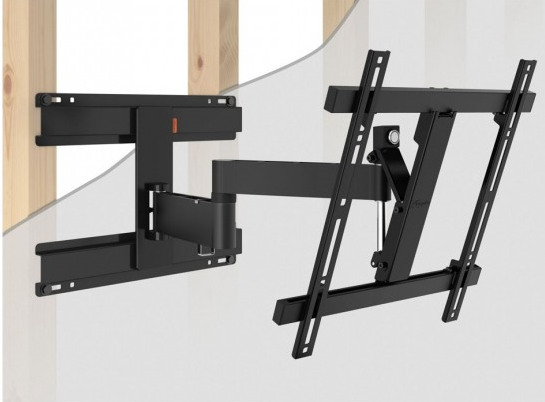 BUY TV WALL MOUNTS Rated Best Overall: • Pipishell Full Motion TV Wall Mount for Most 37-75 Inch TVs up to 132lbs, Wall Mount TV bracket Articulating Swivel Tilt Extension The kit you buy should contain all the required parts including the wall bracket, tv brackets, lag bolts, spacers, bracket screws, washers, lock washers, wall anchors, cable ties and mounting hardware specific to your mount.  Step 1: Choose the location where you want to mount the TV You have to figure out exactly where you want to mount the TV: the height and position on your wall. The most important thing to consider is your normal eye level: usually a sitting viewpoint. If you’re installing a TV in your bedroom, decide whether you’re likely to be watching when lying down or sitting up as this will help you determine the exact height you need. Step 2: Find your wall studs The second step is probably the most critical in this process: locating the studs inside your wall. You need something that can hold the weight of both the mount and your TV, especially if you're going to be using a full motion wall mount bracket. That's going to put significant pressure on the mount points, pulling them away from the wall. For this, there’s really no substitute for installing the wall bracket into the wall studs using heavy-duty, long wood screws. To find your wall studs, one popular tool to use is the Stud Finder Wall Scanner - 5 in 1 Stud Detector. Tools like this let you “see” up to 4 inches deep. Always be careful of pipes and wires, the biggest risk you face when drilling.  Typical home construction has wooden studs supporting drywall in each room. Wiring for power and pipes for water may be inside your walls. Usually wiring is near ground level for outlets. Your goal is to avoid the wiring and pipes and secure the tv mount to a solid stud center. 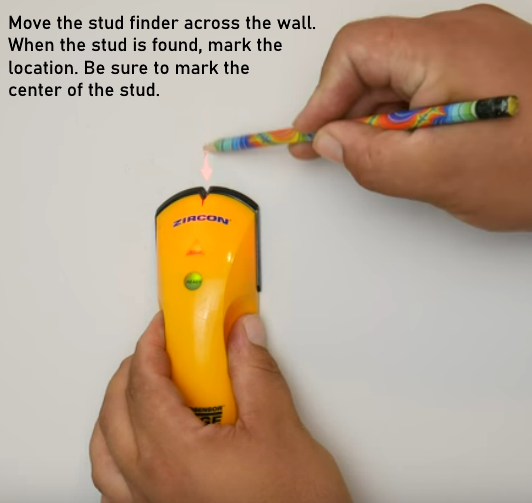 These stud finder tools can reveal the exact center of a wood or metal stud – the strongest point for installing your TV mount. You don’t want to drill into the edge of a stud. • How to use a stud finder YouTube Video Most TV wall mounts will come with a template that you can tape to the wall. This is a great tool for getting the holes in the right spots, matching them up against the marks you’ve made using your Scanner tool. When you put the template on the wall, use a level to make sure that it's perfectly horizontal. The template will also tell you which size drill bit to use. Pre-drill your holes before you put the bracket on the wall. It’s best to drill right through the holes in the template, so there’s no chance of error. Step 3: Install the wall bracket Now you’re ready to fix the mounting bracket to the wall. You’ll be driving lag bolts into the wall to hold the mounting plate up against it, and here you have two options: an impact driver and/or a socket wrench.  You can do the whole job with a socket wrench, but the impact driver makes it easier to get the bolts into the wall, while finishing with the socket wrench delivers just the right amount of pressure, eliminating the risk of over-tightening the bolt with the impact driver. Just make sure you keep your bracket level when you install it. Four lag bolts into two studs will usually get it done, but once the mount is installed you have to test it. If you're installing a standard static wall mount or a tilt mount and you have only the rail system, pull on the top of the rail system to make sure it’s secure. If you have a full motion articulating wall mount, pull it out and down to make sure it's going to hold some weight and that it's embedded nice and tight. 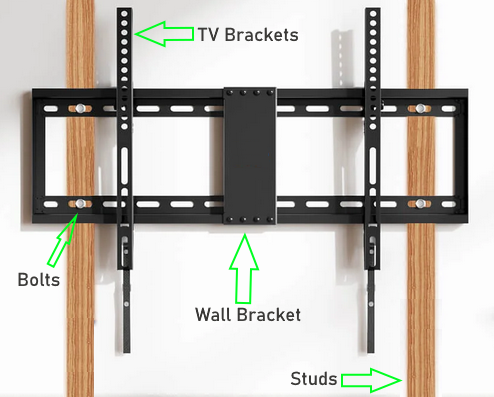 Step 4: Mount your TV The final stage is to get the rail system mounted to the back of the TV and then mount the TV on the wall. The hooked point of your mounting bracket needs to be aligned with the top of the TV, with the securing screw lined up with the bottom, although many mounts have a latch that moves up and down instead. Your mounting kit comes with various screws, spacers, and washers. Make sure you pick out the right screws by testing them in the holes in the back of your TV. If your holes are a little recessed, you want to find the spacer that fits inside the dimple in the plastic. That will give you a nice tight fit up against the bottom of the rail. Likewise, you might have some that are sticking out a little and you can use the spacers to keep the distance between the rails and the TV the same on the top and the bottom, ensuring a nice flush mount.  Now you’re ready to pick up your TV and put it on the wall bracket. Screw in the securing screws at the bottom of the plate – or flip the latch. For large wide TVs, usually this is a two person job. Be careful, you don't want to drop the TV or injure yourself in this process.  The VESA TV Mount Standard The VESA standard for mounting TVs is often referred to as VESA MIS (Mounting Interface Standard) or VESA Mount. This standard was first introduced in 1997 as a way to standardize the hole pattern layout for mounting displays, computer monitor or television, to hardware mounts. The standard provides not only the hole pattern for the screws, but also the thread type and depth. Note that some new mounts meet multiple versions of the standard. Flat Display Mounting Interface (FDMI) The Flat Display Mounting Interface (FDMI), also known as VESA Mounting Interface Standard (MIS) or colloquially as VESA mount, is a family of standards defined by the Video Electronics Standards Association for mounting flat panel monitors, TVs, and other displays to stands or wall mounts. It is implemented on most modern flat-panel monitors and TVs. The first standard in this family was introduced in 1997 and was originally called Flat Panel Monitor Physical Mounting Interface (FPMPMI). Variants The original VESA mount (MIS-D) consisted of four screws arranged in a square, with the horizontal and vertical distance between the screw centers being 100 mm. This is still the most commonly used configuration for desktop computer displays. A 75 mm × 75 mm layout was defined for smaller displays. The MIS-D screw holes have an M4 thread and are typically 10 mm deep. Appropriate fasteners (typically ~10 mm long) are often supplied with the mount rather than the display, but they are also easily available from many hardware stores. M = metric "the number" = the diameter. Thus, M6 is Metric, 6mm diameter M4 = Metric 4mm dia. M8 = Metric 8mm dia. The FDMI was extended in 2006 with a collection of additional screw patterns that are more appropriate for larger TV screens. MIS-D 75 75 mm × 75 mm M4 MIS-D 100 100 mm × 100 mm M4 MIS-E 200 mm × 100 mm MIS-F 200 mm × 200 mm 400 mm × 400 mm 600 mm × 200 mm 600 mm × 400 mm 800 mm × 400 mm 280 mm × 150 mm Don't assume your TV has 4mm holes just because it is a 26 inch screen TV or that the TV has 8mm holes on the back because it is a large TV screen. A 26 inch screen HDTV can have 8mm holes on the rear panel. Usually the mount comes with 4mm, 6mm and 8mm machine screws, spacers, washers, brackets and possibly adapter plates. Examples of the full identification of a particular FDMI variant look like VESA MIS-D, 100, C VESA MIS-F, 200, 200, 6 where * the letter after MIS- identifies the part of the standard used, e.g. o part B, C, D, E for flat displays with 10–78 cm diagonal o part F for flat displays with 79–230 cm diagonal * for part D, a number identifies the 75 mm and 100 mm variants (100 or 75), * for part F, a number pair identifies the maximum width and height of the mounting-hole pattern, * for parts B–E, a final letter identifies the interface location on the flat display as center (C), top (T), bottom (B), left (L), right (R), top and bottom (T/B), or left and right (L/R), * for part F, a final digit distinguishes between 10 mm deep M6 mounting holes (6) and 15 mm deep M8 holes (8). 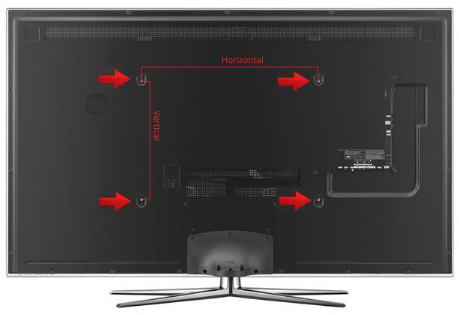 The image above shows the machine screw holes in the rear panel of the flat screen TV. Two vertical brackets attach to these with two screws each. Then the two brackets attach to the wall mount plate which is bolted to wall studs. When wall mounting a TV, remove the TV stand. Do not assume anything when buying a wall mount for your TV! You must be careful because it all has to match up. Ask questions, call, chat, email BEFORE you buy! Sometimes an adapter plate or extension must be purchased in addition to the mount so your particular HDTV fits the mounting hardware. How do I know what wall mount will fit my TV? A typical VESA hole pattern for flat panel displays can be one of the following sizes:
Now look for a bracket that will accomodate the vertical attachment and horizontal attachment of the screw pattern for your TV rear panel. If you have trouble finding a mount to fit, consider an adapter plate. Some mounts are universal and can fit many VESA hole patterns. 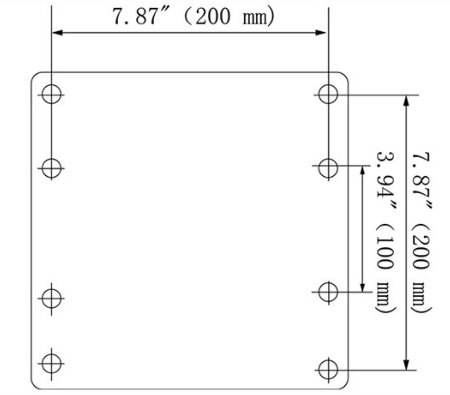 VESA PATTERNS 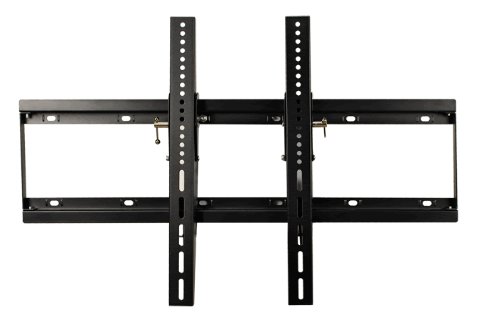 Slide brackets to fit rear panel horizontal hole measurements 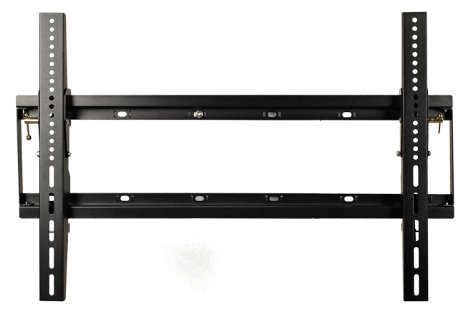 The wall mount above has multiple holes for different vertical distances. You must consider the screw size as the screws have to fit the holes in the back of the TV and this includes both width and depth. Mounts usually come with enough screws to fit most TVs. 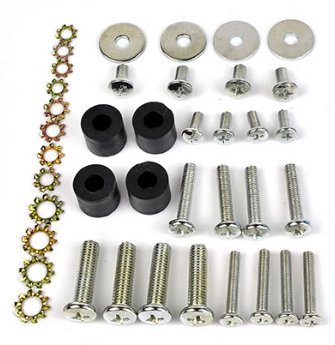 The above image shows M8 screws (the four large screws), M6 screws and M5 screws along with spacers, washers and lock washers. These screw into the TVs rear panel attaching the brackets. You will only use four screws. If the screws are too long to fit in the TVs holes, use a spacer between the tv and the bracket. 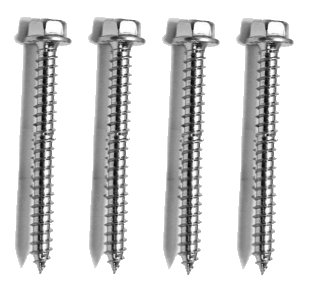 Lag Bolts - These hold the TV wall plate to the wall studs. The two vertical brackets attach to the wall plate. 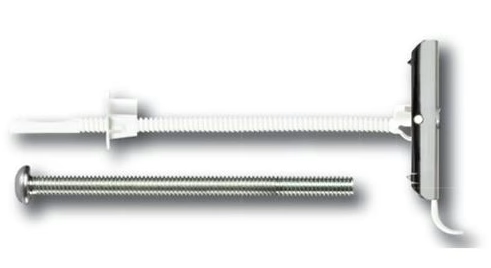 Flip-toggle bolts are used for drywall. When you cannot mount into a stud or you need additional support for the wall plate. 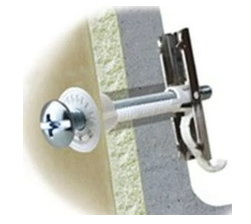 • Flip Toggle Bolt Demo TV wall mount considerations You must decide where the TV is going to be mounted. Only very lightweight TVs can be mounted on a wall without using the wall studs and here you need to use toggle bolts so the drywall can support the weight of the TV and mount. Heavier TVs must use the wall studs for support. Wall studs in most homes are 16 inches apart. If the mount plate is less than 34 to 36 inches wide you will not be able to screw the mount plate into the studs at the widest spot but rather you will have to screw the mount plate into the two wall studs centered 16 inches apart in the center of the mount plate. This is fine and should hold the TV up without a problem but with a 36 inch wide plate you could use the widest spots to attach the wall plate to the wall studs. In the image below, a 55 inch screen TV (blue) has a width of 49 inches. A 29 inch wide wall plate would not reach across 3 studs and so would have to be attached at a narrower distance in the center.  Wall studs are usually made of wood 2 X 4 or 2 X 6. The actual dimensions of a 2 X 4 are 1 1/2 in by 3 1/2 in. with the 1 1/2 in facing towards you. So you do not have much area to work with and the bolt has to go in the center of the wood for a secure hold. A stud finder is used to locate the stud in the wall. Stud finders use different methods to find the stud such as magnetic or internal capacitor or even radar. 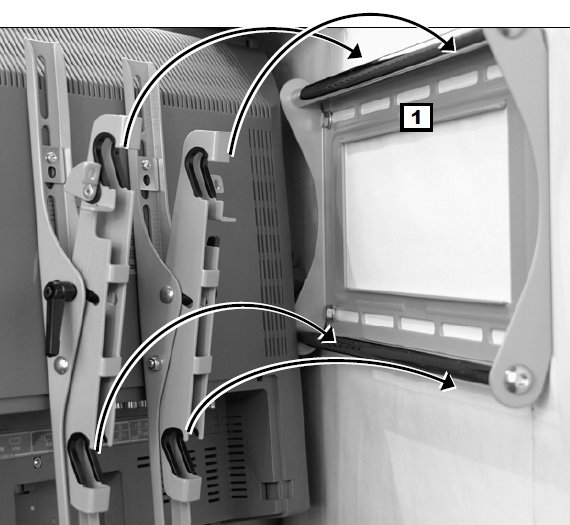 How do I mount the TV? The basic steps are: 1. Gather the tools you need such as a level, electric drill, Philips screw driver, tape measure, stud finder, awl for verifying stud locations, hammer, pencil, socket wrench, drill bits etc. 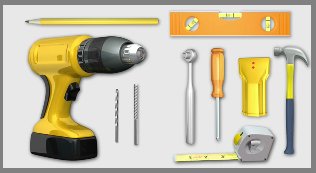 2. Attach the vertical brackets to the TVs rear panel using four machine screws. 3. Find the studs in the wall and the centers of the studs. You can use a stud finder. Standard stud spacing for residential interior walls is 16 inches center to center. 4. Measure the height (from the floor) for proper viewing height of the TV screen. 5. Place the mount on the wall and measure and mark where the bolts go through the mount into the centers of the wall studs. 6. Place a level on top of the mount, level and mark a line on the wall when level. 7. Pre-drill small holes where the bolts go into the wall studs. 8. Drill holes into the studs for the bolts but make sure not to make holes too deep or too wide for the bolts. It has to be a snug and tight fit to hold the weight of the TV. 9. Place mount on wall and screw bolts through mount into wall studs in proper position. 10. Lift TV up and place brackets on wall mount and secure. Additional considerations Audio/Video cable management and Power cords. If the wall has no power outlet, consider hiring an electrician to add one. Audio/Video cables can be hidden in the wall by cutting a small opening and feeding the cables through. Get a dry wall saw for cutting holes. An entertainment stand can contain set-top-boxes or video game consoles just below the TV. If you do not want to run cables behind the wall, you can hide the cables on the wall using a cable raceway. 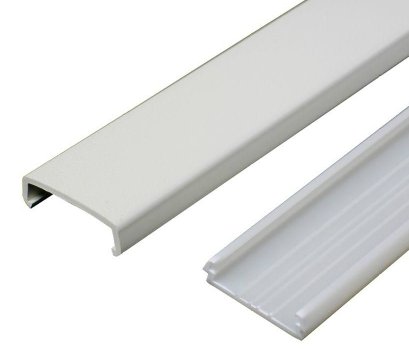 Non-metallic cable raceways come in a variety of styles and colors. The cables fit inside and are hidden from view. If needed, you could paint to match the wall color. • How to wall mount your HDTV What parts should I get with a wall mount? Below is a typical parts list included with a TV wall mount. 4 Philips screws M8 x 35mm 4 Philips screws M8 x 15mm 4 Philips screws M6 x 35mm 4 Philips screws M6 x 15mm 4 Philips screws M5 x 35mm 4 Philips screws M5 x 15mm 4 Philips screws M4 x 35mm 4 Philips screws M4 x 15mm 4 Steel Washers 4 Spacers Wall Plate Vertical Rails Mounting Template 4 wall anchor bolts Notes on wall mounts: M8 machine screws are fairly large compared to M5 or M4 screws. There is a good amount of difference in size and strength. Keep in mind the thread pitch (the linear distance along the screw between successive threads) on machine screws. The threads on the machine screws have to match your TV screw holes. The thread pitch can be for example 1.25 on a M8 screw, 1.00 on a M6 screw, 0.80 on a M5 screw. Machine screws are available at hardware stores in stainless steel if you want more strength than the standard zinc screws. Always make sure the mount is rated to hold the weight of your TV. What tools do I need to mount the TV? Electric drill Drill bits for wood (or masonry if mounting on brick) Stud finder Screwdriver Philips Level Pencil Socket wrench Tape measure Fixed wall mount The following images show a fixed wall mount for a TV. You can get all kinds of mounts from a simple fixed mount to a full-tilt swivel mount to a ceiling mount. You can even get a remote controlled motorized mount. How do I know where to place my TV on the wall? If you are using a fixed wall mount, measure the distance from the floor to the bottom of the TV when the TV is placed so that your eye position is level with the center of the TV screen when you are sitting in your viewing position, typically sitting in a sofa. This way you get the best viewing angle without any neck strain. For tilting mounts, you have more flexibility in placement. Measure all the mount distances so that when the TV is on the mount on the wall you get the proper measurement from floor to bottom of the TV. 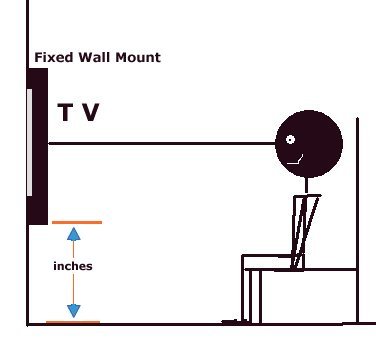 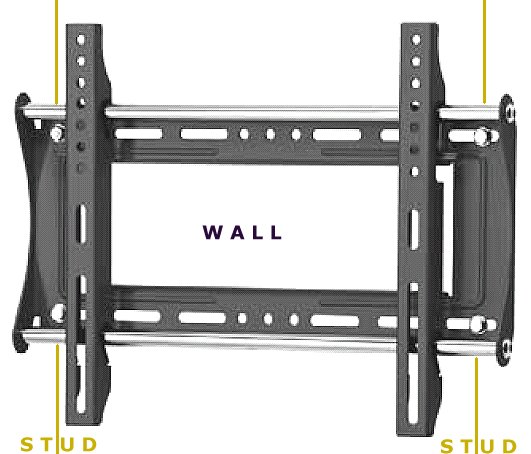   There are also single stud mounts with recticulating arms giving full motion of the TV screen. 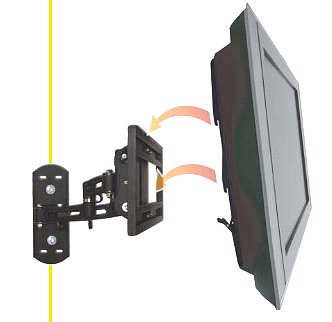 Can I move my TV around on the wall by remote control to get good viewing angle? Yes. This way you can sit where you will be viewing the TV and adjust the angle. TV wall mounts come with motorized control and you just use the mounts own remote control to move the TV around, up, down, left, right and out from the wall. These type of mounts cost more than a standard wall mount. I have metal wall studs in my house. Can I mount my TV on the wall? Yes. Wood wall studs are stronger than metal studs however if you use four or six toggle bolts, you can mount a TV weighing up to 85 lbs. or so using a standard mount. For an articulating mount, more strength would be required. Toggle bolts are designed to insert through the drywall and the metal stud and then flip open a spring loaded metal piece which adds additional backing strength against the wall for heavy loads. There are several designs of toggle bolts but they all do the same thing, add surface area for more strength. SnapToggle bolts for TV wall mounts Can I lock my TV on the wall to deter theft? Yes, many mounts have a way to place a standard lock through the mount to lock the wall mount to the brackets and since the TV is attached to the vertical brackets this is a good theft deterent. Can I hide my TV in a cabinet and have good looking decor when not in use? Yes. There are many kinds of lift cabinets for a TV that have motorized lifts and doors. They function similar to a power electric window in a car, lifting the TV up out of the cabinet and down into the cabinet hidden from view. 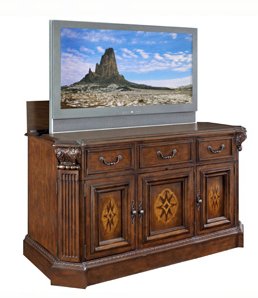 Placing the cabinet at the foot of the bed, you can watch TV in bed but have the TV out of sight when not in use. • Motorized TV mounts - ceiling, pop-up, drop-down, lift Companies selling HDTV mounts - Look for products they offer online to narrow your choices. • How to wall mount your HDTV • SANUS HDTV WALL MOUNTS • PEERLESS HDTV WALL MOUNTS See these below: http://www.youtube.com/watch?v=ayc_QRayoOw TV cabinet with motorized doors, TV stays in place http://www.youtube.com/watch?v=Pj9pEHZtaco&feature=related Hidden TV cabinet DiamondCase Remote controlled TV lift Can I mount my TV to bricks, stucco, concrete, instead of sheetrock? Yes, you just have to get the proper type of bolts to secure the mount to the material you are mounting the TV to. You also may need to use a hammer drill instead of a standard electric drill. Hammer drills are well suited for drilling holes in masonry or stone. They are also used to drill holes in concrete footings to pin concrete wall forms and to drill holes in concrete floors to pin wall framing. The hammering action helps to break up the masonry for removal. You will need to use masonry drill bits instead of wood drill bits. You also may want to use a security strap attached to the TV and the wall for extra insurance should the TV mount ever fail over time. http://www.concretefasteners.com/ CABLE MANAGEMENT Cables running from the TV to the DVD player, Home Theater Surround Sound, Bluray or Satellite Box can be hidden either behind the wall (requires cutting holes in the wall) or on the surface of the wall using cable raceways which can be painted the same color as the wall. • Cable Management Solutions • Wall Mounting HDTV - Companies, mounts See also: • Plasma TVs - top ten things before buying HDTV • PC stereo hookup • VCR Recording • In wall speakers video audio • How to hook up a Plasma or LCD HDTV • How to hook up a Cable TV box • Cable TV - Cable Box Setup • How to Install a HD Cable Box • Surround Sound over HDMI • Surround Sound - How to Hookup • HDTV Antennas and Reviews • HDTV BUYING GUIDE in 9 EASY STEPS • See over 100 hookup diagrams • Bluray Players, internet-enabled, Netflix movie streaming • Cable Types, audio/video for TV, explanation • Hookup diagrams, TV, VCR, DVD, Digital cable box • How to Hookup an Audio Video Receiver o DVR for free TV cord cutters • Audio Video Connections • HDTV Basic Setup • see over 100 Hookup Diagrams • TV input select • Timer Record Radio Shows on a VCR • Camcorder hookup to TV, DVD • Audio Video Connections • See over 100 Hookup Diagrams |