|
|
|
Columbia
ISA home –
› Wiring
Diagrams • Camcorder Formats Hook up a Camcorder to TV, VCR, DVD Recorder, PC |
| How to Hookup a Camcorder Connecting a Camcorder Analog or digital; TV, VCR or DVD recorder; even a computer, can all be connected to your camcorder.
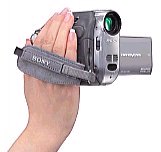
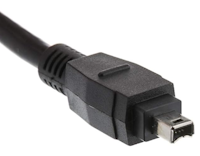
• Audio Video Cables Connection Guide Almost any camcorder can be connected to almost any TV. However, newer TVs with HDMI inputs and high-definition video resolution are not going to show an old Video8 8mm video tape on the screen with high video resolution. That being said there are many ways to connect camcorders to TV, old or new. Camcorders, when sold, usually have the cables of the era needed to connect to devices of the same era. Finding the compatible A/V cables for used camcorders may be more difficult as the technology advances. Common Camcorder Video Cassette Resolutions • VHS-C (12.7mm analog 1982) video tapes are 240 to 320 lines resolution. • Video8 (8mm analog 1985) video tapes are 240 lines resolution, about the same as VHS. • Hi8 (8mm analog 1989) has 400 lines. • Digital8 (8mm digital 1999 to 2005) recorded digital-quality video (720x480 pixels) about the same as MiniDV. • MiniDV (6.35mm digital 1996 to 2010) 720x480 NTSC. Sony produced 3 different formats in the 8mm video cassette range with 30, 60, 90 and 120 minute tapes, 8mm, Hi8 and Digital 8. A Video8 camcorder will only play video8 8mm tapes. A Hi8 camcorder will play Hi8 and video8 8mm video cassettes. A Digital 8 camcorder will play all three formats. Video8, Hi8, and Digital 8 cassettes cannot be played in a regular VHS VCR. However, Sony did produce many 8mm video cassette players and recorders (8mm VCRs) but these units are very rare now. Therefore, you will need the proper 8mm camcorder to play and transfer these video cassettes. • Standard Definition (480p): Older, tape-based cameras (e.g., MiniDV). • High Definition (720p) • Full HD (1080p): high-quality, sharp video. • 4K UHD (2160p): pixels. SD (Standard Definition) 480p 4:3 640 x 480 HD (High Definition) 720p 16:9 1280 x 720 Full HD (FHD) 1080p 16:9 1920 x 1080 4K or Ultra HD (UHD) 2160p 16:9 3840 x 2160 8K or Full Ultra HD 4320p 16∶9 7680 x 4320 Hopefully you have an old TV that matches the time frame of your camcorder. Old 8mm, VHS or VHS-C camcorders had RCA audio and video jacks to output to a TV with RCA inputs. Some SONY 8mm camcorders even had a RCA to RF adapter to connect to a TV with only an RF antenna input. But if you only have a new TV with HDMI inputs, you can buy a RCA to HDMI adapter/converter to connect. RCA to HDMI converter will allow old camcorder to new TV hookup. The newer digital camcorders had mini-HDMI or micro-HDMI output ports to connect to a newer TV with HDMI inputs. 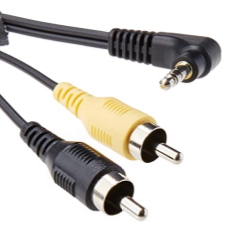 Cable needed to connect analog camcorder to TV or VCR. (Mono audio) 3.5mm to RCA. Black RCA cable goes to white RCA audio input on TV. (next to yellow RCA input).  Cable needed to connect camcorder to TV or VCR (Stereo audio) 3.5mm to RCA. Yellow video, white audio (left), red audio (right) 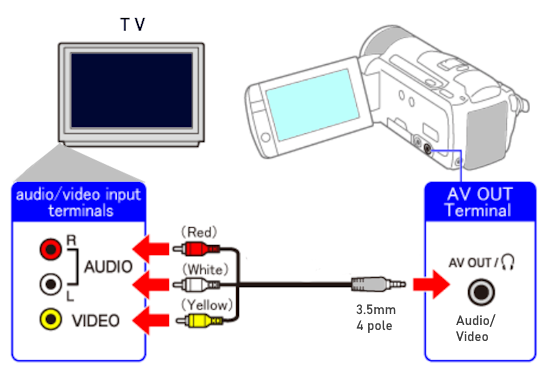 Typically these cables were supplied with the camcorder but if not available, buy online. Q: Can I play my camcorder recordings on a TV with only HDMI inputs? A: Yes, just buy a RCA to HDMI adapter. ANALOG CAMCORDERS - Hook UpIn the early 1980s, the first consumer camcorders were available from Sony, Panasonic and others. Sony introduced the Betamovie BMC-110 (NTSC) which recorded on a Betamax video cassette. Panasonic offered a full-sized VHS camcorder (OmniMovie) which recorded on the same VHS cassette as used in a VHS VCR. The Sony Betamovie was a record only camcorder. The recorded Betamax video cassette had to be played back in a Betamax VCR connected to a TV. The Panasonic OmniMovie VHS camcorder was designed to both record video and also play it back. The Panasonic VHS camcorders had an adapter for charging the battery and for connecting to a TV or VHS VCR. The adapter unit connected to the camcorder with a 14 pin proprietary cable for power and to transfer audio/video. The adapter unit had both RCA (yellow/white) and RF coaxial ports. 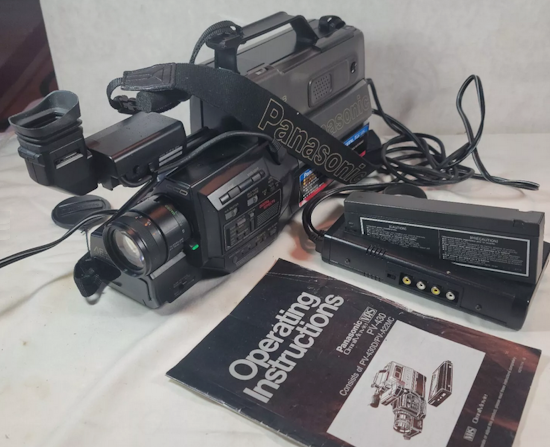 Panasonic camcorder, OmniMovie, VHS with Power adapter, battery charger, audio/video RCA ports The power adapter plugs into AC wall outlet, has an RF modulator (NTSC analog TV channel 3 or 4) for RF coaxial connection, RCA In and Out ports for composite video and mono audio and a cable connection to the camcorder. 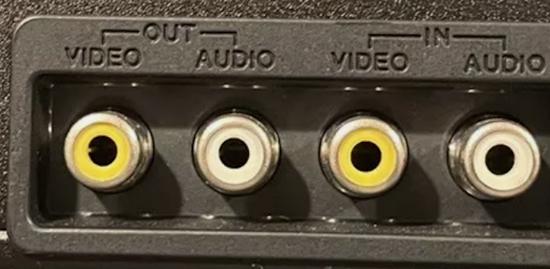 Power adapter/charger has In and Out RCA ports for TV or VCR hookup. To connect to TV, use the OUT ports and play a VHS tape in the camcorder to view on TV. Audio was typically Mono, so only the white RCA audio cable was connected. 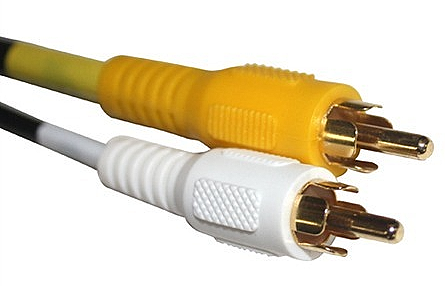 Yellow Video RCA cable and White Audio (Mono) RCA cable 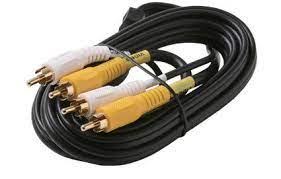 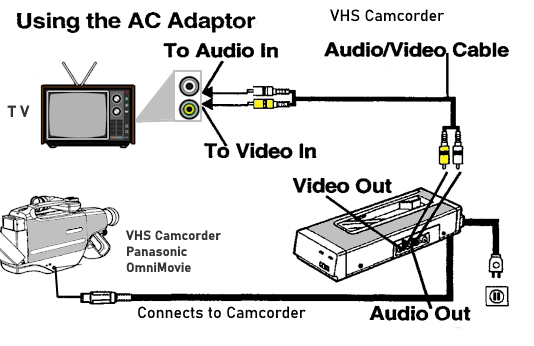  AC Adapter/Charger Panasonic OmniMovie VHS camcorder The large brick type batteries slid into the charger's long slot. You may be able to find a replacement battery from BatteryMart.com • Battery Mart Later, in 1986-1987 era, a VHS-C or compact camcorder was introduced using a smaller video cassette which could be used in a VCR by placing the cassette in an adapter. These old camcorders had poor video by modern standards and usually only mono audio. Advancements in tecnology later reduced the size of camcorders and cassettes but this also created incompatible formats for use in the VCR.  Consumer Video Cassette Tapes Connect to smart TV You may want to connect your old analog camcorder to your TV so you can watch those old videos. If you have a newer TV with only HDMI inputs, you may need to get an RCA to HDMI adapter to connect. These inexpensive little adapters take RCA input (yellow, white, red) and output HDMI. 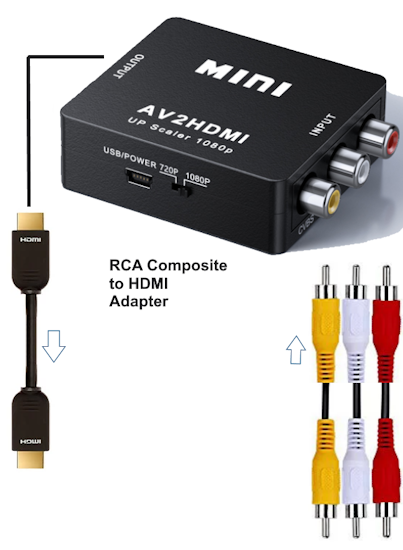 Connect the camcorder RCA cables from camcorder to adapter's RCA inputs and an HDMI cable from adapter's HDMI OUT to one of the TV's HDMI inputs. Then select on the TV, the correct HDMI input, switch camcorder to VCR mode and press PLAY on the camcorder and enjoy your videos on the TV screen. SONY 8mm camcorders 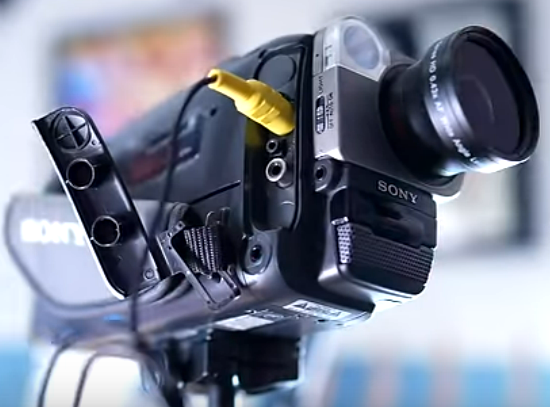 Most camcorders are digital models, but if you have an analog VHS-C or 8mm camcorder, your connection options are limited to RCA audio/video cables from camcorder to TV or VCR, or in the case of VHS-C, you could also use the adapter cassette in a VCR. 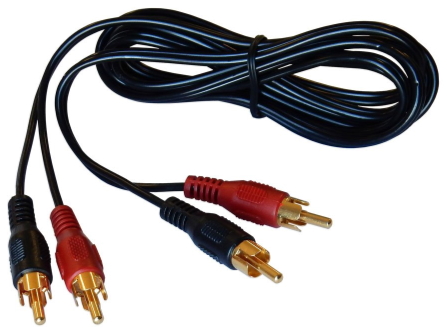 For hookup to a computer you'll need an interface card in your computer with composite audio/video inputs (yellow, white, red) or an S-Video input if your camcorder has S-Video. You can connect a DVD recorder to your VCR to copy your audio/video to a DVD or you can hookup the camcorder directly to a DVD recorder using RCA composite cables to the DVD Recorder RCA composite input jacks. 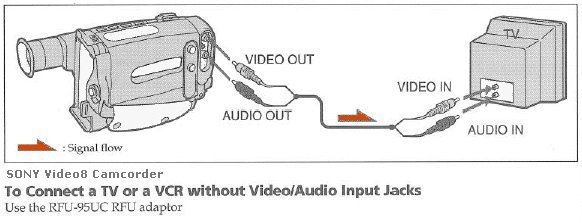 If your TV only has a single RF (antenna) input, you can use an RF Modulator to connect the camcorder to TV. 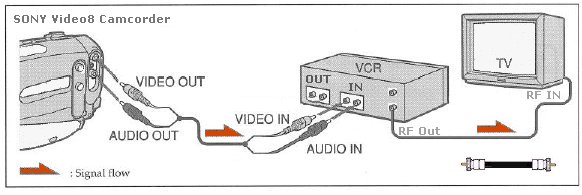 Transfer video tapes from analog camcorder to VCR. Record to VHS tapes. The same connections apply to a DVD recorder to create a DVD from camcorder tapes. Select proper input on the TV (channel 3 or 4) or Line input.  Open the plastic door on the above camcorder to hookup RCA cables to the yellow video and black mono audio. Connect the other ends of the cables to the matching TV RCA inputs. Select correct input on TV. Insert tape into camcorder. Press play on the camcorder to play a tape to TV. Newer camcorders offered stereo sound so connect the RCA yellow video and white and red stereo audio cables to a VCR or TV inputs.  VCR yellow video and white and red stereo audio inputs connected. 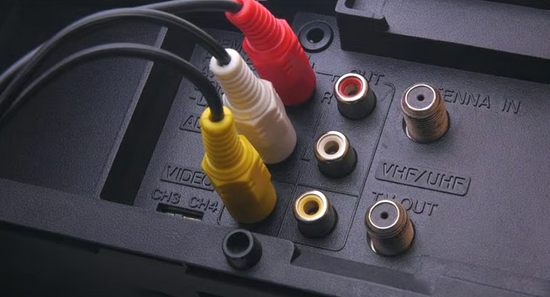 Set VCR to correct LINE input. Panasonic VHS-C Camcorders The VHS-C or VHS compact video cassette can be played in the VHS-C camcorder or in a standard VHS VCR by using an adapter. 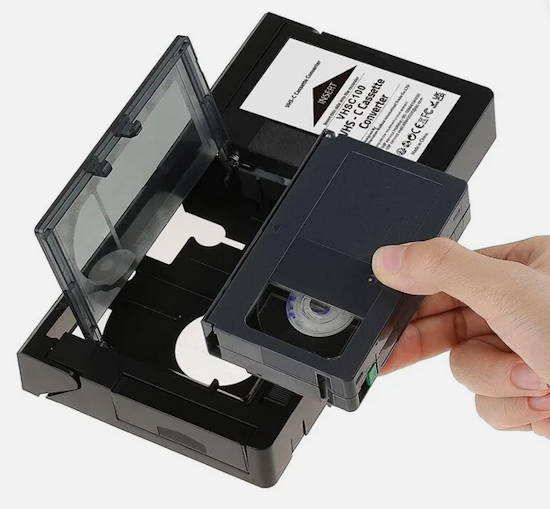 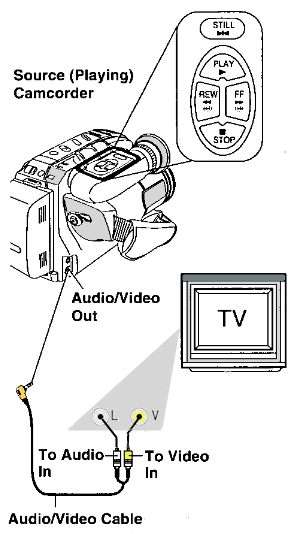 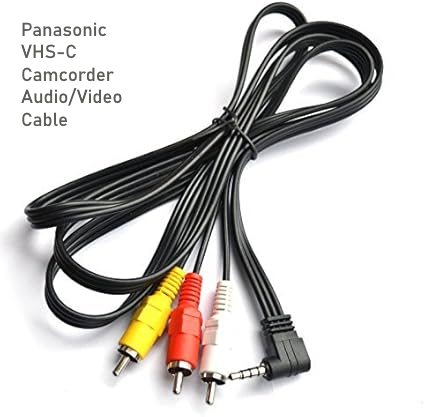 VHS-C camcorder such as the Panasonic models of the 1990s hookup to TV using RCA inputs. Select the proper input on TV using TV remote. Press Play on camcorder.  Panasonic VHS-C Camcorder with 3.5mm Audio/Video port Computer Connection Also, you can capture camcorder video and audio to your computer using a video capture card with RCA inputs and associated software. Then, using software on the computer, you can burn a DVD if your computer has a DVD burner. 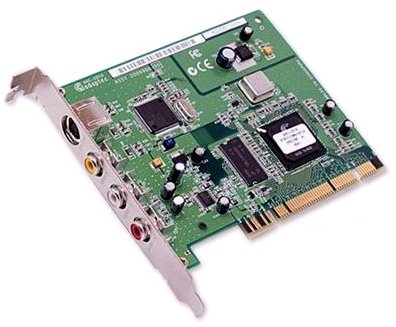 Computer Video Capture Card with RCA composite inputs How to Install pci card in computer DIGITAL CAMCORDERS - Hook Up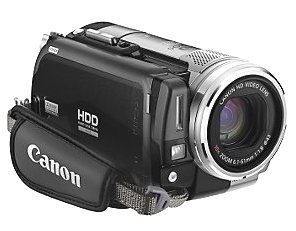 Canon Hard Disk Drive (HDD) High Definition camcorder 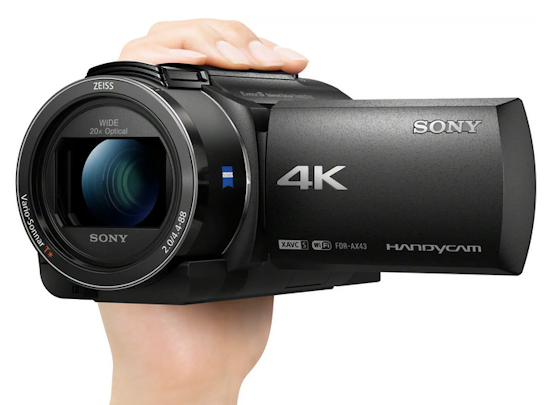 Sony FDR-AX43A UHD 4K Handycam Digital Camcorder With digital camcorders such as the Mini-DV, Mini-DVD, HDD, and flash memory card models, you have more options to hookup your camcorder. Often digital camcorder manufacturers such as Sony, use a proprietary connector to hookup camcorder to TV. The audio/video ports sometimes are combined into a single multi-pin jack. In addition, the digital camcorders offer ports to connect TVs, computers or DVD recorders. These include the Firewire or i.Link IEEE-1394 digital video connection and the USB 2.0 Universal Serial Bus connection. High Definition camcorders offer even more with component video hookup and micro-HDMI ports.   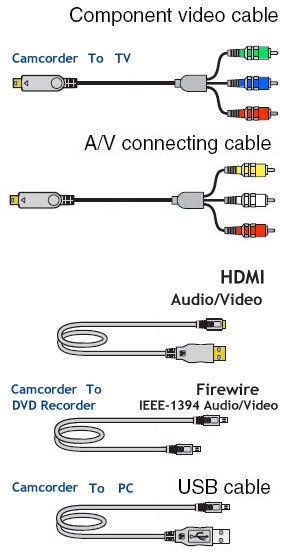 Camcorder connection to TV can use composite, component or HDMI hookup. For High Def TV, use component video or HDMI. For a computer, use USB 2.0 connection. 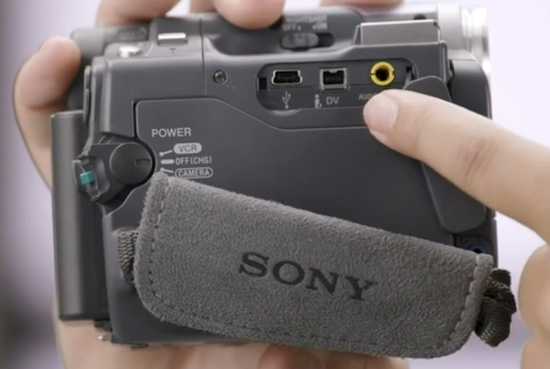 Camcorder ports from left - USB, Firewire, Audio/Video (RCA composite). The composite video (yellow) and the two audio channels (white and red) use a single 1/8 inch plug to the camcorder while the other end of the cable uses the standard RCA connectors. 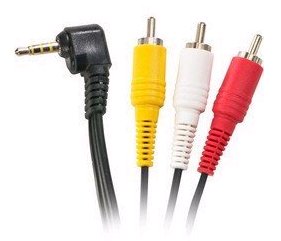 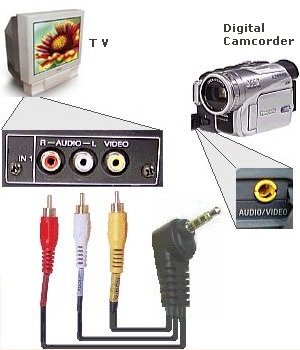 Digital camcorder hookup to TV using Audio/Video cable typically supplied with camcorder. 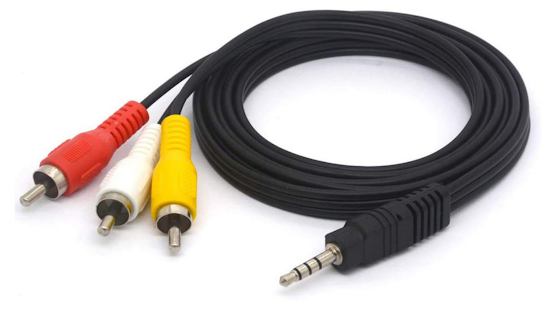  Proprietary connection combines cable hookup using multi-pin connector at camcorder end. 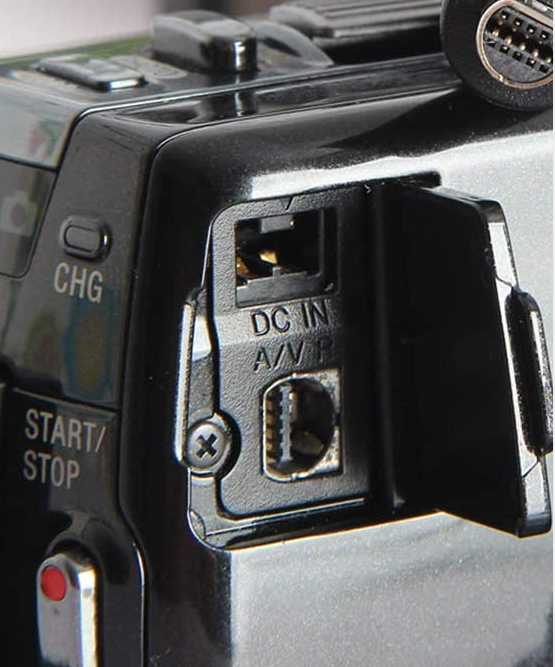 10 pin multi-connector on camcorder uses breakout cable to connect TV 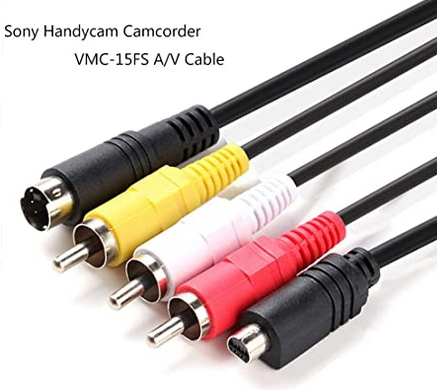 Proprietary connector can be different for the various cables/camcorders so be sure to get the one matching your camcorder. 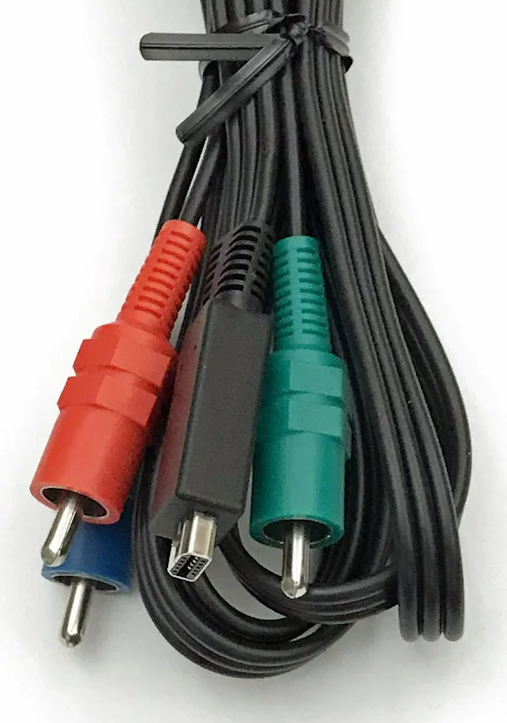 Component video cable with multi-pin connector.  Camcorder to TV hookup using component video/audio HIGH DEFINITION CAMCORDERS With the High-Definition era, we are seeing HD camcorders with the HDMI output port. High-Definition video at 720 or 1080 or 4K lines of horizontal resolution can be played back on a HDTV using the HDMI port on both the camcorder and the TV. These camcorders usually have multiple ways to connect, including HDMI, component video or composite video. You need to use the correct cable and port to connect. 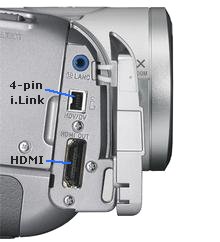 Camcorder with HDMI Out and i.Link connection. Digital Camcorders often have the Mini-HDMI or Micro-HDMI port. The cable you need is typically not included with the camcorder. The cable has a standard HDMI connector on the end for the TV and a Mini-HDMI or Micro-HDMI connector on the camcorder end. 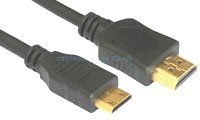 HDMI cable with standard HDMI on top and Mini-HDMI on bottom 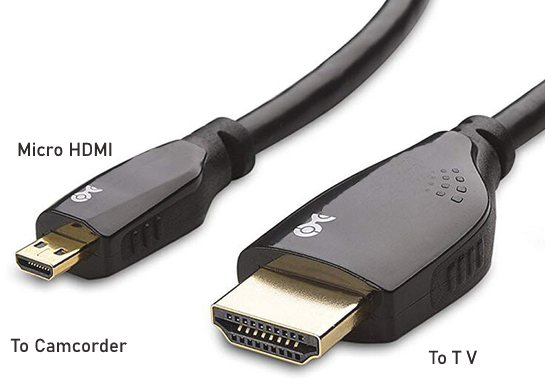 Cable with Micro-HDMI to HDMI 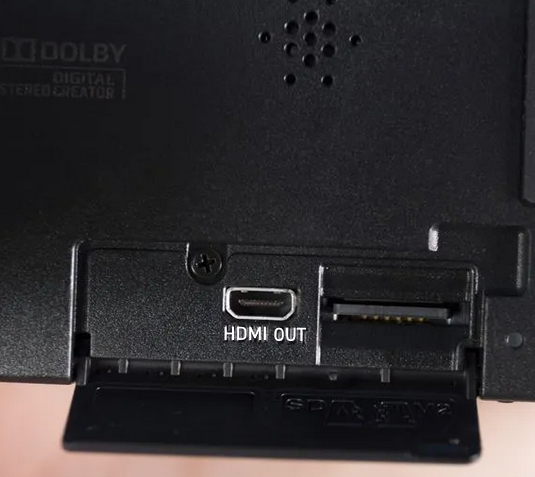 Open the camcorder screen and then pull open the plastic door to access the Mini or Micro-HDMI port on the camcorder. Plug in the HDMI cable to the HDMI port and plug the other end into the TV's HDMI input. Power ON the TV and the camcorder, then put the camcorder into "Play Mode". Switch the TV's source input to the correct HDMI port. 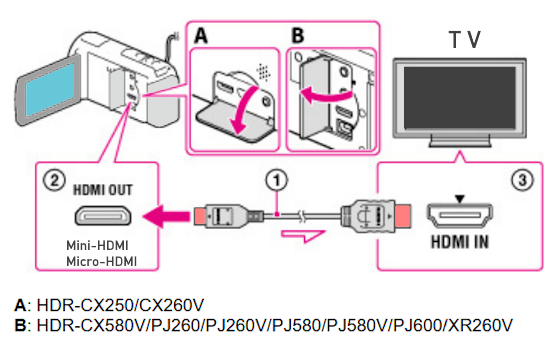 Diagram shows camcorder connection to HDTV using the HDMI / Mini-HDMI cable. 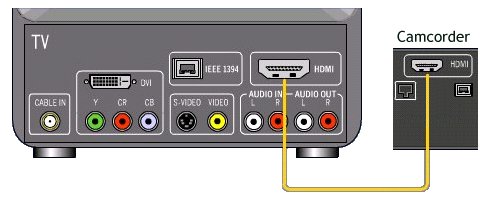 Camcorder to TV hookup using HDMI. 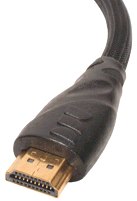 HDMI CABLE The HDMI interface combines audio and video into a multi-pin connection and carries the video and audio information in a digital form. Many HDTV display panels offer HDMI input. 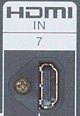 HDMI port on HDTV. High Definition requires different cables than standard resolution video seen in the past with VHS, 8mm etc. You need to use a 3 RCA connector cable called component video or a HDMI cable in order to get High-Definition. The component video cable has a green, red, and blue 3 connector configuration and looks very much like the yellow composite video connector. However, component video is capable of carrying the high definition video where the yellow composite video cable cannot. 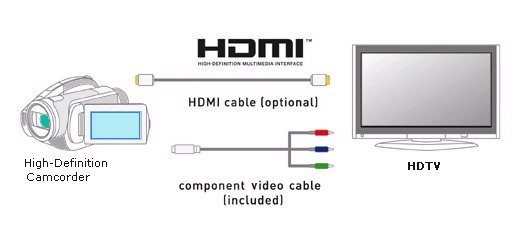 Connecting a digital camcorder to a DVD recorder using Firewire 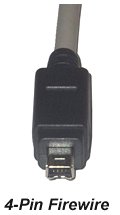 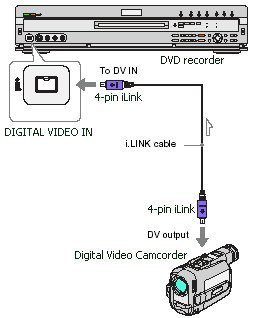 Firewire or i.Link (Sony) is the connection to use to hookup a digital camcorder to a DVD recorder. You can copy MiniDV tapes to recordable DVD with a 4-pin camcorder connection. 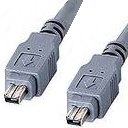 i.Link/Firewire cable (4-pin to 4-pin) Diagram shows camcorder to DVD recorder connection using Firewire. 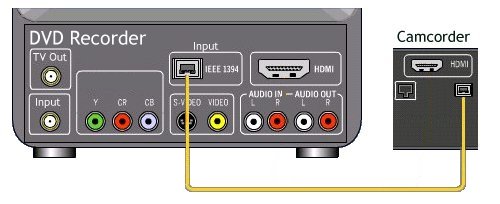 Connect a TV to the DVD recorder so you can monitor the transfer from the camcorder.
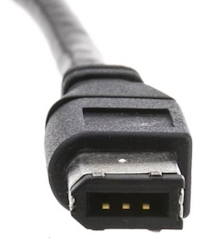
You can also use a Firewire connection to hookup a digital camcorder to a PC or Mac computer. The computer end will have a 6-pin Firewire hookup or a 4-pin. You need the correct cable for your computer. You can edit your video on the computer and then burn a DVD with the completed work. You can take out unwanted scenes, rearrange sequences, add audio and more. You can add Firewire to a desktop computer by installing a Firewire PCIe card. 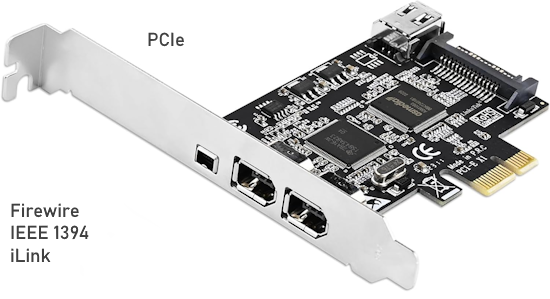 Camcorder hook up to Computer using USB 2.0 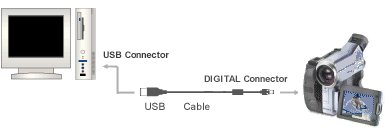 Many modern digital camcorders use the USB 2.0 connection to hookup camcorder to computer. Transfering audio/video recordings to a computer's hard disk is as easy as plugging the small end of the USB cable into the camcorder's USB port and the larger end of the USB cable into the computer's USB port. Then using software on the computer, you can transfer, edit, copy and send your recordings or make still images. Today's operating systems often will recognize the camcorder connection and activate a selection of options for you to copy recordings to the computer. Then you can burn a DVD or upload to the internet. Sony camcorders and others usually ship with the software needed to transfer your footage to a computer. Check the manufacturers website for the software if you need it. See the following link for information on transfer of camcorder video to computer if Windows operating system is newer than camcorder video capture software. You may need a software driver. Transfer camcorder to PC - video capture under Windows. • Copy video from Sony Camcorder to Computer using USB MTP - (YouTube) Computer operating systems compatibility: Windows PC can have compatibility issues with software used by camcorders. Your digital camcorder ships with software which is usually only compatible with the current, at that time, Windows PC software. As Windows progresses over time from Windows 95 to Windows XP to Windows Vista to Windows 7, 8, 10, your camcorder software to connect camcorder to computer may have become outdated. This could be a reason to keep that old PC. Otherwise your camcorder could become incompatible with the new computer. For example, a camcorder sold when Windows XP was current may not work for a computer running Windows Vista or later. There may be a work-around. Getting a driver (software) which works for the older Windows OS installed in the newer Windows version may allow the camcorder software to work under the newer Windows operating system. See the following link for more information. Camcorder video capture 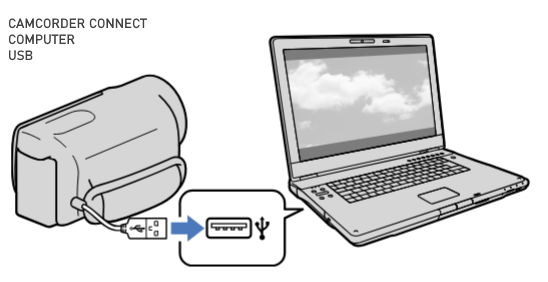 To connect a Sony Handycam camcorder with a built-in USB cable to a computer, power on the camera, extract the USB cable from the hand strap, and connect it directly to the computer's USB-A port. Select "USB Connect" on the camcorder's LCD screen, allowing the computer to recognize it as an external drive so you can transfer files. If the connection is successful, a folder or drive for your camcorder should appear on your computer. For Windows, look under "This PC" in File Explorer and USB Drive. Open the drive, navigate to MP_ROOT or AVCHD folders (or DCIM) to find and copy your videos and photos. Right-click any of the selected files and choose Copy. Paste the files into a different folder on your computer. What does DCIM mean? Digital Camera Images Copy your VHS tapes to DVD using your laptop and capture software If you have a laptop computer, it probably has a DVD burner. This means you can create DVDs from your videos using capture software and a small video converter which plugs into your laptop's USB port. You can use different software to capture your video and there are several capture devices available which hookup to the USB port on a laptop. If your laptop shows DVD-RW or says recordable on the drive, it is most likely a DVD burner drive and can record on blank DVDs. See the Honestech VHS to DVD 5.0 product from Amazon.com Supports Windows 7 / Vista / XP • YouTube video on the VHS to DVD • Honestech.com VHS to DVD 5.0 Deluxe Save your home videos and photos onto Blu-ray Disc media without a PC. From video tapes to digital images, the VBD-MA1 preserves your memories quickly and easily. Record high-definition AVCHD video from your camera or camcorder. Built-in slots accept multiple memory cards. Preview videos and photos on the 2.7-inch LCD screen. Sony VBDMA1 DVDirect MA1 Multi-Function Blu-ray Disc/DVD Recorder
• Sony Bluray/DVD recorder VBD-MA1 Select Canon VIXIA camcorders (HF R32 and HF R30) have built-in Wi-Fi which allows you to transfer your video to a computer on the same network such as your home network. Sony Handycams with Wi-Fi: 4K Models: FDR-AX700, AX100, AX53, AX43A, AX43, AX33, AXP35 (Built-in projector). Full HD Models: HDR-CX675, CX440, PJ440 (Projector), PJ350, CX45, CX410VE, PJ650VE, PJ780VE. Copy Camcorder Video (Sony HDR-CX405) to Computer 2015 Camcorder uses USB Type A to computer for direct transfer of videos. Connect the built-in USB cable to computer and set camcorder to use 'MTP' instead of mass storage. Then you should be able to browse the video files and copy them to your PC. • Sony HDR-CX405 transfer - YouTube video Copy Camcorder Video (MiniDV) to Computer Basic components you will need to copy video/audio from camcorder to computer file. 1. Video capture software compatible with your computer's operating system. 2. Video source (tapes, disc, memory) previously recorded. 3. Camcorder - functioning properly and compatible with video source. 4. Video capture device or interface. 5. Computer with enough free file space to contain your recording. 6. Connecting cables compatible with your computer and camcorder. Adapters can be used to match cable connectors for compatibility. There are many ways to get video onto a computer from a camcorder. If you have MiniDV tapes, which many people have from the 1990s and early 2000s, there is always the question of which method to use to transfer. Should you use IEEE 1394 Firewire (iLink), which would be an all digital solution or would it be fine to use analog RCA Audio/Video. The data on the MiniDV tape is digital and it will end up being digital on the computer so Firewire would be the best solution. However, Firewire is outdated and requires specific compatible ports and cables which you may not have available. You will not find Firewire ports on most modern computers even though the camcorder has one. However, you could add Firewire by buying a Firewire PCIe card and installing into your desktop computer. Then all you need is compatible cables. The alternative is using the analog solution as most MiniDV camcorders also have composite video and stereo audio combo ports, usually 3.5mm 4-pole yellow. Many capture devices connect the yellow, white, red RCA cables and output to a USB Type A connector for the computer's USB Type A port. There are also other analog to USB capture solutions. USB 2.0 can handle video and audio. Q: If USB 2.0 can handle video and audio, then why can't I just connect Mini-USB cable from camcorder Mini-USB output to computer USB-A port and transfer the data digitally using USB? A: Yes, you can. In fact, this is how it was done back when MiniDV camcorders and Windows XP were current. However, you needed to load a specific USB driver which was supplied on a CD, and was compatible with Windows operating systems of that era. When Microsoft Windows advanced to improved operating systems, the USB driver was not updated and therefore did not work with the newer OS. If you have or can buy a Windows XP era computer and can get the USB driver, then you can use software such as Sony's ImageMaker to capture video digitally using USB. This may not be possible for most people. Firewire also may not be a solution many people want to try because the hardware is not available or for other reasons. Note: The USB cable connection from camcorder directly to computer USB-A port will work fine without a specific USB driver on modern Windows computers such as Windows 10 but only for still images. MiniDV camcorders such as the Sony DCR-TRV22 had a memory stick slot to store still images. By switching into "Memory" mode instead of "Camera" or "VCR" mode, you will see on the camcorder display screen "USB MODE" and still images will be sent to the computer. The Analog Solution: Some may say analog transfers result in lost video resolution which may be somewhat true. But many people are fine with analog transfers. It is a generally simple solution and costs are low. 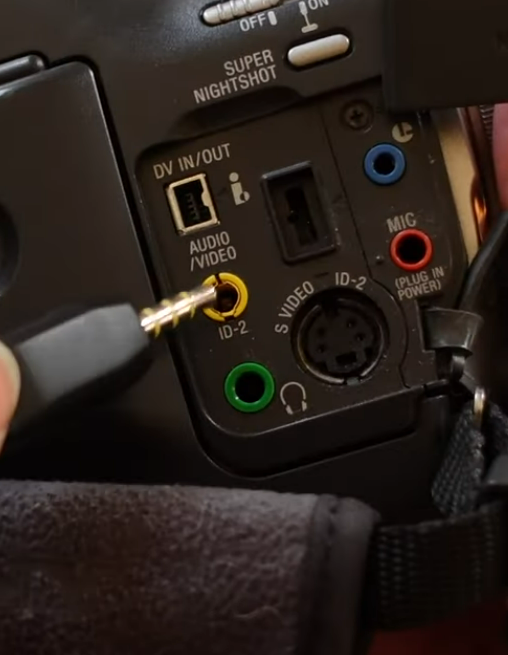 SONY MiniDV Camcorder Ports The yellow 3.5mm analog Audio/Video port is just below the 4-pin Firewire (DV) port. Connect the 3.5mm cable with RCA male connectors at the other end. 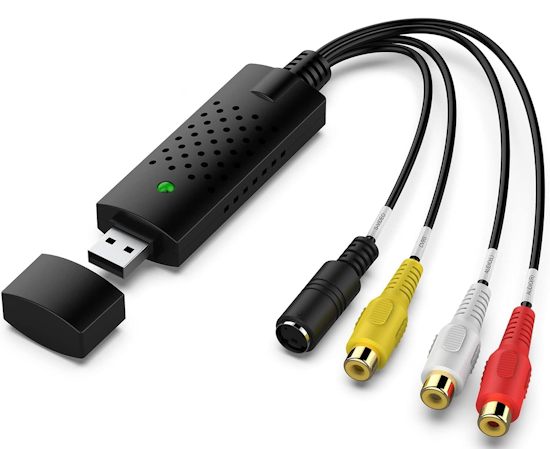 Video Capture device - RCA to USB Connect the cable from the camcorder (RCA end) into the RCA female ends matching the colors, yellow to yellow etc. Plug the USB end into the computer's USB-A port. Power ON camcorder. Insert video cassette into the camcorder transport. When ready, put the camcorder into "VCR" or "Play" mode. Be sure to position the tape at the spot where you want to start. VIDEO CAPTURE SOFTWARE You have to download, install and run video capture software on the computer. One good option is OBS (obsproject.com) which is free. OBS or Open Broadcaster Software is a open-source free tool that lets you record your computer screen, capture video and audio and record to a file on your computer. At first, OBS seems confusing and overly complicated. Take some time to work with this program, possibly doing some test runs before recording your video. After learning more about the options, setup and landscape of OBS, you will be able to meet the challenge and get your video on your computer. In this example, a Windows 10 DELL desktop computer running OBS 29.0.0 beta1 (64 bit). OBS is updated frequently which could be good or bad. You can get previous versions at: https://github.com/obsproject/obs-studio/releases?page=7 Click on "Assets" to download. Configure and setup the capture software for your recordings: OBS has many options but you only need a few to be successful in getting video and audio on the computer. OBS capture software steps to setup: • OBS setup YouTube video Later version of OBS • OBS setup YouTube video Run the OBS program on your computer. 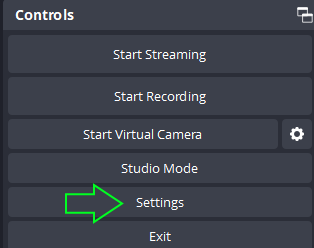 To get started, click on "Settings" in the Controls panel or click on (top left) FILE > SETTINGS and then in the settings window, select OUTPUT. Output Mode: set to simple. Recording format: set to mp4. Set the Recording Path to the destination you want such as C:\Users\Owner\Videos On the left, click on AUDIO. For Global Audio Devices, set your desktop speakers for sound monitoring. You need to add SOURCES such as "Video Capture Device" for video and "Mic/Aux" for sound. These sources will be used as configured. For the USB connection, the video capture device should be set to "USB Video" in Properties and the Mic/Aux should be set to "USB Digital Audio". 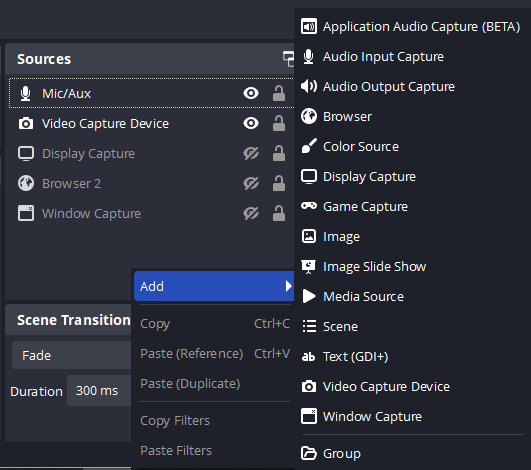 Right click on the SOURCES panel and then select "Add" to add a source such as Video Capture Device. Until the camcorder is connected to the computer, you cannot select "USB Video". Also, OBS sometimes will not recognize the camcorder signal. The solution here is to go into Properties for Video Capture Device and toggle/select between "OBS Virtual Camera" and "USB Video". By selecting one and then the other, it seems to jump start OBS to recognize the USB video signal from the camcorder.  If you are not getting sound Make sure to enable in Windows "settings", the microphone for apps, otherwise you may not get any sound. 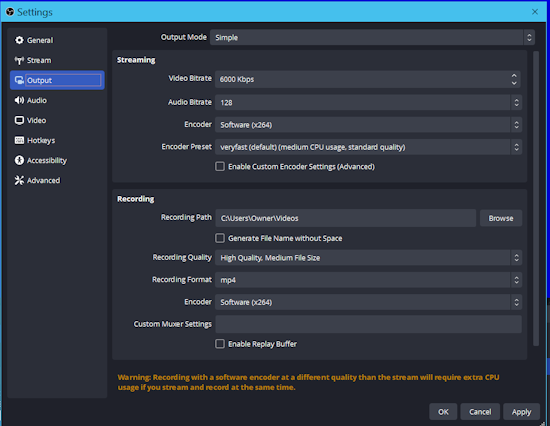 Right click on the video capture device source and select "Transform" and "Fit to Screen" to make sure you get the entire frame captured. Click on "Start Recording" in OBS Controls panel, then, press the PLAY button on the camcorder. This is a one for one recording time frame so you will need to wait for the entire time of the recording to get to the end or until you decide you have what you want recorded. When finished, click on "Stop Recording" in OBS Controls panel. Press the Stop button on the camcorder. OBS will create a file on the computer with the data you just recorded. Look in the path you designated on the computer. You now have your video tape recorded on the computer. You can playback the video file using VLC media player or other player software. The files tend to be large so make sure you have enough space. Now you can do many things with the file such as make a backup copy, load to internet, share on the big screen TV, copy to a flash drive for portability and more. For editing your video, there are many free video editing programs. Search online to find the popular editing programs for your computer's operating system. • See over 100 hookup diagrams • How to choose a camcorder • See over 100 Hookup Diagrams Columbia ISA Audio Video Empowering consumers through information Contact: columbiaisa@yahoo.com SWS |