
 |
| Camcorder Video Capture Transfer camcorder video tapes to PC 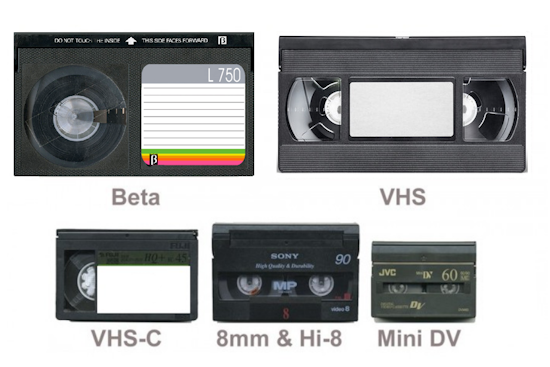 You have some old video tapes and you want to digitize them. They may be VHS or 8mm or MiniDV. You can transfer them from a VCR or a camcorder over to your personal computer using a video capture device and associated software. Once the video is in digital form on the computer, you can transfer to a DVD (or Blu-ray if your computer has a Blu-ray burner) or if you have plenty of disk space on your computer, you can simply watch the video on the computer or on the big screen TV by connecting the computer to the TV. Of course if you are going to do this yourself, you need some gear from the old days. Hopefully you hung on to your old VCR or camcorder but if not, you may be able to buy a used VCR or compatible camcorder on E-bay or locally from Craigslist or even Amazon.com or possibly borrow from a friend or family member. On the other hand if you want to avoid the hassle of doing this yourself, you can always go to the professionals. However, be prepared to pay for this service. Depending on how much source material you have this could get very expensive. The top rated services for digitizing your old tapes are: • iMemories.com • Legacy Box • Scan my photos You can even go to Costco or Walgreens or Walmart. These companies do not do the digitizing themselves but send out to a contract business to do the processing. Video Capture There are many video capture kits you can buy to transfer video tapes to computer and most have the same type of setup. A video capture device with RCA cables at one end to connect to the source (tapes) and a USB Type A connector at the other end to connect to the computer. In between is the analog to digital converter. Also you will get the associated software to run on the computer. This software has to be installed on the computer and then you can play a tape and capture the video and audio on the computer. 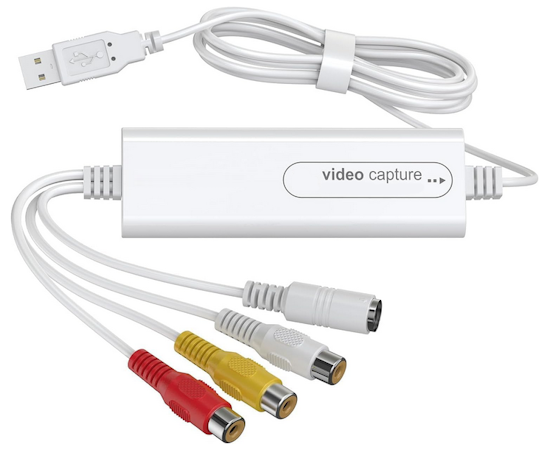 Yellow is video and white is mono (left channel) audio. Red is for stereo (right channel) audio. Some devices offer a S-video connection which can remain unused. Cables to connect source to capture device 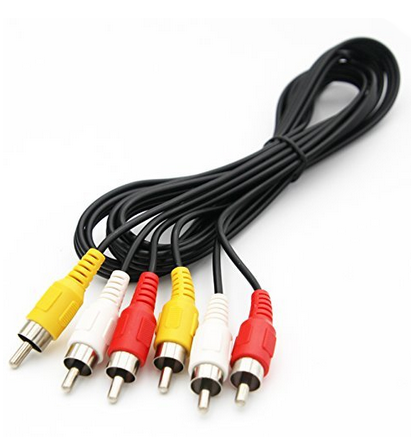 Use a cable like the above to connect a VCR (VHS) to the capture device. Also use this cable to connect a camcorder which has RCA video and audio outputs. This includes camcorders from the 1980s and 1990s such as the Sony 8mm and Hi8. 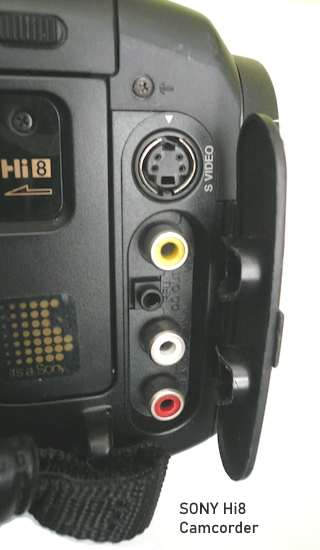 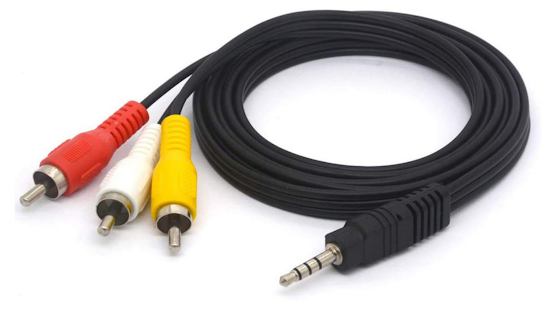 Use a cable like the above to connect a source like a camcorder to the capture device. In the early 2000s, camcorders went "digital" and the ports changed from RCA to a 3.5mm multi plug audio/video or a proprietary audio/video connection. 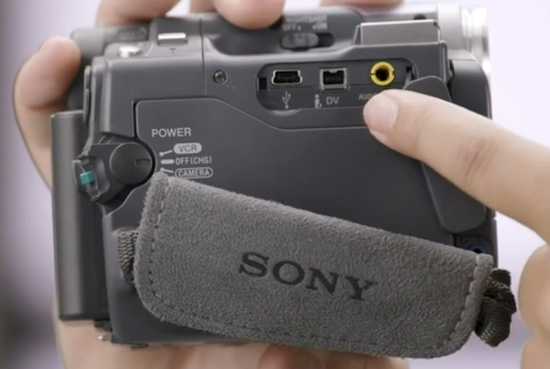 SONY MiniDV camcorder. The yellow port is the 3.5mm multi AV analog connection. 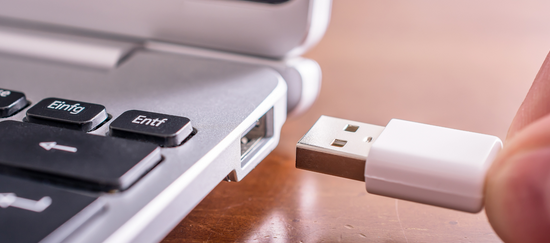 Insert USB Type A of the capture device into the computer's USB port. 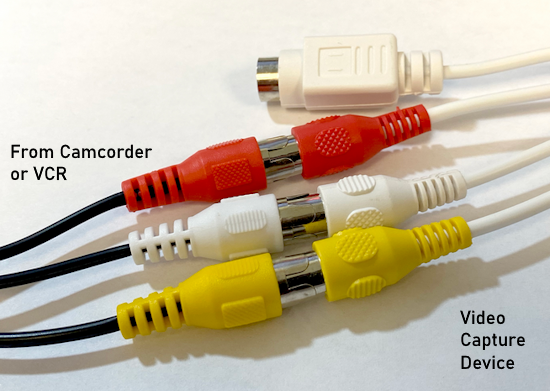 Connect the RCA cables from the VCR RCA OUT ports or camcorder port(s) to the video capture device RCA cables 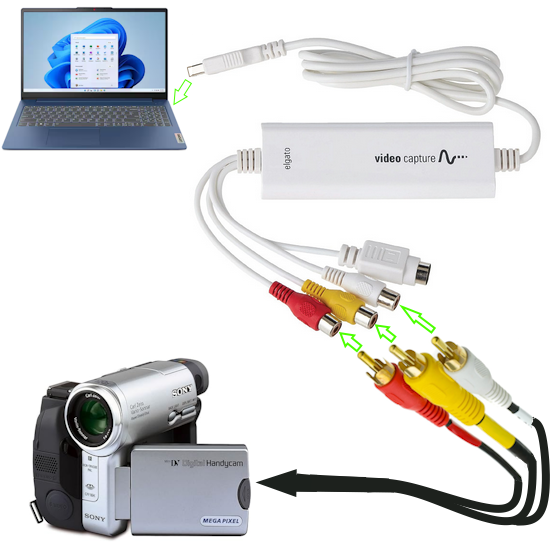 Connection diagram - video capture device to computer 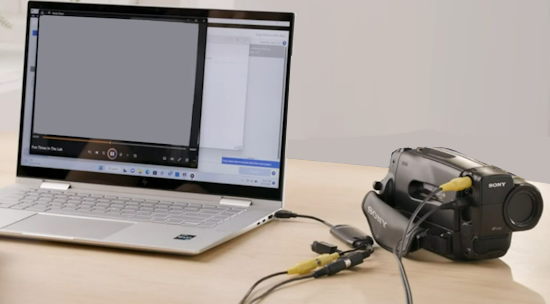 Camcorder connected to capture device which is connected to computer using USB Type A connection. Install the associated capture device software onto your computer. This may come with the device on a disc or you may need to download the software online from the website of the capture device seller. Power on the source device. Insert your tape. Run the capture software program on the computer. You may need to connect the video capture device to the computer before you can run the software program. Get started setting up the video capture by defining the capture file type if required and the location on the computer. If you do not change the location, the default may be the "VIDEOS" folder on Windows computers. Play a tape and see if the software program "sees" your input source device. Make sure to rewind the tape to the point you want to start the transfer. When all is setup, press RECORD on the software program on the computer and press PLAY on the source device (camcorder). The video will be transferred in real time so there is no speeding it up. When completed, check the file on the computer by playing the captured video. There are many capture setups around but the Elgato is one of the best. • Elgato Video Capture Program Transfer video to your Mac or PC from a VCR, camcorder, or any other analog video device as a high quality H.264 file. Elgato Video Capture’s easy-to-use software assists you through every step. The elgato video capture program has six steps, Get Started, Connect Video, Connect Audio, Record, Trim and Finish. 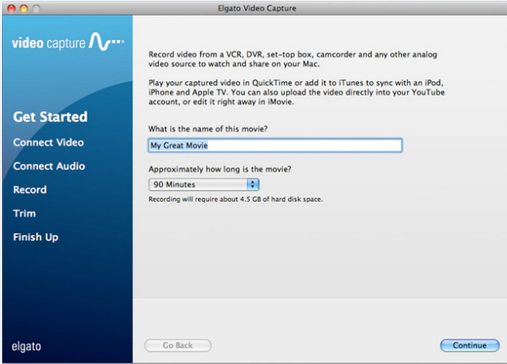 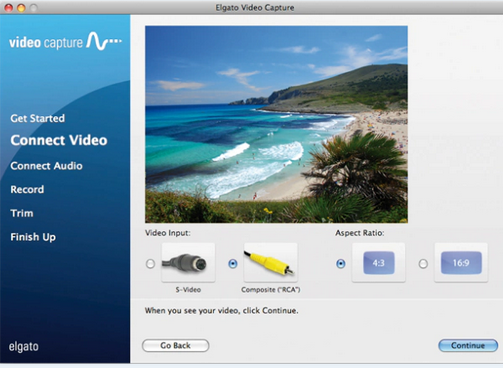 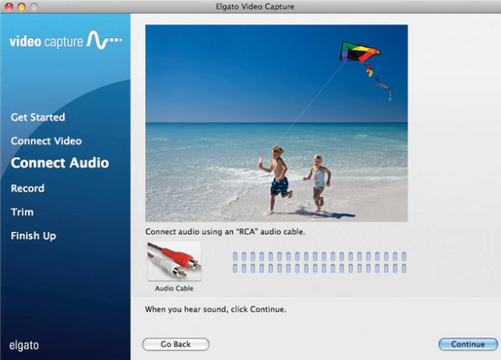 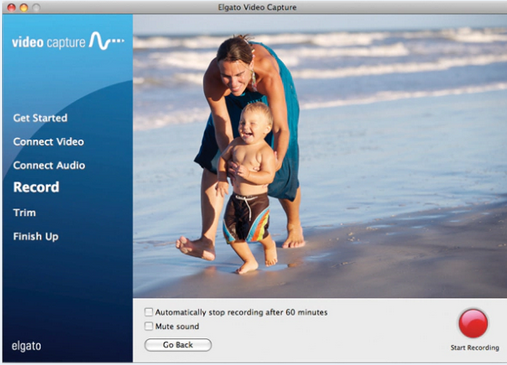 • YouTube video on elgato video capture VIDEO File Types MPEG-4, also known as MP4, is the most common file type for videos. The MP4 format is the standard format for web videos because MP4 videos are high-quality with relatively small file sizes. Not only is MP4 the standard for the web, but this video format is also used for TV. If you’re adding a video to your website or uploading a video to YouTube, using an MP4 video format is a safe bet. A video file will show up as "filename.mp4" Because video files can be large, programs called codecs were developed to make them easier to store and share. Codecs encode data to compress it for storing and sharing. Then they decode that data to decompress it for viewing and editing. The most common codec for video compression is H.264 If you want to burn your video to a DVD, MPEG-2 with an H.262 codec is the way to go. |
Camcorder Video Capture: Camcorder not recognized through USB? Camcorder Video Capture - Windows XP works but Windows Vista does not Problem - Unrecognized USB 2.0 camcorder connection in Vista Disclaimer Although the author has attempted to impart accurate information, modifications to standard Windows operating systems are inherently risky for the novice user and the author is not responsible for any damage or losses of any kind caused by the use of the following information. If in doubt in any way, consult a computer expert professional before executing any instructions below. Many people have bought Digital Camcorders in years past including Mini-DV tape based camcorders which were very popular in 2003-2005. Sony was a major player in the camcorder market in these years. A typical camcorder Sony offered in 2004 was the DCR-TRV22 model Handycam which was later replaced by newer MiniDV models and eventually by DVD, hard-disk and flash memory camcorders. In 2004 and 2005, if you were the typical Sony camcorder buyer, you bought your Mini-DV tapes and recorded your videos, played them back on your TV set using the supplied audio/video cables and all was well. Sony even supplied software which allowed you to capture your video from camcorder to your PC. Sony supplied a CD-ROM with the camcorder which contained the ImageMixer program to capture video from camcorder to computer using a USB 2.0 cable connection. The Firewire cable connection was also offered but often ignored because the consumer had to buy a Firewire cable and may not have had a Firewire interface card installed in their desktop PC or laptop at that time. 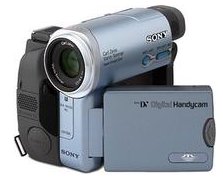 SONY Mini-DV tape based Handycam Camcorder model DCR-TRV22 • Sony product support Microsoft Windows XP operating system was the current OS running on Windows computers when these Sony MiniDV camcorders arrived. Microsoft has many priorities when it comes to software and even supplies extra utility programs for many tasks users may want, however, Microsoft cannot possibly include software for every manufacturers external device and make compatible over every release of new operating system for personal computers. The responsibility lies with the device's manufacturer to provide software to allow their device to work successfully with your computer's operating system software. Sony unfortunately did not update their software when Vista arrived. Sony probably expected you to buy a new camcorder with new drivers and new video capture software. Picture Motion Browser was Sony's replacement for the old ImageMixer package. Video capture from camcorder to computer involves many details. If one piece of the complex process fails, you may not be able to reach your goal. As technology changes over time there are incompatibilities which crop up to create confusion and frustration for consumers. This is exactly what happened for many a Sony Handycam user. As has happened over time, new computers are sold with current operating software and as consumers bought new PCs they got Microsoft's newer software. Enter Windows Vista and Windows 7 to replace Windows XP. Those who were using USB 2.0 to transfer video from camera to computer soon discovered there was a problem under Windows Vista. Error messages informed the user running Vista that the camcorder was unrecognized. A search for a driver was performed but still no communication between computer and camcorder. Frustration, even anger overtook the consumer. How can this be possible? Should not the process just work? It worked under WinXP. Yes it worked under WinXP because everything was compatible. In particular the Sony driver software for the camcorder. Under Windows Vista, Sony's WinXP driver software is confused. A driver is the software which allows higher level software such as Vista to interact with a hardware device such as a camcorder. The driver issues hardware specific commands to the device. Drivers are also operating system specific. Interrupts have to be issued and timing must be coordinated. Windows runs the computer and the driver runs the camcorder but both have to talk to each other. Firewire (1394) Many users want to capture video on their laptop. For those with a laptop and a Firewire port, you are indeed saved from the tasks below. Using Firewire on a desktop or laptop with Vista usually just works. Sony camcorders from 2004 typically had a Firewire port. So buy a Firewire cable, usually 4-pin to 4-pin, a laptop with Firewire (see HP Elitebook 8560p), hookup the camcorder to the computer with Firewire cable and it is recognized by Vista. It is interesting to note that the Memory Stick in the Sony Mini-DV camcorders will indeed allow you to transfer still images to your VISTA computer using the USB 2.0 cable connection. http://www.youtube.com/watch?v=siJSFzNY1RY&feature=related This video shows how to capture video on a laptop with VISTA and Firewire port from Sony MiniDV tape camcorder. This may work for those with a Firewire interface on their computer but what about all of us without Firewire. We bought our computer already and it does not have Firewire. Sure you can go back to WinXP on your old computer but you want to use that new laptop and VISTA or Windows 7. Well there is much confusion about the solution to this issue. At first it seems that there is no solution, nothing seems to work. You connect the camcorder to the computer using Vista with your USB 2.0 cable and it just will not work. As it turns out there just might be a solution after all but it requires a lot of patience and work. Basically you have to go to the Sony website that supports their products and download the original driver for your camcorder. That's right, the old WinXP driver from years ago. The key to this whole solution is called COMPATIBILITY MODE. When done correctly, this allows the Sony WinXP driver to run under VISTA as if it were running under WinXP. When it does, voila, your camcorder is recognized and your video will transfer to the computer using USB 2.0 cable connection. There are several steps however to make it all work. First and foremost, your computer must have Service Pack 2 for Vista (SP2) from Microsoft. You can download SP2 for Vista for free from Microsoft. http://windows.microsoft.com/en-US/windows/downloads/service-packs Follow the instructions and install service pack 2 for VISTA. This will take a while as it installs and reboots. NEXT, download the original Sony driver for your camcorder from the Windows XP days. • Sony product support • Sony driver for DCR-TRV22 WinXP - This utility installs the original driver for Windows XP for the camcorder DCR-TRV22 USBDRVEN.EXE NEXT, right click on the .EXE file and go to PROPERTIES. Click on the Compatibility Tab. 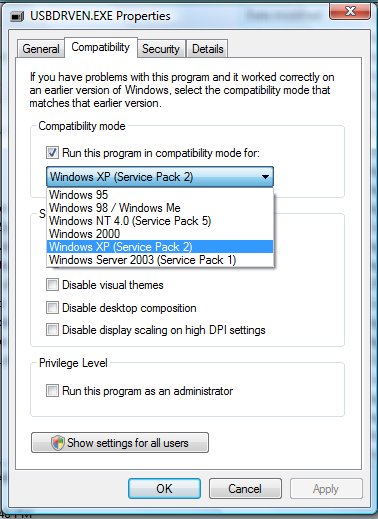 Select Windows XP and APPLY. Now double click on the .EXE file to install the driver. Follow the instructions and hopefully the driver will install. You should get a message to the effect that the driver was installed successfully. Double-click the Setup.exe file. 1.52Mb When you plug the USB 2.0 cable into the computer and power on the camcorder, VISTA gets the Sony driver and is ready for use. If you look in Vista's DEVICE MANAGER now, SONY DIGITAL IMAGING VIDEO appears under IMAGING DEVICES and you can view the details of the driver. 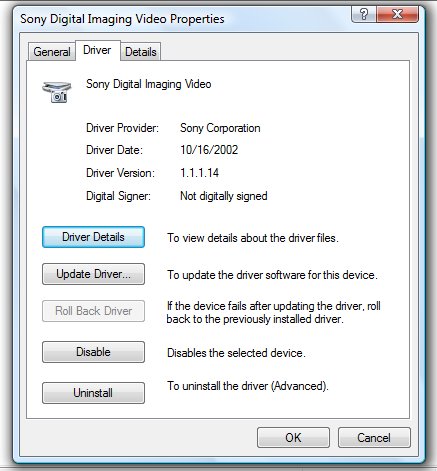 Each time you connect with USB 2.0 and power on camcorder, the driver is added and should be ready for use. CAPTURE SOFTWARE Now you need some software to capture the video. Windows Movie Maker will not work with USB 2.0, only Firewire. So look for software like AVS video recorder at www.avs4you.com or NCH Debut video capture software Download and install. You can now capture your video from the camcorder tapes using your USB 2.0 connection IN WINDOWS VISTA. On your camcorder make sure you have USB Streaming mode set to ON. 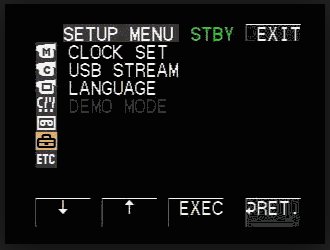 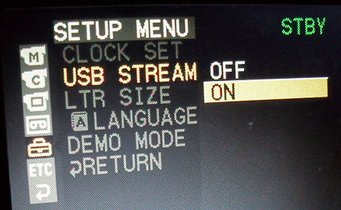 press EXEC to set USB STREAM ON SONY DCR-TRV22 Plug in USB cable to computer and switch camcorder ON in VCR mode. Windows should install the driver. Run your video capture program, play camcorder recording and record on the computer. A file will be created of your video (and audio) on the computer. 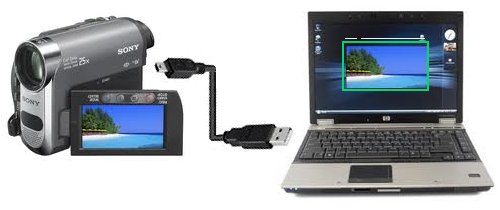 Sony Tape Camcorder USB 2.0 hookup to laptop running Windows Vista Transfer videos from camcorder to PC Once in the computer, you can copy the video to a flash drive, burn a DVD, upload to the internet and more. There are video file conversion programs that will copy your video to another file format if needed. The standard file formats will play in Windows Media Player. Learn more about video file formats. Columbia ISA Empowering consumers thru information. CONTACT / FEEDBACK • columbiaisa@yahoo.com How to setup broadband wireless internet at home • Look for HDTV CABLES • Internet-Ready HDTV has arrived • Internet TV Media Players compared ROKU, Sony, WD, Boxee box, Apple, Netflix, Hulu • How to setup wireless USB adapter for a desktop PC • Blu-ray Players - Sony, Samsung with Internet capability. Get NetFlix, YouTube, BD Live and more. Wireless connectivity to your broadband service. • Bluray Disc and HDTV • How much does it cost to run my TV? º What you need to know about jewelry before shopping º How to hookup TV or laptop to powered speakers • How to tell if your Diamond is real  • Hook up diagram for old portable TV sets using a TV converter box • DTV converter boxes for 2009, the switch to Digital TV • DTV converter boxes reviewed • What is HDMI? • What is USB? • HDTV BUYING GUIDE • Converter box and VCR to TV hookup • DVD player to TV hookup • Digital Cable TV box to TV hookup • RF Modulator for DVD hookup to TV • Ask a question on Columbia ISA - BLOG • Satellite TV home installation guide • DVR - Digital Video Recorder • DVD Recorder Buying Guide • HDTV Buying Guide • How to hook up a cable TV box • How to hook up a SA4250HDC digital cable TV box • How to ground your TV antenna • Broadcast TV reception • Insignia ns-dxa1 - TV converter box for digital TV on your old analog TV set • Surround Sound • Switch boxes video audio RCA phono and more • Audio Video selector switches including Toslink • All About HDMI - HDMI Cables • How to hook up Plasma TV • HDTV Basic Setup |