|
|
| See
over 100 hookup diagrams : see also Cable hookup digital cable and TV SEARCH *** Columbia ISA Audio/Video How to Setup the SA4250HDC Digital Cable Box The Scientific Atlanta 4250HDC High Definition Cable Box This guide is intended for those who are comfortable with electronic gear and want to do their own setup. Those who do not feel comfortable with electronics should consult their cable TV service provider for help or get someone who knows electronics to help them with the setup. Your cable TV service provider will typically charge a fee for the setup service but it is convenient and hopefully the technician will do a proper job. The main point to remember when setting up a cable TV box is to be patient because some operations take time to complete and it is not always apparent that something is happening. Note: You must have Digital Cable TV Service. This service usually has music channels, movies, pay per view and video on demand in addition to all the standard channels. Check with your cable TV service provider to determine what offerings are available and what channels are High Def. Cable TV providers today use a wide variety of cable boxes and several different software programs to control the cable boxes. Even the same cable TV provider may use different brands of cable boxes. Technology is changing rapidly in this area so check often with your service provider. This guide is only for the Scientific Atlanta 4250HDC cable box. Getting Started: The SA4250HDC cable box will work with a standard analog TV or a HDTV. Your cable TV company will provide the cable box, remote control, power cord and possibly cables to hookup to your TV. You can buy cables yourself if you prefer. You should look over the remote control and become familiar with where the buttons are and also insert the batteries into the remote. Typically the remotes for cable boxes are "Universal" remotes, meaning you can control multiple components with the remote IF you setup the remote to do so using the proper codes. STEP 1 Connections Coaxial Cable connection After unpacking the cable box and remote, inserting the batteries into the remote, place the 4250 cable box near your TV. You must connect the cable TV service provider's input cable to the cable box RF input labeled on the 4250's rear panel, "CABLE IN". This would be the same cable you used before if you had cable TV service before you got the 4250 (assuming all else has not changed). This connection provides all your TV shows from the cable company and also provides a path to communicate back to the cable company. The cable is typically a RG-59 or RG-6 coaxial cable with a standard "F" connector. 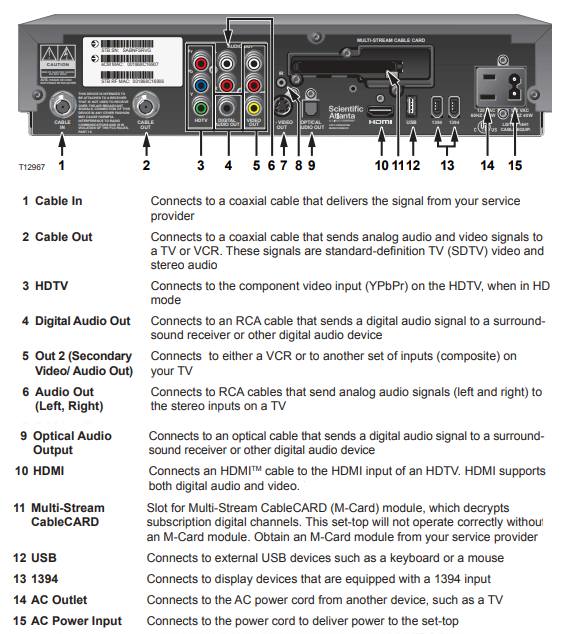 Scientific Atlanta 4250HDC rear panel Connect your cable TV service provider's cable to the far left (1) screw-on input jack on the rear panel of the 4250 cable box. Make sure the wire in the cable goes into the small hole and you screw the cable connector tight on the jack. Cable hookup to TV There are several options when connecting your TV to the cable set-top-box. If you have a HDTV and want High Definition video, you must use either the HDMI connection (10) or the component video connections (3). For a standard TV, use composite A/V connections (5) where yellow is video and white and red are audio or if your TV has component video inputs, use component video connections. HDMI can carry video and audio, High Definition (HD) or Standard Definition (SD) and multi-channel audio. Component video uses three RCA cables for video (green, blue, red) and two RCA cables for audio (white and red). Component video can carry HD or SD video and the two audio cables can deliver 2-channel sound. In addition, if you use HDMI, your TV has to be HDCP compliant. Most HDTV sets today are HDCP compliant. HDMI uses an electronic handshake to constantly verify the connection between components. Note: When you first setup an HDTV, you might consider using the component video connection or even try the composite video hookup to keep things simple. Later you can switch to HDMI when you are more sure about how things work. 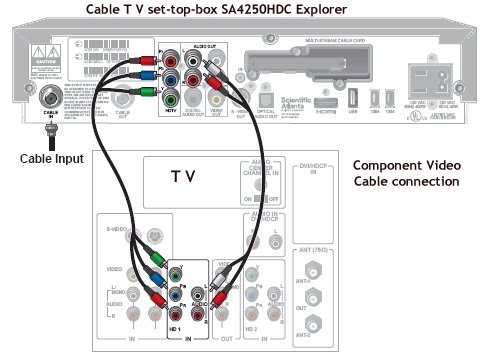 Cable connections from SA4250HDC digital cable box to TV 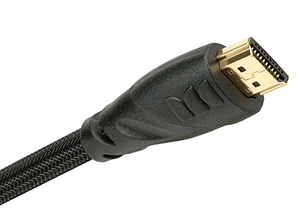 HDMI cable connection Connect one end of the HDMI cable into slot 10 (HDMI) on rear of cable box and the other end of the HDMI cable into an available HDMI input on the TV. Select this HDMI input on the TV for cable TV channels using the TV remote. Tune cable TV channels on the cable box using the remote for the cable box.  HDMI connection - Cable Box To TV STEP 2 Power Now that your TV is hooked up to the 4250 box, plug in the power cord (15) to the cable box rear panel and into an AC power outlet. As soon as the cable box gets power, it starts a sequence of checks and initialization. You should be able to read the front panel display on the 4250 cable box as it goes thru the routines. Look for digits displayed such as "1111" and the word "boot". This means the cable box is initializing. The box will enter a standby state with the power OFF. The 4250 will most likely need to download some information from your cable provider, so wait at least 4 mins. after the box initializes before proceeding. Firmware updates should automatically download to your cable box when available and your 4250 box has to download all the GUIDE information so you can see what TV shows are coming up today. This download can take several mins. to complete. When you see the clock display on the front panel, hours and mins., then the download is most likely completed. STEP 3 TV connection setup At this point, you could probably start watching TV, however there are a few more operations you should perform, particularly if you are using an HDTV. Power on your TV set and make sure you select the input where you have the cable connection to the 4250 cable box. For example, the component video inputs may be video 3, so select this input using the TV's remote control. With the 4250 cable set-top-box powered OFF, press in and hold the "GUIDE" and the "INFO" buttons (7 and 8), on the front panel of the cable box, together for a few seconds. 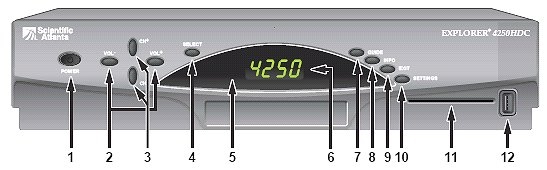 SA 4250HDC set-top-box Front Panel A screen should appear on your TV titled "TV Connection Setup". Using the remote control for the cable box, press the "A" button or the "B" button. The "A" button for standard definition TV (analog) or the "B" button for HD or High Definition TV. The "A" button is yellow and shaped like a triangle and the "B" button is blue and shaped like a square. The procedure for analog or standard definition TVs is simple. The procedure for HD is a little more involved. But never fear, you can always go back and reset or re-do this process. Basically what this does is define your TV's picture size and format. Standard TV sets are 4:3 or an almost square picture. HDTV's are 16:9 which is more rectangular. HDTV sets look wider than they are tall. HDTV "HDTV Setup Wizard" should appear on the TV screen if you pressed the "B" button. Then, press "A" to start. Two choices are available, EASY setup or ADVANCED setup. Advanced setup allows you to select and test various picture formats for your TV and reject or accept them. Picture Formats Picture formats include 480, 720 and 1080. These are the TV video resolutions sent by your cable provider and displayed on your TV. Your TV has a "native" screen resolution. For example, analog TVs work with 480 and cannot go any higher because only 525 maximum lines of resolution are available. HDTVs work with 720 or 1080 but can display 480 also by scaling down the video if required. TV shows are basically sent to you by your cable provider as 480, 720 or 1080. High Definition shows are 720 or 1080. (Analog TVs can still show a High-Def TV show, just not in HD resolution, by using the composite Audio/Video connections) Your HDTV is capable of converting 1080 to 720 if 720 is its native resolution or a 720 TV show to 1080 if 1080 is its native resolution. OPTIONS Using the "SEL" button on the remote and the "B" button, you can run thru all the picture formats and select which ones you want from 480i to 1080i. Press "EXIT" on the remote when finished. SETTINGS There is a button on the remote for the cable box labeled "SETTINGS". Press this button during the time you are watching TV and a pop-up screen should appear with many options. If you press the SETTINGS button again, another screen appears with even more options. One of the options is SET Picture Format. Scroll up or down to get to these lines using the arrow buttons on the remote next to the settings button. By selecting SET PICTURE Format you can hilight several different lines. Scroll to the line "PASS-THRU" and select this. EXIT using the EXIT button on the 4250 remote. Look at the 4250 front panel display. You should see the word "AUTO" lighted up on the front panel. What this does is allow the box to pass-thru the cable TV show without scaling the video and your HDTV can do all the work to scale the video to it's native resolution. Most good HDTVs today will do a much better job scaling the video than the set-top-box. Look at the front panel display of the 4250 as you flip thru HD channels and eventually you should see on the HD digital channels, 720 or 1080 light up on the 4250 display. This means the TV show is coming to you as 720p or 1080i (or close to it) but it is passed thru to your HDTV without change. If you select FIXED instead of PASS-THRU, then the cable box will select 720 or 1080 depending on your selection, and do the video scaling. Diagnostics You can see a System Status screen on your TV by pressing the SELECT button on the 4250 front panel until you see the message icon appear. Then press the INFO button. Certain information will be displayed such as the 4250's last reboot time/date, status of system (READY for example), signal levels, operating system and other technical data. Getting Help If after trying to get everything working you experience problems, don't get frustrated, just call your cable provider for help or go online and search for answers. Many problems have already been solved by other people. You can find some info in forums online. Also download user manuals from Scientific Atlanta or your cable provider. Ask friends, neighbors for help. You can always call in a professional from a local audio/video retailer or shop. An electronic repair shop may be able to help. Do not hesitate to ask your cable provider for another cable box if you suspect the box is the problem. Try a different brand or model. Work your way step by step and document each step. — Enjoy!  Cable box remote control → See more... • Input Select on TV and other devices • Cable hookup digital cable and TV • Audio Video Connections and cables • HDMI Versions • HDTV basic setup • See over 100 hookup diagrams Columbia ISA Audio Video Empowering consumers through information. columbiaisa@yahoo.com |