|
|
| HIGH
RESOLUTION AUDIO FORMATS over HDMI Surround Sound 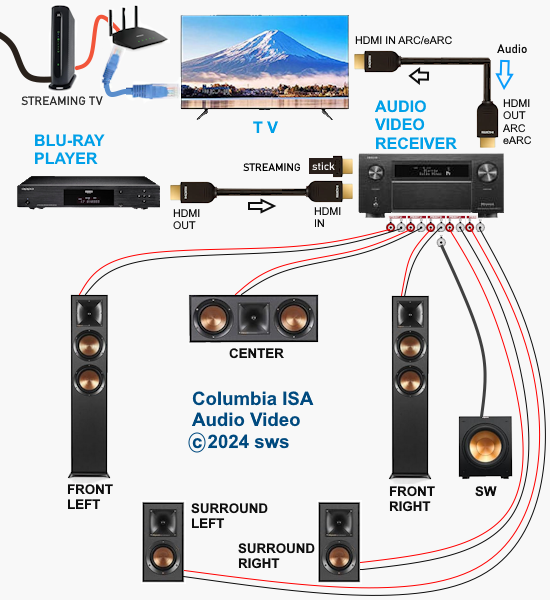 What you need for surround sound: • Source: Blu-ray, TV broadcast, Internet Streaming, DVD • Decoder: Audio Video Receiver or Soundbar • HDMI cables • Speakers: at least 6 or more or a soundbar • Correct Settings: Enable audio output format, eARC, HDMI-CEC 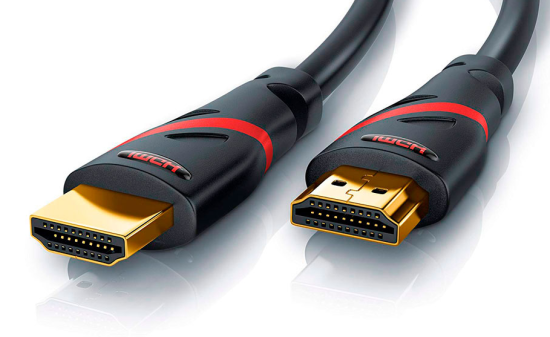 HDMI CABLE You need at least HDMI 1.3 standard capable gear to process Dolby Digital Plus or Dolby TrueHD. HDMI 2.1 is best and ultra high-speed HDMI cables.  Devices like Blu-ray players, game consoles, and streaming devices plugged into your TV are designed to be the providers of content, and your TV is the display. When you select a particular input, your TV is "listening" to the device connected to that input to receive the audio and video signals. Types of TV Input Sources: Built-in Apps: Smart TVs come with pre-installed apps for popular streaming services like Netflix, Hulu, YouTube, etc. These apps are directly integrated into the TV's operating system and can be accessed through the TV's main menu or app launcher. Third-party Apps: Users can download additional apps from the TV's app store, expanding the range of content. External Devices: Devices like cable boxes, game consoles, Blu-ray players, and media streamers connect to the TV via HDMI or other input ports. The TV's input menu allows you to switch to the desired external device. TV Sources vs external audio sources Audio Video Sources coming from/connected to the TV, can be processed by the TV, however, your TV usually has only two built-in physically limited and acoustically limited speakers which do not reproduce the best sounds, so the audio portion of AV content would be limited unless you add an external audio processor such as a soundbar or Audio Video Receiver in order to get quality surround sound. To get the audio from the TV to the external audio processor, HDMI ARC/eARC can be used or in some cases the AV source can be connected directly to the audio processor which then sends the video to the TV. The TV receives an audio signal, often encoded in formats like Dolby Digital Plus. The TV decodes this signal, separating the audio into different channels (e.g., left, right, center, surround). Some TVs may also support advanced formats like Dolby Atmos, which adds height channels for a more three-dimensional sound. The TV may apply signal processing techniques to optimize the audio for the available speakers. This can include adjusting volume levels, applying equalization, and adding virtual surround effects. Some TVs may also have virtual bass enhancement to create the perception of deeper bass. The processed audio signals are then sent to the appropriate speakers. Connecting to an external Surround Sound System:  To get surround sound (5.1/Dolby Atmos) from the Netflix app on your Samsung TV, ensure your TV's audio output is set to "Auto" or Dolby Digital/Atmos in Sound Settings, use HDMI ARC/eARC, and check the Netflix app for the 5.1/Atmos icon on content. If you have stereo, change the in-app audio track to "Original" for clearer dialog. For 5.1 Surround Sound (External Speakers) Check Netflix Content: Look for the 5.1 icon on movie/show pages.  Samsung TV Settings: Go to Settings > Sound > Expert Settings. Set Digital Output Audio Format to Auto, Dolby Digital, or Dolby Digital+ (use HDMI ARC/eARC). Ensure HDMI-eARC Mode is Auto if using eARC. Netflix App Settings: When playing content, select the Audio icon and ensure "5.1" is visible next to an audio option, or select the "5.1" track If You Have Stereo (No Surround Sound System) Change Netflix Track: If dialog is quiet on a 5.1 track, switch to the "Original" or "Stereo" audio track within the Netflix player (Audio & Subtitles menu) for better balance. Check TV Settings: In Settings > Sound > Expert Settings, if you see options for PCM, selecting it sends only stereo audio, but it's best to let Auto handle it or select "Dolby Digital" if you have a soundbar. For Dolby Atmos (Premium Netflix Plan) You need a Premium plan and compatible Atmos equipment/TV. Search "Spatial Audio" in Netflix to find compatible titles with the "Spatial Audio" icon. Troubleshooting Reinstall App: Try reinstalling the Netflix app (hold OK on remote > Reinstall). Check Connections: Use high-speed HDMI cables for Dolby Digital+ and Atmos In order to experience true surround sound, you need to connect your TV to a surround sound receiver or soundbar that supports the desired audio format. Common connection methods include HDMI (ARC/eARC) or optical cable from the TV to the surround processor. Be sure your TV and the surround sound system are properly configured to pass through or decode the audio signals. This can involve navigating to SETTINGS> SOUND> SOUND OUTPUT> on the TV and selecting the desired options.  To hear sound from your TV apps on your soundbar or AVR, you need to 1) connect your TV and soundbar (or AVR) 2) configure your TV's audio output 3) select TV audio output format 4) select the correct input on soundbar or AVR 5) select the desired audio format in the app The best method for cable connection is using HDMI ARC (Audio Return Channel) or eARC (enhanced Audio Return Channel). Most apps have options you can select such as audio output formats. Start by playing a movie selection and then PAUSE it. Apps such as Netflix display a status and toolbar with options/settings. Select "Other" and this should bring up audio options.  Then you can select 5.1 surround sound 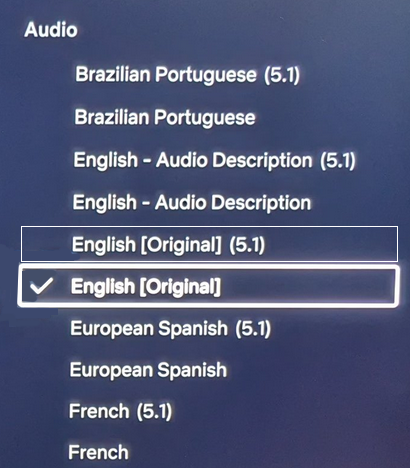 How to get audio from TV to soundbar: Connecting with HDMI ARC/eARC: Look for HDMI ARC/eARC ports: Look for an HDMI port on your TV and your soundbar labeled HDMI "ARC" or "eARC". Connect with a compatible HDMI cable. Use a high-speed HDMI cable (HDMI 1.4 or higher for ARC, HDMI 2.1 for eARC) to connect the HDMI ARC/eARC port on your TV to the corresponding HDMI ARC/eARC port on your soundbar. Configure your TV Audio Settings: For HDMI ARC you may need to enable HDMI-CEC (Consumer Electronics Control). HDMI eARC is not supposed to need CEC enabled as eARC has it's own built-in protocol. Many TVs have this feature (called Anynet+ on Samsung TVs) which allows your TV remote to control the soundbar's volume and power. Set audio output to the soundbar: Navigate to your TV's audio settings and select the soundbar as the audio output device. Select the Soundbar or AV Receiver Input Source: Change the soundbar's input source to HDMI ARC/eARC or D.IN as shown on the status bar display. Switch the AV Receiver's input source  Other Connection Options (if HDMI ARC/eARC is unavailable): Optical cable: Connect a digital optical audio cable from your TV's optical output to the optical input on your soundbar. You may need to set the TV's audio output to "Optical" or "Digital Audio Out". Setting the audio output format: When to use PCM: PCM or Pulse Code Modulation is a digital representation of an analog signal. In most cases, it's a 2-channel stereo audio signal, but can also be a multi-channel (5.1 or 7.1) audio signal if it's processed from a source such as a DVD or Blu-ray player. PCM or Pulse Code Modulation is an uncompressed lossless audio format, meaning it doesn't lose any audio data. PCM is widely compatible with most devices, including TVs, soundbars, and other audio equipment. If you're experiencing issues with other audio formats, switching to PCM can be a good first troubleshooting step. If you're experiencing audio issues (like lip-sync problems or audio dropouts) when using compressed formats like Dolby Digital Plus, PCM can sometimes resolve these issues. If you're using the TV's built-in speakers and are not connecting to an external audio system, PCM is generally a good choice. If your external sound system doesn't support advanced audio formats like Dolby Digital or DTS, PCM can be a reliable option. When to Consider Other Options: If you have a high-end surround sound system and want to experience the full potential of Dolby Atmos or DTS:X, you might want to explore using a bitstream output setting (if supported by your TV and sound system) and let the receiver handle the decoding. HDMI Cable and HDMI ARC/eARC chipsets You can think of the HDMI cable as a high capacity pathway (the video) going in one direction and a narrow bike lane (the audio) going in the opposite direction.  What sound formats can I expect to hear from each connection option? • RCA analog - only stereo • 3.5mm analog - only stereo • Bluetooth - only stereo • Optical - stereo or surround sound • HDMI ARC/eARC - stereo or surround sound including advanced audio surround formats. Standard Surround Sound encoded audio formats Dolby Digital Dolby Digital is a form of discrete digital 5.1 surround sound. Dolby Digital is a whole family of digital surround encoding technologies created by Dolby Laboratories. It is also known as AC-3, or Adaptive Transform Coder 3. It' has the capabilities for various channel configurations, however, it is most widely used as 5.1 surround sound. It includes Front-left, Center, Front-right, Surround-left, Surround-right, and subwoofer channels. Dolby Digital is a lossy encoding technology limited to 640 kbits per second, however, most DVD players may limit it to 448 kbits per second. Since Dolby Digital treats each channel discretely and is digitally encoded, Dolby Digital requires a digital decoder to provide the 5.1 audio standard. Most home theater receivers can decode Dolby Digital, however, to get the signal from a source, such as a DVD player, to the receiver you must use a digital audio connection such as optical or digital coax cable or HDMI. DTS DTS, also a form of Discrete Digital 5.1 Surround, stands for Digital Theater Systems. DTS is a competing standard to Dolby Digital. It is a discrete digital surround standard that provides multiple channel surround including the Front-left, Center, the Front-right, the Surround-left, the Surround-right, and the subwoofer channels. Similar to Dolby Digital, it is different in one primary way. It provides lossy encoding up to 1536 kbits bandwidth on DVDs compared with Dolby Digital's 448 kbits. Depending on the sound system, a broader dynamic range and less hiss may be noticed. Like Dolby Digital, DTS requires that the home theater receiver supports decoding DTS and also requires optical, coax digital audio or HDMI connections. Dolby Digital Plus Dolby® Digital Plus is an advanced, more capable digital audio codec based on Dolby Digital (AC-3) which has historically been used by DVD, broadcast TV, satellite and cable TV for years. Dolby Digital Plus supports up to 7.1 discrete channels when implemented in Blu-ray Disc media. For a stereo presentation, the decoder plays a two-channel downmix. There is no need to include a separate stereo (two-channel) mix because Dolby Digital decoders can create a stereo mix from a 5.1 mix on the fly. Online content providers use Dolby Digital Plus because it is more efficient than Dolby Digital, however it is still a lossy format unlike Dolby TrueHD which is lossless, therefore taking up more space which is why it is found on the high capacity Blu-ray discs. So with Blu-ray, if you can get Dolby TrueHD and ATMOS, you will get a richer ATMOS since it is using the lossless Dolby TrueHD stream. Dolby TrueHD Dolby TrueHD stands for true high definition. TrueHD has nothing to do with high definition video. It is an audio standard. TrueHD is a next generation encoding standard. This standard is optional for Blu-Ray players. TrueHD uses a HDMI 1.3 or higher connection standard. The optical and digital coax connections (SPDIF) are not capable of carrying Dolby TrueHD. Since Dolby TrueHD is uncompressed it is found on Blu-Ray Disc. The compressed Dolby Digital Plus is found on internet streaming services. Dolby ATMOS Dolby Atmos is a surround-sound technology that was first developed in 2012, expanding upon the pre-existing 5.1 and 7.1 surround-sound set-ups with surround channels coming from overhead, enveloping the audience in a dome of sound. But unlike traditional channel based systems, Dolby Atmos doesn't just send audio at discrete levels to each speaker. The technology can also produce up to 118 simultaneous sound objects, allowing the sound designer to place each sound and voice to exact points within the soundfield rather than simply assign them to specific channels. These objects can be manipulated and moved around within the space creating a convincing 3D soundstage. Adding two or four ceiling (height) speakers in home environments in addition to the 6 or 8 ground speakers creates a dome of sound. 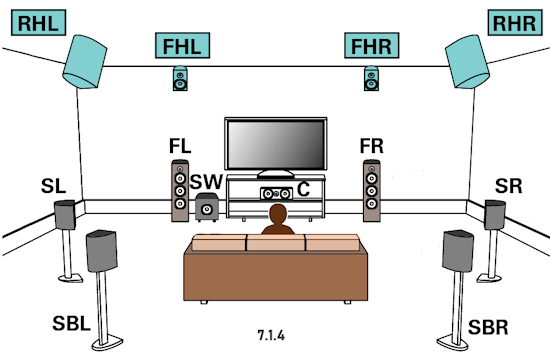 FL = front left FR = front right C = center SW = subwoofer SL = surround left SR = surround right SBL = surround back left SBR = surround back right FHL = front height left FHR = front height right RHL = rear height left RHR = rear height right Audio Video Receiver rear panel - Speaker Terminals 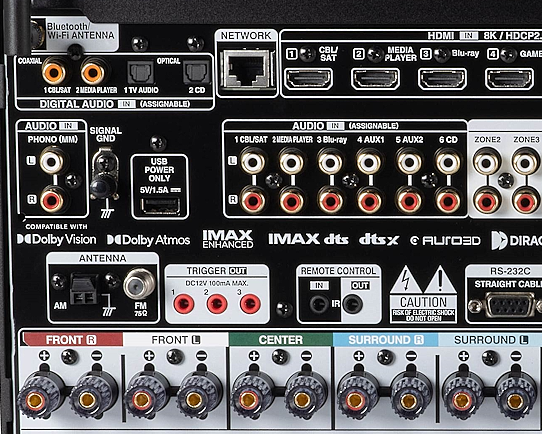 Audio Video Receiver rear panel - Height Speaker Terminals 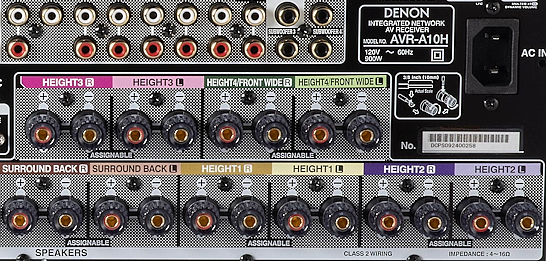 • Speaker Wiring Diagrams Any Blu-ray player that fully conforms to the latest specifications and can output a bitstream audio signal for your AV receiver to decode can playback Atmos. Current Online streaming services and even headphones can have ATMOS capability. ATMOS is not sound but information about sound. ATMOS is carried in a Dolby TrueHD or a Dolby Digital Plus stream. Not all sound sources will have ATMOS. Check the source content. Online streaming services will usually use Dolby Digital Plus to carry ATMOS metadata when available because it is compressed which means less bandwidth. Can I still enjoy Dolby Atmos if my TV does not have HDMI ARC/eARC? Yes, you just need an Atmos capable soundbar or Audio Video Receiver to process the audio from the source such as a streaming media device input to the soundbar or AVR's HDMI input. The soundbar or AVR handles the audio and the TV only is used as the video display. To connect a Fire TV Stick for example to a soundbar, you'll typically plug the Fire TV Stick into an HDMI input port on the soundbar and then connect the soundbar to your TV using another HDMI cable. Plug the Fire TV Stick into an available HDMI input port on your soundbar. Use an HDMI cable to connect the HDMI output (or ARC/eARC port) on your soundbar to the HDMI input (or ARC/eARC port) on your TV. Turn on your TV and soundbar. Select Input Source on TV and Soundbar: On your TV, select the HDMI input that corresponds to where the soundbar is connected. On the soundbar, select the corresponding HDMI input that the Fire TV Stick is plugged into. How to setup Atmos on Fire TV stick: Navigate to Settings: From the Fire TV Home screen, go to the "Settings" icon (usually a gear icon). Select Display & Sounds: Choose "Display & Sounds" from the settings menu. Access Audio Settings: Select "Audio". Choose Surround Sound: Select "Surround Sound". Set to Best Available: Ensure "Best Available" is selected to allow the Fire TV to automatically choose the best audio format based on your setup. Adjust App-Specific Settings (if needed): For some apps, like Amazon Music, you may need to go into the app's settings and enable "Spatial Audio" or adjust audio quality settings to ensure Dolby Atmos is enabled. Check for Dolby Atmos Support: Some apps like Netflix, Disney+, and Prime Video may offer Dolby Atmos, but it's often limited to specific titles and devices. Verify with Diagnostics: You can also go to "Audio/Video Diagnostics" to check what audio formats your Fire TV is currently set up for. How do I enable Dolby Atmos on Netflix? Check your Netflix Plan: You must have a Netflix Premium subscription. This is required for streaming in Ultra HD and Dolby Atmos. Verify Device Compatibility: Confirm your streaming device (TV, streaming stick, etc.) and audio system (soundbar, receiver, etc.) are both Dolby Atmos-enabled. Enable Dolby Atmos on your Device: For TVs: Access your TV's settings, usually under "Sound" or "Audio," and enable Dolby Atmos for the output source (e.g., HDMI ARC, built-in speakers). Consult your device's manual or settings to enable Dolby Atmos output. Check Netflix Content: Search for "Dolby Atmos" in the Netflix app to find supported titles. Look for the Dolby Atmos logo next to the title's description. Not all titles will offer Atmos. Adjust Streaming Quality: In your Netflix settings, ensure your streaming quality is set to "High" or "Auto" to enable Atmos audio. Update Netflix App: Make sure you have the latest version of the Netflix app installed. DTS-HD DTS-HD is the Digital Theater Systems' answer to Dolby TrueHD. The specification allows for unlimited channels that can be down-mixed to the number of channels supported on the home system. The bit-rate is also flexible because it can be as low as lossy DTS, or all the way up to lossless quality. DTS-HD standard is optional on Blu-ray high definition discs.   HDMI HDMI supports Dolby Digital 5.1, Dolby Digital Plus, Dolby TrueHD audio and other high resolution audio formats. HDMI has been designed from the very first version to carry up to 8-channels of audio, 192kHz, 24-bit uncompressed audio, which exceeds all available current consumer media format. Plus HDMI can carry any compressed audio format, such as Dolby or DTS. The Dolby or DTS compressed audio formats are the only multi-channel or high-resolution audio formats that can be carried across the older S/PDIF or AES/EBU interfaces (optical or digital coax). In addition, most existing HDMI sources can output any compressed stream, and the newer sources can output uncompressed 6-channel, 96kHz audio from a DVD-Audio disk. There are A/V receivers available on the market that can receive and process the 6- or 8-channel audio from HDMI. HDMI itself does have the capability to carry up to 8 channels of audio and compressed audio streams. The key consideration in connecting audio source to audio processor using HDMI is as follows: 1) Does the source device send the desired audio out over HDMI? 2) Does the audio processor, such as a receiver, have the capability to handle the sent audio using HDMI? Many modern audio/video receivers do have the capability to handle the latest multi-channel high res audio but be careful, many do not. HDMI Cable Connections HDMI devices such as Digital Cable TV boxes, Blu-ray players, HDTVs, Internet media boxes and Audio/Video Receivers can use an HDMI cable to carry video and audio signals. In fact HDMI MUST be used for the newest audio surround sound as the SPDIF optical and digital audio coaxial cable connections are not capable of handling the newer audio (Dolby TrueHD, DTS-HD). An HDMI cable is connected from the source device (Blu-ray player, cable TV box) to the decoder device (audio/video receiver) and another HDMI cable from the decoder device HDMI OUT to the TV's HDMI input.  Surround Sound Setup Diagram 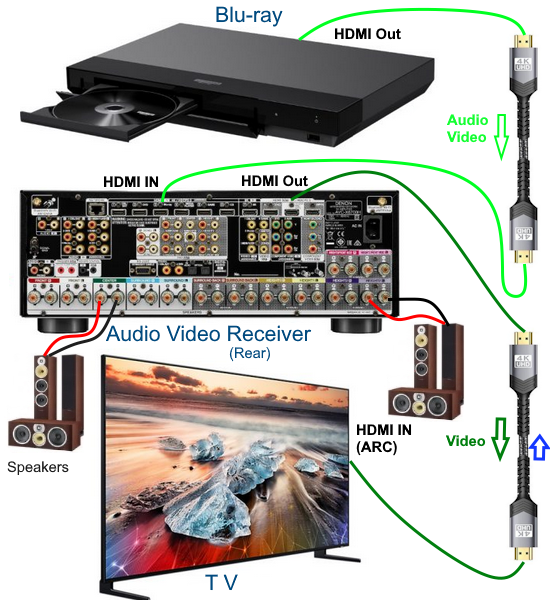 In the case of the TV as the source, connect an HDMI cable from the TV HDMI ARC/eARC port to the AVR or soundbar HDMI ARC/eARC port so audio will be sent from the TV to the sound processor. The source (TV, Bluray, DVD, streaming device) may need some adjustments on the sound OUTPUT menus so that you are selecting the correct audio OUTPUT.  Select the surround sound output on the source device Your source device may have a audio setting of AUTO 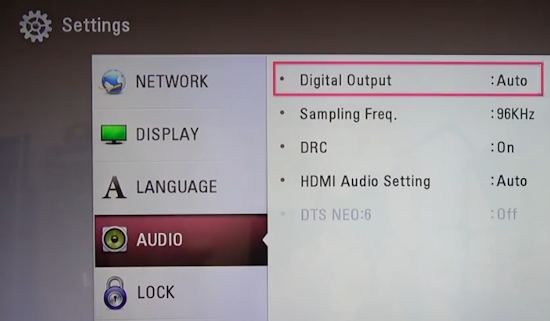 Sometimes this is the best setting Audio Passthrough Audio passthrough is an important feature if you want to use your TV in a home theater setup and you're playing content with high-quality audio. Audio passthrough allows you to connect multiple input devices to your TV and pass high-quality audio signals to an AV receiver for processing. You can use video features your TV may support like HDMI 2.1 and variable refresh rate (VRR) that your AV receiver may not. Even the top-of-the-line TVs may not be able to passthrough every audio format so you need to check which audio formats your TV can passthrough. When using HDMI ARC/eARC to output audio from the TV, additional steps may be required to get sound from the TV to external speakers. Usually these steps are performed by navigating the TV on-screen menu options under the "SOUND" and "Expert" settings sections. These can include the following: 1. Enabling/Turn "ON" the HDMI ARC/eARC function 2. Turn "OFF" TV internal speakers 3. Selecting the audio output port 4. Selecting the audio output format 5. Enabling/Turn "ON" HDMI CEC 6. Enabling the HDMI ARC/eARC features on the audio device such as an Audio Video Receiver. This will involve navigating the menu items on the audio device such that the HDMI ARC/eARC feature will work as desired. 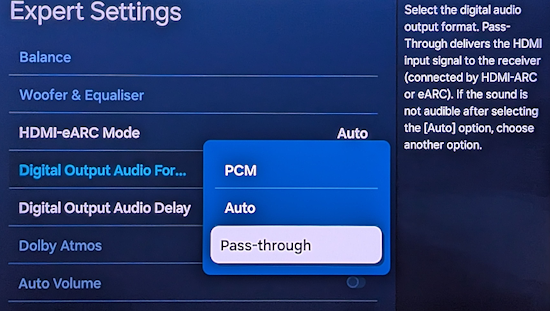 Also select the correct surround sound mode on the Audio Video Receiver or Soundbar In addition, be sure to select the correct SOURCE on the Soundbar or AVR (Bluray player HDMI input for example). Verify by looking at the display on the AVR or soundbar. 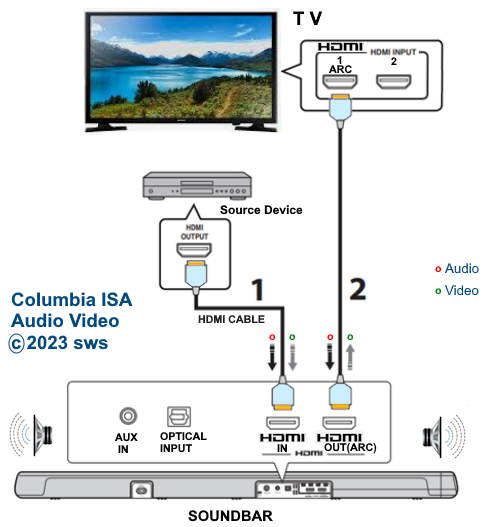  Connect HDMI cable from source device output to HDMI input on AVR or soundbar. Connect HDMI cable from AVR HDMI OUT to TV HDMI ARC/eARC HDMI input. In the case of a streaming stick, just insert the HDMI connector into the HDMI input on the AVR. 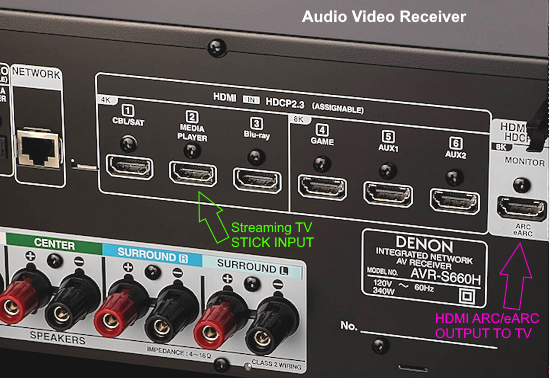 ARC/eARC port The HDMI 2.0 standard can handle high data transfer rates allowing you to take advantage of a feature called ARC (Audio Return Channel). The newer and improved version, eARC (Enhanced Audio Return Channel) requires an even higher data transfer rate, leveraging the new HDMI 2.1 standard which can handle up to 48 Gigabytes per second (Gbps). If both your TV and soundbar support ARC, or both ARC and eARC, it should allow you to pass high-definition audio between your devices using just one cable — just make sure to use the appropriate high-speed HDMI cable for your setup. Check your TV specifications to find out which audio streams it can passthru because some budget TVs will not passthru the higher audio codecs. For this reason, in the case of streaming sticks, you may want to connect to the AVR instead of directly to the TV. The AVR can usually handle Dolby Digital Plus. If both your TV and soundbar support ARC, or both ARC and eARC, it will allow you to pass high-definition audio between your devices using just one cable — just make sure to use the appropriate high-speed HDMI cable for your setup. 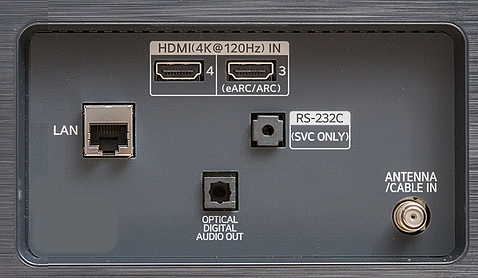 TV rear panel with HDMI ports. The HDMI 3 port has the chipset for eARC and ARC. Look for HDMI port labeled HDMI ARC or HDMI eARC/ARC on your gear. HDMI Cables HDMI cables have advanced over the years from HDMI Standard cable to HDMI High Speed cable to Premium High Speed and then to Ultra High Speed. The best cable to buy is HDMI Ultra High Speed Cable because it is the only cable that complies with stringent specifications designed to ensure support for all HDMI 2.1b features including uncompressed 8k@60 and 4K@120 video. The cable’s bandwidth supports up to 48Gbps, it is backwards compatible with existing HDMI devices, and features exceptionally low EMI which reduces interference with nearby wireless devices. For verification and authentication, the cable packaging is required to display the Ultra High Speed HDMI Certification Label which includes the Cable Name Logo printed on it. I need an HDMI cable for my 4K TV, what should I buy? Buy a high speed HDMI cable that supports at least the HDMI 1.4 standard (2009), the first HDMI standard to support 4K signals. To get a 4K picture, all components must support 4K: the cable box or streaming service, the HDMI cable and the TV. If you are using an old standard HDMI cable purchased before 2009, it will not have the bandwidth to carry a 4K HDR signal. HDMI over Cat5 and Cat6 – A Cat5/6 extender will convert the HDMI signal into similar Ethernet IP packets that can be transmitted over the category cable and reconverted at the other end with no loss of signal strength or fidelity. Using this approach, an HDMI signal can be transmitted about three times further than an active HDMI cable–approximately 100 meters (328 ft.). Shielded (STP) Cat6 cable is recommended for its ability to reduce EMI interference from power lines and crosstalk within the cable. HDMI over fiber –   The connectors on fiber HDMI convert conventional electrical inputs to pulses of light that are transmitted at high speed through optical fiber, then converted back to electricity on the receiving end. Since signal transmission is optical, it isn't subject to EMI/RFI line noise. HDMI over Fiber can be extended well beyond the 100 meter/328-foot limit of copper Ethernet cable. HDMI audio extraction An HDMI signal includes both video and audio, which is convenient because you need only one cable to connect a cable box, game console or streaming device to your television. But if you want to play audio through an older analog sound system that doesn't have HDMI support, you will need to separate the audio track from the video. That's where an audio extractor comes in. An HDMI audio extractor splits an HDMI signal into a separate HDMI signal and an audio output. Depending on the capabilities of the audio extractor, you may have the choice of compressed or uncompressed (LPCM) audio outputs, for example, 3.5mm stereo or a multi-channel format like 7.1 surround sound via TOSLINK. When buying an audio extractor, make sure the video and audio output formats match the capabilities of your television and sound system. NOTE: Manufacturers can pick and choose which of the HDMI 2.1 standard’s features they want to support. They can support them all or just a few, and either way, they’re still allowed to claim that they offer you the HDMI 2.1 standard. HDMI Versions HDMI Cables Wiring diagram - HDMI Surround Sound • How to hookup Surround Sound Columbia ISA Audio/Video Empowering consumers through information columbiaisa@yahoo.com |