|
|
|
Home
> Hookup
Diagrams Index >
Hookup Audio Video Receiver Columbia ISA home – › Wiring Diagrams SEARCH *** Columbia ISA Audio/Video • Bluray/DVD surround sound connections • Bluray Basics • Surround Sound Explained How to hook up an Audio Video Receiver How to connect your Audio Video Receiver to TV, Bluray, DVD, Satellite, Cable TV, surround sound speakers How to Set Up multi-channel surround sound, High Definition Video, HDMI, audio components. 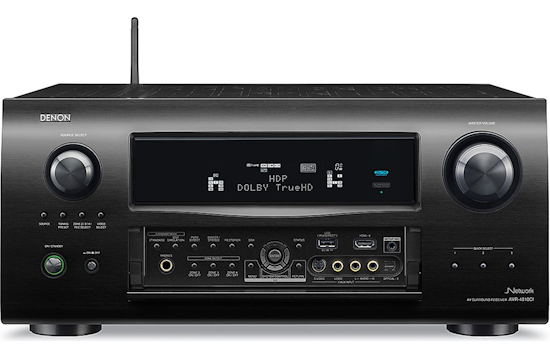 • Audio Video Receiver Guide The AVR, Audio Video Receiver, is a switch, an amplifier, a decoder and more. Connect all your source devices, DVD, Blu-ray, Satellite and Cable TV receivers, Games, Media players to the AVR and switch to the source device you want. The AVR will decode digital audio from the source, amplify it and send to the attached speakers. Also the video will be sent to the TV. The Audio Video Receiver contains a preamplifier which prepares audio signals for further processing and amplification. It enables you to adjust the volume and tone settings and to select different audio source input devices. The preamplifier is where you’ll connect your audio and video sources, such as your turntable, DVD player, music and video streaming devices, gaming console and more. In addition there is a power amplifier which receives signals from a preamplifier and boosts them so they are powerful enough to drive all of your speakers. The number of channels available on your power amplifier is what determines how many speakers you can drive. Additionally, your power amplifier’s wattage determines the overall audio output capabilities. The Receiver is a radio frequency tuner for over-the-air AM and FM signals from local radio broadcasts. Audio Video Receiver AVR Wiring Diagram  How to connect the Speakers 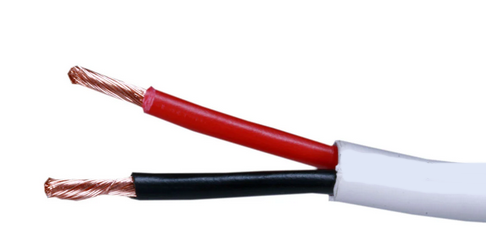 Connect the speakers to the AVR using speaker wire. There are two wires, positive and negative, usually encased in an insulated covering. The positive connects to the positive terminals, one on the AVR and the other on the speaker. The negative wire connects to the negative terminals on the AVR and the speaker. 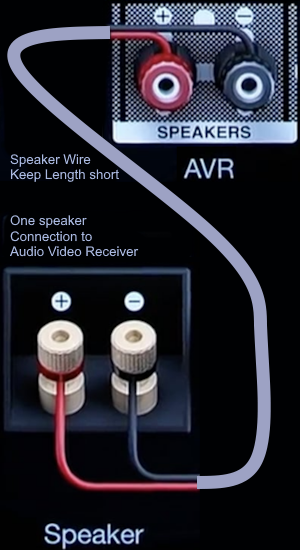 Modern AVRs can have 5, 6, 7, 9, 11 or more speaker terminals or channels. In addition there can be one or two sub-woofer speakers for low frequency sounds. With the addition of Dolby ATMOS audio technology, the AVR may offer height speaker connections. 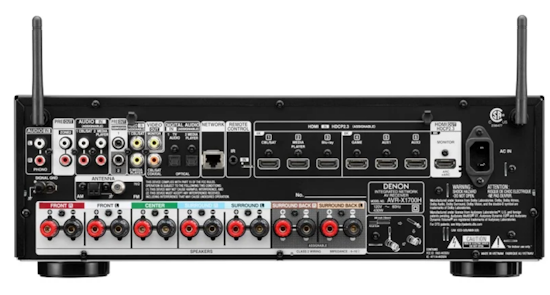 Rear of Audio Video Receiver The speaker terminals are at the bottom of the AVR, two for each speaker. This AVR has 7 speakers plus the sub-woofer. 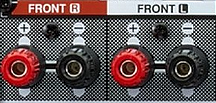 The left and right front speakers are the stereo channels. 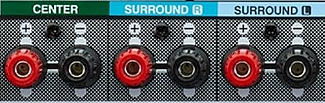 The center front speaker is part of movie surround sound used for dialog. 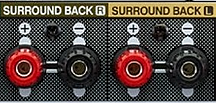 The two rear surround speakers add realism for a movie. 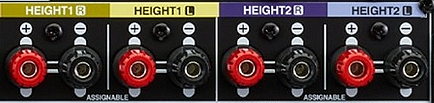 Some AVRs offer additional speakers for Dolby ATMOS Speaker placement is a matter of personal preference but generally follows the scheme in the diagram. 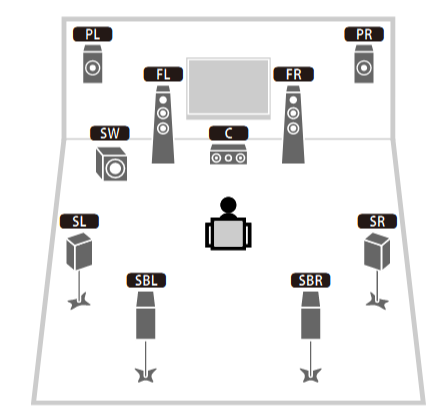 TV in front with left and right front speakers and center channel speaker. Surround speakers rear and sub-woofer on the side. Height speakers can be placed almost anywhere including the ceiling, overhead rear, front, sides. Keeping the speaker wire short between the AVR and the speakers means less work for the AVR. Hooking Up the Loudspeakers The speakers are connected to the AVR using binding posts, two for each speaker. These posts usually offer a choice of either a banana plug hookup or a screw clamp for a bare wire.  Speakers each have two terminals on them for connection to the receiver, usually red and black. Red is the positive and black is the negative. Speaker wire is typically used to hookup speaker to receiver. This consists of two wires connected to the red and black terminals at each end, receiver and speaker. Connect red to red and black to black. When connecting speaker wires to the loudspeakers and receiver, make sure not to cross the wires, meaning be sure you connect positive to positive and negative to negative. With a 5.1 system, you connect 5 speakers, each with two wires plus a subwoofer speaker. The speakers are front left, front right, center speaker, rear left (or surround left) and rear right (or surround right). The subwoofer is for deep bass and can be powered, meaning it has an amplifier contained in the speaker enclosure itself. With a 6.1 or 7.1 receiver, you are adding more rear speakers. For Dolby ATMOS, you can add additional speakers if the AVR supports them and many newer AVRs will offer 2, 4 or more what is called HEIGHT speaker channels. These can be setup in many ways with many different positions around the listener. Where 5.1 is five full range speakers and one low frequency speaker, with ATMOS, a third designation is added for height speakers. A 7.1.2 setup means seven full range surround speakers, one subwoofer and two height speakers. The height speakers can be placed on the ceiling or anywhere around the room high up on the walls. ATMOS is called a sound object based audio format and can have up to 128 sound objects but for home use, this is usually downmixed to eight sound objects moving freely around the room from speaker to speaker creating a more realistic experience. A helicopter sound can start at the left front height speaker and move to the right rear height speaker. Dolby ATMOS can adapt to the number of speakers that are available. Wiring up the speakers Speaker wire is measured by the AWG or American Wire Gauge and can be 12AWG, 14AWG, 18AWG and so forth. The smaller the number, the thicker the wire. Why does this matter? Because thin wire cannot handle as much current flow as thicker wire and thicker wire allows a longer length run from receiver to speaker. Receivers are usually marked so you know exactly which speaker terminal goes to which speaker. Look for LF (left front), RF (right front), C or center, SL for surround left and SR for surround right. Some receivers color code the terminals. The center speaker for example might be color coded green while the other terminals are color coded differently. After connecting all the speakers, power on the receiver and select the tuner. (You may need an external antenna for FM stations) Tune to a known station and make sure the speakers are working. 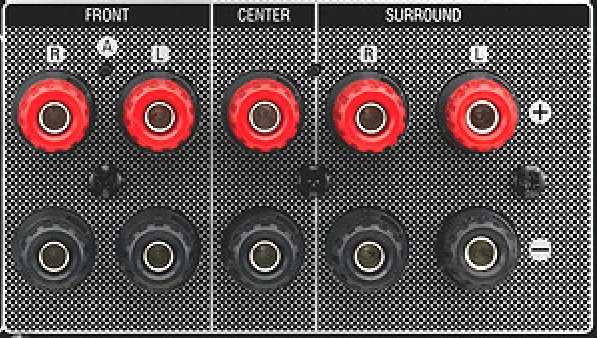 SPEAKER HOOKUP ON REAR OF A/V RECEIVER 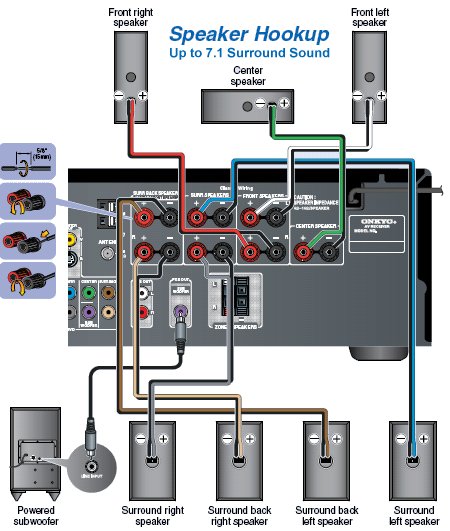  Speaker Wire Speakers connectors can be bare wire, banana plugs, spade lugs, pin connectors, and more. The banana plug slides into the binding post and requires no manual disconnect but the spade lug provides the tightest connection. 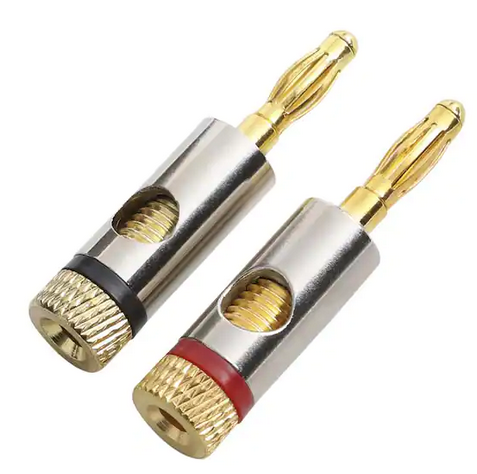 Banana plugs for speaker wire connections 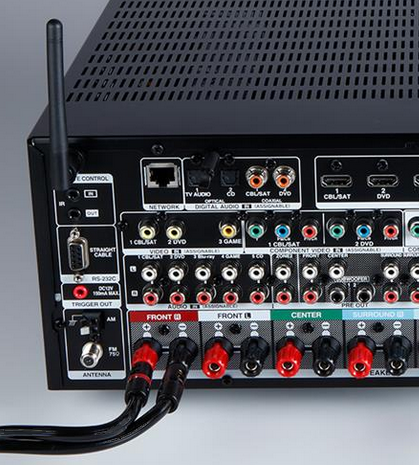 Banana plug speaker wire connections Audio Video Receivers - Dolby ATMOS 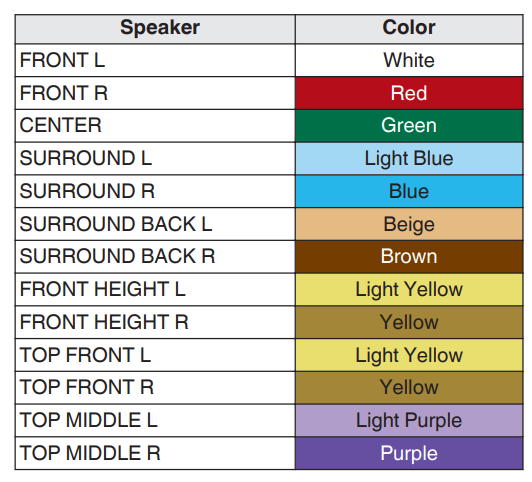 The newer AVRs use color coded speaker designations 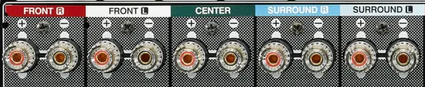 The five basic surround speaker connections on rear panel of AVR  Six additional surround and ATMOS height speaker connections on rear of AVR There can be more ATMOS height speaker connections. You may need a second amplifier to drive them all. PRE-OUTS pre-amplification outputs (Line-Level) 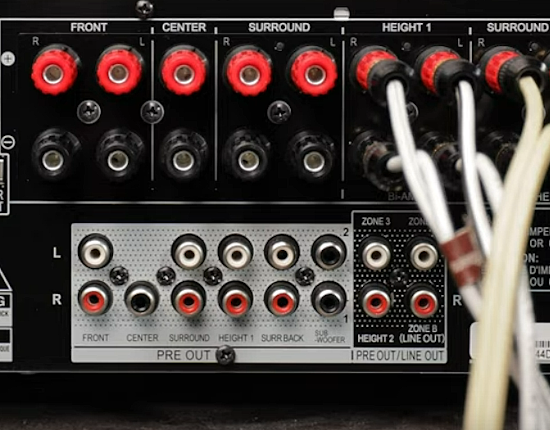 The most obvious pre-out is the sub-woofer output. A single RCA phono-type audio cable connects to the sub-woofer speaker which has a built-in amplifier to drive its speaker. Typically your AVR will have pre-outs for the left and right front speakers, the center channel speaker and the surround speakers. A single RCA phono-type audio cable connects each speaker channel to a power amplifier. 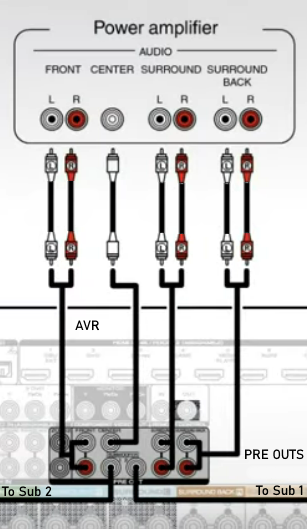 Common usage for pre-outs is to drive a second amplifier in another room for a secondary sound setup. Another option would be to drive a second amplifier which has higher fidelity or more power than your AV Receiver. Older vintage receivers can connect pre-outs to a newer amplifier. You can add an external amp to some or all of your speakers. This takes off some of the load from the AV Receiver. Then instead of connecting the speaker to the AV Receiver, you would connect the speaker or speakers to the power amplifier. 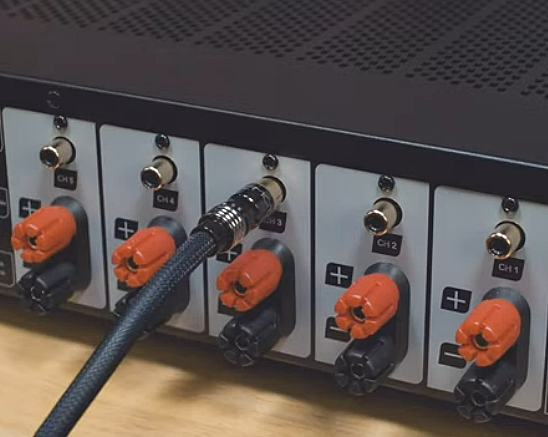 RCA audio cable connected to power amp from avr for one speaker 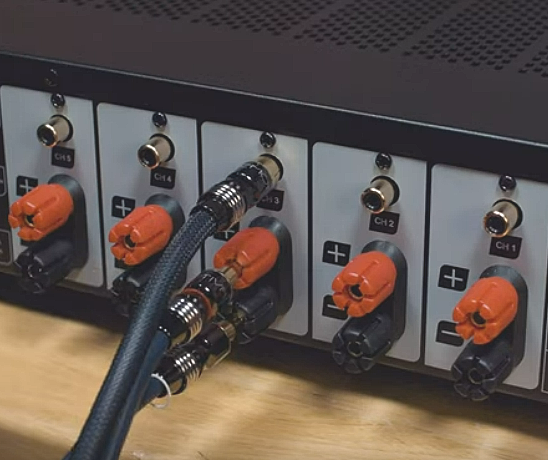 Speaker connected to power amplifier Speaker Placement For the best enjoyment, place the speakers in their proper positions around the room. 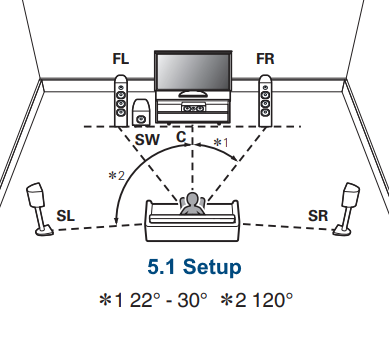 For a 5.1 setup 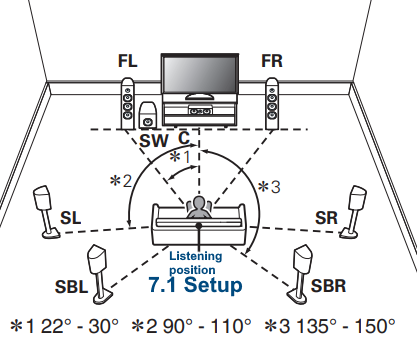 For a 7.1 setup 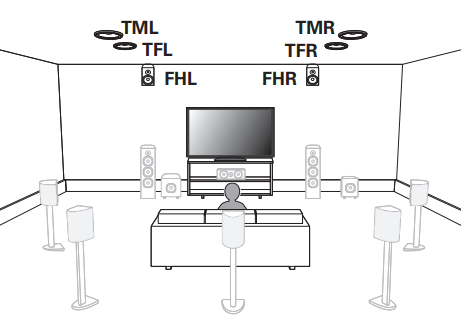 For a Dolby ATMOS setup Subwoofer Speaker Connection 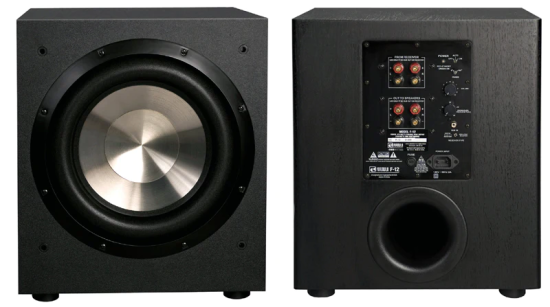 The subwoofer is a speaker for low frequencies or bass, often called low frequency effects or LFE. The subwoofer usually has a built-in amplifier. There are two main methods to connect a subwoofer speaker 1) Low-level connection: also known as an LFE, .1 or line-level connection. Line level and low level are the same thing. The low-level input on your subwoofer will usually require a direct connection from your AV receiver using a single high quality RCA cable. 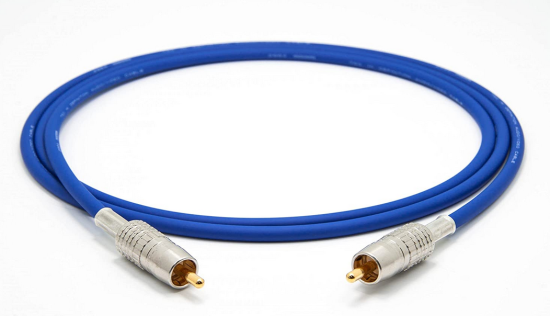 Line Level Connection cable for subwoofer 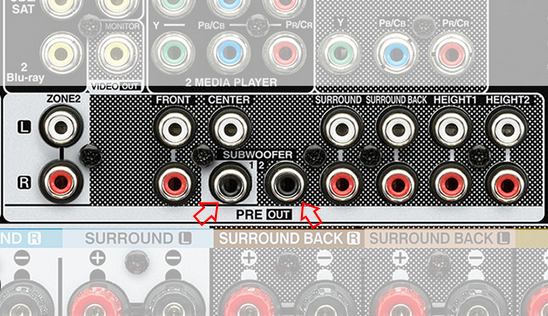 AVR rear panel subwoofer out ports. This AVR has two line level subwoofer connections. 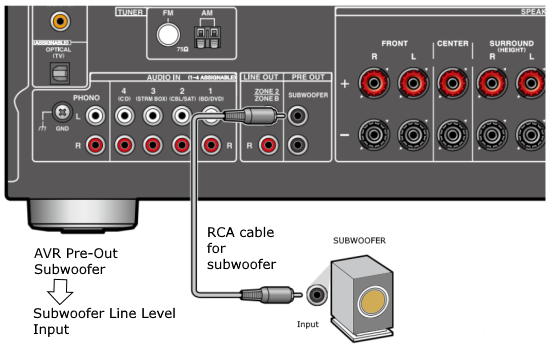 2) High-level connection: also known as a speaker-level connection Many subwoofers will have both connection types. However, some may have only one or the other. Low level connection The most common use for a low level or line-level subwoofer input is when you are using an AV receiver for multi-channel surround sound audio and most AV receivers will have a dedicated subwoofer pre-amp-output RCA type port on the rear panel. This will usually be marked as ‘sub’ or LFE. Using this connection allows the .1 channel in a 5.1 or 7.1 surround sound setup to be sent to the subwoofer speaker. Some subs have two line level inputs so you can connect a stereo amp which has pre-amp outputs. Here you will get a full range audio signal, not just low frequencies. High level connection If you use the subwoofer’s high-level input, you receive the amplifier’s full frequency range audio signal. This hookup looks like a regular speaker connection with a red and a black binding post. You would use the high-level subwoofer connection when you want to connect a subwoofer to an amplifier that does not have a dedicated subwoofer output. This could be a stereo amp for a 2.1 setup. You use the same stereo amp speaker outputs for the left and right speakers to connect the subwoofer, just use four more wires, red to red and black to black for each. Some higher end AVRs offer two LFE outputs. This setup allows another sub in the room to balance the low frequencies around the room. You could use a RCA Y-splitter cable to run two subs even if your AVR only has one LFE output. Bluetooth Some subs are Bluetooth capable for wireless audio. 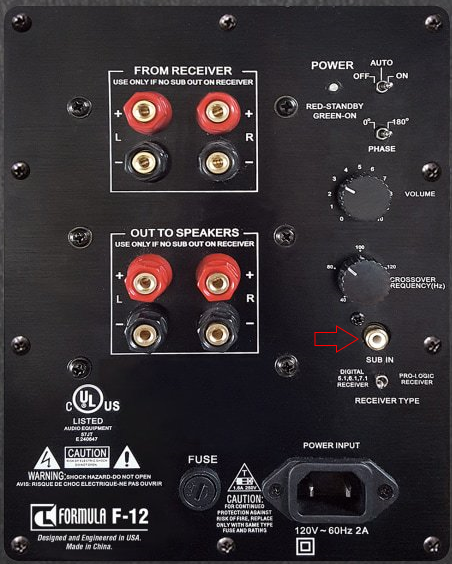 Rear of Subwoofer RECEIVER - AM and FM radio tuner and antennas 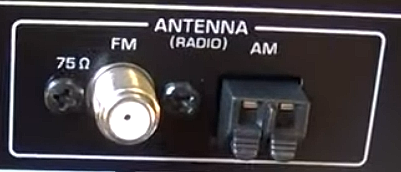 The AVR has input ports for antennas for the best reception of AM and FM broadcasts. FM is typically 2 channel stereo while AM is 1 channel mono audio AM radio broadcasts music, sports, news, weather, commentary, emergency information while FM is typically music.  AM: 535–1605 kHz, with frequencies assigned in 10 kHz increments FM: 88–108 MHz, with frequencies assigned in 200 kHz increments You can connect AM and FM antennas of your choosing to the AVR AM and FM ports. These antennas can be simple such as a loop antenna or they could be large expensive antennas for the best reception. Do not confuse the antennas on the AVR with an AM or FM antennas. The antennas on the AVR are for Wi-Fi and Bluetooth. Connect source devices and TV Modern source devices include DVD/Blu-ray players, Media devices, games, satellite receivers. Most AVRs will have 4, 5 or 6 HDMI inputs for connecting source devices. The AVR's HDMI output connects to the TV's HDMI ARC input so the TV can send audio to the AVR. Also the AVR sends setup screens to the TV so you can setup and configure the AVR. HDMI is the best connection for audio and video.  AVR HDMI inputs and HDMI output. Connect an HDMI cable from the source device HDMI OUT to the AVR HDMI IN. Connect an HDMI cable from the AVR HDMI OUT to the TV HDMI ARC IN. 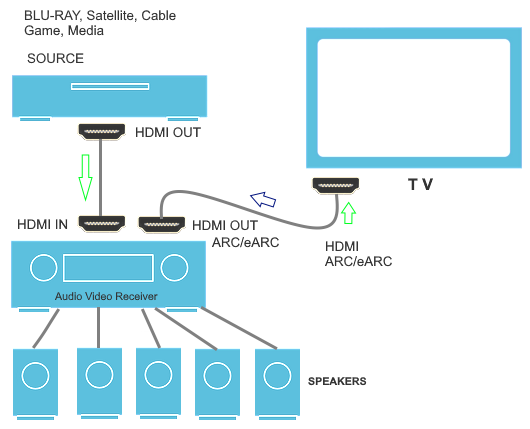 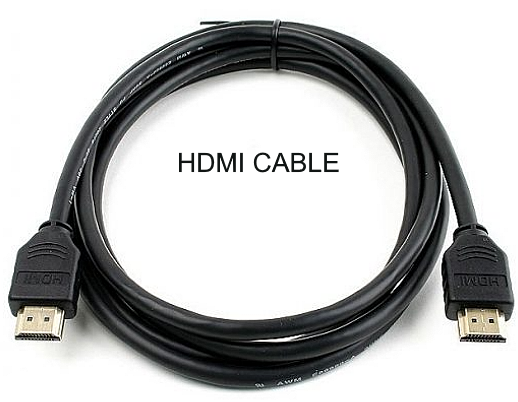 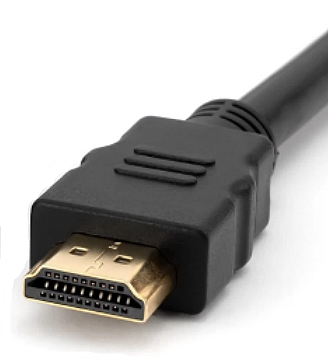 HDMI carries both video and audio. For high video resolution and the best surround sound, use a capable HDMI cable, High Speed, Ultra High Speed with a compatible AVR.  Be sure to select the source input you want on the AVR and select the HDMI ARC input on the TV. Connect TV to Audio Video Receiver 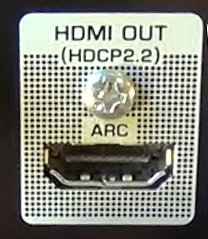 The AVR HDMI OUT port connects to the TV with an HDMI cable to the TV HDMI ARC input which allows the video to get to the TV from sources connected to the AVR and allows audio from the TV to the AVR for sound. The eARC is an update to ARC which allows Dolby Digital Plus audio from the TV sources such as streaming media players to go over the HDMI cable for the AVR to process, amplify and send to speakers. eARC handles the higher resolution audio formats.  Connect AVR to Wi-Fi network Your AVR can be connected to a network using a wired Ethernet cable or wireless Wi-Fi. You can connect your AVR to a Wi-Fi network in four different ways: Scanning Network Using your iOS device Using WPS Router Manually Make sure the AVR's external wireless antennas are connected and oriented in their full upright position. Make sure your AVR is connected to a TV via an HDMI cable, next Power on your AVR. Procedure: Be sure TV is set to the HDMI input that the AVR is connected to. Press the “Setup” button on the AVR remote control. 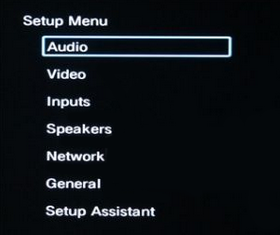 Select “Network” from the main menu. Then, select “Connection” followed by “WiFi Setup”. You can now select “Scan Network” from the menu’s options. 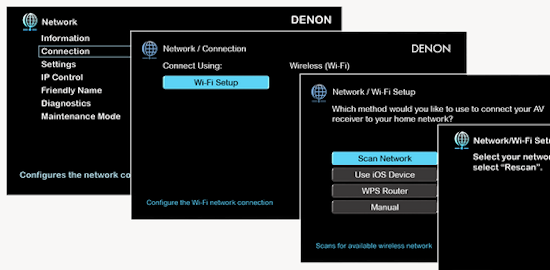 Select the network you wish to connect to from the list and enter your network's Wi-Fi password. The AVR should now be able to wirelessly communicate with your network. Wired Network Connection 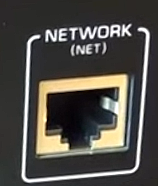 Using a wired (ethernet) connection to your router gives you the fastest and most secure network connection. The Network port on the AVR allows an ethernet hookup for internet downloads of the latest firmware for the AVR. AVR connect to internet Connection to internet with modern AVR is wired (Ethernet cable) or wireless (Wi-Fi). Streaming music services, updates to AVR firmware, AirPlay are some of the uses for a network connection. 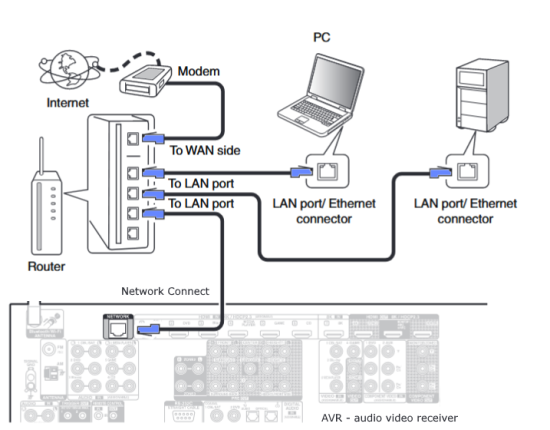  Ethernet cable - wired internet • Ethernet cables How to check if my AVR firmware is up to date. To find out if your AVR has the latest firmware installed: Power on your AVR. Press the "Setup" button on the remote control to access the setup menu. Select "General" from the menu. Then, select "Firmware." Select “Check for Update” from the Firmware menu. 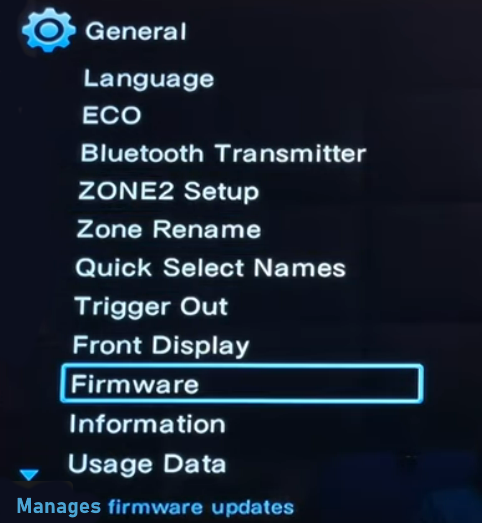   To find the firmware version, go to General> Information> Firmware> Version 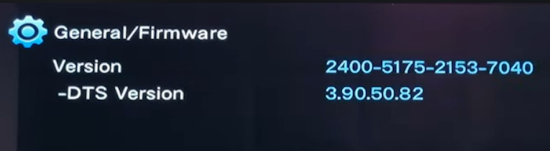 If your AVR is updated, then "No update required. Latest version installed" will appear on the screen. If your AVR needs to be updated, follow the instructions on the screen. Be careful when updating firmware as incomplete or corrupted updates can render the AVR inoperable. Call customer support if needed. The download may take 10 mins. so be patient. The AVR will restart when finished. Wait for AVR to start processing signals again. This may take a min. or so. In the 1960s and 1970s there were just 2-channel stereo receivers and these units were only for sound, no video. These receivers had a built-in tuner mostly AM/FM so you could listen to music from broadcast radio, then you hooked up your turntable for vinyl LP records, your tape deck to record music and your two loudspeakers, left and right, and that was it. Today we call them audio video receivers because video has become as important as audio. Modern A/V receivers act as central switches for all your connected components including HDTV. Many additional features have been added over the years to AVRs such that we now have almost too many options to manage and use. You can hook up your iPhone, get satellite radio, surround yourself with 8 or more loudspeakers, use Wi-Fi and upconvert video to higher resolutions. Current AVRs can decode all of the modern digital audio formats. Yes, modern AVRs can get very complex, but if you break it down and take one step at a time, you will be able to hookup your gear in no time. Most of your components connect to the rear panel of the receiver. The rear panel of a modern AVR looks very intimidating at first but if you look at the various sections and learn what each section does, it becomes much easier to understand. The image below shows each functional area of a rear panel. 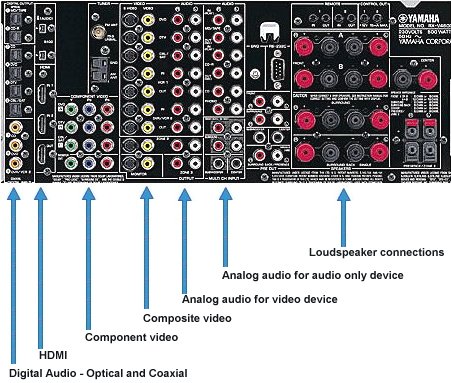 The Audio Video Receiver or AVR functions as a switch, an amplifier, a decoder and a tuner all in one box. Today, the main areas of focus are the speaker connections for sound and the HDMI connections for all your source devices and the TV. 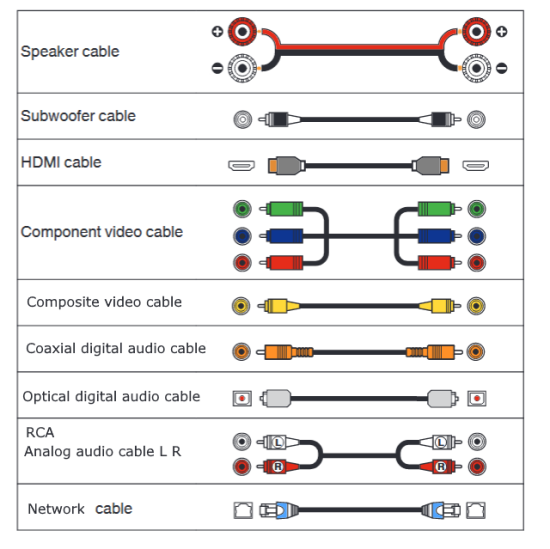 Chart of Audio Video Cable Types Connect TV to Audio Video Receiver AVR The TV and the AVR should be closely matched in capabilities so that video and audio can be processed and connected properly. Otherwise you could end up with a mismatch in connections. For example if your TV is older and has only component video inputs but your newer AVR has only HDMI outputs to TV, then you would need a video adapter rather than have a direct connection. For the newer AVRs, your TV should also be HDMI capable and have at least HDMI ARC if not HDMI eARC. The newer AVRs also will have the decoders built-in for the latest surround sound formats you can get from Blu-ray movies. 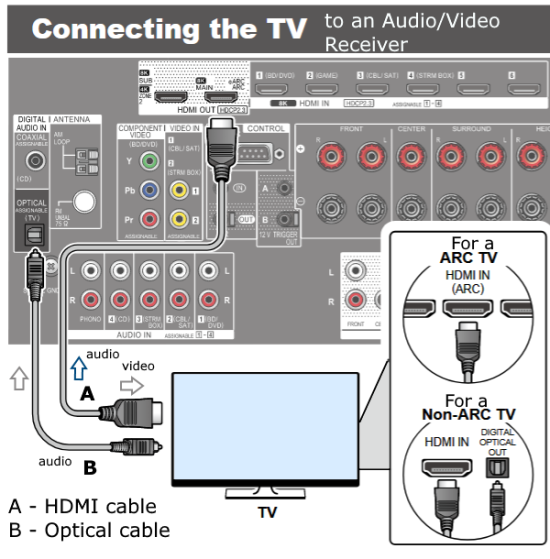 Connect HDMI cable from AVR HDMI OUT to TV HDMI input. This allows all your AVR connected source devices to send video from the AVR to the TV. The audio will be processed by the AVR and sent to the speakers. If your TV has HDMI ARC/eARC, then the TV can send audio to the AVR over the same HDMI cable, however if the TV does not have HDMI ARC, then send audio from the TV to the AVR using the optical output on the TV connected to the optical input on the AVR.  AVR HDMI inputs for source devices such as DVD, Bluray player, game, satellite receiver box and HDMI output to TV. 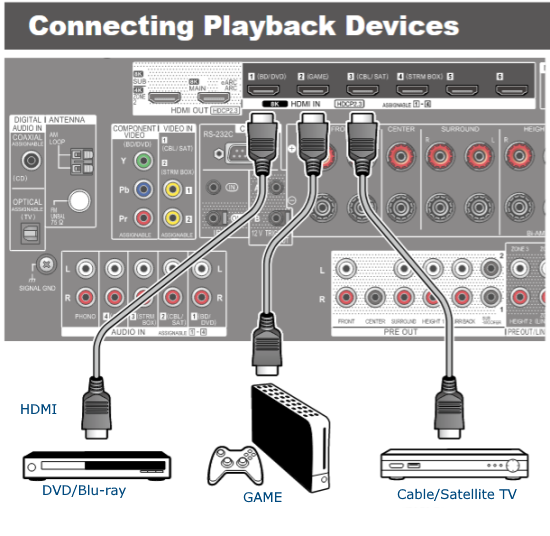 Selecting your Source Device Most AVRs have a large round knob on the left front panel to select your input source device. Some have buttons instead of a knob. The right front panel usually has a large knob for the master volume control. You can also use the AVR remote to select your input source device. The device buttons labeled on the remote correspond to the inputs on the AVR.  AVR Remote control source select  The front panel display shows the current source device and audio format. Connect Analog Audio Components to AVR 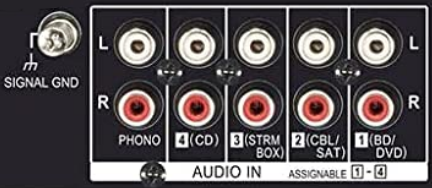 AVR analog audio inputs If you have CD or Tape or other audio only components, these are typically a 2 wire connection, color coded white and red for the 2 stereo channels. Only this time you will use an analog RCA phono style cable. 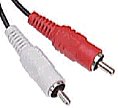 Connect white to white and red to red from component to the receiver. Look for a label on the receiver's rear panel to match the device you are connecting. CD for example would be for your CD player. Audio recorders require an additional 2 RCA cable connection (PLAY/RECORD) for a total of 4 wires for a recorder. Turntables are coming back in style so connect to the PHONO inputs on the receiver if it has one. If not, buy a good phono preamp and connect the output to the PHONO input on the receiver. Turntable to AVR hookup The LP record has made a comeback and newer AVRs now have again a PHONO input. If your AVR does not, you can get a small phono pre-amp for a turntable and connect through that to a line audio RCA input. 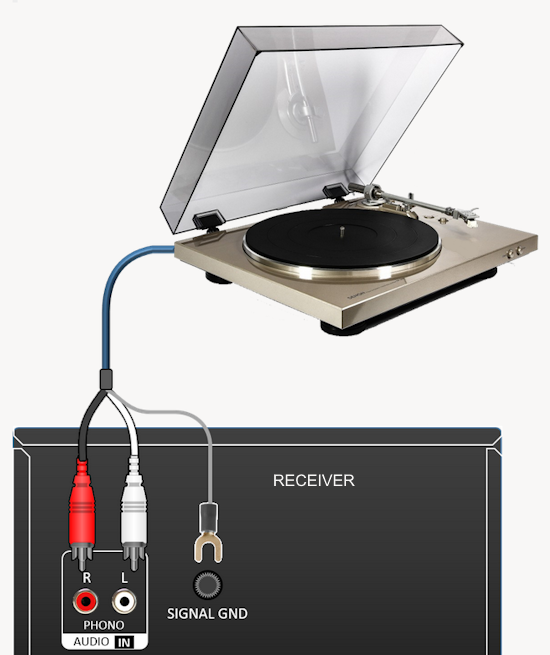 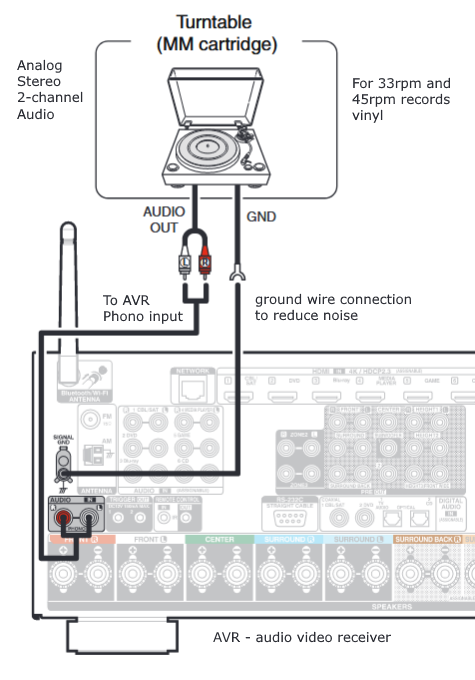 Turntable connection to AVR Phono input  The PHONO input for the turntable is diffrent than the other analog audio inputs and should only be used for the turntable. 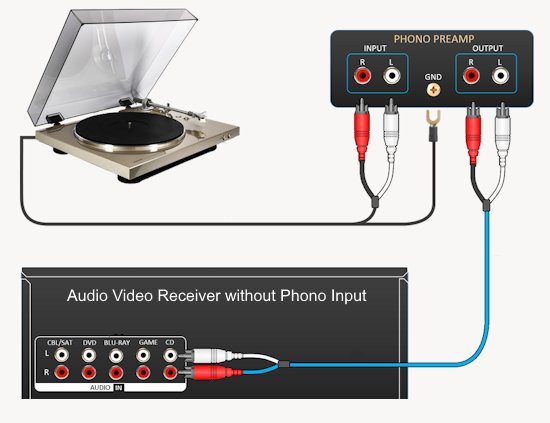 If your AVR does not have a PHONO input, use a phono pre-amp. Be sure to get one with a matching cartridge type for your turntable, either MM (moving magnet) or MC (moving coil). Some phono pre-amps offer both types. MM is the most common. MM cartridges offer the ability to replace the stylus (needle) portion if it becomes worn where MC cartridges do not. With MC, you have to replace the entire cartridge and MC is more expensive. The stylus tip, the part that makes contact with the grooves of a vinyl record, is typically made from diamond. This is due to the diamond's exceptional hardness and durability, which allow it to maintain its sharpness and shape over time. A durable, sharp stylus is essential for accurately tracing the tiny grooves of vinyl records without causing undue wear. 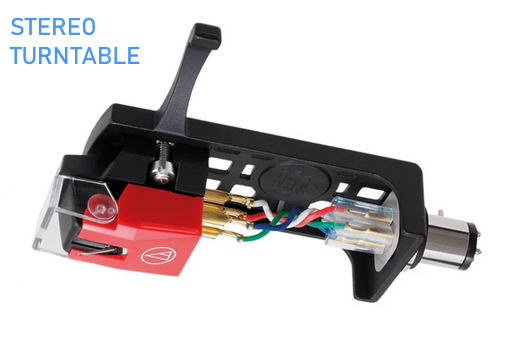 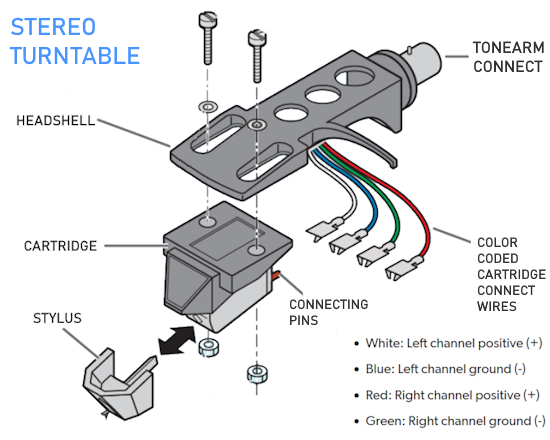 Hook Up your Audio/Video Components If you have a DVD player, BluRay player, cable TV box, satellite receiver (Dish Network, DirecTV) or other audio/video device, connect the video (yellow) and the audio (white and red) to the appropriate inputs on the AVR's rear panel. However, for High Definition, use an HDMI cable to connect. Again, the inputs are usually labeled DVD, SAT etc. so you can connect to a matching port. 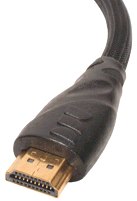 HDMI cable HDMI is an abbreviation of High-Definition Multimedia Interface, which is an Audio-Video digital interface that can be connected to a TV, Bluray player, soundbar or amplifier. With the HDMI connection, high definition video and high quality audio formats used by Blu-ray Disc players (Dolby Digital Plus, Dolby TrueHD, DTS-HD, DTS-HD Master Audio) can be transmitted, which is not possible with the analog transmission. Using the HDMI connection, audio and video signals can be transmitted through a single HDMI cable, while in conventional connections it is necessary to provide audio and video cables separately for connection between devices. HDMI ARC/eARC ARC (Audio Return Channel) This function transmits audio signals from the TV to the audio video receiver (AVR) through the HDMI cable and plays back the audio from the TV on the AVR based on the HDMI Control function. If a TV without the ARC function is connected via HDMI connections, video signals of the playback device connected to the AVR are transmitted to the TV, but the AVR can not play back the audio from the TV. If you want to enjoy surround audio for TV program, a separate audio cable connection is required. In contrast, if a TV with the ARC function is connected via HDMI connections, no audio cable connection is required. Audio signals from the TV can be input to the AVR through the HDMI cable between the AVR and the TV. This function allows you to enjoy surround playback on the AVR for the TV. eARC (Enhanced Audio Return Channel) The eARC function is an extension of the ARC function. It utilizes dedicated eARC function control to play back television audio from the AVR without passing through HDMI control. Furthermore, the eARC function can transmit multichannel linear PCM, Dolby TrueHD, Dolby Atmos, DTS-HD Master Audio, DTS:X and other audio formats not compatible with conventional ARC. 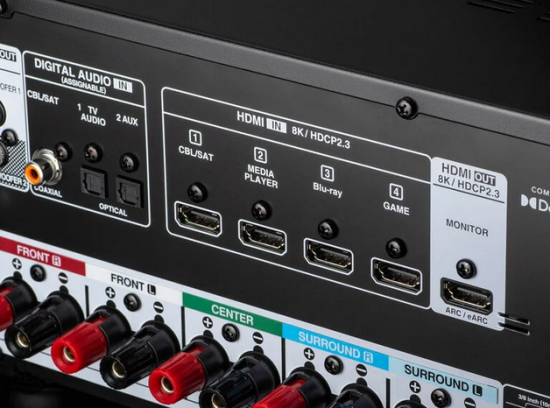 Connecting to an eARC capable television also enables enjoyment of higher- quality surround playback of the audio content played from your TV. Note: Your TV must have the capability to passthrough the higher audio formats such as Dolby Digital Plus if you are streaming content through the TV. Some TVs do not have this capability. 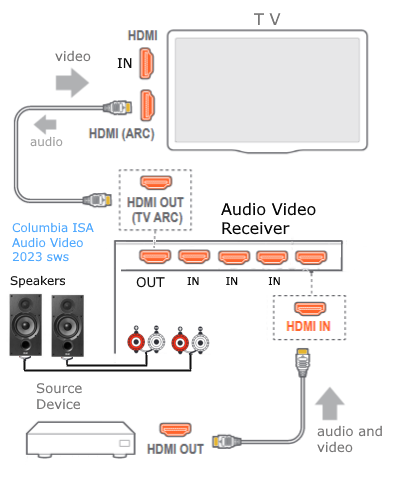 When you get to the audio/video devices, particularly current components, you have some choices as to video and audio connections. High Definition (HD) requires a component video or HDMI connection. Instead of the yellow composite video hookup, HD requires either the HDMI or the component video hookup. HDMI is a single cable connection for both audio and video. Component video requires 3 RCA cables (green, blue, red) for the video and 2 RCA cables (white and red) for the audio. 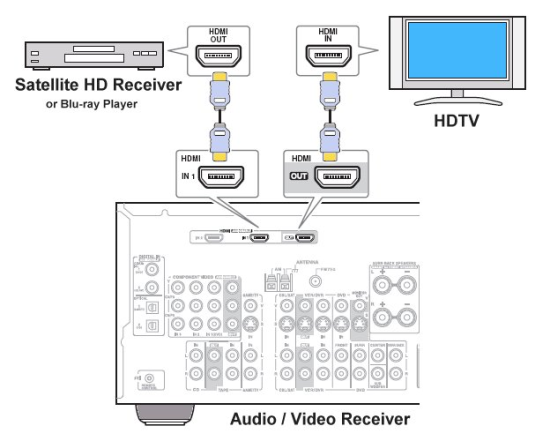 HDMI is a rectangular jack and has multiple pins. Your source device must have a HDMI output such as a Bluray player. HDMI is the connection of choice for the highest video resolutions. Some better A/V receivers can do video conversion, taking a composite video source and output to the HDMI port for your HDTV. Older TV without HDMI ARC If your TV does not have HDMI ARC, use the TV optical audio out 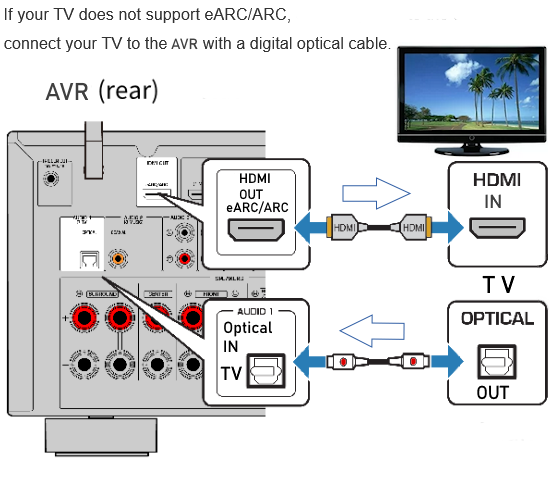 Hook up the surround sound Surround sound is one of the main reasons for having a A/V receiver. Virtually all current AVRs will decode Dolby Digital 5.1 surround sound found on commercial DVDs. Surround sound can be processed by your AVR if a cable(s) is connected from the source device to the AVR. There are 4 ways to hookup surround multi-channel audio. 1) Optical (Toslink) 2) Digital Coaxial (RCA) 3) HDMI 4) Analog RCA (multi-channel) The first two are traditionally used for 5.1 bitstream digital audio with HDMI becoming a new alternative. HDMI will eventually overtake the first two because HDMI has more capacity and capability for the newer audio surround sound sources. 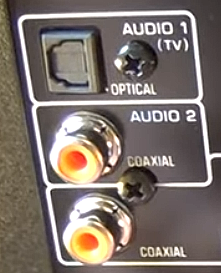
Optical and digital coaxial are both the same in function but use different cables. Optical uses an optical or light method of sending the digital stream while coaxial uses the more traditional electrical over copper wires method. Optical jacks are usually black and square while coaxial are usually orange and round. A good AVR will have plenty of inputs for optical and coaxial digital audio connections. You can connect DVD player digital audio outputs or the TV optical audio output to get sound from TV components like streaming media devices.  Use the TV remote to select the proper audio settings in the on-screen TV sound menus. If your TV does not have ARC and you have a surround sound source such as broadcast TV, then you need an optical cable connection from the TV to the AVR for surround sound. The analog RCA hookup is used when the source device does the decoding of the bitstream and then passes the channels to the AVR already decoded. One RCA phono cable is used for each channel. So all the AVR has to do is amplify and route to the speakers. 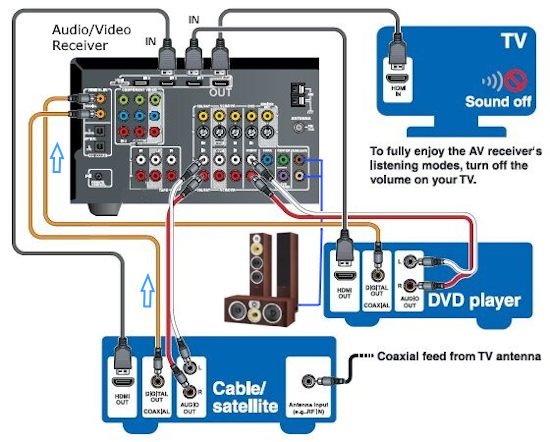 Analog RCA multichannel hookup 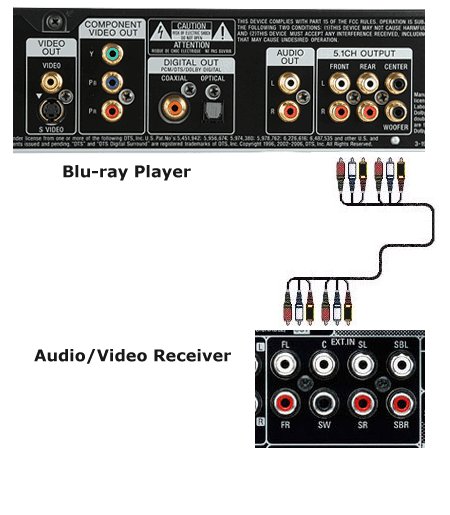 When the player does the decoding you can use RCA audio cables for each channel if your AVR has the inputs. Dolby TrueHD lossless audio could be sent this way instead of using HDMI. Dolby Atmos Introduced first in the cinema, Dolby Atmos brings a revolutionary sense of dimension and immersion to the Home Theater. Dolby Atmos is an adaptable and scalable object based format that reproduces audio as independent sounds (or objects) that can be accurately positioned and moved dynamically throughout the 3 dimensional listening space during playback. A key feature of Dolby Atmos is the introduction of a height plane of sound above the listener. Helicopters flying overhead, rain or a shot bullet sound can move from speaker to speaker creating a realistic listening experience. Dolby Atmos Stream Dolby Atmos content will be delivered to your Dolby Atmos Enabled AV receiver via Dolby Digital Plus or Dolby TrueHD on Blu-ray Disc, downloadable files and internet streaming media. A Dolby Atmos stream contains special metadata (data about the data) that describes the positioning of sounds within the room. This object audio data is decoded by a Dolby Atmos AV receiver and scaled for optimum playback through Home Theater speaker systems of every configuration. Settings It is very important to read your AVR owner's manual. There are many options with modern AVRs and several settings may need to be performed before you can get what you want from your AVR.   Top brands of Audio/Video Receivers Pioneer, Yamaha, Onkyo, Sony, Marantz, Denon  Select the input source on the AVR. Use the HDMI ARC input on the TV if available so the TV can also send audio to the AVR. How do I setup my AVR to output sound to my Bluetooth headphones? Bluetooth is a short range wireless standard to transmit audio to Bluetooth headphones or speakers. You can use your Bluetooth headphones to enjoy audio from most AVRs released after 2019. *Note: Make sure the AVR's firmware is up to date to use this feature. Procedure to setup your AVR to transmit sound to your Bluetooth headphones. Press the “SETUP” button on the AVR remote control. From the Setup menu, select “General.” Select “Bluetooth Transmitter” from the General menu. Set the “Transmitter” option to ON (This setting is Off by default). Select “Device List” to pair your Bluetooth headphones (Make sure your Bluetooth device is set to pairing mode). • How to Pair Bluetooth Airplay Some AVRs have the capability to receive audio from your mobile phone using the same home Wi-Fi network. Apple's Airplay and the later Airplay2 can be used in the latest AVRs to play music wirelessly. Denon offers over 40 AVR models with Airplay2. Music files stored on your iPhone, iPod touch, iPad or iTunes can be played on your AirPlay2 AVR via your Wi-Fi network. (requires iOS 11.4 or later.) Connect your iPhone, iPod touch or iPad Wi-Fi to the same network as your AVR. Play the song on your iPhone, iPod touch or iPad. AirPlay icon is displayed on the iPhone, iPod touch or iPad screen. Tap the AirPlay icon and select your AVR. • Hookup diagram - cablebox to stereo |
|
• Audio
Video Connections Columbia ISA Audio Video Empowering consumers thru information columbiaisa@yahoo.com |