|
|
|
How Do I Get SURROUND SOUND From My DVD Player? 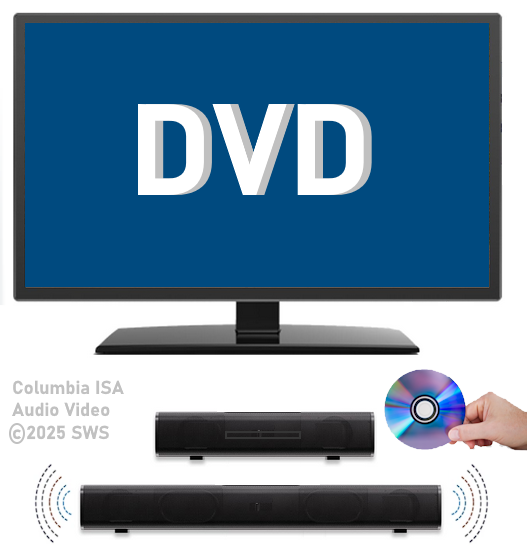 The typical setup for DVD player is to connect to the TV for video and also connect to the TV for sound. This uses the TV internal speaker(s). How can you use external speakers giving you a richer audio experience? There are many ways to do this. You can connect stereo speakers or you can go full surround sound with multiple speakers. Connect DVD Player to Stereo Speakers POWERED SPEAKERS A simple solution for using external speakers instead of the TV speakers is to connect powered stereo speakers to the DVD player with RCA audio cables (white and red). Normally these go to the TV audio inputs but connecting to powered speaker RCA inputs gives you better sound. This setup is not surround sound but improves the sound over the TV speakers. 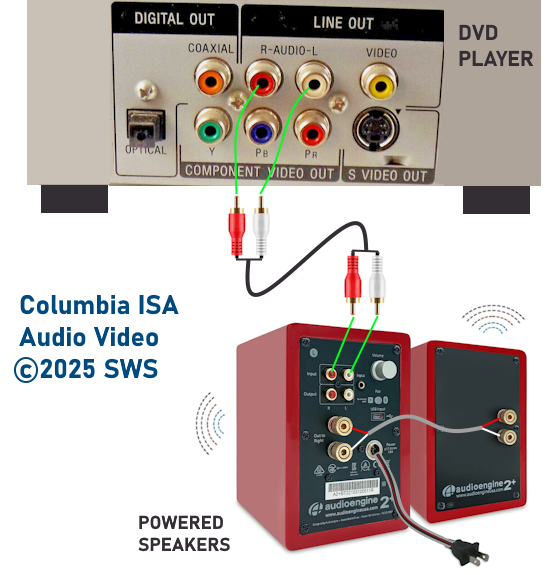 This setup would be for older dvd players without HDMI or older TV sets. Connect the video cables from DVD player to TV video inputs (yellow composite video or if your TV has them, the component video green, blue, red). SOUNDBAR You could connect the RCA white and red analog audio cables to a soundbar (Aux port) or an Audio Video Receiver's analog audio inputs but you will only be getting stereo and not surround sound. 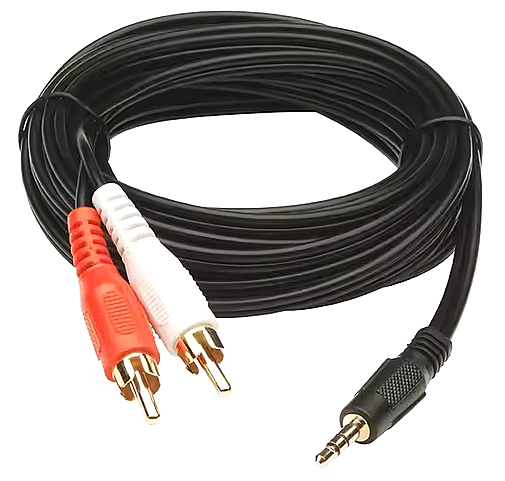 CONNECT DVD PLAYER TO SOUNDBAR - AUX STEREO 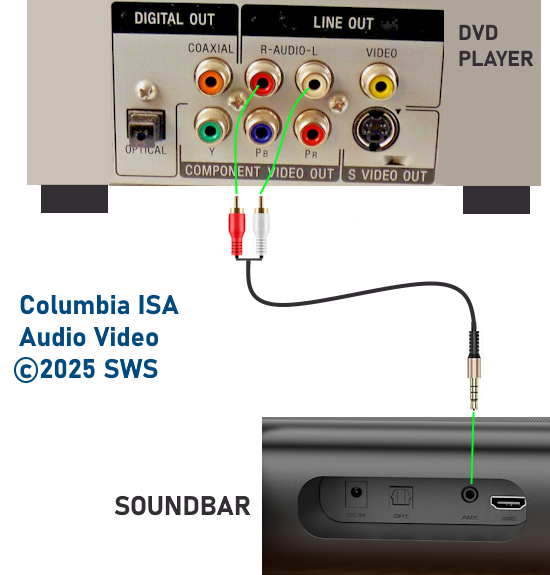 Select "AUX" input on the soundbar. The Soundbar has a built-in amplifier and speakers. PASSIVE SPEAKERS and STEREO AMPLIFIER 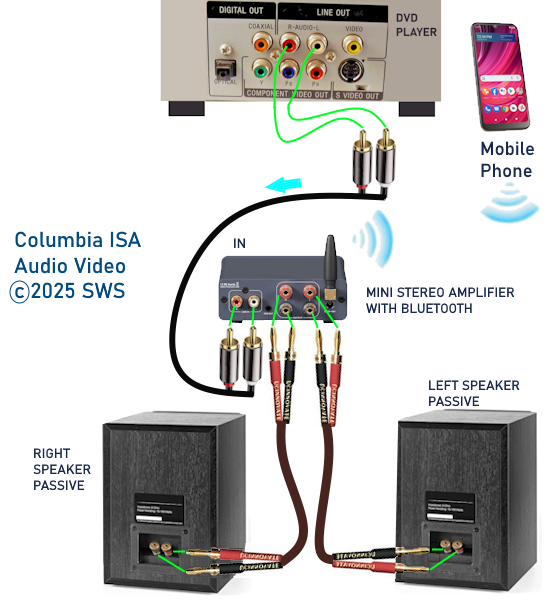 Connect DVD player to stereo amp and amp to passive speakers. A Bluetooth capable amp doubles as a mobile phone music player through the passive speakers. Connect DVD Player to Surround Speakers Standard DVD-Video audio tracks typically use compressed Dolby Digital or DTS surround sound or uncompressed PCM stereo formats. Be sure the DVD has surround sound available on the disc. Most do, in the form of Dolby Digital 5.1 or DTS. For Surround Sound you need: 1. A capable soundbar or 2. An Audio Video Receiver with 6 or more loudspeakers. 3. Cable to connect DVD player to soundbar or AV Receiver Soundbars come with various audio decoding capabilities. Be sure to check the specifications. Surround Sound 5.1 connection diagram DVD player's HDMI output to AVR HDMI input. AVR HDMI out to TV HDMI in (ARC/eARC). The AVR handles the audio. 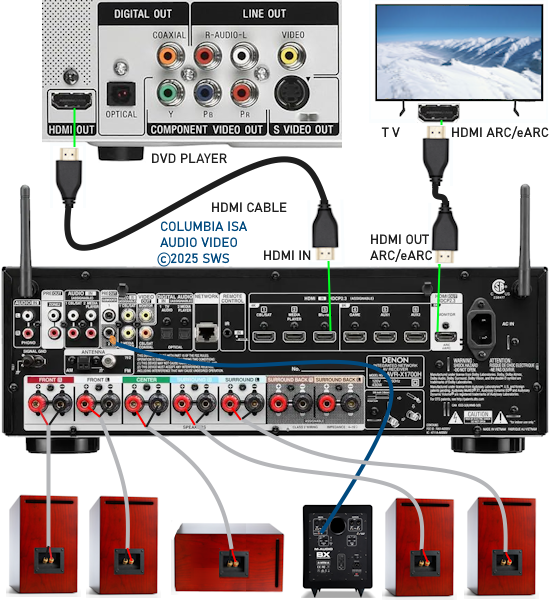 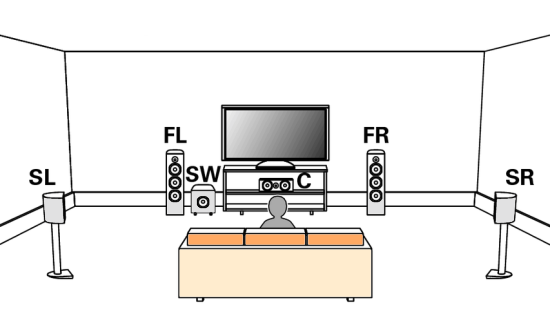 Surround Sound 5.1 Speaker Layout FL - Front Left FR - Front Right C - Center channel (dialog) SL - Surround Left SR - Surround Right SW - Subwoofer Adjust Settings For the AV Receiver: Select the correct HDMI source input Enable HDMI ARC/eARC For the TV: Turn OFF the TV internal speakers Select the HDMI ARC/eARC input Enable HDMI ARC/eARC For ARC only TVs, turn ON HDMI CEC CEC is called by various names such as SimpLink or Anynet+ For the DVD Player: Select the correct Audio format (Dolby Digital or DTS) Enable HDMI Audio Common Audio Formats: PCM (Pulse Code Modulation): A method of digital audio encoding, often used for high-quality stereo and multi-channel audio. Dolby Digital (AC-3): A widely used compressed multi-channel audio format for home theaters, often supporting 5.1 channels. DTS: Digital Theater Systems, another popular multi-channel audio format, typically 5.1 channels. Dolby Digital Plus (E-AC-3): an advanced version of Dolby Digital, offering higher-quality audio, more discrete channels (up to 7.1), and greater efficiency for internet streaming delivery. Dolby TrueHD: A lossless (uncompressed) multi-channel audio format that provides high-quality audio, often used on Blu-ray discs. Dolby Atmos: Immersive audio metadata that adds height channels, creating a more spatial sound field. While not as accurate as a dedicated home theater system with separate height speakers, Dolby Atmos on soundbars can still enhance the listening experience by creating a wider soundstage and a more realistic sense of depth. Dolby Atmos is supported by Dolby Digital Plus, an enhancement to Dolby Digital, used by internet streaming services. Dolby Atmos is also supported by Dolby TrueHD often found on Blu-ray Disc. DVDs do not generally have the capacity for Dolby TrueHD audio so Dolby Atmos will not be available. You need to step up to Blu-ray Disc and player for Dolby Atmos and not all of these discs will contain Atmos content. 1. DVD Player Audio Settings: Digital Audio Output: Most DVD players allow you to choose between 2-channel PCM (Pulse Code Modulation) and multi-channel Bitstream audio output. Some DVDs may only offer 2-channel stereo. Most will offer Dolby 5.1 surround or DTS 5.1 surround or both. Bitstream Audio Output: Select bitstream as the digital audio output option for surround sound. This sends the raw, encoded audio data to your Audio Video Receiver, which then decodes it, amplifies and routes to the appropriate loudspeakers. Dolby Digital/DTS Selection: If your DVD has Dolby Digital or DTS soundtracks, ensure these are selected in the DVD's audio settings. Some players may offer options for Dolby Digital 5.1 or DTS 5.1/7.1. Check Disc Setup: Always verify the DVD's setup menu, as it may default to a different audio format, like stereo. 2. AV Receiver/Sound System Settings: Input Selection: Ensure the correct input on your AV receiver (e.g., DVD, Blu-ray) is selected. Decoding: If your receiver supports Dolby Digital or DTS, and most do, it will decode the bitstream signal from your DVD player. Mode Selection: You may need to manually select the Dolby Digital or DTS mode on your receiver to match the audio track on the DVD. Speaker Configuration: Ensure your speaker setup (e.g., 5.1, 7.1) is correctly configured in your receiver's settings. 3. Audio Port Settings: S/PDIF Output: You can enable S/PDIF (Sony/Philips Digital Interface) output for digital audio transmission. This is the Optical and the Coaxial (RCA orange) ports on the DVD player. 5.1 surround sound is the maximum these can handle. HDMI is required for more advanced audio formats. HDMI Output: If you're using HDMI for digital audio, ensure HDMI is set to ON and selected in the DVD player's audio settings.  If you are using a stereo system for sound, be sure to select PCM. DVD Soundtracks Common types of soundtracks found on DVDs: Dolby Digital (AC-3): This is the most common audio format for DVD-Video discs. It's a lossy compression format, meaning some audio data is removed to reduce file size. Dolby Digital 5.1 is a popular version offering five full-range channels (front left, center, front right, left surround, right surround) plus a low-frequency effects (LFE) channel for bass. DTS (Digital Theater Systems): DTS is another surround sound format used on DVDs, known for supporting higher bitrates and potentially offering better sound quality compared to Dolby Digital. However, DTS was not part of the initial DVD standard, so some older players may not support it. PCM (Pulse Code Modulation): This is an uncompressed and lossless audio format, meaning no audio data is lost during the compression process, resulting in high audio quality but larger file sizes. PCM can be used for both stereo and surround sound, often referred to as LPCM (Linear PCM) in surround applications. While PCM offers superior quality, it requires significantly more disc space. Languages on DVD DVDs can contain multiple audio tracks in different languages which you can select. Look on the back cover to see which tracks are available.  This example shows you that Dolby Digital 5.1 surround sound is available in English with the full 6 audio channels. DTS 5.1 surround sound is also available in English. A Spanish track is available but it only has 3 audio channels. These would be the left front, right front and center audio channels. Notice there is no LFE (low frequency effects) channel for bass.  This example shows you that Dolby Digital 5.1 surround sound is available in English. Other languages are available with various audio channels. Mono would only be one audio channel, usually the center channel for the movie dialog. Usually you would insert the DVD into the player and the DVD player starts playing the DVD and one of the first screens you will see is the DVD Menu screen. This menu offers such options as "Play the Movie" or "Select Language" or other options.  Press the down arrow on the DVD remote until "Languages" is selected, then press the Enter button. Next select the language and press Enter. Next select Play or Resume the movie. Connecting the DVD player The connecting cable can be an optical (Toslink) audio cable or an RCA style SPDIF audio cable or an HDMI (audio and video) cable. Which cable you use depends on which ports are available on your DVD player and soundbar or AV Receiver. There are several different ways to connect DVD player, TV and sound system. The DVD player can be connected directly to the TV or the DVD player can be connected to the soundbar or AV Receiver and then the soundbar or AVR is connected to the TV. If the DVD player is connected directly to the TV, then the TV must output the audio to the AVR or soundbar. Therefore the TV must be capable of passing the audio format out to the AVR or soundbar. 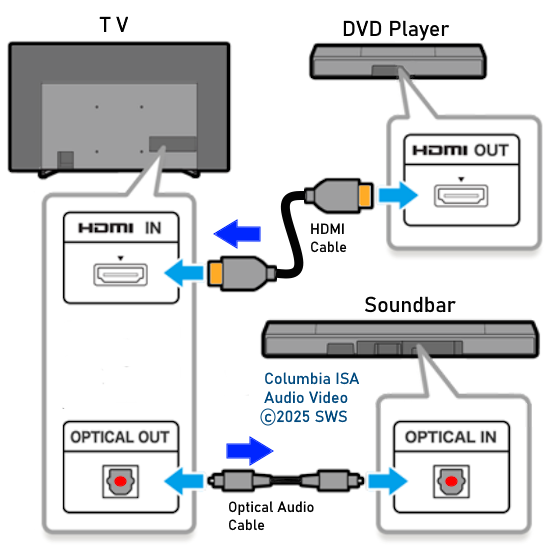 TV Sound Output destination The audio OUTPUT must be directed from the TV to the sound system instead of the TV's internal speakers. 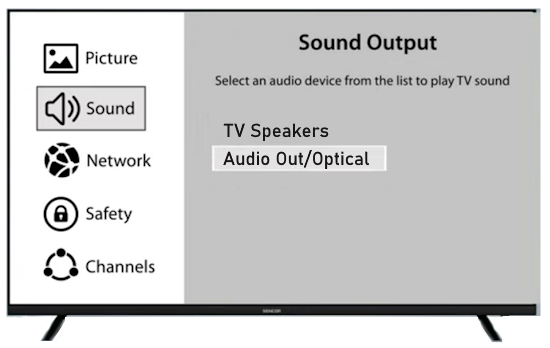 For LG TV: 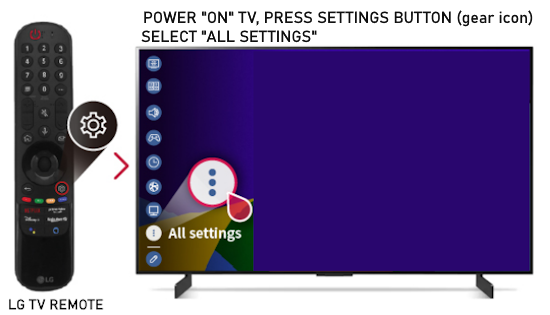 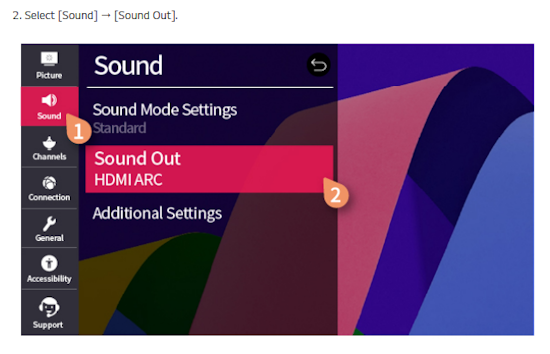 Select "SOUND" and next "Sound Out" 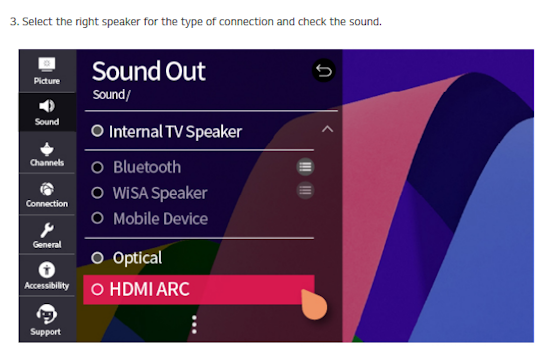 Select "Optical" if using the optical cable connection or "HDMI ARC" if using HDMI or "Bluetooth" for wireless or "TV Speaker" for the TV internal speakers. TV Sound Output Format Select the audio format which best matches the sound device capabilities Accessing the TV Settings Menu to select the audio output format: Press the "HOME" or "Settings" or "Menu" button on your TV remote. Navigate to the "Sound" or Audio settings. Look for options like "Expert Settings," "Advanced Audio Settings," or "Digital Audio Out". Audio output format Options: PCM: Uncompressed audio, often preferred for the highest quality 2-channel stereo. Bitstream: A compressed format that allows the TV to pass through the raw audio digital stream to connected audio devices. Often 5.1 surround sound. Dolby Digital: A compressed audio format that is widely supported. Dolby Digital Plus: An enhanced version of Dolby Digital, often used with surround sound systems, streaming internet content. Capable of Dolby Atmos metadata. Auto: The TV will attempt to automatically select the best audio format available. This is not always the best setting. Pass-Through: The TV will send the raw audio stream from a source device (like a Blu-ray player or streaming app) directly to a connected AV receiver or soundbar without the TV processing or decoding the audio first. This allows the AV receiver or soundbar to handle the decoding of complex audio formats. Specific Instructions for Different TV Brands: LG TV: LG: You can find these settings in the "Sound Out" section of the settings menu. Go to "Settings"> "All Settings"> "Sound"> "Advanced Settings"> "Digital Sound Output"> On older LG TVs "Additional Settings" was used instead of "Advanced Settings". 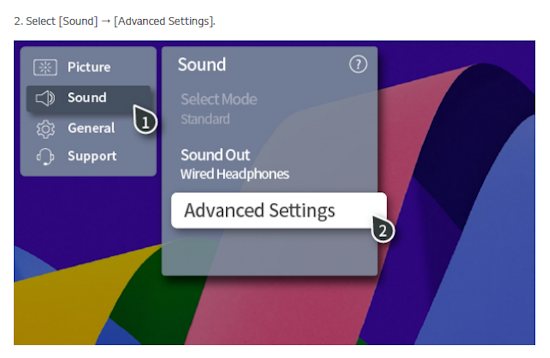 Select "Sound" and next "Advanced".  Select "Digital Sound Output" 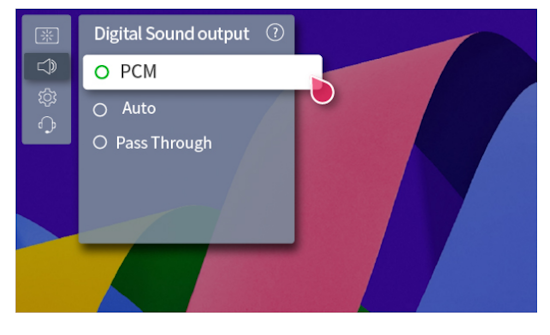 Next select the audio format SAMSUNG TV: Press the "Home" or "Menu" button on TV remote. Samsung: Navigate to Settings > All Settings> Sound > Expert Settings > Digital Output Audio Format. To enable passthrough DVD audio on a Samsung TV, navigate to Settings > Sound > Expert Settings > Digital Output Audio Format and select "Pass-Through". This setting allows the TV to output the raw audio data (like Dolby Digital) to an external device without processing it, so the connected device (e.g., soundbar, receiver) can decode it. Additionally, ensure Anynet+ (HDMI-CEC) is enabled and your sound output is set to the appropriate external device (like a soundbar or AV receiver). 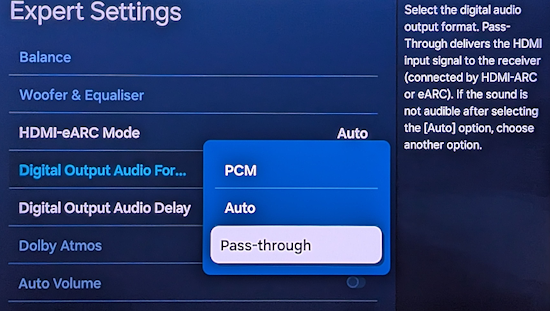 If the DVD player is connected to the AVR or soundbar, the audio from the DVD is processed, amplified and directed to the speakers while the video is passed on to the TV. The soundbar or AVR should be capable of sending the desired video format to the TV. Be sure to select the correct input on the AVR or soundbar.  DVD player connection diagram - direct connect to soundbar 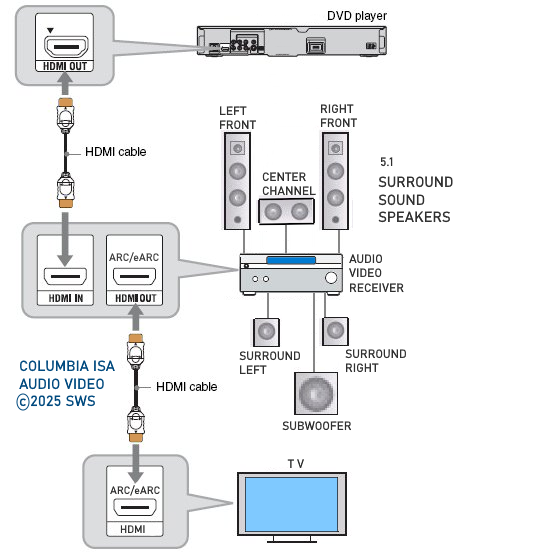 DVD player connection diagram - direct connect to AVR 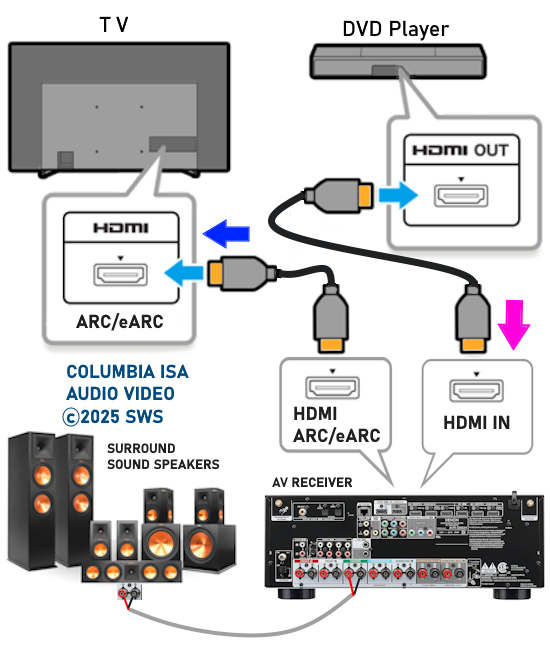 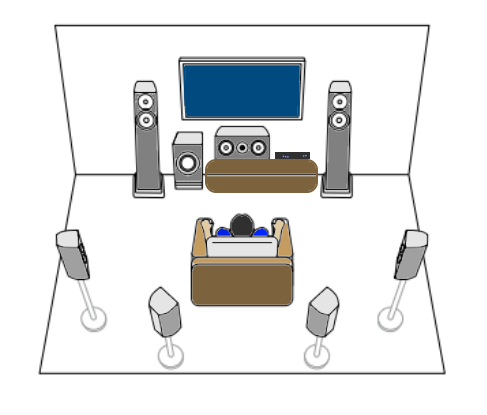 Surround sound home theater setup 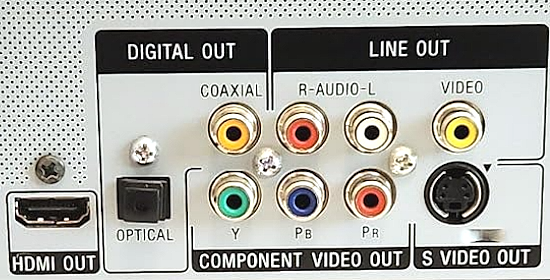 DVD player rear ports - HDMI, Optical, Coaxial Note: Some DVD players may only have HDMI out. 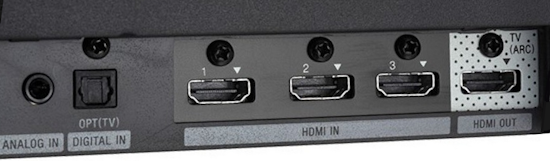 Soundbar ports - 3.5mm aux input, optical input from TV, three hdmi inputs, hdmi ARC out to TV What ports will I use to Connect? Look for the following ports on your devices to hookup DVD, TV and sound system. Match the out and in ports, optical out to optical in, HDMI out to HDMI in and so forth. 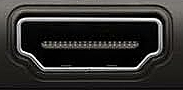 HDMI digital audio/video port  Optical digital audio port (Toslink, SPDIF) Remove any protective covers before connecting  Digital audio port (SPDIF, Coax, Coaxial) Coaxial SPDIF are often found on AV Receivers but not so much on soundbars which usually have optical inputs. Optical and Coaxial are basically the same so use one or the other. Optical has the advantage of less interference due to the light transmission rather than the electrical signals used in the coaxial connection. However, the coaxial can be a more robust cable than the optical. The Optical and the Coaxial audio connections can support many of the surround sound formats such as Dolby Digital, however for the highest quality audio formats such as Dolby TrueHD available on Blu-ray, you have to use the HDMI connection. 1) Connect an audio cable from DVD player output to soundbar or audio video receiver (AVR) input. This cable can be an HDMI cable or an optical audio cable or a coaxial RCA SPDIF audio cable.  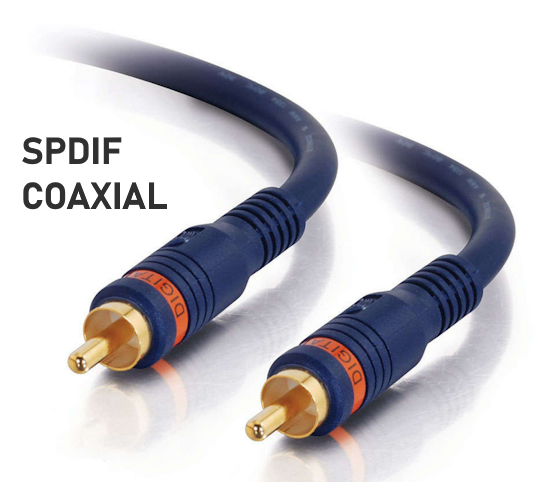 2) Select the correct input source on the soundbar or AVR. 3) Navigate to the setup/settings on-screen menu for the DVD player and select the surround sound settings in the audio output. 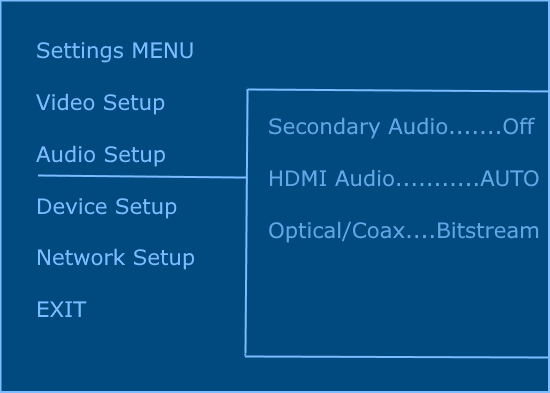 The soundbar or AVR must be able to decode the surround audio sent by the DVD and also must have amplifier and speakers. The DVD must have surround audio tracks available on the disc. Surround sound is available on most DVD in the form of Dolby Digital which is the most common surround sound format on DVD and Blu-ray discs. It is also the format used by most streaming and broadcast TV services. Dolby Labs, the creator of the audio format named it AC-3. This is a digital lossy format meaning the audio is compressed so on playback it has to be uncompressed and converted to analog audio by a processor such as a soundbar or Audio Video Receiver. Any Dolby Digital soundtrack will be decoded by any modern Audio Video Receiver (AVR) that supports this format and just about all of them do. You just have to get the audio from the DVD player to the processor so it can be uncompressed, converted and amplified to drive the loudspeakers. You can connect the DVD player to the soundbar or AVR using one of the following cable connections: 1) HDMI cable connection 2) Optical cable connection 3) Coaxial RCA cable connection How do I know if the DVD has surround sound? If you look carefully at any rear cover of a DVD, there is a section with a description of the audio available. It will read something like the following: AUDIO Main Feature: Dolby Digital 5.1 English, subtitles French, Spanish You may also see DTS is available, another surround sound format. Get started connecting DVD player for surround sound Look on the back of your DVD player to find which output connections your player has available. Your player may only have a HDMI connection and yellow, white, red connections. 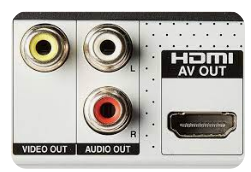 Your DVD player may have HDMI, optical and digital audio RCA coaxial (orange) connections. 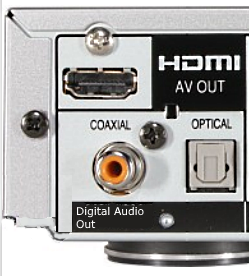 Your DVD player may not have HDMI but it should have at least optical or digital audio RCA (orange). You have 3 ways to connect a DVD player to a soundbar or audio video receiver using cables and a few other ways to connect wirelessly. 1. Use a HDMI cable 2. Use an Optical audio cable 3. Use a RCA digital audio cable For surround sound, you need to connect the DVD player to a soundbar or audio video receiver capable of decoding the audio and amplifying for loudspeakers.  The Audio Video Receiver should be able to process Dolby Digital audio including Dolby Digital Plus, Dolby TrueHD and Dolby Atmos. Also, DTS and DTS:X audio and have HDMI 2.1 capability with eARC. You will be able to view what audio channels the AVR is receiving on the front panel display. Usually for stereo, an indicator for left (L) and right (R) will be displayed. For surround sound, you should be able to view 6 (5.1) or 8 (7.1) channels. There should be an indicator for each channel, FL, C, FR, SL and SR and one that indicates SW or LFE. For 7.1, another two should be displayed, SBL and SBR.  Audio Video Receiver front panel display 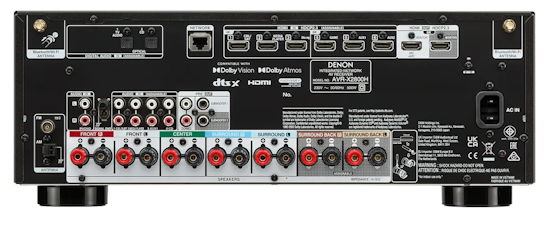 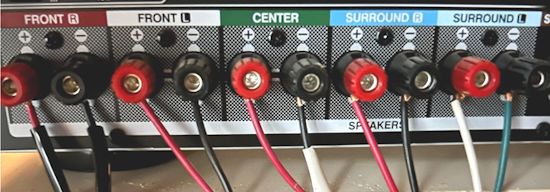 Speaker wiring on AV Receiver The AVR rear needs HDMI as well as optical audio inputs. Speaker connections required are 5 full range and 1 subwoofer at a minimum. 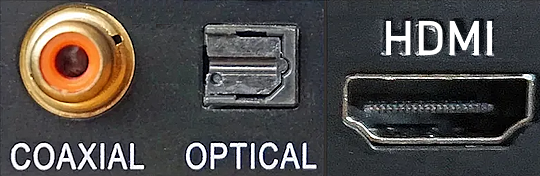 For a soundbar or AVR you need to make sure it has a HDMI, optical or RCA digital audio input, whichever one you have available on your DVD player. Which is best? HDMI is best because it is the most versatile and the most capable. But if all you have is Optical or Coaxial, then use one of those. 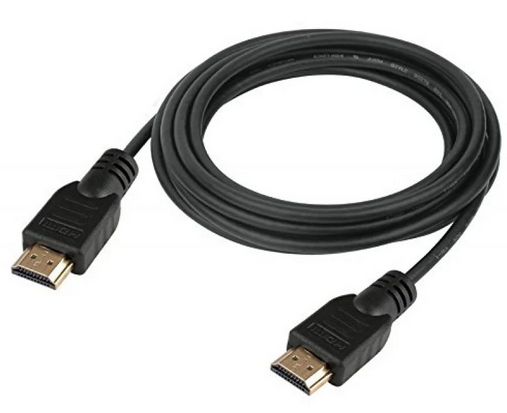 HDMI cable to connect DVD player to soundbar or audio video receiver for surround sound  Soundbars have built-in speakers and inputs for HDMI, optical and other input ports to connect devices. Some have wireless capability. 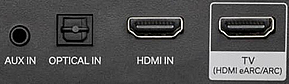 Soundbar ports - HDMI IN, HDMI OUT to TV, Optical IN, 3.5mm Aux IN 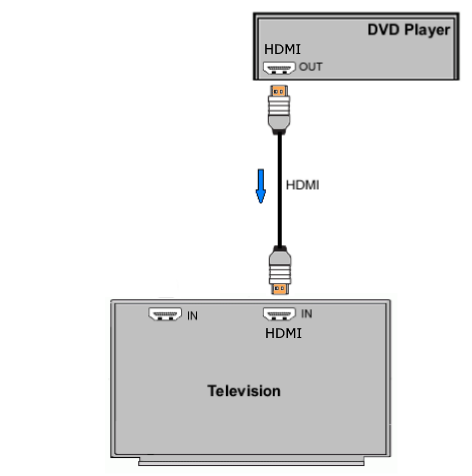 DVD Player HDMI connection to TV: No surround sound  DVD Player HDMI connection to TV with surround sound Connect to TV HDMI ARC/eARC port so TV sound from antenna broadcasts or other sources can be sent to the soundbar over the same HDMI cable. Select the proper input on the soundbar or audio video receiver. Connect HDMI cable to the TV ARC/eARC HDMI port so audio can go to speakers from TV. (Audio Return Channel) How to connect DVD to Older TV without HDMI What sound formats can I expect to hear from each connection option? • RCA analog - only stereo • 3.5mm analog - only stereo • Bluetooth - only stereo • Optical - stereo or surround sound • HDMI ARC/eARC - stereo or surround sound including advanced audio surround formats. 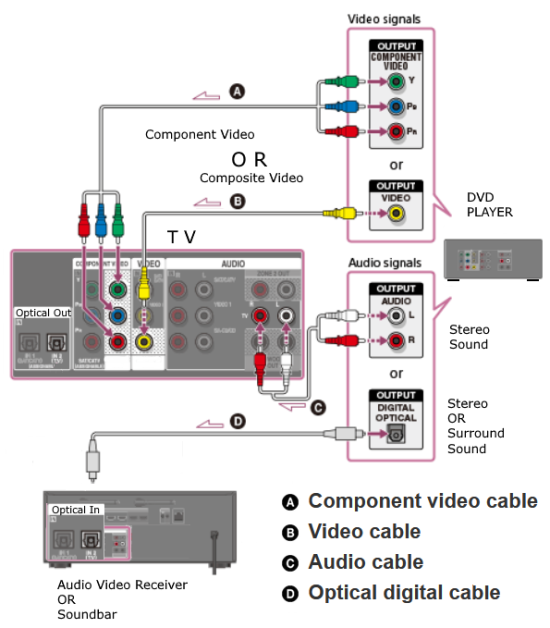 If you have an older DVD player without HDMI or you have an older TV, connect using component video (green, blue, red) or composite video (yellow). For the sound you can connect to the TV with RCA (white, red) audio cables but this is not surround sound. For surround sound you need to connect the DVD optical out to a soundbar or audio video receiver optical input using a optical audio cable.  Optical audio cable to connect the DVD optical OUT to the optical IN on the soundbar or AVR. Optical audio cables do not have the capacity to carry the highest audio formats such as Dolby TrueHD but can carry surround sound in the form of Dolby Digital 5.1 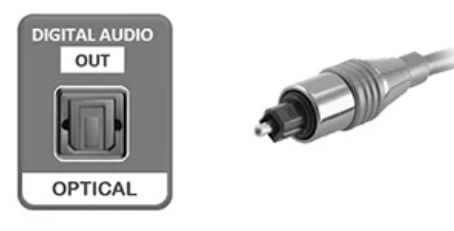 Optical audio cables use light instead of electrical over copper wires to send signals. Be careful not to bend these cables too far because the cable has a glass or plastic carrier inside. 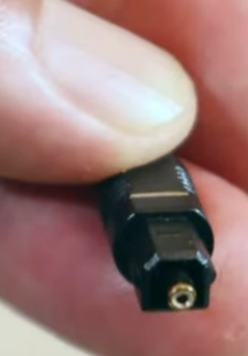 Optical audio cable for surround sound RCA coaxial audio cable 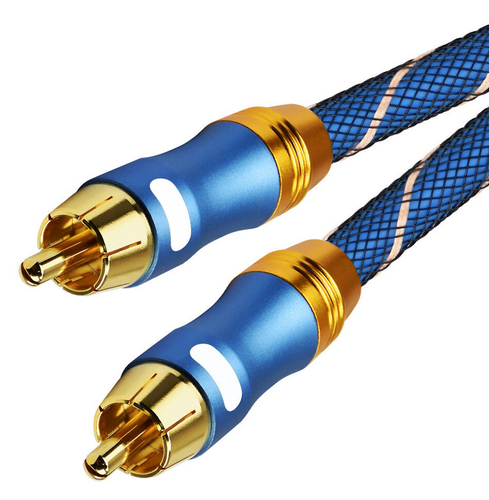 RCA coaxial audio cable for surround sound You will need to select on the DVD player and the soundbar or AVR, which sound you want and which input you want. For example, to hear sound from the AVR or soundbar, you need to select the input for the optical connection. Also select on the DVD player what sound you want to hear, PCM stereo or the selection for surround (Dolby Digital). Each device is different in the way you select so read owner manual or look online. 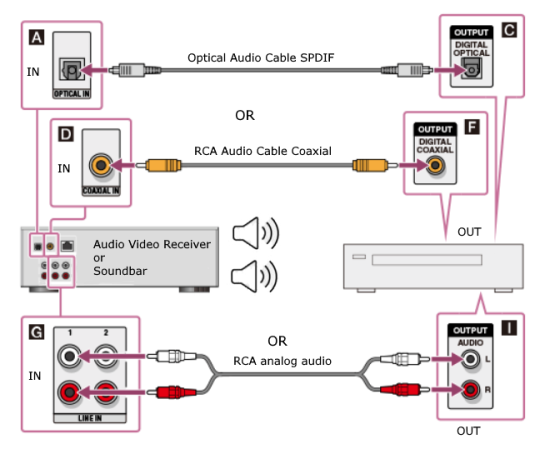 DVD player connections for enhanced audio. The white and red RCA cable connections are 2-channel stereo, not surround sound, however this can still give you a better sound experience than TV speakers if you use a stereo amplifier with loudspeakers. Your DVD-Video disc will be the source of the surround sound. Most DVD-Video disc commercial movies today contain Dolby Digital 5.1 surround sound and may contain DTS surround sound audio. Some discs do not contain surround sound, only 2-channel stereo. Your DVD player will read the disc, video and audio, but the DVD player, in all but a few cases, has to send the audio bitstream out from the DVD player for processing by other devices such as a soundbar or audio/video receiver in order to decode and attain surround sound. You can connect a digital audio cable from the DVD player to an audio/video receiver (AVR) or soundbar. This cable can be digital coaxial or optical. Some DVD players only have a RCA coaxial jack (usually orange) and some may only have an optical jack (usually black) or yours may have both output jacks. You only need to use one or the other. If your DVD player only has a RCA coaxial output and your soundbar or AVR only has an optical input, you can get an adapter with RCA coaxial input and an optical output so that you can connect. Newer DVD players have HDMI outputs. HDMI can also be used for surround sound connection to soundbar or audio/video receiver. HDMI is the best connection. HDMI can handle 6.1, 7.1 audio while coaxial and optical can only handle up to 5.1 audio. 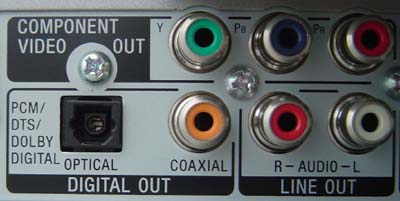 DVD player rear panel - Digital Audio ports (Digital Out) optical and coaxial for 5.1 surround sound connection to soundbar or Audio/Video Receiver and on to the surround speakers. Once the audio data is received by the soundbar or AVR, it can be decoded and amplified and sent out to the various loudspeakers in a surround setup. Always check your DVD player setup. This is done with a SETUP or MENU or DISPLAY button on the remote control. Some DVD players may use the DISPLAY button if they do not have a SETUP button. Newer players may use a HOME button to enter a variety of options including the SETUP. Some initial setup may be done the first time the player is powered on. Select the AUDIO menu and hilight DIGITAL AUDIO OUTPUT or the like, and set BITSTREAM ON. 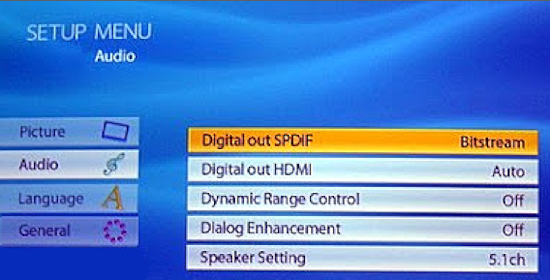 The HDMI output usually has a selection for output format for the HDMI connection.  AUTO may be generally good but may not always work best so bitstream (surround sound) or PCM (stereo) may work. Consult your owner's manual here for instructions on how to setup your particular player for surround sound. You may only be able to select your choice in the LANGUAGE SELECTION of the main menu for "English Dolby Digital 5.1". DVDs do not default automatically to Dolby Digital 5.1. Each time you load a DVD, go to the DVD's setup menu and click on "Audio Setup" or on "Languages" if there is no Audio Setup option and choose "Dolby Digital 5.1." Depending on the age of the disc, the "Audio Setup" on the DVD menu may give you several choices: "5.1 Channel Surround Sound" or "Stereo Playback." Newer DVDs may offer "Dolby Digital 5.1" and "Dolby Digital 2.0," the latter being stereo. Some of the disc menus offer only "Surround Sound" or "Stereo" options. You should go to the DVD player's menu and set the bitstream for Dolby Digital. You will need to refer to your DVD player's owner's manual to find out how to set this for your particular DVD player. 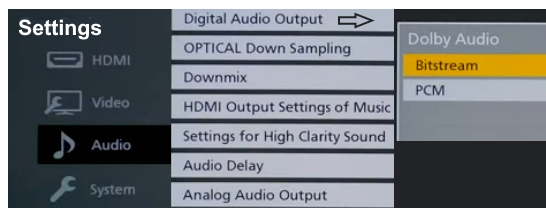
The single digital cable connector--either a plain coaxial cable with RCA male plugs on each end or a Toslink optical connector, carries the entire Dolby Digital 5.1(and dts if its available) channel data stream to the soundbar or Audio/Video receiver. It also carries a digital "flag" that signals your A/V receiver's Dolby Digital 5.1-channel decoder to switch to its Dolby Digital mode and send the multichannel audio signals to your system's six loudspeakers. When it detects the digital flag, the receiver front panel should display "Dolby Digital" or indicate it with an LED or with text on your TV screen. Today's Audio/Video Receiver has the capability to accept the digital audio signal from the DVD player, decode it, and amplify it in order to drive multiple speakers, giving you surround sound (Dolby Digital 5.1 or DTS 5.1). You need to choose between the digital coaxial cable connection (RCA) or the optical cable connection on the back of the DVD player. Both are good. The optical connection uses light to transmit the information from the DVD player to the A/V Receiver. Sometimes the optical cable is called TOSLINK or Toshiba Link after the Japanese company Toshiba. Both of these cables will cost you extra and are usually not included with your player. Connect the cable from the digital audio OUT jack on the DVD player to the digital audio IN on the soundbar or A/V Receiver. Set your DVD player to use bitstream in the audio setup menu. 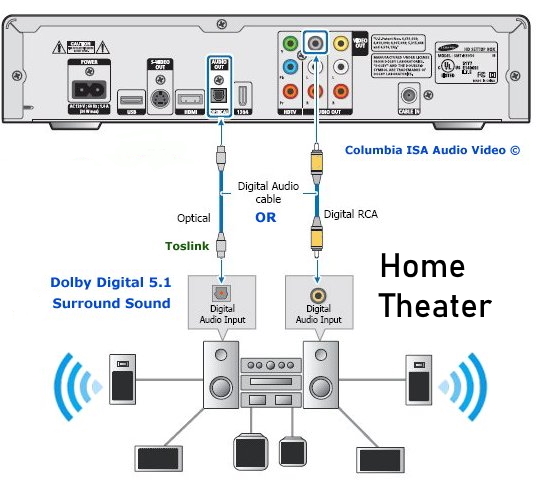 Hookup diagram for A/V Receiver with 5.1 digital surround sound Dolby Digital 5.1 or DTS surround sound is available on most DVD Video movies. In order to listen to these audio channels you need to be able to get them out from the DVD player, decode them, amplify them and route each channel to the appropriate loudspeaker. To handle all this you need an Audio/Video Receiver with a decoder for Dolby Digital 5.1 and/or DTS which most new A/V Receivers today have and also a set of at least six loudspeakers, one for each decoded audio channel. A 5.1 Surround sound setup. Using at least a 5.1 AVR with six speakers, Front Left, Front Right, Center, Surround Left, Surround Right, Subwoofer. To get the digital audio out from the DVD player, you need a digital audio cable connected to the A/V Receiver's digital audio input. This cable can be a RCA type coaxial digital audio cable or it can be an optical (Toslink) cable. Either one works fine. The coaxial cable is more robust physically but the optical is less susceptible to RF interference. The RCA coaxial cable uses electricity to carry the information while the optical cable uses light to carry the digital audio information. Your DVD player may have both of these output jacks but either one will suffice. COAXIAL DIGITAL AUDIO CABLES Coaxial digital audio cables look, on the surface, like standard analog RCA cables; however, you should avoid using a standard audio interconnect to transfer a digital signal. Cables engineered specifically to pass a digital signal provide 75-ohm impedance and wider frequency bandwidth than standard RCA cables, ensuring superior signal transfer. Your DVD player back panel may have both coaxial and optical outputs used for digital audio bitstream transfer to an Audio/Video receiver. The A/V receiver has similar inputs to accept the bitstream and turn it into 6 channel surround sound which you listen to thru the receiver's attached loudspeakers which are positioned around the listener. 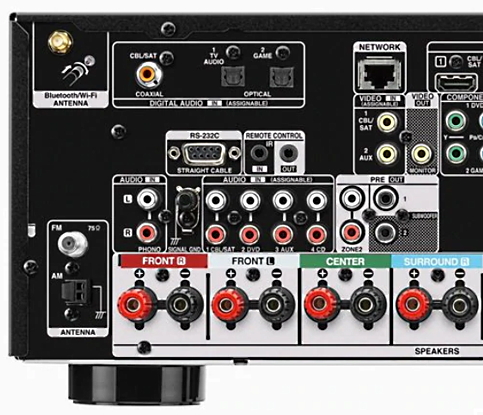
Audio/Video Receiver rear panel - 5.1 surround sound capable Input connections at top for optical or coaxial audio (orange) 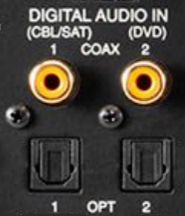 Some AVRs will offer two optical and coaxial digital audio inputs OPTICAL DIGITAL AUDIO CABLES These cables use fiber optics to carry light pulses instead of electricity to convey digital information. If your DVD player has output jacks of this kind you can choose to use optical audio cables instead of coaxial. Most A/V Receivers today have optical input jacks. Optical digital audio cable and jack 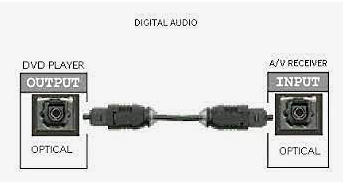 Figure 2 The A/V Receiver will decode the audio bitstream, convert to analog, amplify and send to the connected loudspeakers. Typically you have a center channel speaker for movie dialog right up front with left and right channel speakers on each side of the center channel speaker. Two more "surround speakers" are placed in back of the listener on the left and right. These speakers are used with the others to produce the sounds of realism just like a movie theater placing the listener right in the middle of the action. The sixth speaker is for low-frequency or bass sounds like explosions. That completes the 5.1 or six speakers. The .1 is the bass speaker sometimes called a sub-woofer. Some A/V receivers have 6.1 systems which add a third "surround speaker" in the back and 7.1 systems add another back speaker. Surround sound channel notation Channel notation indicates the number of discrete channels encoded in the audio signal, not necessarily the number of channels reproduced for playback. The number of playback channels can be increased by using matrix decoding. The number of playback channels may also differ from the number of speakers used to reproduce them if one or more channels drives a group of speakers. Notation represents the number of channels, not the number of speakers. Standardized channel identification colors for surround speakers 1 - white - left front speaker 2 - red - right front speaker 3 - green - center speaker 4 - brown - rear left speaker 5 - khaki - rear right speaker 6 - purple - subwoofer speaker 7 - blue - left side speaker 8 - gray - right side speaker 9 - yellow - left height 1 speaker 10 orange - right height 1 speaker 11 pink - left height 2 speaker 12 magenta - right height 2 speaker White and red are the standard 2 channel stereo. Adding green, brown and khaki, plus the purple subwoofer gives a standard 5.1 surround sound setup. For a 7.1 surround setup, the blue and gray are added. When Dolby Atmos is added, the Height channels, which can get numerous, can be taken advantage of to yield a very realistic listening experience. Atmos must be present in the source material which can be Dolby Digital Plus or Dolby TrueHD (Blu-ray Disc). Speaker notation x.y.z where x is the number of full range speakers, y is the number of subwoofer speakers and z is the number of height speakers. Common surround sound setups are 5.1, 7.1, 7.2.4 5.1 Surround Sound This is the most common setup, featuring six channels – five speakers and one subwoofer. The speakers are positioned front left, front right, center channel, rear left, and rear right. 7.1 Surround Sound This system adds two additional speakers to the 5.1 setup, making eight channels in total. The extra speakers are usually placed on the sides for enhanced spatial sound. Dolby Atmos This technology enhances traditional surround speakers by adding height channels, allowing sounds to be interpreted as three-dimensional objects. It can be used in various designs, such as 5.1.2 or 7.1.4, where the last digit represents the number of height channels. Atmos starts at a minimum 2.0.2 (2 floor speakers, 2 height speakers) and can natively render up to a 24.1.10 (24 floor speakers, 10 height speakers). DTS:X Similar to Dolby Atmos, DTS:X offers a flexible, object-based audio format that adapts to the number of speakers in a system, creating an immersive sound experience without a fixed channel layout. If you have more speakers than the source material (DVD) has channels, your AVR will upmix (or matrix) the sound from the available source channels to the extra speaker channels. Modern soundtracks can always be scaled (upmixed or downmixed) to the number of speakers in your set-up. It does not matter whether the audio is lossy (Dolby Digital) or lossless (Dolby TrueHD), it doesn't matter whether the delivery medium is DVD or Blu-ray Disc or 4K Blu-ray or internet streaming. If you have 5.1.2 set-up, then 2.0 & 5.1 tracks will be upmixed while Atmos & DTS:X tracks will be downmixed to conform to your speaker layout. Surround Sound Audio Connection Capabilities 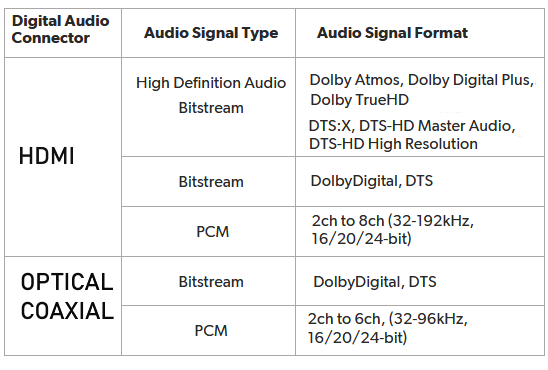 Optical and Coaxial (Toslink, SPDIF) connections are limited to PCM, typically 2 channel stereo and 5.1 surround. Dolby Digital is compressed 448 kb/s for DVD and 640 kb/s for Blu-ray. DTS is compressed 754 kb/s for DVD but supports up to 1.5 Mb/s. The faster, higher capacity HDMI connection can handle everything optical and coaxial can process and in addition, the highest formats available including Dolby Digital Plus, Dolby TrueHD with Dolby Atmos. Wireless Surround Sound Dolby Atmos FlexConnect and DTS Play-Fi DTS Play-Fi and Dolby Atmos FlexConnect are wireless technologies that use Wi-Fi to stream audio to speakers and other devices. DTS Play-Fi can also use Chromecast and AirPlay. • How to hookup Surround Sound for Netflix, Hulu • Surround Sound for TV Streaming • Speaker setup surround sound Setting up the DVD player for surround sound Most DVD players will give you an on-screen menu option for setting up your audio. Every player is a little different. Basically what you need to do for surround sound is select the audio option in the on-screen menu which tells the player to output BITSTREAM. This is the RAW audio data, undecoded. Digital audio removes many variables from the recording and playback process by converting audio into a string of numbers. This will be passed to the AVR over the digital audio cable for processing and conversion to analog, amplified and sent to loudspeakers. Loudspeakers are connected to digital audio devices, but they are analog transducers. Speakers convert analog audio signals (electrical energy) into sound waves, mechanical wave energy, to move air so your ears get the sound. Digital audio must be turned into analog audio in order to drive a speaker. Audio is stored digitally for certain advantages but in the end must be converted back to analog in order to hear it. A DAC or digital to analog converter is present in devices which process audio from a stored state (digital) to a state of amplified sound waves. 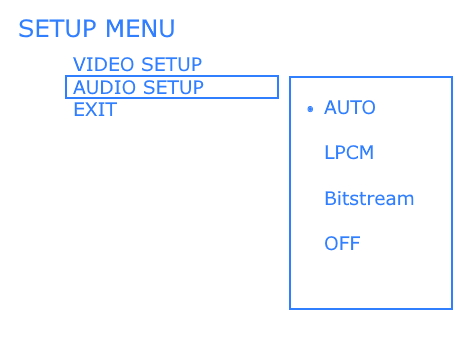
On-screen DVD player's menu for setting audio options. PCM (pulse code modulation) is the “raw” signal generated by the Analog to Digital converter. This means that the digital signal is not modified. As PCM, your signal is pure and usually in the highest quality. It takes up a lot of space but sounds excellent. PCM is an algorithm for representing an analog wave, digitally, and has been around since the beginning of the 1900s. PCM, as on the audio CD, transmits up to two channels (stereo) of sound. LPCM can transmit up to eight channels. Compressed audio formats: Audio formats such as Dolby Digital or DTS, compress the signal so it is encoded. The encoding is done with some loss of quality. It takes up less space but is intended to sound as good as possible without any listener hearing any difference from the uncompressed audio. There are also lossless compression surround sound methods such as DTS-HD Master Audio or Dolby TrueHD. These take up a lot of space which is why they are usually found on Blu-ray discs. These audio formats are transmitted in so-called bitstreams. Bitstream is a sequence of digital data consisting of a string of bits read as binary, 0 or 1. A DVD player can output a bitstream of audio data which can be interpreted by a receiver and processed for analog speakers. High Definition DVD With the arrival of High Definition DVD Players (Blu-Ray) there are additional audio considerations. The HD video revolution has brought with it the potential for several new high-resolution audio formats including high bit-rate Dolby Digital Plus or lossless Dolby TrueHD and DTS-HD Master Audio. The top-end audio streams are high data content, beyond the bandwidth of optical or coaxial SPDIF connections. You need to use HDMI version 1.3 both in the DVD player and the A/V receiver in order to have the capability to transfer and decode. Otherwise you'll be limited to conventional audio streams or PCM using 6 discrete RCA cable audio connections. Internet Media Streaming: Delivery of movies and TV content over the internet is becoming more popular. Netflix and Amazon are two popular content providers. DVD players may become obsolete in the years to come as physical media gives way to internet media. Surround sound from internet content delivery: Surround sound is available from Netflix streaming. Dolby Digital Plus is the format Netflix offers. You must have a device capable of decoding the DD-Plus audio stream. There are a number of devices which can handle both 1080p video and Dolby Digital Plus audio. The ROKU 3 is one such device. You must also have an Audio/Video Receiver with Dolby Digital Plus capability and HDMI cable connection to get surround sound from Netflix internet movies. 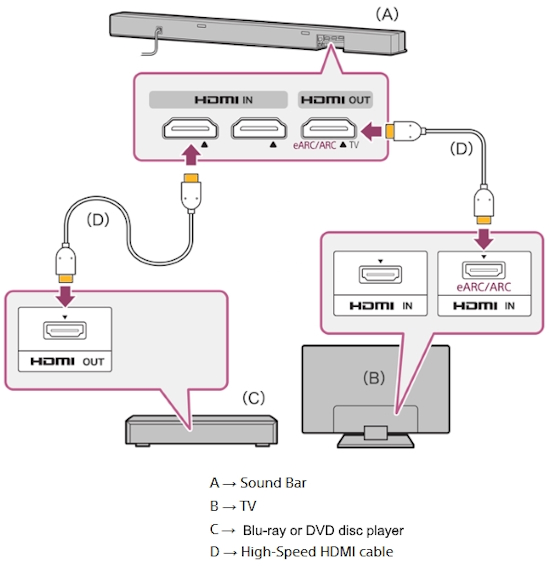 DVD player HDMI out to soundbar for audio and on to TV for video. Q: How can I take my TV HDMI ARC Audio Output and use to connect analog audio RCA (white, red) to my stereo system? A: Yes, this is possible by using an HDMI Audio Extractor device. Set the TV audio to PCM and connect an HDMI cable from TV HDMI ARC port to the Audio Extractor HDMI input port. Next connect the RCA (white, red) analog stereo cables to the Audio Extractor RCA OUT ports. Next connect the other ends of the RCA cables to the RCA analog stereo input ports on your stereo amplifier/receiver. Next select the correct input on the stereo amp/receiver. More hookup Options ... 1 ------- | 2 ------- | 3 ------- | 4 ------- | Next more... Surround sound • How to hookup a Stereo • How to setup Surround Sound for DISH satellite • How to setup Surround Sound for DIRECTV • ARC and eARC Explained • Blu-ray Surround Sound • How to hookup Surround Sound • Surround Sound Explained • Help, my TV sound is no good • How to hookup a camcorder • How to connect VCR to flat screen TV • How to hookup PC to Stereo • Diagram hookup DVD and satellite TV • Index of connection diagrams • How to hookup TV to Stereo • How to ground antenna for TV • RF Modulator connections • RF Modulator • RF Modulator diagrams • XBOX 360 Sound • Hookup diagrams for Cable TV DVD • How to hookup VCR to PC • How to connect cassette tape to PC • HDMI Versions • How to hookup TV DVD VCR • How to connect Plasma TV • Home Digital Phone Explained • Surround sound for XBOX • How to hookup VCR and Cable TV • Diagrams Video connection • Wii connections • Copy VCR to DVD • Connect DVD Player • How to connect DVD Player • How to connect DVD to TV without RCA inputs • VCR Basics part 2 • RV TV diagrams • Cable TV adapter box hookup • How to connect VCR DVD Combo to TV • Hookup diagrams TV satellite Receiver • How to hookup Laptop to TV • Headphones for TV • Audio Video Connections • Connection diagrams VCR TV Receiver • How to hookup Audio Video Receiver • VHS to DVD • How to connect DVD to TV Contact: columbiaisa@yahoo.com
|