|
|
| Transfer Audio Cassette to Computer How to convert/copy Audio cassette to digital file for preservation and portable use on phone, CD or computer/laptop Analog stereo audio Deck to Computer Hookup MP3 Convert How to record/transfer analog audio music to digital computer MP3 - CD - DVD 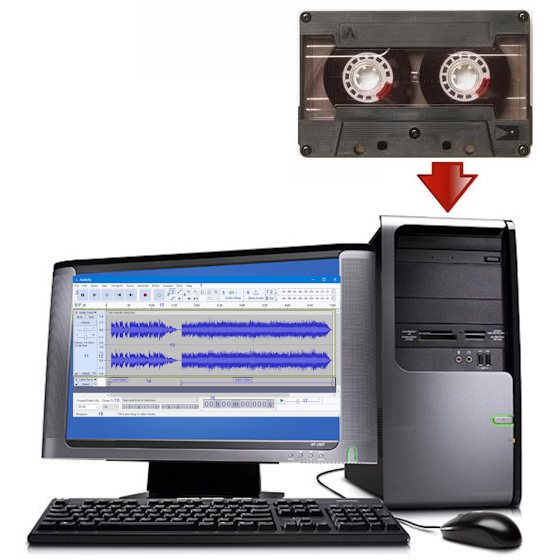 |
The concepts are the same for any analog stereo component such as cassette deck, reel to reel deck, 8 track, MiniDisc or turntable to copy and convert songs or voice recordings. 1. Connect analog deck outputs to computer input. 2. Run music capture program on computer. 3. Play source content, adjust volume. 4. Save as a digital music file on computer. Recording audio cassettes or CD to PC Have any old music cassettes from the 1970s or 1980s. What about old reel to reel tapes? Want to make sure the old tunes are not lost? Maybe that old cassette player is getting too old or the tape in the cassette is aging and may not playback. Maybe you just want to add your old tunes to your iPod or iPhone. Once you get the songs on the computer, you can burn them to CD, put them on your portable player such as iPod/iPhone or play them on the computer. But the music is saved in a digital file for future play.  Audio cassettes were popular in the 1970s before the Compact Disc (CD) arrived. Music was recorded on magnetic tape on a two reel hand-held tape cassette. The size of the cassette was approximately 4 in. by 2 1/2 in. by 1/2 in. Usually stereo sound was recorded. A total of four tracks on the tape, two for side 1 and two for side 2 (left and right stereo channels). So the cassette would need to be flipped over to play the second side, although some high-end recorders could flip the heads thus eliminating the need to flip the cassette over. This allowed continuous play without human intervention. One commercial cassette could usually hold around 5 or 6 songs per side. The magnetic tape was improved over the years and finally in 1979 the various formulas were officially classified. Type I or normal tapes were ferric oxide. Type II tapes were chromium dioxide. Type III tapes were a combination of the first two called ferrichrome. Type IV tapes are known as "Metal". Introduced in 1979, these were expensive and required high-end recorders but had certain acoustic advantages. The cassette deck component was typically connected to an AM/FM stereo receiver/amplifier using RCA phono type cables. Audio Cassette Decks Sony, Panasonic, Pioneer, Technics, JVC, Yamaha, Nakamichi and many more all made cassette decks for home use. These old decks are still sold on E-Bay or you may find one online at Craigslist or at your local thrift store. 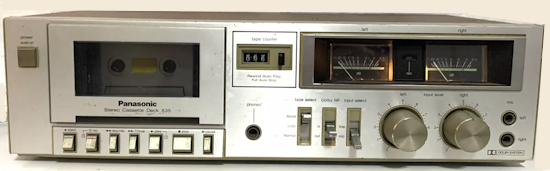 These old decks often have worn out drive belts. It is a good idea to know before you buy if the deck plays a cassette well (proper speed). Testing may not always be possible so make sure you can return it. The best decks were made in the 1970s so while not required, if you want the best quality deck, get one made between 1975-1979. One way to tell the vintage of an old deck is to look for the VU meters. Newer decks use an electronic LED display for the meters, usually green to red while the older decks use the VU meter with an analog needle.  For on-the-go, car stereos usually had built-in cassette players and then there was the Sony Walkman handheld portable cassette player with earphones. 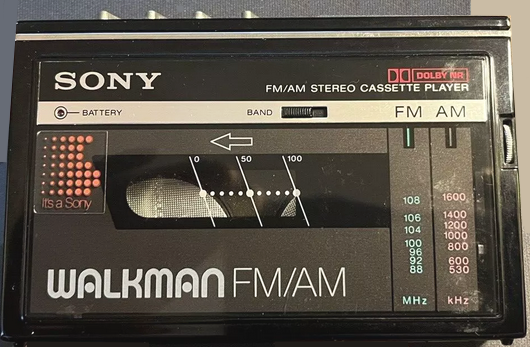 Little more than the size of a cassette itself, these portable players often had AM/FM Radio and could use batteries or A/C power. WalMart and Amazon both sell a variety of new cassette devices which can usually play and record on an audio cassette. 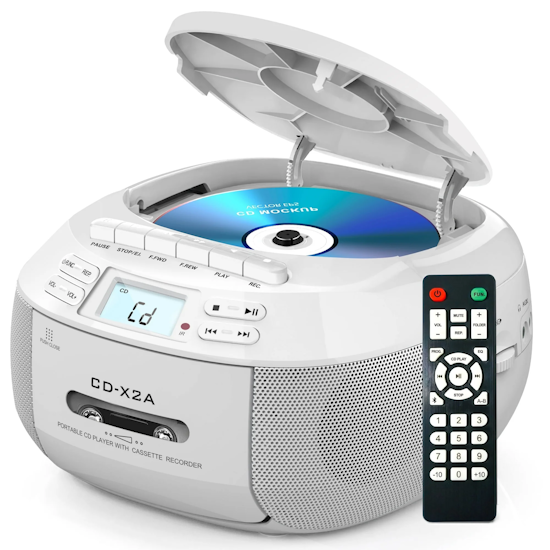 This player can play both CD and audio cassette plus AM/FM, Bluetooth and has Aux and headphone jacks. With the arrival of digital music on computers and portable music players like the Apple iPod and others, cassettes seemed limited, bulky and outdated. Digital music platforms provide faster access to songs, many more songs in a smaller device and no tape jams not to mention no rewinding or fast-forwarding. You find the music you want and have your entire music library anywhere you want. 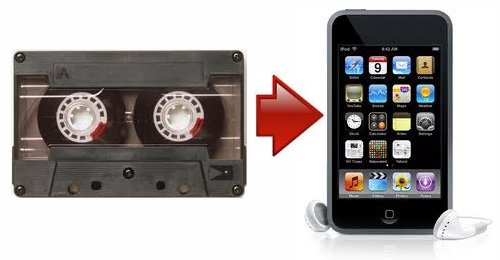 If you are PC savvy, have installed software on your computer and have some basic electronics knowledge, you can most likely accomplish this process yourself. If you feel that a professional shop would be better for you then look around for a business to do the whole process for you. Also be willing to pay for it. Do it yourself What do I need to record analog audio to my computer? 1) Connect stereo audio cables from the audio deck output to the computer audio input. If you have a laptop, you may need an external soundcard. More on that later. 2) Run software on the computer to capture and record the music. 3) Save recording to disk. Play back with Windows Media Player or other software. 4) Burn (create) a CD of your audio or copy to your portable MP3 player (iPod or iPhone). What you need: Cable to connect audio player to computer Depending on what type of analog audio player you have, use either a cable with RCA connectors and 3.5mm stereo plug or a cable with 3.5mm stereo plugs at both ends. The 3.5mm stereo audio cable is specifically designed for quality computer audio applications. It connects a PC sound card, portable CD player or any mini-stereo audio device with 3.5mm jacks.  Cable to connect audio player deck to computer. Stereo 1/8 inch mini jack-to-RCA plugs Y adapter cable.  Audio Cable has 3.5mm stereo plug for computer connection and at the other end is the two RCA plugs for left and right stereo channels connection on the analog audio player, be it cassette, reel to reel or other players. White is left channel RCA connection and red is right channel RCA connection for stereo sound. Most personal computers utilize a 3.5mm (1/8-in) jack as the line input connector and most hi-fi equipment uses RCA type sockets for connecting audio components. 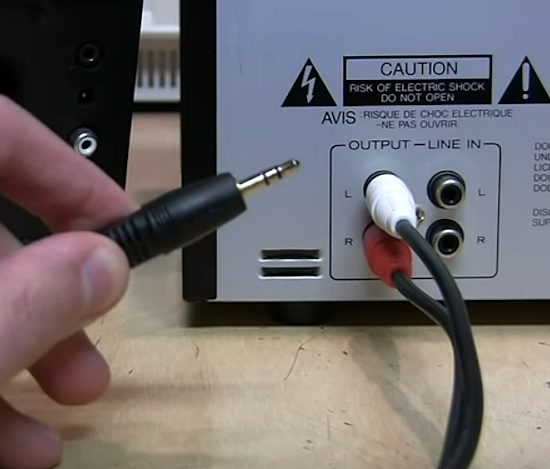 Insert the RCA cables (white, red) into the OUTPUT of the audio player deck. White to left (L) and red to right (R). An easy way to remember this is "Red is Right". Insert the other end of the audio cable into the blue 3.5mm input port on the desktop computer.  Desktop computer standard audio ports (3.5mm) Pink is the microphone input, green is the output for external speakers and blue is the input for audio. If your analog audio player cassette/CD/radio only has an earphone out jack, use a 3.5mm to 3.5mm audio cable to connect to computer line input (blue) on the sound card rear. This is the blue socket connector, not the green.  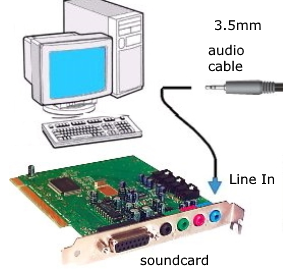 For older decks with a 1/4 in. output jack, use an adapter plug which has 1/4 in. male plug and 3.5mm female jack. Then connect the 3.5mm cable. Some older analog stereo decks such as reel to reel tape decks have earphone jacks with a set output level which may be too high for recording the digital files. Use the RCA output jacks in the rear of the deck because these are low level output called line level. This way you will not get distortion when recording/capturing the music. USB Connection to Computer Audio Interface Devices Why use an audio interface device? The analog to digital converter (your computer stores the music digitally) in your computer's sound card may not be as good as the analog to digital converter in an audio interface device. So for better audio quality and for flexibility for other connections, an audio interface is often used. These devices can get very costly when professional levels are desired. The Audio Interface device accepts an analog audio input signal (cassette player) and outputs a digital signal so that the USB connection can be used to connect to the computer's USB port so you can record the audio on the computer. There are many of these devices with different capabilities and costs. One of the least expensive of these is the Behringer U-Control UCA222. (Designed in Germany, made in China) 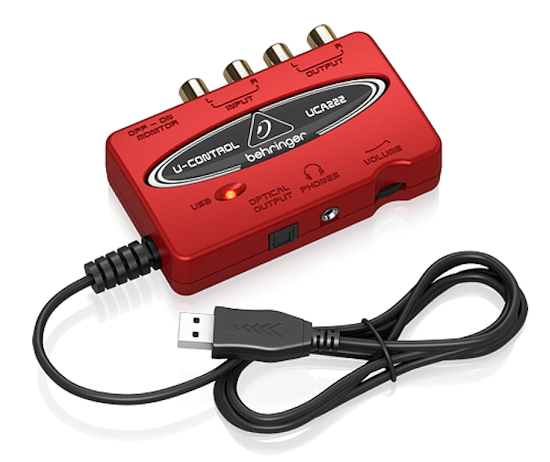 On your Windows computer, the device will show up in the "Sound" devices as "Microphone USB Audio CODEC". You can change the Properties of the recording device such as designating 2-channel stereo with DVD quality bit rates so you get the better audio recorded. 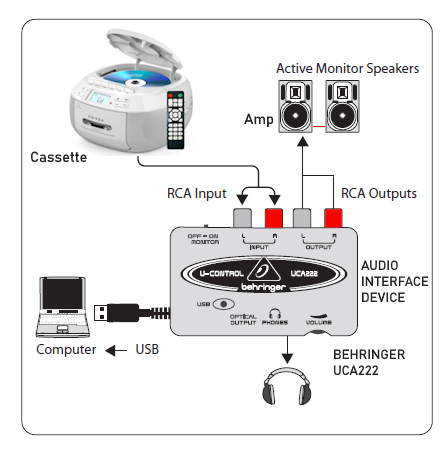 Connection diagram for audio cassette to computer What you need: 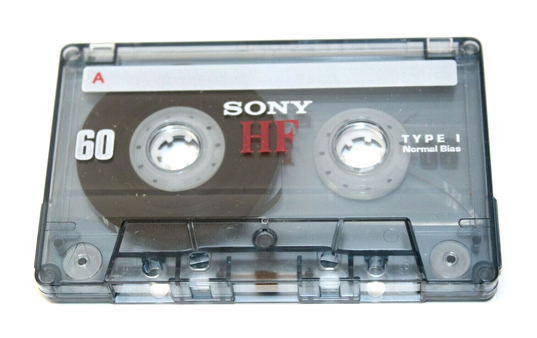
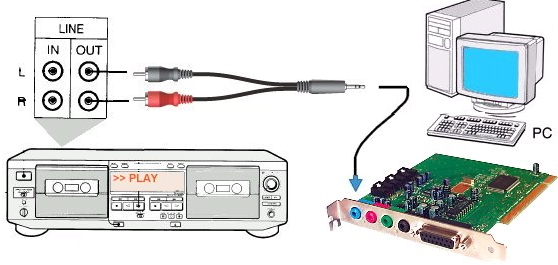 Connecting Cassette Deck to PC Connect the two RCA phono plugs to the OUT or PLAY ports of the audio cassette deck and the other end of the cable to the PC sound card's LINE INPUT port (usually blue). This allows the music to come from the tape to the computer. If your audio player only has a stereo headphone jack then get a audio cable with 3.5mm stereo plugs at each end. 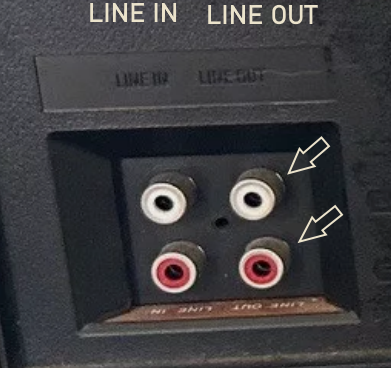 Rear of cassette deck - Use the two OUT ports and connect. Some older decks may have only black ports instead of white and red. Connect white RCA cable to LEFT (L) and red RCA cable to RIGHT (R). Then connect the 3.5mm plug to the computer's audio input port. • How to Connect Also you can connect the tape deck to a stereo amp or receiver so that you have more control over the volume levels. White and red RCA audio cables from tape deck OUT to the stereo Amp TAPE Inputs and then either headphone jack on the amp to computer line input or use AUX OUT to computer. Use a 1/4 inch to 3.5mm plug adapter if needed for the headphone jack. • Audio Stereo Hookup For a reel to reel tape deck the connection would be the same so the conversion from 7 inch reels and 10 1/2 inch reels and so forth to MP3 files could also be accomplished. 8-tracks could likewise be converted to digital music files. Basically any audio format which you have a player for can be converted to digital music files and played on your computer using software like Windows Media Player. Windows 10 recorder Windows 10 has a recorder app available called voice recorder. It is a very simple and limited app but it does record audio from the line input. It saves the result m4a type files in a folder called Sound Recordings (This PC> Documents> Sound Recordings). The files can be played back on the app or on Windows Media Player. You should be familiar with Windows 10 so you can adjust volume and set the properties for the Line Input. LP record, turntable to computer For a laptop computer: Laptops may not have a line input jack, only a mic input which does not work too well. The solution to this issue is to either buy an external soundcard for the laptop with a line input or buy a USB type player. External sound card for laptop StarTech.com 7.1 USB Sound Card - External Sound Card for Laptop with SPDIF Digital Audio - Sound Card for PC - Silver External soundcards for laptops provide the inputs to connect your analog audio player and connect to the laptop with USB cable connection. Combined with the music capture software running on the laptop, you can copy the analog audio and convert to a digital music file. Soundcards are not very costly and usually perform well. One example is the Star Tech 7.1 USB Audio Adapter External Sound Card. This small box provides the link between analog audio player and your laptop. The box has 3.5mm audio line input, earphone output, USB connection to laptop, volume control and more. 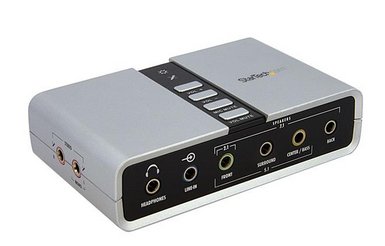 External Sound Card for Laptops Star Tech audio adapter Reel to reel convert to digital MP3 file 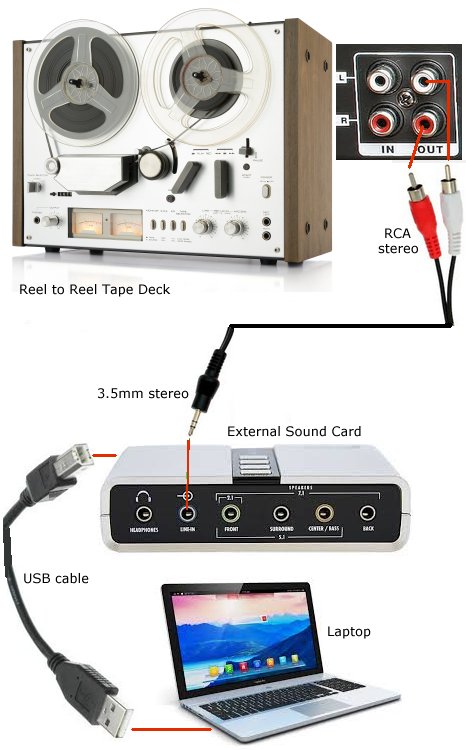 Reel to reel tape deck connected to sound card connected to Laptop 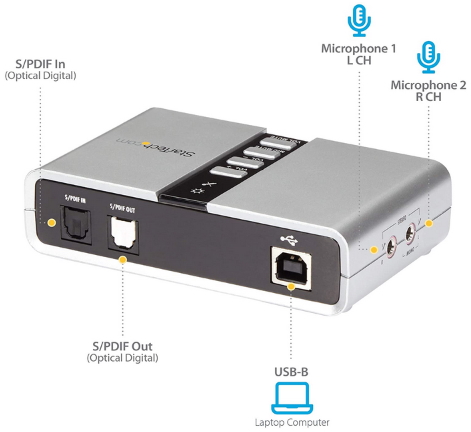 Recording the Sound You need Software to capture the sound and record to computer You need to run a sound capture program on the computer such as Windows Voice Recorder or you can run more complex and flexible programs such as WAVEPAD or Audacity • Download Audacity Download Audacity from audacityteam.org How to download and Install Audacity on Windows 10 YouTube software program to record your songs. Audacity is a free software audio capture program and performs very well. Download and install on your computer. Wavepad can be downloaded for free at: www.nch.com.au/wavepad Volume Levels: Setting volume levels is a very important step before copying your music. Too high a volume creates distortion and too low doesn't give you a proper sound. Volume levels need to be set at multiple locations. Line input, speaker output, source (player) need to be set properly. Always do a TEST recording first to establish volume levels. Volume level is important so you avoid distortion while recording. WAVEPAD is a good program to use as it is much more useful than default recording programs. There are other programs you can use to record on the computer. Search online for audio editors, CD burners and so forth to find a good software program to use. Note: If you record your sound as a MP3 format, you are compressing the audio, meaning you lose some of the digital bits. If you plan on burning a CD, it is better to record as a WAV file which is not compressed, then go from WAV format file to the CD. If you go from a MP3 file to CD or convert from MP3 to WAV then to CD, you lose some of the clarity. There are many software programs available to burn a CD including Windows Media Player. About Wavepad WavePad is a sound editor program for Windows. This software lets you make and edit voice and other audio recordings. You can cut, copy and paste parts of recording and, if required, add effects like echo, amplification and noise reduction. WavePad is designed to be very easy and intuitive to use. Within minutes you will be able to open or record a file and edit it. But if you take time to explore the other features you will find many powerful tools designed with the professional sound engineer in mind. WavePad basic is free but you can upgrade to WavePad Master's Edition. With the Master's Edition you have a set a features designed with the professional in mind. These include a file batch converter, keyboard macros and automation tools, bookmarks, file regions (with the region assembler) additional file formats and more. To view pricing or to purchase WavePad Master's Edition please see www.nch.com.au/wavepad/register. Wavepad Features ~ Supports a number of file formats including wav (multiple codecs), mp3, vox, gsm, real audio. ~ Edit functions include Cut, Copy, Paste, Delete, Insert, Silence, AutoTrim and others. ~ Effects include, Amplify, Normalize, Equaliser, Reverb, Echo, Noise Reduction, Sample Rate Conversion. ~ Supports sample rates from 6000 to 96000Hz, stereo or mono, 8, 16 or 32 bits. ~ Ability to work with multiple files at the same time. ~ Includes a CD ripper to load audio direct from a CD-ROM. ~ Player includes Scrub/Cue control for precise editing. ~ Recorder supports autotrim and voice activated recording. ~ Support MDI (Multiple Document Interface), which allows displaying multiple files all on one screen. System Requirements ~ Windows 95/NT4/98/2000/Me/XP/Vista/7/ 8/ 10/ 11. ~ Pentium 300 or above with at least 16MB RAM (32MB for 2000/XP, 512MB for Vista). ~ A sound card. WavePad is just one component of the NCH Swift Sound suite of audio software. Please visit www.nch.com.au to download many other audio related programs. How to record/transfer songs to computer. Insert audio cassette into tape deck and press PLAY. If you want to transfer a certain song, fast forward or rewind until you get the song you want, then PLAY. Start the recording software on the PC and adjust volume. When the song ends, stop the recording software and playback on the computer to see if you recorded the song properly. Music is typically recorded as a WAV file or MP3 file. Make sure you have plenty of free disk space as music takes up megabytes of space. 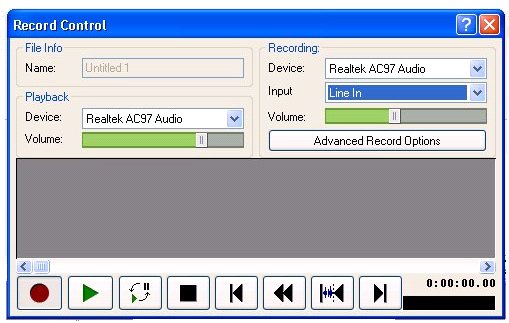 Wavepad record control has many features and control options. Click the red circle to record, the green arrow to playback and the black square to stop. While recording you should see the 7 digit counter increasing. (lower righthand corner). When finished recording always save to a file such as MP3 or WAV. Audacity Audio Capture Software 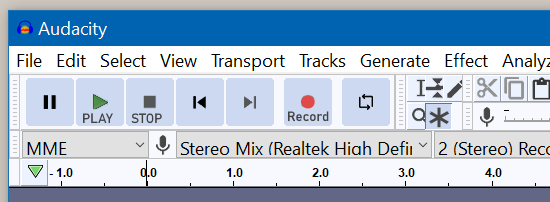 Audacity has Play, Stop, Record, Pause buttons at the top left you can click on to control your recordings. Open/start the Audacity program once you get it installed on your computer. Go to EDIT and Preferences. Select DEVICES. Under Recording devices, select the device you want to use. This could be your external soundcard or your standard PC line input from the sound card or if you have it, Stereo Mix. You may need to ENABLE STEREO MIX. For Windows 10 go into SOUND SETTINGS, then MANAGE SOUND DEVICES. Find Stereo Mix and ENABLE. Now you can record audio from internet. On the far left, select MME or WASAPI as the audio host. Now adjust volume levels. You may need to run several test recordings before proper volume levels are found. Audacity has volume level slider bars you can move left or right for volume control. Output (Speaker) and Input (Line) can both be adjusted. Also you can adjust volume levels on the source device such as a stereo amp or cassette player. Audacity has a few settings which can come in handy, for example you can play your audio without recording so you can adjust volume levels. To do this click on the microphone (under ANALYZE). Hilight START MONITORING and click on it. You should see the green audio bars move to the right briefly. This allows you to hear the sound as your music source plays. You can adjust the volume on the source player. 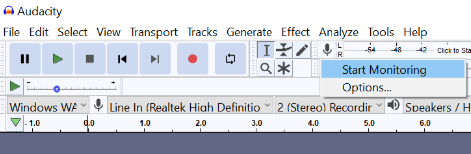 Another Audacity setting is SOFTWARE PLAYTHROUGH.  Go to TRANSPORT then TRANSPORT OPTIONS and turn SOFTWARE PLAYTHROUGH option ON. By turning this option on you can hear the sound as it records. Audacity tips FAQ Troubleshooting Once you connect the external soundcard, Audacity shows you have Stereo Mix and Line Inputs. Select proper input. 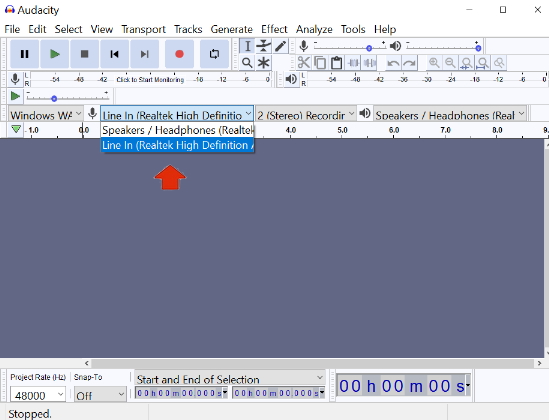 o Click the Audacity record button. o Play your music cassette. o You should see left and right sound channels recording, meaning your music is being captured by Audacity. Click the square STOP button in Audacity when finished. Click the green PLAY button to check if your music was captured properly. You can re-record if volume levels were off. 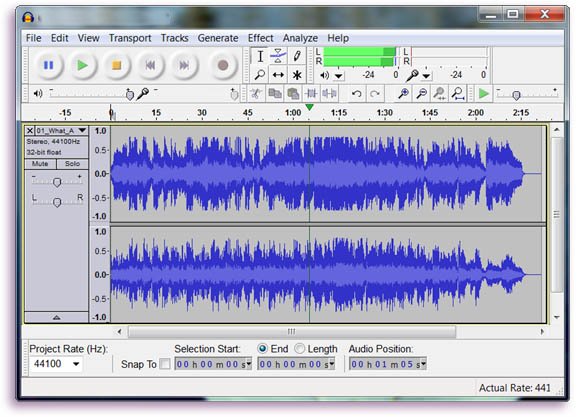 EXPORT as a MP3 file - To save your cassette music as a MP3 file Ready to SAVE - Go to FILE, then EXPORT. You can select MP3, WAV or other formats to save your music to your hard drive. Under OPTIONS you can specify bit rate quality and other MP3 digital music specifications. Now you can play the song back using Windows Media Player, burn to a CD or copy over to your iPod, iPhone, Android phone as a MP3 file. Your computer USB port can be used to connect your smartphone or use wireless Bluetooth to transfer the data. Now it is time to enjoy your cassette music played digitally on your computer or smartphone as a computer file, saved and backed up on storage. When a new smartphone is needed, you can copy the files using Bluetooth from old phone to new phone. Audacity recording for beginners YouTube Audacity Tutorial YouTube Record audio cassette or CD using PC microphone input You may be able to use the microphone input on your PC instead of the line input. 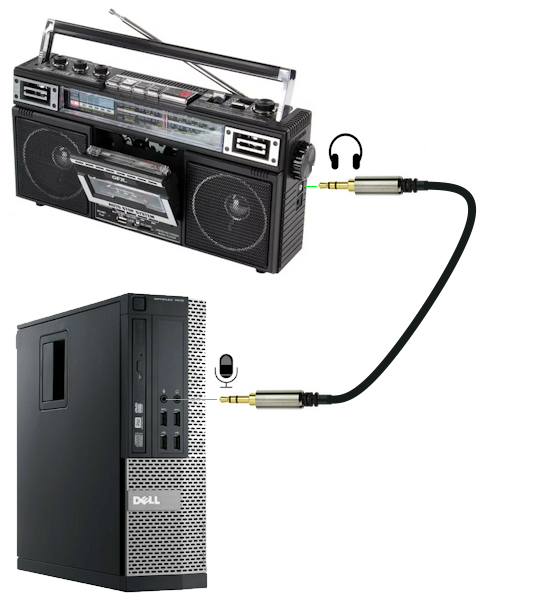 3.5mm to 3.5mm audio cable connects player to computer, earphone output to microphone input. Plug in the audio cable to the mic input and go into SOUND SETTINGS on Windows. Look for INPUT - choose input device (Mic). Make sure the device is ENABLED. Go into DEVICE PROPERTIES. Under the LISTEN tab, check Listen To This Device. Under the LEVELS tab, make sure boost is set to 0.0dB (no boost). Set Mic level to 60. Now go to the ADVANCED tab. Make sure 2 channel, 16 bit, 44100 Hz (CD Quality) is set as the default format. Click OK. Run Audacity and select MME in the upper left pull down tab. Play the source (cassette) and adjust the volume level on the player. Click RECORD button in Audacity and check the volume level in Audacity. USB tape player: Convert your old cassette tapes to digital files for music on the go. Turn your tapes into MP3s and listen on your computer, iPod, or in the car! This device is a handheld USB tape player that works with all kinds of tapes. It has an easy-to-use USB connection for sending the music on your tapes right into your computer where it's instantly turned into MP3 files. You can listen to MP3s on your computer, load them onto your portable music player, or record them onto a CD and listen in your car. Rediscover those old songs with This Device. This Device runs on USB power when connected to your computer for convenient operation. Also comes with a tape Converter software. This powerful, yet easy-to-use program guides you through transferring your music and In addition to transferring your tapes, This device also has an audio output that enables you to listen on your stereo, headphones, or other speaker system for your enjoyment. See also: Laptops often do not have line inputs like a desktop PC has, but you can overcome this by buying an external soundcard for the laptop for around $35. The external soundcard has a line input to connect your cassette deck or player. • Turntable to PC hookup / record vinyl LPs to computer • PC to Stereo hookup - how to play computer thru sound system • Audio cassette to computer hookup - how to record audio cassettes to PC • PC stereo hookup • Windows Sound Recorder FAQ I am getting an echo on my recordings using Windows 10 Answer: Make sure to only have one input enabled. You can enable or disable inputs (line input) by going into Windows SOUND SETTINGS, then MANAGE SOUND DEVICES. Enable or disable inputs and test volume level of headphone output by clicking on TEST. Also, if using Stereo Mix, try checking the Properties tab by going into Control Panel, then Sound, then Recording, hilight Stereo Mix and then Properties, click on the Listen tab. Make sure to uncheck LISTEN TO THIS DEVICE. 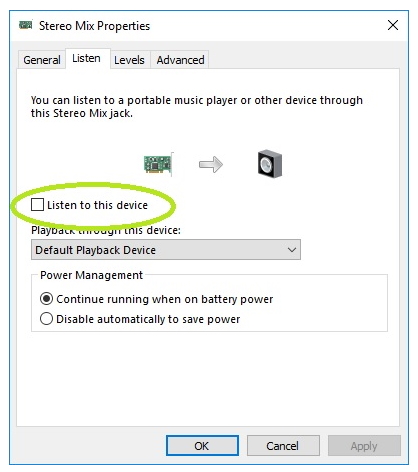 I am getting an error with Audacity after a Windows 10 update from Microsoft Answer: Try going to SETTINGS then PRIVACY. Next go to MICROPHONE and make sure to turn ON microphone access. 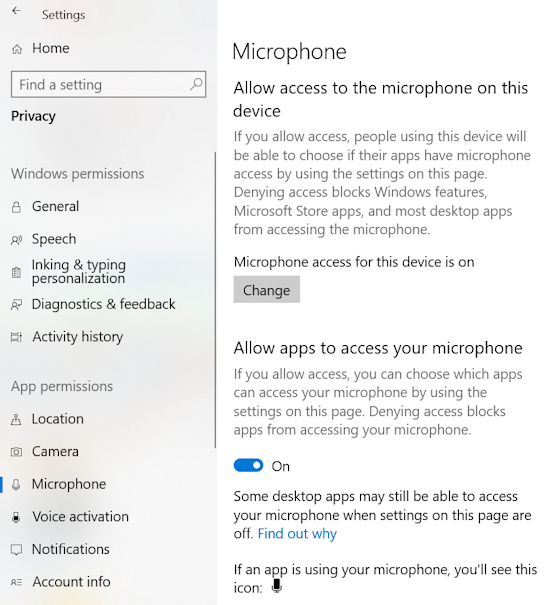 What if I do not have a cassette player? Answer: Cassette players are around for sale on craigslist.com or at your local thrift store like Goodwill or at a pawn shop. Prices are usually low because cassette players are out of style. E-bay.com always has cassette players for sale. Borrow one from a friend, look at garage sales or estate sales. Just always be sure the player works because usually these devices are old. If you cannot get a player, you can buy a player from Amazon.com that will hookup to a laptop. Cassette portable player/recorder from Amazon These are known to work to get cassette tapes onto a computer. Which brands are best for cassette decks? Pioneer, Sony, Nakamichi, Marantz, Tandberg, and many more. What is the difference between WAV file and MP3? Answer: The MP3 file format is another way to store music and is like the WAV file format only the information is compressed to save space. The compression can be 1/10th the amount of space the same WAV file uses. So the same song in uncompressed WAV format uses ten times the space of the MP3 compressed file. Humans are not supposed to be able to discern the difference in sound quality when compression is used even though data is discarded when compressed. Can I store my music files on a flash drive? Yes. Once you get the songs on the computer, you can copy them to a flash drive. Playback on any device which can decode the files. Many HDTVs today have USB inputs and if your music files are in a format which the TV can read, such as MP3, you can listen to your songs. I ripped all my CD tracks as WMA files with Windows Media Player and now I cannot play them because the player cannot read WMA format, only MP3 format. Is there a way to convert them to MP3 files? Yes. You can go about this in several ways. One way is to re-rip the CD tracks into MP3 format. This way you do not lose any additional audio quality. Converting from WMA to MP3 can be done using software like winff which can convert audio or video files. Free download at www.winff.org DOWNLOAD The winff program is easy to use and will create your MP3 file from the WMA file hopefully without a discernable loss in audio quality. What is bitrate? Bitrate refers to the number of bits (or data) that are processed over a certain amount of time. In audio, this usually means kilobits per second (kbps). So if a song is processed at 192kbps, that means every second 192 kilobits of data is processed for the song. The larger the bitrate the more space it uses. There is some argument as to whether most people can actually hear a difference between music saved at different bitrates. What is lossless and lossy? Lossless means you did not alter the original data when the song was stored. Lossy means you have changed the data, usually compressed it which means you have taken some of the data out of the original song to save space when stored. MP3 files are lossy. Burn a CD or DVD in Windows Media Player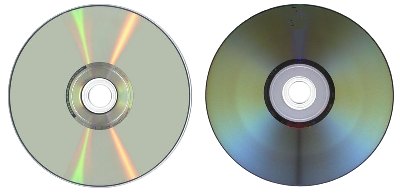 You can copy music or data to a CD or DVD using software that came with Windows (Windows Media Player). Your computer must have a CD/DVD burner/writer drive. Most laptops sold today have a drive to write to CD or DVD but you can also buy an external drive. Start Windows Media Player (WMP) and select BURN from the menu. Select AUDIO CD if you want to create an audio CD of uncompressed digital songs. Audio CDsAudio CDs contain high quality uncompressed PCM stereo data at 44,100 Hz sample rate, 16 bit resolution. So if you want to burn an audio CD, you should export the file you want to burn as a 44,100 Hz 16 bit stereo WAV or AIFF file. To configure Audacity to do this:
Insert a blank CD-R disc into your drive. Make sure you have all the items you want to copy in your WMP library. If AUTOPLAY pops up, just close it. Notice you have a burn list on the right. Using your mouse, drag and drop each music selection from the left side into your burn list on the right side. Right click on a song and select REMOVE FROM LIST to remove a song from the burn list. You can also drag songs up and down in the burn list to change the order. When finished, select START BURN. 80 mins. is about all a music CD can hold, so if you want longer playing times, select DVD or data CD. One caution here is that your playback device must support the file formats you burn on the disc. For example if you burn WMA format files and your player supports only MP3 files, you may not be able to playback the disc. Most modern players can playback a variety of digital file formats but not all. The difference between an audio-CD and a data CD is how the information is written on the disc. The data CD stores files like MP3 files which are digital compressed files in the MP3 format. The audio CD is more like the standard CD you would buy, which is stamped, not burned and contains uncompressed digital audio. Storing music on a DVD A recordable DVD can store more than four times as much information as a CD. A single layer 4.7 GB data DVD can store nearly 80 hours of 128 kbps MP3 audio. Again, the playback device must be able to read the file formats recorded on the data DVD. DVD-R, DVD-RW are two recordable DVD disc types you can use. The write once DVD-R is not erasable so once recorded, the recorded area is not re-recordable. The DVD-RW is re-writable meaning it can be written over again. Add songs to DVD-RW or CD-RW Even though the RW discs can be re-written, once the disc is finalized, you cannot add more files. You can however, erase the whole disc and start over. Windows Media Player will automatically finalize your disc when the last file is burned so be sure you have all your songs in the burn list before starting the burn. You now have your music on disc, ready for playback or just stored as a backup. Playback music from CD or DVD Insert CD or DVD in your computer optical drive and start Windows Media Player or Winamp to play your songs from CD or DVD. Windows Vista and Windows 7 even have the capability to burn a CD/DVD directly from the file manager. Click BURN in the top menu bar and insert disc. Select files and write to disc. Car Stereo can play MP3 or WMA files on CD-R SONY Has Aux input for iPod Music file formats: AAC: Advanced Audio Coding. AAC is a proprietary lossy audio compression format used in the Apple iPod, iPhone and iTunes music store. MP3: MPEG-1 Layer 3. MPEG stands for Moving Pictures Experts Group. MP3 is a lossy audio format and bit rates for MP3 music files range from a low of 32kbits/s up to 320kbits/s. PCM: Pulse Code Modulation. Also known a Linear PCM, it is the standard audio format for CDs. PCM audio is an uncompressed, lossless digital storage system. WMA: Window Media Audio. WMA was developed by Microsoft as a competitor to MP3 files and is a proprietary lossless compressed audio format. WAV: Waveform. WAV audio files are similar to PCM audio and can be coded as compressed or uncompressed lossless audio. WAV files were the first audio file format Microsoft offered way back in the beginning of Windows operating system. WINAMP Media Player download free for your PCWINAMP is a free multi-media player capable of playing a wide range of formats. www.winamp.com Columbia ISA Audio Video Empowering consumers through information Contact: columbiaisa@yahoo.com • See over 100 Hookup Diagrams • TV input select • Timer Record Radio Shows on a VCR • Camcorder hookup to TV, DVD • Audio Video Connections • Hookup Diagrams |