Turntable to PC Hookup
Convert Vinyl LP to MP3 - Analog to Digital Music
Once on the computer, you can burn to a CD, transfer the files to your mobile phone for on the go listening, backup to a flash drive, send to
someone else, listen on a stereo system or powered bookshelf speakers.
Record Music from a Vinyl Record to
Your Computer - LP to MP3/CD/storage
• PC
to stereo hookup
• Copy files from computer to mobile phone
•
Tape Cassette to PC hookup
There are many ways to get vinyl records content from a turntable to a computer. The connections depend on which kind of turntable you use, what computer you use and what capture software you use on the computer.
A USB turntable can connect directly to a computer with a USB
cable, usually USB Type B on the turntable to USB Type A on the computer. USB turntables will usually supply the correct USB cable when
you buy the USB capable turntable.
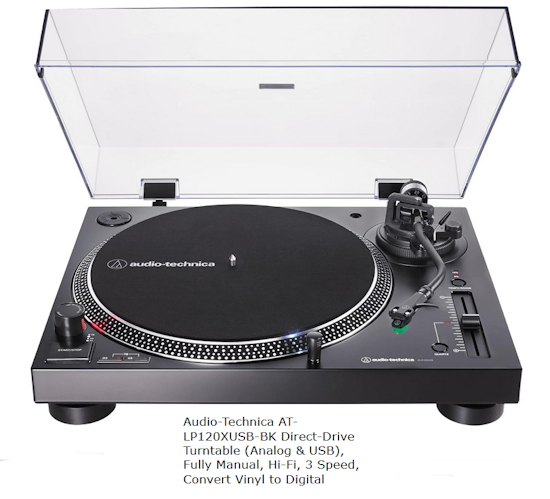
Audio-Technica AT-LP120XUSB-BK
USB Turntable, Direct Drive, Fully Manual
Convert vinyl to digital

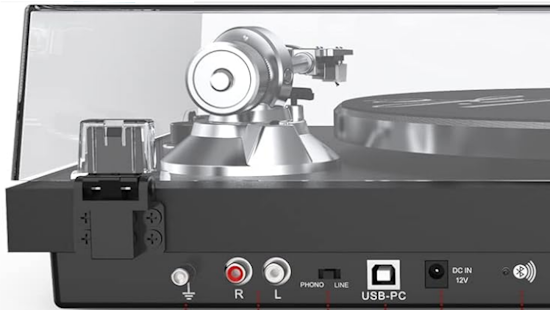
Turntable Rear - Analog RCA out, USB Type B out
Switch on the left to disable built-in Pre-amp

USB Cable - Type B to Type A
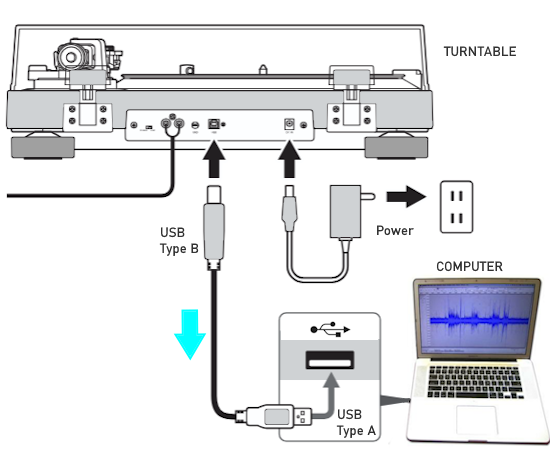
Connection diagram: USB Turntable to Computer
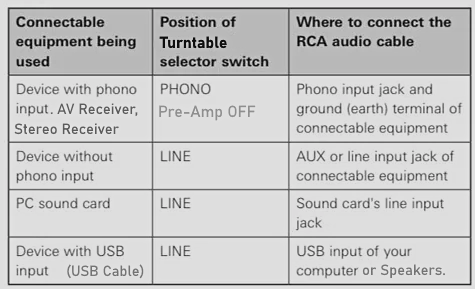
Turntables have different capabilities so the connection
depends on the type of turntable you have and the capabilities of your computer.
Turntables can be the older vintage types with simple RCA stereo output cables or the more modern types with a USB output
as well as RCA stereo outputs. Some turntables have a built-in pre-amp and some even have wireless Bluetooth so you can listen through
Bluetooth wireless headphones or speakers. You could even add a Bluetooth transmitter to a non-Bluetooth turntable so you could
listen on Bluetooth speakers or by using a Bluetooth receiver, listen on a vintage stereo or A/V Receiver with passive speakers.
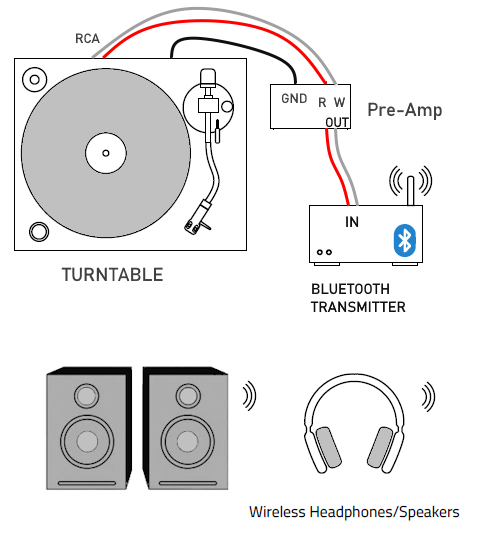
Turntable to Bluetooth Connection Diagram
Turntable Signal Levels
When a record is played on a turntable, the signal levels from the cartridge (needle) is very low.
So the signal level must be raised up to what is called the "line level". Line level
is the signal level used by stereo amplifiers and other audio gear before the power amplification is applied to drive the loudspeakers.
Line-level signals are approximately 1 volt, which is about 1,000 times stronger than mic-level signals.
Standard Audio Signal Levels
Microphone Level = 1 millivolt to 1 Volt. (LOW)
Moving coil (MC) cart. = 0.15 milliVolt to 3 milliVolt (LOW)
Moving magnet (MM) cart. = 3 milliVolt to 6 milliVolt. (LOW)
Instrument Level = 0.1 volt to 1.7 volts. (MID)
Line Level = 0.5 volts to 1.2 volts. (MID)
Speaker Level = 2 volts to 24+ volts. (HIGH)
Back in the 1970s and 1980s, stereo receivers had a PHONO INPUT. This was specifically designed for turntables to raise the signal
level up to line-level so it could be used like the other audio inputs on the stereo receiver.

What is a Phono Input?
A phono input is an audio input that can be found on a preamplifier, an amplifier, a stereo receiver or an Audio Video Receiver.
This type of audio connection accepts signals from an analog turntable. This RCA analog stereo connection inputs the low-level signals from a turntable and then
boosts those signals up to line-level and adds RIAA equalization to recreate the original sound. Vinyl records are recorded with the higher frequencies increased and lower frequencies reduced, but during playback, the frequency response is reversed to reduce audible background noise.
Any turntable with a built-in pre-amp should disable the pre-amp if connecting to a phono input.

Turntable with built-in pre-amp - Line switch
Turntable with pre-amp - switch settings
Phono inputs on a stereo receiver are designed for the weak signals from turntables, requiring amplification and equalization (RIAA curve), while line inputs are for standard, higher-level signals from devices like CD players, cassette tape decks and so on.

A turntable with a built-in pre-amp will set the switch to "LINE" and directly connect to powered speakers using RCA (white and red)
audio cables.
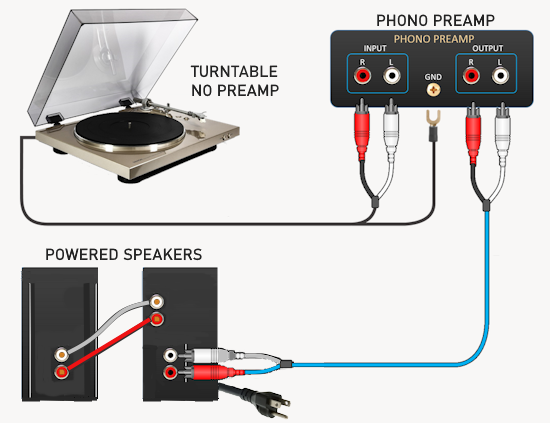
A turntable without a built-in preamp needs an external phono preamp to connect to powered speakers.
In the 1990s, the phono inputs were removed from receivers due
to the Compact Disc becoming more popular and vinyl records falling out of favor. However, more modern A/V Receivers have added the
phono input back into the mix of available audio inputs due to the rising popularity of vinyl records once again.

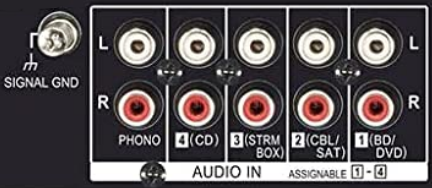
Audio Video Receiver with a phono input. Be sure to connect the ground wire of the turntable to the ground (GND) connection on the
receiver so the "hum" is reduced.
What is a phono pre-amp and why do I need one if I do not have a stereo receiver or Audio Video Receiver with a PHONO INPUT?
A phono preamp boosts the weak electrical signal from a turntable's cartridge to a level suitable for your amplifier or receiver,
and applies the RIAA equalization curve to correct the frequency response of vinyl records.
It essentially prepares the signal for your audio system, making it possible to enjoy vinyl records as the original producer intended.
If you have a receiver with a "PHONO" input, you can simply connect your turntable to the receiver's PHONO input with a set of analog (RCA red and white) cables.
Note: If your turntable has a built-in preamp, it should be disabled when using the receiver's PHONO input.
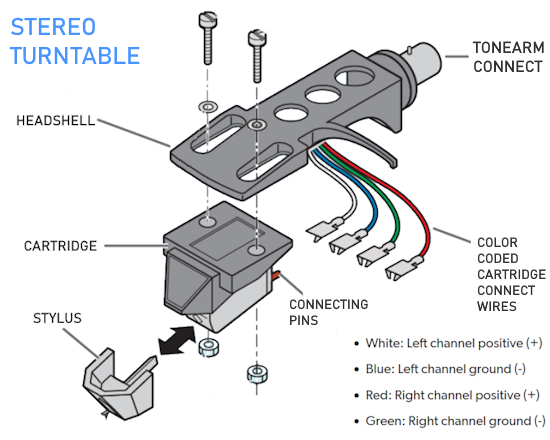
Turntable cartridges
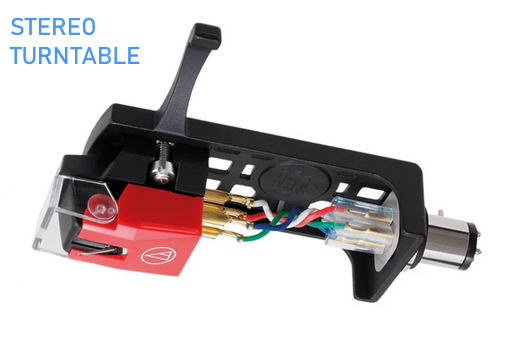
Turntable cartridges, the "needle or headshell" at the end of the tone arm can be one of two types, either MM moving magnet or MC moving coil. Moving Magnet cartridges (MM) are found on most turntables that you can purchase in music stores, but many audiophiles prefer to spend more on a turntable with a Moving Coil cartridge (MC) because the needle can read the grooves in the vinyl more accurately.
The signal level of an MC cartridge is much weaker. Since there is such a difference in the signal level of these two cartridges, some phono preamplifiers will allow you to switch between cartridge types, while others are only designed to work with one kind.
Both moving magnet (MM) and moving coil (MC) cartridges are tiny electromagnetic generators, converting the mechanical movement (vibration) created by their stylus riding in a record’s groove into an electrical signal that will be amplified and processed by a sound system. Both use magnets and coils of wire to generate the signal, with one or the other vibrating in unison with the stylus assembly to which they are attached, and each type has its advantages and disadvantages.
Phono pre-amps can be compatible with MM or MC or both. Be sure you get the correct type for your setup.

To connect a turntable to a computer via a preamp, you'll need a phono preamp, an audio interface (or a computer with a good sound card), and suitable cables. First, connect the turntable's output to the phono preamp's input. Then, connect the phono preamp's output to the audio interface's input (or your computer's line-in) using RCA cables.
1. Turntable to Phono Preamp:
Cables:
You'll need RCA cables to connect the turntable's output (usually a pair of red and white RCA jacks) to the phono preamp's input (also RCA jacks).
Grounding:
Make sure to connect the turntable's ground wire to the phono preamp's ground screw.
2. Phono Preamp to Audio Interface or Computer:
An audio interface provides better sound quality and more flexibility than using your computer's built-in sound card.
It acts as a digital converter, allowing you to record and listen to your vinyl.
Line-In (Alternative):
If you have an audio interface, connect the phono preamp's output to one of its inputs. If you don't have an interface, connect the preamp's output to your computer's line-in (the light blue 3.5mm jack on the back of your computer, if your computer has one).
Cables:
Use RCA cables to connect the phono preamp's output to the audio interface's input (or the line-in jack on your computer).
3. Connecting to the Computer:
Audio Interface: Connect the audio interface to your computer via USB.
Line-In: Connect the audio cable (from the phono preamp) to the line-in jack on your computer.
4. Recording and Listening:
Software:
Use audio recording software like Audacity or GarageBand to record the vinyl.
Audio Interface Settings:
If using an audio interface, you'll need to configure the software to use the interface as the audio input source.
Listening:
Once connected, you can listen to your turntable through your computer's speakers or headphones.
Phono Preamp:
Most turntables require a phono preamp to amplify the signal from the cartridge to a level suitable for playback.
Audio Interface:
An audio interface offers better sound quality and more flexibility for recording and playback.
Line-In:
If using the line-in, ensure your computer's audio input is enabled in your recording software.
Cable Quality:
Use good quality RCA cables for optimal sound quality.
Software:
If using a computer to record, you'll need to use appropriate software like Audacity.
What is a phono pre-amp?
A phono preamp is essential for playing vinyl records because it amplifies the tiny signal generated by a turntable's cartridge and applies the correct equalization curve to the signal. Without it, the signal would be too weak to play through a standard stereo amplifier.
1. Amplification: The phono cartridge in your turntable produces a very low-level electrical signal. This signal needs to be amplified significantly to a level that can be processed by your stereo amplifier or receiver. The phono preamp does this, boosting the signal to "line level," which is the standard for other audio sources like CD players.
2. Equalization (RIAA Curve): Records are cut with a specific frequency response (RIAA curve), where bass frequencies are reduced and treble frequencies are boosted to optimize groove width and signal-to-noise ratio. The phono preamp applies the inverse of this curve during playback, re-emphasizing the bass and lowering the treble, to restore the original sound. This process ensures that the music sounds as it was intended on the original recording.
3. Essential for Vinyl Playback: A phono preamp is a necessary component in your audio system if you want to play vinyl records properly. Many amplifiers or receivers do not have a dedicated phono input, so you'll need a separate phono preamp to connect your turntable.
Turntable to PC hookup using an audio receiver with Phono Input
If you have a receiver with a phono input, you can connect the turntable to the receiver's phono input and connect audio adapter
cable (RCA to 3.5mm) to the TAPE REC output on the receiver to the computer's LINE INPUT on the soundcard (blue 3.5mm).

Be sure to select the PHONO input source on the receiver.
Older receivers have a stereo TAPE/RECORD output you can use to connect the computer.
My receiver does not have any TAPE/REC output. What is the solution?
1. Buy or borrow an older vintage receiver with stereo tape outputs. E-bay has many for sale. Older audio receivers from the 1980s and 90s may also have a VCR analog stereo output which can be used to record from the receiver's tuner or other sources so that you can record audio to your computer or a VCR VHS tape or just listen on your computer's speakers. Even
receivers from 2001-2005 era such as the Yamaha RX-777 have phono input, tape/rec output and zone 2 out.
2. Use the headphones out on the receiver. Although not ideal, you can record audio from the audio receiver's headphones output to the computer line input. Adjust the volume on the receiver and the computer. Audacity will record the audio input.
3. The newer A/V Receivers have phono inputs and analog audio outputs although not specifically designed for recording audio.
Look for analog audio line level outputs called ZONE 2 or ZONE 3. These are for output to a second amplifier in another room or a higher
quality power amplifier but could also be used to record audio.
![]()
1. Connect the recording device:
Connect the Zone 2 output (RCA stereo) of your AV receiver to the corresponding input (e.g., RCA) on your recording device.
2. Set Zone 2 output to "Fixed":
In the AV receiver's settings, you'll likely need to configure the Zone 2 output to a fixed level or output type.
This ensures a consistent signal for recording.
3. Select the source:
Choose the audio source you want to record from the AV receiver's inputs (e.g., CD, turntable, HDMI).
4. Play and record:
Play the source in your AV receiver, and the audio will be sent to the Zone 2 output, where it can be recorded.
Can I use the AV Receiver's Pre-Outs to record audio?
Yes, it's possible to record audio using pre-outs, but it's generally not the best method.
Pre-outs are designed to send a signal to an external amplifier, not directly to a recorder.
While you can connect pre-outs to a recorder, the signal level will be dependent on the volume
control of the device with the pre-outs, which can lead to inconsistent recordings.
The 1950s, 1960s and 1970s was an era when
analog LP vinyl records were the media of choice for music in the home.
The Beatles, Rolling Stones and all the rock bands of the time started
out on vinyl records.

LP vinyl record from the 1960s The Beatles Magical Mystery Tour Album
The vinyl LP record played at 33 1/3 RPM on a turntable. Turntables are
still available today. You might find some vintage turntables on
EBay.com that still work or even at a local thrift shop or classified
ad online. Amazon.com also sells turntables. Pioneer was one of the more dominant brands.
Some folks have kept their turntables over the years and are now
thinking about preserving those oldies but goodies on CD or digitizing
their songs for an iPod, iPhone or other portable digital music player.
Options to record vinyl to computer
To get the music from LP record to digital audio, you need to
think about which approach is best for you depending on what gear you
already have and what gear you may need to buy to get the job done.
There are several ways to go about the task.
1. You can buy a modern USB Turntable that connects to your
computer/laptop's USB port.
USB Turntable has analog audio output and USB Type B output. A USB cable Type B to Type A connects turntable to your computer.
• Connect this vinyl record player turntable to your computer via USB and encode vinyl audio into MP3s for digitized storage and playback on your computer, smartphone or tablet. Take your favorite vinyls with you on-the-go
2. You can use a vintage turntable and a vintage amp/receiver with a
phono input and then connected to a PC sound card Line Input.
3. You can use a vintage turntable and a modern audio/video receiver. Some Receivers do not have a PHONO input but many
modern AV Receivers do come with a Phono Input. If you have an AVR without a phono input, you can use a Phono Pre-Amp
and then connect to the AVR audio input.
4. You can use a vintage turntable with an Audio adapter or phono pre-amp which has a
USB connector for PC or laptop or has RCA stereo audio outputs.
Most PCs have a soundcard built-in with a line in and line out but laptops may not, so you can use an
external soundcard device which has these inputs and outputs and connect to laptop with USB.

Yes, those old records can be sent over to your laptop or PC and kept
on disk and backed up for history. What do you need to do that?
You need some RCA audio cables, your computer, recording software, such
as Audacity,
and a component to connect the turntable to the computer.
This component can be either a vintage stereo amplifier, a stereo
receiver, a phono pre-amp box or a more modern audio/video receiver
with a PHONO input.
If you want to record to your laptop, you may also
need a USB audio adapter box because many laptops do not have a line-in
port. You could record using the mic input but you will not be pleased
with the results. USB audio adapters will take the RCA input and
connect to the laptop using a USB connector.
USB Audio Interface
Digitize your vinyl LP collection
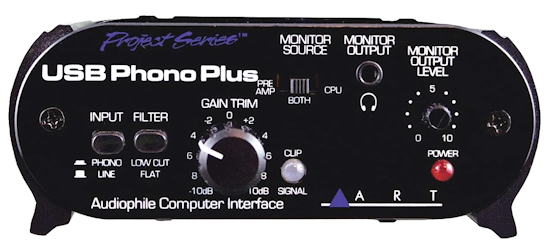
The ART USB Phono Plus phono preamplifier / audio interface is the perfect solution for transferring your vinyl collection
to your computer. It also makes an ideal audio interface.
The USB Phono Plus features a high-performance RIAA phono preamp with a low cut filter for pristine audio transfer.
There is a robust compliment of analog and digital I/O onboard, and front-mounted gain and signal/clipping indication let you optimize a variety of analog sources.
All-aluminum black anodized case with integral rubber sides.
USB bus powered or 7-12V DC or 9-12V AC @ 150mA (external; not supplied)
• Applied Research and Technology
Things You'll Need
1) Your LP record albums,
2) a quality stereo turntable with a working cartridge,
3) a stereo phono preamp (unless you have a receiver with one),
4) a pair of RCA audio cables,
5) a computer (PC or Mac) with sufficient hard drive space,
6) a software application that can record audio directly to the hard
disk in the computer,
7) a hardware interface (soundcard),
8) a software application that can record digital audio files to the CD
burner/drive,
9) some blank digital media (CD-R).
Anyone who has bought a personal computer in the last five years
already has a soundcard and most likely has software to burn a CD. You
also most likely have enough free disk space to hold your recordings.
Blank CD-R discs are available at many stores or online. Basically the
things you may need to get are a turntable if you did not keep your old
one, software to capture the audio and save it on disk, audio cables to
connect the components and a phono pre-amp or stereo receiver with
phono input.
Some things
to consider and tips:
You might want to clean your records so they will sound their best for
the recording transfer process. Invest in a record cleaner such as the
Discwasher 1006.
If the turntable speed is not what it should be, try replacing the
drive belt if it is a belt-drive turntable. Consider buying a new
turntable.
If the turntable's phono cartridge is not up to par, it is best to
replace it with a new one to achieve the best results.
Make sure the cartridge is properly aligned and that the tone arm
counter-weight is set correctly for proper tracking on the vinyl
record.
With a turntable, the output can’t be plugged directly into
the line level input of another stereo device because the signal levels
are not strong enough. Most turntable cartridges put out a signal on
the order of just a couple of milliVolts (mV). The turntable also
can’t just be plugged directly into the mic inputs on a
recorder or computer, even though they are setup to handle a signal
with an amplitude of only a few milliVolts.
The reason is that when LP vinyl records are recorded, they have a
special equalization curve called the RIAA EQ curve, applied to the
signal. (The RIAA is the Record Industry Association of America.) This
special EQ curve is used to limit low frequencies and highlite high
frequencies. Then when the LP disk is played back, the opposite EQ
curve is applied to flatten the signal out again (i.e., highlite the
low frequencies and reduce the high frequencies). This special EQ
resides in the phono preamplifier. Many receivers and amps do not have
a phono preamp built in. Most vintage stereo amps and receivers from
the 1960s and 1970s do have a pre-amp built-in. In 2010 you are able to
find many more current audio/video receivers with a PHONO input
available. If you have one of these receivers, you do not need a phono
pre-amp, you can just use the receiver.
Make sure you select the correct phono pre-amp for your turntable cartridge, depending on whether your cartridge is Moving Magnet (MM) or Moving Coil (MC).
Most phono pre-amps and turntables use RCA outputs, whereas the line inputs on some audio interfaces are 6.35 mm (1/4 inch) Jack inputs. Therefore, you may need to purchase a 2x RCA to 2x TS mono 6.35 mm jack cable or purchase a pair of RCA to TS 6.35 mm adaptors to connect to an existing RCA cable.
# Allows use of turntables with magnetic cartridges, with computers
sound card input
# Boosts low level turntable signal to line level
# RCA type female input and output connections
# Great when transferring LPs to digital media
# Frequency response: 30Hz~20KHz
# Input level: 6mV
# Output level: 500mV
# SN ratio: >60dB
# Requires 117VAC, 60Hz
# Separately available cable (#24-6270) converts output connection to
3.5mm male plug for connection to computer
www.bswusa.com
Generally, most turntables come with their own set of stereo cables,
and you will connect these to the phono preamp inputs. If there is a
ground wire coming from the turntable, connect it to the ground screw
on the phono preamp (if there is one) or connect it under a chassis
screw on the phono preamp.
The sound card you have in your computer dictates what type of cable
you need to go from the phone preamp outputs to the sound card input
jack(s). Look at the sound card audio input jack(s). It may be a stereo
3.5mm jack or it may be a pair of RCA jacks. Buy a set of cables that
will allow you to connect from the phono preamp RCA output jacks to the
input jack(s) on the sound card. Make sure you use the Line In jack on
the sound card, not the Mic In jack.
The computer you use can be a PC or Mac.
TIP: Every stereo minute of uncompressed digital audio (WAV file
format) requires 10MB, so 1 hour of digital audio will take up 600MB on
your hard disk drive.
The software application you use is a matter of choice and must be
compatible with the computer platform (PC or Mac) you have. If you
bought a custom sound card for your computer, they usually come bundled
with some sort of sound recording program that will allow you to record
external audio from the Line In jacks and digitize it to your hard
drive. If you don’t have a sound recording application on
your computer, you can get one from the Internet.
Hook up all the connections, fire up the computer, launch the sound
recording software application, put on an album and monitor it with
your computer speakers. If you are getting hum, make sure that all the
grounds are connected and that all the audio cables are seated properly
in their jacks.
If the recording software you are using also has an editor associated
with it, you can record the whole album side and then split the tracks
up into separate audio files later with the editor. This is quite a bit
less tedious than recording one album track at a time and then creating
a digital audio file of just that one track, however it can be done
this way.
Continue recording until you have converted the whole analog album into
one or more digital audio files. Once you have converted your album
tracks into WAV (on a PC) or AIFF (on a Mac) uncompressed digital audio
files, then you can burn an audio CD-R and/or you can convert those
uncompressed audio files to the MP3 compressed audio format.
To burn an audio CD-R, you will need a CD-R or CD/RW drive in your
computer and the software that came bundled with it to perform the
actual creation of the audio CD-R. Note that this CD Burning software
is not the same as the Sound Recording software you initially used to
record the analog audio into your computer.
- (1) "Y"
stereo adapter cable with a pair of RCA-style channel connectors (one
is usually red, the other white) at one end, and a single line-in,
1/8-inch (3.5 millimeter) mini-connector at the other. This is also
called a 3.5mm Stereo to RCA Dual Audio Cable. It can be purchased at
Walmart for about $5. The 3.5mm "mini" end plugs into the computer's
sound card Line-IN jack (usually blue) and the other end, the two RCA
connectors, plug into the stereo
jacks on the stereo receiver or
phono-preamp box.
- OR -
(1) A regular stereo hook-up cable with RCA connectors at both ends and
(2) a 3.5mm mini-connector adapter.
or
(1) A regular stereo hook-up cable with RCA connectors at both ends and
(1) RCA-to-USB audio interface (converter). With this setup you connect
the RCA cable to the converter, which has a USB plug to connect to your
computer's USB port.
or
(1) double-ended 3.5mm stereo cable; (also available at most
electronics stores)
- A PC with
a sound card that has a line-in jack. Almost all computers have this
device, except for some laptop computers that do not have a line-in
jack. In this case, you may need to use the USB interface. If your PC
or laptop does not have a line-in, you may also be able to use the
microphone-in port. Just make sure that the volume setting is not too
high: start with the lowest setting and raise it little by little until
you are able to record a low-volume sound.
- Sound
recording software such as Audacity.
- A
turntable with:
(1) audio RCA output (line-out)
You can connect using various components depending on which way you
want to hookup. If you have a stereo amplifier or stereo receiver or an
audio/video receiver with a PHONO input, then you do not need a
Phono-Preamp. If you have none of these components, then you will need
a Phono-Preamp.
You also need some cables to connect up components and
you also need some software to record on the computer. There are also
today some other options such as a USB turntable which connects to the
computer with a USB hookup. These devices are available for around
$150. One newer turntable has a built-in iPod port so you can go from
vinyl to iPod.
To connect a component type (unamplified) turntable, WITHOUT A
RECEIVER, to your PC sound card, you will need a separate phono preamp
. There are two reasons for this:
1. Low output - Turntable Phono cartridges put out a much weaker signal
- 6 millivolts or so - than the other standard components of a stereo
system do, which typically put out 300 to 500 milli-volts or more. A
sound card line-in is simply not matched for the low output of phono
cartridges. That is why you have special phono only inputs on your
receiver.
2. Equalization - this is the process of weakening (compressing) the
low frequencies and strengthing (stretching) the higher frequencies.
This is how vinyl records are recorded and what makes it possible to
squeeze the wide range of sound within the narrow grooves of a record.
If that signal were to be played back directly, you would have a
totally unnatural sound - screechy highs and no bass. To be played back
correctly, the sound has to be restored to it's normal state during
playback - the reverse of equalization has to occur - and that is the
purpose of a phono pre-amp which fixes the problem by boosting the weak
signal and "flattening" the frequency response.
You can buy a simple phono preamp for 30 to 50 dollars.
See www.phonopreamps.com
DJPRE II: Phono Preamp
ART DJ PRE II for $49
Phono Preamp with RIAA EQ in a Rugged Metal Case.
The ART DJPRE II solves the three basic problems common to vinyl
records:
* 1. It is physically impossible to press them with ridges that end up
allowing low frequencies to come out at the same reproduction level as
mid and high frequencies. Bass compensation is therefore needed during
playback.
* 2. Records produce a certain amount of hiss, which is covered up in
post-production by boosting the gain of the high frequencies before
pressing. Counter-EQing during playback compensates for this.
* 3. Magnetic cartridges produce a weak signal, which must be boosted
to match the rest of the amplification, and this too is done during
playback.
The DJ PRE II is a high quality Phono preamp designed for your home and
studio. It acts as an interface between your turntable and your audio
recording
system. The analog input capacitance can be switched between 100pf and
200pf to optimize your phono cartridge response. A switchable low cut
filter
removes turntable rumble while leaving the audio pristine. The front
gain trim
control and signal/clip LED allow you to optimize the preamps gain for
a wide
range of input sources. The built-in low noise Phono preamp circuitry
is highly
accurate and precisely conforms to the RIAA standard. The Line Output
jacks
are low impedance and can work with any sound card. Housed in an all
aluminum black anodized case, the DJ PRE II can be powered
by a wide variety of external supplies. If you need to amplify and EQ
your vinyl
records to interface with your audio workstation, sound card, or main
monitor
system, the DJ PRE II gives you flawless audio reproduction in a rugged
and
reliable package. Has left and right RCA audio inputs and left and
right RCA audio outputs.
APPLIED RESEARCH AND TECHNOLOGY
Email: support@artproaudio.com • www.artproaudio.com
Once your turntable is connected to the preamp's input jacks, you can
connect it to your sound card from the OUT jacks like you would another
unamplified component, such as a tape deck (using the Y-adapter cable
with rca plugs on one end and a stereo mini plug on the other). You can
also use it on an amp that doesn't have phono inputs.
Diagram PC to Stereo Receiver to Turntable
STEREO RECEIVER rear panel showing RCA audio jacks with PHONO input for
Turntable
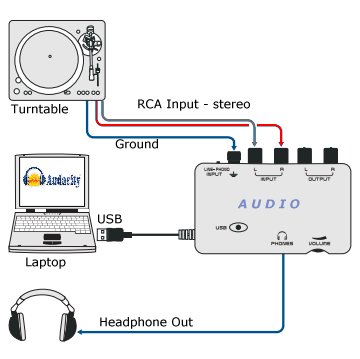
Diagram - Turntable to Laptop using Audio Adapter with USB |
The audio input connection on your computer:
The audio input connection on a desktop computer is typically a 1/8"
mini-jack on the back panel, labeled Line-In, usually marked with a
light blue color, close to where the speakers are connected to a
similar type of jack (usually marked with a green color). The Line-In
connection is sometimes marked with the symbol Line-In symbol where the
arrow points inwards, which is not to be confused with the speaker
output marked with the symbol Speaker symbol where the arrow points
outwards.
To record from the connected audio equipment, you typically select the
sound source named Line-In in the Sound Recorder:
Sound source selection
* Laptop or notebook computers
Laptop
Many laptops do not have a LINE IN jack. The solution for this is to
get an external sound card.
See this link for more information
on external
sound card for laptop. These
boxes have all the jacks you need.
Cost is around $30 or so. Amazon.com should have them.
Most laptop or notebook computers only have one 1/8" mini-jack input
connection, marked Mic or Microphone, usually marked with a red/pink
color, close to where a headphone can be connected to a similar type of
jack (usually marked with a green color).
To record from the connected audio equipment, you typically select the
sound source named Mic or Microphone in the Sound Recorder:
Sound source selection
If your laptop or notebook (or its docking station) has a blue colored
Line-In connection as well, then it is preferable to connect the audio
equipment to that connection. In that case you typically select the
sound source named Line-In in the Sound Recorder software.
The plug that goes into the input connection of the computer, has to be
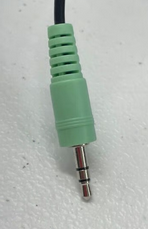
a stereo 1/8" mini-plug, similar to the one for the computer speakers:
Stereo plug
Note that the stereo mini-plug has two black plastic rings at the tip
and this is not to be confused with a mono plug that has only one black
plastic ring at the tip:
Mono plug
Using a mono plug to connect the audio equipment to the computer,
typically results in sound coming in on the left channel only.
The audio output connection on the audio equipment
What the audio output connection type on the audio equipment is,
depends on the kind and model.
It is usually marked Play-Out, Line-Out, Audio-Out or something in
similar wording (Out being the keyword here):
* RCA connectors
This type of connector is most times found on modern audio equipment,
like on this JVC cassette deck:
* Mini-jack connectors This type of connector is most times found on
portable players.
Connecting a traditional turntable (vinyl record player)
To record from vinyl records, you will need a (pre-)amplifier connected
in between the turntable and the computer. The signal strength of the
turntable output is too weak to be connected to the computer directly
and besides that, the pre-amplifier applies so called RIAA correction
on the signal.
If your home audio set does not have a pre-amplifier built-in, or if it
has no Rec-Out, Line-Out or Audio-Out output, then you can buy a
separate turntable pre-amplifier.
Your home audio set will have a pre-amp built-in, if it has a Phono
input connection to connect the turntable to and a Rec-Out output
connection to connect to the computer.
Turntable
The Rec-Out connection on the amplifier must be connected to the
computer. This is the same connection that is usually connected to a
cassette or tape recorder to record on tape the traditional way.
It is especially important to select the right type of cartridge
(pick-up element) that is installed on the turntable, with the phono
selector switch on the amplifier. Consult the manual of the turntable
for the right type, for example MM (Moving Magnet) or MC (Moving Coil).
Selecting the wrong one will influence the sound quality and the Click
and Crackle filters in the Sound Editor may not be able to filter
clicks or scratches in recordings.
Do not forget to also connect the ground-wire from the turntable to the
amplifier. This eliminates hum, picked up by the sensitive pick-up
element on the turntable.
What
if I only have headphones or speaker outputs?
Some audio sets like boom boxes don't have audio output connectors
other than for headphones or speakers.
The signal strength of these outputs is most times higher than desired
for the input on your computer and their signal strengths depend on the
volume control setting for that output.
Special care is therefore required to connect such outputs to your
computer.
Before you connect the headphones or speaker output to the computer,
make sure to set the volume control on the audio equipment at zero
first!
* Headphones output connection
If your audio set has a headphones output connector, then it is
preferred to use that one as opposed to the speaker connections. You
will have to experiment with the volume control level for the
headphones connection, to see which level results in the best recording
quality. The headphones volume control on the player, in combination
with the recording volume control in the Sound Recorder, determine the
end-result.
As a rule of thumb the recording level peak meters in the Sound
Recorder should hover in the yellow zone near the top, during the
loudest fragments. To achieve this, set the volume control in the Sound
Recorder window at approximately 75% of the full scale. Then playback
something loud and slowly increase the volume control of the headphones
output, until the recording level peak meters reach the yellow zone.
Setting the headphones output volume too high will result in distorted
sound, no matter how low you set the volume control in the Sound
Recorder window.
RCA Stereo To 3.5mm Stereo Mini-Jack Adapter.
If you're planning to record your LPs onto Recordable CDs on your
computer, this is the adapter you need. Many other adapters are for a
1/8 in. mini-jack, which is .013 inches too small. A 1/8 in. jack will
fit, but the electrical contact will not be solid, and it will jiggle
and likely fall out. This is a true 3.5 mm mini-jack, the correct size
for your computer sound card. To record an LP onto a computer will
require a phono-stage circuit with RIAA equalization. Going directly
from the cartridge to the soundcard will not produce a correct signal.
Step by step to
record vinyl records to Computer:
1. Make sure all cable connections are completed, including turntable
to stereo pre-amp or stereo receiver and then to computer's sound card
line input.
2. Start up recording software on computer and select new/blank file to
accept sound data.
3. Start RECORDING process on computer. Usually hit record "button" on
graphics interface.
4. Play record on turntable. (Select songs you want as you go along or
just entire record).
5. Adjust volume as needed.
6. Stop recording on computer by pressing STOP "button" in software
program.
7. SAVE as MP3 or WAV file to disk.
If you need to edit the music file, open file, edit, save, close file.
Play back music with appropriate software such as Windows Media Player.
To burn a CD of your music or transfer to an iPod, follow instructions
for the iPod synch up process and/or use CD burning software on your
computer.
Burn
a CD in Windows Media Player
You can easily create your own customized CDs using Windows Media
Player.
Click the Burn tab, click the arrow below the Burn tab, and then click
the type of CD you want to burn (audio or data).
Insert a blank CD-R or CD-RW disc into the CD burner. Or, insert a
CD-RW disc that has files on it, and erase the contents of the disc by
right-clicking the drive in the Navigation pane and then clicking Erase
disc. (Erasing is required before you can burn to the disc again.)
If you have multiple CD burners and the burner you want to use is not
the one selected, choose the one you want to use by clicking the Next
Drive link in the List pane above the playlist.
Note that you can only burn CDs to one CD burner at a time.
To add albums or files from your Player library, drag them from the
Details pane to the List pane to create a list of files to burn.
If you need to clear the List pane before beginning to build your burn
list, click the Clear List pane button.
For audio CDs, the Player typically calculates how many minutes and
seconds of empty space remain on the disc after each song is added to
the burn list. However, occasionally the Player may not be able to
detect the duration of songs in advance, which means it may not be able
to accurately calculate how many songs can fit on a CD. If this occurs,
playing the songs on the burn list first may help the Player to
determine the correct duration of the songs.
To add a file that is on your computer but not in your library,
right-click the file and then click Add to Burn List, or drag the file
to the List pane.
If you have selected more files than can fit on one CD, the Player can
burn all of the files to multiple CDs. Or you can try switching to
burning the files to a data CD to fit more files on the CD (but note
that many CD players cannot play music burned to a data CD). If you
only want to burn one CD in this session, remove files from the list
until they all fit on one CD. To do so, right-click the file you want
to remove, and then click Remove from List. Note that removing files
from the burn list will not delete the affected files from the library.
For an audio CD, it is possible that the last song will not fit even if
the total time exactly matches the CD length, because the Player
inserts two seconds between songs when burning.
In the list, drag files up or down to arrange them in the order you
want them to appear on the CD. If you have chosen to burn more than one
CD at once, make sure that the files will be burned to the CD you want.
Click Start Burn.
If you are burning multiple CDs, insert a blank CD when the first one
has finished burning, and then click Start Burn. Repeat this step until
you have finished burning all of the CDs.
As the CD is burned, you can check its progress in the burn list.
Burning a CD will take some time.
It is recommended that you do not try to perform any other actions on
the computer while burning a CD. For example, playback and recording
may be affected if you try to play music from the library while burning
a CD.
Installing
recording and editing software on your computer.
The standard sound recorder application that comes with most PCs is not
the best way to record an LP to your hard drive. There are, however, a
variety of programs that record audio, ranging from freeware to very
expensive professional editing software. Some of these obviously work
better than others, and some have more features, but in general you
want a program that writes files directly to the hard drive and that
enables you to do some minor editing of the recorded files.
One example
that works fairly well is AUDACITY
which you can download here for Windows -
AUDACITY DOWNLOAD
OR here for Mac
AUDACITY DOWNLOAD
AUDACITY can be used free. Audacity® is free, open source
software for recording and editing sounds. It is available for Mac OS
X, Microsoft Windows, GNU/Linux, and other operating systems.
Download and Install Audacity on your computer:
Download Audacity: Go to the official Audacity website www.audacityteam.org/download and click the download button for your computer's operating system.
Run the Installer: Once the download is complete, locate the downloaded file (usually in your "Downloads" folder) and double-click it to start the installation process.
Follow the Installation Wizard: The installer will guide you through the steps. Choose your preferred language, confirm the installation location, and decide if you want a desktop shortcut.
Complete the Installation: Click "Install" to begin the installation process.
Launch Audacity: After the installation is complete, click "Finish" to launch Audacity.
How to use Audacity Software
Audacity has undergone many upgrades over time from version 1 to the version 3 and many minor upgrades. May 2025
version is 3.7.3 and it would seem more upgrades are to come.
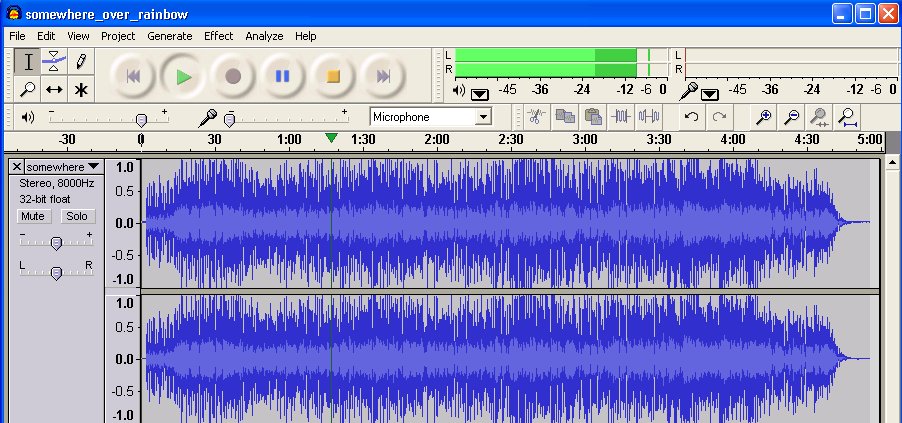
AUDACITY screen shot - The "buttons" to control recording and playback
are on top. PLAY is the green arrow to the right, RECORD,
PAUSE and STOP.
Audacity Controls - Record, Play, Stop, Rewind

Getting Started
Get started by going to EDIT (upper left next to FILE) and selecting PREFERENCES
Here you can define/select your audio driver, Recording and Playback devices, channels, sample rate and sample format.
Your playback device is typically your computer speakers. Your recording device can be selected here such as microphone,
stereo mix, usb audio and so forth.
Right click on the speaker icon  in the windows taskbar and select "Sounds". In the sounds window, select the "Recording" tab. You can view
the recording devices you have available and make adjustments by selecting one of them and then "Properties".
in the windows taskbar and select "Sounds". In the sounds window, select the "Recording" tab. You can view
the recording devices you have available and make adjustments by selecting one of them and then "Properties".
MME (Microsoft Multimedia Environment) is a native Windows audio driver. MME was the first audio driver released when Windows 3.1 was released. Most built-in audio cards run on the MME driver protocol. Most PC audio software supports MME.
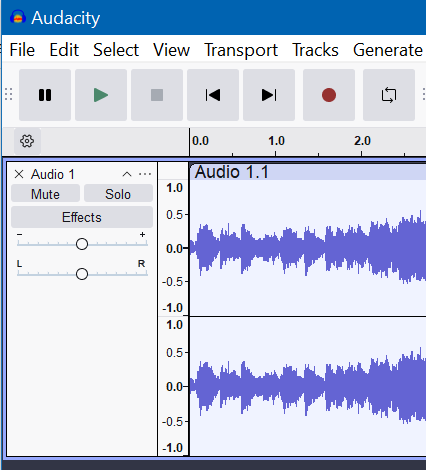
Volume Levels
Volume levels are very important. You want to set a volume level so that you get good sound but not oversaturated so there is
distortion. Recording volume levels can be set in the tool bar at the top. It is a scale of numbers.
One scale is for the audio input like a microphone and the other scale is for the audio output like speakers. Notice there are
both left (L) and right (R) channels. Objects in the toolbars can be moved around to suit your preference.
Click on the grabber (set of dots) for a given tool and slide it to a location you prefer. The volume scales can be adjusted length, width, height for a better view by using the bottom right corner. Go to VIEW> Toolbars> Reset toolbars in order to restore the
original settings.
You will probably want to do a test recording
at first so you can set the recording volume level. You want to see green across the scale without much red. Red means you are
getting over saturation. It is OK to see a little red but you do not want to see red all the time during the recording. You can adjust
the recording level based upon your test recording of your source material. The last thing you want is to find out at the end of recording that the volume level was not set correctly, too low so you cannot hear it or too high so there is distortion.

Audacity input Volume toolbar
Before recording, you can check the volume level based upon input signals by clicking on the small microphone icon
in the volume level toolbar and selecting "Enable Silent Monitoring".
This enables you to dynamically check the volume levels before actually recording anything based upon your input signals.
When you are ready to record, click the record button in Audacity and play the source input. You should see the wave form moving
along the audio track consistent with the input. Click the stop button in Audacity when finished.
Using the horizontal scroll bar at the bottom, you can move to any location in the recording.
You can delete the entire track by clicking the small X in the upper left corner of the recording.
Audacity has editing capabilities which allow you to modify the recording. You can cut out unwanted audio by selecting the area and
then going to "EDIT" and selecting "CUT". Audacity has many more capabilities which will take time to learn.
Getting Help from the Audacity Forum
• Audacity Forum
Saving the file you created with your recording software:
Audio files can be created in the native Windows PC sound file type: WAV format
or MP3, a compressed format.
WAV files offer uncompressed, lossless audio, resulting in higher quality but larger file sizes. MP3 is lossy compressed for smaller files. WAV files are preferred for professional audio work and editing, while MP3 files are suitable for storage and streaming due to their smaller file size.
Once saved, you can play the file with almost any audio
software like "Windows Media Player". WAV files are about 10 times larger
than the same song in MP3 format. Your sound recording software may be
able to select which file format to save the recording in or you may
need to get additional software. You can also get conversion software
for copying from WAV to MP3.
Click "Record" and once you are finished hit "Stop".
If using Audacity go to the "File" menu and select "Export".
Export will SAVE the recording in a file on the computer.
Select a file format and create a file name. If you want to add metadata such as track title, artist name, date, year etc., click on edit
metadata, enter the information and save.
If using Garageband go to the "File" menu and select "Save As". The default file type is AAC.
• Apple Store for Garage Band
For anyone with a large vinyl collection and money, try
• PURE VINYL
- Do not hook up
your computer sound card to a speaker output on your stereo receiver.
The signal from a speaker output is likely too powerful, and it could
cause serious damage to the sound card.
- Power down
either the computer and/or the audio source before the final
connection. The intial surge can damage circuits with some combinations
of sound card and audio source. Sound cards are especially sensitive to
this damage.
Tips, tricks and troubleshooting
Many problems can occur when trying to get vinyl records content onto the computer.
The computer's sound settings must be defined correctly.
For Windows 10
Right click on the Windows icon (lower left) and select "SYSTEM". Then click on "SOUND" (left menu). On the far right, click on
"Sound Control Panel". In the SOUND popup window, click on the "Recording" tab. Select a recording device to modify settings.
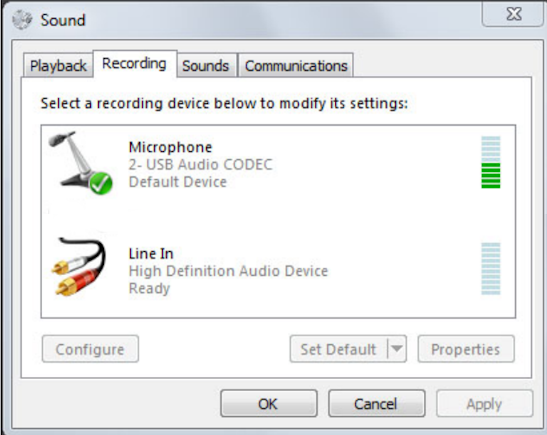
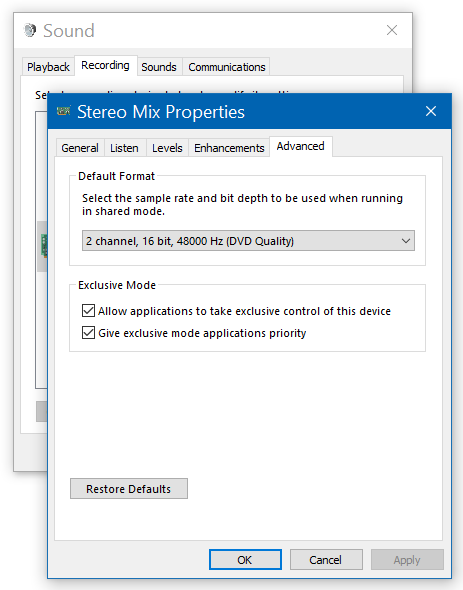
If you have a USB turntable connected to the computer, it should show up as "USB Audio CODEC". When you select it, the
"Properties" tab should now be active and you can make modifications such as stereo or mono recording, sample rate and bit
depth by clicking on the "Advanced" tab.
Click on "Apply" and then "OK".
Recording PC audio
When using the (default) MME driver, you may find a virtual microphone called Stereo Mix.
To use "Stereo Mix" in Audacity for recording computer audio, you'll first need to enable it in your Windows Sound settings.
Then, within Audacity, you'll select "Stereo Mix" as the recording device. Finally, you can start recording your computer's audio output.
1. Enabling Stereo Mix in Windows:
Open Sound settings: Right-click the speaker icon in your system tray and select "Sounds."
Go to Recording tab: Click the "Recording" tab.
Show disabled devices: Right-click in the empty white space and select "Show Disabled Devices."
Enable Stereo Mix: If "Stereo Mix" appears, right-click on it and select "Enable."
Set as default: You may also want to right-click "Stereo Mix" again and select "Set as Default Device," though this isn't always necessary for recording in Audacity.
2. Recording with Stereo Mix in Audacity:
Open Audacity: Launch the program.
Audio Setup: Click the "Audio Setup" button or open the "Device Toolbar".
Select Recording Device: Choose "Stereo Mix" as your recording device.
Choose Output Device (if needed): If using WASAPI, you might also need to select your output device (e.g., speakers, headphones).
Start Recording: Click the red record button to begin recording your computer's audio.
3. Troubleshooting:
If Stereo Mix doesn't appear:
Double-check that you've enabled "Show Disabled Devices" in the Windows Sound settings and that you have the necessary audio drivers installed, as discussed in the Audacity Forum.
If you're having trouble recording:
Make sure your Windows audio settings are set to the correct sample rate (44100 Hz is a common choice) and that your recording device is selected in Audacity.
Consider WASAPI (if needed):
For recording computer audio with higher fidelity, you might consider using Windows WASAPI instead of MME. This may require a bit more setup but can provide better quality recordings.
Play LP vinyl records to your TV
Don't have a amplifier or Audio Video Receiver? Want a quick way to listen to LP vinyl records from your USB turntable or
non-USB turntable with a phono pre-amp? Use your TV. Yes, your TV speakers can give you an inexpensive way to listen to
records played on the turntable.
How to do it
USB Turntables or even some non-USB turntables, will usually have a switch to turn off or turn on a built-in pre-amp.
This switch is usually labeled "PHONO" and "LINE". The "Phono" setting means you are connecting to a PHONO INPUT
on a stereo receiver or audio video receiver. This is the "OFF" setting. Switching to the "LINE" setting, means you are
using the built-in phono pre-amp. This is the "ON" setting. Now you can connect the turntable to a RCA input on a TV or other
line-level audio input.
Non-USB turntables (the old standards) need a phono pre-amp to raise the
signals to line level. You need the pre-amp, built-in or separate to raise the signals to line-level.
Be sure to connect the turntable's ground wire if using a separate phono pre-amp, to the pre-amp's ground terminal.
Also, you will need a VCR, or Blu-ray or DVD player,
or cable TV receiver or some other RCA video source. This unit will satisfy the video requirement for the AV input on the TV
even though no video is actually needed.
Digital TVs, usually the budget models or the older models, will have the 3 RCA inputs (AV). The older CRT TVs also have them.
Look for yellow, white and red ports on the TV. You can also usually use the green video input for the yellow video cable.
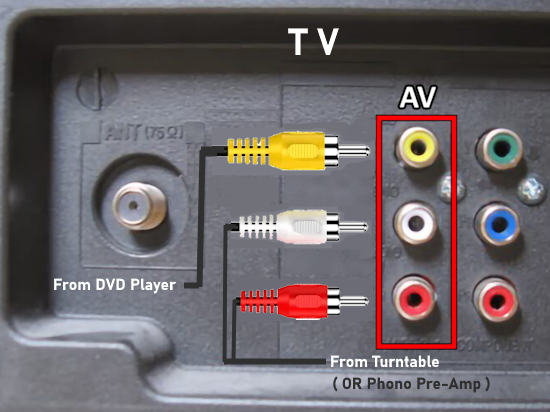
Connect the white and red RCA cables from the turntable (or external pre-amp) to the TV's white and red audio inputs.
Connect a yellow video cable
from the yellow video output of the VCR, DVD or cable TV box etc. to the TV's yellow (or green) video input. Power on the VCR, DVD or
cable box. Power on the TV. Select on the TV, the AV input where you connected the yellow, white and red cables.
Play a record on the turntable.
You should hear the sound from the record on the TV speakers. Turn up the volume on the TV.
Digital TVs need a video input signal, not just the audio to activate the AV input ports. The older CRT TVs may work without
a video input, just the audio.
This will work for any RCA sound source. Play CDs from a portable CD player (use an audio adapter cable 3.5mm to white, red) or
tape cassette recorder.
Turntable with built-in speakers
• 1 by ONE High Fidelity Belt Drive Turntable with Built-in Speakers, Vinyl Record Player with Magnetic Cartridge, Bluetooth Playback and Aux-in Functionality, Auto Off
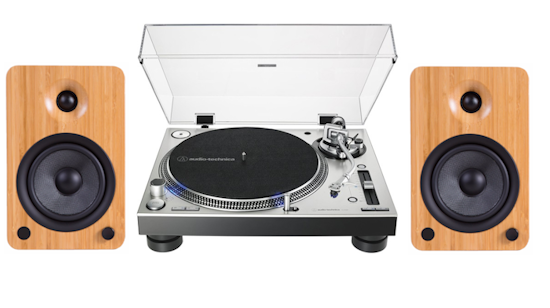
Connect Turntable to PC speakers
Play LP vinyl records through PC speakers
Q: Does a turntable with a built-in preamp need a ground wire connection?
A: Typically, a turntable with a built-in phono preamp does not require a separate ground wire connection.
The built-in preamp handles the grounding internally, eliminating the need for an external ground wire.
PC speakers with a 3.5mm male connector usually plug into a computer 3.5mm female audio output port.

A/C powered PC speakers
3.5mm male stereo speaker connection
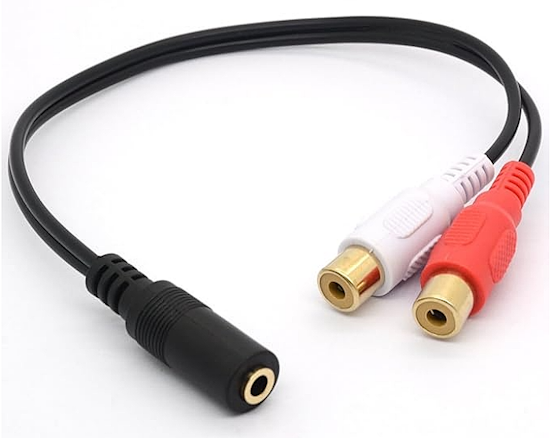
Audio adapter cable RCA to 3.5mm
Plug the turntable with built-in pre-amp or the external pre-amp RCA white and red connectors into the white and red
female connectors of an audio adapter cable and then plug the green male connector of the speakers into the
female 3.5mm connector on the adapter cable. Power on the speakers. Play a record on the turntable. You should now
hear the sound coming from the PC speakers. Turn up the volume.
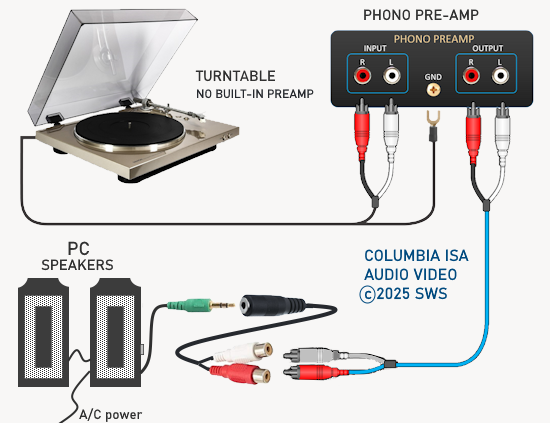
Diagram - Turntable to PC Speakers
• Phono Preamp - Turntable Preamp for Audio

• Pro-Ject Audio - MM/MC Phono Preamp
Turntable Setup:
Belt Drive with USB and phono pre-amp
Included Parts:
Turntable body - 2 speed Motor (33 1/3 and 45 rpm), tonearm, controls, cue-lever for safe stylus placement
Platter with belt
User manual
Headshell with cartridge (MM) and stylus (needle)
Counterweight with scale (0 to 4 grams)
45 RPM adapter
Slipmat
Dustcover
RCA analog audio cables
USB cable
Step by Step Turntable Setup and Assembly
1. Attach Platter - line up over center spindle and set down
2. Attach Belt over drive pulley - platter should spin freely
3. Plug headshell into the tonearm and tighten collar to set in place
4. Attach counterweight to rear of tonearm
5. Release tonearm from cradle and remove guard over stylus
Hold tonearm so stylus is not damaged from contact
6. Turn counterweight until the tonearm is balanced
7. Tonearm should not fall down or rise up (should be level and float)
Lock tonearm back into cradle
8. Adjust counterweight scale to zero (line up with white line on tonearm)
Counterweight scale moves independently of counterweight
9. Set tracking force to 1.8 grams
Turn counterweight and scale to 1.8 (rotate counterclockwise)
Line up with white line on tonearm
10. Adjust anti-skate - turn anti-skate knob to 1.8
11. Place slipmat over center spindle and set down on platter
12. Attach dustcover to rear hinges on turntable
Turntable is now assembled. Next, go to the rear of the turntable to find
power cable, RCA stereo white and red analog audio output ports,
USB digital audio output port and pre-amp switch.
For analog stereo output connection
Connect white and red audio cables to RCA ports, matching colors, white to white, red to red.
Connect other ends of RCA cables to audio receiver or powered speakers white and red analog audio inputs.
For USB connection to computer or powered speakers
Connect one end of USB cable (usually a USB Type B) to the turntable USB port and the other end to the computer
USB port (usually a USB Type A) or a powered speaker with a USB input.
Pre-amp switch
LINE setting turns on the built-in phono pre-amp so you can connect to devices without a phono pre-amp.
PHONO setting turns off the built-in phono pre-amp so you can connect to devices with a built-in phono pre-amp such as a
audio receiver with a PHONO input.
Operation:
Plug power cable into A/C outlet
Power ON turntable
Place record onto platter
Select correct speed
Place tonearm/cartridge/stylus onto outer track of record
For 45 rpm record, insert adapter onto spindle
Turntable Parts and Terminology:

Top view
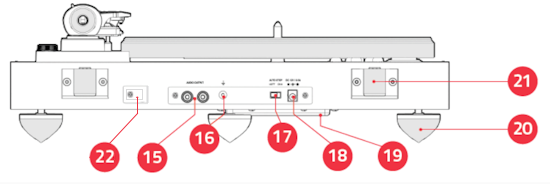
Rear view
1. Platter - The surface where you place your record and is spun by the belt in order for the stylus/needle to track the record groove.
Usually made of aluminum, steel or acrylic and 12 inches in diameter to accommodate a 12 inch vinyl record.
2. Motor Pulley - Will drive the belt to spin the platter.
3. Motor Pulley Cap - Protects the motor from dust and debris.
4. Rubber Belt - Connects the Motor Pulley and Platter to drive the platter at a consistent speed.
5. Spindle - A center protruding rod with rounded end attached to the bearing that the platter sits on that also keeps your records in place.
6. Turntable Mat - A protective surface to isolate your records from platter vibrations while also protecting your records from scratching. Can be made of various materials each with unique properties and benefits to playback.
7. Speed Selection/On Button - Knob to change speeds from 33 1/3 to 45 RPM. Different models of turntables have different methods for selecting rotational speed.
8. Power LED - Indicates if power is on.
9. Counterweight - Adjustable weight that allows you to balance your tonearm specifically to your selected cartridge.
9a. Counterweight scale - Adjustable fine tune of tracking weight.
The tracking weight varies because tonearm and cartridge weights vary. If the tracking weight on your stylus is too low, it will cause the stylus to jump and damage your record (which is why too low a weight is more harmful that too high a weight).
If you set the tracking weight too high, the stylus will not track the grooves correctly, losing information while aural distortion will often be evident as well and, there’s a possibility of record damage, over an extended period.
10. Anti-Skating Control - Adjustable knob allowing you to select an anti-skating measurement to prevent you records from being pulled toward the center of your platter too aggressively during playback avoiding skipping or distortion.
11. Cueing Lever - Allows you to raise and lower your headshell onto your records with more precision preventing unwanted wear or damage to your records.
12. Tonearm Lock - Fastener allowing you to lock your tonearm in place preventing it from moving when your turntable is not in use.
13. Tonearm - A pivoting metal arm that supports the cartridge and allows it to hang over the record and track the record groove as it spins toward the center of the record.
14. Headshell & Stylus - The cartridge containing your stylus is what generates an electrical signal from the tracking of a records grooves. The cartridge is precision mounted and aligned to the headshell so it can accurately track record grooves while the tonearm is moving during record spinning.
15. RCA Audio Outputs - Analog audio connection port allowing you to wire your turntable to your speakers or amplifier.
16. Ground Terminal - A metal post allowing you to connect a grounding wire to your amplifier to prevent undesirable noise/humming caused by static electricity or ground loops.
17. Auto Stop Switch - Allows you to turn the auto stop function on and off. With the auto stop switch enabled the record will stop spinning after a few rotations after it has finished playing a side of a record. If auto stop is disabled the record will spin continuously until the user lifts the headshell off the turntable.
18. Power Input - Input for power cable.
19. Motor Servo - Speed control device using comparator circuit to maintain and correct turntable speed. Different turntables may use different technologies/methods to accomplish consistent speed.
20. Isolation Feet - Allows for damping of environmental vibrations preventing those vibrations from reaching the plinth.
21. Hinge - Allows you to open and close your dust cover.
22. Pre-amp switch - PHONO setting allows pre-amp to be disabled. LINE setting alllows pre-amp to amplify signals to line-level.
See also:
• How
to hookup stereo
• PC
to Stereo hookup - how to play computer thru sound system
• Audio
cassette to computer hookup - how to record audio cassettes to PC
• PC
stereo hookup
• How
to hook up a Plasma or LCD HDTV
• How
to hook up a Cable TV box
• Cable
TV - Cable Box Setup
• How
to Install a HD Cable Box
• Surround
Sound over HDMI
• Surround
Sound - How to Hookup
• HDTV
Antennas and Reviews
• See
over 100 hookup diagrams
• Bluray
Players, internet-enabled, Netflix movie streaming
• Cable
Types, audio/video for TV, explanation
• Hookup
diagrams, TV, VCR, DVD, Digital cable box
• DVD
Players reviews and Guide
• VHS
to DVD copy VCR tape to DVD disc
• ROKU
digital video player Setup Guide
• See
over 100 Hookup Diagrams
• TV
input select
• Timer
Record Radio Shows on a VCR
• Camcorder
hookup to TV, DVD
• Audio
Video Connections
• Hookup
Diagrams
Columbia ISA Audio Video
Empowering consumers through information
columbiaisa@yahoo.com
SWS
|
|