|
|
| ROKU Player SETUP - Streaming Media, How to Setup ROKU Player for TV ROKU Streaming Media Players: Internet TV 
What you need: 1. A ROKU account (free) 2. A laptop, desktop computer or a smartphone with service (Keep your smartphone or computer handy, as you will need to access your email in order to verify your account.) 3. Home internet service (modem/router) with Wi-Fi 4. Your network password to setup access to your Wi-Fi 5. A credit card or payment method if you want paid content (not all content is free) 6. Your e-mail account 7. TV (Newer TV with HDMI inputs or older TV using HDMI adapter) 8. ROKU Kit 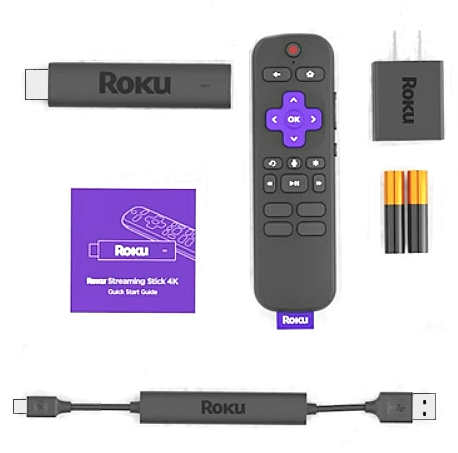 • ROKU Streaming Stick • ROKU Remote • ROKU Power Adapter • Batteries for remote • USB Power Cable • ROKU Quick Start Guide 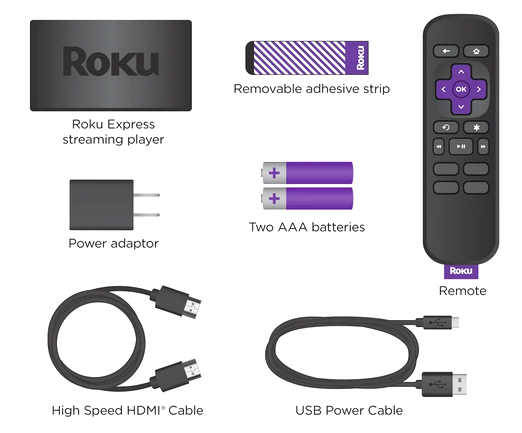 • ROKU Players - Choices • ROKU Help TV Stick ROKU Remotes There is the older IR infra-red light remote control which has to be pointed at the ROKU player and the newer ROKU point anywhere voice remote which has the microphone button on it for voice control. The remote should pair automatically with the ROKU device/player but if it does not, then remove the battery cover and press and hold the small button until the small light comes on. Pairing between two devices establishes communication. 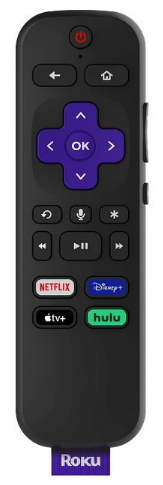 ROKU Remote Control ROKU SETUP A welcome screen will appear after you switch your TV input to where your streaming device is connected. During setup, you will choose a language, connect to the internet, download the latest updates, configure display settings, and finally activate your Roku streaming device. You must create or use an existing Roku account and then activate and link your device using an activation link sent to your email or accessed with a QR code. ROKU TV Sticks plug directly into the TV HDMI input port while ROKU players plug into TV HDMI input via a HDMI cable.  • ROKU player has to be connected to an available HDMI input on the TV. The ROKU stick plugs directly into a HDMI input port so no HDMI cable is required. The ROKU player devices require an HDMI cable plugged into the TV HDMI input port and the other end of the cable into the ROKU device HDMI port. • ROKU player has to be connected to electrical power, USB on TV or wall outlet using power adapter (supplied). If using the TV USB port and you see a small red led light, that means not enough power is available for operation and the wall outlet will be needed for enough electrical power. Use the A/C adapter. 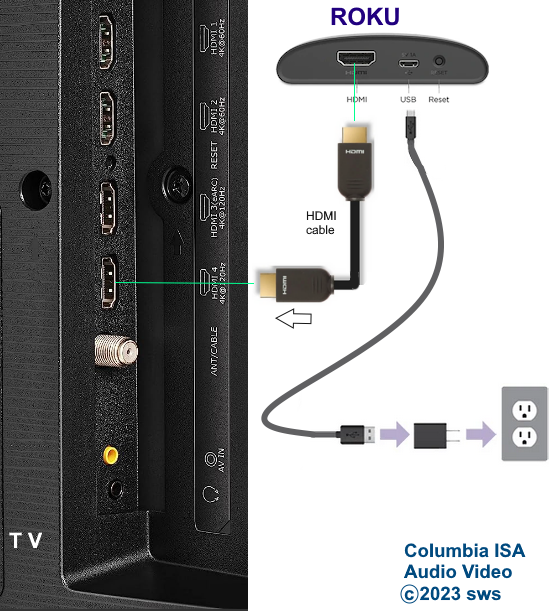 ROKU Express hookup diagram • Note the TV input used to connect ROKU player/device. • Install batteries into the ROKU remote control (positioned correctly) • Power ON your TV, select proper HDMI source input (use TV remote control) and ROKU logo should appear on TV. Use the ROKU remote control (arrow keys) to navigate up, down, left, right to make selections and then press OK button. • Select your Language 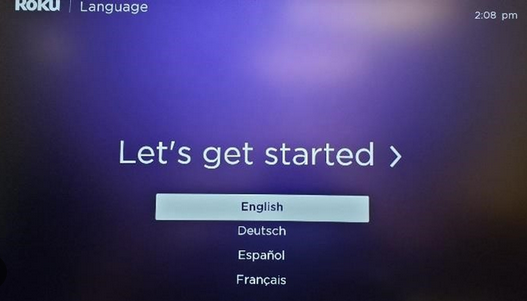 • Setup Network - select wired or wireless. 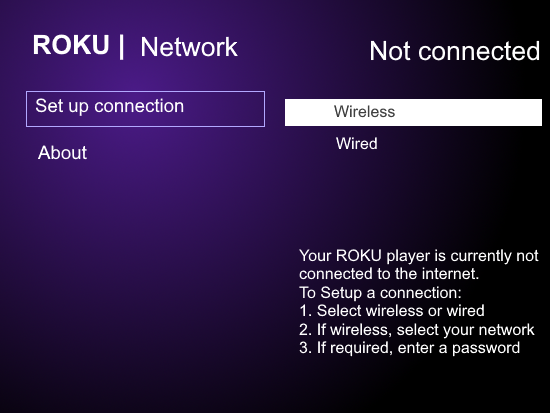 • For wireless - Connect to your network (select SCAN AGAIN to see all networks) 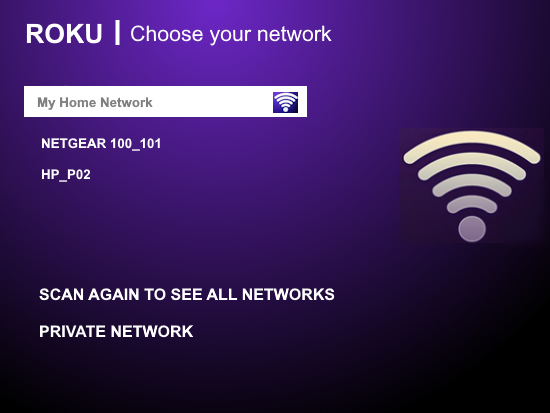 • Enter wireless password (passwords are case sensitive). Use on-screen keyboard to enter. Use remote arrow keys up, down, left, right to select letters or numbers.  ROKU wireless connection problems ROKU player update Your ROKU player will download the latest software revisions and update the player (this may take a while) TV screen resolution Your ROKU player can output 720p or 1080p or 4K video resolution. You can select AUTO DETECT if you do not know your TV video resolution. 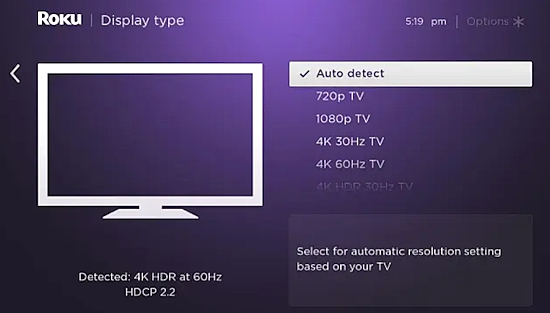 LINK your ROKU player to your ROKU account Create an account or sign in to your existing ROKU account ROKU account Sign-up The ROKU website keeps track of all your information. Your ROKU device type, channels, payment methods, purchase history, settings etc. • ROKU account for updates and your account information Once your Roku streaming device is connected to power and the network, it may download new software. After that your Roku streaming device will display a link code on the TV, that you’ll have to enter on: roku.com/link on your computer or mobile device. The link code has to match to continue. The code will be different each time you attempt to LINK/ACTIVATE your player. 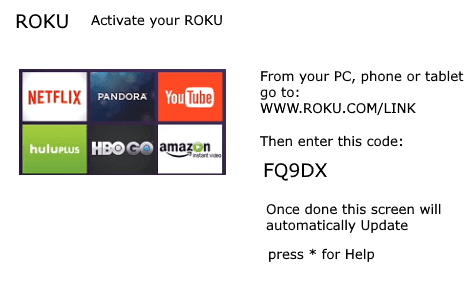 Following the instructions on the website, you’ll be asked to create a Roku account or log in to your existing Roku account. • ROKU Sign In to existing account Adding Channels Once logged in you will be able to add your channels. You can add channels through the ROKU website by logging on, or you can add channels through your ROKU device or you can add by using the ROKU app for Apple or Android. Login to your account at ROKU.com and go to MY ACCOUNT. Go to the CHANNEL STORE to browse channels Browse channels This page will show you which channels you already have installed and which channels you can add. Click on a channel and you see the details and can then click on ADD CHANNEL. Add the channels you want and then press OK on continue (may take a while to add all channels) Using your ROKU device: Go to Streaming Channels on the ROKU Home screen. Press OK, this will open the channel store. Find the channel you want to add. Select Press OK, then select ADD CHANNEL. Press OK. Message should show CHANNEL ADDED. If you have the Roku Voice Remote, you can access added channels quickly with a voice command. Hold the microphone button and say something like “launch Netflix channel.” • ROKU Link Code • ROKU.com for sign-in, support 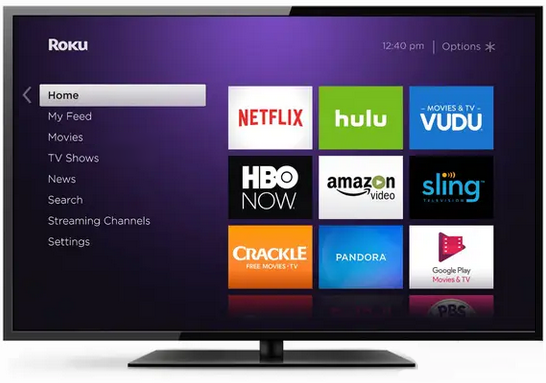 Once setup, you can enjoy internet content from content providers you have added to your channels. You can always adjust settings or make changes, add channels, remove channels, change account settings. Select a channel, sit back and watch movies, TV shows, news, sports, original video content from everyday creators. Using Voice Control Press and hold the microphone button. Speak your search or commands such as show me comedies or go to YouTube or Pause or fast forward. Making changes after setup is done You can make changes at any time by going to ROKU Home screen and SETTINGS 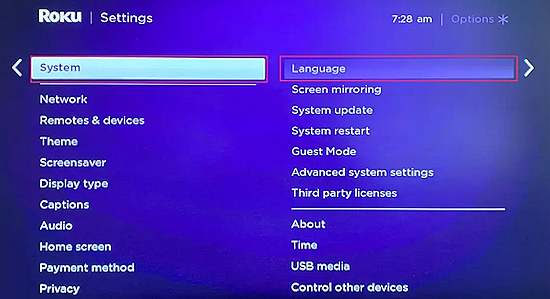 Network connection - wireless settings Press Home button on Roku remote Scroll and select Settings Select Network Select Set up connection Choose Wired (Ethernet) or Wireless (Wi-Fi) If you select Wired, your Roku device will automatically connect to your network and the internet. If you select Wireless, continue to the next step. Select your network from the list of available networks. If you do not see your network, select Scan again to see all networks. Enter your network password. To see the password as you type, choose Show password. Select Connect If you have problems connecting to your network, you should have the password for log-in to your modem/router and userid (admin) so you can modify or troubleshoot network settings. 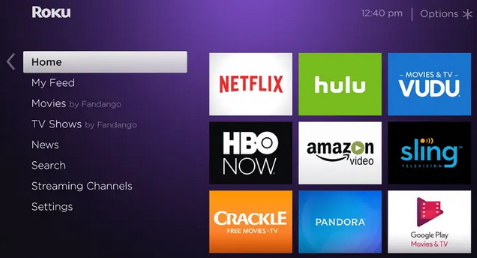 ROKU home screen • ROKU SETUP Also see the ROKU forums for more help • ROKU Community Forums ROKU Support - ROKU Setup Additional steps you may need to perform Steps to Disconnect From WiFi If you need to disconnect from the internet, you need to reset the network connection. Step 1: Press the home button on the Roku remote control. Step 2: Select Settings from the home screen menu. Step 3: Select System from the Settings screen menu. Step 4: Choose Advanced System Settings. Step 5: Select Network Connection Reset. Step 6: Select Reset connection and your Roku will no longer be connected to the wireless network. OLDER ROKU MEDIA PLAYERS 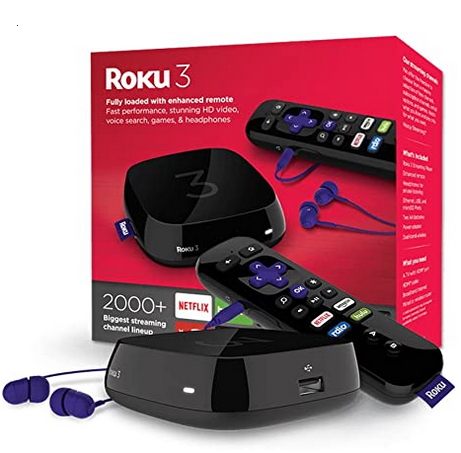 ROKU Players or streaming internet boxes or sticks. Improvements include faster speeds, earphone jacks and more memory. ROKU offers (2015) 3 players from $50 to $99, the ROKU 1, 2 or 3. The ROKU 3 model 4230 now has voice search which helps to find the content you want. The ROKU 3 box has wired (ethernet) and wireless internet connections while the ROKU 1 and 2 models have wireless only. The ROKU 3 does not have the RCA connections, only HDMI so for older TV households, you will need the ROKU 1 or 2 models. The ROKU 2 has earphones. All three models support up to 1080P high definition video (HDMI required for HD). A power adapter for wall plug-in comes with the unit and also earphones for private listening. All you may need to buy is the HDMI cable for connection to your TV. 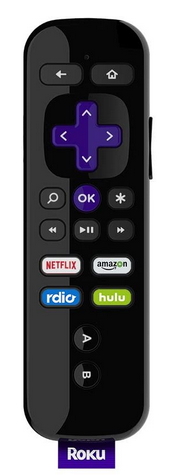 ROKU remote for model 3 Video available includes: Netflix, Amazon Instant Video, HBO GO, Hulu Plus, Vudu, Crackle, YouTube and many more. You still have to pay the monthly charge to Netflix and Hulu for example after you buy the ROKU if you want to watch Netflix and Hulu content. There is no record capability with ROKU boxes. Both standard TV (analog) and HD TV (digital) can be connected to the ROKU players. You plug the ROKU player into the wall outlet, connect the player to the TV using HDMI or RCA audio/video cables and setup your ROKU account online. You also need internet service from a provider such as your local cable TV company and for wireless access, a wireless router. You can also use a wired connection if you do not want to buy a wireless router. But here you would need an Ethernet cable (CAT 5 or CAT 6) connected to the ROKU box for internet access using your home network setup and the ROKU 3 model. ROKU offers both free and pay content. Netflix is one example of pay content. But you only pay for what you choose to watch in the pay channels. The ROKU box is small and comes with a remote control. Make sure you install the batteries into the remote. So here is what you need: 1) ROKU player with remote and power adapter 2) HDMI cable or RCA audio/video cables 3) HDTV or older analog TV 4) Power outlet for player 5) Internet service fast enough for your viewing needs 6) Ethernet Cable or Wireless router 7) Credit card or Paypal account for billing (see below for no credit card) 8) For a wireless setup, your SSID and network password Step by step setup for ROKU player STEP 1 - Connect ROKU box to TV using HDMI cable (or RCA Audio/Video cables) HDMI cable does not come with the ROKU. STEP 2 - Insert batteries into ROKU remote STEP 3 - Plug ROKU power adapter into ROKU box and wall outlet STEP 4 - Connect Ethernet cable to ROKU 3 box and your home internet modem/router or for a wireless setup, which the ROKU 2, 3 and ROKU 1 have, no ethernet cable is needed. STEP 5 - Power TV ON STEP 6 - using the TV remote, select the source/input on the TV where the ROKU is connected. The name varies with each TV brand. SOURCE or INPUT select button on the TV remote. STEP 7 - The ROKU screen should show on the TV. At this point you begin the setup process which will start with basic settings such as your language choice. STEP 8 - ROKU network setup: Settings Select wired or wireless depending on which type of connection you will be using. If wireless is used, ROKU will scan for available signals and should show you the network(s) available. Press OK on ROKU remote for the network you want. Make sure you are broadcasting your SSID. Next enter network password. This is cumbersome because you need to select letter by letter, then skip down to CONNECT. Screen should show CONNECTING to internet. There are three green check marks for local network and internet etc. which shows progress in full connection. Any red X's shows a problem connecting. Hopefully you are the person who setup your router. Any changes to the router, you need to know the userid and login password. Sometimes people have problems connecting to the internet. It can be a problem with your provider, or a router setting, signals from router to ROKU and a host of other issues. With the ROKU 3 you can connect with the ethernet cable directly from ROKU to router. This may allow a successful setup until wireless issues can be resolved. If you do not have home internet service, there are a number of steps to go through to setup particularly a wireless network. For a wired network using ethernet cable, just plug into cable TV modem. Your provider will support you and help with questions on internet setup. STEP 9 - ROKU LINK : Do you have a ROKU account? if NO, create ROKU account. You need a laptop or other computer or device to access the internet to setup your ROKU account. On ROKU's website, https://my.roku.com/signin CREATE ACCOUNT or sign in if you already have an account. https://my.roku.com/signup Enter your first name, last name, email address, password. Enter a PIN code to control payments if desired. This way a person must enter the PIN in order to charge a credit card and make purchases. Enter Credit card or Paypal account information. You should ADD some channels such as YouTube next, although you can always add channels later on the ROKU. Enter link code from TV screen. The link code is generated for each bootup of ROKU and is different each time. • ROKU Link Code https://my.roku.com/signup/nocc Just click on SKIP at the bottom of page to skip the credit card entry. You can also sign up online at roku.com before ROKU purchase. Payment method can be added later. ROKU has a free app for iOS and Android smartphones. STEP 10 - Setup is complete. Press OK on ROKU remote. You should see the ROKU screen on your TV which allows you to select channels, Netflix and other content. Press HOME button on ROKU remote if needed. Navigate using the arrow keys on the ROKU remote, then press OK. Skip up, down, right and left to make selections, then press OK. Yes, there are ads but many can be skipped or fast forwarded. SETUP for all ROKU models: http://support.roku.com/entries/26409964-Select-a-Roku-player-model ROKU step by step setup/install with pictures for the ROKU 3 with voice search ROKU 2 internet player for 2011-2012 You
will need the following to set up and use the Roku 2 internet player:
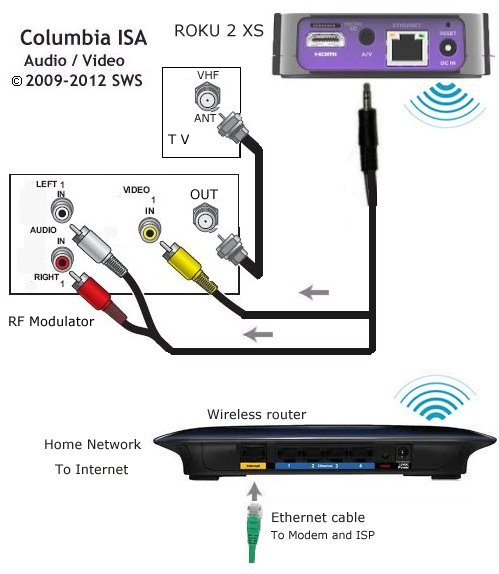
º How to setup wireless internet at home º How to setup wireless USB adapter for a Desktop PC 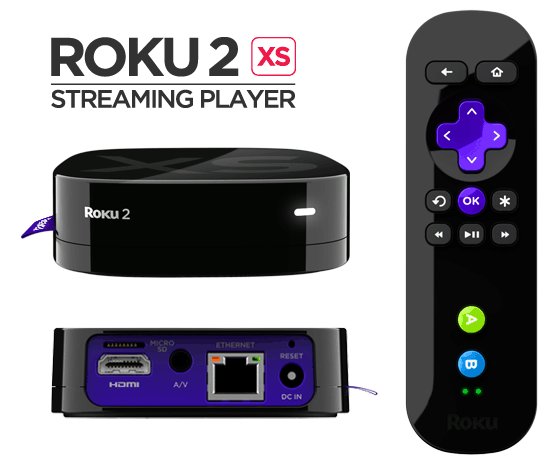 The 2011 ROKU boxes come in four models, from the LT model up to the XS model. All have built-in wireless Wi-Fi for internet connection to your home network. All have High-Definition video capability with HDMI for your HDTV and also an audio/video connection which works with virtually any TV set. http://support.roku.com/entries/20565547-how-to-set-up-the-roku-2 See above link for ROKU 2 setup video Also see the ROKU forums for more help http://forums.roku.com ROKU SETUP INTERNET SERVICE You need a broadband internet setup from your provider (local cable TV or telephone company), a home cable modem or DSL modem, router (wireless preferred) and a PC or Mac to best use the ROKU box. Although you do not need a PC to view internet content using the ROKU box, you do need a PC or Mac to setup your router and to setup your accounts on ROKU.com and Netflix, HULU and Amazon.com to view movies and video. CONNECT ROKU TO TV Basically you need to connect the ROKU box to your TV's video input using an HDMI cable or the supplied A/V cable (yellow, white, red) if you do not have an HDTV. An HDMI cable is available from Amazon.com CONNECT TO ROUTER Next, connect the ROKU box to your home network using either a wired ethernet cable or the wireless connection. You must have a wireless router for the Wi-Fi connection which is what most people use. Be sure to get the latest wireless N router (802.11n). POWER UP Plug in the power to the ROKU and power on the TV. Insert the batteries into the ROKU remote. Select the TV's input where you connected the cable from the ROKU box. Use the TV's remote to select proper input port. CONFIGURE The ROKU has a selection of on-screen menus to tell you about your player and allow you to change and configure your player as well as make choices for videos, movies and other internet content. The settings menu allows you to setup your player. Make selections using the ROKU remote control. See ROKU 2 Remotes to learn about ROKU remote controls. BEGIN If your TV and ROKU are plugged in and powered up and you have connected ROKU to your TV and selected the proper TV input, there should be an initial ROKU screen on the TV with a WELCOME message and indication to press OK on the ROKU remote to begin setup. Next, Select the SETTINGS box to get started. 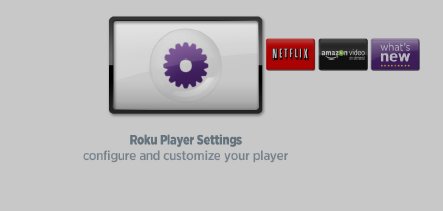 ROKU PLAYER SETUP SELECTION 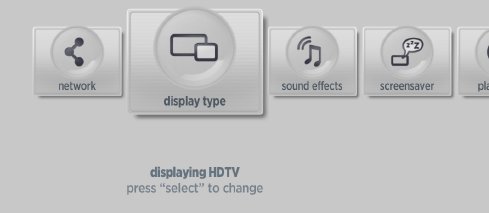 You can select the Network section to setup your router/home network or your TV display or sound or do a software update. Setup your connection to your home router and enter your network password if you have one. Select wired or wireless (most select wireless) 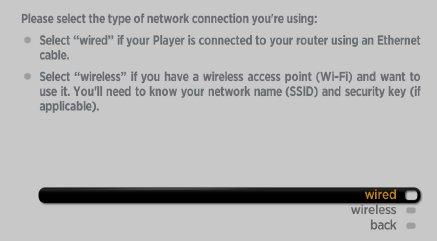 See ROKU setup for more information. 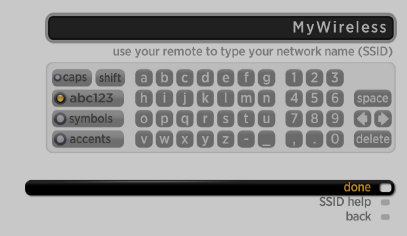 If you did not setup your router, ask the person who did to supply the SSID and any passwords required. This information is needed to establish the communications with your home network. Then, online, setup your ROKU account. The account itself is free, but you will have to enter your credit card or Paypal information so that you can be charged for any optional channels you may purchase from the ROKU channel store. See FAQ below. You also need accounts at Netflix and other content providers so you can pay for any movies that are not free. Roku Phone Numbers Phone Support: 888-600-7658 Hours: Monday through Saturday (8AM to 8PM PST) ROKU.com also offers online CHAT which gives you realtime help 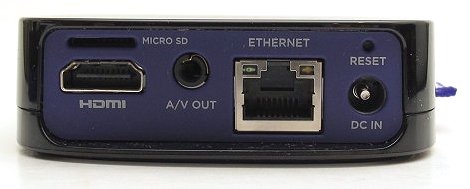 The ROKU 2 XS model rear panel showing the HDMI port, standard definition Audio/Video port, Ethernet and power ports. You need to buy an HDMI cable if you do not already have one for an HDTV. For a standard TV, use the supplied audio/video cable to connect TV to ROKU. ROKU 2 hookup diagram for HDTV and wireless router. 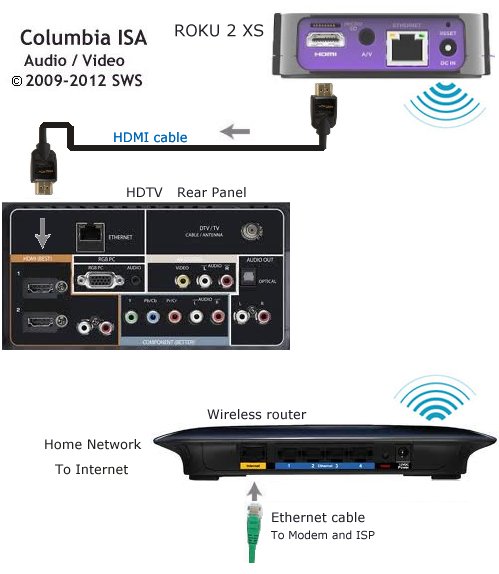 ROKU 2 Hookup Diagram for standard TV 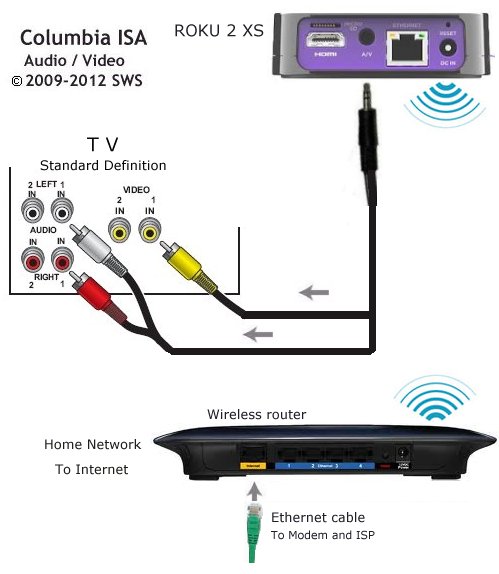 If your TV only has a RF input jack (round silver single pin), you need to get an RF modulator and use it to connect the coax cable to the TV. See this diagram for hookup. Once connected to your TV and powered up, continue with the setup process. Power on TV and ROKU box. The Roku player will boot up and display the following sequence of screens:
Follow the on-screen instructions.
Once linked, your Roku player will refresh to a congratulations screen and be ready for use. Press the HOME button on the ROKU remote. See ROKU setup for more information. ROKU FAQ:Q: Is there a way to create a ROKU account without providing credit card information? A: Yes. Call ROKU customer service or online CHAT and ask for a ROKU account to be created. If you only plan to use Netflix for example, a ROKU account can be created for you without any payment information. You can always enter payment information later. Q: Why do I need to enter the code displayed by my player online? A: The code will link your player to ROKU. If you have a second or third ROKU in the house, they can be linked thru their codes. Q: My code does not work, what do I do now? A: You can generate another code and try again by holding the reset button on the ROKU box for 20 secs. or by pulling out the power plug and plugging back in to the ROKU box. There is an option on the link screen to Get a New Code. If it still will not work, call ROKU customer support or consult the ROKU forums. Q: How do I reset my ROKU box if I change routers/home network setup? A: Follow these instructions: Step 1 Turn on your television and set it to the correct input for the Roku. Step 2 Press the "Home" button on the Roku remote control. Step 3 Select the "Settings" option in the Roku menu displayed on your television screen. Once in the settings menu, select "Network," then choose "Repeat Guided Setup." Step 4 Select "Wireless" and choose your new wireless network from the list of available options. Step 5 Enter the WEP key or WPA password to access the wireless network. Step 6 Select "Done" to allow Roku to connect to your new network. Q: How do I know how fast my broadband internet service is for HD video? A: Go to SPEEDTEST.NET run the test and see your download speed. 10Mbps or more is good. Q: Can I get surround sound on ROKU 2 box? A: Yes. Amazon Video and Netflix offer some movies in Dolby Digital 5.1 and if you have an Audio/Video receiver with Dolby Digital 5.1 decoding and HDMI you can connect the ROKU to the A/V receiver with HDMI cable and then HDMI cable from A/V receiver out to HDTV. Be sure your broadband speed is fast enough to handle the data. See ROKU setup for more information. Q: How do I setup Amazon video on the ROKU? A: On the ROKU select the Amazon box art then select YOUR VIDEO LIBRARY and get 5-digit code. Visit http://www.amazon.com/gp/video/ontv/roku/ref=atv_faq_roku online and click on BEGIN REGISTRATION. Sign-in using your Amazon userid and password. If you do not already have an Amazon account, you can create one for free. Enter your code and click CONTINUE. Follow the instructions from Amazon on each screen. • How to hook up a Plasma or LCD HDTV • How to hook up a Cable TV box • Cable TV - Cable Box Setup • How to Install a HD Cable Box • Cable TV - Cable Box Setup Scientific Atlanta 4250HDC • Surround Sound over HDMI • Surround Sound - How to Hookup • HDTV Antennas and Reviews • Bluray Players, internet-enabled, Netflix movie streaming • Cable Types, audio/video for TV, explanation • Hookup diagrams, TV, VCR, DVD, Digital cable box • DVD Players reviews and Guide • VHS to DVD copy VCR tape to DVD disc • How to Hookup an Audio Video Receiver How to setup ROKU video set top box (older model) |
||
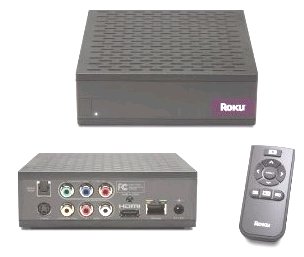 The ROKU box is small and comes with a remote control. Combined with your TV and high-speed internet service, the ROKU box delivers video content from internet providers directly to your home. Movies from Netflix and Amazon, TV shows, sports and more. You choose what to view on your TV and when to view it. ROKU comes in three flavors, the standard definition box for $79.99, the high definition box for $99.99 and the high definition plus extended range box for $129.99. The SD box does not have the optical audio or HDMI outputs that the other two have and the ROKU HD-XR box gives you the latest wireless b/g/N capability for extended range wireless in the home. (Wireless connection from your ROKU box to your wireless router.) |
||
ROKU Player Setup ROKU, meaning six in Japanese, is a reference to the six companies ROKU founder and CEO Anthony Wood has created. Released in 2008, the ROKU digital video box is a way to get movies and other video content over the internet and displayed on your home TV, any TV, without using a computer **. The box has standard composite video and audio connections as well as HDMI and component video hookups for High-Definition video. You must have high-speed internet service (broadband) and an account with your content providers such as NETFLIX or Amazon video-on-demand. The box has both wireless and wired network capability for your home LAN. A remote control allows easy selections of content, all from your couch. ** Note: An internet connected computer is required for one-time device activation (Netflix account) and to manage your queue of content. Costs involved are the following: 1) ROKU player - about $100 2) Internet broadband service - about $40 per month 3) TV or HDTV - depends on your choice of TV 4) Account with content providers - about $8.99 and up per month depending on your selections 5) Router, cable modem - depends on your choices but generally $70 or so for router and per month costs possibly for (Cable or DSL) modem. Depends on your internet service provider. 6) Cables such as Ethernet, HDMI or RCA audio/video - $15 to $45 Many people already have high-speed internet service and an HDTV. The on-going costs consist of the internet service and the content providers rates. Contrast these costs with the costs for cable TV service or buying DVDs or Blu-ray movies at the store. Plus there should be much more content in the future including sports, financial, weather and international news all delivered to your home. Some people have cut their cable-TV already in favor of internet-based content because they get what they want and only what they want. With Wi-Fi and High Definition playback capability built-in, Roku HD Player is the easiest way to stream instant movies and shows directly to your TV - over 50,000 and counting, from Netflix, Amazon Video On Demand, and more. Works with any TV. The Roku Player is a $100 set top box that streams movies and TV shows from Netflix and Amazon Video On Demand as well as live baseball via MLB.TV directly to your living room. A Netflix, Amazon Video On Demand or MLB.TV account is required to use the box, but then you simply connect the box to the Internet via Wi-Fi or Ethernet, send a request to link the Roku player to the respective content provider and then the box is paired and you’re ready to start streaming from a library of over 50,000 combined titles and live or on demand baseball. Roku Setup 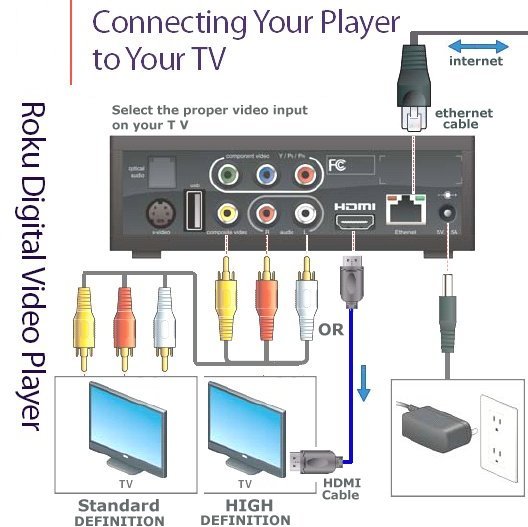 The diagram above shows how to hookup a ROKU box to your TV. The ROKU box has all the ports you need including digital audio, HDMI, ethernet and wireless LAN. Connect your router to the ROKU wirelessly or use an ethernet (CAT5) cable. See laptop to TV hookup for a complete network diagram. The ROKU just substitutes for the computer. The Roku box will walk you through the process of registering the Player with your online Netflix account. You must have some kind of unlimited account with Netflix in order to use the player with them. Currently these plans start at just under $9/month. You can register online with Netflix and try it out for free. www.netflix.com Configuring the Player involves entering a Roku-supplied number into your online account using a URL the system provides for just that purpose. To activate and manage your Netflix ready device, both your device and your personal computer need to be simultaneously connected to the Internet -- your Internet connection must be equipped with a router to enable this.*** To activate your Netflix ready device: * Navigate to the Netflix option on your device (ROKU) and select it * Follow the on-screen instructions until you see a screen that displays your Activation Code. Write down the code. * At your computer, go to www.Netflix.com/activate and enter the code. * Your device will be associated with your Account, and the instant Queue that you create on the computer will be displayed on your TV via your Netflix ready device *** Broadband Internet access services typically provide high-speed modems with built-in routers, so you can connect multiple computers to the Internet. If you do not have a router or are unfamiliar with this technology, your Internet Service Provider should be able to provide you with more information. If a router is not an option for you, Netflix customer service can assist you in activating your device, but you will still need access to a Web-connected computer to manage your Instant Queue. According to Roku and Netflix, you can have as many as six Netflix players in your home tied to a single account. You can always tack on another Netflix account if you want a Netflix player in every room. Next you'll want to tell the Roku box what type of TV screen you have (4:3 is the default). 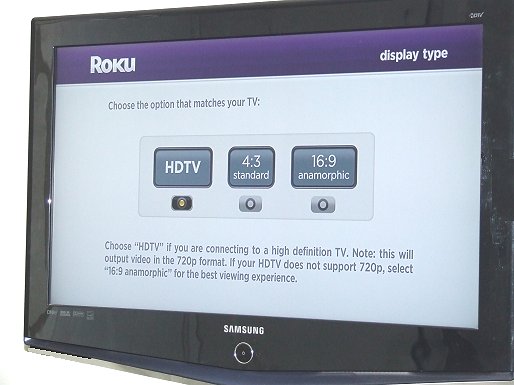 Remote Control The remote for the Player is perfectly simple. It's only got 9 buttons. Nothing else is needed in order to navigate the system. You've got a Home button, four directional keys and a Select button in the middle. Below you have Play/Pause (single button), Rewind, and Fast Forward. 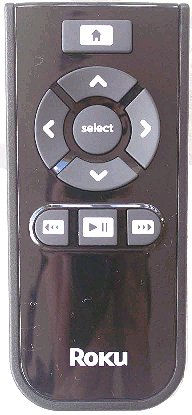 Selecting and Watching Your Movies According to Netflix you can add up to 500 titles to your instant Queue. As you watch movies you can simply rate (optional) and delete them right then and there from your list. Your account on the Netflix website will be updated to reflect the deletion and you can add more movies at your leisure.  To watch any movies, you first need to dump those movies into your Watch Now Queue. Browsing the Watch Now Queue is extremely intuitive. The title, duration and MPAA rating are given for each movie/show and it is very easy to navigate. To select a show you simply hit the Select button on the remote control. At this point the system takes into account your network download speed and grabs the video at one of four video quality levels. While it is loading, a black screen appears with the show title, quality level, and a progress bar. Once the movie begins you can Fast Forward, Rewind and Pause the picture.  REVIEWS: Roku HD XR Review Roku HD XR adds high speed WiFi (802.11n) to the popular HD streaming box. The upgrade gives consumers access to the fastest WiFi protocol so they can take better advantage of high speed Internet connections. This means consumers with an 802.11n router in their home and a fast broadband connection can expect the highest possible quality when streaming Netflix, Amazon on Demand and MLB.tv content. Roku HD XR Setup The Roku player comes with a pamphlet that has six steps to get set up. One of those steps is adding batteries to the remote and another shows how to use the play button. Plug the Roku into the wall and connect to the TV. If you’re using a wireless router you’ll configure that in the setup, there’s also an option for a hard wired Ethernet connection. If you do not have an HDMI cable for the HDTV, you will have to buy that. ROKU does provide RCA A/V cables. Getting setup though is simple. The configuration screens are very easy to understand and the unit even finds its own firmware updates for installation as part of the setup. Using the Roku HD XR Once you’re powered on, the Roku will present three viewing options, Netflix, Amazon Video on Demand and MLB.tv. While these are currently the only channels available on the Roku; Roku has been indicating plans to add more content in the near future. To configure each of these services, you’ll need to pair the Roku player with your existing accounts at Netflix or Amazon etc. What happens is that when you select Netflix for instance, the Roku box will show you a code. Log into your Netflix account online to add the code to your profile. Within a few seconds of adding the code, the Roku will get the pairing message and you’re ready to roll. Once paired, you’ll have access to the content available by the channel. For Netflix, this means you’ll have access to your entire instant viewing queue. Amazon will show you the movies or videos you have available either from purchases or rentals and MLB.tv offers streaming of baseball games and related content. Each of these services requires some level of subscription, all of which is managed outside of the Roku environment. Testing the Netflix queue. The interface is easy to use, just scroll through the movie/TV show cover art until you find the one you want to watch. Select the one you want and the Roku streamer will connect to the service, do a quick Internet speed test, and get started. From the point of selecting your show or movie to the stream starting took about 5 seconds each time, which is very fast. The Amazon service and MLB content work roughly the same way – easily and quickly connecting and streaming to the Roku HD XR from your Amazon library or your selected out of market baseball game from MLB. The controls for the Roku box are handled entirely by the included remote control. The remote is a sturdy 9 button unit that is intuitive to use and responsive to button presses. The home button takes users back to the main menu. This box is a tremendous value; for $129 you get HDMI, 802.11n WiFi and it is reliable. All three Roku systems are available from Amazon.com for purchase online. Ships right to your home. Routers or access points that will work with the Roku digital video player. Any router or access point that supports the 802.11b or 802.11g wireless protocol should work with the Roku digital video player. Below is a list of wireless routers and wireless access points that have been tested to work with the Roku Player. Linksys BEFW11S4 Wireless B Router WAP11 Wireless B Access Point (WEP only) WAP54G Wireless G Access Point WAP4400N Wireless N Access Point with Power Over Ethernet WRT54GL Wireless G Router (opensource) WRT54GS Wireless G Router WRT300N Wireless N Router Belkin F5D6130 Wireless B Access Point F5D6231-4 Wireless B Router F5D7130 Wireless G Access Point F5D7231-4 Wireless G Plus Router F5D8231-4 Wireless N1 Router D-Link DIR-655 Xtreme N Gigabit Router DWL-900AP+ Wireless B Access Point DWL-2100AP AirPlus Xtreme G High Speed Wireless Access Point WBR-2310 RangeBooster Wireless G router Netgear WGT624 Super-G Wireless Router WN802T RangeMax NEXT Wireless N Access Point WNR834B RangeMax NEXT Wireless N Router WPN802 RangeMax Wireless G Access Point Apple M7601LL/B AirPort Base Station M8799LL/A AirPort Extreme Base Station (wireless G) M9470LL/A AirPort Express MB053LL/A AirPort Extreme (wireless N) Buffalo Technology WHR-HP-G54 Wireless-G MIMO Broadband Router and Access Point WZR-AG300NH Wireless-N Nfiniti™ Dual Band Gigabit Router & Access Point Airlink 101 AP431W Super G™ Multi-function Access Point AR525W MIMO XR™ 802.11g Wireless Router AR680W 300N Wireless Router Motorola SBG940 Wireless Cable Modem Gateway ROKU Digital Video Box Specifications Networking: Wi-Fi (802.11b/g) with WEP, WPA, and WPA2 support; 10/100 Ethernet (RJ-45) Video Outputs: Composite video, S-Video, Component video (Y/Pb/Pr), HDMI Video Modes: 16:9 HD (720p), 16:9 anamorphic (480p), 4:3 standard (480i) Audio Output: Stereo (L/R RCA), Digital Optical (Toslink), Digital over HDMI Remote Control: NEC protocol, supported by various universal remotes Power Input: 5V, 1.5A provided by included AC adapter Power Consumption: 5 watts peak, 3 watts in standby Size: 5 x 5 x 1.75 inches (130 x 130 x 41 mm) Weight: 11 oz (300 grams) www.ROKU.com See also: • Plasma TVs - top ten things before buying HDTV • PC stereo hookup • VCR Recording Contact: columbiaisa@yahoo.com • see over 100 Hookup Diagrams • TV input select • Timer Record Radio Shows on a VCR • Audio Video Connections • See over 100 Hookup Diagrams
|