|
|
| Car
Stereo Systems - How
to install a new car stereo Wireless Hands free Smart Phone while driving plus music Car Audio SystemsEntertainment on the road has come a long way since the days of AM radio as the only in-car source of audio. In those days your car audio consisted of the AM radio and one speaker only. When FM radio arrived, things improved and you could have stereo sound with two speakers. Next the audio cassette was added and then the CD player. Today we have many sources of audio and video with multiple options of radio, phone, music player, navigation, DVD, CD, multiple amps, custom speakers, remote control and more. Although car makers are installing better quality sound systems in their new cars today, many people still want more. Custom audio systems can give the car as good a sound system as the budget allows. The following covers the basics of a custom audio system for your car. If you decide to replace your factory sound system, there are many considerations. 1.) Your new head unit, the in-dash hardware that contains the radio receiver, CD player/DVD player, display and controls, must physically fit into the space in your dash. Dimensions of head unit, width, height and depth plus in dash mounting all have to be considered. 2.) You have to decide if you can install the gear yourself or have a professional do this for you. This could get involved as wiring and physical installation of amps, speakers etc. could test your skills and knowledge. 3.) You have to decide what your system is going to consist of in addition to what brands of gear you want to buy with what capabilities. What is available today? HEAD UNIT - receiver plays MP3, WMA, and AAC files on disc, AM, FM, HD, satellite radio tuner, USB input, built-in iPod® controls, rear auxiliary input, 7-band equalizer, make and receive calls through the stereo, DVD player, system information, menus, song titles, 3-line LCD display, 10-key wireless remote. Connect amplifiers and subwoofers to sets of high-voltage preamp outputs. High-pass and low-pass filters let you adjust the range of frequencies you send to your speaker setup. CD : plays CDs, CD-Rs, and CD-RWs, including discs loaded with MP3, WMA, and AAC files. A car audio system is composed of four different groups of components. These are: head units, amplifiers, speakers, and auxiliary input devices (such as a CD changer or a graphic equalizer). Let's take a look at each. The Head Unit This is the heart and soul of your system. Without this component, your car audio system can't work. The head unit, or, more simply, the radio, is the central processing device in the system. All changes and controls come through the head unit. If you could see behind the radio in your dash, you'd find a dozen or so wires going off in all different directions to other systems in the car. In addition to volume, bass, etc., the head unit may contain other systems. These include: tuner, equalizer, CD or amplifier. International standard ISO 7736 defines a standard size for car audio head units. The standard was originally established by the German standards body Deutsches Institut für Normung as DIN 75490, and is therefore commonly referred to as the "DIN car radio size". It was adopted as an international standard in 1984. Head units generally come in either single DIN (180 x 50 mm panel) or double DIN (180 x 100 mm panel) size. The depth is not standardized; as a result, some cars have the correct sized front aperture but will accommodate few DIN sized radios other than the original due to the shallow depth. The US standard for a DIN radio is 2" high x 7" wide and the Double DIN sized radio is a 4" high x 7" wide. The single DIN size typically has a tuner, display and controls while the double DIN size may have a DVD screen, navigation plus tuner and more. 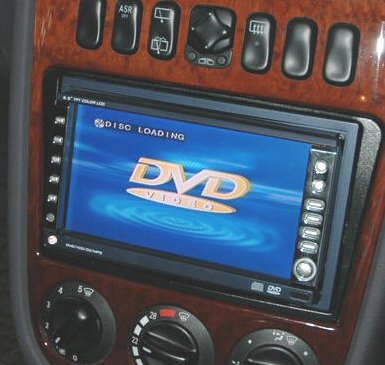 Double DIN Head Unit The Amplifier All car audio systems have an amplifier, even if it's a small one. Occasionally the amplifier will be attached to the rear of the head unit; however, in most systems it is hidden elsewhere in the car to better dissipate heat. Signal amplification is actually a two-stage process, handled by two separate components. These are the preamplifier and the power amplifier. The preamplifier (preamp) produces a very tiny signal coming directly from the radio (in fact, the preamp resides inside the head unit). Whether it's reproducing a cassette signal, a CD signal, or an FM broadcast, the preamp puts out a signal inaudible to the human ear. This is where the power amplifier takes over. It's the power amp's job to take the signal from the preamp and boost it into the audible range. The Speakers The speakers take the boosted signal from the power amp and deliver it to your ears. Essentially, loudspeakers transform electrical energy (the amplified signal) into mechanical energy (the motion of the speaker cone). Sound energy is measured in wavelengths, known as hertz, and goes from 20 to 20,000 cycles. A cycle is the distance from the top of one wavelength to the top of the next. Traditional loudspeaker design calls for three components to reproduce sound energy: woofers, tweeters and midrange drivers. As the name implies, the woofer reproduces the lower frequencies. The tweeter, replicates the higher register. The midrange handles the frequencies in between. Car audio manufacturers use various assortments of these drivers to achieve the sound they want. Auxiliary Input Devices Components such as CD changers and equalizers, not to mention cell phones, navigation systems, MP3 players and many of the newer technologies, interface with the head unit for amplification and signal processing. Typical factory car audio setup : 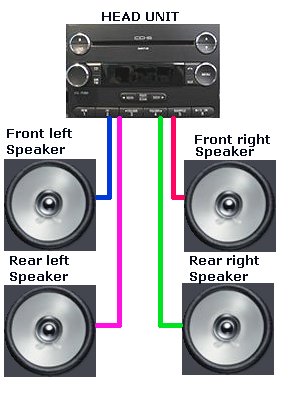 Companies like Blaupunkt, Pioneer, Panasonic, Sony, Kenwood, Clarion and Alpine, to name a few, led the way to more complex and higher quality audio systems for vehicles. Upgraded custom sound system : 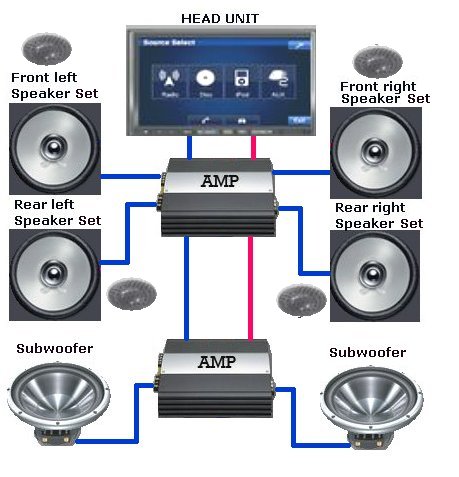 The Head Unit 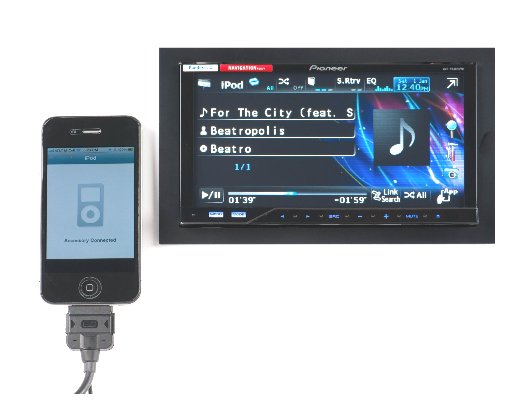 The tuner section. This group of circuits is responsible for delivering AM and FM radio signals to the head unit. In recent years many automakers, such as Mercedes-Benz and General Motors, have also begun offering weather band, marine band, and other channels to the radio dial, so that drivers may keep abreast of weather patterns that might affect traffic flow, for instance. In addition, satellite radio and HD radio are available. Satellite radio requires a paid subscription while HD radio is free. You will need a radio tuner however. The tuner section includes the presets and all the receptors for the radio signals. The tuner section is typically attached to an exterior antenna, which serves to pull in a stronger signal and improve reception. Many automakers, particularly upscale sedan manufacturers, now use a radio antenna built into either the windshield or rear window for this purpose. In addition to creating cleaner-looking cosmetics, it reduces wind resistance, cuts down on vandalism, and protects the antenna against undue harm (corrosion, rust, physical damage). Other automakers use an automatic electronic antenna. Here, a lead runs from the tuner section to the antenna. When the radio is turned on, the antenna goes up; when it's turned off, it goes down. The audio cassette. Many head units, either aftermarket or original equipment, had a built-in cassette player. Although the cassette is considered passé in audiophile circles these days, the format has been around for 30-plus years and is a very cost-effective way to transmit information and/or entertainment. Books on tapes and lectures are just two examples. As with the tuner section, the cassette is actually a separate group of components dropped into the head unit. Cassette players are so outdated now that many head units do not have them anymore. The CD player. Most cars also have a compact disc player built into the head unit. Many upscale cars don't even offer a cassette anymore, or offer it only as an option, since CD has now become the high-fidelity music format. CD will eventually be replaced by some other digital technology down the road. The principle here is the same as the cassette deck: the CD is actually a separate component built into the head unit. As with the cassette, the CD player, because it contains moving parts, is subject to wear and service issues. Many vehicles also incorporate a six- or 10-disc CD changer into the sound system, located somewhere else within the car, which feeds into the head unit through a separate circuit. The DVD player. Newer head units incorporate a DVD player. Also video ports in the rear of the unit. A second display can be mounted in the rear seats of the vehicle for the kids. The USB port. Interface your USB device with the head unit. Navigation features. Some head units have a navigation option to help you find locations on the road. Phone interface. Make and receive phone calls using the head unit. HEAD UNIT WIRING Wiring schemes follow certain guidelines, however there are many differences. Always check the manual from the manufacturer. Example for a Clarion head unit: SPEAKERS: White = Left Front + White/Black = Left Front – Gray = Right Front + Gray/Black = Right Front – Green = Left Rear + Green/Black = Left Rear- Violet = Right Rear + Violet/Black = Right Rear – POWER/ACCESSORY: Yellow 14ga = Battery Main/Memory Yellow 18ga = Battery CeNET Power/Memory Red = Accessory (ignition on) Black = Ground Blue = Antenna Turn On + Blue/White = Remote Turn On (amps) + Orange/White = Dimmer Brown = Phone Mute Orange or Mint Green= Parking Brake Video Lockout White/Red = CCD (camera) input instant on + RCA Cables: Gray = Front Output Black = Rear Output Purple = Non-Fade or Subwoofer Output 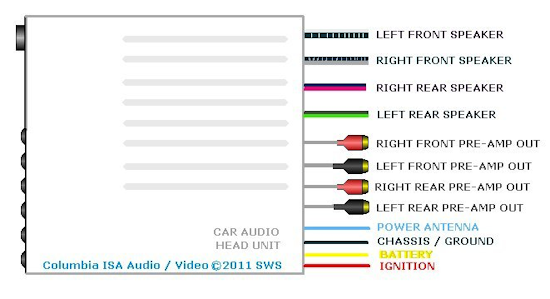 • How to install a new car stereo The amplifier  The power amp has two RCA inputs (white and red) for signals from the head unit and two RCA outputs for sending signals through to another amp. Also there are connecting terminals for 12V power from the car battery and then there are the speaker connecting terminals. The amplifier stage is composed of two subcomponent groups: the preamplifier section (preamp) and the power amplification section. The signals are first carried by wire or circuit board to the preamplifier stage. The preamp routes the chosen signal to the power amplifier, which then boosts it into the audible range and sends it, via wire, to the speakers. When you press the FM button, for instance, the circuitry inside the preamp directs the signal from the tuner, through the preamp, to the power amplifier. Likewise for the CD player and the cassette. The preamp stage also includes all the tone controls (bass, treble, etc.), sound processing (balance, fade and the like), and other signal processing circuits. For instance, some vehicles offer a three-, five-, or seven-band equalizer built into the head unit. In this case, the equalizer is actually an expanded tone control. The signal is fed through the equalizer in a loop, exiting out of the preamplifier and returning back to it with the signal altered per your adjustments. The preamp then sends the altered signal onto the amplifier. The back of the head unit holds a group of wires known as the wiring harness. These wires carry the signal to other components in the system. In more sophisticated setups, a remote power amplifier will typically be located in the rear of the car. In this scenario, a lead coming directly from the preamplifier stage exits the rear of the radio and carries an inaudible signal to the power amplifier, where it is boosted into the audible range and sent on to the speakers. This kind of radio is known as having a "pre-out." In more conventional setups (i.e., systems with lower power), a small power amp is attached to the rear of the head unit. For reasons of heat dispersion, the power amp will almost never be located inside the radio. In this situation, the preamp signal travels the short distance to the power amp, where the amp increases it and forwards it on to the speakers. The preamplifier serves more of a routing and control function, while the power amplifier deals with delivering brute force to the speakers. The power amplifier's main job is to deliver a boosted, or "amplified," signal to the loudspeakers. The technology for this actually goes back more than a hundred years, to Thomas Edison and the light bulb, but it took a quantum leap in the '50s, when Sony introduced the transistor for commercial use, to pave the way for the power amp as we know it today. Prior to this, most electronic devices — television sets, radios and industrial computers — used vacuum tubes. Vacuum tubes, or tubes as they're more commonly known, are still used in high-end home amplifiers, because of their excellent sonic qualities and "warmth" of tone. However, tubes have a major aversion to heat and vibration, so they're less than ideal in an automotive setting. Think of the transistor as equivalent to the microprocessor in computers. Just as the microprocessor revolutionized the computer industry, making the PC possible, so too did the transistor transform the face of consumer electronics. Since amplification is the last stop for the audio signal before it goes to the speakers, the amp merely takes whatever signal is delivered to it (after tone adjustments, balance/fade, etc., have altered it) and increases it. But that "merely" makes all the difference in the world, and it's the reason people will pay thousands of dollars for an aftermarket system that delivers awesome bass. Through a series of transistors, conductors, rectifiers, resistors, inductors, capacitors and circuit boards, the inaudible signal coming from your radio passes through the amplifier and is "boosted" into the audible range. Once this is accomplished, the signal is delivered to the speaker terminals at the other end of the amp. Speaker wires connected to the terminals then carry the amplified signal to the speakers. Amplifier output is typically measured in watts per channel, with a normal stereo system having two channels, left and right. You'll frequently see "RMS" after the wattage figure — this stands for "Root Mean Square," which is a mathematical measurement of the magnitude of the AC signal. More watts means more power output to the speakers, which in turn means louder volume. When a power amp is pushed beyond its limits, it generates a signal high in total harmonic distortion. That distortion gets reported to your ears by the speakers. If pushed hard and long enough, the signal will become so distorted that it melts the thin copper wire around the voice coil and you get a blown loudspeaker. What is a crossover? Simply stated, a crossover is a device, sometimes built into an amplifier, which divides and directs frequencies to different loudspeakers. For instance, many car audio systems have a two-way speaker system built into the front doors of the vehicle — a tweeter and a woofer. The tweeter handles the highs, the woofer the lows. Tweeters do an excellent job of reproducing upper frequencies, but they don't handle a lot of power. The crossover sends only the higher frequencies to the tweeter, directing the rest of the power of the amp to the woofers. It's like an electronic gate. Most sophisticated aftermarket power amplifiers have built-in crossovers, as do many OEM systems in cars. Another, simpler (and cheaper) way to do this is to place a capacitor between the two loudspeakers and the amplifier. This "rolls off" the sound to the woofer, protecting the tweeter from receiving too much signal. How much power do I need in an amp? For mids and highs, anywhere from 30 to 50 watts (RMS) per channel would be a minimum. For subs you would need at least 80 - 150 watts (or more) per subwoofer. There should always be more total power going to the subwoofers than the rest of the speakers, since human ears are more sensitive to higher frequencies than lower. For example, if you have 4 x 50 watts going to all your mids and tweeters (total=200 W), then you should have at least 200 W or more going to your subs. A lot of people wonder if too much amplifier power can burn up the speakers. What damages speakers most of the time is distortion, not power. If the speakers have the proper crossovers and are not distorting, then it is really hard to blow them. A bigger amp just gives you the opportunity to go to higher volumes without distortion. Get the biggest amplifiers you can afford and your car's electrical system can handle. More power means louder sound, but most importantly, cleaner sound. What Else to Look For in an Amplifier It is a good idea to get an amp with a built-in crossovers, so that you don't have to spend extra money later on crossovers. If you are going to be using multiple speakers, make sure the amp is 2-ohm stable (or less). A bridgeable amplifier could come in handy in the future if you are planning to upgrade. Overheat, short-circuit, overload protections are good features that any good amplifier should have. Look for a low THD (total harmonic distortion) rating. Amplifier Classes There are different amplifier designs: Class A, A-B, B and D Class A amplifiers are the most sonically accurate. On the other hand, they have some drawbacks that make them a rare breed. Class A amplifiers use only one output transistor that is turned "on" all the time, giving out tremendous amounts of heat. Class A amplifiers are very inefficient (less than 25%). More heat means more heatsink area, so even though most class A amps have built-in cooling fans, they are big. Class A amplifiers are usually and expensive choice. Class B amplifiers are the most common by far. They use two output transistors. One for the positive and one for the negative part of the cycle. Both signals are then "combined". The problem with this design is that at the point when one transistor stops amplifying and the other one kicks in (zero volt line), there is always a small distortion on the signal, called "crossover distortion". Good amplifier designs make this crossover distortion very minimal. Since each transistor is "on" only half of the time, then the amplifier does not get as hot as a class A, yielding to a smaller size and better efficiency (typically 50%). Class A-B amplifiers are a combination of the two types described above. At lower volumes, the amplifier works in class A. At higher volumes, the amplifier switches to class B operation. An increasingly popular kind is the class D amplifier (known as digital amplifier). These amplifiers are not really digital (there is no such thing), but operate similarly in the same manner as a digital-to-analog converter. The signal that comes in is sampled a high rates, and then reconstructed at higher power. This type of amplifiers produce almost no heat and are very small in size, but really expensive. Although there are full-range class D amplifiers available, most high-end manufacturers are designing amps for low frequency applications. These amps are capable of over 1000 Watts. Efficiency is much higher in class D amplifiers (~80%). The Speakers 
No matter how powerful the amplifier, nothing matters if you don't have speakers to reproduce the sound. Speakers are designed for the level of sound they will reproduce. Small tweeters are for high frequencies while somewhat larger midrange speakers are for voices. The extra large subwoofers are for the bass low frequencies. Sound waves travel through the atmosphere by vibration. The sound eventually reaches your eardrums, where the vibration is interpreted by your brain as sound. Within all those vibrations are different amplitudes and frequencies. Amplitude is the loudness or attack of a particular sound. For instance, a piano key could be struck firmly or softly; each note would have the same frequency (pitch), but a different amplitude (loudness). Amplitude is measured in decibels. Frequency, on the other hand, would vary with each key on the piano. Frequency is measured in Hertz (Hz). Human hearing ranges from 20 to 20,000 Hz, or cycles per second. The higher the note, the more wavelengths per second; conversely, the lower the note, the fewer wavelengths per second. At 20 Hz, you have deep bass notes; at 20,000, very high piccolo notes. Interestingly, most humans don't hear in that wide of a range. A speaker's job is to convert one form of energy into another form of energy. We call this type of device a transducer. Let's break the word down. "Trans" means across, like transatlantic; "duce" means power or strength. Therefore, a transducer changes one kind of force into another kind of force. In the case of a loudspeaker, it converts electrical energy (a signal from an amplifier) into mechanical energy (the motion of a speaker cone). Remember when we began our discussion of sound, we spoke of it as vibration? A loudspeaker converts electrical current into sound vibration in a very ingenious way. This technology goes all the way back to Thomas Edison and accounts for most modern audio devices, from movie theaters to rock concerts to boom boxes. At the center of a speaker sits a voice coil. The voice coil is a magnet encircled by many windings of copper wire. When the electric signal from the amplifier passes through the copper wire it energizes the magnet, producing motion. The moving magnet causes the speaker to vibrate, and we have sound. You'll note that in our stereo evaluations we frequently refer to "full range" speakers. These are the most common type of loudspeakers found in automobiles, particularly in the rear doors and along the back deck. Such speakers handle all the signal designated for a particular channel. They usually don't sound too good, and they're cheap, which is why most manufacturers use them. Higher performance systems will use two-way or even three-way designs. These setups, typically located in the front doors, divide the audio signal into different frequency ranges using an electronic crossover. A crossover is like a cop directing traffic in a busy intersection. It says to the various frequencies, "You go to that speaker, and you go to that speaker." Assigning different frequencies to different speakers makes for better sound. There's another reason for doing this, and it has to do with power handling. A separate tweeter can't handle the power needed for deep bass notes. Most car tweeters are about 1 inch across, and have very little mass. They need only a small amount of power to make sound. A woofer, on the other hand, needs a lot more power to move the much larger mass of the heavier speaker cone. The crossover sends only the higher frequencies, say, 2,000 Hz to 20,000 Hz, to the tweeter, and the remainder, 2,000 Hz down the 20 Hz, to the woofer. This prevents blowing out the tweeter by limiting the amount of signal it receives. Other systems, such as those found in BMWs, utilize a three-way setup, which inserts a "midrange" speaker between the tweeter and the woofer. This is much more common in home loudspeakers. As the name implies, the midrange handles the middle sounds, in the frequency range between the tweeter and the woofer. Occasionally systems will contain a subwoofer to give some extra oomph in the bottom end. Remember : Speakers often blow because the amplifier got turned up too high and subsequently went into distortion. When this happens, an "unclean" signal heats up the thin copper wire surrounding the voice coil and melts it. Believe it or not, it's much easier to blow a speaker in a standard OEM car audio system because of the low quality sound signal produced by a typical OEM amplifier. Increasing the quality of sound produced at high volumes by improving the amplifier design goes a long way toward protecting your speakers from meltdown. Using your iPhone, iPod or Bluetooth with the head unit. 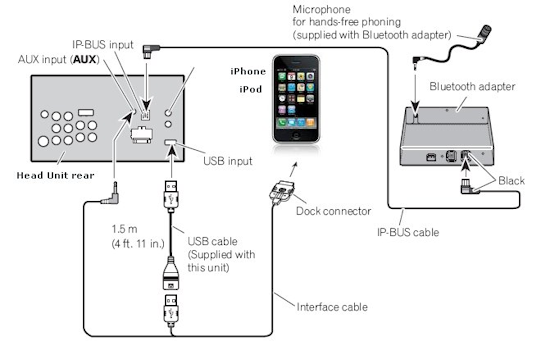 You need to buy an adapter cable to hookup your iPhone/iPod to the head unit or use Bluetooth wireless. The iPhone now has Bluetooth wireless built-in. Cost should be around $25 for this cable. Then you can listen to your songs using the car audio system. Also the iPhone/iPod will be charged up while connected. The head unit display and controls can be used to operate and fine tune your playback. Check for proper compatibility with head unit, cable and device. 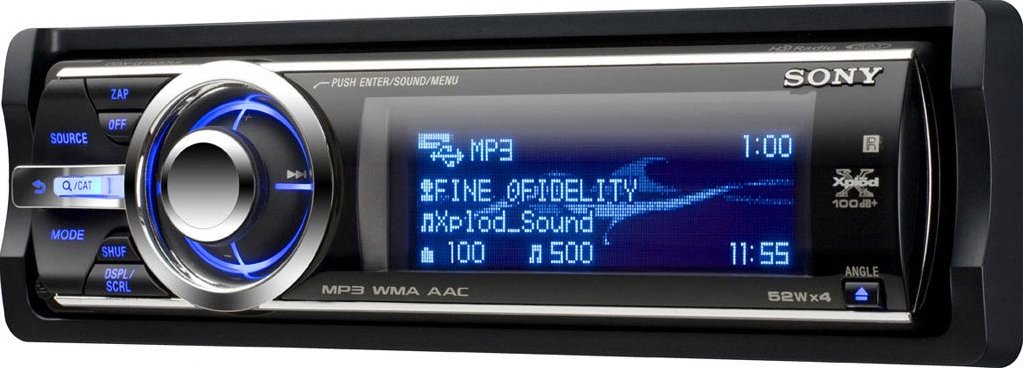 Larger image • Directory by U.S. state of car audio installers Car Stereo Manufacturers: AC Delco AEG Aisin Alpine - Alpine-USA.com Audison Audiovox - over Jensen Electronics, Phase Linear, and others. Bang & Olufsen Bazooka of Southern Audio Services Blaupunkt - Blaupunkt.com Bose (exclusively OEM option for various car manufacturers) Boston Acoustics Carver Cerwin-Vega Clarion - Clarion.com - Clarion USA Digital Designs Directed Electronics Dual Dynaudio Eclipse (a brand of Fujitsu Ten) Eonon Focal-JMLab Grundig Harman International Industries (over Harman Kardon, Infinity, JBL, and Mark Levinson (exclusive OEM option for Lexus)) Hertz JL Audio JVC JBL Kenwood Kicker - www.kicker.com/Car_Audio Lexicon LG Maxxsonics USA, Inc. (over Hifonics, Autotek, MB Quart and Crunch) McIntosh MTX Audio Monster Cable Morel Metra Electronics Nakamichi Panasonic (a brand of Matsushita Electric Industrial Co.) Phoenix Gold (a brand of Aamp of america) Pioneer - www.pioneerelectronics.com Polk Audio Pyle Audio Panasonic Qlogic Rockford Fosgate (also over Lightning Audio) Soundstream (Epsilon Electronics) Samsung Sanyo Sony Scosche Selenium Second Skin Thiel Audio How to Choose a Car Audio Installer One of the most important decisions you can make after you purchase your car audio gear is who is going to do the installation. Car audio enthusiasts will be either a Do It Yourselfer (DIY) or Do It For Me (DIFM). Whether you are a pretty adventurous DIYer, installing your own gear, or you’re a music lover who isn’t technically savvy enough for the installation of a car audio system and who needs to rely upon a professional doing the work, everyone needs the expertise of a seasoned installer at one time or another (even if it's only for proper advice). “I’m someone who does not have the time or expertise to install my own gear, but I love music in my car.” If this sounds like you, it’s comforting to know you are in the majority. Even though many DIY enthusiasts are trying their hand at installing certain items, the vast majority of the enthusiasts prefer to leave it to a professional car audio installer. Vehicle-Specific Today’s vehicles are very complex and full of sensitive computers, electronic systems, and gadgets. If you do not have some of the specialty hand and electrical measurement tools to proceed safely and efficiently with an installation, this is one of the first things you’ll seek in a professional installer. Ask if they’ve worked on your type of vehicle before and ask what system designs they’ve used as well as the outcome of them. Ask what inherent challenges this particular car presents and if there are products specifically geared to work well for overcoming those installation challenges. Often an experienced professional will have worked on a number of similar vehicles in that make/model and can immediately recommend system plans that they know have worked well with previous cars. Check for Types of Tools Second, check out their tools! Installers who are in the business as a career make substantial investments in their tools. They often have no problem showing prospective customers just how much they’ve invested in their craft. Professional tool brands such as Beta, Facom, Snap-On, Matco, Mac, Cornwell, Craftsman Professional, SK, and Fluke are sure signs that an installer has chosen tools that will last a lifetime and it often reflects on their personal commitment to their career as a professional installer. Besides the hand tools and electrical meters, many installers also leverage their computer as a tool for subwoofer enclosure design as well as for accessing various databases of vehicle wiring schematics and fitment information. Discuss Sound Quality Third, talk to them about their philosophy of getting better sound. Quite often you will find that what you may think is the next logical step to take is not necessarily the step that they’ll recommend for the best result. There is no sense in going in with a shopping list of parts when it’s really a great way to lean on the expertise of the installer to allow them to suggest what would be the best bang for the buck and (this is very important) what offers the most reliability. Installers put car electronics products in all day long, week after week. They know the reliable and not-so-reliable products and if you give them the opportunity to help steer you in the right direction with your own choices, you will thank yourself (and them) later. Service and Warranty Policy Fourth, you need to feel comfortable with your ability to call on them for service after the sale and installation. Whether it’s for questions on how something operates or ironing out any small noises or squeaks in the interior panels, ask up front what their policy is for service and warranty after the sale. Once again, this is where their expertise can be a real plus. Many products will carry a longer warranty period when installed by that authorized dealer/installer and the best installers will warranty their work for many, many years—sometimes as long as you own that car. Installation Costs You should also know many shops and installers do not offer installation of items you purchase on your own from other outlets (like Internet retailers), but the ones who will install them often charge a different rate than for items they sell and they may also handle any offer of installation warranty differently as well. This is why it really pays to visit the shop and strike up a conversation with some local installers way before buying anything on your own. Again, the savings of time and hassle are well worth the efforts. If you're not a DIYer, then you can skip the next section and go directly to the general tips list at the bottom. “I’m a total DIY installer and love to install my own gear, yet I often need advice or some clear direction on more complicated wiring or certain aspects of custom work”. Build Relationship with Shop First, when you seek out a shop and installer to work with, you should be up front about being a DIY installer. The shop and installer will both appreciate that candor. You may find a little technical conversation with the installer goes a long way to helping the two of you get on the same page about what your overall goals are with your system and what tools, capabilities, and previous experience you have to complete certain aspects of an installation. For instance, if you lack significant wood working or fabrication expertise, perhaps a pre-fabricated subwoofer enclosure or ABS plastic speaker adapters for a door location become more appropriate to help get your installation completed successfully. Accessories Second, ask if they can sell you the accessories you will need to complete your installation. This will include any small parts like butt connectors, crimp terminals, relays, mounting hardware, dash kits, wire harnesses, antenna and speaker adapters, etc. By doing so, they’ll know right up front you want to work with them and they will definitely be more cost effective than purchasing those same items piecemeal. They’ll certainly save you money on the little connector parts that will cost considerably more at an auto parts, hardware store or home improvement store. There are many advantages to dealing directly with a local car audio retailer! Potential Loss of Warranty for DIYers Third, ask what their policies are with merchandise sold over the counter so that you understand right away the warranty, return, or cost differences without installation. Should there ever be any issues, knowing these policies up front is helpful and it’s certainly better than having to box up items that have to go back to somewhere purchased from the internet. Check Hourly Rates Fourth, when you get into your install you’re going to need advice. Ask the shop and installer what their hourly rate is for looking over your install and helping you work through any issues you might be having. The reality is that having already worked with a shop up front, you’ll hopefully have avoided some of the major potholes that DIY installers commonly hit. Still, when you need to get help from a professional, an hourly rate (prorated by a section of an hour) is a great way to ensure to the installer that they’re getting compensated and that you can get the help you need. An experienced and skilled installer can troubleshoot common problems and mistakes in very short periods of time so that you can get down to the business of enjoying your car audio system sooner than later. General Tips Any installer that has been to technical training classes or seminars will only add to their value as you seek out a professional. In addition, installers that have credentials from the Mobile Electronics Certified Professional (MECP) program demonstrate to you that they voluntarily choose to maintain an industry standard certification at one of the three MECP levels (Basic, Advanced, or Master). If you are lucky enough to work with an MECP Master you will quickly realize they are at the top of their game. Photo logs and build photos of previous installations that installers have done are also a helpful tool to see what goes on behind the scenes, particularly if you’ll be having them do the work. Don’t be afraid to ask about how components are going to be mounted or finished out. You should also ask about how the items can be serviced down the road should something need adjustment or replacement. One of the big things DIY enthusiasts sometimes overlook is how serviceable the install will be after it’s done. Planning Your System You do not have to get everything at once. With a little planning you can upgrade your system in steps and that way its like getting a new system every time you change something. Basic System: A good system should start off with a good head unit that either has a DVD/CD player and/or is connected to a changer. Next get a good midrange/tweeter speaker set for the front. Head units generally do not put out enough clean power so you will want an amp to drive the component set. In the rear where you only need some "fill" for ambiance you can get away with cheaper coaxials and set their level lower than the fronts to keep the sound stage in front. A modest (50x4) 4 channel amp is a good choice here for powering the component set up front and the rear speakers. You could use a good 2 channel amp and run the front and back in parallel on the amp but it would harder to adjust the level between them. Midranges sound best when they do not play bass so you will want a 2 way electronic crossover and use the high pass output to drive your 4 channel amp. Most people are happy with a single 10" woofer or a pair of 12" woofers. Use an appropriate enclosure and a big amp (at least 75x2, preferably even more). Throw in installation and wiring accessories (like fuses and distribution blocks). Estimate cost: Head Unit: $100-$800 4 channel amp for highs: $250-$400 2 channel amp for lows: $300-$700 sub(s) (1-10" to 2-12"): $150-$450 component set: $200-$500 coaxials for rear fill: $100-$400 wiring and accessories: $50-$250 Head Units Ideally, your head unit would be used to provide a signal to your amplifiers that is line level and you would not use its internal amplifiers (if any). They usually do not have the power and strength to drive speakers both loudly and cleanly. The line level signal is cleaner than the speaker level outputs on the head unit because it is does not go through the internal amplifiers in the head unit. That being said there are occasions where you would use the head unit's internal power. One situation is when you are on a budget and are building your system over time. The head unit can be used to drive speakers (but not subwoofers) until you can get an amp. No head unit typically has more than about 60watts of total output power because more would require a real DC-DC power supply (which does not fit in a head unit easily). Using the head unit power can be a temporary solution until a separate amplifier can be purchased, just make sure you do not try to power any subwoofers or insensitive component sets with the head unit's built in power. According to Car Audio and Electronics magazine, most head units use the same chips for the internal amplifiers so they all produce about the same low power. The best they have measured is about 14watts into 4 channels at 1% distortion. Their power level at a better lower distortion figure (like 0.1%) is significantly lower. Using factory head units with external aftermarket amps: Typically you cannot get a clean signal from the head unit because factory heads do not have line level (RCA) pre-amp outputs to drive an amp. You can use a speaker level to line level converter but the sound is still going through the factory head's internal amps. Some people are willing to sacrifice some sound quality in order to keep their factory head. Also, if your factory system uses an external amp you may be able to find an adapter so you can use an aftermarket amp instead. Theft Protection: Detachable faces are the most common theft prevention scheme in head units. There are two flavors, fully detachable and partially detachable. With a fully detachable face all the controls on the front come off leaving behind a blank panel, whereas a partially detachable face leaves some features on the head unit but the head unit is still useless without the face. Fully detachable faces are larger and bulkier to carry around than partially detachable ones but leave nothing behind to be seen. Another option is Eclipse's ESN system. With these head units when you first apply power to them you must supply a CD which the unit remembers as the "reference" CD. Thereafter if the unit ever loses power you must insert the "reference" CD before it will work again. Only you know what the "reference CD" is so the head unit is useless to a thief. Eclipse also tracks the units they repair. More than once a stolen head unit was returned to them for service because it was not working. Upon verifying the head unit was stolen they can apprehend the thief as the person who returned the stolen head unit for service. I still wouldn't count on the thief to know that Eclipse does this though so I stick with a conventional fully detachable face. A new twist from Kenwood flips the face around when you turn off the power so the thief can't see the head unit. There are also smart cards which must be used before the head unit will function. Here the problem is lost smart cards. Pre-amp outputs: These are a must for any serious head unit. These outputs allow you to run an amplifier directly without need for any conversion. This is the cleanest output of the head unit. Some units have multiple outputs and sometimes ones that are crossed over. Look for the amount and type that you need for your system but keep in mind future expansion. One is sufficient but having two allow you fade, or adjust the levels of multiple amplifiers right from the head unit. Some head units now offer 4 volt outputs instead of the usual 1-2 volts. This can be very beneficial since cars have a lot of electrical noise in them. The 4 volt output is less susceptible to noise, however, you must be certain that the amplifier or crossover being connected to the output can handle 4 volts or you will not be able to use the extra voltage. If your head unit does not have pre-amp level (RCA type) outputs you can buy an adapter which will convert your speaker level outputs to line level. They range in price from $12 on up. CAR AUDIO WIRING DIAGRAM 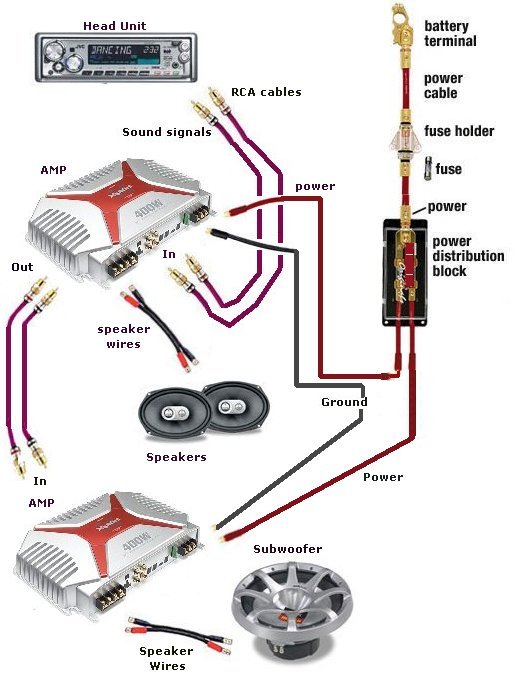 WIRING Car audio installs require wires for the audio signals, power and speaker connections. Audio signal connections use the RCA phono type cables usually one for left (white) and one for right (red) channels. The speakers connect using speaker wire. For power, you need a positive and a negative hookup. Copper wire is typically used with a plastic insulator covering the wire. The amount of current flow determines the size of the wire because you need a heavier guage of wire as the current increases because current flow produces heat. The American Wire Guage (AWG) is the standard used for wiring with lower numbers meaning bigger wire and higher numbers meaning smaller wire. So 12 AWG is bigger wire than 14 AWG. 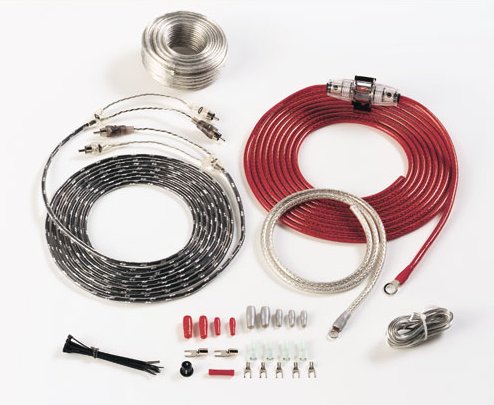 4 AWG Amp and Power wiring Kit 17 feet of 4-gauge translucent RED power cable with attached platinum-plated ring terminal 3 feet of 4-gauge translucent clear ground cable with attached platinum-plated ring terminal platinum-plated AGU fuse holder and 50-amp fuse 17 feet of 18-gauge tinned silver turn-on lead protective grommet wire ties and connectors Car Audio Installers around the USA Drive Customs San Luis Obispo, CA Jay Oliphant (805) 541-4455 drivecustoms.com JML Audio Fenton, MO Joshua Landau (636) 343-2020 jmlaudio.com Adrenaline Autosound Clayton, NC Dave Evans (919) 359-0009 adrenalineautosound.com Handcrafted Car Audio Mesa, AZ Jon Kowanetz (480) 580-2283 handcraftedcaraudio.com The Specialists Tucson, AZ Peter Riker (520) 571-8500 az-specialists.com California Soundworks Lancaster, CA Jeff Meece (661) 945-0971 Benchmark Motoring Bellevue, WA Anthony Aiello (425) 614-4100 benchmarkmotoring.com Kingpin Car Audio Wilsonville, OR Jason Kranitz (503) 582-1315 kingpincaraudio.com Sound In Motion Allston, MA Derek Kenny (617) 787-7744 sound-in-motion.com Audio Logic Hollywood, FL Charles Dixon (954) 437-0400 audiologic.net SRQ Custom Autosound Sarasota, FL Ryan Pepsin (941) 923-6200 srqcustoms.com Crush’s Custom Soundworks Effingham, IL Roger Collins (217) 342-9773 Ocala Car Audio Ocala, FL Parish Tanner (352) 351-1920 OcalaCarAudio.com Sonus Car Audio Clarksville, TN Micah Williams (931) 802-8913 sonuscaraudio.com Westminster Speed & Sound Westminster, MD Mark Miller (410) 876-1227 westminsterspeed.com CT Customs Houston, TX Todd Krueger (713) 896-8324 ctcustoms.com www.carstereohouston.com Car Audio Zone 10815 Beechnut St. #128 Houston, TX 77072 (281) 530-8287 Car Stereo Outlet 10998-B I-45 North Houston, TX 77037 (281) 847-2700 www.blvdcustoms.com 15 years in the Tampa Bay area. Boulevard Customs 3063 Tech Dr. Saint Petersburg, FL 33773 727-540-0700 Premiere Auto Sport 805 Post Road Darien, CT 06820 203-655-1578 www.premiereautosport.com Elite Audio Solutions 2637 Durango Dr. Colorado Springs CO. 80910 719-325-6974 www.eliteaudiosolutions.com Innovative Audio & Styling 6220 Edith Blvd NE unit A Albuquerque, NM 87107 505.508.2608 www.innovativecars.net info@innovativecars.net Pioneer DEH-4300UB CD Receiver with iPod/iPhone Control and MultiColor LCD Single-DIN AM/FM radio, CD, CD-R/RW, MP3/WMA/WAV, USB, iPod/iPhone receiver 4 x 50W MOSFET amplifier with two 2V RCA preamp outputs for system expansion Detachable faceplate with 10-character LCD display; customizable illumination from over 210,000 colors Includes front panel auxiliary input, USB port with direct iPod control Advanced Sound Retriever restores audio from compressed digital recordings Columbia ISA Audio Video Empowering consumers through information columbiaisa@yahoo.com |