|
|
| See
over 100 hookup diagrams : see also Cable hookup digital cable and TV 7 Ways to View TV in a RV Camper Wiring your RV for video - TV on the road Power / TV Choices / Options • Satellite TV Satellite TV is a good choice for an RV because you can tune in from many locations as you travel around the country. You need an antenna, satellite service from a provider, a satellite receiver and wiring to connect everything, including your TV. Disadvantages - it is expensive and reception can be a problem with rain, snow, trees. You need a clear, open sky to get good audio and video. Automatic Portable Satellite Antennas Many portable antennas (like the KING Tailgater or Winegard Playmaker) are fully automatic. You place the antenna on the ground with a clear view of the southern sky, connect the coaxial cable to your receiver, and power it on. The internal motors will automatically find, tilt, and lock onto the satellite signal. Extremely fast and user-friendly. The portable satellite antenna can be setup on a tripod so it can be moved to a location away from the RV if parked under trees. 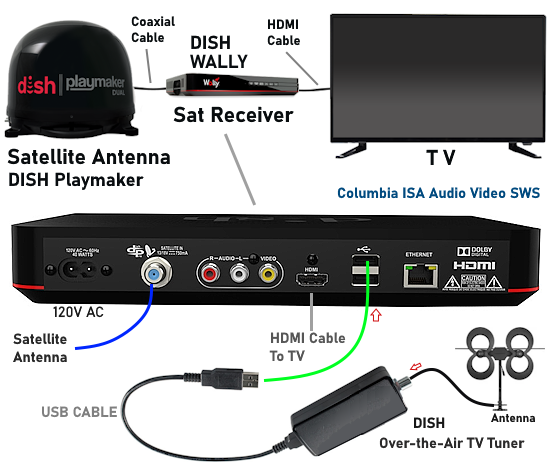 The optional Over-The-Air TV tuner integrates local broadcast channels directly into your on-screen program guide so you can watch and record them. Wally Receiver: Scan for Over-The-Air broadcast TV Channels Procedure Press the MENU button on your DISH remote. Select the Settings tile, then navigate to Diagnostics. Select Over the Air Locals. Select Scan. Select Yes if a pop-up warns about disrupting other TV viewing. The Wally will scan for all available local TV channels in your area. This process takes a few minutes. Press the VIEW LIVE TV button, then the GUIDE button on your remote. Roof-Mounted "In-Motion" Satellite Antennas   If you travel frequently and dislike setting up a portable unit at every stop, a roof-mounted setup might be right for you. An automatic dome antenna such as the Winegard RoadTrip T4 is permanently mounted to the RV's roof. When you arrive at a stop, it automatically searches for the satellite signal with the push of a button. Zero setup time at the campsite and the ability to track satellites while driving. The antenna can be setup for various satellite providers such as DISH or DirecTV or Bell by moving internal DIP switches to the correct positions on the control board under the dome. Remove the dome by unscrewing the six screws holding the dome in place. Locate the switches. For DISH Network: Set switches 4, 7, and 8 to Down. All other switches (1, 2, 3, 5, 6) remain Up. 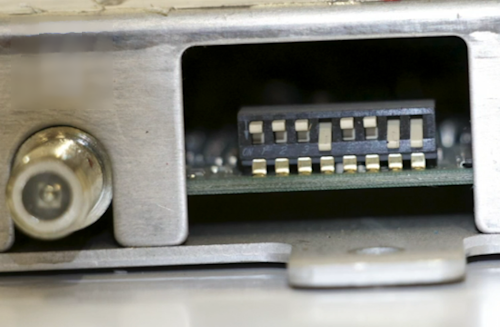 Dual coaxial outputs allow for two separate receivers. Disadvantages: Expensive • DirecTV.com • DISH.com SETUP: DISH Wally Receiver: 1. Press the "Home" button twice on your DISH remote. On the “Home” tab, select “Settings”. 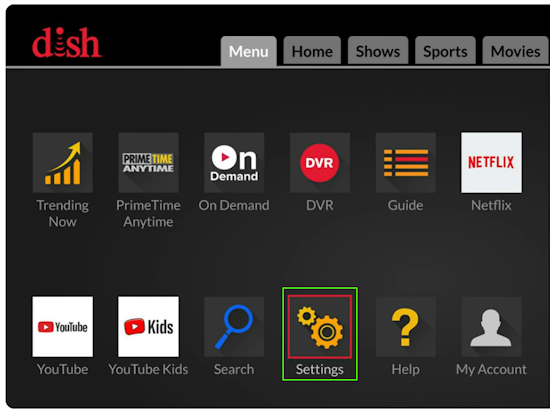 2. Within the “Settings” menu, select “Diagnostics”.  3. Within the “Diagnostics” menu, select “DISH 3” on the left.  4. Select “Test Installation 5” to start the Check Switch test. The “Check Switch Status” screen will show the progress. Next, the receiver should download the Program Guide. • Internet from satellites Starlink (SpaceX): Known for low-Earth orbit (LEO) satellites providing high-speed internet (up to 400 Mbps or more) with low latency, suitable for streaming. Internet on the go. T-Mobile AWAY is a mobile internet solution that's powered by 5G. Both Starlink and T-Mobile are reliable mobile internet solutions, but they are for different types of users. T-Mobile is ideal for RVs, campers, and frequent travelers who don't venture too far off the grid where Starlink is available off-grid where there is a clear sky and you can power the device. Where cell service is unavailable, Starlink is the answer but where cell service is available, you could be better off with 5G. Ever changing technology landscape Starlink has improved their antennas, reduced the size and built-in routers. "Starlink Mini" is about the size of a laptop and weighs about 3 pounds. It comes with a power adapter for a wall outlet or a portable battery such as the Jackery Explorer 1000 v2. It can also be powered by a small USB-C type portable battery such as the Anker Prime Power Bank 27,650mAh 3-Port 250W Portable Charger. A USB-C to barrel plug adapter cable can be used. The Starlink Mini does not need an additional router to function. It features a built-in Wi-Fi router directly within the antenna, allowing for a "plug-and-play" experience without extra hardware. The integrated system supports Wi-Fi 5 and provides enough speed for streaming, with a built-in Ethernet port available if a wired connection is desired. • Starlink Mini - Take The Internet Into The Wild Where to buy StarLink Mini: Best Buy or Home Depot or direct from Starlink.com Starlink Mini Setup: Plug in the power cord to the antenna and connect to power. Place the antenna in clear sky. Download the Starlink app to your mobile phone. Follow the instructions on orienting the antenna and connecting to the Starlink Wi-Fi. All Starlink internet plans and pricing (subject to change)
Call Starlink Support For phone support in English: Call (24/7): 888-GO-STARLINK (888-467-8275) Key Disadvantages of Starlink: Upfront Costs: The costs have come down from $600 to under $250 for the gear with some promotions even less. However, you still have to cover the initial cost. Obstruction Sensitivity: The system requires a clear, unobstructed view of the sky. Trees, buildings, or even minor obstructions can cause annoying service interruptions. Performance Inconsistency: Speeds can be volatile, with potential for slowdowns during peak hours or heavy network congestion. IP Location Issues: Websites may misidentify your location based on the ground station, not your actual location. Weather Sensitivity: Heavy rain, snow, or thick ice can degrade the signal or cause issues with the dish's self-heating feature. Alternate Providers Viasat: Offers speeds up to 150 Mbps, often preferred for its unlimited data plans and lack of strict, long-term contracts in some areas. Hughesnet: Known for affordable, reliable service using GEO satellites, with speeds up to 100 Mbps. They are considered a strong, budget-friendly option. • Cable TV is available at some RV parks. Connect a coaxial (RG-6) cable from provider to your RV coaxial input and out to the TV. Then go to "Settings" on the TV and to CHANNELS. Select "Cable" instead of "Air" to auto scan for available cable TV channels. Disadvantages - video quality can be poor. Not all locations have it available and channels can be limited. Many RV parks have unencrypted cable TV meaning you do not need a cable decoder box. Some RV parks have encrypted cable TV in which case you will usually need to rent their cable box receiver/decoder to get Cable TV. The park may require a deposit to ensure a return of the cable box. Connect the coaxial cable from the RV park to your RV coaxial input and then connect coaxial cable to the Cable box receiver/decoder. Next connect an HDMI cable from the cable box receiver to the TV HDMI input. Select the correct HDMI input on the TV. Select channels on the cable box receiver using the remote for the cable box. Cable TV at RV parks is becoming rare as RVers transition to their Wi-Fi or Satellite services for streaming TV. Some smaller RV parks may still have the legacy cable TV service. • Over-the-air broadcast TV is FREE and is available in the cities and surrounding areas. You need a VHF/UHF TV antenna. Channels can be limited. You must be within 50 miles or so of a TV broadcast tower. Every area you stop, the RV will require a scan for local broadcast channels. Using the TV remote control, press the Menu button or Home button. Select Settings (gear icon), look for the section with "Channels". Select "Air" and start the auto scan for channels. TV tower and channel locator tools: • FCC.gov • AntennaWeb.org • RabbitEars.info RV TV antennas for years have typically been the old style Winegard "Wing" manual crank up/down antenna. These TV antennas are manually operated to raise and lower by an inside crank. They are installed on the RV roof with a coaxial cable from the antenna through the roof and on to the TV coaxial antenna input.  1. To elevate the antenna, turn the ceiling crank clockwise about 13 full turns until you feel resistance. Pull down on the directional handle wheel and turn it to rotate the antenna toward the broadcast towers. 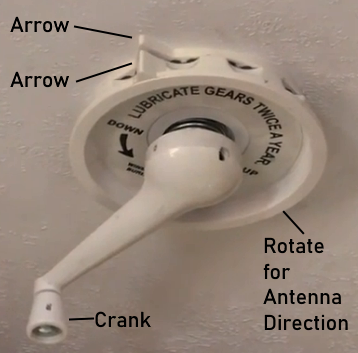 To Lower the antenna, align the front arrow on the directional handle wheel with the arrow on the ceiling plate. Next, turn the crank counter-clockwise until it stops and you feel the antenna "thump" into its travel cradle on the roof. Never move the vehicle with the antenna raised. 2. Tuning for Digital Channels Turn on the Booster: Press the tiny button on the 12V wall plate (usually near your main TV) to activate the internal antenna amplifier. The green LED light must be on, or you will get no signal. Aiming: Find the direction of local broadcast towers using an app like Antenna Point, point the antenna roughly in that direction, and run a channel scan on your TV. If you don't get a perfect picture, turn the directional knob 90 degrees at a time and re-scan for channels. The newer omni-directional low profile antennas have largely replaced the older RV TV antennas. If you do not want to drill holes in your RV roof for a TV antenna, you can use a portable outside TV antenna. The KING OmniGo is a portable, omnidirectional Over-The-Air (OTA) HDTV antenna designed for RVers, campers, and tailgaters. It receives VHF, UHF, and FM signals from all directions without needing to be aimed or rotated. The device does not require permanent installation, is designed to be used outside on a ground tripod mount and can be found at retail stores such as Camping World. The Winegard Air 360+ is a omnidirectional roof-mounted RV antenna that provides over-the-air (OTA) HD television and FM radio. It is "always on" and requires no manual aiming. It has a signal reception range of up to 55 miles. This device is a TV antenna by default, however, the upgrade models are pre-wired to support internet. Their housings contain hidden antennas dedicated to cell service (MIMO) and campground Wi-Fi. To unlock these internet capabilities, you must purchase and install a compatible Winegard Gateway Router (such as the GW-1000 for 4G or the GW-5G01 for 5G) inside the RV. Once the Gateway is attached to the ceiling port and synced with the Winegard app, it acts as a router. It can capture campground Wi-Fi signals and extend them inside your rig, or use a cellular SIM card to provide your own localized, private Wi-Fi network while on the road. • Your own sources for TV - Having a backup plan, more than one signal source, comes in handy when nothing else is available. VCR VHS tapes, Bluray/DVD movies, camcorder, laptop or cell phone video you provide. This works while traveling. Kids can still watch something on TV. A portable DVD player is very convenient for watching DVD movies. 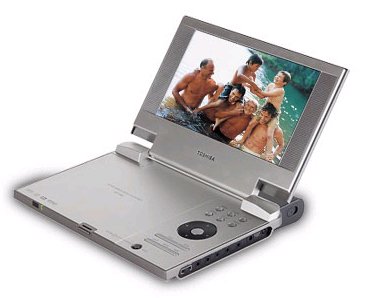 Previous Recordings for on the go TV Modern flat screen TVs can support USB flash drives with images and music files. You can record video sources using recorders such as the Cloner Alliance 4K video recorder. Connect your source device and record to a USB storage drive.  • Cloner Alliance.com • Cloner Alliance recorder YouTube video Any video you previously recorded on a laptop can be viewed on the TV by using an HDMI to HDMI connection from laptop to TV or by a wireless screen cast from laptop to TV. This can provide TV enjoyment on the go without any outside source. 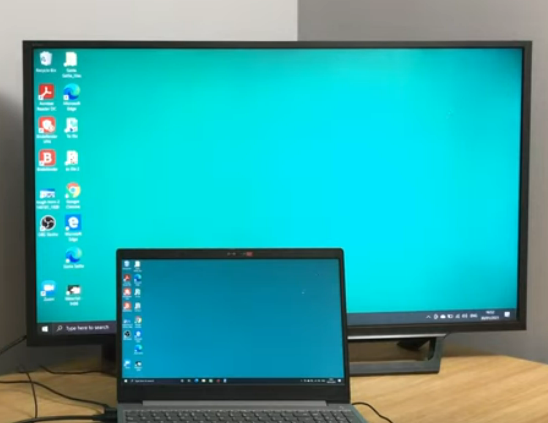 Free software for Windows and Mac computers for video recording • OBS software Screen capture any video you can play on your computer and then playback on the go in your RV. Another way to enjoy TV when you have no outside signals is using your Fire TV Stick. No, you do not need internet access because you can view videos stored on flash drives or external storage which are connected to a USB OTG (On-the-Go) adapter which is connected to the Fire TV Stick which is connected to the TV. • Fire TV Stick USB Storage for TV viewing • Internet TV - Wi-Fi is popular (Netflix, Hulu, Amazon video, classic TV shows) - Streaming is the most popular form of TV viewing and over 60 percent of the 13,000 RV parks in USA have WiFi available, many have free WiFi while some charge a small fee. All you need is a TV with built-in Wi-Fi or HDMI input or you can use a HDMI to RCA converter on an older TV, plus a streaming device such as ROKU or Amazon Fire TV. Sign up, load apps, connect to WiFi and you can watch movies, sports, news, YouTube. Some RV parks may not want everyone streaming and will limit the speed which may limit your ability to watch high quality video. • Cellular TV You can access your pre-recorded videos from your phone's storage and view anywhere without any outside signals or access streaming content from internet providers if you have internet access. Mobile phones average 128GB up to 1.5TB of internal storage but if you have plenty of images, data and music files on your phone, you may want to insert a MicroSD storage card into your phone for storing videos. MicroSD cards can store 1080p video at 30 fps for 24 to 30 hours of enjoyment. 1080p video at 60 fps for about 15 to 20 hours and 1080p video at 120 fps for around 8 hours of viewing. By using multiple MicroSD cards, you would have almost unlimited "on the road" TV viewing.  Are all microSD cards the same physical size? Yes, microSD cards currently available have the same physical dimensions (15 x 11 x 1 mm), although their storage capacities and speeds can differ significantly. This standardization ensures compatibility across a wide range of devices. Connect your mobile phone to TV using an adapter such as a USB-C to HDMI for your phone and an HDMI cable to the TV HDMI input. You can also wirelessly screen mirror your mobile phone to your TV screen with the latest TVs and mobile phones. Example: Samsung mobile phone to 2025 LG TV screen mirror - Wireless Phone Connection to TV  Mirroring your Samsung phone to an LG or Samsung TV is quick and easy using the built-in Samsung "Smart View" feature. Both devices must be connected to the same Wi-Fi network or use Wi-Fi Direct where no network is needed. Steps to Mirror your phone screen on TV screen: Ensure your Samsung phone and your LG TV are on the same wireless network. Swipe down from the top of your Samsung phone screen to open the "Quick Panel".  Select Smart View: Tap the Smart View icon. If you don’t see it, swipe left or right to find it, or tap the three dots to edit your button order. Choose Your TV: Your Samsung phone will scan for available devices. Select your LG TV from the list. If TV does not appear, make sure the TV Wi-Fi is enabled. Accept on TV: A prompt may appear on your LG TV asking to ALLOW the connection. Use your LG TV remote to select "Accept" or Yes. Tap "Start Now" on your Samsung phone to begin screen mirroring. To disconnect, go again to the Smart View icon and tap on it. The TV will now disconnect. Requirements: You will need your cell service nearby and an Unlimited Data plan so you do not run out of Gigabytes. Standard Definition uses up about 1 GB per hour and High Definition uses up about 3 GB per hour for 1080p video. Weak Cell Signals You can use antenna boosters for your mobile phone to get better reception. Every standard cell booster system consists of three main components working together. 1. The Outdoor Antenna: Mounted outside, on a roof, this antenna scans for and captures the faint, existing signal from the nearest cell tower. 2. The Amplifier (Booster Unit): The captured signal travels via a cable to the booster, which amplifies the signal to make it usable and strong. 3. The Indoor Antenna: Placed inside your space, this antenna receives the boosted signal from the amplifier and rebroadcasts it so your mobile phone can benefit from the stronger signals.  Cell booster connection diagram • HiBoost.com AT&T 5G Bands: 850 MHz (n5), 3.7 GHz (n77 - C-Band), 39 GHz (n260). 4G LTE Bands: 2, 4, 5, 12, 14, 17, 30, 46, 66. Note: Band 14 is used exclusively for FirstNet (public safety) and critical communications. T-Mobile 5G Bands: 600 MHz (n71), 2.5 GHz (n41), 24 GHz (n261), 39 GHz (n260). 4G LTE Bands: 2, 4, 5, 12, 25, 26, 41, 46, 66, 71. Note: Features a massive sub-6 GHz 5G footprint due to the integration of Sprint's Band 41 spectrum. Verizon 5G Bands: 700 MHz (n13), 3.7 GHz (n77 - C-Band), 28 GHz (n261), 39 GHz (n260). 4G LTE Bands: 2, 4, 5, 13, 46, 48, 66. How to Connect phone to TV Confirm your phone’s USB-C port supports video output. (Most modern Samsung Galaxy S/Note/Fold, Google Pixel 8+, and iPhone 15+ models support video). Plug the USB-C end into your phone and the HDMI end into an open HDMI port on your TV. Power on your TV and use your TV remote to change the Input/Source to match the HDMI port you used to connect (e.g., HDMI 1). Your phone screen should instantly appear on the TV so you can view on the big screen. • Cell Phone Download TV Watch TV on demand without any signal at all wherever you are. Your cell phone is the only source. Prior to traveling, download movies at home or download on the road at a retail store to view later. You can download videos many ways. One way to download YouTube videos is to sign up for YouTube Premium. Not all videos can be downloaded. Connect cell phone to TV using adapter for your phone (Apple iPhone or Samsung Galaxy etc.) and an HDMI cable or use a cable with USB-C on one end and HDMI on the other. • Cable USB-C to HDMI from Amazon USB C to HDMI Cable 4K, USB Type C to HDMI Cable Adapter for iPhone 15/15 Pro/Max, Samsung Galaxy S24/S23/S22/S21/S20/Note20, MacBook Pro/Air, iMac, Steam Deck, Surface, Dell and More-10ft Cable is plug and play. Connect USB-C end to phone and connect HDMI end to TV HDMI input. Select HDMI input port on TV using TV remote. 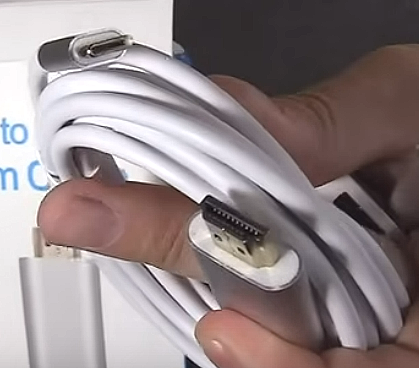 10 ft. cable connects phone to TV, USB-C to HDMI 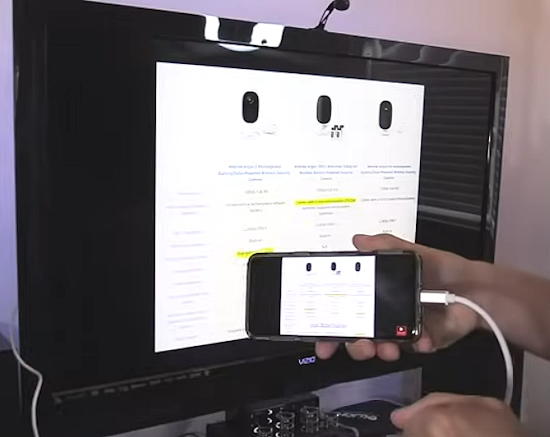 phone screen will display on TV, watch movies, view photos 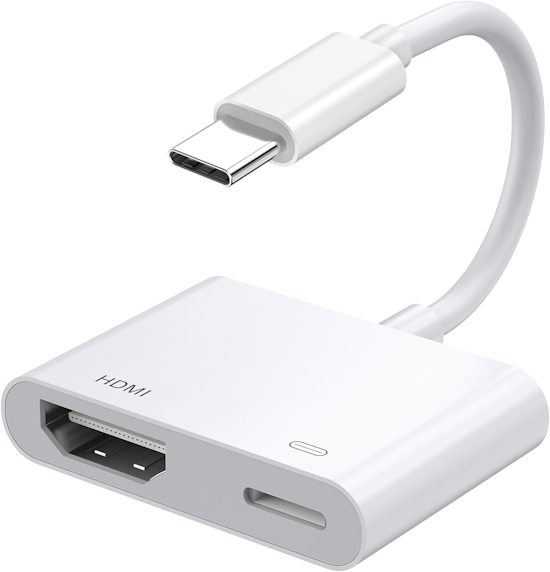 Adapter iPhone USB-C to HDMI for TV connection  Always be sure to select the proper HDMI source input on the TV using the TV remote (the hdmi port the phone is connected to). ON THE ROAD - 12 Volts Your house or apartment generally uses only one kind of power, AC or alternating current (120 volts at 15 to 20 amps or 240 volts at 15 to 50 amps). Your car or truck generally uses only one kind of power, DC or direct current (usually 12 volts). However, your RV uses two kinds of power, DC and AC. The AC power is available when your park at a RV camp and the DC power (12V battery) is what you have on the road away from utility power. RV Batteries Lithium (LiFePO4) is the most popular modern battery upgrade. They provide 100% of their usable capacity without dropping voltage, last for 4,000+ cycles (10+ years), and weigh up to 65% less than lead-acid batteries. However, they require special charging modes and some models can be damaged if charged in freezing temperatures. • 5 Best Lithium Batteries for RV • LiTime 12V 50Ah Lithium LiFePO4 RV Battery, Max. 15000 Deep Cycle Battery, 11.57lbs Ultra-Light, Perfect for Camper, Van How to Connect RV Batteries 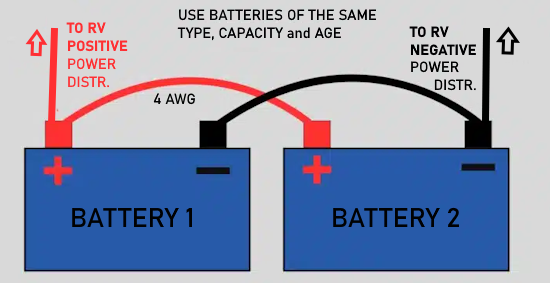 Portable Batteries • Jackery portable batteries Jackery portable batteries can be recharged using AC power, solar panels or 12V car (lighter socket) while driving. A small TV (24 in. to 32 in.) uses 20W to 60W which would allow a run time of between 10 to 14 hrs with the Jackery Explorer 1000v2. All you need is an antenna for over-the-air TV in 60 mile radius of cities or connect a DVD player for hours of movies. Recharge the Jackery over and over and it should last at least 10 years giving you off the grid TV enjoyment while also charging your phone, laptop, camcorder and other small devices. Almost all modern RVs are equipped with 110-120V AC (standard household) outlets. Standard household electrical outlets (historically called 110V but modernized to 120V provide either 15A or 20A (amperes) of current. They generally feature several outlets located in the kitchen, bathroom, bedroom, and near seating areas. However, how these outlets receive power depends on your setup. While plugged in: Outlets receive standard 110-120V power when your RV is hooked up to a campground pedestal ("shore power") or a generator. Some RVs have a built-in generator. Use an extension cord to connect to "shore power".  What is Shore Power? Shore power is an external power supply provided at campgrounds that allows your RV or trailer to connect with a utility power source. RVs are connected to a shore power pedestal with 30A or 50A RV shore power equipment, depending on the model of your RV. Adapters Q: What if only the 50A power outlet at the campgrounds is working and the 30A has an outage? A: You can use a 50A to 30A adapter plug. The adapter does not reduce the 50 amps to 30 amps. It simply routes one of the 120-volt "hot" legs from the 50-amp pedestal into your 30-amp plug. Your RV will only ever pull the 30 amps it is wired to handle.  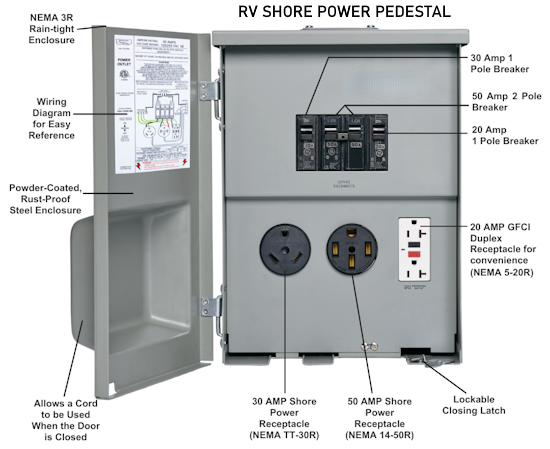 Your RV’s batteries use DC, or direct current electricity while out on the road. Since shore power pedestals provide AC, or alternating current electricity, your RV has a built-in converter to turn shore power from AC to DC current that can be used to charge your batteries. To ensure your batteries keep a healthy charge, regularly staying the night at a campsite keeps the batteries energy levels generally above 70%. Converter vs. Inverter Converter: Changes 120V AC to 12V DC (Charges batteries, runs 12V appliances). Inverter: Changes 12V DC to 120V AC (Allows you to run standard household appliances from your RV batteries) Why 30Amps is Necessary for RV Heavy Appliances: An RV air conditioner draws about 1,500W when running, and significantly more to start. A standard 15A household outlet leaves you very little overhead for other items. With a 30A hookup, you can comfortably run your A/C while using a microwave or heating element without tripping a breaker. Charging & Maintenance: It easily supports built-in converters charging your RV’s 12V batteries while powering your fridge, lights, and entertainment center. Power: A 50-amp cord has four prongs: two "hot" wires, one neutral, and one ground. 240V: Each hot wire carries 120V. Because they are out-of-phase with each other, testing them together yields 240V (which runs heavier items like central air conditioners). 110V: Each of the two hot wires functions as its own 120V feed when paired with the neutral wire. This gives you two separate 50amp zones for a total of 100amps of 110V power. Cost for RV park Costs vary widely to stay the night at a campground. Basic Campgrounds / Public Parks: $25 – $40 per night. Often located in state/national parks or government lands. Usually feature standard electric/water. Standard / Mid-Range RV Parks: $40 – $70 per night. Includes most full-hookup private parks (water, sewer, electric, Wi-Fi). Luxury RV Resorts / Franchises: $80 – $150+ per night. Includes premium networks like KOA Resorts, Sun Outdoors. Tips for Lowering Costs: Extended Stays: Booking weekly ($250–$600) or monthly ($500–$1,200) significantly reduces the nightly rate. Memberships: Utilize camping clubs like Good Sam, Passport America, or AAA for 10%–50% nightly discounts. Location & Season: Peak travel times (summer, holidays) and premium locations (e.g., coastal Florida, major tourist hubs) will push rates higher. RV Power Cords allow you to easily hook up your RV and enjoy shore power. An easy way to spot the difference between a 30A and 50A RV Power Cord is by looking at its prongs. 30A RV Power Cords will have three prongs rated for up to 120 volts of electricity. In contrast, 50A RV Power Cords will have a fourth prong to safely handle up to 240 volts of electricity. Your RV typically has a 30A or 50A electrical system. 30A systems are rated to distribute up to 3600 watts at 120V and can be used to power small or mid-sized RVs, making them the most common. 50A systems can circulate up to 12000 watts of electricity at 240V, making them a good choice for large RVs that require much more electricity. While unplugged: Standard 110V outlets will not work straight off just the RV batteries unless your rig is equipped with a power inverter. A power inverter is a device that converts direct current (DC) power from a battery or solar panel into standard alternating current (AC) power. This allows you to run everyday household electronics and appliances (like laptops, microwaves, and tools) in cars, RVs, or off-grid locations using a DC power source. Basic or smaller trailers usually require an inverter to turn your 12V battery power into 110V AC. • RV Electrical Systems: 12 Volt and 120 Volt Power TV with 110AC and 12 volts DC for power A 12V TV runs directly off a 12-volt DC power source, making it ideal for RVs, camper vans, boats, and off-grid living. Because they bypass the need for an AC inverter, these TVs are highly energy-efficient and highly resistant to vehicle vibrations, while often offering both 12V DC and 110V AC power options. How long will a TV run off a 12 volt battery? A standard TV will typically run for 10 to 30 hours off a standard 12-volt 100Ah battery. However, the exact runtime depends entirely on the size and wattage of your TV, the type of battery you are using, and whether you are using a power inverter. • Sylvox.com TV Family travel and watching TV - the kids may want to watch TV on the road so a 12V TV may be the answer as it runs off battery power. Another option is a power inverter to convert 12V to 110AC so you can run a regular TV. A few DVD movies on a long trip can give hours of TV viewing on the road. Portable DVD players have battery power and 12V. • 12Volt Travel RV Supply Powering the TV 1. Use an Inverter: Many standard TVs require 110V-120V AC power. If your RV has an inverter (a device that turns your 12V DC battery power into 120V AC), you can plug your TV into your existing wall outlets. 2. Portable Power Station: You can use a portable power station (like an EcoFlow or Jackery) to run a standard 120V AC TV. These are quiet, safe, and do not drain your RV's house batteries. 3. Use a 12V TV: Many RVers install a TV designed specifically to run on 12V DC power. They can be wired directly to your RV’s 12-volt electrical system or plugged into a 12V round cigarette-lighter style socket, if available in your RV, bypassing the need for an inverter. Because 12V power pulls straight from your house batteries, you can easily install your own 12V or dual USB-C sockets if your RV is lacking them. Many owners buy a 12V Socket Kit and wire it directly into the rig's existing 12V fuse box or splice into a nearby 12V LED light fixture. Any 12V RV socket kit that includes a USB Type-A port has a built-in "buck" converter (or voltage regulator) that safely steps down the 12V from your RV battery to the standard 5V required to charge USB devices. A buck converter or step-down converter, takes a higher DC input voltage and drops it to a lower, regulated output voltage while stepping up the current. 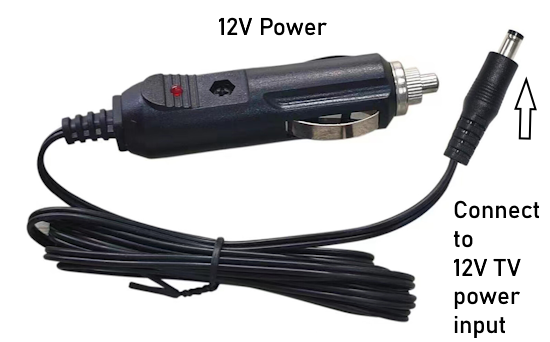 • Power Distribution Panel Wiring for RV Wiring in 12V TV into your RV AC and DC (12 volt) electrical distribution panel  There are many different power panel models and many different wiring configurations. Some power panels contain a converter and some do not. The converter may be located elsewhere in the RV. CAUTION - SAFETY FIRST If you work on power circuits, you always have to think safety first before anything else. Electricity can cause serious harm if you do not follow strict guidelines. Remove and disconnect all AC and DC sources of electrical power BEFORE working on wired circuits. When in doubt, hire a licensed electrician. When working on your RV power panel, always completely de-energize both the 120V AC and 12V DC systems to prevent fatal shocks or shorts. Unplug the RV from shore power (pedestal) and physically pull the power cord up near your entry door. Shut off the generator, turn off the inverter, and disconnect the negative terminal on your RV battery. Using an inverter to take 12V to AC power so you can run a standard 120V device is slightly inefficient as the inverter consumes some of the battery energy. A direct connection from 12V battery to 12V device will give you more run time. Wiring a 12V TV directly to the 12V fuse box portion of the RV power distribution panel is one way to operate a TV off grid and maximize operating time. 12V TVs usually include a power cable with a barrel connector at one end for the TV connection and a lighter plug at the other end for the power connection.  There are several ways you could connect the 12V TV to 12V battery. To access your RV batteries, you could connect the positive and negative wires of the TV's power cable directly into the RV's 12V DC power panel. Another option would be to install a nearby 12V socket, running the positive and negative wires to the power panel and having the socket close to the TV. This way the standard 12V TV power cord could just plug directly into the nearby 12V socket.  • How to Connect Wires • 120PCS Solder Seal Wire Connectors - Heat Shrink Waterproof Solder Butt Connector Kit • SEEKONE Mini Heat Gun WF-8930/50 Series Power Distribution Center  Wiring the DC Fuse Board Fuses - Bussmann type ATC  When adding devices to the power panel, insert a fuse into the circuit which is appropriate for the load. Calculate the amps: If you only have the TV wattage, use the formula Amps = Watts ÷ Volts. For example, a 60W TV running on a 12V system draws 5 amps. You should then add about 20-30% to account for surges, rounding up to the nearest standard fuse size (e.g., a 7.5A or 10A fuse). 15 Positive Circuits: These are the individual 12V fuse slots (e.g., F1 through F15) where individual positive wires from your RV appliances and lights are connected. 12 Negative/Neutral "Negative Bars": Instead of running 15 individual negative wires back, the panel uses a built-in Negative DC terminal bar. This single, unified ground block acts as the "negative return" for all 15 circuits, saving you the hassle of installing extra negative bus bars. The first two positive positions (F1 and F2) are for 30 amp fuses to run slide outs and other higher loads while the rest (F3 through F15) are for 20 amp max loads such as LED lights, fans, or 12V appliances. For a 12V TV, use 14AWG or 16AWG wiring. Make sure the converter/charger is OFF and the house battery is disconnected before beginning the DC wiring. Determine what DC loads are to be connected to the fuse board and what position they will occupy. Circuits F1 and F2 can be used for slide-outs or other higher current loads and can have a maximum 30 Amp ATO or ATC fuse installed. The remaining 13 circuits are general purpose and can have up to a 20 Amp ATO or ATC fuse installed. Make sure the fuses are seated properly. All models have lug screw connections. Strip approximately 1/4” of insulation from the DC load wires and insert the wire into the appropriate lug. Tighten the lug screw to the torque spec found on the back of the door assembly. Make sure all connections are tightly secured. • 12V TV Wiring in RV option 3 TV Options for your RV WiFi Internet TV - Streaming RV parks offer Wi-Fi but the service is often slow and unreliable. Many RV users are opting for StarLink Internet for a more reliable and faster service. Broadcast TV - Over-the-Air (OTA) television channels Since the 2009 switch to digital TV broadcasts, you need a digital TV or a digital to analog converter box for an older analog TV. Traditional TV reception has been over-the-air using a VHF/UHF TV antenna. With the 2009 transition to all-digital broadcast TV, things have changed somewhat. Now you need a digital TV or a converter box for that old TV. With a newer digital TV, you get an ATSC tuner built in, so you get digital broadcast TV and you do not need a converter box. Older analog TVs with an NTSC tuner need a digital to analog converter box so that you can get the digital broadcasts on that old TV. One important thing to remember is that most of the TV broadcasts are now on UHF. Very few are on VHF. What that means is you should have a very good UHF antenna. 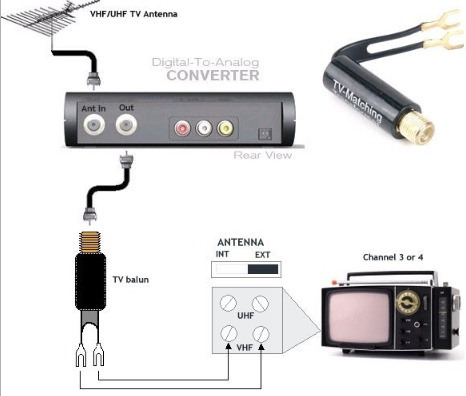 Older TV with only a twin lead antenna connection can use a balun 75 to 300 ohm to connect the coaxial cable. 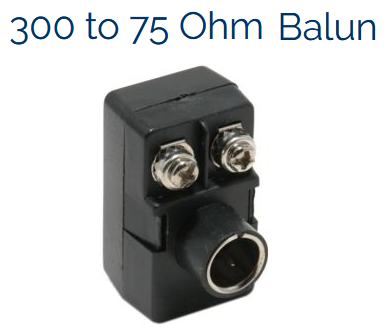 For older TV antennas you can use a 300 ohm to 75 ohm balun to connect antenna to converter box.  Many portable older TVs have a 3.5mm antenna input. You can connect the converter box antenna Out to the TV antenna input with an adapter. • How to hookup older vintage TV set without any inputs Q: Can I use a regular TV in my RV or do I need a special RV TV that can stand wide temp changes? A: You can use a regular TV. They work just fine. Make sure you have a way to power the TV (110-120 volt). Q: Can I have a Smart TV in my RV and get Netflix? A: Yes, and remember, any TV can be a Smart TV if wi-fi is available and you have an adapter. Q: Can I wall mount a TV in my RV? A: Yes, just have access to power. • Antennas • TV Reception and Antennas www.winegard.com Burlington, IA - 1-800-288-8094 or 1-800-788-4417 Winegard has been in business for over 50 years and offers many RV solutions for TV reception. Winegard has sold a roof-top antenna for over-the-air TV reception called the SENSAR. This antenna is mounted to the roof of the RV and folds down in the travel position. An elevating crank raises the antenna when ready to view TV. A coaxial RG-6 type cable connects the antenna thru to the inside of the RV using a weatherproof boot to protect the cable. The SENSAR 3 with WINGMAN accessory yields better UHF reception. The diagram below shows a basic wiring hookup with TV antenna, converter box and single analog TV. RG-6 cable connects antenna to converter box and converter box to TV. Select channel 3 (or 4) on the TV and tune channels on the converter box. 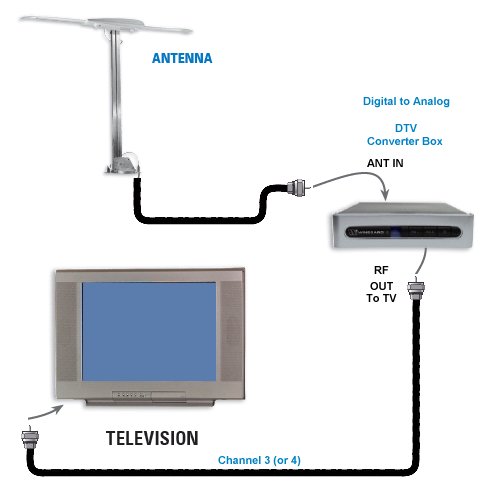 Digital to Analog TV Converter box • RF input; RF Output • Audio/Video Outputs Components: o VHF/UHF Antenna for over-the-air TV o DTV digital to analog converter box o Analog NTSC TV set. o Standard VHS VCR. o DVD Player o Video Switch box o Audio/Video RCA cables (1-yellow, 1-red & 1-white audio). o RF coaxial cables (RG-6). Hook up DIAGRAM - TV, DTV Converter box, VCR, DVD Player The DTV converter box will output your selected digital TV channel on VHF channel 3 or 4. The VCR therefore has to be set to channel 3 or 4. The VCR will output on channel 3 or 4 therefore the TV has to be set on channel 3 or 4. TV Channels are selected on the DTV converter box using the remote control for the DTV box. The DTV converter box will output on channel 3 or 4 (VHF) using the RF cable connection. VCR must be set to channel 3 or 4 if using the RF coaxial connection. ADD A VCR or DVD Recorder For recording the channel tuned on the converter box, connect the RF ANT IN and OUT jacks on a VCR or DVD recorder with a tuner as shown in the diagram below. You can also simply play a VHS tape (or DVD) to your TV. 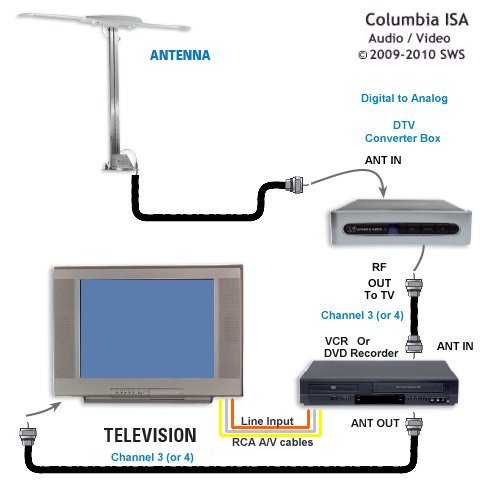 Two TVs - For two TVs, use a splitter with RG-6 coax cable. You would need a second converter box to view different channels on each TV. 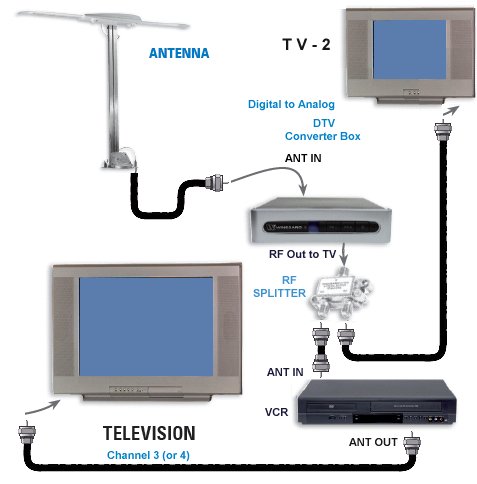 Combinations and more options A Video Switch Box is essential for more complex wiring and more options. RV Video Setup - Connect DTV converter box to TV Switchbox with DVD These setups show how to connect a DTV converter box with a VCR and DVD Player using a video switch box for multiple TV. Video Switch Box- A Video Switch Box is a standard device on most RV's and Campers. This box is used to allow the proper distribution of Coaxial Signals from equipment such as Antennas, Cable Service, DVD Players, and Satellite Receivers, through the selector switches to multiple TV's. The standard is a 5-to-3 box. This means it allows the user to distribute the signals from five signal sources to three different devices. 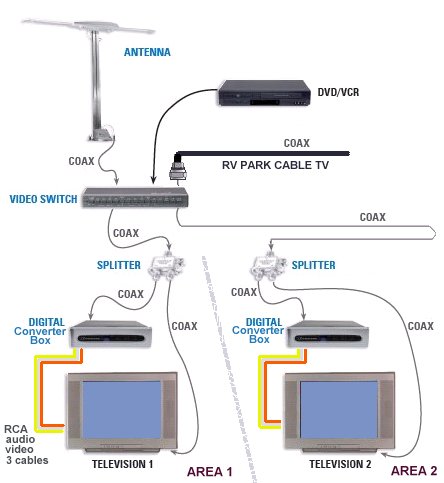 VIDEO SWITCH BOX 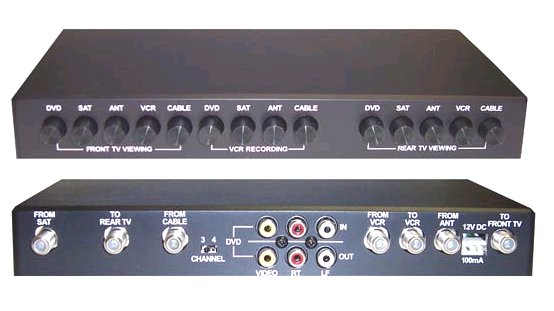 Winegard VS-5312A RV Camper Video Signal Selector Switch - DSS DBS Satellite Dish Off-Air HDTV Channel TV Antenna, 5 IN / 3 OUT Power Passing Audio Component Entertainment 12 Volt Distribution. Winegard’s Entertainment Select line of video switches makes selecting television programming easy. With a push of a button, you can watch different programming on two TV sets, whether programs are received from TV antenna, VCR , Satellite TV, Cable TV, or Auxiliary. In addition, you can be recording your favorite program on your VCR while you’re watching another program. The power supply is incorporated into the video switch so no wall-mounted power supply is needed! Features: 5 Inputs Include: Satellite Receiver, HD TV Antenna, Cable TV, AUX/VCR/DVD. 3 Outputs Include: Main TV, Second TV and VCR/TV3. Built-In Channel 3/4 DVD Modulator allows independant veiwing of signals at 2 different TV's with an additional recording option to a VCR, or when Not using a VCR it allows a third TV output. A special DVD Loop Through feature with a 1K/75oOhm slide switch allows easy hook-up to a Stereo TV or Surround System for enhanced audio and video performance. Built-In +12 V power supply eliminates the need for separate wall-mounted TV antenna power supply. Compact Size fits easily into overhead cabinets. Over-the-air TV reception involves many components and factors. Getting a good picture on your TV means having a good antenna and a good tuner. TV reception over-the-air is only good for about a 60 mile radius from the broadcast tower. So you have to be close enough to the tower to get the signals. Broadcast TV is also somewhat directional. This means you should be able to rotate your TV antenna to pick up signals. Generally an outdoor antenna works better than an indoor antenna. One of the best aspects with over-the-air TV is you can get High-Definition video which is better than cable or satellite. Cable TV and satellite TV have High Definition also but usually these signals are compressed so much you lose resolution. Of course the other benefit of over-the-air TV is its FREE! The problem with broadcast TV is once you travel outside the broadcast tower range, you get no TV reception. You can play a DVD or watch camcorder video on your TV but that is all. What you need is more coverage area. Enter satellite TV. SATELLITE TV IN MY RV Get many more channels and not be limited to metro area reception. Setup your satellite antenna at your stop-over location or get satellite TV on the road as you drive along. There are several solutions from satellite providers for TV, including the DISH Network Tailgater and many more. Carryout Portable Satellite TV Antenna - Winegard GM-1518 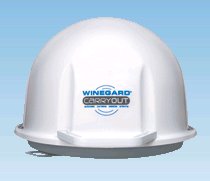 • Carrying Handle • Lightweight 14 lbs. • plugs into satellite receiver with coax cable • 12VDC power • View one satellite at a time • Supports two receivers • Stationary use only. Carryout antenna will not function while in-motion. • Switch settings allow change to Dish Network, DirecTV or Bell with DirecTV the factory default. • The Carryout antenna will toggle between the primary or alternate satellites for either DISH Network, BELL TV or DIRECTV. All have programming on more than one satellite. When a channel is selected on the remote control and it is not on the satellite currently selected, the unit will automatically toggle to the correct satellite. • Use with Dish Network 110°, 119°, 129°, DirecTV 101°, 119°, Bell 82°, 91° Will not receive DirecTV HD channels at 110° or Ka band 99° or 103° • DIRECTV receivers must be set for oval dish 2 sat selection to enable toggling between primary 101°W satellite and alternate 119°W satellite • Connecting the Carryout SAT Antenna to the Cable TV entry port on your RV: Generally, the port on the side of an RV is designed for Cable TV and the cable from this port runs through the wall plate for the over-the-air antenna or through a video distribution system. Satellite signals will not pass through these circuits. The only thing that can be between the Carryout SAT antenna and the satellite receiver is coax. Therefore it is important to make sure that the cable from the external port by-passes everything and runs directly to the satellite receiver. • There are certain areas within the U.S. where the Carryout antenna may experience limited or no coverage. • Depending on receiver type and location, you can access satellites DISH Network 129°, 119°, 110° or 61.5° DIRECTV 119° or 101° BELL TV 91° or 82° See Lyngsat.com What programs are available on various satellites. HD usually requires certain satellites from the provider to be receivable by your dish antenna and your satellite receiver must be able to tune and decode these signals. You also need an HDTV with 720p or 1080p video resolution. Plasma or LCD HDTVs usually have this resolution but always check. HD video requires an HDMI cable connection to your HDTV from the receiver box. You could also use the 3 cable RCA component video cable connection. The standard yellow video RCA cable is no good for HD. Also your receiver box must be HD not SD. HD receivers can process HD and SD but SD boxes can only process SD (standard definition). • Audio Video Cables - Types The new satellite receiver boxes have often eliminated the Coaxial Signal output connector on the box. If you have older TVs in the RV, pre-wired with coax cable connections, you may have a difficult job getting cable from the receiver box to your TV, particularly for HD video. This is something to consider. You also may need a video switch box with the newer connectors. Satellite TV providers: DirecTV, Dish Network, Bell, Shaw (Canada) Dish Network Tailgater Dish Network Tailgater The Tailgater® is an automatic portable satellite HD TV antenna that lets you watch HD TV wherever you are—in the parking lot of the big game, on a camping trip, or in your RV. Compatible Receiver Models: 411, ViP® 211, 211k, 211z Price: $350 standalone Tailgater Antenna only (if you already have a compatible receiver)$499 antenna with ViP 211z receiver bundle (if you do not already have a compatible receiver)  The Tailgater antenna is portable, lightweight (10 lbs.) and automatically points to satellites 110°, 119° and 129°. It all connects with RG-6 coaxial cable. The Tailgater Antenna draws power from the receiver through the coax cable. The receiver requires 110VAC power. Some people use a portable generator outside like the Honda EU2000. Call 1-800-333-3474 for programming plans. Typically $45 per month for 120 channels with options up to $105 per month for 250 channels. High Definition adds $10 and Premium channels add $15 per month. With Pay-As-You-Go TV, there is no contract required, so you pay only for the months you use. When the season is over, simply stop your service without penalty. For RV customers, no credit card is required, no SSN and no activation fee. Search Columbia ISA SEARCH *** Columbia ISA Audio/Video • DVD Recorders with built-in digital TV Tuner See more... • Input Select on TV and other devices • Cable hookup digital cable and TV • Audio Video Connections and cables • HDMI Versions • HDTV hookup options • HDTV basic setup • See over 100 hookup diagrams Columbia ISA Audio Video Empowering consumers through information Contact: columbiaisa@yahoo.com • HDTV Antennas • Surround Sound • Audio and Video cable connections • Best HDTV • Bluray surround sound • Bluray players internet Netflix • Bluray BD-LIVE • Bluray HDTV • Bluray Samsung players • Bluray Sony players • Bluray Sony players • Hookup cable box VCR • Cable connections • Cable connections cable TV • Cable connections DVD • Cable connections HDTV • Hookup diagram DVD recorder • USB • Camcorder Formats • How to choose a camcorder • Audio cassette to PC copy • CRT Phosphors • Analog TV VCR hookup diagram • Satellite and Cable TV • HDMI switch A/V receiver • Hookup DVD Tivo switchbox • Digital tuner U.K. • U.K. freeview • Cable TV Music channels • Hookup diagram Bravia Xbox 360 • Satellite DVD TV hookup • TV VCR DVD Cable diagram • Combo HDTV satellite hookup • Hookup DVD cable box • FTA TV DVD VCR diagram • HDTV HDMI hookup diagram • HTIB VCR TV hookup • Hookup iPod to Stereo • Playstation • Sat TV DVR • Hookup TV 2VCR • Hookup TV DVD A/V receiver • Hookup diagrams Index of 100 • DVD connections • DVD FAQ • DVD Glossary • How to connect DVD player • How to connect DVD player • How to connect DVD player • How to connect DVD player • DVD Introduction • DVD Players • DVD player buying • DVD player connection • DVD Primer • DVD RF Modulators • DVD Sound • DVD • DVD player trouble • Easy HDTV hookup guide • Easy DVD hookup guide • HDMI switchbox • HDMI Versions • HDTV Panasonic • HDTV Samsung • HDTV SONY • HDTV SONY • HDTV Buying Guide • HDTV Facts you should know • HDTV Screen Size • HDTVs under $500 • Home • How to hookup camcorder • Hookup diagram HDTV DVD surround • How to add great sound to HDTV • How to add great sound 5.1 • How to buy a pre-paid cellphone • How to buy a pre-paid cellphone • How to buy a pre-paid cellphone • How to buy a pre-paid cellphone • How to buy a pre-paid cellphone • How to hookup audio/video receiver • How to install cable DSL modem • How to install HD cable box • How to install PCI card • How to setup surround DirecTV • Internet-Ready TV • How to connect laptop to TV • LED HDTV • Network Windows PC • Home Network • How to connect PC to Stereo • Picture in picture TV • How much does it cost to run my TV • RF Modulator • RF Modulator Hookups • Samsung HDTV • SEARCH • Sound recorder Windows • Surround Sound • Surround Sound Glossary • How to hookup surround sound • Surround Sound using HDMI • How to hookup TIVO • TIVO video recorder • TV DVD VCR Hookup • TV hookup Cable Antenna • TV introduction • Satellite diagrams • Satellite hookup • VCR and cable hookup diagrams • VCR Basics • VCR basics 2 • VCR HDTV hookup • Video connection diagrams • Video RF Modulator • Video switch box |