|
|
| Columbia
ISA home –
› 100 Wiring
Diagrams How to Hookup a TIVO DVR TIVO 4K Streaming with voice control • Tivo Series 2 for 2001 • Tivo Series 3 HD for 2007 Tivo Series 4 for 2010 • Tivo Series 5 Roamio for 2014 • TIVO Premiere setup/hookup Go to HDTV hookup Existing TiVo DVRs still work, but their future is limited. TiVo officially discontinued the sale and manufacturing of all consumer DVR hardware. However, the company continues to support currently active devices. The final standalone DVR model released by TiVo was the TiVo Edge in 2019. Existing TiVo boxes (such as the Roamio, Bolt, and Edge) will continue to receive guide data and function. If your unit is already activated with a subscription, it will record Over-The-Air (OTA) broadcasts or function with a CableCARD provided by your local cable company. You can no longer buy new TiVo boxes or accessories directly from the company, as all remaining inventory has been depleted. Cable providers are increasingly phasing out CableCARDs, which will eventually render cable-based TiVo models unusable. Because no new units are being made, aging hard drives and internal components mean that once an active box breaks down, it cannot be replaced with a new TiVo. If you are looking for modern alternatives that don't require expensive monthly subscriptions, consider switching to modern hardware-based DVRs like Tablo or ZapperBox. Help! How do I hookup my TIVO DVR.... Where do all these cables go? Which cable do I need for .... sound familiar? Having trouble connecting your TIVO? Well, you are not alone. Connecting a TIVO is not difficult. Actually, once you learn the basics, you should be able to setup your gear just fine. Introduction Connecting TiVo to a Cable or Satellite Box When TIVO digital video recorders first arrived back in the late 1990s, the idea was to record TV shows and watch them later on your own schedule. TIVO would record your TV programs for you automatically according to a downloaded schedule which was current with the calendar day by day, hour by hour and TV show by TV show. TIVO "knew" the channel to record, the time to record and it kept all the video on an internal hard disk drive. TIVO worked with any TV and worked with an antenna or analog cable TV box. These were the stand-alone TIVO Series 1 models. A few years later, a number of improvements were made and the result was the TIVO Series 2 model. The new model was faster, had a bigger hard disk for more TV shows than before and had more connectivity. 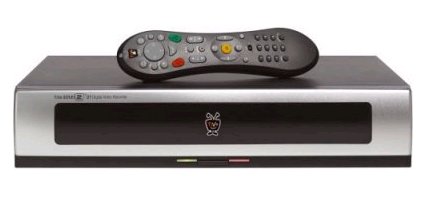 TIVO SERIES 2 DVR With the popularity of satellite TV and cable TV growing, things started to get a little more complicated. The satellite TV providers incorporated the TIVO functionality into their own receiver boxes. With over-the-air local broadcast TV or analog cable TV you did not need to unscramble or decode the TV show in order to record. The TV tuner in your TV or TIVO could get the TV show "in the clear" without any additional hardware or software required. Satellite TV and digital cable TV is not free and the providers try to ensure that nobody steals their programming by encrypting or scrambling the signals so as to make them unviewable unless you have the authorized gear to unscramble the signals. This means having to use a tuner/receiver which is capable of decoding the signals. Your pay TV provider, satellite or cable, will typically rent their receiver to you on a monthly basis. Well, now you've got a challenge because your TIVO must do extra duty. With the addition of your pay TV tuner/receiver (to unscramble your TV channels), the stand-alone TIVO has to change channels on an external tuner instead of it's own tuner. You also have to connect the satellite/cable box to your TIVO so you can get the unscrambled video and audio signals. How does this work? The biggest obstacle is getting TiVo to change the satellite/cable box's channels. Letting TiVo change channels on a cable or satellite box Normally, when watching TV through a cable or satellite TV box, you change channels with the satellite/cable box's remote. This presents a problem for TiVo because it must change the box's channel to record your shows. How can TiVo change the channels without being able to push buttons on a remote control? TiVo uses one of two methods: a "Serial Control" cable used by some satellite boxes, or a "mini-remote on a string" called an "IR (infrared) Control" cable that works with most satellite and cable boxes. Method 1: Hooking up a Serial Control cable A few satellite TV boxes let you plug in this cable so that TiVo can change its channels. 1. Examine the back of your satellite box for a "serial port" connector. This jack has either 9 or 15 tiny holes. If you see a 9-hole connector, look for TiVo's Serial Control cable with the 9-pin connector and proceed to Step 2. If you see a 15-hole connector, go to an electronics store and buy a "15-pin male to 9-pin female" adapter and push it onto the end of TiVo's included serial port connector. 2. Push the larger end of the TiVo serial cable into the plug on the back of your satellite box. The plug's pins should align perfectly with the holes. If they don't, you're plugging it in upside down, or you need the adapter discussed in the previous step. 3. Plug the cable's other end into TiVo's Serial Connector port. Then tell TiVo to use the "serial" connector for changing channels when you run TiVo's onscreen "Guided Setup." Once you've connected TiVo to your satellite box, hide the satellite box's remote. TiVo's now responsible for changing channels, so stick with TiVo exclusively. If you accidentally press a button on the satellite box's remote while TiVo's recording a show, you might change channels in the middle of your recording. If this setup sounds too complicated, or you can't find those connectors, don't worry. Use the IR (Infrared) Control, described next. It works for most satellite/cable boxes, but sometimes needs a little extra adjustment. Method 2: Hooking up an Infrared Control cable IR Control is a fancy name for the "mini-remote control on a string" that TiVo uses to change channels on your cable or satellite TV box. When you fasten TiVo's little IR Control cable in the right place on the front of your cable or satellite TV box, TiVo uses it to beam invisible signals to tell the box to change channels. Follows these steps to set it up: 1. Locate the IR Control (Infrared Control) cable packaged with your TiVo. The IR Control cable is black; one end has a little pointed connector, the other has two small angular plastic arms. 2. Locate the infrared receiver on your cable or satellite TV box. Almost invisible, it's always on the box's front panel, usually behind a semi-transparent plastic window. 3. Fasten TiVo's infrared control arms above and below the cable or satellite TV box's infrared receiver location. Let the two arms hang about 1 inch past the box's edges. Use pieces of double-sticky tape to fasten each control arm to the box. 4. Plug the cable's other end (usually purple) into TiVo's IR jack. Then tell TiVo to use the "IR" connector for changing channels when you run TiVo's onscreen "Guided Setup." 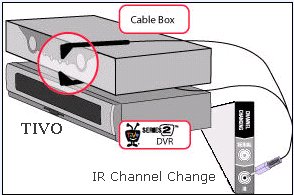 TIVO can run tests to determine which channel changing codes will work for your particular tuner box. This process can be time consuming and there is always the possibility you will not find the codes that work on your box. If you run into this problem, you can try contacting the TIVO company, look on TIVO's website, read your owner's manual or read the online TIVO forums to see if you can find the proper codes. Others have experienced this problem. Sometimes you can find the answer in these discussion groups. Major cable TV providers typically have used boxes made by Motorola or Scientific Atlanta. The codes below show possibilities which could be correct for your particular receiver box.
The TIVO Setup Guide process also has an Advanced Channel Changing Setup procedure and troubleshooting guide you can follow to attempt to find your codes for IR channel changing. Even if you find codes that work on your box, problems can still occur. Sometimes you have to use a cover or "tent" over the arms to prevent unwanted signals from interfering with the normal channel changing commands. Look at the TIVO website under Customer Support for this procedure or search online. Around 2004-2006 we started to see the idea of TIVO DVR being included in the satellite/cable boxes rented to customers. DirecTV for example had models with a built-in TIVO. Part of the reason for this involves the "pay-per-view" service offered to customers. Cable TV providers are moving towards a "two-way" communication path where the consumer will send data to the cable company as well as receive information. The provider company increasingly is managing a proprietary environment. This means "add-on" products like a stand-alone TIVO could become incompatible with the provider's environment over time. High Definition TV is becoming more and more available and the TIVO Series 3 model is designed to record HD video as well as SD or standard definition video. Contact TIVO Inc. Contact Tivo Questions about buying a TIVO call (877) 289-8486 or (877) BUY-TIVO Corporate Offices 2160 Gold Street P.O. Box 2160 Alviso, CA 95002-2160 TiVo Customer Support Live agent support available: Monday - Sunday 7:00 AM - 8:00 PM Pacific Phone number: 877-367-8486 TiVo-Manufactured DVR Technical Support 24 hour automated support: 877-367-8486 Phone number: 877-367-8486 Hours of operation: Monday - Sunday 8:00 AM - 8:00 PM Pacific DIRECTV DVR with TiVo Technical Support Phone number: 800-DIRECTV (800-347-3288) Hours of operation: Monday - Sunday 24 hours a day Routing the sound and video to TiVo and your TV After TiVo's connected to your telephone line and your cable or satellite TV box's channel changer, you've completed the hard part. Now TiVo needs to get the sound and video sent by your satellite or cable box. Finish up by connecting TiVo's audio and video outputs to your television. Follow these steps to send the box's information to TiVo and let TiVo send information to your TV set: 1. Examine your cable or satellite box's Video Out connectors. 2. Connect the best video cable connection between the satellite/cable TV box's Video Out jacks to TiVo's Video In jacks. Use S-Video if your box offers it; otherwise, use the yellow RCA/composite cable. Note: High Definition requires HDMI or component video connections. 3. Examine your box's Audio Out jacks. You'll probably use the red and white RCA/composite cables. Only a DirecTV TiVo can record in Dolby 5.1 Surround Sound. Standalone owners should ignore Surround Sound outputs on their cable box, no matter how tempting, or else their sound won't match the video. 4. Connect the appropriate sound and video cables between TiVo's Audio Out and Video Out jacks to your TV's Audio In and Video In jacks. Red is for the right channel, and white is for the left. If your TV doesn't have stereo sound, plug in one of the two jacks and leave the other dangling. If your TV offers S-Video, connect an S-Video cable between it and TiVo's S-Video Out. (Leave the yellow cable dangling.) No S-Video? Then use the yellow RCA/composite cable. If your TV only offers an Antenna or RF In jack, connect a cable between that and TiVo's RF Out jack. (Only one cable will fit, and it carries both sound and video.) Tune your TV to channel 3 or 4 to see TiVo. Depending on your component setup, brand of cable or satellite box and your TV type, your hookup will be something like the one shown below. 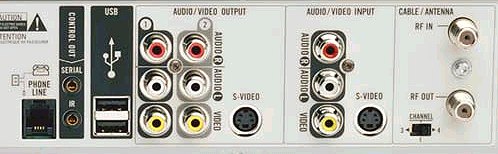 TIVO REAR PANEL - Series 2 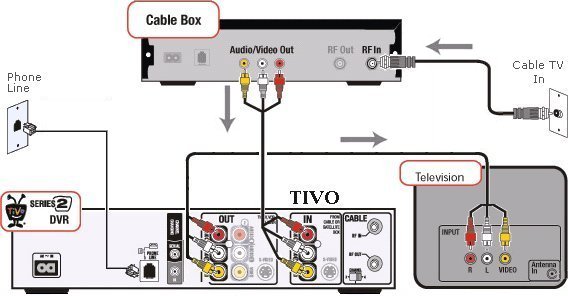 TIVO video recorder Audio / Video Connector and cable types • See over 100 hook up diagrams • Cable Types Digital Cable, High Definition, TIVO HD DVR Series 3 Digital cable gives you more channels than standard analog cable TV and the possibility for High-Definition TV. The TIVO company introduced their new DVR, the Series 3, around the Sept. 2006 time frame. It was the first cable-compatible TiVo to record high-def programming. The $800 price tag was not attractive to potential buyers when cable companies provided HD DVRs for just a few extra dollars added to the monthly bill. But the TiVo HD, except for a smaller hard drive and more-generic cosmetics, delivers, essentially, the same feature set as the Series 3 model for a much more reasonable $300. It was released in July of 2007. Designed to work with antennas or digital cable via cable card(s), these units will also not work with any cable boxes or satellite system. The TiVo HD's CableCard compatibility still means sacrificing video-on-demand and any other interactive functionality your cable company offers. TiVo usage still entails an additional fee, ranging in price from $8.31 to $16.95 a month.  TIVO Series 3 • No satellite TV compatibility: The TiVo HD is designed to receive only cable and over-the-air antenna broadcasts. It will not work with DirecTV and Dish Network satellite receivers. • Over-the-air antenna recording: In addition to, or instead of, cable TV, the TiVo HD can receive and record standard-definition and high-definition TV signals via an antenna hookup (both analog NTSC and digital ATSC broadcasts are supported). • Pause and rewind live TV: Like all previous TiVos--and all other DVRs--TiVo is always buffering live TV, so you can pause and rewind anything you're watching. • Full resolution and aspect-ratio control: The TiVo HD offers a full range of resolution controls. Component and HDMI output resolutions can be fixed to any standard resolution (480i, 480p, 720p, or 1080i) or--if your HDTV has the scaling wherewithal--you can send the unmodified, native resolution of the channel as well (e.g. 720p for ABC, ESPN, and Fox; 1080i for CBS, NBC, and HDnet; 480i for standard-definition programming). Likewise, flexible aspect-ratio control lets you stretch, zoom, or pillarbox non-wide-screen programming, and you can set the pillarbox colors to gray or black, according to your preferences. 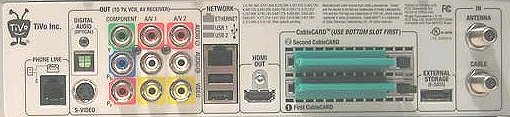 TIVO HD REAR PANEL The High Definition Tivo has a HDMI output for HDTV sets. Also component video and composite video outputs for VCRs and DVD recorders or standard TV sets. 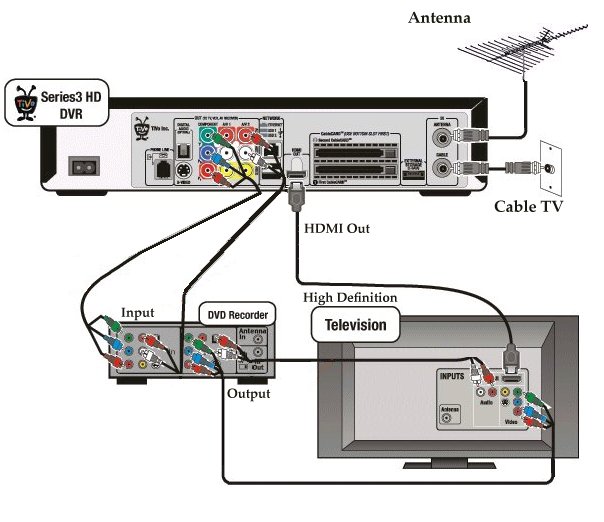 TIVO HD Series 3 HOOK UP DIAGRAM to HDTV Once you connect the TiVo HD box to your TV and cable line, it automatically commences a 30- to 45-minute guided setup routine. For the most part, the onscreen interface is all but identical to that of earlier TiVo models. Like the TiVo interface itself, the guided setup is largely idiot-proof. The system verifies that your AV cables are correctly connected and that your TiVo is online via phone line or broadband so that it can access the electronic programming guide. Two CableCARDs (either S-Cards or M-Cards) must be installed in the Series3 HD DVR and activated by your cable provider before you can view and record two digital cable programs at once (including high definition cable programs). If you install only one card, you will be able to view/record only one program at a time. Many cable providers are installing only M-CARDs. Series3 HD DVRs require software version 8.0.1c or later to use M-CARDs. Some DVRs are shipped with an earlier software version, so be sure to run Guided Setup before CableCARD installation. TIVO basics: The TiVo HD's main goal is to record and play back TV shows. TiVo invented the hard disk DVR (digital video recorder) concept in the late 1990s, but since then every cable and satellite TV provider offers their own DVR inside their set-top-box. Basic features are as follows: Dual-tuner HD recording: The TiVo HD has two CableCard slots. Once the cards are installed (it accepts either two standard CableCards or a single multistream "M-Card"), the TiVo HD can record any of the channels (analog or digital, standard or high-definition) offered by your cable TV company. The important exceptions are video-on-demand programs as well as any channels using SDV technology. You can toggle back and forth between the two tuners by hitting the Live TV button on the remote. Over-the-air antenna recording: In addition to, or instead of, cable TV, the TiVo HD can receive and record standard-definition and high-definition TV signals via an antenna hookup (both analog NTSC and digital ATSC broadcasts are supported). Pause and rewind live TV: Like all previous TiVos--and all other DVRs--TiVo is always buffering live TV, so you can pause and rewind anything you're watching. 30-second skip: A quick and easy hack enables a 30-second skip feature on the TiVo HD. Once enabled, it makes skipping through commercial breaks on recordings as easy as tapping a button on the remote a few times. This feature won't be found on many--if any--cable company DVRs. EPG: All digital cable and satellite boxes and DVRs offer an onscreen EPG (electronic programming guide), but TiVo's steps it up a notch, with a degree of customization and configuration that most cable company DVRs don't offer. The guide extends 14 days into the future, and it can be displayed as a standard grid or as a split-screen "Live Guide," which breaks out several hours of program info from each channel on the right half of the screen. Season Pass: The TiVo Season Pass function lets you record every episode of a favorite show within the parameters you set. For instance, you can record every Law and Order episode on any channel and keep only the five most recent episodes, or you can record only the new (nonrerun) episodes in prime time, or both. This function has mostly been co-opted by other DVRs, but TiVo's Season Pass is generally more accurate and reliable than other cable DVR models, especially at delineating between new episodes and reruns. Wish List: The Wish List is just what it sounds like: you choose an actor, director, genre, or keyword, and TiVo will record any program that meets that criteria. Again, this feature is also starting to show up on other DVRs, but TiVo's implementation still tends to be more user-friendly. Universal Swivel Search: Earlier TiVos had a perfectly fine search function, but the company has upgraded the feature with something called Universal Swivel Search. In addition to being able to search on titles, actors, directors, and genres, Swivel Search adds cross-referenced lists, keywords, and related programs. TiVo Suggestions: By default, TiVo also uses your TV downtime--overnight, when you're at work, and so forth--to record programs based on interests you express by using the thumbs-up and thumbs-down button on your remote. The more you vote on your viewing choices, the better your TiVo will become at finding similar, related programming, which it duly labels TiVo Suggestions. Some may object to this functionality as invasive or overkill--which is why it can be easily turned off. KidZone: For parents looking for an easier way to control their children's viewing options, TiVo's KidZone function creates a walled garden of family-friendly viewing choices. Once engaged, the safe zone will let children watch only the shows and recordings you deem appropriate. Meanwhile, your own programs remain safely hidden from view until you disable the password-protected filter. As such, KidZone goes above and beyond the simple ratings and channel lockouts available on other set-top boxes and TVs. The TiVo HD has the standard dimensions of a DVD player and will fit in any component rack. There's no fancy OLED display (as seen on the Series3), but the front readout does have bright LEDs to indicate when the tuners are recording or when the unit is downloading material from the Web. Likewise, the output resolutions (720p, 1080i, and so forth) are clearly indicated. Home theater purists can enter the TiVo HD's settings menu and completely darken everything but a single power LED. The CableCard slots are behind a flip-down door on the front panel, which is far more convenient than the rear-panel arrangement of the Series3. Notably, the TiVo HD is compatible with the new multituner M-card standard (dual tuners on a single card), or it can take two single-tuner CableCards instead. The TiVo HD's rear-panel is mostly similar to the Series3 model's. Thanks to the CableCard tuners, you need only connect the RF cable wire from the wall to the back of the box. A second RF jack accepts an antenna connection, so you can pull in analog and high-def channels over the air as well. You can use either--or both--cable and antenna sources. You'll need to connect the HDMI and component outs in order to get a high-def picture, but the box also includes a full set of composite A/V outs for pairing with DVD recorders or VCRs, or even with older non-HD TVs. There's also a single S-Video output and an optical digital output (surround sound is available via the optical out or--if your receiver supports it--HDMI). On the networking front, you can opt for Ethernet or use one of the two USB jacks to connect the Wi-Fi adapter. Rounding out the back panel is the eSATA port and a nearly silent cooling fan. TIVO ROAMIO DVR 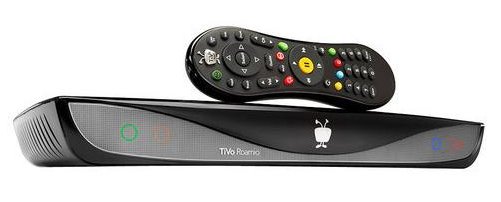 TIVO Series 5 DVR 2014 Roamio The TIVO Roamio comes in several models with retail prices $200 ($145 Amazon), $400, $600 and all have built-in WiFi. Record up to 6 shows at once.
Does not work with AT&T U-Verse or satellite. You must obtain a cablecard from your provider to use their encrypted cable channels. CableCard is inserted into the TIVO DVR and the card must be activated.
For your TV, connect with HDMI cable from TIVO to HDTV or for old TV, connect TIVO using a breakout cable. Connect coaxial cable to TIVO from antenna or cable company. Internet connection (wired or wireless) uses Ethernet cable or wireless router. Activate TIVO service. www.tivo.com/activate or 1.877.367.8486 Next you power on TIVO and navigate the setup process. 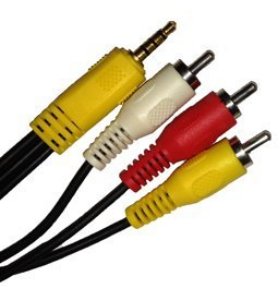 Breakout cable sold separately $14.99 at Amazon.com For old TV connection (video and audio) and the TIVO Roamio 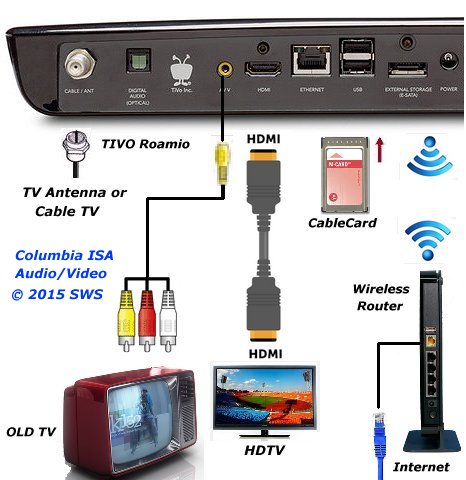 DIAGRAM - TIVO entry-level Roamio DVR Hookup setup diagram TIVO EDGE DVR As of Oct. 1, 2025, TiVo has stopped selling Edge DVR hardware. (6 year product life). You can find available inventory of refurbished, open-box, or pre-owned units through third-party retailers such as eBay. The TiVo Edge for Antenna features four tuners and a 2TB hard drive. The tuners mean you can record up to four shows at once. TiVo continues to require a subscription, and for the TiVo Edge for Antenna that means $6.99 per month or $69.99 per year to use the DVR. The TiVo Edge has built-in Wi-Fi, which allows it to easily connect to your home network to download guide data, receive software updates, and access streaming apps. Connect an RG-6 coaxial cable from TV antenna to Tivo. Screw your coaxial cable tightly onto the "Cable In" or "Antenna" port on the back of the TiVo Edge. Connect a Ultra High Speed HDMI cable from the Edge HDMI OUT to an available HDMI input on your TV. Internet connection - Although the TiVo Edge has built-in Wi-Fi, a wired Ethernet connection to your router is recommended for faster downloads and streaming. Plug the power adapter into the back of the TiVo, then into a wall outlet. Switch the TV to the correct HDMI source input. 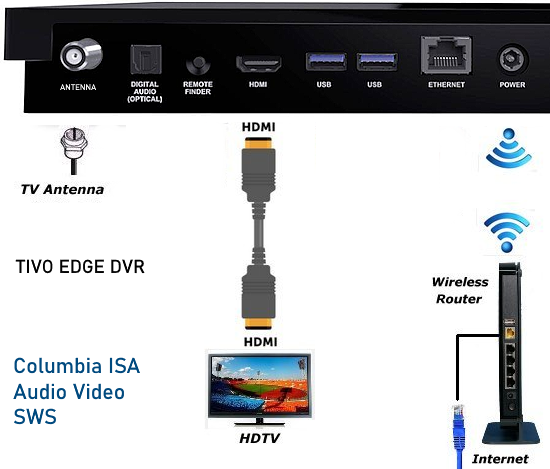 TIVO EDGE Connection Diagram Surround Sound TIVO EDGE Plug an optical audio cable into the digital audio (optical) port on the rear of the TIVO and plug the other end of the cable into an available optical input on the rear of the A/V Receiver. On the TIVO go to SETTINGS > AUDIO > DOLBY DIGITAL. For surround sound, select Dolby Digital, do not select PCM. PCM is 2-channel stereo. Select the correct source input on the A/V Receiver. Go to HDTV hookup Columbia ISA Audio Video Empowering consumers through information. SWS |