|
|
|
TIVO
DVR SETUP TIVO Premiere, TIVO EDGE Video Recording from Cable, Broadcast and Internet TIVO models Series 1 (1999), Series 1 DVRs are already end of life. Series 2 (2002), Series 3 (2006), Series 3 devices can support Cable and Antenna simultaneously. Series 4 (2010) Premiere, TiVo Premiere XL supports Cable and Antenna simultaneously. Series 5 (2013) Roamio, Series 6 (2015) Bolt, Series 7 (2019) Edge. Many different models have been introduced for each series with different features and capabilities. Some models are for digital cable only while other models are for over the air TV broadcasts only. • Internet TV streaming video Search Columbia ISA TIVO DVR SETUP - Premiere • Audio Video Connections • HDTV Basic Setup • Internet Ready TV TIVO DVR SETUP - TIVO Premiere Back in the 1970s, recording TV shows was done using a VCR. The video cassette recorder used tape in a cassette to record a standard analog TV signal and was played back on an analog TV. This tape format was the standard method to record TV until digital TV became the norm. VCRs can still be used today but not to record a high definition signal, only a standard definition signal and VCRs do not have digital TV tuners meaning you need another tuner other than the VCRs built-in analog TV tuner. HDTVs are more and more the norm today and to take advantage of the HD video capability of 720p and 1080p HDTVs, you need a DVR or digital video recorder with plenty of random access storage and High Definition recording. DVRs are part computer and part TV recorder. A hard disk drive or HDD is used to record TV shows. Some DVRs have tuners for cable TV and broadcast over-the-air (OTA) TV also called an ATSC tuner. DVRs can access video randomly as opposed to sequentially like a VCR does so this means you can find a show or video clip much faster and without the fast forward and rewinding required with a tape cassette. The DVRs hard disk works much like a computer disk drive. Combine the DVRs computer processor and you can expand your recording capabilities far beyond the VCR. Internet access allows your TIVO Premiere to link to Amazon video on demand, Netflix, Youtube, HULUplus, and music services. DVR OPTIONS: Your cable TV provider typically offers a DVR setup for their system usually in their cable box. The cable company provides the software needed to operate their DVR and has technical support and upgrades when needed. There are other DVRs such as TIVO which has a monthly fee and you buy the recorder rather than renting it from your provider. Renting a DVR from the cable company might cost around $100 per year for a single TV. TIVO has been around since 1999 and offers a way to record OTA TV (antenna) and Cable TV (digital cable) in high definition so you get the most from your HDTV. Local TV from nearby TV stations is usually free and is broadcast in standard definition and high definition. So using a VHF/UHF antenna, you can get free HD programming and the video is typically better than cable TV. The TIVO Premiere has both antenna and cable TV hookups. TIVO Recorders. TIVO recorders go back to 1999 with the TIVO Series 1 followed by the improved Series 2 recorder in 2001 which was very popular for years until the Series 3 (2006) was needed to record HD video. TIVO has released new DVRs with improved capabilities as the technology changes. The TIVO Series 4 or Premiere was released in 2010 with faster processor, increased storage and added features. (Note: does not work with satellite or AT&T U-verse) TIVO Premiere is offered from $99.99 plus monthly fee ($20) for the basic model to the TIVO Premiere XL for $299.99 and finally the TIVO Premiere Elite model for $499.99 plus monthly fee. Setting up your TiVo® Premiere.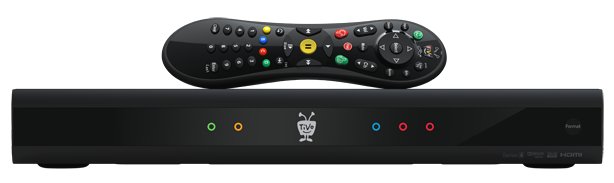 Installation instructions Before you install your TIVO Premiere box, be sure you do these tasks: 1. Order an M-Card from your cable TV provider. To view digital cable channels, you'll need to get one multi-stream CableCARD (M-Card) from your cable provider. IMPORTANT: Premiere boxes are NOT compatible with single-stream CableCARDs (S-Cards) or cable boxes. Some cable companies allow you to pick up your CableCARD and install it yourself, and some require an installer to come to your home. For an installer visit, please make sure you set up your system and completed Guided Setup before the installer arrives. If you are installing the CableCARD yourself, you can do this during or after Guided Setup. 2. Activate your TiVo service. If you purchased your TIVO Premiere box at the TiVo store, it already has active TiVo service. If you purchased it at a retail store, you can activate TiVo service online at www.tivo.com/activate. To set up your TIVO Premiere or Premiere XL, you only need to make the following connections: 1. Connect your signal source Connect your TIVO Premiere or Premiere XL to a cable line from your wall cable outlet. For more channels (including HD channels), you can also connect a VHF/UHF antenna to your TiVo box. 2. Connect to the TiVo service TIVO Premiere is designed to be a cable box, movie box, web box, and music box. To get the full Premiere "one box" experience, you will need to connect your TiVo box to the TiVo service over a broadband internet cable or DSL connection. For the fastest connection, plug one end of the included Ethernet cable into a port on your router or hub and plug the other end into the Ethernet port on the back of your TiVo box. If your TV is not near your router, you can connect your Premiere or Premiere XL to your home network using a TiVo Wireless G Adapter or Wireless N Adapter (sold separately). If you do not have a home network, you can set up a connection to the TiVo service using a TiVo Phone Adapter (sold separately). You won't get the full "One Box" experience, but you'll still be able to enjoy the classic TiVo experience that includes intuitive menus, Season Pass recordings, and Wishlist searches. 3. Connect your TV Connect your TIVO Premiere or Premiere XL to an HDTV to view HD TiVo menus. These menus include the Discovery Bar and integrated search, to help you find shows whether they are on TV, on the web, or through Video On Demand from providers like Amazon, Blockbuster, and Netflix. The HD menus also have a built-in viewing window, so you can watch Live TV or a recorded show while you are navigating through the TiVo menu system. Here are a few ways you can connect your TiVo for HD quality: 1 - HDMI cable connection 2 - HD component video/composite audio connection HDMI connection: This cable carries both HD digital video and digital audio. HD component video/composite audio connection: Both cables are included in the TiVo carton. The component cable carries HD-quality analog video. For better audio quality, use an optical (digital) audio cable (sold separately) instead of the two audio connections on the composite cable. SD composite video (yellow) and audio (white and red) connection: If you do not yet have an HDTV, you can connect your TIVO Premiere or Premiere XL to a standard definition TV. 4. Plug the TIVO in to power and turn it on. Make sure you also turn your TV on, and use the TV's remote control to select the input that matches the physical connection you made to your TiVo box. You will see a Welcome screen and then some additional progress screens as your TiVo does a series of system checks during startup. After you complete the physical cable connections, go thru Guided Setup: 1. Complete Guided Setup 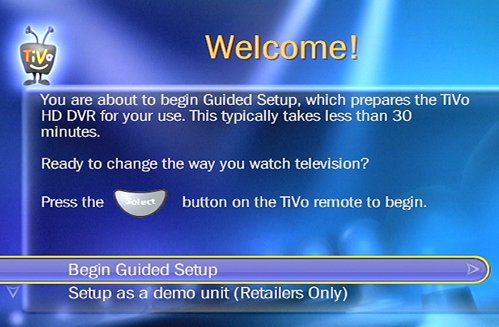 The first time you start up your Premiere box, it will begin Guided Setup. The Premiere box will download a software update during Guided Setup and will then reboot to install the software. After the reboot, Guided Setup will resume automatically. It can take from 1-2 hours to complete this initial Guided Setup. If your cable provider is sending a technician to install your CableCARD, please make sure you set up your TiVo box and complete Guided Setup before the installer arrives. During Guided Setup, you will be prompted to select the resolutions your TV supports and will be asked questions about what station is on a particular channel, which helps the TiVo box choose your channel lineup. You will also be asked to set up either a phone connection or network connection to the TiVo service. If your TV supports 720p or better resolution and you set up a broadband connection to the TiVo service, you will see the new TiVo with HD menus as soon as Guided Setup is complete. If your TV does not support 720p resolution or better, or your new box is using a phone connection to the TiVo service, you will see TiVo with SD menus. 2. Program the TiVo remote to control your TV Press the TiVo button to go to TiVo Central and then select Messages & Settings > Settings > Remote, CableCARD, & Devices > Remote Control Setup. Follow the instructions on this screen to program the remote to control your TV power, volume, and mute. The code you enter for the TV power, volume, and mute often also sets the TV input function (so you can press the Input button on the TiVo remote to cycle through your TV's input selections), but a separate TV Input selection is also available from the Remote Control Setup menu, as are instructions for setting the code to control sound on an AV receiver, and to control the behavior of the ADVANCE and REPLAY buttons on the TiVo remote. If you have more than one TiVo in the house, make sure you set each remote to control its own TiVo box. 3. Install your CableCARD Now that your TiVo box is set up, you can turn it into a cable box by installing a multistream CableCARD. Insert an M-Card into the slot on the back of the TiVo box. Within 20 seconds, you'll see the TiVo CableCARD Decoders screen, and about 30 seconds after that a black-and-gray CableCARD screen will pop up automatically, giving you a number to call to get the CableCARD activated, and listing all the information your cable provider will need to complete the activation. NOTE: If you already have a digital cable box, and you have not yet received a CableCARD, you may want to connect the cable box to another input on your TV while you're waiting for CableCARD installation, so you don't miss any of your favorite shows. After an M-Card is installed in your TiVo box, you can either disconnect the cable box and return it to your cable provider, or use it to receive interactive cable services. You're now ready to enjoy all the features of your new Premiere or Premiere XL. Press the TiVo button to start exploring all the features available from the TiVo menus and set up future recordings, or press Live TV to begin watching your shows. Don't forget to register at www.tivo.com/manage so you can name your TiVo box, manage your downloads, and manage your account online. This login also can be used to schedule recordings over the internet from your computer or phone. For tips on how to get the most out of your TiVo box, visit www.tivo.com/howto. Advanced setup examples - surround sound To set up your TIVO Premiere or Premiere XL with an A/V receiver or surround sound system. Your actual setup will depend on your equipment and the cables that you have available. 1. The cable line from the wall always goes into the TiVo box first. A TiVo with CableCARDs replaces a cable box so the cable from the wall MUST go into the TiVo first. 2. Not all cables have the same picture or audio quality. From lowest to highest quality, the cables included with your Premiere or Premiere XL are: Composite (red, white, yellow) - carries standard-definition analog video and analog audio. Component (red, blue, green) - carries high-definition analog video only. You will need to add a separate audio connection, either by using the red and white audio leads from the included composite cable, or by connecting an optional digital audio (optical) cable. HDMI - carries high-definition digital video and digital audio in one cable. An HDMI cable is included with the Premiere and Premiere XL. With a surround sound system, the speakers carry the high-quality audio. The TV should only be used as a monitor, so in the case of a component connection, you do not need to run a separate audio cable to the TV. Using HDMI, connect the HDMI cable from the TIVO to an Audio/Video Receiver with HDMI inputs and then connect another HDMI cable from the MONITOR output on the A/V Receiver to the HDTV's HDMI input. This is the best way to get surround sound on your system. The digital audio (optical) output on the TIVO could also be used in the case of component or composite video connections. Connect an optical audio cable from TIVO to A/V receiver's optical audio input. To get help from other TiVo users, visit the TiVo Help Forums. Activate the TiVo® Service The TiVo Service is what makes your Premiere work. It includes everything from your program listings to Season Pass® recordings and WishList® searches. Some TiVo Premieres are sold with a TiVo Service plan. If yours was not, activate the TiVo Service at www.tivo.com/activate or call TiVo Customer Support at 1-877-367-8486. You’ll need your 15-digit TiVo Service Number, found on the label on the back of the Premiere. About CableCARD decoders Do I need a CableCARD decoder for this TiVo Premiere? If you subscribe to digital cable, the answer is YES. The TiVo Premiere or Premiere XL does not work with external cable boxes. To receive digital cable channels, and to watch and record two channels at the same time, you need one Multi-Stream CableCARD decoder (M-CARD) from your cable company. Order one Multi-Stream CableCARD (M-CARD) from your cable company and disconnect your digital cable box (if you have one). The M-CARD will replace your digital cable box. Do I need to wait for CableCARD installation? No. Start connecting your TiVo Premiere now. You can install the CableCARD decoder later. 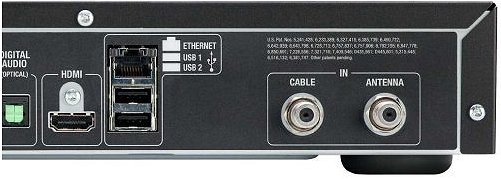 TIVO Premiere has inputs for antenna and for cable TV coax cables. The HDMI output, digital audio (optical) and the USB and Ethernet ports are also on the rear panel. 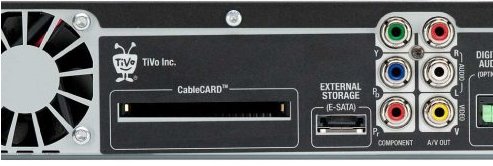 TIVO Premiere has a cablecard slot for inserting your cable TV providers cablecard. Also a hookup for an external disk drive for additional storage, and the RCA component and composite audio/video outputs. Connect Audio/Video 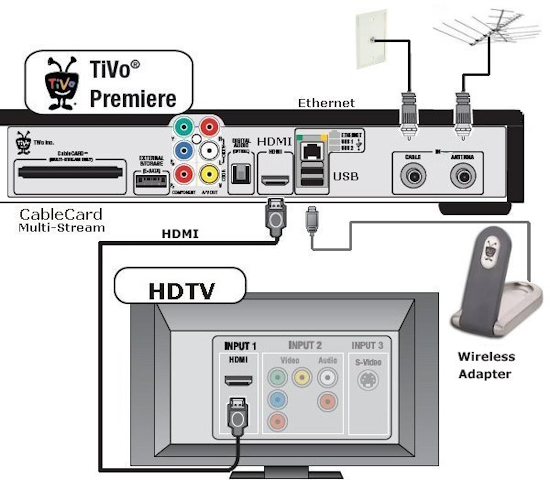 Connect your video and audio cables between your television and your TiVo Premiere box. HDMI Port If your HDTV has an HDMI port (Recommended): Connect the HDMI cable from the TiVo Premiere’s HDMI OUT jack to the HDMI IN port on the back of your high-definition TV. If you use this method, video and audio are connected with this one cable! If your high-definition TV does not have an HDMI port: 1. Connect video: Connect a Component Video cable (green, blue, red) from the TiVo Premiere’s COMPONENT OUT jack to the COMPONENT IN jack on the back of your high-definition TV. 2. Connect audio: Connect the red and white ends of a Composite A/V cable from the TiVo Premiere’s A/V OUT jacks to the A/V IN jacks on your TV. Do not connect the yellow end (standard video). Note: Most TVs have more than one input. Make note of the input you use for video, and use the same input when you connect audio. If you have a standard-definition TV: For a standard definition (non-HD) video connection, connect all ends of the Composite cables (red, white, and yellow) from the A/V OUT jacks on the TiVo Premiere to the red, white, and yellow A/V IN jacks on your TV. Connect to the TiVo® Service: Network (recommended), or Phone Line The TiVo Premiere needs to connect to the TiVo Service to receive program listings, service updates, and other information. Network-connected Premieres also have access to video downloads, podcasts and more. You can connect to the TiVo Service through a wireless N, wireless B/G, or wired home network, or through a phone line. Wireless N – Connect a TiVo® Wireless N Network Adapter (sold separately) to the Premiere’s rear panel, and follow the instructions provided with the adapter. The TiVo® Wireless N Network Adapter is available at www.tivo.com/store. Wireless B/G – Connect a TiVo Wireless G USB Network Adapter (sold separately) to one of the Premiere’s USB ports, and follow the on-screen instructions. The TiVo® Wireless G USB Network Adapter is available at www.tivo.com/store. Wired (Ethernet) – Connect an Ethernet cable from your home network to the TiVo Premiere’s Ethernet jack. Phone Line If you don’t have a home network with a broadband Internet connection, you can still connect to the TiVo Service through your home phone line. Connect a TiVo Phone Line Adapter, (sold separately), to one of the Tivo Premiere’s USB ports, and then connect your phone cord to the adapter. The TiVo® Phone Line Adapter is available at www.tivo.com/store. Note: If you have DSL, use a DSL filter when connecting the phone cord to the wall jack. • TIVO Support Question: Must my cable TV provider rent me a cableCard if I request one? Answer: It was a Federal law but has been discontinued. Question: How do I setup the cableCard on the TIVO recorder? Answer: Request a multi-stream cableCard from your cable company. Install the card into the proper slot in the rear of the TIVO. Write down the information (host ID, card ID, card serial number) from the diagnostics screen and call your provider and say you want to pair a cablecard with your TIVO. They will ask for the numbers you wrote down and activate your card. Next proceed with the Guided Setup to ensure you are getting all channels. TIVO support will help if required. Question: When I rent a cablecard from my provider for my TIVO, do I still need to pay for a cable box for digital cable TV? Answer: NO. The cablecard is all you need for the TIVO and it should rent for much less than a cable box so you will save money every month. Question: Can I connect an antenna and get over-the-air broadcast high definition TV shows on the TIVO Premiere? Answer: The TIVO Premiere and the Premiere XL can get ATSC digital TV broadcasts but the Premiere Elite cannot. TIVO EDGE for Antenna Setup 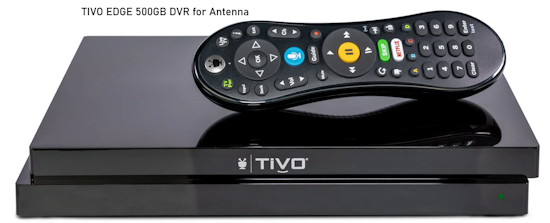 Model: TCDD6F500 SKU: RD6F50 Included in the Box: TiVo EDGE TiVo Remote (2-tuner TiVo EDGE for antenna) Setup + Product Features Guide Power cord 6ft. 4K HDMI Cable Voice Control Skip commercials Dolby Atmos 4K UHD Inputs/Outputs Coax (Digital cable, ATSC,MoCA) Optical audio out Remote Finder HDMI 2.0 / (4K, 1080p 24/60) USB 3.0 ports (2) Ethernet port: 10/100/1000Mbps Power: 12V CableCARD slot (for TiVo EDGE for Cable) • How to Install TiVo EDGE OTA DVR Activation, Setup, Step by Step Instructions Channel Master • Tivo Edge Streaming DVR for antenna • TIVO EDGE Setup 1. Activate TIVO Service (877) 367-8486 or online at tivo.com (you will need your 15 digit TSN from box or DVR label) 2. Connect the Edge DVR 2a. Connect your TV antenna to the silver threaded port on the back of the DVR (coaxial cable) 2b. Connect an HDMI cable from DVR HDMI output to TV HDMI input 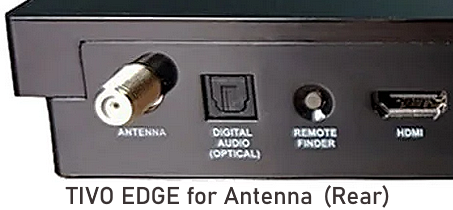 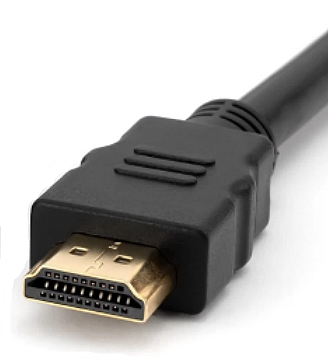 HDMI Cable 2c. Connect an Ethernet cable to your modem or router and the other end to the LAN (Ethernet) port on the DVR 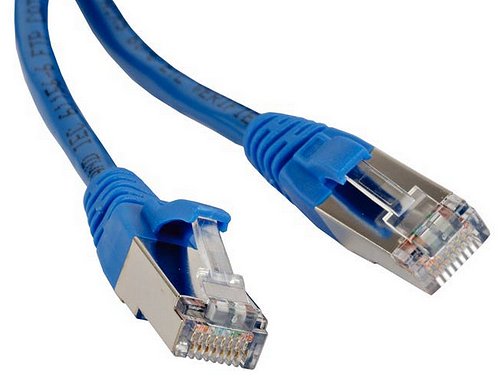 Ethernet Cable 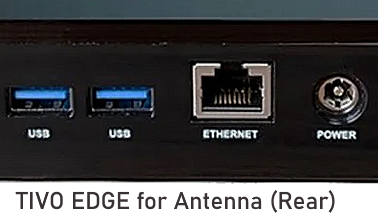 2d. Connect the DVR power adapter cable to the power port on the DVR and plug into AC outlet 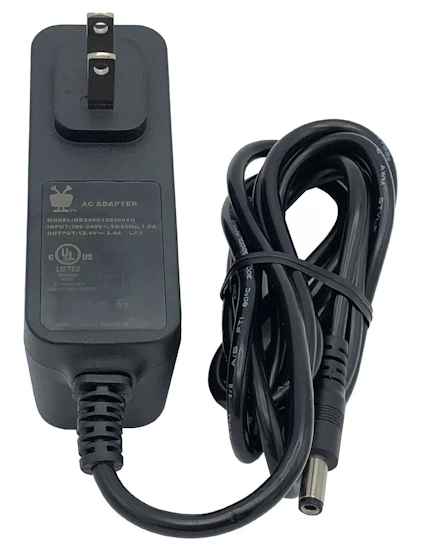 3. Complete guided setup: Power on TV and DVR. Select on the TV, the correct HDMI source input. Guided setup may take up to 30 min. to complete so be patient. 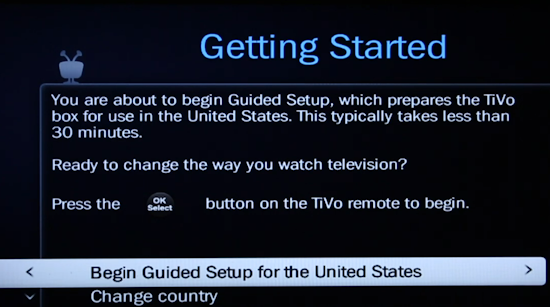 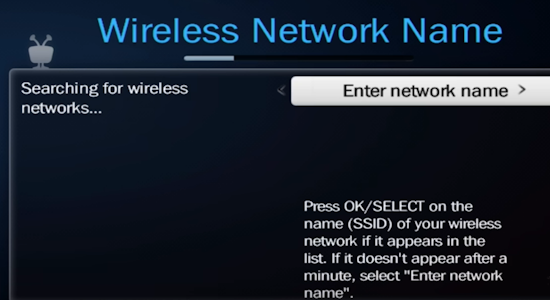 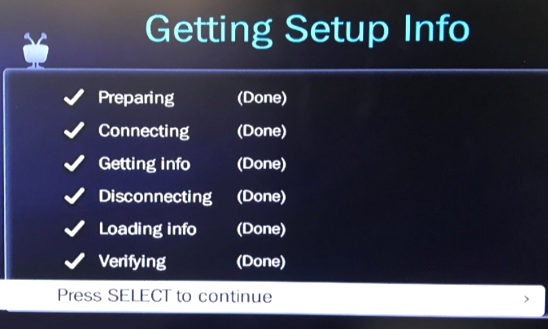 4. Program TIVO Remote  5. Manage your settings  Press the LIVE TV button on the remote to bring up your local over-the-air TV channels. Press the GUIDE button for the channel guide showing what's on and coming on. 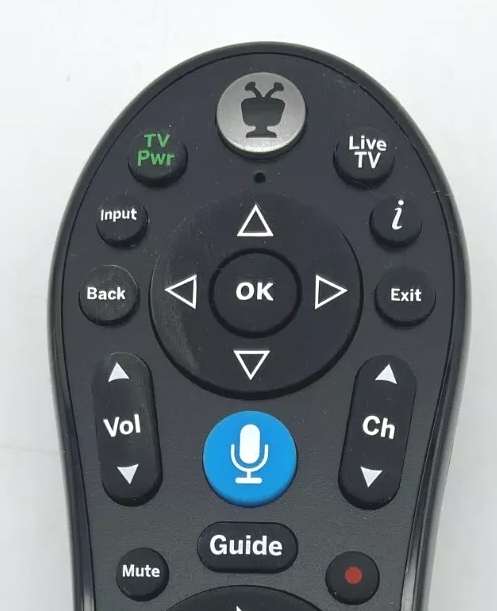  TIVO Home screen with smart bar TIVO RECORDING There are many ways to record and setup recordings. You can simply press the red dot "record" button on the remote to record the show you are watching. Option 1 - VOICE - use the voice search (press and hold microphone button on TIVO remote) say your show name and select it when found. Go to "Get This Show" tab. Select CreateOnePass. Press OK on remote. Option 2 - Select a show from the smart bar. Option 3 - Locate a show in the Channel Guide. Select "Create a OnePass" for this series. Press OK on remote. Option 4 - Press the Tivo button on the remote and select "Search" Press OK on remote. Enter the name of the show. Hilight your show name using directional arrows on remote. Press OK. Select "CreateOnePass". The TIVO button on the remote  The Tivo button takes you to the Central home screen, the starting point for all your Tivo settings and functions. You can select many different options within the setup to record. Select "Create OnePass with these options" and view in "My Shows". • Wall Mounting TV • How to upgrade SAMSUNG TV firmware FAQ Q: How much TV show guide information is available? A: About 2 weeks when fully loaded Q: How do I reset Tivo DVR to default? A: Press tivo button on remote for Home screen main menu and go to HELP. Select "reset to defaults". You can also reset the Tivo DVR by unplugging from power, waiting 10 secs. and then plug back into outlet. HOME NETWORK - Internet from your provider plus cable TV channels you can record on DVR. How to setup a home network for TIVO DVR and Internet access.  TIVO EDGE setup diagram - Home network How to setup wireless internet at home TIVO Screen user interface - TIVO Central Find TV, movies, and videos Manage recordings Browse Web movies, music See also: • PC stereo hookup • VCR Recording Contact: columbiaisa@yahoo.com • see over 100 Hookup Diagrams • TV input select • Timer Record Radio Shows on a VCR • Camcorder hookup to TV, DVD • Audio Video Connections • See over 100 Hookup Diagrams • How to install a PCI card in your computer Audio Video Cable Hookups • Audio Video Connections • See over 100 hookup diagrams • Connection Diagrams • USB • PC to stereo hookup • Connecting PC to stereo components • Nintendo Wii hookup © Columbia ISA Audio/Video |