
 |
|
SAMSUNG Upgrade Firmware on TV SAMSUNG TV SOFTWARE UPDATE |
Search Columbia ISA How to Update Software on SAMSUNG TV • Screen Mirror iPhone to TV • Audio Video Connections • HDTV Basic Setup • How to connect MacBook to TV • How to load Apps on Samsung TV   SAMSUNG TV How To Update Your Samsung TV Firmware (Software) TVs today are part TV and part computer. Computers run on instructions called software code like your Windows or Apple Operating System. Firmware is digital code to tell the TV what to do. Firmware is the set of instructions for a particular TV so it works properly. Your TV was loaded at the factory with the latest software code at that time. If problems arise that can be fixed with a firmware modification, the TV manufacturer can make this code available online for you to download so your TV can operate with the latest instructions. Samsung smart TV is a popular smart TV product. Samsung smart TV uses the Tizen operating system (OS), which is developed by Samsung based on Linux kernel. Some TVs have a direct internet connection capability using your home network setup, modem and router. Some TVs however do not have a RJ-45 LAN port for internet hookup or you may be having issues with your Wi-Fi or Ethernet hookup. So the only way to update firmware for those TVs is by using the TV USB port with a USB thumb drive. See below for procedures to update using a USB drive. How to find your current version of Samsung TV firmware 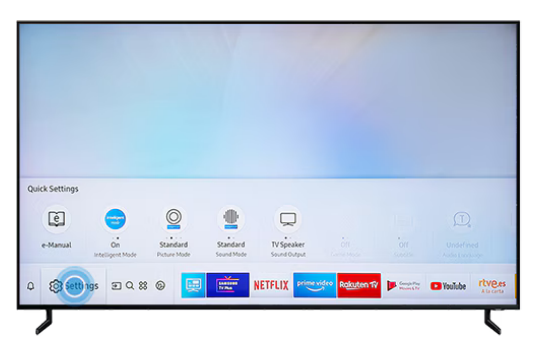 1. Press the "Home" button on your Samsung TV remote 2. Go to "Settings" ("All Settings") > "Support" > "Software Update" > "Update Now" and you should see the current version. 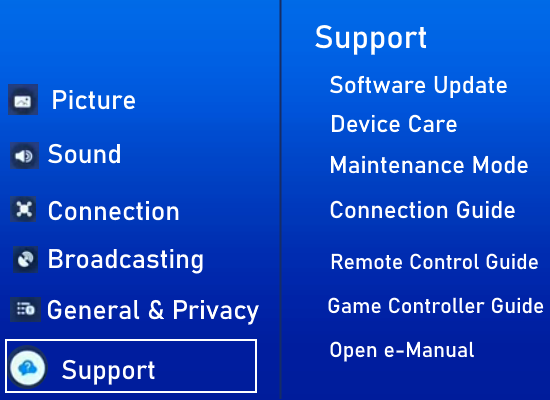 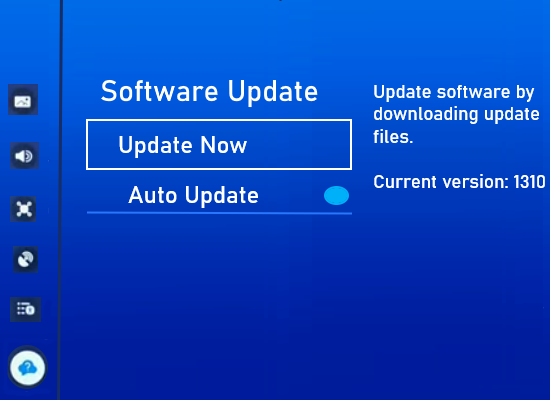 Example - current version 1310 Q: Can I revert back (downgrade) to previous software version if I already have installed an update? A: NO, Samsung's policy, as is the case with most TV makers, is to not allow you to revert back to a previous software version. Samsung intentionally prevents users from downgrading their TV firmware. Factory reset won't revert update: Performing a factory reset on your TV will not restore the previous firmware version. Unfortunately, it's not possible to revert an update on your TV. Therefore be sure you want to upgrade to the latest software version. Update your Samsung TV's software using the internet to download files Software updates can bring new features, improvements, and bug fixes for better performance, however software updates sometimes can cause new issues with your TV so if you are satisfied with your TVs current performance and there are no other reasons for an update, you may want to consider not doing an update. Remember, the steps to update the software on Samsung TVs might differ from series to series and model to model. Depending on the year your Samsung TV was manufactured, the Smart Hub or User Interface appearance of the menus may vary. Also, remember a software update may reset your TV’s settings to all default settings. NOTE: When trying to do the software update process, sometimes the problem of Samsung TV software update option being greyed out in your TV menu can occur due to running apps, like Netflix, Hulu, YouTube or your TV source selection not being set to "TV". 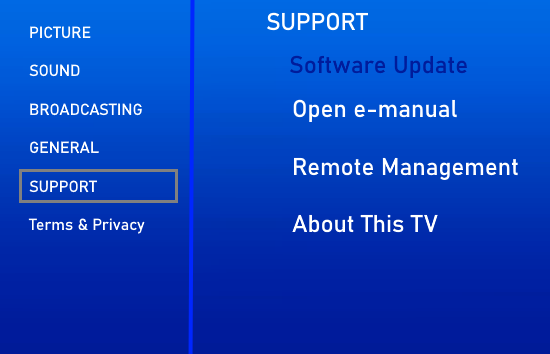 If you find a running app after you encounter the Samsung TV software update greyed out issue, you can simply press the exit button on your remote to close it. If there isn’t an exit button on the remote, you can press the back button to close the target app. The TV should be more or less idle so you can proceed with the update. If the update software menu option is still greyed out, go to SOURCE on the TV and select the "TV" icon to be active as shown below. 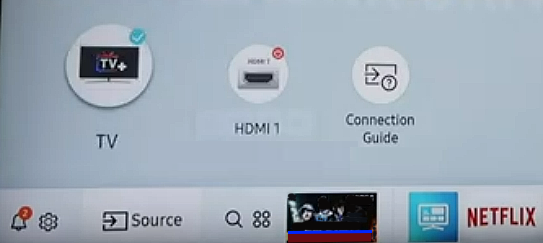 Now go back to SUPPORT and the software update option should not be greyed out anymore and you can proceed with the update. Make sure your TV is connected to the internet by Ethernet wired connection or by Wi-Fi wireless connection to your router/modem. Once your TV is connected to the internet, press the HOME (or MENU or SETTINGS button for older TV) button on your Samsung TV remote, navigate to Settings/All settings, (Left arrow to the gear icon) press Enter/OK button on remote, then choose Support. 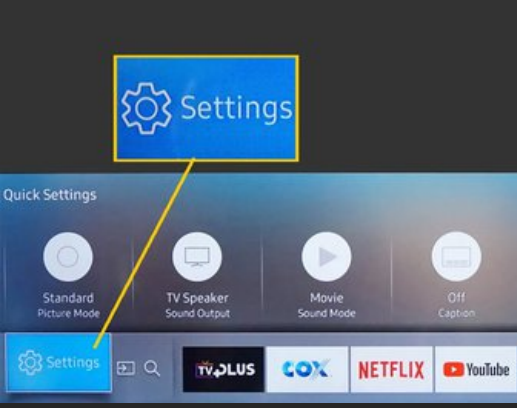 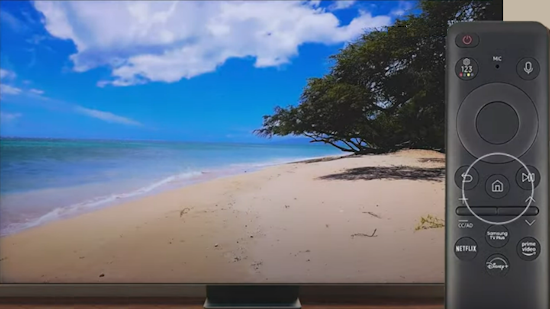 Press the HOME button on the TV remote 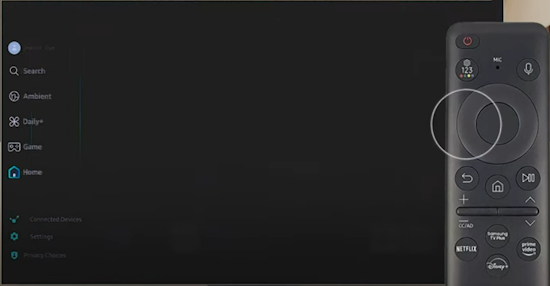 Press the LEFT Navigation button 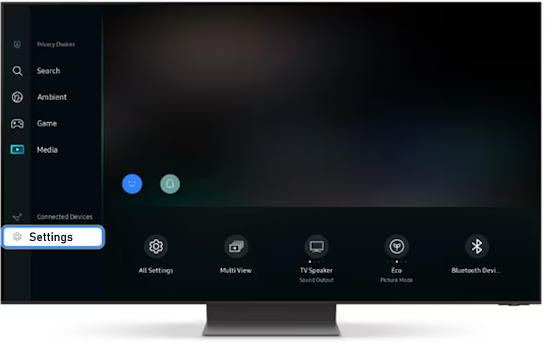 Scroll down to SETTINGS 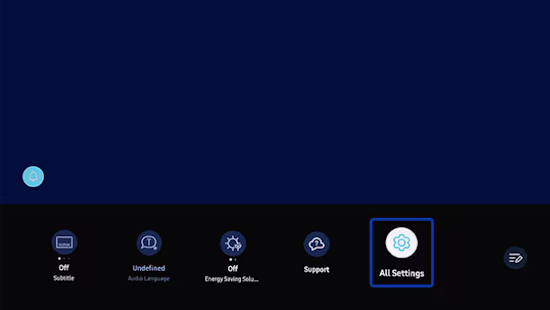 Go over to ALL SETTINGS  Choose SUPPORT 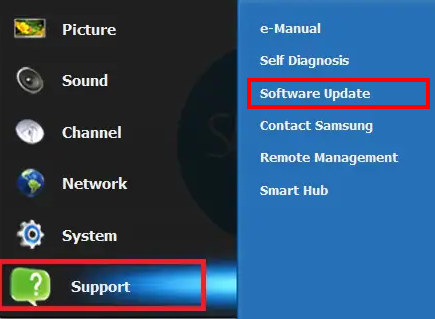 Next, select Software Update, then Update Now.  Your Samsung TV software may already be current and up to date in which case there is no need to update. 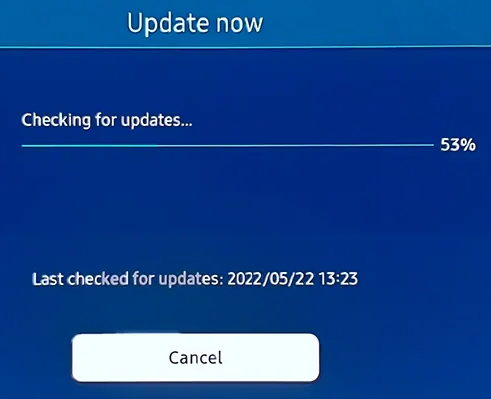 Your Samsung TV will check to find any updates.  If your current TV software version is the latest available then you will see a screen with "Latest Version" and no update is needed. If an update is found, you have the option to proceed with the download or not. If you want to update, select YES.  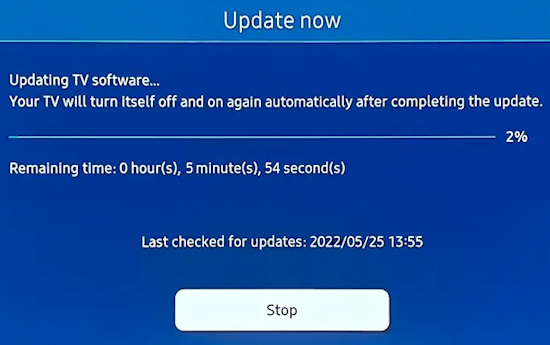 If there is an update available, the TV will ask you to confirm the download. Once you grant permission, the TV will begin downloading the data from the internet source and installing it on the TV. DO NOT TURN OFF YOUR TV during this process. When the update is finished installing, your TV will restart automatically. You now will have the latest software installed on the TV. NOTE: Installing a new update may reset your TV to all the default settings. Update your Samsung TV's software with a USB flash drive Your recent Samsung TV has a USB port and your recent personal computer has a USB port. A USB port is used with a USB thumb drive to display media as well as for firmware updates via USB drive. The USB drive software update method is much more complex than updating using the direct internet to TV method outlined above. However the USB method may be your only option in some cases. If your home internet is not working or has problems connecting, you may need to visit your local public library for access to internet or visit a friend who has working internet. To update your TV software via this method you will need the following: 1) A USB flash drive with the storage capacity large enough for the firmware file. These small data storage devices are about the size of your thumb and plug into your TV or computer. You can use them to transfer data from computer to TV. 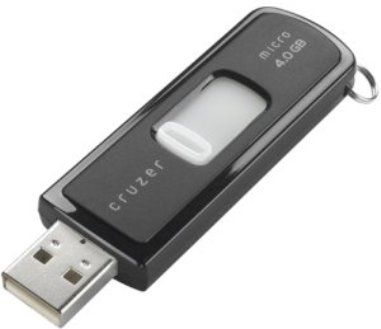 USB flash drive (thumb drive) available at retail stores or online. 2) A personal computer with an internet connection. 3) WinZip (this is a program used to open the downloaded firmware file and is standard on Windows based PCs). WinZip or a similar compressed file extraction program is used to extract files from the compressed folder downloaded from Samsung. Updating your TV firmware using the USB drive method is a two Part process. Part 1 is downloading the firmware from SAMSUNG Support website to your computer and copying to your USB drive; Part 2 is loading the firmware into your TV from the USB drive. CAUTION: Use extreme care to ensure you load the correct data into your TV. You should only load a firmware update into your TV when there is a known problem which the firmware will correct. Loading firmware into your TV could result in a failure of your TV to work properly. You can contact Samsung FIRST so that you ensure you are proceeding correctly. You will need your TV Model number. Finding your Samsung TV Model number This Example is the format you should look for: QN65Q800TAFXZA Where: Q = QLED N = North America 65 = Screen size in inches Q800T = The specific model name A = First generation F = ATSC tuner type (USA, Canada) X = Design code ZA = Made for USA Samsung TV model code explanation Of course, your TV model number will be slightly different. This is just an example. Another example Samsung TV model number is UN58TU700DFXZA In order to find the correct software download, you need your Samsung TV Model number. There a several ways to find your TV model number. Look on the rear of the TV and find a label with the information on it such as TV Model number. 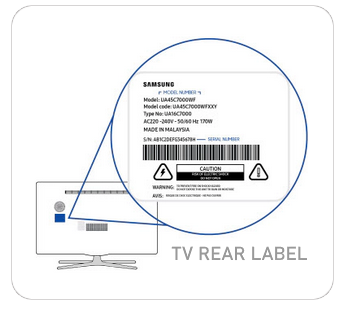 On newer Samsung TVs you can find the information by going to SETTINGS on the TV menu and selecting SUPPORT. Next, select "ABOUT TV". 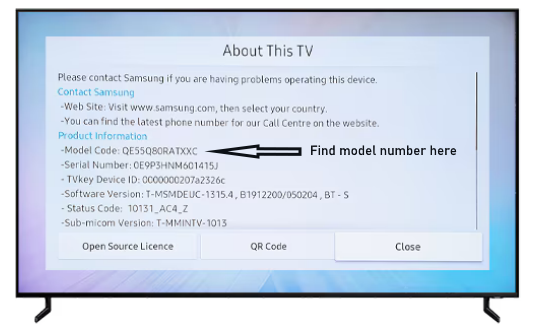 Model Code: Check the model type of your device, which includes information like the country of origin and screen size. Serial Number: See your unique manufacturer serial number. Software Version: View the currently installed software type. Status Code: Displays error messages by numerical code. Sub-micom Version: View the name of the embedded microchip. e-Manual Version: An electronic troubleshooting guide for different features and settings. Wired MAC Address: Check the Ethernet address of the adapter. Wireless MAC Address: Find the network address for the TV or projector. Bluetooth Address: Used for connecting speakers or headphones wirelessly. Smart Control Bluetooth MAC Address: Displays the network address for the physical remote. Smart Control Battery Status: Keep track of the Smart Control remote’s battery percentage. Number of mobiles with Ambient Auto on: Check the devices with Ambient mode, which shows an image or timestamp when the screen is not in use. To download the firmware for your TV to your computer follow these steps. QUICK Step by Step Guide to get started: 1. Go to the download center on Samsung's main webpage. www.samsung.com Click on SUPPORT then manuals and software In the SEARCH bar, enter your TV model number 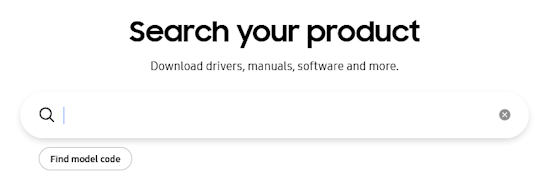 You should see USER MANUAL and QUICK START GUIDE and FIRMWARE. Scroll down and Look for FIRMWARE UPGRADE FILE (USB TYPE). The file size may be about 1600 MB. Click on "Download" to begin the transfer from Samsung to your computer. The ZIP (Compressed) file should be copied to your computer's "Downloads" folder. 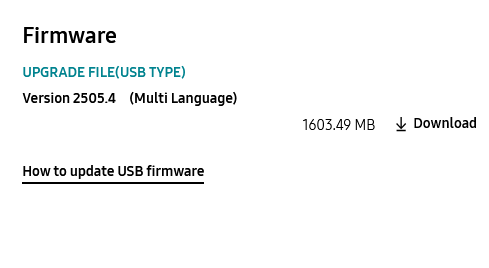  Download Progress Bar should be shown during the download. It may take a few minutes to transfer. When completed, look in your "Downloads" folder on your computer. Look for a folder with .ZIP at the end of the name. It should have the current days date. This folder is the compressed software update for the TV. The next step is to uncompress or unzip this folder using Winzip. To do this, right click on the folder.  Next click on "Extract All".  Select a destination location and then click on "Extract" Winzip will now uncompress the downloaded folder and place the files in a new folder with the same name (only without the .zip) in your selected location. 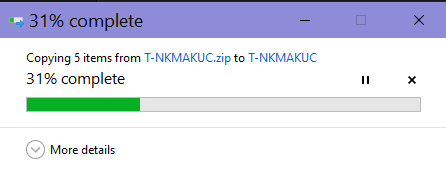 Winzip progress bar - unzip and create new folder with files for Samsung TV software update.  If you selected your Downloads folder for the destination of the new folder, you should see both the original folder and the new folder.  If you selected your desktop, you should see the new folder on the desktop. The next step is to copy the new folder to your USB thumb drive. Useful Samsung website links: www.samsung.com/us/support/download SAMSUNG Manuals and Software Update Samsung TV using USB Drive If no firmware file is available on the Samsung website for your TV model, then your TV probably is current and no upgrade is required. 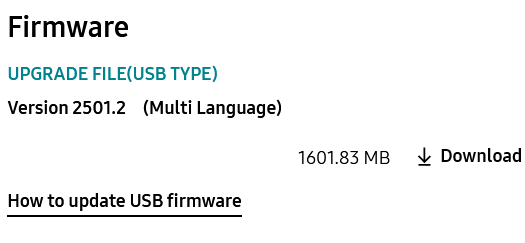 Most USB thumb drives are formatted right out of the box and ready for use using the FAT32 file system. FAT32 is a common file system and it’s recognised by both Mac and Windows operating systems, but it offers no security and files max out at 4GB in size. Most USB flash drives will have a FAT32 file system out of the box. It is the most compatible file system for older/modern computers (PC and Mac). Other file systems in use are exFAT, NTFS, APFS. FAT was originally designed for floppy disks back in the 1970s, and could keep an 8-bit sized record of the data clusters stored on the disk. With FAT32, that increased to 32 bits. The exFAT file system is the 64-bit version of the FAT file system. With each increase, the maximum volume and file sizes supported by the file system increased. FAT16 can't hold more than 2 GB of Data. The FAT32 file system can store up to 32 GB of Data, making it suitable for small USB drives. Microsoft developed FAT32 before NTFS, making FAT32 the oldest of the three file systems but the most compatible. FAT32 is generally considered less efficient than NTFS. FAT32 has a smaller 4 GB file size and 32 GB volumes in Windows. Sony TV's typically support FAT32 and exFAT, while Samsung and other brands typically support FAT32 and NTFS. Some TV's may even support all three file systems. The following TV manufacturers use the file systems listed below. Samsung HD 1080p TV: FAT32 and NTFS file systems Samsung QLED and UHD TV: FAT, exFAT and NTFS file systems TCL, Hisense, Roku: FAT16, FAT32, NTFS, EXT2, EXT3, and HFS+ file systems LG: FAT32 and NTFS Sony: FAT, FAT32, and exFAT FAT stands for File Allocation Table. NTFS stands for New Technology File System. Microsoft Windows OS (and some removable storage devices) uses NTFS to organize, name and store files. All Microsoft OSes from Windows XP on, use NTFS version 3.1 as their main file system for HDD (Hard Disk Drive) and SSD (Solid State Drive). NTFS can support up to 8 petabyte volumes and files. Partitions are the major divisions of the hard drive's physical space. You can skip the next section unless you need to format your USB drive CAUTION: Formatting the USB drive will erase all data on the drive. Formatting USB Drives in Windows Insert a USB drive into a USB port on your computer. Open File Explorer. Click on "This PC" from the left pane. Under the "Devices and drives" section, right-click your USB flash drive and select the "Format" option. Use the "File system" drop-down menu and select the preferred option. In the "Allocation unit size" drop-down menu, use the default selection. In the "Volume label" field, confirm a drive name that will appear in File Explorer. For example, SamsungUSB. Under the "Format options" section, select the Quick format option. Click the Start button. Click the Yes button. Once formatting is complete, the USB flash drive will be all set to store files on the removable drive. Insert USB thumb drive into computer Now insert (mount) your USB drive into a free USB port on your computer 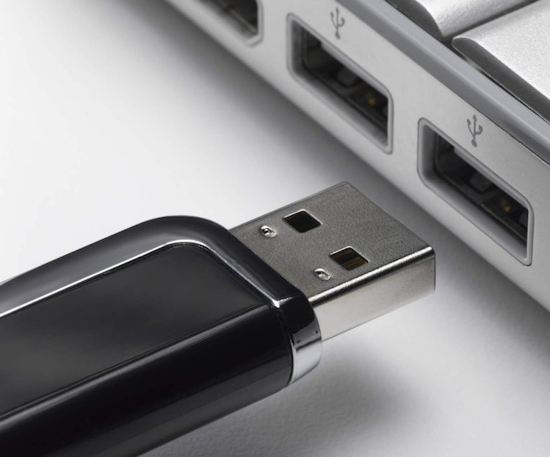 Take the folder with the extracted files in it and place on (copy to) your USB Thumb drive. You could also right click and select "Send To" the USB Drive. 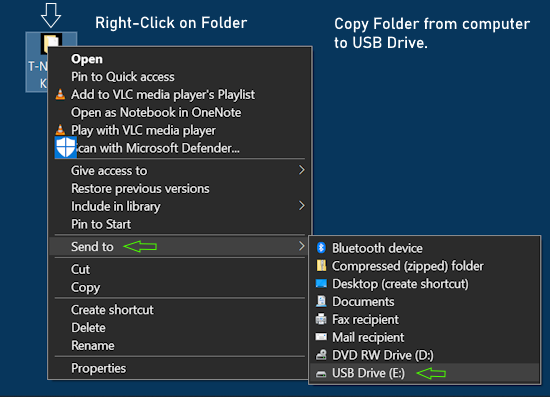 The USB drive should now contain the update needed for the TV. Note: * The folder name will depend on the firmware. * When the folder is put on your thumbdrive do not place it in a sub folder. If it is in a sub folder the TV will not be able to find the firmware. Now that you have the firmware downloaded you are ready to update the firmware on your TV. Part 2: Updating The Firmware On The TV Once you have the firmware unzipped and loaded onto your USB thumb drive you are ready to upload it into your TV. 1. Connect your USB thumb drive with the firmware file on it to your TV's USB port. Dismount the USB drive - EJECT the USB drive and then unplug it from your computer, then connect it to one of your Samsung TV's USB inputs. To eject a USB drive from your computer, simply right-click on the drive icon and select "Eject" from the context menu. 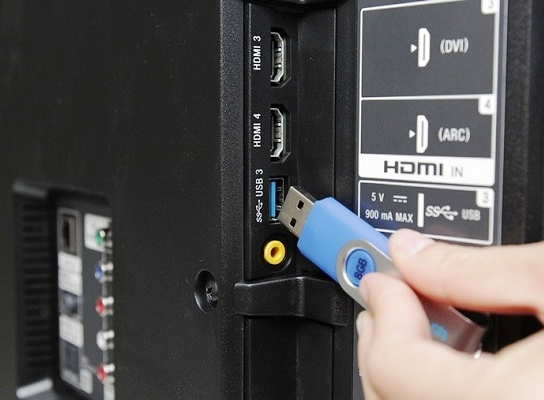 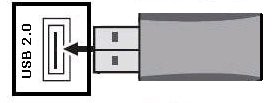 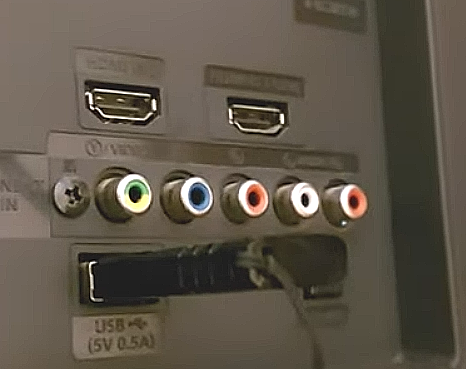 USB drive - insert firmly into TV USB port 2. Using your TV's remote, press HOME or MENU to open the Main menu 3. Depending on your TV's menu options, you will need to select the section that contains the option to upgrade your firmware. On newer Samsung TVs, Go to SETTINGS then SUPPORT then SOFTWARE UPDATE.  Use the UP or DOWN arrow keys on the remote to browse the menu choices until you find the area with the upgrade software option. 4. Use the UP or DOWN to select the "Software Upgrade" option, then press ENTER. You may be able to see the current version of your firmware. 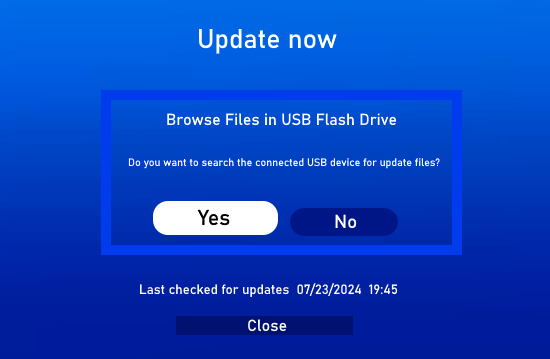 5. The Software Update menu will appear and by default "By USB" will be highlighted. if it is not, use the UP or DOWN to select "By USB", then press ENTER 6. On older Samsung TVs, a message will appear on your screen stating "Scanning for USB". On newer Samsung TVs, Select the YES button on the USB update screen. 7. After finding the firmware, your TV will display a message that "A valid firmware version was found" and ask if you would like to update. Press ENTER to accept and begin the software update installation on the TV. 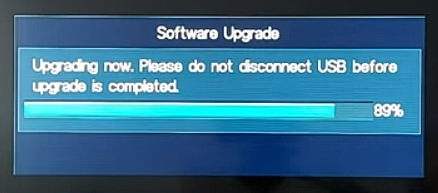  8. After the firmware finishes installing, your TV will power off and then power back on. Your TV will now have the latest firmware. CAUTION: Never power off your TV while the update process is running. • YouTube explain USB upgrade Samsung TV (Older Samsung TV) • YouTube explain USB upgrade Samsung TV (Newer Samsung TV) Samsung TV - Firmware Won't Update USB Drive How to Solve Samsung Smart TV USB Not Working The update files from Samsung have to be in the root folder on the USB drive. Try formatting the USB drive which will erase all files on the drive or use a new USB drive out of the box. Be sure that your software update USB drive is the only USB drive inserted into the TV. Try copying the unzipped update folder to the new or just formatted USB drive so that is the only data on the USB drive. How to Format a USB Flash Drive Understanding Disk File Systems When formatting your drive, it’s important to understand the different formatting options available. The file systems most commonly used in USB flash drives are: FAT32 is a common file system due to being recognised by both Mac and Windows operating systems, but it offers no security and files max out at 4GB in size. Most USB flash drives will have a FAT32 file system out of the box. It is the most compatible file system for older/modern computers (PC and Mac). exFAT is the ideal file system for USB flash drives. It doesn’t have the 4GB file size limit and it’s compatible with most Windows and Mac operating systems. Older operating systems might require an update to properly read and write to a USB drive with an exFAT file system. NTFS format is the file system Windows uses by default for internal drives running the operating system or used as a secondary storage drive. It has a much larger max file size but is read-only on Mac OS X (unless you install a third party NTFS read/write utility). Mac OS Extended is the native solution for Mac users and has the max file size of any of them. Only use this option if the drive will only be used in Mac OS. Windows will not detect this file system without a third-party utility. APFS is a file system developed by Apple for macOS that was introduced with macOS 10.13 in 2017. APFS includes features like cloning and file-level encryption. APFS cannot be read or written by a Windows PC without third-party software, so use ExFAT or FAT32 if you need compatibility. Format Options: Quick format: Deletes the file system table and the root folder. This option is frequently used for USB flash drives to efficiently free up the available space to transfer or store other files. It’s not the most secure way to delete your files because the data may still be recoverable with data recovery tools. Full format: Will scan for bad sectors and write zeros in all sectors, which deletes all data permanently. This action can take a long time, depending on the capacity of the drive. Formatting USB Drives in Windows Insert a USB drive into a USB port on Windows computer. Open File Explorer. Tip: You can Open Windows File Explorer by holding down the Windows Key and then pressing the E key. Click on "This PC" from the left pane. Under the "Devices and drives" section, right-click the USB flash drive and select the "Format" option. Use the "File system" drop-down menu and select the preferred option. In the "Allocation unit size" drop-down menu, use the default selection. In the "Volume label" field, confirm a drive name that will appear in File Explorer. For example, SamsungUSB. Under the "Format options" section, select the Quick format option. Click the Start button. Click the Yes button. Once formatting is complete, the USB flash drive will be all set to store files on the removable drive. Sometimes the size of the USB drive can be too large such as 32GB or 64GB and can cause issues with the Samsung TV. So even if all else is completed correctly, you may find it still will not work. Possible SOLUTIONS: The capacity of the USB thumb drive may be too large for the TV. A smaller 512MB drive should work but hardly any thumb drives of this small capacity are still available, so the solution may be to "CLEAN" a larger size USB drive such as 32GB USB drive which is available, with DISKPART and make a new, smaller partition of 512MB on this USB drive. The Diskpart command would look like: CREATE DISK=x PARTITION PRIMARY SIZE=512 The 512 is in MB (megabytes) Then let the PC format it and the Samsung TV may now recognize a directory with a IMAGE folder with the proper extracted firmware. DiskPart is a Windows command-line tool to manage drives, partitions, volumes, and virtual disks through Command Prompt. Usually, it works better than other tools like "Disk Management" or the "Format" feature available on Windows File Explorer. Reformatting USB Drive with Diskpart Here is the step by step Step 1: Press “Windows + R” keys simultaneously to open the Run window Type “cmd” in the Run box and press Enter key to open Command Prompt window. Type “diskpart” in the cmd.exe input window and press Enter key to open diskpart. DISKPART> If you enter HELP, you can see all the possible commands available. Help format (will show all the parameters you can use for the format command) Help create (will show all the parameters you can use for the create command) Step 2: Type the following commands in the diskpart input window. Enter the following command: list disk You can also enter the following command: list volume You can see from the information all of the disks on the computer. Now insert your USB drive into a USB port on the computer. list disk again to see which disk is the USB drive. It should be the last one in the list  Enter the following command: select disk n (where n is the number of the USB drive) example: select disk 1 list disk - look for the asterisk next to the disk you selected to verify correct disk Enter the following command: clean - this will erase all the data on the drive. Now you are ready to define a new partition size for the USB drive. Enter the following command: create partition primary size=512 Enter the following command: list partition Enter the following command: select partition 1 Now you are ready to format the partition Enter the following command: format fs=fat32 label=samsungtv quick look for message "100 percent complete" Enter the following command: assign letter=x (where x is a letter of your choice such as g or w or f and so on) Enter the following command: exit (this will exit the diskpart program) Now go back and try to copy the unzipped folder (from Samsung) to the USB Drive you just formatted, mount into TV and try the Update Software process again. OPTIONAL: Reformatting USB Thumb Drive with Disk Management Tool in Windows You can use this to reformat the USB flash drive. Here is the step by step: Step 1: Press “Windows + R” keys at the same time. Step 2: Enter “diskmgmt.msc” in the Run box. And then press Enter key to open Disk Management. Step 3: Right-click on the USB flash drive partition and click Format… from the context menu. Step 4: Choose a proper file system and keep other parameters as default. Then, click OK button to start the reformatting process. Step 5: Click OK on the pop-up format warning window. or you can use Diskpart Update your Samsung TV software 2022-2023 Different ways to update Samsung TV firmware: Update automatically If the TV is connected to the internet, you can have software updates installed automatically. Once the update is complete, it will be applied the next time the TV is turned on. Also, when you agree to Smart Hub Terms and Conditions in the initial setup, Auto Update is set to ON. Navigate to Settings, and then select Support. Select Software Update, and then select Auto Update to turn it off or back on. Update using a USB Drive: Smart TVs usually have firmware updates when they are released to help any old issues. Normally, you will update these automatically via your network connection; however, if your home network is not working, you will need to manually download your firmware onto a USB drive, off of the Samsung Download Center Web Page. Here's how: Access a different network, at work, at a friend's house, at a public library and go to the Samsung Download Center. https://www.samsung.com/us/support/downloads/ What is the Model Number of your TV You can find the model number of your Samsung TV in several ways Look on the back of the TV and find the label that has this information. Understanding Model numbers on a Samsung TV The easiest way, you can look up the model number of your Samsung TV in the TV menu Use your TV's remote to navigate to Settings (All Settings). Select Support and then select About TV (About this TV). 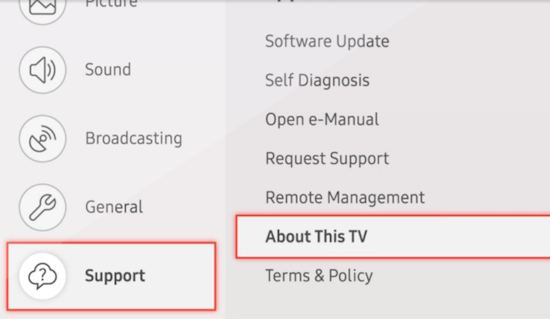 The model number or code and serial number will be displayed on this page. An example of a model number for the 65" Class Q800T QLED 8K UHD HDR Smart TV (2020) QN65Q800TAFXZA What do all the numbers and letters mean? Q = QLED N = North America 65 = Screen size in inches Q800T = The specific model name A = First generation F = ATSC tuner type (USA, Canada) X = Design code ZA = Made for USA Older Samsung TVs before 2016. To do this, go to settings. Open the Menu (press the menu button on the remote control)→ Support → Contact Samsung → the Model Code field will show the TV model. New Samsung TV models from 2016 onwards. Menu → Support → About this TV • If you have access to the back of the TV, you can see the model number of the TV on the information label. • Look at the model of the TV on the box (if you still have it) or look for the purchase receipt. • You can also see the model of the TV in the service (engineering) menu 1. Navigate through the download page & find your Samsung TV model. 2. Find the correct firmware and download it to your computer. 3. Unzip the firmware file you just downloaded and save it onto a USB drive. 4. Make sure your TV is off. 5. Plug your USB drive into an available USB slot on your TV. 6. Turn on the TV & press the Home button. 7. Navigate to Settings > Support > Software Update > Update Now. 8. Select YES. You will then be given the option to select USB - do so. Next, your TV should automatically scan for any available software on your drive & install it. After this is done, the TV should restart by itself. How to Load Apps on Samsung TV Updating APPS on Samsung smart TV How to load Apps on Samsung TV Note: Not all Apps are available from TV makers app stores but the major apps should be available for download. Not all Smart TVs are created equal and you may not find the app you want. For example: The YouTubeTV app is only available for Samsung TVs from 2016 or later. Peacock app is only available for Samsung TVs 2017 or later and so forth. Some apps do not work with the Samsung TVs operating software so are not available. Some apps do not support Samsung TV due to on-going costs and are not available. For more Apps, you can get a Fire TV stick, ROKU or other streaming device, plug into HDMI port on TV and load those apps available from a compatible source. You don't need to buy a new Samsung TV only to get apps. You can only download Apps from the Samsung TV App Store. Samsung offers hundreds of apps for download but some apps you might want may simply not be available. 1. Be sure you have active internet connection to TV (Wi-Fi or Ethernet cable) 2. Sign in to your Samsung account or create an account (www.samsung.com) If you need to create an account Go to www.samsung.com Click on the account icon upper right (to the right of the shopping cart) You will need to enter an email address, a password, a date of birth, a zipcode To sign in to Samsung account on Samsung TV Go to SETTINGS> All Settings> General&Privacy> System Manager> Samsung Account 3. Power ON Samsung TV 4. Press HOME button on Samsung TV remote 5. Move to APPS icon (four circles) and select 6. Navigate to the APP SEARCH icon (magnifying glass) and select 7. Enter into the app search bar, the APP you want, letter by letter. You may see a suggested app that matches your search so far but if not, keep entering the full name then select the magnifying glass to SEARCH for your app. 8. Move to the APP icon that was found and select it. If the app is not found or cannot be installed, follow troubleshooting steps. Your TV may be out of storage space. Free up space by deleting unused apps. Be sure TV firmware is updated. Power off TV, wait a few mins. and power ON TV then try again to install app. Sign off from Samsung account then sign in again and try install. Some apps are not available. 9. Now select the on-screen INSTALL icon APP should now download to your Samsung TV When completed, see On-screen message> Name of App > Installed You can now Open/Launch the App or Select "Add to Home" The APP should now show up in the on-screen bar with other apps Press the HOME button on the Samsung TV remote The APP can be moved to the left so you see it first Select the APP to Open/Launch You can Delete, Move, Reinstall, or View Details about the App Long press the select button on the Samsung TV remote with the APP hilighted The apps on your smart TV can become outdated over time. Updating them can be automatic or done manually. Step 1: On your Samsung TV remote, press the Smart Hub or Home button. Step 2: Choose Apps from the bottom-ribbon of menu options. Next, select My Apps, followed by Options. Step 3: If you want your TV apps to update automatically, toggle Auto Update on. • Wall Mounting TV • Audio Video Connections • See over 100 Hookup Diagrams • Timer Record radio shows on a VCR Listen to radio on your own schedule • How to install a PCI card in your computer • Audio Video Connections • See over 100 hookup diagrams • Connection Diagrams • USB • PC to stereo hookup • Connecting PC to stereo components • Nintendo Wii hookup • How to Hookup an Audio Video Receiver • Surround Sound • VCR basics © Columbia ISA Audio/Video Empowering consumers through information Contact: columbiaisa@yahoo.com |