|
|
|
Home :
Hookup Diagrams Index Satellite Receiver to HD TV and A/V Receiver HDMI Columbia ISA home – › Wiring Diagrams Index • Netflix not working: How to Fix SEARCH *** Columbia ISA Audio/Video How to setup surround sound on a DirecTV satellite receiver DirecTV Gemini and DirecTV Gemini Air Satellite or Streaming TV 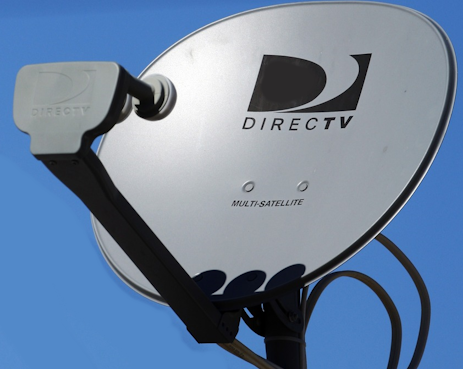 How to connect a satellite TV box to a A/V Receiver and TV DirecTV Satellite TV Gemini Receiver  Rear Ports - left to right: Ethernet (network), Optical (audio out), HDMI out, USB, power The DIRECTV Gemini device uses the Android TV operating system. This operating system allows the Gemini to function as a general-purpose streaming box. It integrates the traditional DIRECTV experience along with streaming apps such as Netflix, Hulu, and HBO Max (now Max). DirecTV Gemini Air Streaming TV box 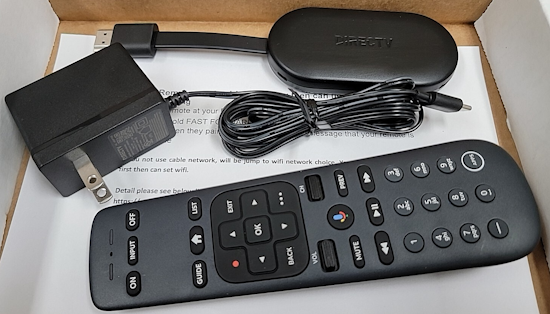 The DIRECTV Gemini Air streaming device uses a customized version of Google's Android TV. 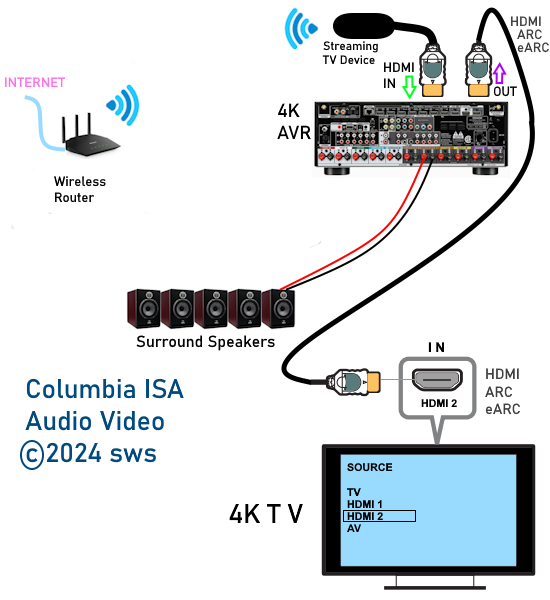 Connection diagram - DirecTV Gemini Air streaming TV Surround Sound Be sure your sound system has an HDMI input or optical/digital audio input. Your TV, soundbar, or A/V receiver needs to be set to the correct source input for the Gemini to be recognized. Step 1: Connect the Gemini device to your sound system. Plug the Gemini's HDMI cable into an HDMI input on your soundbar or AV receiver. If your soundbar or Audio/Video receiver has an HDMI output for the TV, connect that to your television. Alternatively, if your soundbar or receiver has an optical audio input, you may be able to connect the Gemini to the TV via HDMI, and then use an optical audio cable from the TV optical output to the soundbar/receiver optical input for audio. The optical connection will be limited to PCM stereo or Dolby Digital 5.1 surround sound. HDMI will be able to handle the best surround sound formats. Step 2: Adjust the Gemini's audio settings Press the Home button on your Gemini remote. Go to Settings.  Select System > then Audio. 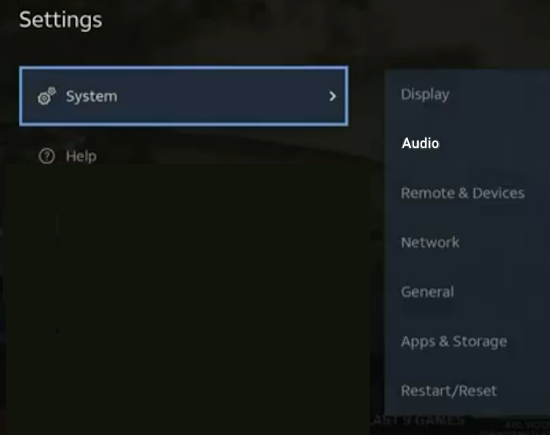 Ensure that Audio Output or Dolby Audio is set to Surround Sound or On. 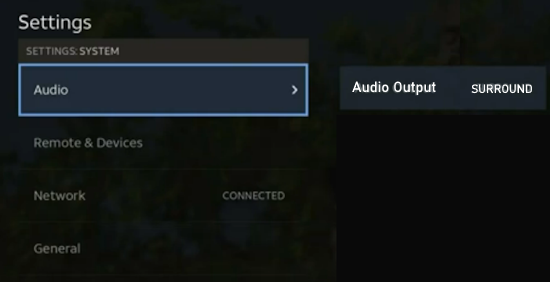 Check if surround sound is working. If not, try setting to "Stereo" to see if this setting is working. If surround sound is available from the source you can see the audio channels displayed on the A/V receiver front panel. Note: The App must also support surround sound. DirecTV Gemini - set audio to surround sound How to Set Up Surround Sound for an older DIRECTV HD DVR Satellite Box Press MENU on your DirecTV remote control, select Settings & Help, then Settings to review or change your system settings. These include: audio options, video format, TV resolution, network setup, remote control setup and more. 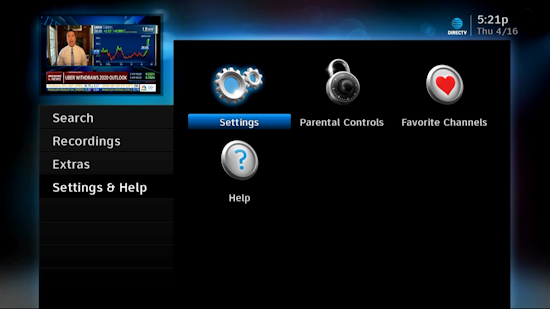  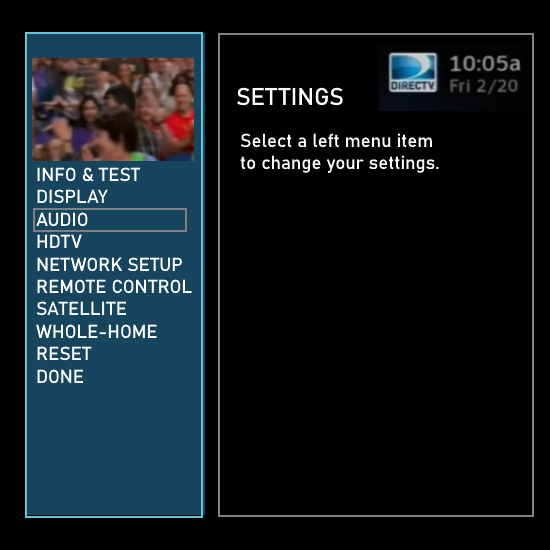 OLD DIRECTV RECEIVER AUDIO MENU 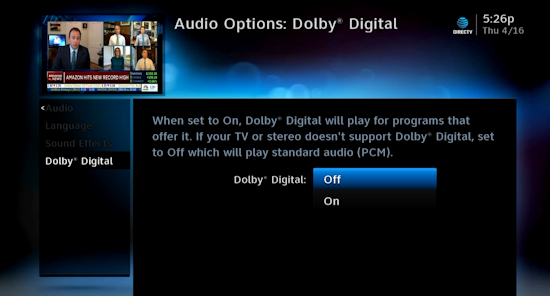 Only two choices, ON or OFF. When set to ON Dolby Digital will play for programs that offer it. AUDIO: Dolby® Digital*: Select ON or OFF for Dolby Digital audio output to enable or disable a surround sound system. HD Channels include 5.1 surround sound when available from the source content program provider. Additional equipment is required (soundbar or Audio Video Receiver). NEWER DIRECTV RECEIVER AUDIO MENU 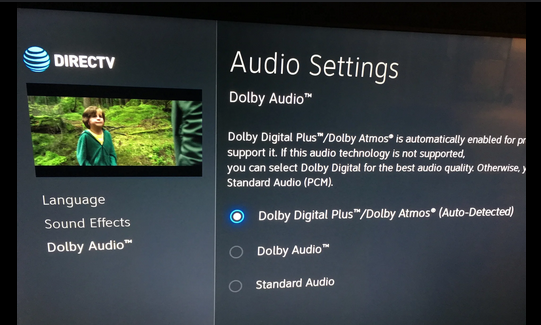 Three choices, Dolby Digital Plus/ATMOS auto-detected or Dolby Audio surround or Standard 2-channel stereo. DIRECTV RECEIVERS  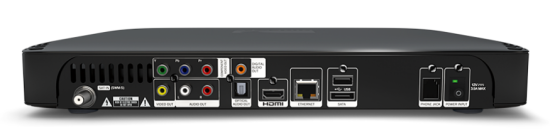 Surround sound - how to get the sound you want PCM Audio PCM is 2-channel stereo audio, encoded the same way as CDs. It is a digital stream, which means the quality is pretty good, but you don’t get the real highs or lows, and the sound can be a little mechanical. Of course because this is a 2-channel source, you don’t get true surround. If your home theater receiver can decode Dolby Pro Logic II, you can get a simulated surround. Dolby Digital 5.1 Dolby Audio is the standard for most broadcasts. In most cases, you get five channels of audio (front left, center, front right, left and right rears) plus one channel of bass. The Dolby Audio standard does allow for up to seven channels of audio and two bass channels. In general though, you won’t find “7.2” in DIRECTV broadcasts because the content providers don’t offer it. Press MENU on your DirecTV remote. Scroll down to Settings. Arrow to Audio and press SELECT. Arrow down to Dolby Audio and press SELECT. If you have an older HD receiver, you’ll see a screen with a choice of “Off” or “On.” If you have a 4K Genie client you will have the choice between Off, Dolby Audio, and Dolby Atmos. Choose what you want by arrowing over and down, and pressing SELECT. Press EXIT to go back to TV. The audio delivered to you with the video of a program you view can be stereo or it can be surround. Stereo is 2 channel, 2 speaker audio, a left and a right channel/speaker setup. Stereo is used mostly for music but can be used as a soundtrack in movies. Your TV usually has a stereo speaker setup as does a vintage stereo receiver used to play vinyl stereo records or Compact Discs. DVD also contains a stereo soundtrack but also very often contains surround soundtracks. Surround differs from stereo in that surround has 6 or more channels and 6 or more speakers. So surround has more data and uses more space than does stereo. Surround can be down-mixed into 2 channel stereo. What is the difference between sound and audio? Sound is mechanical energy while audio is electrical energy. Sound occurs when air is moved or vibrated at frequencies the human ear/brain can interpret. Audio is electrical signals that when processed by electronic devices, can be converted into mechanical energy. Surround sound requires a soundbar or an Audio Video Receiver with multiple loudspeakers. If the program you are viewing has surround sound then you need to have your DirecTV Receiver connected to a soundbar or an Audio Video Receiver using either the HDMI cable connection or the optical or coaxial digital audio connection. This gets the audio from the DirecTV receiver to a processor so the digital audio can be decoded, amplified and converted to analog audio for the speakers. You also need to select in the audio menus, the correct audio format for surround sound. Use one of the three methods available to get surround sound from DirecTV receiver to a soundbar or Audio Video Receiver (AVR) depending on what components you have and what options are available on those components. 1. HDMI connection - HDMI can handle all current audio formats. 2. Optical connection - only handles PCM and 5.1 surround, cannot handle Dolby Digital Plus or ATMOS. 3. Coaxial connection - only handles PCM and 5.1 surround, cannot handle Dolby Digital Plus or ATMOS. 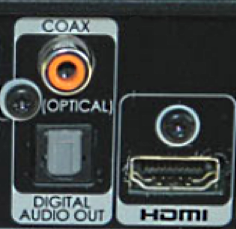 The usually orange coaxial connection uses a RCA cable to connect DirecTV receiver to surround sound processor. 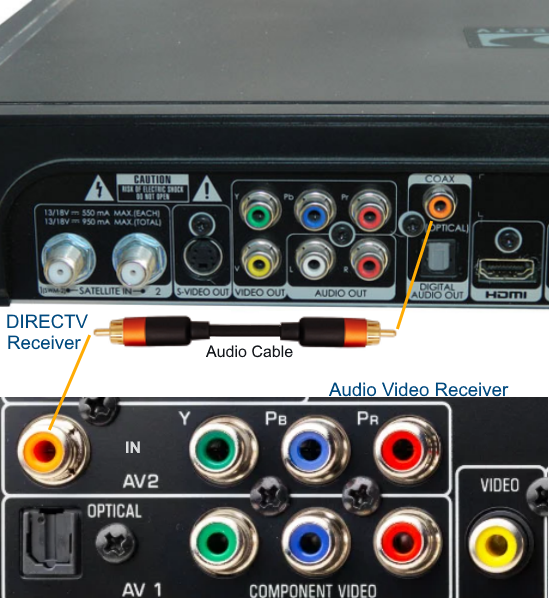 The RCA cable for coaxial digital audio is typically a much higher quality than a regular analog RCA audio cable. You can send Dolby Digital surround (5.1) with the coaxial connection, however HDMI is required for Dolby Digital Plus or Dolby TrueHD. Be sure to select the correct input on the AVR and select the correct audio option in the DirecTV on-screen menus. The surround processor will decode, amplify, convert to analog and send each audio channel to the correct loudspeaker. The optical cable connection has the same capabilities as the coaxial. The only difference is the optical connection uses light over a fiber optic cable instead of electricity over a copper wire cable. This allows for somewhat longer cable distances and less interference than copper cables. DIRECTV Receivers for secondary rooms 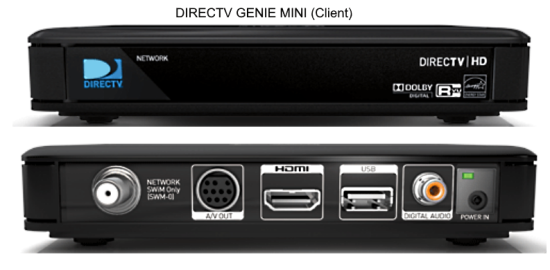 The DIRECTV DVR Main Receivers are not the only receivers available. You can have additional receivers in the bedroom or other areas for additional TVs. The Genie Mini is one of these secondary receivers. This box has HDMI, coaxial digital audio and AV (analog audio/video) Outputs for digital or analog TVs. By using the 10 pin cable with yellow, white and red RCA connections, you can hookup an older TV or a stereo system for better sound than a TV can produce. The 10 pin cable is available online. 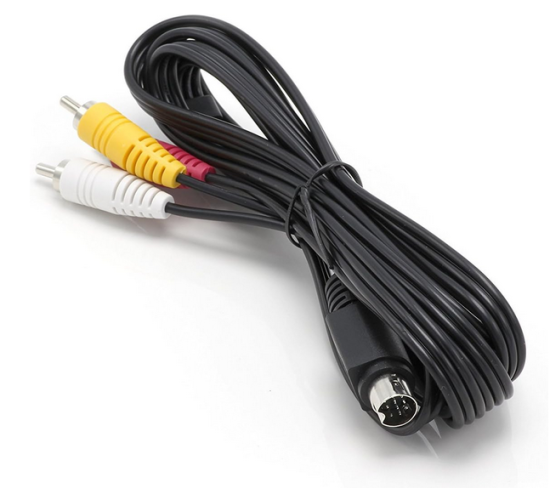 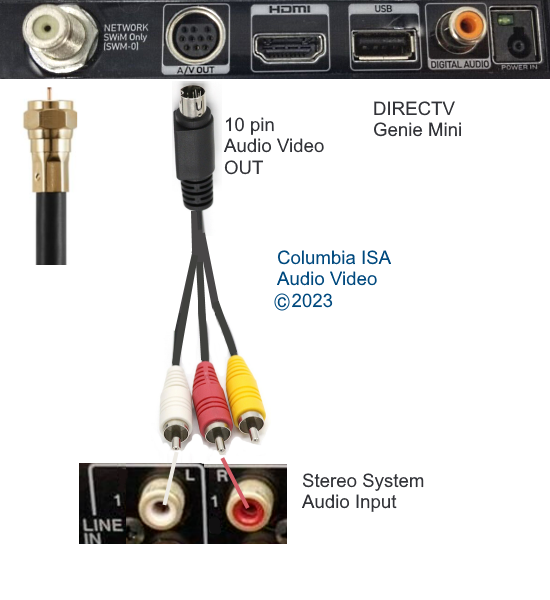 Soundbar 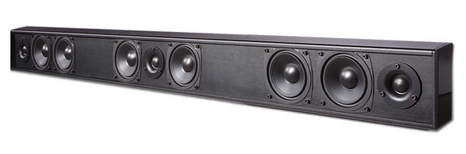 Soundbars can be used instead of a stereo system for better sound. Be sure to get a soundbar with all the inputs you need and all the capabilities your setup requires. 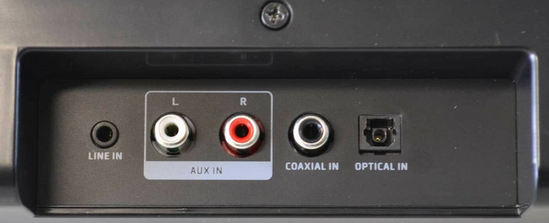 Soundbar inputs: 3.5mm - RCA stereo - coaxial digital - Optical 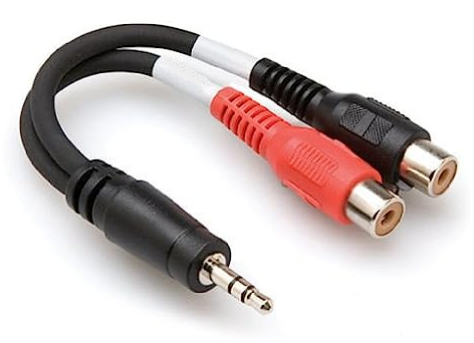 Audio cable adapter: RCA stereo to 3.5mm Use for soundbars without RCA inputs, only 3.5mm aux HDMI connection options 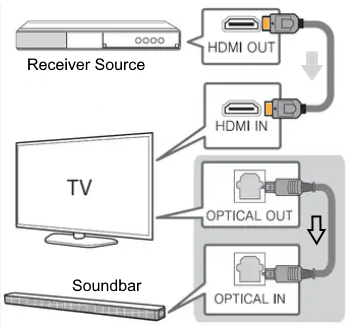 DirecTV Surround sound connection - option 1 Video and audio from DirecTV Receiver to the TV using HDMI cable connection and then optical cable audio connection from TV to soundbar. In this connection option, the TV must be capable of audio passthrough for the audio formats you want. 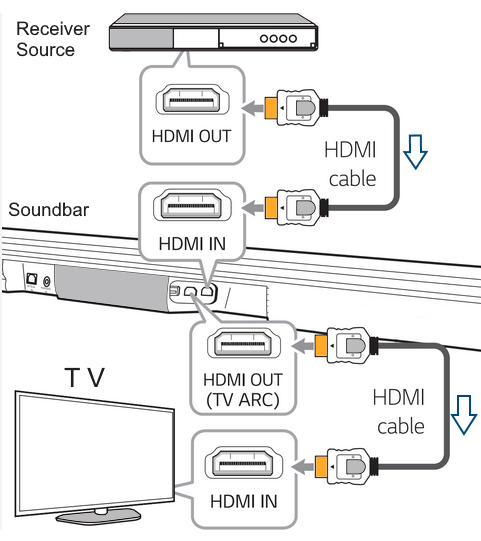 DirecTV Surround sound connection - option 2 Using this connection option, the audio and video goes directly to the sound processor which handles the audio and passes the video to the TV. 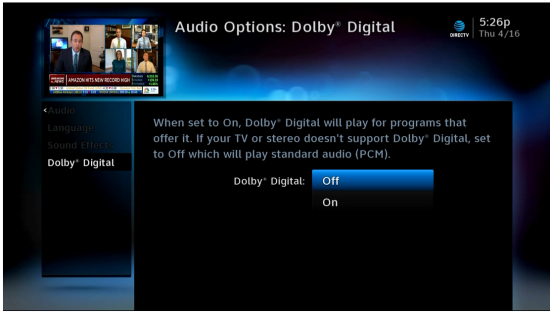 AUDIO SETTINGS Press MENU on your DIRECTV remote. Arrow down to Settings&Help and press SELECT. Make sure that Settings is highlighted and press SELECT. Arrow down to Audio and press SELECT. Arrow down to Dolby Digital and press SELECT. You will see a choice between “Off” and “On.” Arrow over and down and press SELECT to choose. OFF will use PCM which is 2-channel stereo while ON will use Dolby Digital surround sound. Press EXIT to go back to live TV Using your DIRECTV remote select MENU - SETTINGS - AUDIO. Scroll down to Dolby Audio. Find "Dolby Audio/Dolby Atmos is automatically enabled for programs and equipment that support it." Audio and video content you receive from your provider can be sent to you in a variety of formats. In addition, the original content creators have decided what formats will be available. So if you want a certain format and it is simply not available, either from the content creator or from your provider, it does not matter how capable your equipment is, you will not get the format. Think of a chain and each link in the chain as a part of what is required to get the sound you want. If any link does not have the capability to process the audio format you want, then you will not be getting the audio as desired. For example, if you want Dolby ATMOS but the movie does not have it or your provider does not transmit the format, you cannot hear that format. Every link in the chain must be capable of handling the format you want. Your sound processor, soundbar or audio video receiver, your cables and equipment must all be capable of processing the sound you want to hear. HDMI ARC and eARC HDMI ARC or Audio Return Channel allows you to send audio from your TV to your soundbar or AVR using a single HDMI cable. It is a two-way path, audio from the TV and video to the TV over the same HDMI cable. Look for the HDMI port labeled HDMI ARC or HDMI ARC/eARC on TV, soundbar, AVR. HDMI 2.1a features Enhanced Audio Return Channel (eARC) which is an advancement over the previous Audio Return Channel (ARC). eARC supports the latest high-bitrate audio formats up to192kHz, 24-bit, and uncompressed 5.1 and 7.1, and 32-channel uncompressed audio. It also supports DTS-HD Master Audio™, DTS:X®, Dolby® TrueHD, Dolby Atmos®. eARC enables the audio to a TV that originates from cable, satellite, streaming or source devices to be sent to an AVR or sound bar through a single HDMI cable. Dolby ATMOS 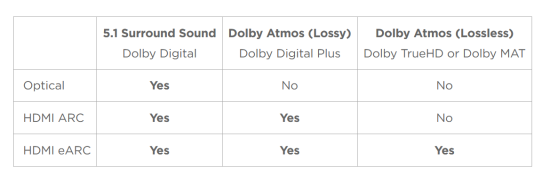 Most Dolby Atmos audio can be played through HDMI-ARC using the Dolby Digital Plus codec. HDMI-eARC is required to play lossless Dolby Atmos audio using the Dolby TrueHD codec. 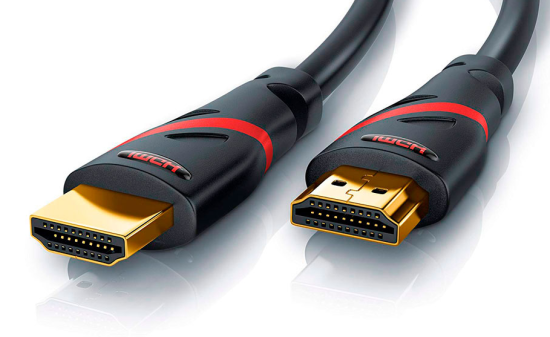 HDMI cable Surround Sound connections are either an optical cable (Toslink) or HDMI cable. Connect satellite receiver to audio/video receiver (with loudspeakers) using the optical audio cable or HDMI. Also on the satellite receiver, go into menu, settings, audio, dolby digital and set dolby digital to ON. If you prefer to use a soundbar instead of an audio/video receiver (AVR) for surround sound, make sure the soundbar has all the input and output ports you require such as HDMI, optical. 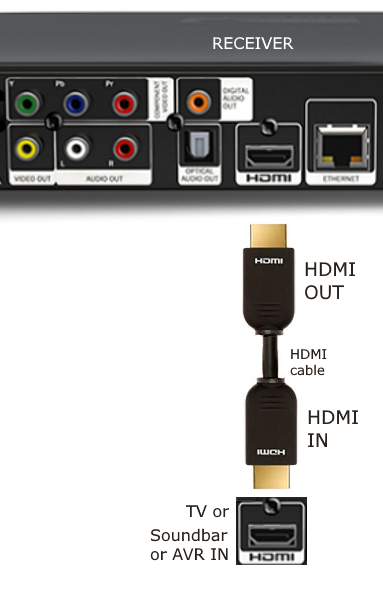 You can connect an HDMI cable from the receiver HDMI output to one of three devices capable of processing the desired audio/video formats. 1. TV - must be capable of audio passthrough for the desired audio formats. Not all TVs can passthrough all audio formats. 2. Soundbar - must be capable of decoding the desired audio format. Must be capable of passing desired video quality to TV (HDMI ARC/eARC) 3. Audio Video Receiver AVR - must be capable of decoding the desired audio formats. Must be capable of passing desired video quality to TV (HDMI ARC/eARC) If you connect the receiver to the TV, the TV must pass the audio to the soundbar or AVR for decoding and then to loudspeakers. If the TV does not have audio passthrough for the audio format, then you can connect the receiver to the soundbar or AVR but they then must passthrough the video to the TV using HDMI ARC/eARC. Be sure the soundbar or AVR has the video passthrough quality you desire. You Need: o HDTV with HDMI inputs o Up to date home theater receiver (AVR) or soundbar with at least two HDMI input ports and one HDMI out port or optical audio input port. o Five to seven loudspeakers if using an AVR o One subwoofer o Two HDMI cables o Speaker wire for AVR loudspeakers 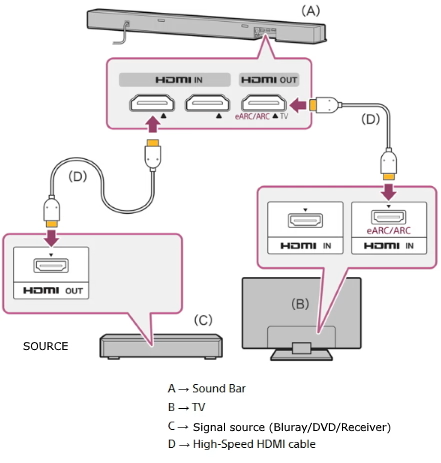 Soundbar connection with HDMI to TV for surround sound • How to Setup DISH satellite Surround Sound • Streaming TV and devices • DVD Satellite TV hookup • How to hook up Surround Sound for Netflix, Hulu • What to look for in a TV for 2022-2023 • What you don't know about your 4K TV Share on Twitter Tweet  Optical Audio Cable • 8K 10K 4K HDMI Cable 48Gbps 6.6FT/2M, Certified Ultra High Speed HDMI® Cable Ultra High-Speed HDMI Cable (48Gbps, 8K/60Hz ) from Amazon  HDMI Cable AUDIO SETTINGS: DirecTv broadcasts many shows and movies in Dolby 5.1 surround. DirecTv receivers are not set by default to output Dolby surround. To check, first press ‘menu’ on your remote. Then, on the left side of your screen, scroll down and select “Settings & Help.” Arrow over to the right and press select on “Settings.” Then scroll down and select “Audio.” Then select “Dolby Digital.” Then press select and you will see 2 choices: “Off” and “On.” Select “On” Then, press “exit.” Try watching some movies and your audio/video receiver should indicate “Dolby”, or “Dolby Digital”. 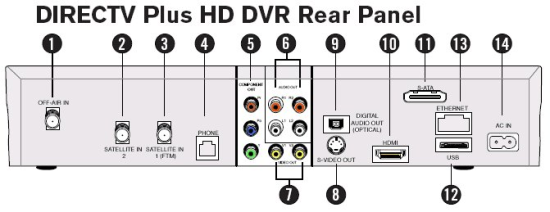 DIRECTV HD DVR satellite receiver Receiver set-top-box jacks explanation: 1) OFF-AIR IN – Connect an ATSC VHF/UHF antenna to the DIRECTV Plus HD DVR using this jack. You will be able to watch off-air digital TV broadcasts (ATSC programming) on your DIRECTV HD DVR, and these ATSC channels will appear in the Guide. 2) SATELLITE IN 2 – Use to connect the DIRECTV Plus HD DVR to the satellite dish antenna. 3) SATELLITE IN 1 (FTM) – Use to connect the DIRECTV Plus HD DVR to a second LNB on the satellite dish antenna, giving you the ability to watch and record up to two programs at once. If your installation includes an FTM (Frequency Translator Module), connect the FTM output to this input. FTM is a technology that allows multiple tuners to work with a single satellite input. 4) PHONE – Connects the DIRECTV Plus HD DVR to a telephone wall jack. A land-based telephone connection is needed to communicate periodically with the DIRECTV Plus HD DVR. 5) COMPONENT OUT/ YPbPr – Provides good HD picture quality, but not as good as HDMI. YPbPr carries only picture information, not sound; use it along with a digital audio connection or AUDIO (L/R red/white) jacks. 6) AUDIO (R-Red and L-White) – Audio cables offer better sound quality than RF coaxial cables. You can connect a second set of audio cables to another component, such as a VCR or stereo. 7) VIDEO (Yellow) – Provides good picture quality for standard-definition TV. Connect the second RCA-type composite VIDEO jack to another device, such as a VCR. You must also connect the AUDIO cables when using the VIDEO connection. 8) S-VIDEO OUT – Provides the best picture quality for standard-definition TV, better than VIDEO RCA-type jacks. If your TV has an S-Video jack, use it along with the AUDIO jacks (S-Video only carries picture information, not sound) to connect to your TV. 9) DIGITAL AUDIO OUT (OPTICAL) – Provides digital-quality audio signal. 10) HDMI – Provides the best quality HD picture. The HDMI also provides audio, for a high-quality, “one-cable” solution. 11) S-ATA PORT. 12) USB. 13) ETHERNET (RJ45). 14) AC POWER INLET – Connects to an electrical outlet. Dolby® Digital The recommended audio format for HDTV is Dolby Digital. The DIRECTV Plus HD DVR is capable of reproducing 5.1-encoded audio: five discrete channels of full-range digital audio, plus one channel of low-frequency (subwoofer) audio, for use by A/V receivers capable of decoding the 5.1-channel signal. The audio signals are broken into left-front, center, right-front, left-rear, right-rear and low-frequency channels. The result, when your DIRECTV Plus HD DVR is connected to a compatible Dolby Digital A/V receiver and 5.1 channel speaker setup, is an experience that gives you much of the dynamic range, 360-degree imaging and sonic excitement of a real theater. Not all TV programs deliver 5.1 channel signals, and not all programs are broadcast using Dolby Digital for DIRECTV programming. Programs using this high-quality audio standard are indicated by the words Dolby Digital in the program description in the Channel Banner and Guide. DirecTV receiver setup: To change the Digital Audio format, press MENU, select Settings, then select Setup. Select Audio in the left menu. Highlight the Dolby Digital tab and press SELECT, then follow the onscreen instructions and select from the following options: On: Turns on Dolby Digital audio output. Note: True Dolby Digital is only available via HDMI or optical / digital coaxial outputs. Off: Select this option to turn off Dolby Digital Audio output. Cables and Connections HDMI Jack and Cable The DIRECTV HD DVR incorporates HDMI™ [or High-Definition Multimedia Interface] technology. HDMI offers a high-quality connection that combines the video and audio signal into a single cable. The HDMI jack uses HDCP content protection to allow you to view HD programming that has been encoded using the HDCP protection system. For the best access to HD programming at the highest available resolution, connect this to an HDTV that supports HDCP technology. Component Video Output (YPbPr) The component connector provides high-quality video for your HDTV system. Component video is also referred to as “YPbPr.” It uses three separate cables—with connectors colored green, red and blue—one for each component of the HD video signal. A separate audio connection is also required, using either Digital Audio Optical cable or the audio portion of an A/V cable. Digital Audio Outputs (Optical Jack and Cable) The Digital Audio Optical cable provides the best quality audio. The jack and cable use light to send digital audio data to A/V receivers equipped to receive and interpret it. The jack and cable must be aligned before plugging in, and may be covered by protective caps, which must be removed before making connections. Use caution when handling optical cables. Hooking Up the Loudspeakers  Position the speakers where you want them around the room. For each speaker, take a roll of speaker wire and measure out how much you'll need to get the wire from the speaker to where you've placed your Audio/Video receiver, then add an extra 6 feet or so. Allow for the entire route of wiring including turns, angles, up, down, and around. About 6 inches from the end of each wire that you've placed near the receiver, make a mark that will help you figure out which wire goes to which speaker (left front, right front, center, left rear, right rear and sub). To connect the wire, strip off about 1/2 to 3/4 of an inch off the end, then pull the ends apart, separating a bit of the remaining wire. Twist the threads of each side of the wire together. Connect this side into the red speaker connector. Insert the other side into the black speaker connector. Complete this process for each speaker. At the receiver, complete the stripping process for each of the wires, then insert the ends into the appropriate speaker port--these should be well marked on your receiver. Connect your subwoofer into the back of the receiver using your subwoofer cables. Also, if your receiver has a power port on the back, plug your subwoofer into the receiver. This will allow you to shut off power to your subwoofer by simply shutting off the receiver. Connect to the audio/video Receiver 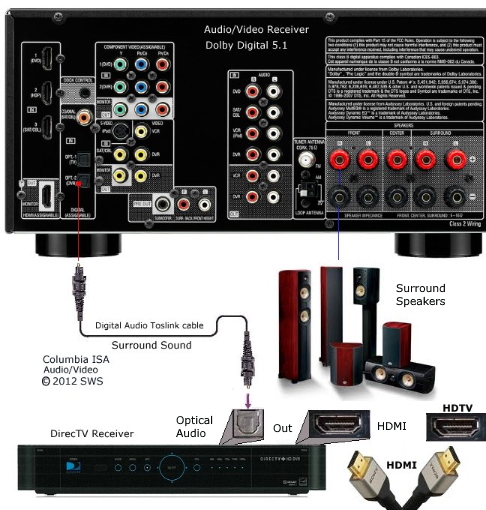 DirecTV Diagram - Surround Sound Connection HDMI Supported Audio Formats • 2-channel linear PCM (32–192 kHz, 16/20/24 bit) • Multichannel linear PCM (7.1 ch, 32–192 kHz) • Bitstream (Dolby Digital, Dolby Digital Plus, Dolby TrueHD, DTS, DTS-HD High Resolution Audio, DTS-HD Master Audio) Your source component (cable/satellite receiver or DVD player, etc.) must also support HDMI output of the above audio formats. Digital audio signals received by the HDMI IN jacks are output by the loudspeakers connected to the A/V receiver/AV amplifier. Normally, they are not output by the HDMI OUT (To TV), unless the HDMI Audio Out setting is set to ON. 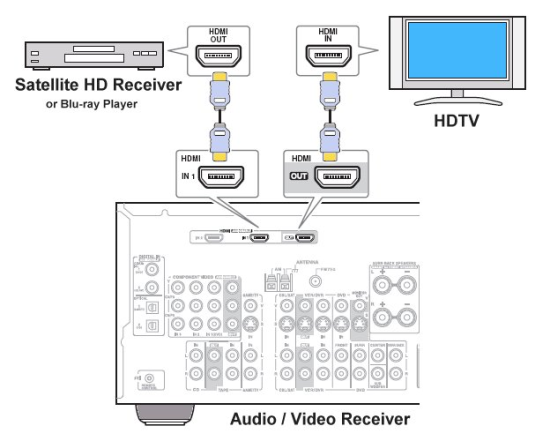 Connect one of the HDMI cables to the back of your DirecTV HDMI output port. Then connect it to the back of the appropriate HDMI input port on the A/V receiver. Some receivers will require you to "assign" an HDMI port to a certain setting on the receiver, for instance, assign an HDMI port to the mode that will control your television. Check your A/V receiver's manual for more information on this. Plug in any other devices you might want to use into the back of the receiver such as a DVD player. If your TV has an HDMI port, connect the second HDMI cable to "Monitor Out" or "Out to TV' or the like on the back of your A/V receiver. Then connect the other end to the HDMI input port on the back of the television (HDTV). If you do not have an HDMI port on your television, do the same with your component video cables, connecting them according to color code (your receiver will have a Video Out, or Monitor Out for these as well). Set the television to the appropriate input. Turn the volume on your TV all the way down; if you have sound coming from your TV speakers AND surround sound, it's apt to sound off-balance. You'll just need your home theater surround sound system now. SETTINGS Both the A/V Receiver and the DirecTV receiver have audio settings which may need to be selected for the proper output. Check owner's manuals here. TV DIRECTV Installing Surround Sound TROUBLE, PROBLEMS I have no sound, what can I do? Try unplugging the TV and the satellite receiver from power outlets for 2 mins. and also disconnect the HDMI cables from the TV, AVR or soundbar and the satellite receiver. After waiting 2 mins., plug in the HDMI cables back into the TV, AVR or soundbar and the satellite receiver, then plug the TV, AVR or soundbar and satellite receiver back into power outlets. Power on the TV, AVR or soundbar and the satellite receiver. Select the satellite receiver on the TV source using the TV remote. Check the audio settings for the satellite receiver using the receiver remote for on-screen menus. Try different audio settings to see which works. Remember not all TV shows have surround sound. PCM Audio PCM Audio is 2-channel stereo, encoded the same way as CDs. It is a digital stream, which means the quality is good, but because this is 2-channel, you don’t get true surround sound. Dolby Audio (Dolby Digital) Dolby Audio is the standard for most broadcasts. In most cases, you get five channels of audio (left, center, right, and two rears) plus one channel of bass. The Dolby Audio standard does allow for up to seven channels of audio and two bass channels. In general though, you won’t find “7.2” in DIRECTV broadcasts because the content providers do not provide this. Dolby Atmos Dolby Atmos is the most high-tech audio solution. Technically, you can use hundreds of speakers, although in the home there’s not really a need. The biggest difference with Dolby Atmos is height channels. A typical surround setup is 2-D. There’s no description of how high the speaker is in the room. Atmos changes this by allowing for speakers that are higher and lower and directing sound as needed. Instead of relying on a fixed, discrete number of audio channels, a home theater receiver processes an Atmos stream with an understanding of where all the speakers in the room are in 3-D space and sends audio where it needs to be. DIRECTV Audio Settings: Press MENU on your remote. Scroll down to Settings. Arrow over to Audio and press SELECT. Arrow down to Dolby Audio and press SELECT. If you have an HD receiver, you’ll see a screen above with a choice of “Off” or “On.” If you have a 4K Genie client you will have the choice between Off, Dolby Audio, and Dolby Atmos. Choose what you want by arrowing over and down, and pressing SELECT. Older Receivers: Press MENU on your remote. Arrow down to Settings&Help and press SELECT. Make sure that Settings is highlighted and press SELECT. Arrow down to Audio and press SELECT. Arrow down to Dolby Digital and press SELECT. You will see a choice between “Off” and “On.” Arrow over and down and press SELECT to choose. Press EXIT to go back to live TV. • Hookup diagram - cablebox to stereo • How to hookup a TIVO • How to hook up a Plasma or LCD HDTV Streaming TV and devices • How to hook up a Cable TV box • Cable TV - Cable Box Setup • How to Install a HD Cable Box • Cable TV - Cable Box Setup Scientific Atlanta 4250HDC • Surround Sound over HDMI • Surround Sound - How to Hookup • HDTV Antennas and Reviews • Internet TV media boxes compared • How to setup wireless internet • How to setup wireless USB adapter on PC • TV sound - external speakers º How to hookup speakers to your TV or computer • Bluray Players, internet-enabled, Netflix movie streaming • Cable Types, audio/video for TV, explanation • Hookup diagrams, TV, VCR, DVD, Digital cable box • DVD Players reviews and Guide • VHS to DVD copy VCR tape to DVD disc • iPhone to HDTV • Missing stereo Mix in Vista, Windows 7 • Wall Mounts for TV • Audio Video Connections • Tivo video recorder hookup, channel changing Columbia ISA Audio Video Empowering consumers through information columbiaisa@yahoo.com - |