|
|
|
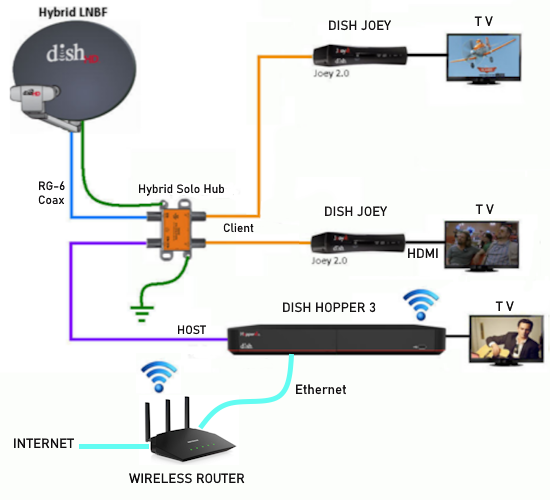
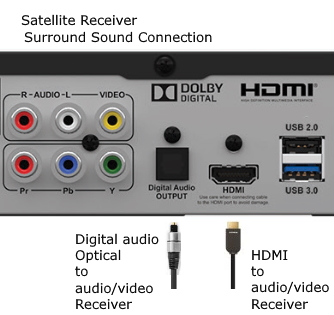
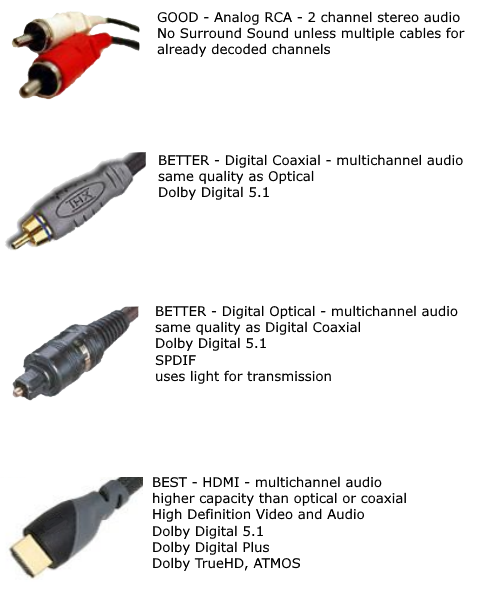
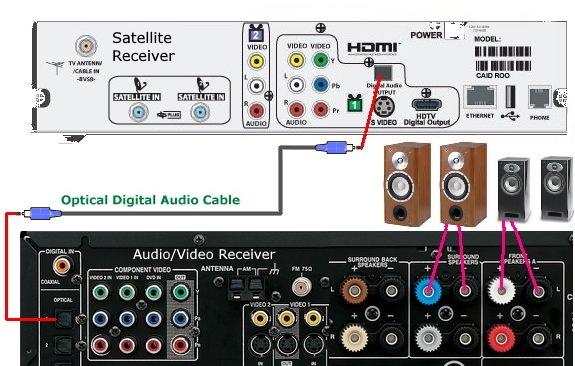
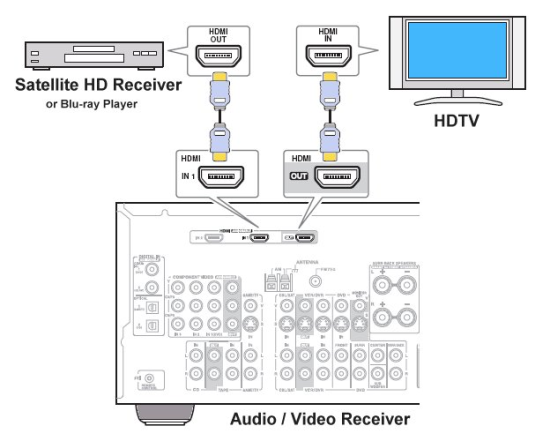
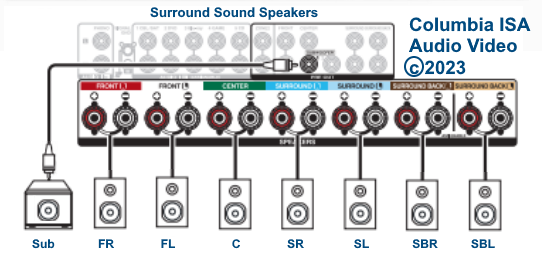
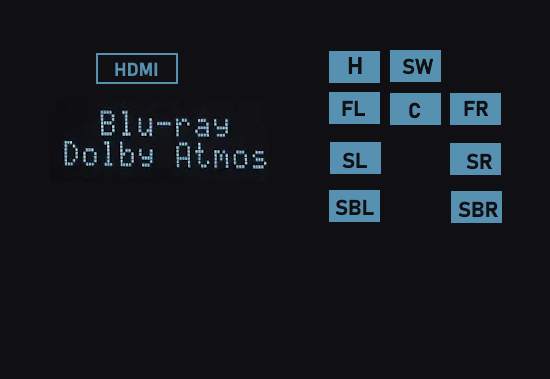
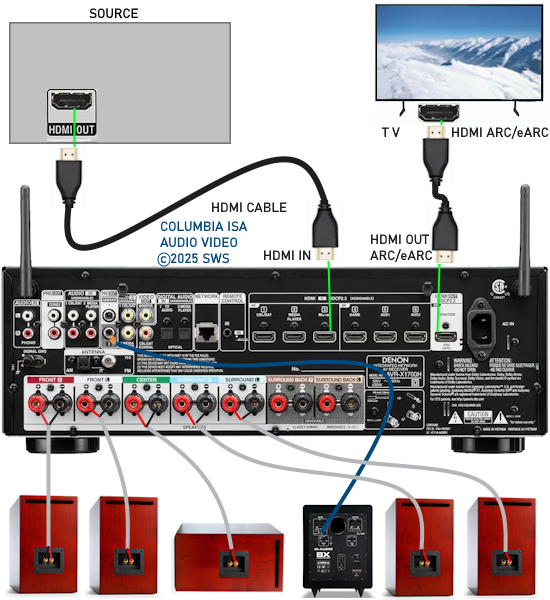
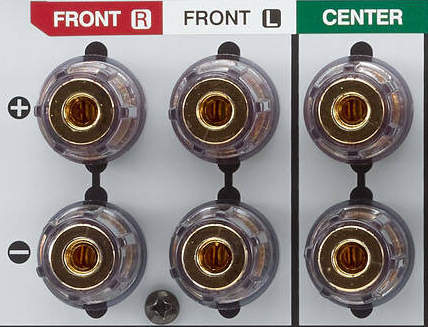
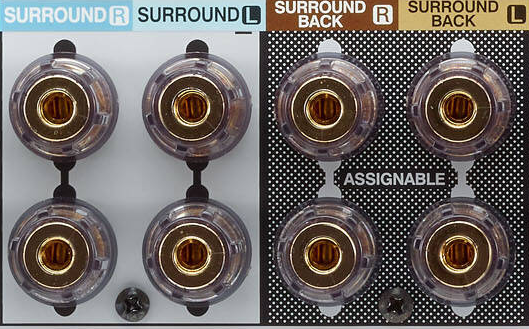
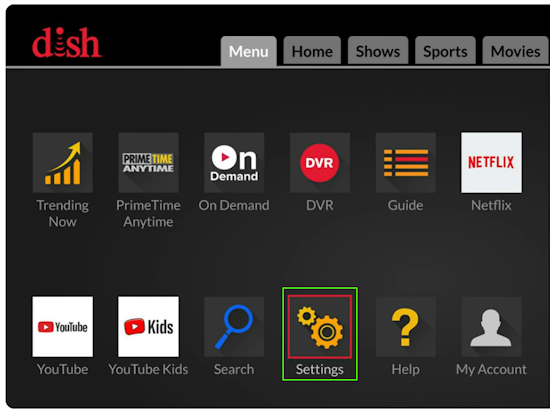
Home > Hookup Diagrams Index > Satellite Receiver to HD TV and A/V Receiver HDMI SEARCH *** Columbia ISA Audio/Video • Streaming TV and devices • DVD Satellite TV hookup • How to hook up Surround Sound for Netflix, Hulu Share on X (Twitter) Tweet How to setup surround sound on a Dish HD DVR satellite TV receiver How to connect a digital satellite TV set-top-box to a A/V Receiver How to Set Up Surround Sound for a DISH HD DVR SATELLITE BOX 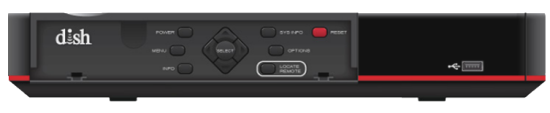 DISH Satellite Receiver Set DISH Satellite Receiver for Surround Sound The Dolby Digital setting allows you to turn Dolby Digital Surround on or off to enable or disable surround sound. Step 1 - Press the MENU button once or the HOME button twice, depending on your DISH remote control. Step 2 - Select "Settings". Step 3 - Select "Audio Output". Step 4 - Select "Dolby Digital Pass-through". Make sure Dolby Digital Pass-through is set to ON. AUDIO SETTINGS Both the A/V Receiver and the Dish receiver have audio settings which may need to be selected for the proper output. Check owner's manuals here. Example - Press the MENU button or the HOME button (twice) on the DISH remote control. Pressing HOME twice or MENU once gets you to the main screen where you can find settings, apps, and more. Navigate to the proper selection such as SYSTEM SETUP or AUDIO SETTINGS and select. Hilight the Dolby Digital option and select DONE. This allows surround sound instead of stereo or standard audio. 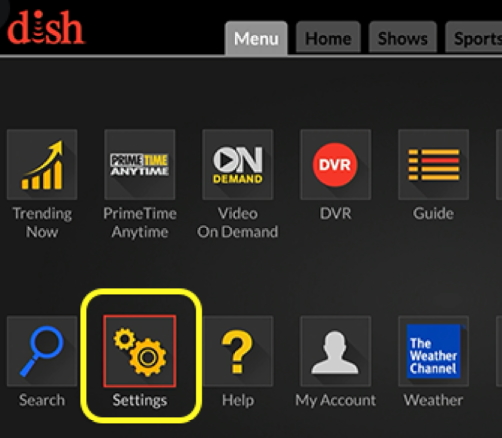 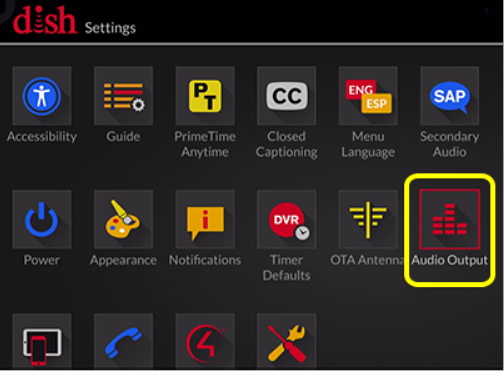 Dolby Digital Passthru is set to OFF by default. Set to ON to allow surround sound to pass through. 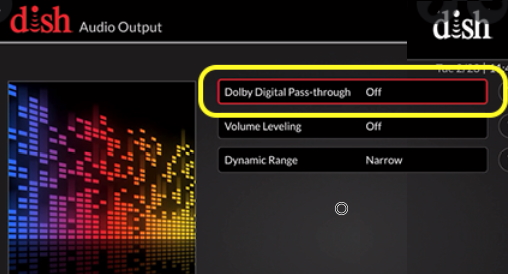 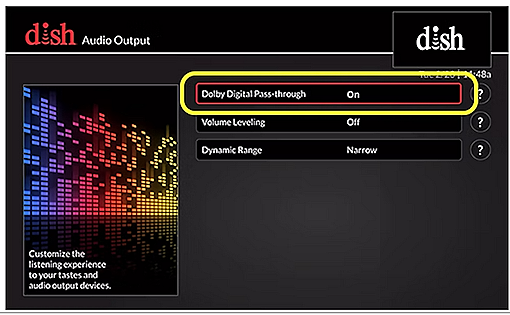 DISH Joey client Receivers: To enable surround sound on a DISH Joey client receiver, navigate to "Settings" > "Audio Output" and select "Dolby Digital" or "Dolby Digital Pass-through". Connect the Joey to a surround sound receiver via HDMI cable or optical audio cable.  DISH Joey client receiver rear ports DISH Network setups, specifically those using the Hopper and Joey system, use MoCA technology to connect receivers to each other and to the internet via existing coaxial cables. DISH is a member of the MoCA and utilizes this to stream video content between the main Hopper DVR and satellite Joey units. MoCA (Multimedia over Coax Alliance) technology is bidirectional, allowing data to flow in both directions simultaneously (full-duplex in higher versions) over coaxial cables. It supports high-speed, two-way internet traffic and networking, capable of coexisting with existing cable TV or ISP signals.  DISH satellite connection diagram - Surround Sound Steps for DISH and TV Surround Sound Setup: Plug an HDMI cable from the Hopper's "HDMI Out" into an "HDMI In" port on your TV. For audio, connect either an optical audio cable from the TV's "Digital Audio Out" to your surround sound system optical input port, or use an HDMI cable if both devices support HDMI ARC/eARC. Connect only to the HDMI ARC/eARC ports. DISH Hopper Audio Settings: Press the Home button twice or Menu, select Settings > Audio Output. Next, Select Dolby Digital Pass-through to enable 5.1 surround sound. TV Audio Settings: Ensure your TV's audio output is set to "External Speakers" or "Audio System" and that the digital output format is set to "Pass-through" or "Bitstream". If the TV only has HDMI ARC, be sure to enable HDMI CEC (SimpLink, Anynet+ etc.). Surround Sound has many considerations including what equipment you have, what content source and which user settings. In order to get true surround sound, you need to look at several settings, cables, hookups and gear. Soundbar or AV Receiver and speakers What is a soundbar? 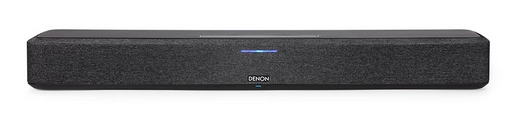 A soundbar is a long, slim, self-contained speaker system designed to improve your sound experience by delivering richer sound, and immersive surround effects in a space-saving unit. It houses multiple speakers (drivers), connects with HDMI or optical cables, and can include wireless connectivity and separate subwoofers or rear speakers. Soundbars contain an amplifier, several speakers, a digital signal processor and a power board. In addition, wireless transmitter/receivers for connectivity. Soundbar methods of true surround sound Simulation (Virtual Surround) Digital Signal Processing (DSP): A soundbar's internal chip decodes the received surround sound audio signal but then uses algorithms to downmix those separate channels to play through fewer speakers. How does a soundbar handle Dolby Atmos? A soundbar can handle Dolby Atmos by using built-in upward-firing speakers and/or side-firing drivers to reflect sound off ceilings and walls, creating virtual overhead and surround effects, alongside advanced audio processing to place audio objects in a 3D space, mimicking a full speaker system without the physical speakers of a true Atmos setup. While not "true" Atmos (which requires physical height or ceiling speakers), high-end soundbars offer impressive immersion through these acoustic tricks and sometimes add separate rear modules with height channels for a more convincing 360 degree effect. Soundbars can be a simple single unit or can have a subwoofer speaker and some surround speakers. 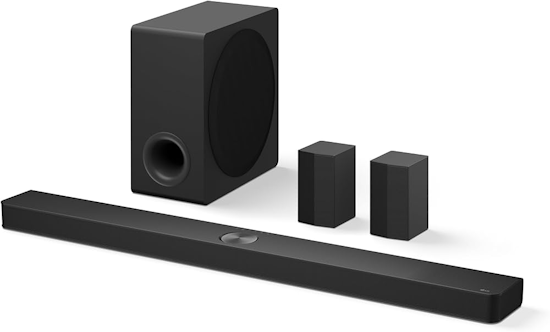  Depending on the format of the audio signal the soundbar receives, different combinations of speakers can be activated to accommodate the sound required. For example, a 2 channel stereo signal may only fire a couple of speakers. A 5.1 surround signal may fire many more speakers. Newer technology soundbars are blurring the line between soundbars and full surround sound setups. 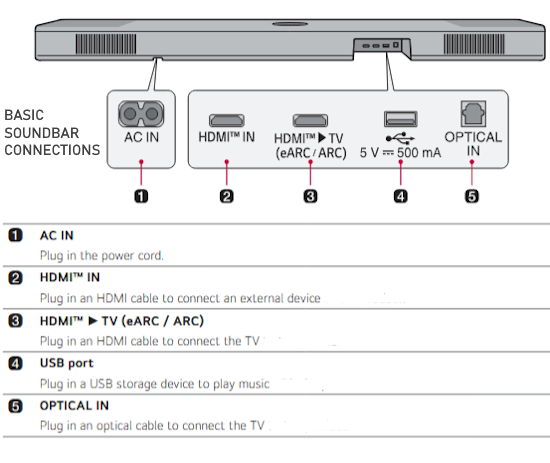 What is a full surround sound setup? A full surround setup uses an Audio Video Receiver with multiple speakers (6 or more) placed strategically around the listener to create an immersive, 360-degree sound field, making audio feel like it's coming from all directions, not just in front. The most common setup is a 5.1 system (front left/right, center, two surrounds, one subwoofer) for enveloping sound, while systems like 7.1 or Dolby Atmos (e.g., 7.1.4) add rear surrounds and overhead speakers for even greater realism. Reasons to use a soundbar instead of a full surround setup 1. Cost - soundbars are usually less costly than a full surround setup. 2. Room size - soundbars work in small rooms which cannot accommodate a full surround setup. 3. Setup labor - soundbars are more simple to setup, use less materials, less time, less space. 4. Wireless speaker connectivity. Reasons to use an AV Receiver (full surround setup) 1. Best sound experience but more cost. 2. Room size - Larger rooms can accommodate a full surround setup. 3. Greater flexibility and features. 4. More power and dynamics for fuller, richer sound. Basic connection for DISH satellite receiver to flat screen TV 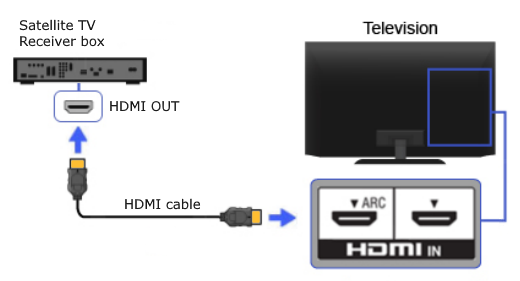 Connection diagram without surround sound Using HDMI cable for High-Def video and audio but not surround sound For surround sound you need a soundbar or an Audio Video Receiver with speakers.  Surround sound setup for DISH Receiver  AV Receiver HDMI inputs/output (rear panel) Select on the AV Receiver, the correct HDMI input source. Select on the TV, the correct HDMI input. Cables  HDMI is best, fully capable of the highest surround sound formats. Optical is good for Dolby Digital 5.1 basic surround sound. Speaker Placement For true surround sound, you need at least 6 or more speakers. The basic setup is two front speakers, left and right, a center channel speaker for dialog, two rear speakers and a subwoofer speaker for low frequencies. This is a 5.1 setup and matches the Dolby Digital 5.1 audio present in content from your provider. Some content may offer the Dolby Digital Plus audio format which could contain Dolby Atmos metadata. To experience the full effects of Atmos, you need some height speakers and an Audio Video Receiver capable of processing the audio and sending to the speakers. 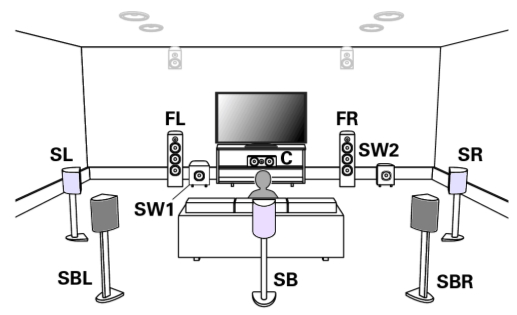 Surround Sound Speaker Setup Q: Can you get Atmos over a DISH satellite receiver? A: Yes, it is possible. You can get Dolby Atmos over a DISH Network satellite connection , but it is limited to specific content and hardware setups. Requirements: You must have a DISH Hopper 3 receiver, which is capable of outputting a Dolby Digital Plus (DD+) signal, which carries the Atmos metadata. Content Limitations: True Dolby Atmos is generally only available on select 4K movies or special events broadcast on DISH, not on standard programming. Connection Method: You must use an HDMI cable to connect your Hopper 3 to your TV or AV Receiver. Optical cables do not support Dolby Atmos. Audio Settings: You may need to ensure your DISH Hopper is set to output audio via HDMI and configured for surround sound (often found under Settings > Audio Output > Dolby Digital Pass-through). Limitations: Do not expect Atmos on all channels; it is mostly limited to high-end, on-demand, or movie-specific content. For the best experience, your TV and soundbar or AV receiver must also support Dolby Atmos via HDMI ARC/eARC. Connection diagram for Analog TV 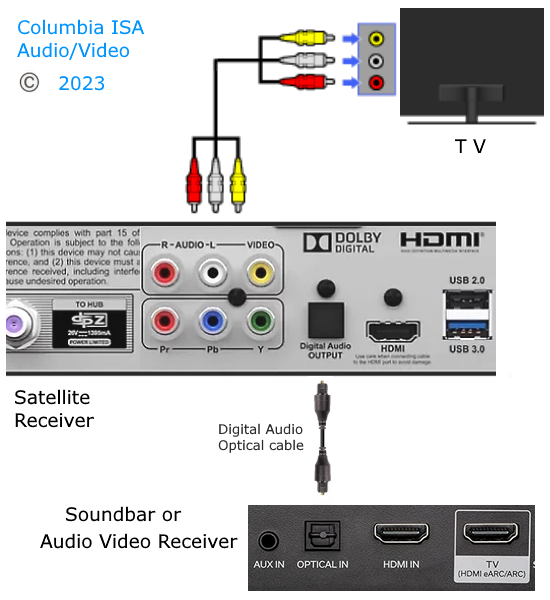 With this hookup, you get surround sound using a digital optical audio cable 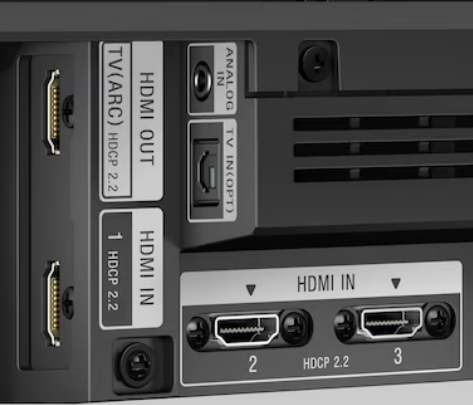 Soundbar connection ports Connection diagram for surround sound using HDMI cables 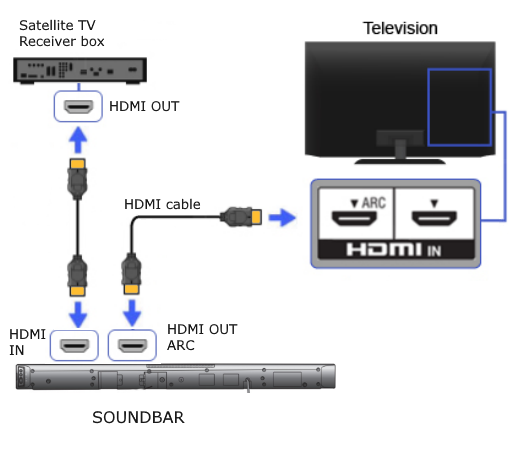 Connection diagram with surround sound Set DISH Receiver for Surround Sound Press the MENU button once or the HOME button twice, depending on your remote. Select Settings. Select Audio Output. Select Dolby Digital Pass-through. Set to ON. Use the remote of the soundbar to select the correct input. Use the remote of the TV to select the correct input. Soundbars What is surround sound? Surround sound is designed to enhance the audio experience for the listener by literally surrounding them with multiple loudspeakers, each assigned their own channel which can be voice, music, very low sound or sound effects such that the audio is more realistic and closer to real world sound experience. Surround sound is stored digitally on DVD/Blu-ray or broadcast digitally over the air or via satellite for TV. The standard for surround sound is Dolby Digital 5.1, a six channel standard which is compressed digitally and requires decoding and amplification by a home theater system or audio/video receiver with six loudspeakers. Surround sound is only available on certain TV channels such as some high definition channels or pay-per-view type channels. The two channel audio standard, stereo, is not surround sound. Two channel stereo, two speakers, is analog audio, the white and red RCA cable connections. Some DVD or Blu-ray players have built-in decoders. They will have audio outputs for connection to an amplifier for each audio channel. The six audio channels (5.1) are left, right, center, surround left, surround right and subwoofer low frequencies. The left, center and right speakers are typically in front of the listener. The surround left and right are typically in the rear of the listener and the subwoofer can be placed where the listener prefers. Surround sound - how to get the sound you want Audio and video content you receive from your provider can be sent to you in a variety of formats. In addition, the original content creators have decided what formats will be available. So if you want a certain format and it is simply not available, either from the content creator or from your provider, it does not matter how capable your equipment is, you will not get the format. Think of a chain and each link in the chain as a part of what is required to get the sound you want. If any link does not have the capability to process the audio format you want, then you will not be getting the audio as desired. For example, if you want Dolby ATMOS but the movie does not have it or your provider does not transmit the format, you cannot hear that format. Every link in the chain must be capable of handling the format you want. Your sound processor, soundbar or audio video receiver, your cables and equipment must all be capable of processing the sound you want to hear. HDMI ARC and eARC HDMI ARC or Audio Return Channel allows you to send audio from your TV to your soundbar or AVR using a single HDMI cable. It is a two-way path, audio from the TV and video to the TV over the same HDMI cable. Look for the HDMI port labeled HDMI ARC or HDMI ARC/eARC on TV, soundbar, AVR. HDMI 2.1a features Enhanced Audio Return Channel (eARC) which is an advancement over the previous Audio Return Channel (ARC). eARC supports the latest high-bitrate audio formats up to192kHz, 24-bit, and uncompressed 5.1 and 7.1, and 32-channel uncompressed audio. It also supports DTS-HD Master Audio™, DTS:X®, Dolby® TrueHD, Dolby Atmos®. eARC enables the audio to a TV that originates from cable, satellite, streaming or source devices to be sent to an AVR or sound bar through a single HDMI cable. If your source devices are connected to TV, make sure the TV has audio passthrough capability for each audio format you want because TVs usually do not decode surround sound into individual channels. Unless the TV passes the original audio to a surround processor, you may get a downmixed version. The alternative is to connect source devices to a capable soundbar or AVR but again, make sure the soundbar or AVR can passthrough the video quality you want to the TV. 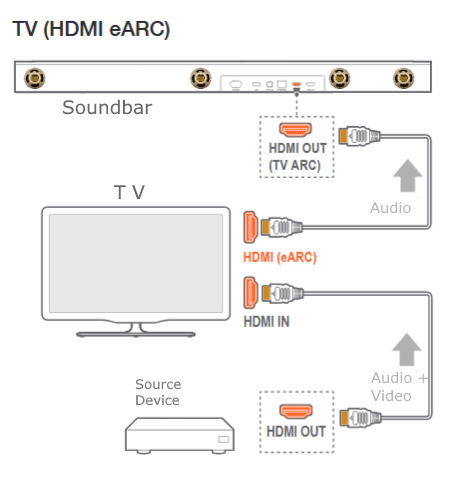 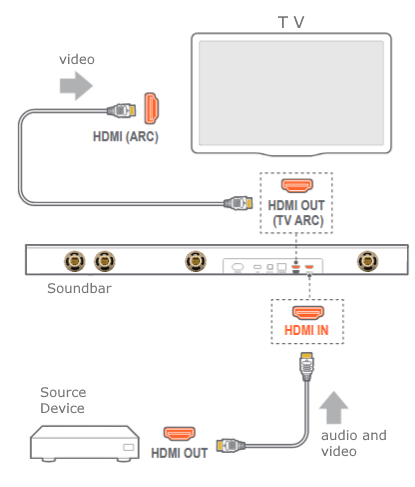 Connect Soundbar to DISH Receiver and TV SURROUND SOUND Sound has been recorded since the early 1900s. Back then there was only one loudspeaker because all sounds were on a single channel. In the 1950s, a two channel sound setup called stereo became popular. A left and a right loudspeaker gave a more realistic sound experience. In the 1990s, a movie theater experience in the home became possible with the six channel or surround sound setup. As technology moves forward even more advanced sound systems will emerge to give a truely realistic audio experience. Speaker Formats 1.0 - Mono - 1 speaker, 1 channel 2.0 - Stereo - 2 speakers, front left/right 3.1 - Surround - 4 speakers, front left/right, center, sub 5.1 - Surround - 6 speakers (1 subwoofer) 7.2 - Surround - 9 speakers (2 subwoofers) 7.1.2 - Surround - 10 speakers (2 height speakers) 9.2.4 - Surround - 15 speakers (4 height speakers) 9.4.8 - Surround - 21 speakers (4 subs, 8 height) The first number is the number of full range speakers, the second number is the low frequency effects (bass speakers) and the third number is the number of height speakers. Surround Sound Formats 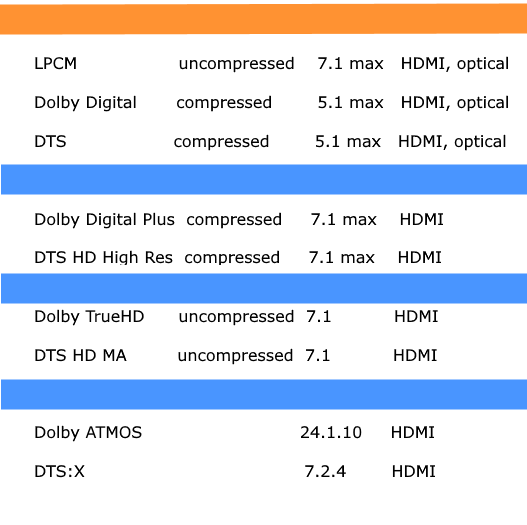 The most important characteristics of different surround sound audio formats LPCM LPCM is lossless audio format. It supports a maximum of 8 channels (7.1), but LPCM surround sound format on a DVD or Blu-ray disc more often supports only 6 channels (you will need 5.1 system to get the maximum out of this format). You can use any type of HDMI connection (starting from 1.0) to pass LPCM audio. Using a digital coaxial or digital optical, LPCM audio will be downmixed to 2 channels (stereo). LPCM is the basic lossless surround sound audio format (not compressed) and every audio track is recorded in this format. Every receiver or Blue-ray player supports this format. LPCM supports 8 channels maximum and it will work fine with 7.1 system but it performs best when used with 5.1 systems. LPCM can be transmitted via any HDMI cable. Dolby Digital (Dolby AC-3 or DD 5.1) DD 5.1 is the DVD and Blu-ray standard. Unlike LPCM, this is a lossy format (audio gets compressed and some data is lost). DD 5.1 supports up to 6 channels. Dolby Digital was invented in 1992 and it is also one of the mandatory formats supported by all kinds of AV receivers and Blue-ray players. However, it is not lossless, which means it is compressed, which also leads to partial information loss. This format supports 6 channels max, and it works best with 5.1 systems. Dolby Digital can be transmitted via HDMI connection as well as optical or digital coaxial. DTS (DTS 5.1) DTS 5.1 is the direct rival of DD 5.1. This one is almost the same as DD 5.1 – it’s lossy and it supports up to 6 channels. It offers slightly better audio bitrate, but in reality, the difference between DTS 5.1 and DD 5.1 is not that noticeable. DTS is Dolby’s competitor and rival. It appeared in 1993 and it is also mandatory lossy format, just like Dolby Digital. It also supports 6 channels max so it is recommendable to use it with 5.1 speaker systems. As far as sound quality, these two are essentially the same. DTS supports the same types of connection as Dolby Digital. Dolby Digital Plus (DD+ or E-AC3) Dolby Digital + is the first optional encoding format. It offers much better audio quality than DD 5.1 (significantly higher bitrate) but it is still a lossy format. DD+ supports up to 8 channels (you will need 7.1 system to get the maximum out of DD+). Considering the size of DD+ file you will need at least HDMI 1.3 connection to pass DD+ audio (you will need HDMI 1.3 input port on your receiver). This format first appeared in 2004. It is one of the lossy formats, it supports maximum 8-channel systems and in order to get the expected sound quality, you will have to use at least HDMI 1.3 cable. Not all receivers and players support it but it definitely offers better audio quality than the original Dolby Digital format (higher bitrate). DTS HD High-Res Audio Just like DTS 5.1 was a direct rival of DD 5.1. DTS HD High-Res Audio is the competitor of DD+. It’s also lossy format and it supports up to 8 channels (7.1 system). DTS HD High-Res and DD+ have pretty much the same bitrate and need the same type of connection (minimum HDMI 1.3). Digital optical and coaxial connections are not supported. Dolby True HD Dolby True HD is Dolby’s lossless digital format. It offers the best audio quality with much greater audio bitrate than DD+ and DTS HD High-Res audio. It can support up to 14 channels, but most of Blu-ray Dolby True HD soundtracks will have up to 8 channels (made for 7.1 systems). You need HDMI 1.3 connection on your home theater receiver along with Dolby True HD decoder. DTS HD Master Audio A direct rival of Dolby’s True HD. It is also lossless, it has slightly greater bitrate than True HD, but there is no real difference in audio quality. Maximum number of supported channels is 8 (7.1). Required connection is HDMI 1.3. Note: Not all home receivers support both Dolby True HD and DTS HD Master Audio. Check the supported formats or you may end up with a receiver that doesn’t support the format that you want. (that doesn’t mean you won’t get any audio, you can get a mandatory audio track, but you won’t get the best possible audio quality) Object-based audio formats. They allow studios and film makers to include additional audio objects and improve listening experience by adding another dimension (height) to the sound. You will need two or four additional height speakers in order to hear all those additional sound objects. Dolby Atmos Dolby Atmos is a lossless format, it supports up to 34 channels, but Blu-ray discs will have a maximum of 12 channels supported (7.1.4). Required connection is HDMI 1.4 and you need this connection on your receiver in order to make use of Dolby Atmos. Dolby Atmos, this format started a true audio revolution in 2012. It is the optional lossless audio format that supports up to 34 channels and it requires minimum HDMI 1.4 cable. Receivers that support Dolby Atmos decoding require minimum 7 channels to reproduce Dolby Atmos audio track, which means that it is not enough to have 5.1 speaker system to achieve the expected sound quality. You will need at least two additional speakers and it should be two height speakers. DTS:X DTS:X is a direct rival of Dolby’s Atmos. This format exploits DTS HD Master Audio and adds object-based sounds to HD Master Audio track. It’s very similar to Dolby Atmos. The maximum number of channels is 13 (you can easily make a 7.1.4 or 7.2.4 system). You need HDMI 1.4 connection (digital optical or coaxial inputs can’t be used). You don’t have to have height speakers (if you have 5.1 or 7.1 system) since DTS:X uses standard 5.1 or 7.1 soundtrack and adds object-based sounds to these tracks. Any 5.1 or 7.1 system will be able to play DTS:X audio (your receiver has to support DTS:X audio format). DTS:X appeared later (in 2015) and it’s the greatest rival of Dolby Atmos. It is lossless, it supports up to 13 channels and it requires minimum HDMI 1.4 cable in order to reproduce DTS:X audio. However, it doesn’t require the use of height speakers and it works normally with regular 5.1 or 7.1 home theater systems. Soundbars Soundbars are not true surround sound as they only present front speakers and sometimes also height speakers for Dolby ATMOS audio. Soundbars attempt to create surround sound but for true surround sound, you need an audio/video receiver which can send audio to each appropriate channel and 6 or more speakers around the listener. Soundbars are popular because they are less complex, do not require wiring and can fill a small room with better sound than the TV speakers. A true surround sound experience will create a bubble of sound, all around the listener, and is much richer and distinct using high end loudspeakers with a quality decoder, amplifier and discrete sound channels. As surround sound advances, even more speakers will be used to enhance the audio experience and a true surround setup with height or ceiling speakers will be desired. This requires the extra effort and cost of wiring plus new gear. Satellite Receiver set-top-box |


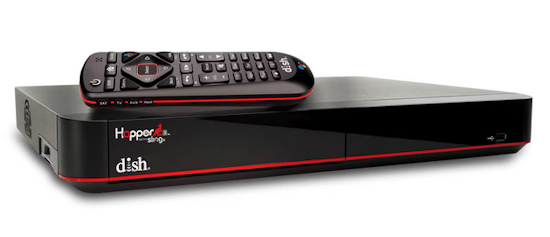
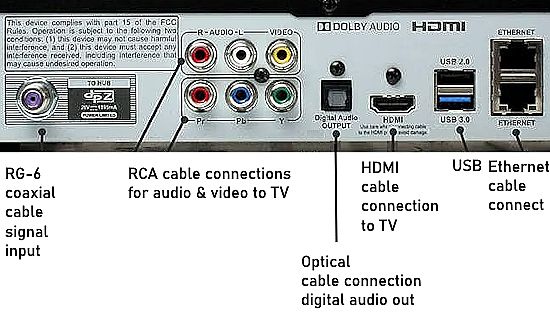 DISH Hopper 3 rear ports