|
|
|
Broadband Internet • Surround Sound over HDMI • How to hookup surround sound • Surround Sound Glossary • How to add great sound to your HDTV Cable Modems and DSL Hookup Diagrams : Wiring : Cable Modems : Routers How To Install Cable Modems and DSL Modems High-speed internet access is something that many people want today because of the volume of information that sometimes is required to download or upload. Dial-up access is just too slow for large amounts of data. Broadband Internet service can use the existing wires in your home to provide high-speed access to the Internet. There are several ways to get high-speed internet service. Your local cable TV provider may offer this service or your local telephone provider may offer internet access. The cable company and the telephone company both will have the hardware required for your home. In the case of cable modems, the Internet data uses the same coaxial cable that brings the cable television signal into your home from your cable TV provider. With DSL, the Internet data uses the same wires that offer land line telephone voice signals into your home. In both cases the Internet data travels with the other signal, letting you surf the Web while watching cable television or talking on the telephone. In the USA, cable internet holds the highest residential adoption rate (61% of connections), followed by fiber (23%) and DSL (9%), with varying availability. Cable is available to over 82-84% of homes, DSL availability ranges from 82% to 90%, and fiber access has expanded to around 51-60% of households. Optical Fiber availability has grown significantly, exceeding 50% in 2024 and reaching 60% in some reports, with rising adoption in urban areas. Despite fiber gains, cable remains the most used broadband technology in the U.S. DSL is widely available, particularly in rural areas, but has the lowest, fastest-shrinking subscriber base due to slower speeds compared to cable and fiber. To separate the Internet data from the TV or telephone voice signal, and direct it to your computer, you'll need a broadband modem. For your computer to receive the data, you'll need a network adapter card in your computer. In addition, you'll most likely want to use a broadband router so you can add a level of security to your always-on connection, as well as make it easy to share your Internet connection with other computers in your home. Broadband modems 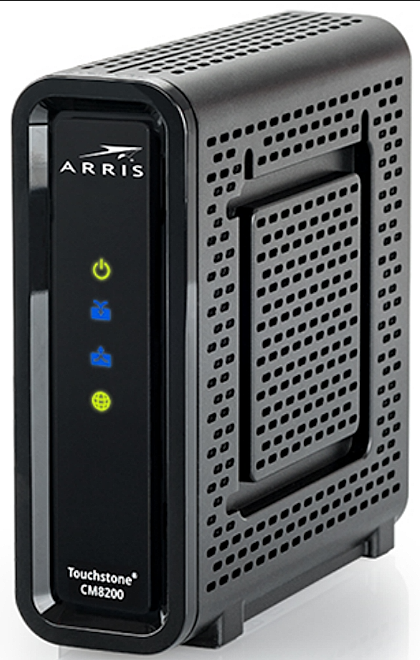 When you sign up for broadband Internet service, you might discover that your service provider will include the broadband modem free or at a discounted price as part of a new service promotional package. Even if the service provider isn't currently advertising a new service promotional package, it can't hurt to ask about a free or discount-priced modem. If the service provider does provide the modem as part of a package deal, ask for a self-installation kit as opposed to having to pay a technician to come to your home to perform the installation. Self-installation kits that come from the service provider usually include a broadband modem along with the necessary cables and accessories for making the connection. Remember that there are self-installation kits that include everything you need except for the broadband modem. Get your own modem. If your service provider won't give you a free broadband modem or sell you one at a discounted price, don't let them talk you into leasing or renting a modem. Lease programs made sense back in the early days of broadband Internet connections when modems cost hundreds of dollars and were hard to find, but times have changed. Broadband modems are modestly priced these days, and you can purchase one, in accordance with your service provider's specifications, for much less than it would cost to rent one over the course of time. Just make sure the modem you buy is compatible with your service provider's specifications. Get one with the latest DOCSIS specifications. As of 2026, DOCSIS 3.1 is the dominant standard used for cable internet, providing gigabit speeds to 98% of residential cable locations. While DOCSIS 4.0 is emerging to offer symmetrical multigigabit speeds and is being deployed by providers like Xfinity in select markets, DOCSIS 3.1 remains the standard for most households. Home Phone service (VOIP) may not be compatible with customer-owned modems. Buy online or get one from a local computer parts store. Network Cards Once you have a broadband modem for receiving Internet data from your service provider, you'll need to get that data into your computer. For this you'll need an Ethernet network card (or the equivalent capability) installed in your computer. If your computer already has a network card in it, then you're all set. If not, you can pick up a PCI (Peripheral Component Interconnect) network card at most local and online computer stores. In addition, your computer's motherboard may have integrated Ethernet ports built into it, thus you won't need a network card. Check your owner's manual or other computer paperwork that came with your computer to see what kind of setup you have and then you can determine what you need if anything. If required, installing a network card really isn't a difficult operation. It involves opening the computer case and inserting the card into a slot on the motherboard. (Be aware that opening your computer's case can void the warranty on some systems, so check your computer's documentation.) After you install the card, turn on your computer and install the drivers from the CD the manufacturer provided. As always, following the included instructions will usually lead to a successful end result. In the case of laptop computers you may not need anything as new laptops today come with built-in adapters and are ready to go right out of the box. USB vs. Ethernet. Many broadband modems come with both USB (Universal Serial Bus) and Ethernet connection capabilities. The selling point here is ease of installation: If your computer doesn't have a network card, you can simply plug the cable modem into your computer via the USB port without the hassle of purchasing and installing a network card. However, chances are that you'll get a better connection if you go with an Ethernet connection. If your computer only has USB 1.x ports, your high-speed broadband signal will slow to a trickle once it hits the sluggish USB 1.x connection. Even if your computer has faster USB 2.0 ports, the broadband signal may still run into traffic problems with the signals from other USB devices because all devices must compete for bandwidth on the USB connection. When you use Ethernet, you'll have a fast and dedicated connection specifically designed to handle the network data streaming between your broadband modem and your computer. Routers Although you can connect your broadband modem directly to your computer's network card, it is recommended that you use a broadband router as an intermediary device for several reasons. First, configuring a broadband router to handle the Internet connection is usually much easier than doing the same in Windows. Plus, delegating the handling of the Internet connection to a dedicated external device lets you avoid adding a lot of extra overhead to your Windows OS. Second, a broadband router will let you easily configure and share the Internet connection with other computers on a home network via its built-in NAT (Network Address Translation) and DHCP (Dynamic Host Configuration Protocol) services. Third, the broadband router's NAT service, by its very nature, will provide a key level of firewall protection. A router is a device that allows access to an Internet connection over a network. It can be wired or wireless. With the Wireless-G Broadband Router, this access can be shared over four switched ports or via the wireless broadcast at up to 11Mbps for Wireless-B or up to 54Mbps for Wireless-G. Use the WPA standard to secure your wireless network while the whole network is protected through a firewall and Network Address Translation (NAT) technology. Networks are useful tools for sharing computer resources. You can access one printer from different computers and access data located on another computer's hard drive. Networks are even used for playing multiplayer video games. PCs on a wired network create a LAN, or Local Area Network. They are connected with Ethernet cables, which is why the network is called wired. These cables are often called CAT5, CAT5e or CAT6 cables. PCs equipped with wireless cards or adapters can communicate without cumbersome cables. By sharing the same wireless settings, within their transmission radius, they form a wireless network. This is sometimes called a WLAN, or Wireless Local Area Network. The Wireless-G Broadband Router bridges wireless networks of both 802.11b and 802.11g standards and wired networks, allowing them to communicate with each other. With your networks all connected, wired, wireless, and the Internet, you can now share files and Internet access. A Wireless Broadband Router protects your networks from unauthorized and unwelcome users if setup properly. Many routers have a Setup CD-ROM for first-time installation. If you do not wish to run the Setup Wizard on the Setup CD-ROM, then use the instructions in your Router's User Guide to help you connect the Router, set it up, and configure it to bridge your different networks. A wireless local area network (WLAN) is exactly like a regular local area network (LAN), except that each computer in the WLAN uses a wireless device to connect to the network. Computers in a WLAN share the same frequency channel and SSID, which is an identification name shared by the wireless devices belonging to the same wireless network. Unlike wired networks, wireless networks have two different modes in which they may be set up: infrastructure and ad-hoc. An infrastructure configuration is a WLAN and wired LAN communicating to each other through an access point. An ad-hoc configuration is wireless-equipped computers communicating directly with each other. Choosing between these two modes depends on whether or not the wireless network needs to share data or peripherals with a wired network or not. If the computers on the wireless network need to be accessible by a wired network or need to share a peripheral, such as a printer, with the wired network computers, the wireless network should be set up in Infrastructure mode. The basis of Infrastructure mode centers around a wireless router or an access point, such as the Wireless-G Broadband Router, which serves as the main point of communications in a wireless network. The Router transmits data to PCs equipped with wireless network adapters, which can roam within a certain radial range of the Router. You can arrange the Router and multiple access points to work in succession to extend the roaming range, and you can set up your wireless network to communicate with your Ethernet hardware as well. If the wireless network is relatively small and needs to share resources only with the other computers on the wireless network, then the Ad-Hoc mode can be used. Ad-Hoc mode allows computers equipped with wireless transmitters and receivers to communicate directly with each other, eliminating the need for a wireless router or access point. The drawback of this mode is that in Ad-Hoc mode, wireless-equipped computers are not able to communicate with computers on a wired network. And, of course, communication between the wireless equipped computers is limited by the distance and interference directly between them. A Wireless-G Broadband Router is specifically designed for use with both 802.11b and 802.11g products. Now, products using these standards can communicate with each other. (ssid - service set identifier: your wireless networks name.) An SSID is the network name shared by all devices in a wireless network. Your wireless networks SSID should be unique to your network and identical for all devices within the network. DHCP and NAT The DHCP and NAT services in the broadband router work in concert and are designed to make sharing your Internet connection on a network an effortless operation. DHCP is a networking protocol designed for automatically assigning private IP (Internet Protocol) addresses to multiple computers on a network. Any Windows computer on the network that is configured with the Obtain An IP Address Automatically setting will locate the DHCP service and request an IP address. In addition to an IP address, the DHCP service will also provide the Windows computer with the necessary Subnet Mask, Default Gateway, and DNS (domain name system) addresses that are required to access the Internet. As such, using DHCP saves you from having to manually configure the IP addresses on each computer on your network. Configuring the broadband router's DHCP (Dynamic Host Configuration Protocol). NAT is an Internet networking standard that essentially allows a group of computers using a private IP address on a network to share a single public IP address on the Internet. More specifically, the broadband router is assigned the public IP address that your service provider assigns to you. DHCP assigns the computers on the network private IP addresses. Whenever any computer on the network requests access to the Internet, NAT intercepts the request and then uses the public IP address to perform the actual access. Make sure Windows is ready for DHCP. If you've been surfing the Internet via a dial-up modem connection or have a network card installed in your computer, chances are good that Windows already has TCP/IP (Transmission Control Protocol/Internet Protocol) installed and it is configured to automatically accept an IP address from the DHCP service. However, you might want to make sure that Windows is ready for DHCP. If you're using Windows 9x/Me: 1. Click Start, select Settings, and click Control Panel. 2. Double-click the Network icon. 3. Double-click the line in the network components list that includes TCP/IP followed by the name of your network. 4. Make sure the "Obtain An IP Address Automatically" option is selected. If you're using Windows 2000/XP: 1. Click on START (lower left) and select "My Network Places". 2. Under Network Tasks, select "View Network Connections". 3. Right click on LAN or High-Speed Internet icon and select PROPERTIES. 4. Double-click the line in the network components list that includes Internet Protocol TCP/IP. 5. Make sure that the "Obtain An IP Address Automatically" option is selected. If you're using Windows Vista: 1. Click Start, right-click Network, and then select Properties from the context menu. 2. Look for Local Area Connection in the Network section. Click the nearby View Status link. 3. Click Properties when the Local Area Connection Status window appears. 4. Click the Continue button if a UAC (User Account Control) window appears. 5. When the Local Area Connection Properties window appears, double click the line in the network components list that includes TCP/IP. 6. Make sure that the "Obtain An IP Address Automatically" option is selected. If you're using Windows 10/11: In the Search bar (bottom left) type Control Panel and click on Network and Sharing Center. Next click on Change Adapter Settings. Right click on your internet connection. Click on Properties. Click on Internet Protocol TCP/IP. Click on Properties. Click the button "Obtain an IP address automatically" and "Obtain DNS server address automatically". Click OK. 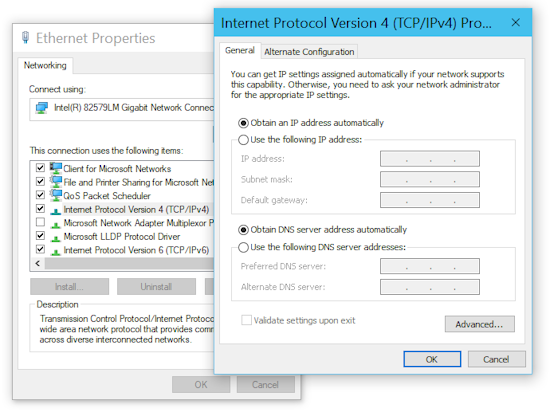 • Cable box setup TV Install A Cable Modem 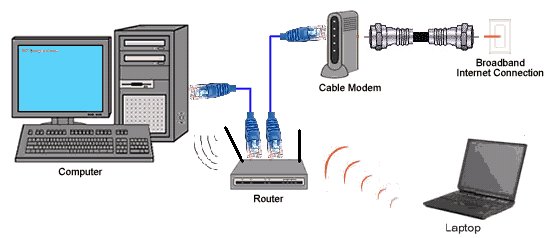 Use the cable company coaxial outlet. If a TV set is connected, use a RF splitter.  Hookup diagram - Cable Modem, Wi-Fi Router, TV, computer, digital home phone Connecting the cable modem to the cable system is the first part of the operation. Your service provider will activate your cable Internet service. When your service provider has activated your cable Internet service and you have your cable modem in hand, you can get started on the installation. The basic components of the cable kit will include the modem and power supply, as well as an RJ-45 Ethernet cable. You'll also need some RF coaxial cable. If you plan to connect the cable modem and a television to the same cable outlet, you'll need a cable line-splitter and three lengths of RF coaxial cable (RG-6). Once you have the necessary components, connecting the cable modem to the cable system is easy with these steps: On the back of the cable modem, you'll find the CATV RF coaxial connector and an RJ-45 port for making the cable and network connections. 1. Connect the cable modem to one side of the cable line-splitter using an RF coaxial cable. 2. Connect your cable set-top box to the other side of the cable line-splitter using an RF coaxial cable. 3. Connect the cable line-splitter to the cable outlet on the wall using an RF coaxial cable. The next step is to connect the cable modem to the broadband router and then connect the broadband router to the network card in your computer. 1. Shut down your computer and unplug the power cable. 2. Connect the cable modem to the WAN or Internet port on the broadband router using the RJ-45 Ethernet cable. Connect a standard Ethernet network cable to the Routers Internet port. Then, connect the other end of the Ethernet cable to your cable or DSL broadband modem. 3. Connect the broadband router to the network card in your computer using a standard RJ-45 Ethernet cable. Connecting the cable modem to the broadband router and then connecting the broadband router to the network card in your computer is the second part of the operation. Once you connect the cable modem to the cable system and to the broadband router, you can connect the power-supply cable to the broadband router and turn it on. Next, connect the power supply cable to the cable modem and turn on the modem. Finally, reconnect the power supply cable to your computer and turn on your computer. At this point, you're ready to configure your broadband router. Configure Your Router What You Need Before You Begin Prepare the following before you set up your router: Internet service. The configuration information your Internet Service Provider (ISP) gave you. Depending on how your Internet account was set up, your may need one or more of these settings for the router to access the Internet: Host and Domain Names Internet Login Name and Password (frequently an email address and password) Domain Name Server (DNS) Addresses Fixed or Static IP Address Your ISP should have provided you with all the information needed to connect to the Internet. If you cannot locate this information, you can ask your ISP to provide it. With your broadband modem connected to the broadband router, it's time to configure the router. This will basically consist of configuring the broadband router to work with the IP, Subnet Mask, Default Gateway, and DNS addresses that your cable or DSL service provider assigns to you. Then you need to enable your router's DHCP server functionality. Network Mode should generally be set to MIXED mode. This allows both B and G standards network devices to work. WPA (wi-fi protected access: a wireless security protocol using TKIP (Temporal Key Integrity Protocol) encryption. WEP (wired equivalent privacy): a method of encrypting network data transmitted on a wireless network for greater security. Configuring a broadband router is usually a simple fill-in-the-blanks operation. You can configure most broadband routers via a built-in Web server, which you access with your Web browser. Some are configured via a Windows-based utility that you install on your computer. You could configure a Linksys Cable/DSL Router, for example, using a browser. You can configure the router simply by filling in the form using the information your cable or DSL service provider gave you. Once you fill in this form, you'll configure the router to use DHCP. The type of Internet connection your ISP provides. DHCP. By default, the Routers Internet Connection Type is set to Automatic Configuration - DHCP, which should be kept only if your ISP supports DHCP or you are connecting through a dynamic IP address. Static IP. If you are required to use a permanent IP address to connect to the Internet, select Static IP. Internet IP Address. This is the Routers IP address, when seen from the Internet. Your ISP will provide you with the IP Address you need to specify. Subnet Mask. This is the Routers Subnet Mask, as seen by users on the Internet (including your ISP). Your ISP will provide you with the Subnet Mask. Typically it looks like 255.255.255.0 Gateway. Your ISP will provide you with the Gateway Address, which is the ISP servers IP address. DNS. Your ISP will provide you with at least one DNS (Domain Name System) Server IP Address. The DNS translates internet addresses like www.google.com which you type on your browser into the actual IP address like 169.22.55.12. If you need to login to your router, here are the typical IP addresses and passwords for common routers.
Start Your Web Browser After you connect your broadband modem and configure your broadband router, you're ready to start your Web browser and surf the Internet at blazing speeds. DSL Internet Service How does DSL service work DSL uses the same copper wiring as standard voice telephone service. DSL equipment at each end of the line transforms the telephone line into a high-speed digital connection. The DSL provider is the telecommunications company that supplies the DSL portion of your high-speed Internet access. The Internet service provider (ISP) adds the Internet Protocol (IP) networking services that ride over the DSL connection. If you are using ADSL, your DSL service runs over the same telephone line as your voice service. The data service is split off from voice service at the Central Office. Your voice communications go to the telephone network and the data goes to the DSLAM (DSL Access Multiplexer) of the DSL provider and on to the Internet Service Provider. COs house DSLAMs, which consolidate data traffic from individual DSL connections into large high-capacity backbone networks. What is the top speed for DSL Advances in DSL technology now allow speeds of up to 7 Mbps. That is 124 times the speed of a normal 56k modem connection. Of course the actual speed limit is dictated by the type of plan that you have purchased from your ISP. For instance if you purchased a 976k connection, your maximum speed would be 17 times the speed of a 56k modem. How much does DSL service cost today DSL service costs from $19.95 per month up to about $60 per month depending on your line speed. Line speeds range from just under 1 Mbps up to 7 Mbps. So you could get a plan for around $35 per month and have about 3 Mbps speed. Some providers offer bundles, meaning if you get internet, phone and TV service all together from the same company, you can reduce your overall total cost somewhat. How to install a DSL Modem A DSL modem is a device that connects your home network to the internet over existing copper telephone lines, utilizing ADSL or VDSL technology to provide broadband access. It modulates and demodulates signals, converting digital data from a computer into analog signals for transmission, and vice versa. Modern DSL modems often include built-in routers and Wi-Fi. DSL (Digital Subscriber Line) technology allows data and voice to travel simultaneously over telephone lines. A filter is often used to separate the voice signal from the data signal to prevent interference. The modem establishes a connection with the ISP's equipment in a local telephone exchange (DSLAM) to provide internet access. Types of DSL Modems ADSL/ADSL2+: Traditional DSL, ideal for basic browsing. VDSL/VDSL2: Offers faster speeds, capable of handling higher bandwidth requirements. Bonded DSL: Combines two telephone lines for higher throughput. DSL provides a dedicated line to the home, which is often more consistent than shared cable connections. Speed: Modern VDSL can provide high speeds, with some options reaching up to 350 Mbps. Many modern devices act as a DSL modem router combo, offering built-in Wi-Fi and Ethernet ports. Performance decreases the further you are from the ISP's central office. DSL is being replaced by faster, more modern fiber-optic technology. How to Set Up a DSL Modem Connect: Plug the phone line into the modem's DSL/Line port and connect it to a wall jack. Filter: Use a filter on the phone line to separate phone and data signals. Network: Connect the modem to your computer or router via Ethernet. Power: Plug in the power cord. Configure: Wait for the DSL light to become solid, indicating a connection to the provider, and follow the ISP’s instructions to configure the settings. What to Look For When Buying Compatibility: Ensure the modem is compatible with your ISP. Standards: Look for ADSL2+ or VDSL2 support. Decide if you need a built-in router/Wi-Fi There are stand-alone DSL modems and there are combo units which have the modem and a router in a single unit. For a combo modem/router unit, follow the procedure below:  Using a phone cable (RJ-11), connect the DSL port on the modem router to a DSL wall outlet. If your modem router includes a DSL microfilter, install the DSL microfilter in between the DSL wall outlet and DSL port on the modem router. You can also connect a landline phone to the DSL microfilter. 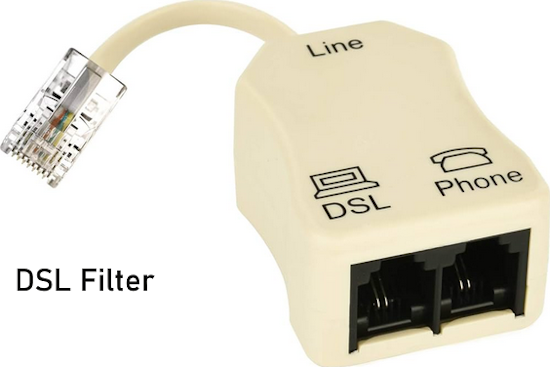 The DSL filter makes sure your voice conversations do not get interference from the digital data for the computer. Connect the power adapter to your modem router and plug the power adapter into an electrical outlet. Your modem router powers on. If the Power LED does not light, press the Power On/Off button on the back panel. Wait for the DSL icon on modem router (DSL) LED to light solid white. Your modem router is connected to DSL service. Connect your computer or mobile device to the modem router with WiFi or Ethernet cable: WiFi: Use the WiFi network name (SSID) and password on the modem router label to connect. Ethernet: Use an Ethernet cable to connect a computer to an Ethernet port (LAN) on the modem router. Launch a web browser and enter 192.168.1.1 in the address field. When the "Configuring the Internet Connection" page displays, select your country and ISP, and click or tap NEXT. The modem router detects your Internet connection. You might be asked to enter your DSL account user name and password, or other account information that your ISP requires. Note: Your WiFi connection might be lost during the setup process. If this happens, reconnect to the modem router, and wait for the process to continue. Change your modem router’s admin credentials and set up security questions. Review your WiFi network name (SSID) and password. 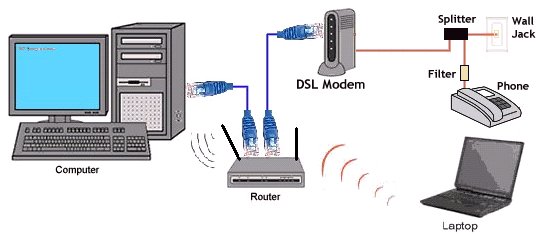 You need Ethernet cables and standard telephone wires plus a filter for your telephone. The Modem and telephone plug into a RJ-11 splitter. Then the splitter is plugged into your telephone wall outlet using standard telephone wire. 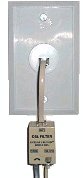 DSL line filter. RJ-11 to wall outlet. DSL line filter. RJ-11 to wall outlet.DSL is a technology that provides digital data transmission over the wires of a local telephone network. DSL uses high frequency, regular telephone uses low frequency. 1. Plug a phone Line Splitter into your Wall Jack. If you are going to be using another device (phone, fax machine, satellite receiver etc.) plug-in one of your Phone Line filters into the Splitter and then plug your phone into the filter. On the other side of the splitter hookup your DSL modem directly with a standard phone line. Be sure to plug it into the LINE or DSL port on the back of your modem. 2. Make sure your computer is turned off. 3. Take an Ethernet cable and plug it into the LAN or ETHERNET port on the back of the modem. Plug the other end of the cable into the Ethernet port on the computer. 4. Plug the power cord into the modem and then into an available plug nearby. If there is a switch on the back of the modem make sure to flip it to the ON position. On the back of a DSL modem, you'll find the RJ-11 and RJ-45 ports for making the phone line and network connections. After your service provider has activated your DSL service and you receive your DSL self-installation kit, you're ready to get started. The basic components of a DSL self-installation kit will include the modem and power supply, a RJ-11 telephone line cord, an RJ-45 Ethernet cable, a two-outlet modular adapter, and several micro-filters. Once you have the necessary components, connecting the DSL modem to the phone system is easy: Connecting the DSL modem to the broadband router and then connecting the broadband router to the network card in your computer is the second part of the operation. 1. Connect the DSL modem to one side of the two-outlet modular adapter using the RJ-11 cable. 2. Connect the micro-filter to the other side of the two-outlet modular adapter. 3. Connect your telephone to the micro-filter using your existing phone cord. 4. Connect the two-outlet modular adapter to a standard phone outlet on the wall. (Keep in mind that you must use micro-filters on all the standard telephone devices that are on the same phone line as your DSL connection in order to eliminate interference.) Next, connect the DSL modem to the broadband router and connect the broadband router to the network card in your computer. In addition to the components that come in the cable modem package, you'll need to supply RF coaxial cable and a cable line-splitter. 1. Shut down your computer and unplug its power cable. 2. Connect the DSL modem to the WAN (wide-area network) or Internet port on the broadband router using the RJ-45 Ethernet cable. 3. Connect the broadband router to the network card in your computer using a standard RJ-45 Ethernet cable. Once you have the DSL modem connected to the phone system and to the broadband router, you can connect the power-supply cable to the broadband router and turn it on. Next, connect the power-supply cable to the DSL modem and turn it on. Finally, reconnect the power-supply cable to your computer and turn it on. At this point, you're ready to configure your broadband router. On the customer side, the DSL modem is hooked up to a phone line. The telephone company(telco) connects the other end of the line to a DSLAM, which concentrates a large number of individual DSL connections into a single box. The location of the DSLAM depends on the telco, but it cannot be located too far from the user because of attenuation, the loss of data due to the large amount of electrical resistance encountered as the data moves between the DSLAM and the user's DSL modem. It is common for a few residential blocks to be connected to one DSLAM. When the DSL modem is powered up, it goes through a sync procedure. The actual process varies from modem to modem but can be generally described as: The modem does a self-test. The modem checks the connection between the modem and the computer. For residential variations of DSL, this is usually the Ethernet port or a USB port; in rare models, a FireWire port is used. Older DSL modems sported a native ATM interface (usually, a 25 MBit serial interface). Also, some variations of DSL (such as SDSL) use synchronous serial connections. The modem then attempts to synchronize with the DSLAM. Data can only come into the computer when the DSLAM and the modem are synchronized. The synchronization process is relatively quick (in the range of seconds) but is very complex, involving extensive tests that allow both sides of the connection to optimize the performance according to the characteristics of the line in use. External, or stand-alone modem units have an indicator labeled "CD", "DSL", or "LINK", which can be used to tell if the modem is synchronized. During synchronization the light flashes; when synchronized, the light stays lit, usually with a green color. Modern DSL gateways have more functionality and usually go through an initialization procedure that is very similar to a PC starting up. The system image is loaded from the flash memory; the system boots, synchronizes the DSL connection and establishes the IP connection between the local network and the service provider, using protocols such as DHCP or PPPoE. The customer end of the connection consists of a DSL modem. This converts data from the digital signals used by computers into a voltage signal of a suitable frequency range which is then applied to the phone line. In some DSL variations (for example, HDSL), the modem is directly connected to the computer via a serial interface, using protocols such as RS-232 or V.35. In other cases (particularly ADSL), it's common for the customer equipment to be integrated with higher level functionality, such as routing, firewalling, or other application-specific hardware and software. In this case, the entire equipment is usually referred to as a DSL router or DSL gateway. Some kinds of DSL technology require installation of appropriate filters to separate, or "split", the DSL signal from the low frequency voice signal. The separation can be done either at the demarcation point, or can be done with filters installed at the telephone outlets inside the customer premises. Either way has its practical and economical limitations. At the exchange, a digital subscriber line access multiplexer (DSLAM) terminates the DSL circuits and aggregates them, where they are handed off onto other networking transports. In the case of ADSL, the voice component is also separated at this step, either by a filter integrated in the DSLAM or by a specialized filtering equipment installed before it. The DSLAM terminates all connections and recovers the original digital information. DSL implementations may create bridged or routed networks. In a bridged configuration, the group of subscriber computers effectively connect into a single subnet. The earliest implementations used DHCP to provide network details such as the IP address to the subscriber equipment, with authentication via MAC address or an assigned host name. Later implementations often use PPP over Ethernet or ATM (PPPoE or PPPoA), while authenticating with a userid and password and using PPP mechanisms to provide network details. The line length limitations from telephone exchange to subscriber are more restrictive for higher data transmission rates. Technologies such as VDSL provide very high speed, short-range links as a method of delivering "triple play" services (typically implemented in fiber to the curb network architectures). ADSL modem or DSL modem is a device used to connect a single computer or router to a DSL phone line, in order to use an ADSL service. The acronym NTBBA (network termination broad band adapter, network termination broad band access) is also common in various countries. Some ADSL modems also manage the connection and sharing of the ADSL service with a group of machines: in this case, the unit is termed a DSL router or residential gateway. Asymmetric digital subscriber line transceiver or ATU-R, as the telephone companies call it, is a functional block inside every ADSL modem which actually performs modulation, demodulation and framing, while other functional blocks perform Asynchronous Transfer Mode Segmentation and Reassembly, IEEE 802.1D bridging and/or IP routing. Typical user interfaces are Ethernet and USB. Although an ADSL modem working as a bridge doesn't need an IP address, it may have one assigned for management purposes. Most DSL modems are external to the computer and wired to the computer's Ethernet port, or occasionally its USB port, whereas voiceband modems are usually built inside the computer. Microsoft Windows and other operating systems do not recognize external DSL modems, and hence have no Property Sheet or other internal method to configure them. This is because the transceiver and computer are considered separate nodes in the LAN, rather than the transceiver being a device controlled by the computer (such as webcams, mice, keyboards etc.). Routers can be configured manually, using a Web page provided by the modem via the ethernet that the router connects to. DSL modems rarely need to be configured, because they are part of the physical layer of computer networks. They are only forwarding ones and zeros from one medium (CAT5) to another one (telephone line). DSL modems use frequencies from 25 kHz to above 1MHz, in order not to interfere with voice service which is primarily 0-4 kHz. Voiceband modems use the same frequency spectrum as ordinary telephones, and will interfere with voice service. DSL modems vary in data speed from hundreds of Kilobits per second to many Megabits, while voiceband modems are nominally 56K modems and actually limited to approximately 50 kbit/s. DSL modems exchange data with only the DSLAM to which they are wired, which in turn connects them to the Internet, while most voiceband modems can dial directly anywhere in the world. DSL modems are intended for particular protocols and sometimes won't work on another line even from the same company, while most voiceband modems use international standards and can "fall back" to find a standard that will work. Most of these differences are of little interest to consumers, except the greater speed of DSL and the ability to use the telephone even when the computer is online. Because a single phone line commonly carries DSL and voice, filters are used to separate the two. Many ADSL modems can have their firmware upgraded to support additional features or fix existing problems. The switch to digital broadcast TV. • RF Modulators and DVD Connections. More options for video and audio connections. • Surround Sound • Camcorder Formats • How to choose a Camcorder • HDMI Switch box • VCR Basics COLUMBIA ISA Audio Video Empowering consumers through information. columbiaisa@yahoo.com |