|
|
|
• Diagram
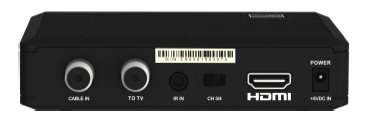
Index • How to Transfer/Copy Audio cassette to computer PC o How to connect HDTV with only optical audio output to stereo Cable TV Adapter Box - DTA Cable TV - Digital Terminal Adapter 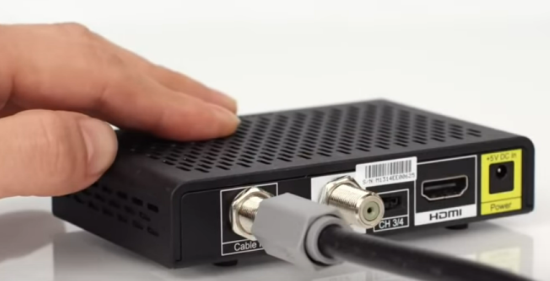 DTA Cable TV box - DTA Mini Box Originally all cable TV channels were analog. Digital channels came along and we had a hybrid system of both analog and digital channels. Well now your cable TV provider is all digital, converting those low numbered channels from analog to digital. This change is significant for anyone without a cable box, even those with a newer digital TV but no cable box because most cable tv providers scramble (encrypt) their channels. Sure some channels may come in the clear (unscrambled) but you know that one channel you want is going to be scrambled. This is why you need the DTA box if you have no other cable TV box. Xfinity/Comcast, Spectrum/Time Warner, COX and others implemented this change over time with the goal being an all digital channel lineup. You have a few choices such as renting the full-size, full-function digital cable TV set-top-box with DVR, program guide and on-demand features or go with satellite TV services or live with internet TV. But if you do not want premium cable services and just want the basic cable TV channels, you can rent a DTA or digital terminal adapter box. With the DTA box you get basic cable channels such as PBS, CBS, ABC, NBC, FOX and a few others. Plus you can get more channels in the range most likely up to channel 99 maximum if you buy additional subscriptions. These channels would include CNN and depending on your provider, such channels as National Geographic. The channels 100 and beyond probably would not be available. These include HBO, SHOWTIME and the like. Check with your provider to find out what channels are available. You can still use a VCR but you will not be able to view one channel while recording another unless you use two DTA boxes. 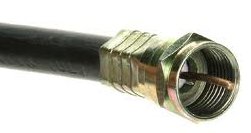 Coaxial RF Cable RG-6 If you have a digital cable TV converter box from your cable TV provider then you may be fine and do not need to do anything. But if you have an older analog TV or even a newer digital TV, but you are not using any cable TV converter box from your cable TV provider, you may need to continue reading and take action. Otherwise you may not be able to view some of your cable channels. Many cable TV customers will go ahead and rent a full size digital cable converter box, some with a DVR to record shows, but these boxes can cost more per month than the digital adapter boxes. The digital adapter box costs less per month but also has less capability. What is the difference between a DTA box and a DTV box? The DTV converter box is a digital to analog TV converter box for local over-the-air broadcast TV reception so that an analog TV can view the current digital TV broadcasts. The DTA box is a digital to analog converter box for Cable TV which comes to you from a cable TV provider usually over a fixed coax cable so that an analog TV can view digital cable TV channels. Some DTA boxes provide an HDMI output for connection to a smart TV. What is the difference between a cable converter box and a cable adapter box or DTA? The cable TV adapter box (DTA) does not have the full on-screen program guide or on-demand programs. Typically the DTA adapter box is much smaller than a digital cable converter box. The DTA box has no record capability and usually has less channels available. When do you need a digital adapter box? If your cable provider informs you that analog cable channels are being converted to digital and you have no cable TV box at all for a TV. The adapter box will decode the scrambled digital channel and convert to analog (channel 3 or 4) or digital HDMI for your TV. This way you can still use an older analog TV or a digital TV which has an analog tuner. Any digital channel not scrambled can be viewed on a digital TV with a QAM tuner. Most digital TVs have a QAM tuner built-in. You can also connect to a VCR and tune it to channel 3 or 4 to record, then connect from VCR to TV using a coaxial cable. How do I connect the cable TV adapter box? Instead of a direct connection of cable to TV, the cable goes into the adapter box and the adapter box connects to the TV. The adapter box outputs on channel 3 or 4, so you tune the TV to channel 3 or 4 and select channels on the adapter box using the provided remote control. Some adapter boxes have an HDMI output which uses an HDMI cable connected to the HDMI input on a digital TV. 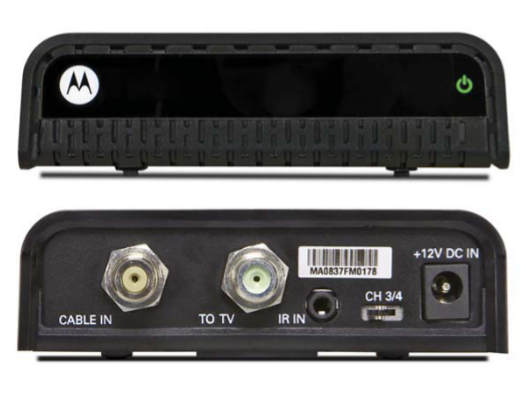 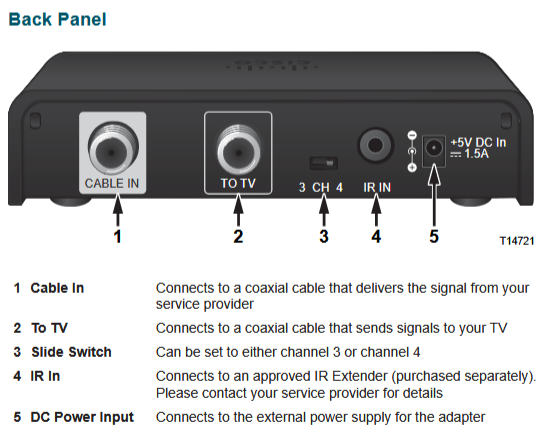 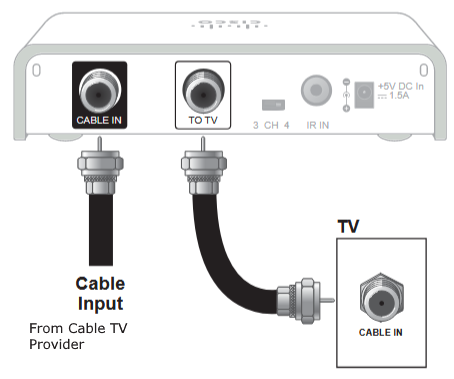 For older analog TV or any standard definition TV, use coaxial RG-6 cable connection and tune to channel 3 or 4. 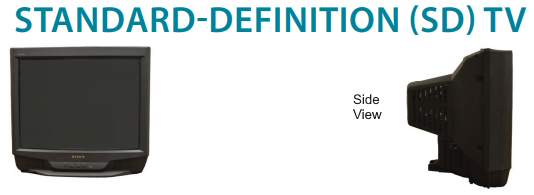 Standard Definition TV is square, has a CRT (tube) and has no HDMI input ports. 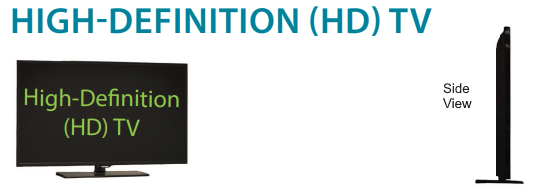 High Definition TV is a wide rectangle flat screen display with HDMI input ports HDMI Connection to High-Def digital TV 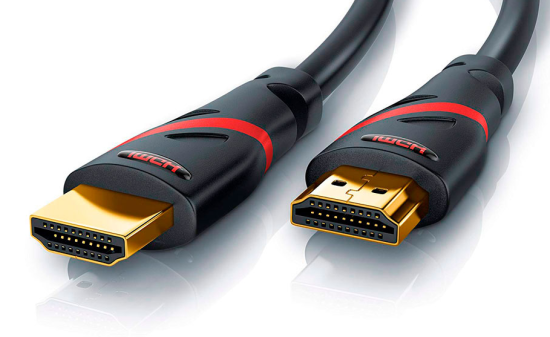 HDMI Cable 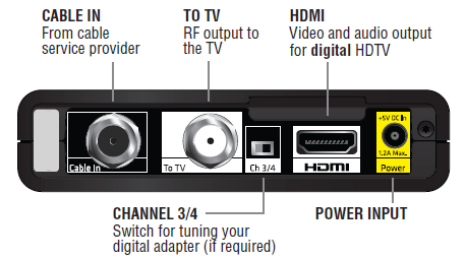 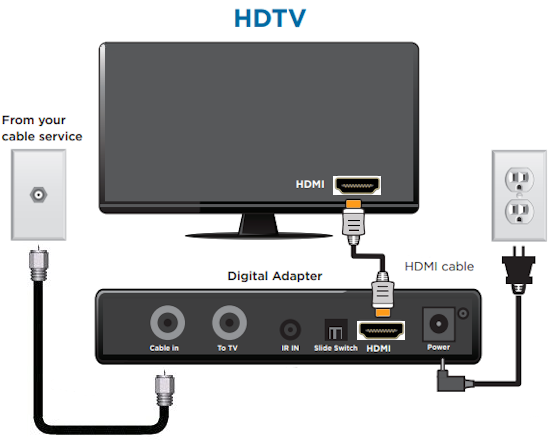 DTA box HDMI connection to HDTV using RG-6 coaxial RF cable and HDMI cable to TV HDMI input. Still want to use that old VCR? Yes, you still can, by connecting the adapter box to the VCR and the VCR to the TV. Tune the VCR to channel 3 or 4 and set to the time your program starts. 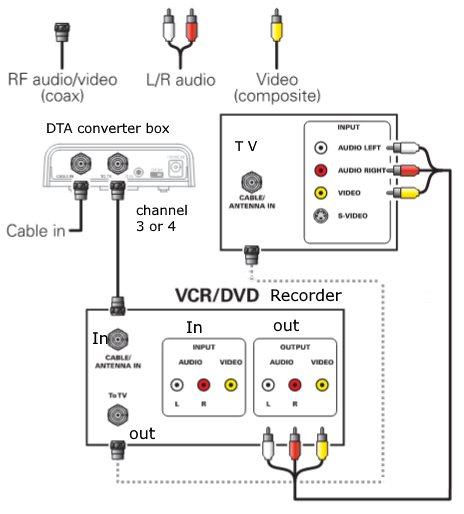 Some Cable TV boxes are limited and are called DTA for digital terminal adapter. These smaller receivers may have HDMI output but some may only have RF coaxial output. Connect to VCR using RG-6 coaxial cable as shown in diagram. Tune to channel 3 or 4. The DTA mini box cable TV converters were offered by Cable TV providers to customers when the conversion from analog cable TV signals to digital Cable TV signals was implemented. Any customer with an analog cable box had to get a new digital cable box converter and the DTA was a basic and less expensive alternative to the full service digital cable boxes. Cable TV providers did not have a mandated switch from analog to digital cable television as part of the 2009 broadcast television transition. While broadcast television transitioned from analog to digital signals in 2009, cable companies were not required to follow suit, and most transitioned to digital cable gradually over time, with some completing the switch to digital during the 2013 to 2015 time frame. 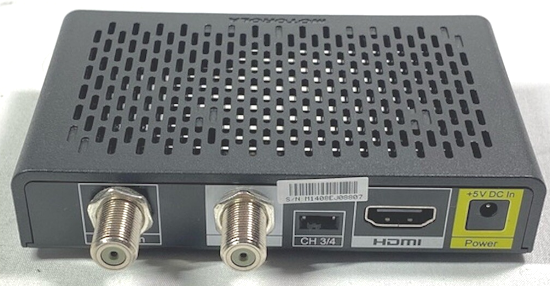 Cable TV DTA mini box  Connection diagram DTA mini box 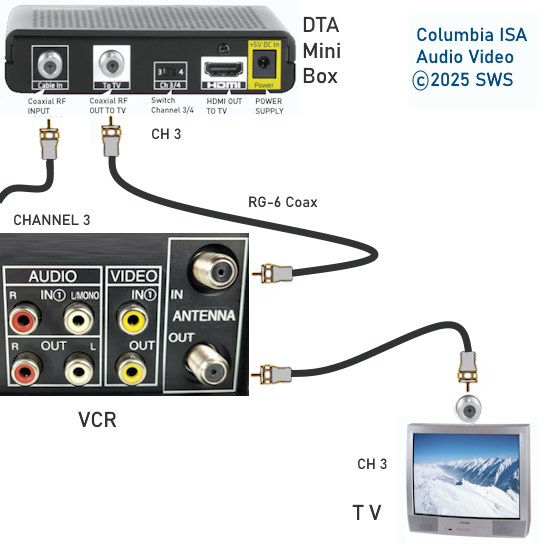 Record Cable TV  Cable box to VCR to HDTV using A/V to HDMI adapter  How much does the DTA box cost? Costs can range from $2 to $10 per month. How can I get the DTA adapter box? You can order the cable TV adapter box from your cable TV provider by phone or online. After connecting to the TV, call your provider or go online to activate the box. Included in the kit should be the following: DTA box Power adapter Remote Control Batteries for remote Coaxial Cable HDMI Cable Instruction sheet  My DTA box has a blinking light and I do not see a channel on the TV. What can I do to fix? After connecting either coax or HDMI cables from DTA box to TV, selecting the proper TV input or channel, plug in the box and wait for any updates to load. This may take a while. Next, you may need to activate the DTA box by either calling your cable TV provider or by going online to the providers website. For example, Spectrum Cable TV - Spectrum activate You may need your Cable TV provider account number and your DTA box serial number. Your account number may be on your bill statement and the box serial number should be on a label on the bottom of the box. After activation, you may need to unplug the DTA box, wait 30 secs. and plug back into wall outlet. This will reboot the DTA box. If you still do not see a channel on the TV, call your provider. The LED light on the DTA box should be solid ON if working properly.  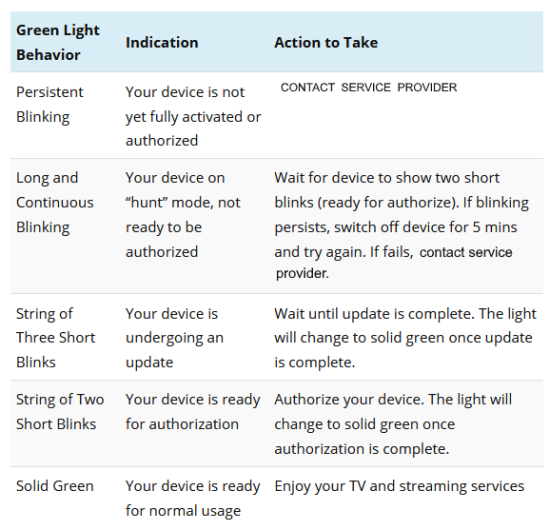 Green light blinking on cable box - FIX Is High Definition available? It depends on the adapter box and your TV and your cable service. Some adapter boxes have an HDMI out, so if you have a TV with HDMI inputs and the correct cable TV service with HD channels, you could possibly get High Definition. Keep in mind your provider may charge a fee for HD. If your TV is analog (CRT tube) then HD is not possible but you could get a low resolution version of an HD channel if you have HD cable service. Who makes the adapter boxes? Four companies authorized by FCC include Motorola, PACE, CISCO and Thomson. Does the DTA have a guide? A basic guide was rolled out throughout 2014-2015. Cable Channels Cable Channels 2-24 considered basic cable will all be eventually transmitted digitally, some in the clear and some scrambled. If you have an older analog TV, you will need a digital cable converter box or DTA adapter box. This box is similar to the OTA / Over The Air digital adapter box, but smaller. It needs to be authorized and activated by the cable company and you have to use its remote for your channel functions. Channels 25-70 considered expanded cable are most likely transmitted encrypted and will require the converter/adapter box, per TV. If you have a QAM tuner in your HDTV and expanded cable 2-70, you presumably will get basic channels 2-24 unencrypted. You tune to channel 3 or 4 to get the cable signal from the adapter box for channels 25 through 70. If you already have a digital cable box (channels above 100) with every TV, nothing changes. Just keep using the rented equipment. If you do not have a cable box for all additional TVs, then those additional TVs’ reception will be affected for the basic and expanded lineup included with your service. What is included in your adapter box kit from your cable TV provider? The Adapter box with two coaxial jacks, input for wall cable and output to TV, a channel 3/4 switch, an AC wall plug, a coaxial cable for TV connection, a remote control for the adapter box and a user manual. Some will also include an HDMI cable if the box has HDMI capability. 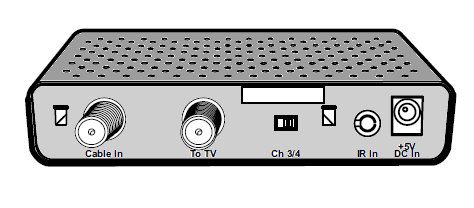 The Cable TV Adapter Box Hookup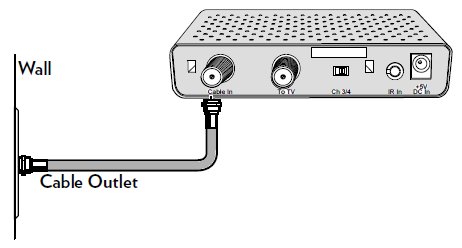 Connect the coax cable from the wall to the (Cable IN) box instead of directly to the TV. 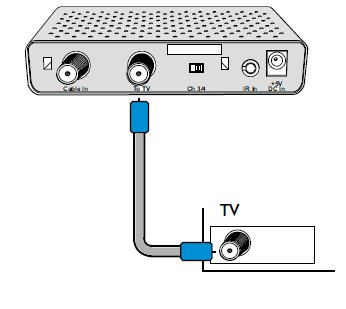 Connect the supplied coax cable from the (To TV) box to your TV's coaxial input jack. 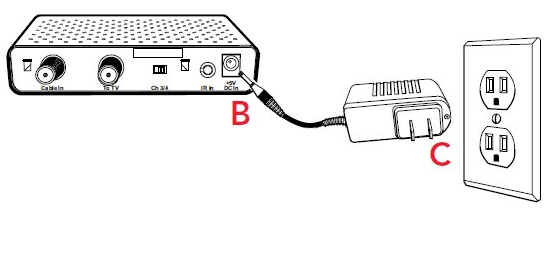 The adapter box will require power from an AC outlet. Plug in the supplied AC wall plug to the wall outlet (C) and also into the correct spot on the box (B). 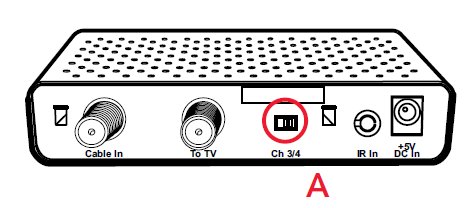 Switch the small two-position switch in the rear of the box to Ch 3. Plug in the power to the box and wait 15 min. before activating the box with your cable TV provider. Tune your TV to channel 3. Tune the adapter box to a channel you want using the remote that came with the box. Some cable companies may not activate your box until the analog channels are initially switched to digital channels. You can get the adapter box before the switch and be ready. On the day of the switch, you may need to contact your provider to activate the box. Some providers will activate your box automatically. The CISCO DTA 170HD DTA adapter box
Cisco DTA 170HD
with HDMI output. Available Jan 2013.
Connect HDMI cable from DTA box to HDTV. Tune TV to HDMI
source
input.
HDMI can
carry High Definition video to your digital TV with HDMI input. Your
cable TV provider may even include an HDMI cable in the kit. Activating the CISCO 170HD box for the first time After connecting
the box to your TV, plug in the power
adapter. The green LED light on the front of the box will flash on and
off. This means the box needs to be loaded with code provided by your
cable TV company. Until the box is loaded/updated with code, it will
not be functional and will continue to flash on and off. When the box is activated and loaded, the green light will be solid on (stay green with no flashing at all). This is the normal operating mode. The light will be solid red when powered off. The DTA Box will not power off if not loaded with software code. Your Cable TV provider will load box with updated software from their end. This may take some time and may be required to do several times to get the latest updates.Power cycle the box by pulling power plug in rear of box and not plugging back in for 30 secs. This may be requested by your provider to reset the box. The Coax cable and the HDMI cable can be connected to the TV at the same time. Typically, if the green LED on the front of the box is not solid on green (no flashing), the box is not fully operational. Some cable TV providers offer a CHAT online to help troubleshoot your connection and box. You will need internet access and a sign-on id and password to CHAT online with your provider. Messages on the TV from your DTA box may include: SEARCHING FOR CHANNELS..... This message comes up first after a power on. If the green light flashes on and off, the box is not operational yet. If this message stays on the screen for more than a few mins. you probably need to contact your provider for assistance.PLEASE WAIT. YOUR DEVICE REQUIRES AN UPDATE. This message will come up after the box has been activated. Before the box works properly it has to get loaded with software from your provider. A PROGRESS bar will show you the percentage of completion for the load. If you do not see progress after 5 min. call your provider for assistance. The box may be bad and need replacement or your provider may need to reset your services. Your provider also may need to update the software on their end so your box will work. If the box completes the load, you should be able to switch channels and watch TV.
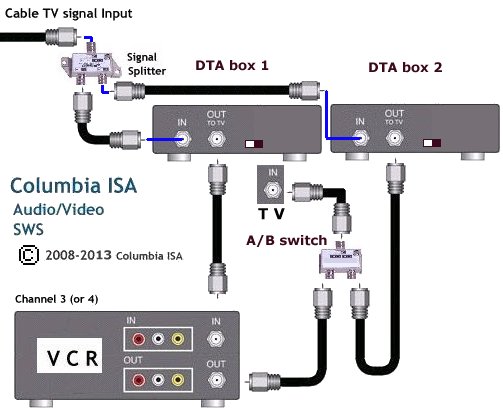
Usually when this message pops up you need to contact your provider and ask for a reset for your DTA box. When directed to, pull the power plug from the DTA box rear panel, wait 30 secs, then plug back in. This will help to reset your DTA box and start fresh. CHnnn NAME is currently not included in your subscription. Contact your service provider. Where nnn is a number of a channel and NAME describes the channel such as HBO or FOXNEWS. This message may cause the LED on the DTA box to flash red. This message just means you have selected a channel which you do not get. To correct, just use your DTA remote to select a valid channel such as 13 or 24. Selecting a channel such as 441 or 500 may cause this error. Just change to a channel you know you get. CISCO DTA 170HD box - INFO button Press the INFO button for 7 seconds on the DTA remote and a on-screen menu will come up showing all kinds of information. Navigate using the arrow buttons and press ENTER to see additional information. When finished, press LAST to return to the menu. Some of the information about the DTA box could be useful in diagnosing problems. HOOKUP DIAGRAM - VCR and DTA boxes to watch one channel while recording another channel You need 2 DTA boxes to view and record at once. You need a signal splitter and an A/B switch plus some coaxial cables (RG-6). Switch the A/B switch to the side you want, either view the VCR or the cable TV feed. Make sure to set the DTA box, VCR and TV to channel 3 (or 4) but they all have to be on the same channel. Set VCR to record channel 3. Select the correct channel on the DTA box. Remember, if you have an HDTV, you may be able to get over-the-air local TV channels using an antenna. This way you could view an over the air TV channel while recording a cable channel. Switch the TV input sources using the TV remote to view antenna or the DTA box source. CISCO PROGRAM the DTA Remote
control to power on/off your TV so you often only need one remote. Your cable TV service provider may use one of many different brands of DTA mini box. Each manufacturer will use different procedures and may offer different remote controls. Some brands include Humax, Motorola, Cisco, Pace and others. Some service providers are phasing out traditional cable boxes in favor of streaming boxes such as Xumo. PACE DTA Mini Box - Remote Control Enable RF Remote Control Pairing Power on the TV and the DTA box. Switch the TV to the correct input/channel a. Insert two good batteries into the remote control. b. Press MENU on the remote control. c. Scroll to Remote Control in the Setup Menu. d. Scroll to RF Remote Setup (Advanced) and press OK/ENTER to enable RF remote pairing. Ensure you are NOT disabling the feature but enabling it. e. Scroll to IR Remote Setup (Advanced) and press OK/ENTER to disable IR remote capabilities. Ensure you are disabling the feature, NOT enabling it. Program the DTA Remote Control to control the DTA box a. Point the DTA remote control toward the DTA box. Press and hold SETUP until the "All Power" LED turns red, then release. b. Press and release MENU rapidly (up to 5 times) until the Remote Control Pairing overlay appears on-screen. 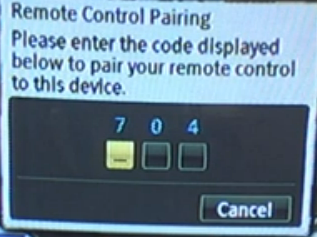 c. Enter the three digit code that is displayed. 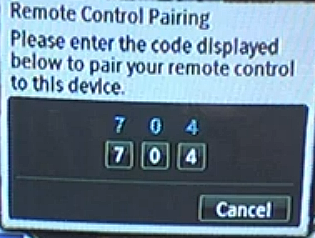 d. Once the device is paired, you will see “Success!” displayed on-screen. Press OK/ENTER to complete the process. 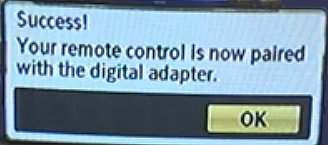 Program the DTA Remote Control to the TV (3 Options) Option 1: Popular Brands Method (see chart) a. Manually turn the TV on. b. Press and hold SETUP on the remote control until the LED blinks twice. c. Press the TV Power button on the DTA remote control. d. Press and hold the corresponding digit button for your TV brand. 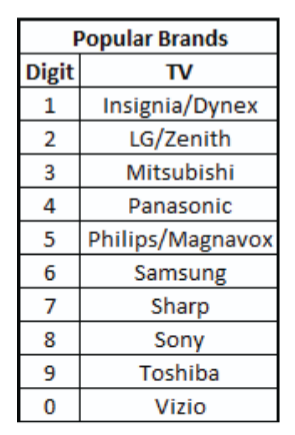 e. Release the digit button when the TV turns off. Setup is complete. f. Test the DTA remote to ensure the buttons now control the TV and DTA box. Option 2: Popular Brands Method (Remote Control User Manual) Manually turn the TV on. 1. Press and hold SETUP on the remote control until the LED blinks twice. 2. Find the manufacturer’s code for your TV from the Remote Control User Manual supplied with the DTA box. 3. Enter the code for your TV brand. 4. Press the TV Power button on the remote control to test. If the TV turns off, setup is complete. If the TV does not turn off, repeat steps above using the next code listed for your TV brand. 5. Test the remote to ensure the buttons now control the TV and DTA box. Option 3: Code Search Method a. Manually turn the TV on. b. Press and hold SETUP on the DTA remote control until the LED blinks twice. c. Press and hold down OK/ENTER. d. Release the button when the TV turns off. This may take a while. Setup is complete. e. Test the DTA remote to ensure the buttons now control the TV and DTA box. DTA Mini Box Remote Control The remote will be different depending on the DTA mini box. Press or long press (3 secs.) the SETUP button to enter the settings menu. Press the MENU button to enter the main menu options. 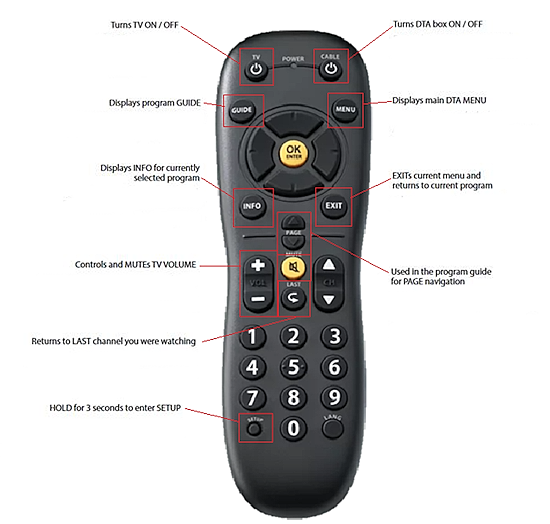 The settings options available will be shown on the setup menu. You can adjust the picture resolution such as 1080 or 720 or set to "AUTO". 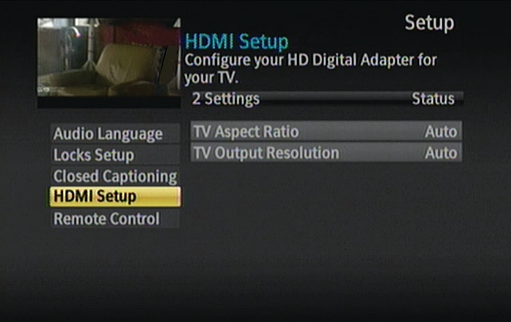 Other settings such as Audio, channel locks, closed captioning or remote control options can be adjusted. Xfinity (Comcast) Pair, program, factory reset Xfinity remote control If you have Xfinity X1 box, a Xumo Stream Box, or Xfinity Flex, follow the steps below. Pairing means programming your Xfinity remote to control a specific single TV Box. Once a remote is paired, it will only work with that one TV Box — until you factory reset it. If you have multiple TV Boxes, make sure you're using the remote that’s paired with the box you want to control. Pair your Xfinity Voice Remote with your TV Box, TV, and audio equipment. Step 1: Pair with your TV Box Aim the Voice Remote at your TV Box. Press the Microphone (Voice) button and say, "Program remote." You’ll receive a notification that your remote is paired for voice control. Follow the on-screen instructions. Step 2: Pair with your TV When asked, “Do you want to use your remote to control your TV power and volume?" select Yes. Use the on-screen keyboard to type your TV brand. Then, select OK. When you see “Ready to pair”, select OK. Try changing the volume on your TV using the remote. If you can adjust the volume, select It Works! If you can't adjust the volume, select It Doesn’t Work and try again. Step 3: Pair with your audio equipment (optional) When asked, “Do you want to control your audio receiver using your remote?" select Yes (if applicable). If you don’t have audio equipment, select "Not Now" and you’re done! Type in the brand of your audio equipment using the on-screen keyboard. Then, select OK. When you see “Ready to pair”, select OK. Try changing the volume on your audio equipment using the remote. If you can adjust the volume, select It Works! If you can't adjust the volume, select It Doesn’t Work and try again. • YouTube video Xfinity X1 box setup Program your Xfinity remote to your TV or audio equipment using our online code lookup tool You can also use the online tool to connect your remote to your TV or sound system. • Xfinity Remotes Go to the Remote Code Lookup tool • Xfinity remotes device brands codes Choose the Xfinity remote you have. Remove the battery cover to see the model number. Click Continue. Follow the steps to program your remote. Can’t find your TV brand in the list? If your TV brand isn’t listed in the tool, try this if you have an: XR11 Voice Remote (with a Setup button) Turn on your TV. Press and hold the Setup button until the light at the top changes from red to green. Enter 9-9-1. The light should blink green twice. Press the CH ^ until the TV turns off. When the TV turns off, press Setup to save the code. Press the TV power button on the remote. If the TV turns on, you're all set! XR15 Voice remote (no Setup button, but has number buttons) Turn on your TV. Press and hold the xfinity and Mute buttons together for five seconds until the light at the top changes from red to green. Type the first five-digit code for the TV brand. If the remote light blinks green twice, the code worked. If the remote light blinks red then green, the code didn't work. Aim the remote at the TV, and press Power. If the TV turns off, turn the TV back on and make sure the Volume and Mute buttons work. If the TV doesn't turn off, try the next code. XR16 Voice Remote (no Setup or number buttons) Aim the Voice Remote at your TV Box. Press the Microphone (Voice) button and say, "Program remote." Follow the on-screen instructions. Factory reset your Xfinity remote If your remote still isn’t working, try a factory reset. This will erase the connection between your remote and TV Box, so you’ll need to pair them again afterward. You can pair your Xfinity Voice Remote again by saying “Program remote” into the microphone button. If it is a new TV Box make sure it’s activated before you re-pair. XR11 Voice Remote (with a Setup button) Press and hold the Setup button until the light at the top changes from red to green. Press 9-8-1. The light will blink green twice. Your remote is now reset. XR15 Voice Remote (no Setup button, but has number buttons) Press and hold the A (triangle) and D (diamond) buttons at the same time for three seconds until the light at the top changes from red to green. Press 9-8-1. The light will blink blue three times. Your remote is now reset. XR16 Voice Remote (no Setup or number buttons) Press and hold the Info (i) and Home (house icon) buttons at the same time for about five seconds until the light blinks. Press Power, then Last (<- arrow), then Volume Down (-). Your remote is now reset. XR100 Remote (Xumo Stream Box Remote) Press and hold the back (←) and add (+) button until you hear a beep. Press 9-8-1. Wait for the beeps to finish. Your remote is now reset. XRA Large Button Voice Remote  To factory reset the XRA Large Button Voice Remote, see how to pair the XRA Large Button Voice Remote below. Pair your XRA Large Button Voice Remote Control an X1 or Xfinity Flex streaming TV Box Make sure the remote batteries (AA) are installed and your TV and Xfinity X1 TV Box or Xfinity Flex streaming TV Box are powered on. Set the TV input to match your Xfinity X1 TV Box or Xfinity Flex streaming TV Box. Smart pairing Aim the thicker, slanted end of the remote at your TV Box and press the Microphone button. To make sure the remote is pointed in the right direction, check if the attached strap is toward your body. The Microphone button is a dished, glossy, round button directly below the down arrow of the metal directional pad at the center of the remote. Follow the on-screen instructions to complete pairing. Manual pairing If smart pairing doesn't work, try these steps: Hold the Home and Info buttons for five seconds. Info is a round, black button in the middle row, second button down from the top of the remote. Home is a black button on the right side of the remote below the directional pad. It has a white house icon. Wait for the remote light to change from red to green. The remote will buzz gently. Follow the instructions — enter the three-digit, on-screen pairing code. Once your remote is paired, follow the on-screen steps to set up power, volume and input control for your TV. Control a TV Control your television’s power, volume and input from the XRA Large Button Voice Remote. While the TV is on, press and hold the Home and Mute buttons on the remote together for five seconds. Home is a black button on the right side of the remote below the directional pad. It has a white house icon. Mute is the first button at the top center of the remote. Hold for five seconds until the remote light at the top changes from red to green. The remote will buzz gently. Enter the first five-digit code listed for the TV manufacturer. Most likely code: 10810 Others to try: 11685, 11791, 11786, 12337, 11712, 11913 Valid code: Remote light blinks green twice Invalid code: Remote light blinks red, then green Aim the remote at the TV and press the Power button. The Power button is on the top right hand corner of your remote. If the TV turns off, turn the TV back on and verify that the Volume and Mute buttons work. If the TV doesn't turn off, repeat this process with the next TV manufacturer device code. Control an audio/video receiver or soundbar Control your audio/video receiver or soundbar’s volume and power from the XRA Large Button Voice Remote. With the TV and audio/video receiver or soundbar on, press and hold the Home and Mute buttons on the remote together for five seconds. Home is a black button on the right side of the remote below the directional pad. It has a white house icon. Mute is the first button at the top center of the remote. Hold until the remote light at the top changes from red to green. The remote will buzz gently. Enter the first five-digit code listed for the audio/video receiver or soundbar manufacturer. Most likely code: 31495 Others to try: 11685, 11791, 11786, 12337, 11712, 11913 Valid code: Remote light blinks green twice Invalid code: Remote light blinks red, then green Aim the remote at the audio/video receiver or soundbar and press the Power button. The Power button is on the top right hand corner of your remote. If the TV turns off, turn the TV back on and verify the Volume and Mute buttons work. If the TV doesn't turn off, repeat this process with the next manufacturer code listed above. Get to know your XRA Large Button Voice Remote Voice commands: Press and release the Microphone button, then say the name of a show or movie you want to watch. The Microphone button is a smooth, dish-shaped button located immediately below the down arrow button. The remote will capture your voice commands continuously for up to 2.5 seconds after releasing the Microphone button. You don’t need to hold down the Microphone button while you’re speaking. Simply press and release the Microphone button and then say your command. Wrist strap: Use the removable wrist strap for easy access to your remote. Home button: Press the Home button to see the Xfinity menu. Accessibility (*) key: See the yellow button at the top left corner of the remote? You can choose what the button goes to: The guide Accessibility options A screensaver Record: Say “record” or select the Info button in the Guide, then select Record. Changing batteries: Simply push the yellow button on the back of the remote to open the battery door. This button is located toward the top of the remote, on the opposite side of the detachable strap. Once opened, there are also battery lift tabs to make removing the batteries easier. Yellow silicone tabs alongside both batteries help you turn the batteries the correct way and make it easy to remove them with a gentle tug. Button mapping Below are the buttons on the remote from top left to bottom right. Accessibility: Yellow button with a black asterisk. It's located at the top left corner of the remote. When you press it for the first time, it will show on-screen instructions for setting this button to your desired shortcut. Power: Black button with a power icon in white. It's located at the top right corner of the remote. Turns the TV on or off. Volume up/down: A vertical, elongated black button along the left side of the remote with “VOL” written in white and tactile + and – symbols. Increases or decreases the TV’s sound. Mute: Round, black with a white speaker icon and an “x”. Toggles TV volume on or off. Channel up/down: A vertical, elongated black button along the right side of the remote with “CH” in white and tactile + and – symbols. Moves to the next channel. Info: Round, black with “Info” written in white. Shows more information about the program you’re exploring or watching. Guide: Round, black, with “Guide” written in white. Press once for the on-screen live TV guide, twice to choose a filtered guide view (on X1 only). Page Up: Round, black with “PG^” in white. Scrolls up a full page in a list of items or jumps forward in a program you’re watching. Directional Pad: a dished, metal diamond shape with rounded corners. Press the direction you want to move on the screen. OK: The round, black button at the center of the directional pad. Press to select and confirm your choices. Exit: Round, black with “Exit” written in white. Returns to the program you’re watching. Page Down: Round, black with “PGv” in white. Scrolls down a full page in a list of items or jumps backwards in a program you’re watching. Last: Black button with a white arrow pointing to the left. It's located directly beneath the Exit button on the left side of the remote about halfway down. Press to return to the previous screen or bring up your last nine watched items when viewing a program. Voice Button: Round, dished and glossy with a blue microphone icon. Press and then say a voice command like “Watch NBC." Home: Black button with a white house icon. Press to go to the Xfinity main menu. Rewind, Play and Pause: Each has an elongated, black button with white icons. The Play/pause icon is in the center. Double arrow icons for rewind and fast forward are on either side of the play/pause. Number pad: Use to enter channel numbers, T-9 search or on-screen codes. Input: Round, black button with “input” written in white. Choose HDMI inputs on your TV. Factory reset an XRA Large Button Voice Remote Hold down the Home and Page Up buttons until the status LED turns green. Press the number buttons 9, 8, then 1. • Xfinity Voice Remote XR2, XR5, and XR11 remotes These Xfinity remotes can be identified by a model number beginning with "XR" on the back of the remote. You can pair them again by using the Remote Code Lookup tool. Press and hold the Setup button until the light at the top changes from red to green. Press 9-8-6. The light will blink green twice. Your remote is now reset. Remote control won’t work? Try installing new batteries.
|