|
|
|
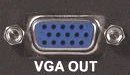
Computer to TV / HDTV Connection Use your HDTV as a computer monitor Many people want to view their computer video output on a big screen TV instead of a traditional computer monitor. This can be done IF you have the proper hardware, settings and cables. The potential problem for viewing computer video on a TV is that computer video and TV video work in very different ways. Those differences create potential issues that must be overcome to make a computer's output signal compatible with a TV. Old and New Technology The newer technology just works. A Windows 11 computer can cast video and audio to a smart TV with a few keystrokes. This can be done with an HDMI cable connection or it can be done wirelessly using Wi-Fi. With the older technology this is not so easy. The personal computer has been ubiquitous since the 1980s. In 1987, IBM introduced the VGA connection for the PS/2 personal computer display monitor (640 x 480 signal). TVs at that time had no input ports to connect directly to a computer for use as a video display. 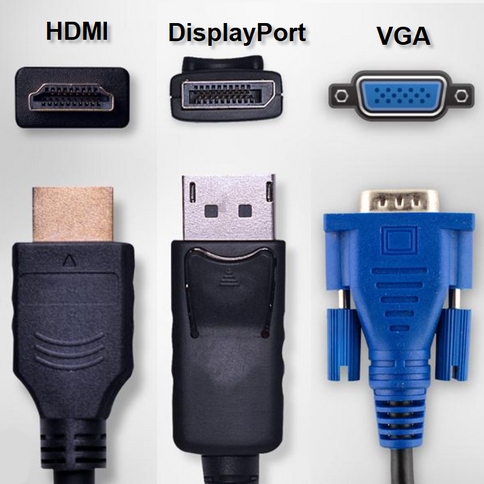 What is VGA? VGA, which stands for Video Graphics Array, is an analog video standard that has been used in computers and other devices since 1987. It uses a 15-pin connector to transmit video signals from a device to a display. Around 2000, TVs started offering VGA input ports so you could connect your computer using the VGA output. A TV made around 2010 usually has a VGA input port. After 2015, TVs generally had no VGA input as HDMI became the new standard. VGA was used until HDMI eventually replaced the older analog display technology. HDMI is digital and is a better match for digital flat screen TVs.  Computer VGA port for display/monitor connection 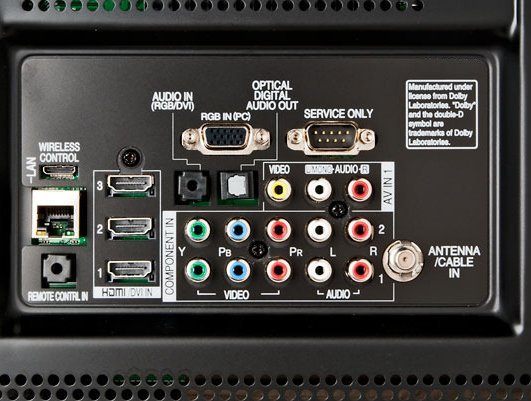 TV rear panel with VGA and HDMI inputs 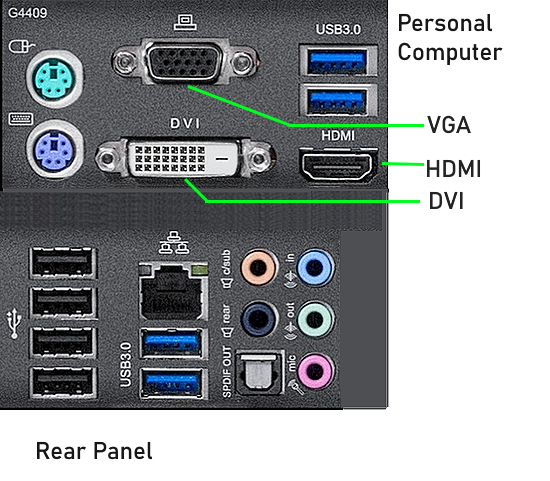 Computer with VGA, DVI and HDMI outputs What is DisplayPort? DisplayPort was created in 2006 by Dell and later standardized by the Video Electronics Standards Association (VESA). Just like HDMI, it was introduced to replace VGA and DVI standards. Also just like HDMI, DisplayPort is a digital interface that can transport both audio and video. What is HDMI? HDMI (High-Definition Multimedia Interface) is a digital audio/video interface that has become the standard for most modern devices since its introduction in 2002. Unlike VGA, HDMI offers several advantages: o Digital signal transmission o Support for higher resolutions (up to 10K in the latest versions) o Ability to carry both high-quality video and audio signals through a single cable 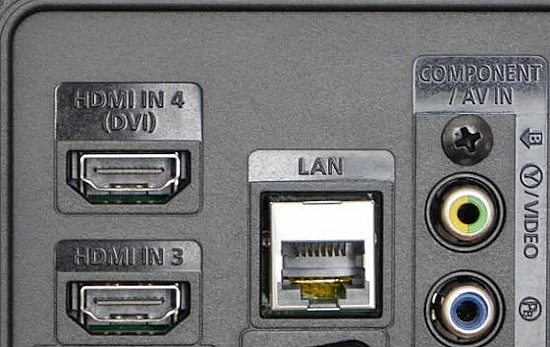 TV rear panel HDMI input ports HDMI Connection Modern laptop computers have an HDMI out port to connect an HDMI Cable to the TV HDMI input port. Some laptop computers have the USB-C port in which case you will need a USB-C to HDMI adapter to connect the TV using an HDMI cable. Adapters Using an adapter for VGA to composite video, you can connect an older CRT TV through an RF Modulator. Tune TV to channel 3 or 4. Audio from computer 3.5mm jack to RCA stereo on RF Modulator to coaxial RG-6 cable to TV antenna coaxial RF input jack. VGA Adapter for older CRT TV 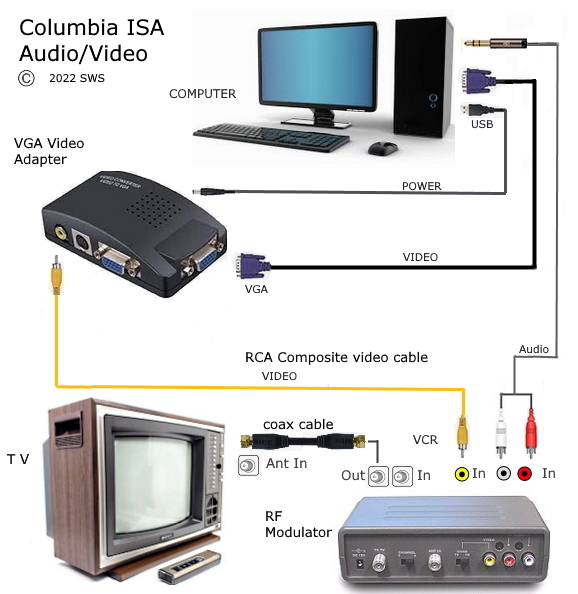 VGA to HDMI Adapter Since VGA is an analog signal and HDMI is a digital signal, you need a powered signal converter to get VGA to HDMI for a TV HDMI connection. 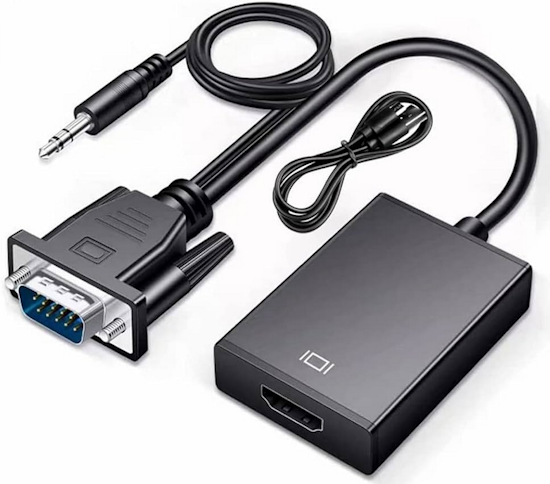 VGA is video only so you need an audio connection (the 3.5mm stereo plug) Older Technology WARNING: Following the guidelines below could potentially result in damage to your TV due to the incompatible properties of computer signals and television signals. Do so at your own risk! The following are four primary challenges that must be addressed when connecting a computer to a television: Colorspace compatibility Resolution compatibility Refresh Rate compatibility Overscan If you have an HDTV with a VGA input, you probably are most of the way there. Many older computers offer VGA output. Check to make sure the HDTV input accepts the output resolution and refresh rate your computer video card offers as they must be made compatible. If you do not have an HDTV with a VGA input, there are still ways to make a successful connection, however, you must overcome the four problem areas above in order to get acceptable video from the computer to the TV. Just using a cable with matching connectors at each end will not get the job done, as the signals are usually not compatible unless you use a signal converter/adapter. Some adapters are just passive however, and will not do any signal conversion. They just allow a cable connection between computer and TV. Video signal converters or scalers can be "active" not just passive, and actually do signal conversions. These products are available and usually run $100 to $300. That said, you may still have to make adjustments in one or more of the four problem areas mentioned above, on your computer using your DISPLAY SETTINGS screen or vendor supplied software designed specifically to adjust video settings on your computer. Understanding video signals - Colorspace VGA - (Computer) VGA is a generic term sometimes applied to HD-15 connectors, which are 15-pin connectors. VGA connections carry an RGBHV signal. RGBHV is sometimes abbreviated as RGB. RGBHV stands for "Red/Green/Blue/Horizontal Sync/Vertical Sync". It requires five pathways to pass its signal. COMPONENT VIDEO - (Television) Component video uses the Y-Pb-Pr colorspace, and its cables are often terminated in RCA plugs. Component video is sometimes erroneously referred to as RGB due to the common red, green, and blue coloration of its RCA jacks, causing confusion. Y-Pb-Pr divides the video information in a particular way, which requires three pathways to pass these signals. Y = luminance (black & white information) and sync Pb = blue image data, Pr = red image data, RGB and Y-Pb-Pr employ completely different colorspaces, and are not compatible with each other in their native states. Simple ?VGA to Component? cables are intended for different applications, not signal conversion they simply can't work in such an application because they do nothing but change the connector type, not the signal they carry. To address this issue, a quality transcoder must be installed to change the colorspace. Resolution Resolution Compatibility - You must make the computer?s output compatible with the television's input. Look at the video output settings on your PC or Mac. You will see a resolution like 1024x768, or 800x600, or 640x480 or the like. None of these are resolutions that most HDTVs will accept from their video inputs. Those inputs expect standard consumer electronics video signals, not VESA computer standards. TV and HDTV inputs often support only 480i, 480p, 720p, and 1080i/p signals. You must adjust your computer's resolution to one directly compatible with the HDTV set (1280x720, for example), or use a third party software program to achieve such a resolution. Alternatively, another option would be to use an outboard video scaler. The scaler can be used to make both resolution and refresh rate compatible without adjusting the computer?s video output. Refresh Rate The refresh rate must be compatible between computer and TV. Look at your computer settings again - the refresh rate might be anywhere from 60 Hz to 85 Hz, or above (this is the number of times a device is asked to renew what is on the screen). Most televisions can only accept 60 Hz refresh rates, higher refresh rates could even potentially damage your television set! Computers often run at much higher refresh rates, so it is important to get the signal compatible with your television set. Caution: Never apply a custom refresh rate setting without first confirming your television is compatible with that setting! Adjust the computer's refresh rate to one directly compatible with the HDTV set (60 Hz, most commonly) or use a third party software program to achieve such a refresh rate. Alternatively, another option would be to use an outboard video scaler. The scaler can be used to make both resolution and refresh rate compatible without adjusting the computer?s video output. Overscan Overscan is extra image area around the four edges of a video image that is not normally seen by the viewer. It exists because television sets in the 1930s through 1970s were highly variable in how the video image was framed within the cathode ray tube (CRT). Overscan tolerance was built into television sets and broadcasts due to several CRT-related phenomena, such as image centering irregularities and ?stopping? the horizontal motion of the electron beam. Some video synchronization information is also drawn in the ?overscanned? area of the image. Today's TV sets can be based on newer fixed-pixel technologies like liquid crystal displays (LCDs), and those with CRTs have much less image drift with crystal-based timing, and so can have perfect image placement. Nevertheless, these sets when used for TV must overscan the image so that older programming will be framed as intended. Even high-definition television sets overscan. It is common to see HDTV sets crop out text and station logos on HDTV programming. In response to different picture ratios, some broadcasters crop, magnify, or stretch the original video, further distorting the image a HDTV set may receive. Analog TV overscan can also be used for datacasting. The simplest form of this is closed captioning and teletext, both sent in the vertical blanking interval (VBI). Electronic program guides, such as "TV Guide On Screen", are also sent in this manner. One of the most unique aspects of computer versus television images is that computers do not overscan at all, properly adjusted, the entire image is contained within the frame of the computer monitor. Some may even appear ?underscanned?. Since televisions generally overscan their video inputs, you must make the image fit the screen. In virtually every case, overscan will have to be adjusted within the computer operating system itself, using software for PC or for Mac. Some manufacturers offer high end graphics card drivers that include an overscan adjustment wizard as well. Most outboard devices don't have the screen size controls necessary to make the appropriate adjustments. UNDERSTANDING VIDEO for PC to TV hook up - To understand what is and isn't possible, we need to know the differences between a computer's video signal and the one expected by your television (usually NTSC (North America) or PAL (Europe)). Typically, Personal Computer's display in one of 640x480, 800x600, 1024x768, 1280x1024 or 1600x1200. The low pixel addressabilities are supported by VGA. The higher resolutions are typically used when in windowing environments like Win98 or Windows-XP. In addition, computers refresh the screen at varying rates, ranging from 50 to 75 or more Hertz (cycles/s). Traditional standard televisions are analog devices, designed to accept a broadcast television signal like NTSC. The NTSC standard supports a maximum of 525 lines of resolution. The screen refresh rates are fixed for NTSC as 60 Hz. In addition, the video amplifiers used in televisions are fairly low bandwidth devices, and can't handle high horizontal resolutions like 1024 or 1280 pixels. What this all comes down to is that standard televisions can display a video signal derived from up to a 640x480 pixel mode. To summarize, a VGA to TV converter can be used to translate the VGA's RGB signal to a TV compatible signal for resolutions up to 640x480. Converters that claim to handle higher resolutions have scan converters in them that reduce the effective resolution to that of NTSC television. i.e. You simply can't display better than 640x480 on an analog NTSC TV. There are many ways to connect your computer to your TV. How you do it depends on what type of TV you have and what type of computer hookup options you have available. Your TV could be a standard or a high definition TV. Your computer may have only a VGA connection or a fancy video card with many connection options. The key is to make sure the computer is sending a signal the TV can handle. The following chart shows some of the many possible solutions to hooking up a computer to a TV:
* for a TV with only a RF input, use a RF modulator to convert from composite video Making the connection You have many options on personal computers today as far as video connections are concerned. The typical low cost computer may only have a VGA port for connection to a computer monitor. Many HDTVs today have a VGA input port, so the physical hookup is easy. Just run a VGA male to male cable from the computer VGA output to the HDTV VGA input. To make sure the video signal is compatible for the TV, you need to know what refresh rate, resolution and other attributes, such as overscan, are associated with the TV. Some HDTVs can only display certain resolutions and refresh rates. Consult your owner's manual here. Typically the refresh rate is 60 Hertz. The resolution could be 640 X 480, 800 X 600, 1024 X 768 or 1280 X 1024 etc. Your task is to setup the correct parameters in the computer software so the TV can display a good image. Common screen resolutions are: VGA - 640x480 SVGA - 800x600 XGA - 1024x768 SXGA - 1280x1024 UXGA - 1600x1200 In the simplest case, the connection from your computer should match the connection on your TV. For example, if your TV has a VGA input and your computer has a VGA output, you just need a cable to connect both together. If there isn't a match of video inputs to outputs, there is still a good chance that a connection is possible. All kinds of video adapters and transcoders are available to hookup just about any configuration. Computer connection
2) a DVI connection, composite, component or an S-Video output. These connections are usually available on video cards you install yourself in a slot in your computer. 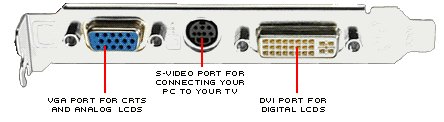 3) an HDMI connection.
Your computer could support one, two, or all of the connections listed. If you are unsure, refer to the video section of your computer's user manual or your video/graphics card user manual. TV connection Next, you will need to identify the type of television you have. It will be
either an analog or digital TV. Finally, you need to find a matching connection between the two. If you have a
VGA or DVI match, use that as it is the best connection. Download and install the latest drivers for your computers' video card. The most common video / graphics cards are the following:
Always refer to your computer manufacturer's website before installing any software. Sometimes, drivers are available there. Do not download drivers for a graphics chip different from what your computer uses. If you do not own an HDTV but have a standard analog TV: How to use a standard analog NTSC TV as a Computer Monitor Most TVs have three types of inputs. 1) coaxial (RF), the same as your cable box signal input or satellite TV box signal input, 2) an RCA composite input (the yellow, red and white inputs) and 3) an S-video connector. Newer televisions have Component Video, and possibly DVI, VGA or HDMI inputs. These days computer manufacturers are adding TV compatible outputs on their products, but for the most part you will find the usual 15-pin VGA output that a regular computer monitor uses. The newer multi-media computers will probably have all high definition outputs that connect directly to your TV, but for now, most people have to use existing ports for both computers and televisions. Adapters for Computer to TV Hookup You may need to get an adapter so you can hookup your computer to your TV. These have a VGA port on one end and (usually) a selection of outputs on the other (S-video, RCA composite and Component). People without non-integrated video cards installed on their computer (i.e. VGA only) will usually need an adapter of some kind. Then there is the option to use a wireless adapter. It costs more but it's worth not having a cable mess and not needing to keep your computer near your TV. If you have a TV compatible output on your computer, such as an S-video jack, just take an S-video cable and connect it to your computer and your TV. If you do not have an S-Video jack, then attach the VGA end of your adapter to your computer and use the RCA, S-video or Component Video cable to attach to your TV input. After you've made the connections, make sure you are on the correct TV video input. Press the input button on your TV or remote until you see your computer's output signal. 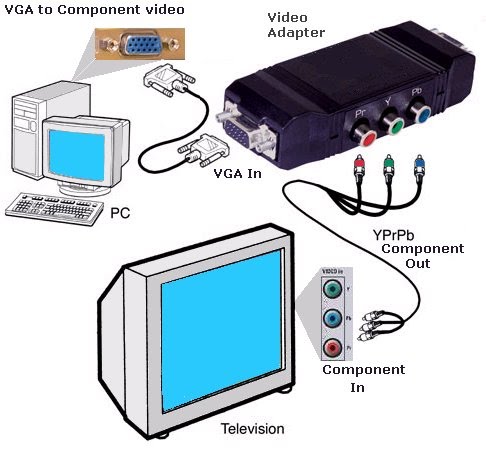 Your standard analog TV's usual video signal is based upon the NTSC video standard (PAL if you live in Europe). This signal is different than the one generated by your computer. Computers use screen resolutions measured in pixels: 640x480, 800x600, 1024x768, 1280x1024 or 1600x1200. Most standard TV's can only get about 500 lines of resolution. So the end result is you are left with a maximum resolution of 640x480 on a traditional analog television. This is enough to play games and watch video, but you will not get the resolution your computer monitor will give you. You can get an adapter for an HDTV that will give you higher resolutions. You can use your HDTV as a computer monitor if you have the correct compatible hardware, cables and settings. Getting the correct display depends on the video card in the computer, the type of connection and the type of HDTV and its associated video connections. Some HDTVs are PC ready, meaning the TV display is already setup for a PC connection. Most HDTVs can be connected to a computer. But connecting is one thing, getting successful results is another. CRT based HDTVs are probably the least desirable HDTVs to hookup to a computer because of the overscan associated with these type of TVs. The fixed pixel HDTVs (Plasma and LCD) generally will be the best type of HDTVs for connection to a PC and many of them are equipped with a VGA port specifically for this purpose. These TVs generally will only require the use of a VGA cable and the setting of the PC video card to match the recommended resolution of the HDTV. VGA to component video converters allow you to have both your VGA monitor and your HDTV connected at the same time. Video cards such as the ATI 7500 pci Radeon have both a DVI and a VGA output connector. Connecting with S-videoTo make this connection, you will need the following:
Some computers require a separate adapter to use the S-Video capability of your graphics card. In many cases, the adapter will need to be plugged in prior to making adjustments to the output settings of your graphics card. Connecting with S-Video is the easiest connection to make from your computer. This connection will not yield computer quality image results.
Once complete, you can disconnect your computer monitor. When you boot-up your computer, the S-video connection should be enabled. In some cases, the S-video output needs to be enabled on a per session basis. If your software reflects this, leave the computer in a stand-by or hibernation mode when not in use. Your current settings will remain intact until the next time your computer is shut down. Connecting with VGA/DVIYou can make a connection with DVI by following the same basic steps below. Substitute a DVI cable in place of the 15-pin VGA cable. To make a connection with a 15-pin VGA cable, you will need the following:
Some televisions may include a 5 wire RGB input (R, G, B, H, V). You can use this input to make a connection. However, you will need to obtain a 15-pin VGA to 5-wire RGB cable. If you've identified a 15-pin VGA input on your television, you will need to do a little hunting in your manual for compatible display formats. Compatible formats might be listed on the back of the TV, or in the owner's manual for the television. If it's listed in letters, a chart is below to explain them. If your input is PC compatible, it will say one or more of the following:
Your 15-pin input might not be directly PC compatible. If this is the case it will say one or a few of the following television formats. The compatible PC resolution is listed next to it.
If your input does not list any computer formats, only television formats, don't worry! You can still get this to work. If you are hooking up a Plasma, DLP, or LCD television, you should be able to plug it in and turn it on. However, if you do this and get no picture, use the computer monitor to adjust settings before plugging the cable into the TV.
Once complete, you can remove the computer monitor. You will be able to shut down the computer when not in use, or use the standby and hibernation modes. The computer will keep your current settings unless you physically change them, or install new drivers for your graphics card. Connecting with Component VideoTo make this connection possible, you must have the following:
NOTE: If you have a computer with an ATI Radeon graphics card, ATI sells a kit to hook up your computer to an HDTV set. If you do not have an ATI graphics card, you will need to purchase a high resolution capable VGA to component video transcoder / adapter.
Once complete, you can remove the computer monitor. You will be able to shut down the computer when not in use, or use the standby and hibernation modes. The computer will keep your current settings unless you physically change them or install new drivers for your graphics card. Using DVI or HDMI The reason many TV manufacturers include a DVI connection in addition to component video was not to allow the connection of a computer. The main reason was to allow the exchange of video information in a digital format rather than analog. The DVI interface came into being due to the LCD and plasma flat panel computer monitors and projectors, and later DLP and LCOS (D-ILA) displays and projectors. Since these are fixed pixel devices an interface that would present a digital value for each pixel rather than an analog signal level made sense. The DVI interface answered the question of, "Why start out with a digital array of pixel values then convert them to an analog signal to send to a monitor only to have the analog signal reconverted back to digital. With the DVI interface the possibility of the signal remaining all digital is possible. The DVI interface was also given interaction capabilities between the video card and the monitor. This allowed the computer to inquire of the monitor what the resolution and timing that it supported and then via software in the computer set the video output accordingly. This capability is actually the essence of the DVI interface, the ability to tell the source what signals the monitor will display. The earliest DVI-I interfaces were actually just VGA analog signals with the digital link to allow the information to be exchanged between the computer and the monitor. There is a cable available to convert a DVI-I output from a video card to a VGA input on a monitor. The DVI connection that is most desirable for fixed pixel devices is the DVI-D, dual link connection. This is the connection that most HDTV manufacturers use primarily for compatibility reasons. Adoption of DVI for HDTV Signals Since the computer was able to ask the monitor to supply information concerning its signal capabilities, as well as other information, the consumer electronics industry saw this interface (and later the HDMI) as a possible answer to the copy protection issue that had prevented HD movies from being made available for broadcast in HDTV. The entertainment industries were concerned with copy protection and insisted on a method of preventing cloning of their movies. The HDCP protocol was developed and the DVI became the first interface to have HDPC implemented. This allowed the broadcasters to "raise the HDCP flag" that would prevent a recording device connected to the DVI output from recording by shutting off the output. As long as a monitor only device was connected the output was enabled. Computer Output Compatibility Many people think that because there is a DVI connection on their HDTV that it should be a matter of connecting a DVI cable between the two and presto! We have computer video on our HDTV screen. This is not always the case. There are exceptions to this, primarily plasma, LCD displays and projectors. These are generally higher cost display units that are built with the connection of a computer in mind, but many HDTVs are not. Computer monitors today will accept a vast range of video signals. Refresh rates from 50Hz to 120Hz are typical for most computer monitors, whereas most HDTVs will only handle 59 to 61Hz refresh rates. Horizontal scan ranges are also reduced compared to a computer monitor. It is important to know what is possible for your particular HDTV because serious damage can be done to your HDTV if non viewable signals are sent to your TV. If while trying out different resolutions and timings you hear a high pitched noise from your TV, remove the signal or turn off the TV immediately. First of all you will need to have a computer monitor connected as well as your HDTV. Since the majority of resolutions that can be displayed on your monitor will not be displayable on your HDTV, you would be operating blind. Some video cards have both a VGA output and a DVI output and if yours is this type, then you can hookup your monitor to the VGA output. Start by setting your computer to 640x480 and get a stable picture. The VGA input on a TV will give you the best match for a PC input, for most cases. As far as resolution goes, the VGA output will handle more resolution than the HDMI input port most likely, so picture quality would not be a reason for choosing HDMI over VGA. Now it may be that the TV has some restricted resolutions that it will support through the PC port. Consult your manual on this point, but if it will handle the native resolution of your TV then you should have no problem setting the VGA output on the PC to accommodate the TV. The HDMI and component inputs will be expecting a video device to be connected to the input and as such those inputs will be set with overscan. On a fixed pixel TV, overscan is done by the internal scaling processor. Basically the resolution received is scaled up to a slightly larger resolution so the edges of the picture are forced off the screen. This eliminates video noise that almost always exist in the first lines and last lines of broadcast video. In early CRT type displays, the horizontal and vertical sweeps were enlarged to accomplish the same thing. Newer CRT designs that employ all digital processing treat the overscan the same way as the fixed pixel devices. Employing a scaling processor will usually result in the text being somewhat fuzzy and is not the optimum picture. Usually when the TV has a VGA PC input port (often referred to as a RGB input) there will not be any scaling processor involved and thus a clear picture. If you do decide to use the extra HDMI input for the PC and reset the overscan, just be aware that input will not be suitable for a video device until the overscan is restored. I would suggest you use the PC input and see what the picture looks like. Be sure to set your PC video output to match what the TV manual indicates and be sure the refresh rate is set to 60 Hz. VGA Abbreviation for video graphics array, a graphics display system for PCs developed by IBM. VGA has become one of the de facto standards for PCs. In text mode, VGA systems provide a resolution of 720 by 400 pixels. In graphics mode, the resolution is either 640 by 480 (with 16 colors) or 320 by 200 (with 256 colors). The total palette of colors is 262,144. Unlike earlier graphics standards for PCs -- MDA, CGA, and EGA -- VGA uses analog signals rather than digital signals. Consequently, a monitor designed for one of the older standards will not be able to use VGA. Since its introduction in 1987, several other standards have been developed that offer greater resolution and more colors (see SVGA , 8514/A graphics standard, and XGA), but VGA remains the lowest common denominator. All PCs made today support VGA, and most likely some other more advanced standard. Choosing a Video Card A video card or graphics card is similar to a processor, but is specially designed to control the screen images - or graphics --- on your personal computer. If you love graphics-intensive games or videos, a high quality video card is a must for your PC system. Before You Buy Make Sure Your Card is Compatible. Before you purchase a video card you need to make sure your motherboard is compatible with it. For example, PCI Express video cards won?t work with motherboards designed only for AGP or PCI video cards, and vice versa. Once you?ve determined which type of video card you need, you?re ready to make your choice. Installing a PCI Adapter Card The task of installing a PCI adapter card into a desktop computer takes only a few minutes. All you need to complete the job is a Philips screwdriver. Please note that there are many PCI adapters that can be installed in your computer system. Therefore, this brief guide only covers the physical installation of the card itself. To install peripheral attachments you will need to consult the installation directions that come with the adapter card. Warning: Before you begin any installation project make sure you ground yourself to prevent injury. If you don't have a grounding antistatic wrist strap, you can ground yourself by touching any of various household objects, such as a water pipe, a lamp, or another grounded electrical device. And as an added safety precaution, unplug all power cords before you begin to work. Note: Be sure to consult your user manuals when embarking upon any PC installation project. Computer systems and components vary and manufacturers may make slightly different installation recommendations. 1) Make sure your computer system is shut down and the power switch is off. 2) For safety measures, remove the power cord. 3) Remove the screws from the computer case housing. 4) Gently remove the case panel or cover from your computer. 5) Locate the PCI slot you will be using and remove the appropriate slot cover. 6) Place the PCI card into the slot by first positioning it directly over the PCI connector and gently pushing down on the card until it slides into the connector 7) Attach the PCI card by screwing it into the slot holder. 8) Consult your instructions to find out what internal or external cables are required, and attach them. 9) Place the panel or case cover back over your PC system. 10) Reattach the cover by screwing it back into place. 11) Plug in the power cord. 12) Turn on the power and boot up. Now that your PCI card has been successfully installed, your system must detect the proper hardware. Once this process is completed, your system will request any software drivers needed to finish the installation process. Refer to the documentation that accompanied your adapter card for software installation instructions. How to display your computer screen on your modern TV via HDMI - HDMI Computer to HDMI TV Connect your computer's HDMI port with an HDMI cable to an unused HDMI input port on the TV. Find the input/source button on your TV remote control. Use this button to switch between "inputs". Each HDMI port displays audio and video of the connected device. Most TV remotes have an input button that cycles from one input to another. Press the input button repeatedly until the correct HDMI input is displayed on the TV. For newer menu based TVs, select HOME, then SOURCE and select the HDMI source connected to the computer. Adjusting the display settings on your computer Windows 10 Hold down the Windows key and press the P key on your keyboard. Select one of the following display style options. o PC screen only (the screen is not displayed on the TV) o Duplicate (the same screen is displayed on both the computer screen and the TV.) o Extend (the image is extended onto the TV and allows you to have a desktop across both the computer screen and TV.) o Second screen only (the screen is displayed on the TV only.) Apple Mac Press [F7] to change the display mode. If you need to adjust the resolution on your TV, go to the Apple menu, select System Preferences, click Displays. Then select Default to automatically use the best resolution or select Scaled to select a resolution manually. HDMI cable See also: • PC stereo hookup • Hookup Diagrams • Timer Record Radio Shows on a VCR • Camcorder hookup to TV, DVD • Audio Video Connections • Video Cables Connections • See over 100 Hookup Diagrams • HDTV basic setup • HDTV Cables Columbia ISA Audio Video Empowering consumers through information |