|
|
|
SET the CLOCK on a VCR How to set the clock on a VCR 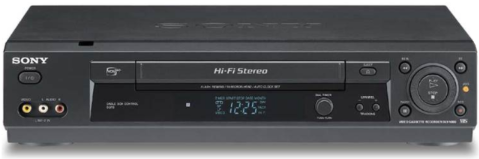 Connect the VCR to the TV using coaxial cable or RCA cables 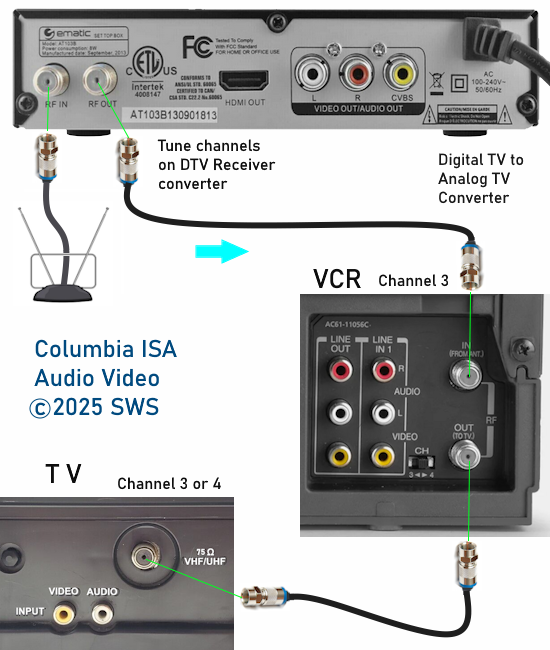 DTV converter to VCR to Mono audio CRT TV  VCR connect to TV using coaxial cable. Set TV to channel 3 or 4. 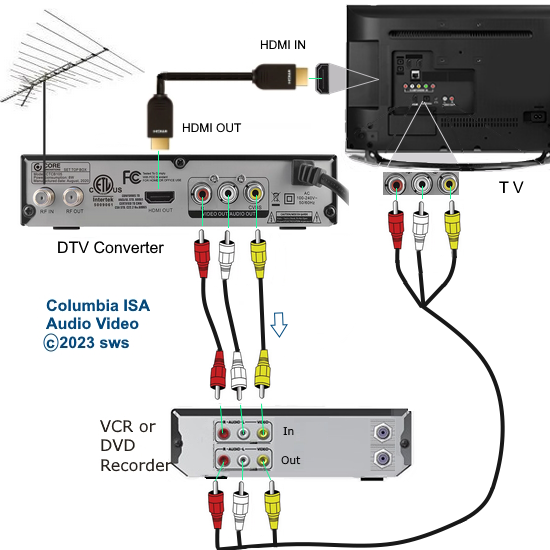 When connecting with RCA cables, be sure to select on the TV, the correct source input.  VCR REAR PANEL Your VCR has a clock function and the time is typically displayed on the VCR front panel when powered OFF. Some VCRs will display a blinking 12:00 when the clock is not setup. You must set the clock to the correct time and date if you want to do timer recording. Every brand and model of VCR is a little different in the way you set the clock but basically the process follows the same main idea which is to toggle up/down and forward thru the on-screen menu to get the day, date, year, hour, minute and AM/PM indicator setup. You may need to set the clock on your VCR after a power failure or when Daylight Savings Time occurs during the year. If you are using a remote control which can control your TV and your VCR, make sure to switch to the VCR. Your remote may have a physical switch labeled TV/VCR or TV/VIDEO. Be sure it is set to control the VCR. Displaying the VCR's internal on-screen menus Many older VCRs, especially combination units (TV/VCR), included a physical or button-based TV/VCR switch. This switch is a two position switch to toggle between viewing live broadcast television signal (received via the VCR's tuner) and the signal from the VCR itself (e.g., playing a VHS tape). Think of this as one position for viewing TV channels and the other position as the VCR transport (VHS tapes or on-screen display). To get the VCR menus on the TV screen, this switch must be in the "VIDEO" or "VCR" setting, not the "TV" setting. It may be labeled ANT for antenna and VIDEO for the VCR transport. Some VCRs will automatically switch to the VIDEO mode when you insert a VHS tape and press the PLAY button. Then you could press the stop button and then press the MENU button and you should see the VCR's on-screen menus. When the VCR is powered OFF, the default is typically the TV mode (tuner) when first powered ON.  VCR on-screen menu displayed on a connected TV VCRs typically utilize an on-screen display (OSD) to navigate settings and options. Common menu items include: Clock setting: To ensure accurate recording times. Channel setup: To program receivable broadcast channels. Timer recording: To schedule recordings of TV programs. VCR remotes typically have buttons for navigating these menus, such as arrow keys, Enter, and Menu buttons. Consult your VCR's and TV's user manuals for model-specific instructions and troubleshooting tips. The VCR Auto Clock Set Option The "Auto Clock Set" feature on VCRs, which automatically adjusted the time using a signal from local PBS TV broadcasts or local cable TV providers, generally does not work anymore. This is because the signal source, primarily PBS, has largely discontinued broadcasting the time signal. While some VCRs offer the feature, it is effectively defunct due to the lack of a compatible TV signal. VCRs with Auto Clock Set relied on a specific time signal broadcast by local PBS stations and some cable TV companies. When enabled, the VCR would automatically tune to a designated channel, receive the time signal, and adjust its internal clock accordingly. Due to declining use of VCRs, the time signal was discontinued, rendering the Auto Clock Set feature inoperable on most VCRs. If your VCR still has the feature, you may need to set the clock manually using the VCR's remote or the VCR's front panel controls. Therefore, while some VCRs might still have the "Auto Clock Set" option in their menus, it's unlikely to function correctly due to the lack of a compatible time signal. How to set the clock on a SONY VCR SONY VCR CLOCK SET Power ON the VCR and the TV SONY VCR Remote Control  Be sure to select the "VIDEO" not the "TV" mode by pressing the TV/VIDEO button.  Press the MENU button on the VCR remote control The Auto clock set will not work anymore since the switch to digital TV so you must use the option set MANUAL. Manual Clock Set 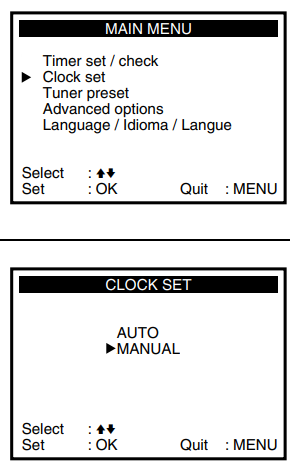 1. Make sure your VCR remote has good batteries installed. 2. Power on the TV and the VCR 3. Set the TV to channel 3 or 4 if the VCR is connected to the TV with coax cable or if your VCR is connected to the TV with RCA cables (yellow, white, red), set the TV to the correct VIDEO/AV input. 4. Press TV/VIDEO to display VCR on TV. This button may be labeled VIDEO/ANT or VCR/TV Press MENU button on SONY VCR remote control 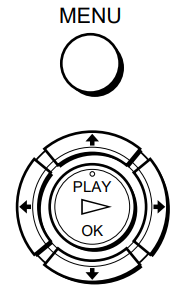 Navigate up/down/left/right using the arrow buttons on the remote control. Press the center "OK" button to select. You should now see the on-screen VCR menu on the TV screen. The main menu will look different for various VCR models even within the same brand. 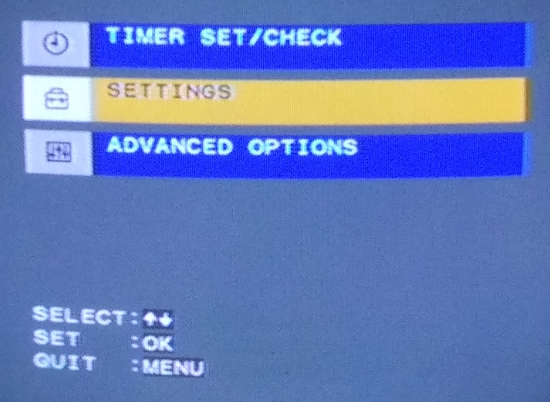 SONY VCR SLV-789HF main menu Press the "OK" button to select "SETTINGS". Skip down to the CLOCK SET option using the down arrow key on the SONY VCR remote control and hilight the CLOCK SET line. Next PRESS the OK button on the VCR remote control. This should bring up the CLOCK SET screen showing the options AUTO or Manual. Select MANUAL using the arrow keys on the remote. Next PRESS the OK button on the remote.   Press the down arrow until you arrive at "Clock Set" and press "OK".   Skip down to "Manual" and press "OK". 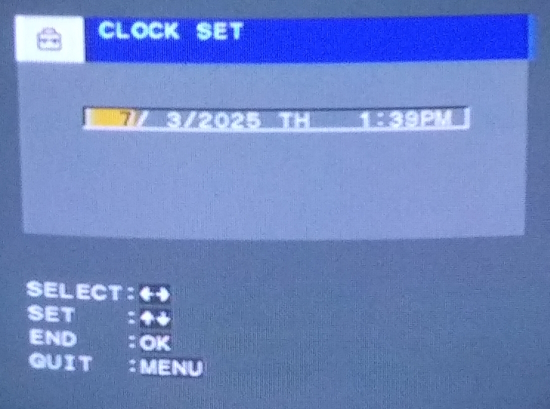 Now you should see the screen to change the time and date. 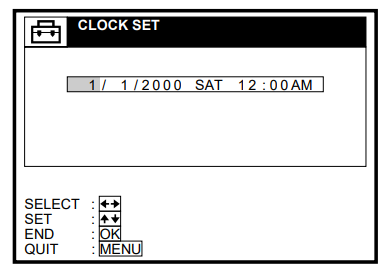 Using the arrow keys on the SONY VCR remote, select the month, day and year and change to the correct settings using the UP and DOWN arrow keys on the VCR remote. Next, move over to the HOUR and MIN and use UP and DOWN arrow keys to change to the correct time. Last step is to change the AM/PM setting to the correct time of day either AM or PM. Now press OK or MENU to quit. If set properly, you should now see the correct time on the VCR display. Some VCRs do not have a display on the front panel. If your VCR does not have the current year in the display you can set the year to an equivalent year by looking at Repeating calendar years and choosing a year which has the same days. Your VCR will not know the difference and will work properly. For example the year 2023 has the same calendar as 2006 so just set the year to 2006 on the VCR. For example the year 2025 has the same calendar as 2003 so just set the year to 2003 on the VCR. For example the year 2026 has the same calendar as 2009 so just set the year to 2009 on the VCR. • How to connect VCR to flat screen TV Auto Clock Set • Get current time and date Some VCR models have an AUTO CLOCK SET feature which in the past allowed you to skip the set clock procedure entirely if you lived in an area where you could receive the local PBS TV station which broadcasts an XDS (extended Data services) signal containing the data which gives your VCR the ability to set the clock automatically. This is called the XDS or extended data service and was usually available from your PBS station and/or your pay cable TV provider. The accuracy of this XDS signal was not always reliable or available, forcing users to set the clock manually. PBS no longer provides this external time signal so setting the VCR clock manually is the only alternative. ATSC (digital TV broadcasts) replaced much of the analog NTSC television system in the United States on June 12, 2009. Since then Auto Clock Set will not be able to get the time signal since VCRs have the NTSC analog tuner. Set the clock manually. Many VCRs have a menu item labeled "Auto Clock Set" and two choices. One for AUTO and one for MANUAL. By selecting AUTO and setting it to "ON", the VCR would attempt to set the clock using the XDS signal when it is received. This should be within 15 min. or less. Some VCRs have to be powered off in order to receive the signal and set the clock. DBS Direct Broadcast Satellite pay TV providers do not send out this signal. If your VCR does not have the Auto Clock Set feature, then you need to set the clock manually using your VCR remote control and the TV. Most VCR remotes have a button on them to bring up the on-screen menus on the TV screen. This button will be labeled MENU or GUIDE or PROG. Consult your VCR owner's manual or look at your remote for the VCR and find this button. 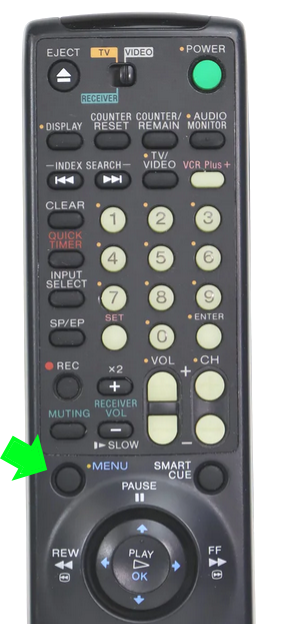 SONY VCR remote control - MENU button and Navigation buttons with center "OK" button. 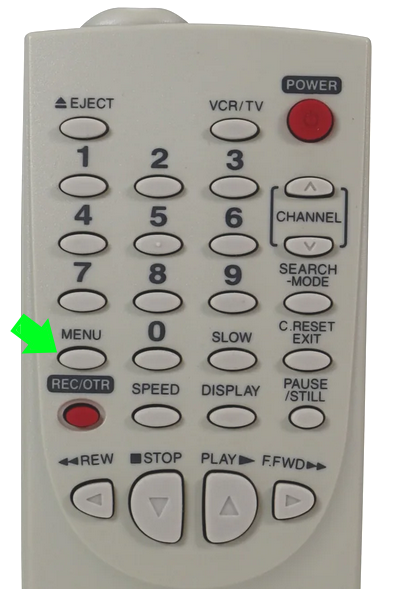 Emerson VCR remote control - MENU button If you experience problems bringing up the menu on the TV screen, check your cable hookup (VCR to TV) and check that your TV is set to the proper input and powered ON. Also toggle the VCR/TV button on the VCR remote. Make sure the VCR is powered ON. Consult the VCR's owner's manual if required. If your TV is connected to the VCR using a RF coaxial cable, your TV may have to be set to channel 3 or 4 to get the VCR signal. VCR TV HOOKUP Your TV may have a button labeled TV/VIDEO to select the different TV inputs or try using your TV remote to select different inputs. The remote control should have a button labeled VIDEO or INPUT SELECT to change the inputs. Consult your TV's owner's manual if required. If you have had your VCR hooked up to your TV for years and have been watching video tapes then you should have no problem seeing the menus on the TV screen. 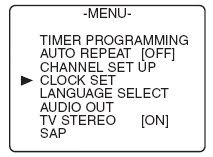
After you press the MENU button, the On-screen Main Menu is shown on the TV. The MENUS are presented in a cascading style. That is to say, each item that can be selected will present sub-menus until all your choices are exhausted. You will use your remote control arrow keys to navigate to your selections. Use the UP/DOWN arrow keys to move to the CLOCK SET line. Then press OK or ENTER or FFWD depending on your model of VCR. Basically you move up, down, and right, left using the arrow keys. When you put the cursor on the item you want, press OK, Enter, or FFWD to get the next menu. Arrow buttons UP or DOWN to select menu items and arrow buttons LEFT or RIGHT to change/adjust value of items. Your VCR's menus may look a little different but the same information will be there, namely, YEAR, DATE, HOUR, MINUTE, AM/PM To set the clock, use the arrow keys to move to each item (RIGHT/LEFT) and then UP/DOWN to increase or decrease the value of the item until you have the value you want. For Example:
Continue changing each item in this way until you reach the last item and correct it's value. Change the HOUR and the MINUTES to the current time of day. 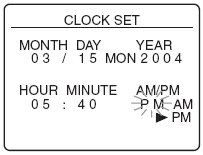
If you make a mistake or need to return to a previous item, press the left arrow key/button on the remote and you should see the item blink or be hilighted. Then you can press UP/DOWN button to change the value to the correct one. When all the items have been set to the correct numbers or values, press MENU again to EXIT. If done correctly, you should now see your VCR's front panel clock displayed with the correct time. 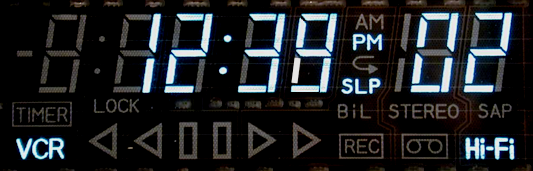
Every VCR will be slightly different but the concept is the same. How to set the clock on a RCA VCR 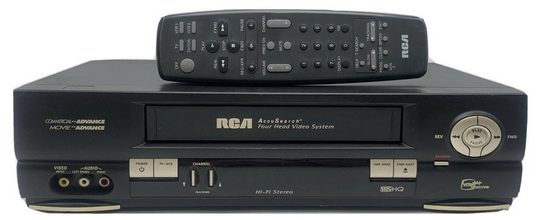 RCA VCR 1985 AccuSearch Four Head VCR Plus Video Cassette Recorder model VR646HF 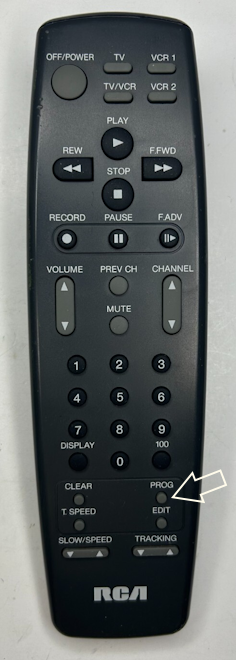 RCA VCR remote control Be sure you have the VCR remote set to control the VCR and not the TV. If the VCR is connected to the TV with yellow, white, red cables, be sure to select the proper TV input using the TV remote. Select VIDEO input for VCR connection. Some VCR remotes will not have a "MENU" button but will have a "PROG" button instead.  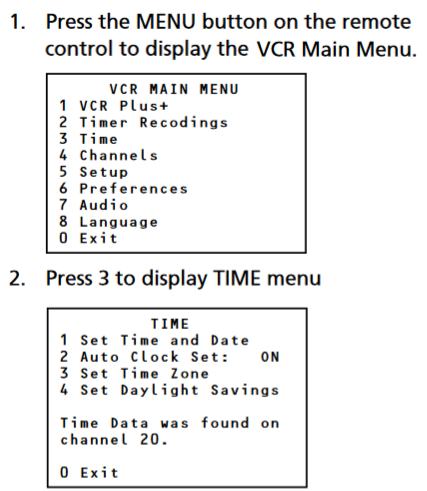 Press 1. to display time and date menu 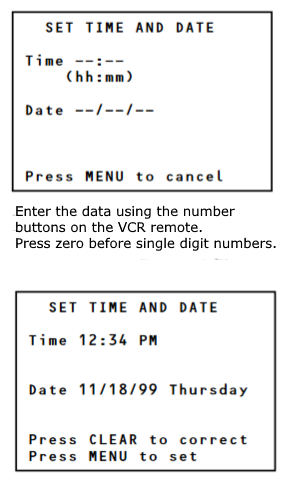 Press MENU to set. You should now see the correct time on the VCR display. Be sure to setup the correct time zone (Eastern, Central etc.) for your area and be sure to setup daylight savings time. Option 3 and 4 under the TIME menu. In this example you would press "5" on the remote  Press the correct number buttons on the VCR remote to enter the current hour and min.  Next select 1 or 2 for AM or PM  Next, move to the DATE and enter the month, day and year. Example for March, enter "03". Older VCRs only used a two digit year so 2005 would be "05". 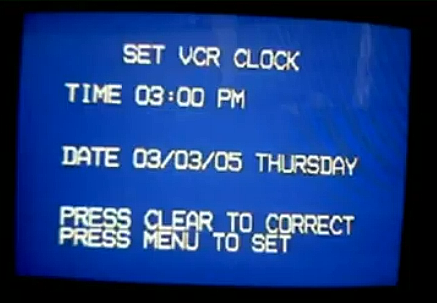 Press "Menu" to save  Verify the correct settings while in stop mode How to set the clock on a Panasonic VCR  Model: PV-V4620 Panasonic VCR remote control with navigation pad for moving UP/DOWN/LEFT/RIGHT and the center SELECT button. Some Panasonic VCR models have "ACTION" button instead of "MENU" button although some models have a "MENU" button.  Press the "ACTION" button on the remote If you do not see the on-screen menu, press the VCR/TV button. 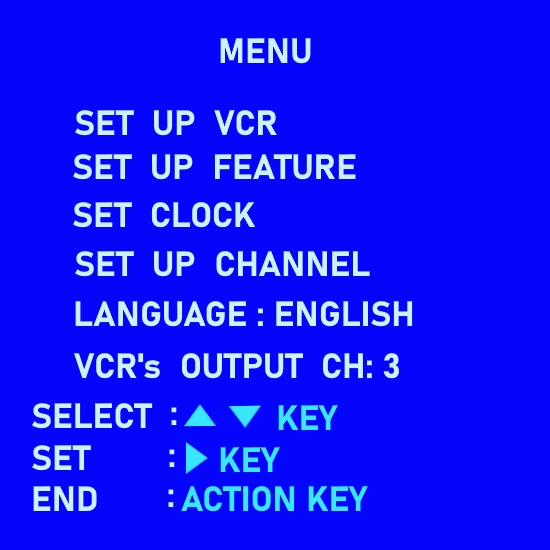 Navigate down and select SET CLOCK 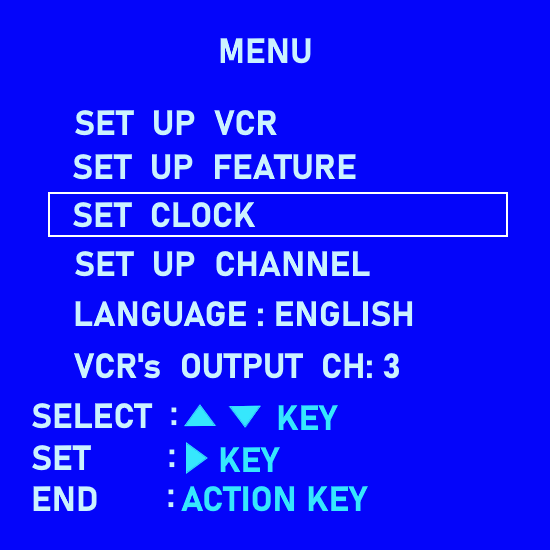 Select "MANUAL"  Use arrow buttons to select month, day, year. Next move to hour and min. and set the current time. 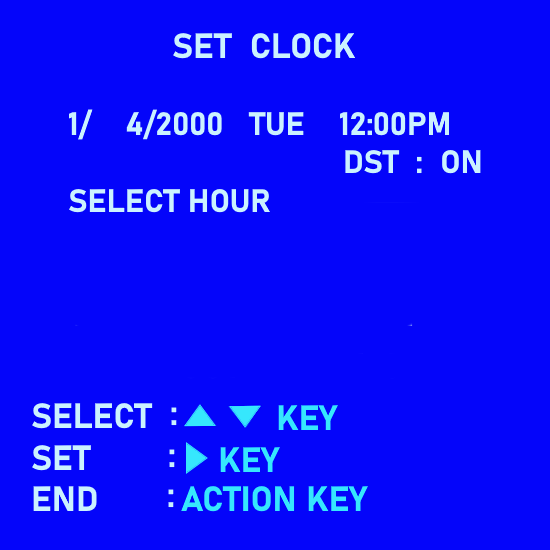 Press the "ACTION" button twice to set the clock and exit. How to set the clock on a JVC VCR  Model: JVC HR-S3800U  Power ON the VCR and the TV. Select on the TV, channel 3 or 4 if using coaxial cable connection or select the TV's Audio/Video RCA input if using RCA cable connections. You can use the VCR remote or the VCR's front panel buttons. Use the Channel UP/DOWN buttons on the front panel or use the remote's Shuttle Plus buttons to navigate. There are buttons for "OK" and "MENU" on the front panel. 1. Press "MENU" button on the VCR remote If you do not see the VCR main menu on the TV screen, press the "TV/VCR" button on the VCR remote.   2. Press the SHUTTLE PLUS down arrow to move to "INITIAL SET" 3. Press "OK" button  Be sure CLOCK SET is highlighted and then press "OK"  Press Shuttle Plus UP/DOWN until the desired time appears. Then press "OK". To set the DATE and YEAR, Press Shuttle Plus UP/DOWN until the desired date appears then press "OK". Next press UP/DOWN until the desired year appears and press "OK" twice. You can long press UP/DOWN to skip faster. To start the clock, press "MENU". To make corrections any time during the process Press OK or SHUTTLE PLUS right arrow repeatedly until the item you want to change blinks, then press CH UP/DOWN or SHUTTLE PLUS UP/DOWN. To set the TIME ZONE such as Eastern or Central, navigate to the TIME ZONE selection and press UP/DOWN to cycle through all the possible time zones. Select the time zone for your area. How to set the clock on a HITACHI VCR 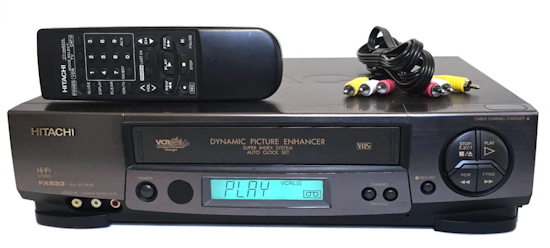 Hitachi VT-FX633A VCR, 4-Head Hi-Fi Stereo Power ON the TV and the VCR.  Press the "GUIDE" button on the VCR remote.  Press the "3" button to bring up the clock set menu  Press the "1" button to select Clock Set Manual  Press the "2" button to bring up the clock set menu 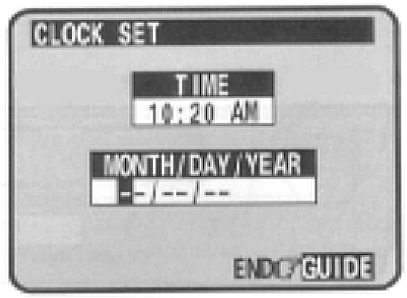 Press the number buttons to fill the hour and minutes. For times with only one number (1-9) press the (0) button first, then the hour or minute. Press "1" for AM or "2" for PM Press the number buttons to fill in the number of the month, then the day, then the year. Example March is 03. If you press the wrong digit, exit the screen by pressing GUIDE and recall the screen to enter the correct setup. Press the "GUIDE" button to exit and the clock should now be set. How to set the clock on a PHILIPS VCR 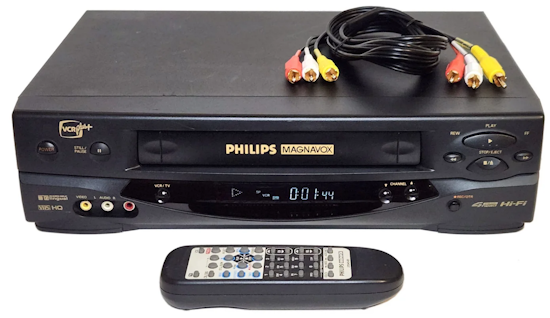 Philips VCR model VRZ255 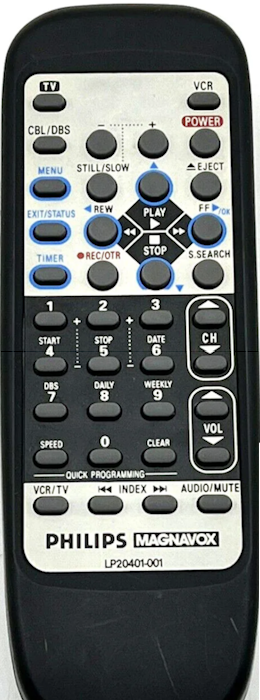 Remote control for VCR MENU button, VCR/TV button, EXIT/STATUS button  The directional navigation buttons are: PLAY/UP, STOP/DOWN, FF/OK Power on the TV and VCR Press the VCR button Press the "MENU" button on the VCR remote 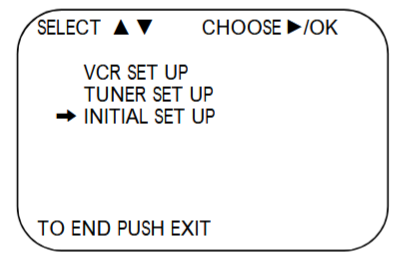 Press PLAY(UP) or STOP(DOWN) to select "INITIAL SET UP" and then press FF(OK). 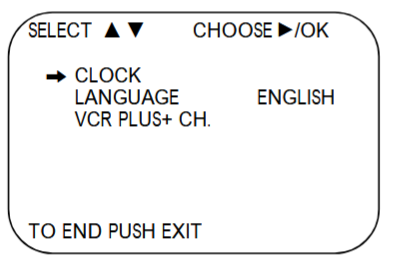 Select "CLOCK" and press FF(OK)  Press the PLAY (UP) or STOP (DOWN) button repeatedly to set the TIME. Every time you press the PLAY or STOP button, the time changes in one minute increments. If you press and hold the PLAY or STOP button, the time changes in 30 minute increments. When the time is correct, press the FF (OK) button.  Press the PLAY or STOP button repeatedly to set the DATE (month and day). Every time you press the PLAY or STOP button, the day changes in one day increments. If you press and hold the PLAY or STOP button, the day changes in 15 day increments. When the month and day are correct, press the FF (OK) button. Press the PLAY or STOP button repeatedly to set the YEAR. When the year is correct, press the FF (OK) button. The day of the week will appear automatically. Press the FF (OK) button once again to skip the “AUTO CLOCK” selection and go to “D.S.T.” (Daylight Saving Time) selection. Press the PLAY or STOP button to set D.S.T. to ON or OFF. Press the EXIT/STATUS button. How to set the clock on a Magnavox VCR 2004 Model MVR450MG Philips purchased Magnavox in 1974, but the brand is now licensed to Funai Electric, which has held the rights to produce and sell Magnavox-branded consumer electronics in North America since 2008. Funai also produced VCRs for Emerson, Magnavox, Sylvania, Symphonic, and Durabrand. 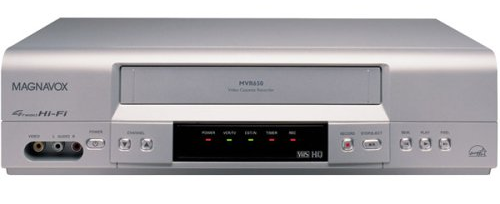 Be sure the remote control has good batteries installed. If the VCR is connected to the TV using RF coax cable, set the TV to channel 3 (or 4). If the VCR is connected to the TV using RCA audio/video cables, select the A/V Input or Auxiliary Input or Line Input channel on the TV.  VCR Remote Control MVR450MG 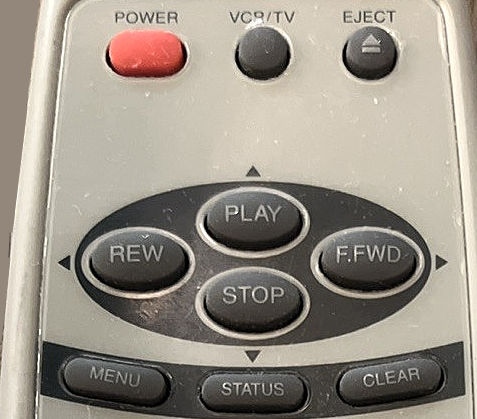 Power ON the VCR and the TV. VCR is in the "VCR position", not the TV position (VCR/TV). Press "MENU" button on VCR remote until the menu appears on TV. The "Play" and "Stop" buttons will move up and down in the menu, so select "Clock Set" by pushing the "Play" button until the "Clock Set" menu item is selected, then press the F.FWD button.  The CLOCK SET screen appears. While MONTH is flashing, press PLAY or STOP repeatedly until the desired month appears. Then Press F.FWD to move over to DAY. While DAY is flashing, press PLAY or STOP repeatedly until the desired day appears. Press F.FWD to move over to YEAR. While YEAR is flashing, press PLAY or STOP repeatedly until the desired year appears. Press F.FWD. The day of the week will appear automatically. While HOUR is flashing, press PLAY or STOP repeatedly until the desired hour appears. Press F.FWD to move over to MINUTE. 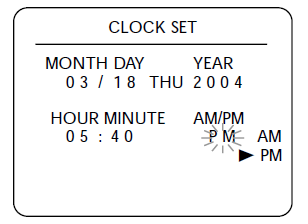 While MINUTE is flashing, press PLAY or STOP repeatedly until the desired minute appears. Press F.FWD. While AM/PM is flashing, press PLAY or STOP repeatedly to point to AM or PM. Your selection will flash on the screen in the AM/PM space. Select AM or PM. Press CLEAR or F.FWD to start the clock. Troubleshooting: How can I access the main menu? Use the remote control to set all on-screen programming, and press the menu button. If the main menu does not appear, make sure the TV is set on channel 3 or 4 and the VCR RF switch (3 / 4) is corresponding on the VCR's rear panel. Also check for the "VCR" indicator on the front display. Hookup VCR to TV using RF coaxial cable from VCR ANT OUT jack to the TV VHF Input jack. How can I put the VCR in line mode? Press the [Line In] button or [Input Select] button on your remote or VCR front panel. How can I timer record? Your VCR can record on a specific day or every day, Monday through Friday. Daily and weekly programs remain in the timer until erased. A single program is erased after the program records. Make sure the clock is set. Press the program button on the remote. Respond to the appropriate questions and fill in the information and turn the TV and VCR power off. How do I set the time on my VCR? Access the VCR main menu, select Clock set/adjust, select manual if available, enter month, year, time and day. Press MENU to exit. I do not receive any audio or video from my VCR on my television, what could be wrong? Before having the unit serviced, verify that your hook ups and connections are correct. If the VCR is connected to the TV through the RF output, verify that the television is tuned to the VCRs output channel (3 or 4). If the VCR is connected to the TV through the A/V outputs, verify that the TV is in the Video or Auxiliary mode. Also, make sure that the VCR is in the VCR mode. I lost the remote control for my VCR, will a universal remote control work? You can probably get a universal remote control to operate the VCRs basic functions such as power, change channel, stop, play, rewind, but it may not operate all the menu functions. My VCR only receives up to channel 13, but I have cable. What should I do to get all my cable channels? In the VCRs channel set up menu, select Cable, not Antenna or Air, then select Auto channel memory to scan and memorize the channels. The incorrect time or date is shown A power interruption may have occurred and Automatic Clock Set was not turned on or did not work properly. Check the time zone and Daylight-Saving settings in the TIME menu. Make sure the VCR or cable box is tuned to the time data channel (check with your cable service provider for information about time data). Auto Clock Set is not supported in all areas or by digital satellite receivers. Set the time and date manually. The time did not adjust for Daylight-Saving Time Make sure the "Daylight-Saving Time" feature is set correctly in the menu. VCR video is smeared on TV, what should I do? Clean VCR video heads Clean VCR video heads See also: • PC stereo hookup • VCR Recording • Hookup Diagrams • TV input select • Timer Record Radio Shows on a VCR • Camcorder hookup to TV, DVD • Audio Video Connections • Video Cables Connections • Hookup Diagrams Columbia ISA Audio Video Empowering consumers through information columbiaisa@yahoo.com |